

系列文章
- [Vue源码学习] new Vue()
- [Vue源码学习] 配置合并
- [Vue源码学习] $mount挂载
- [Vue源码学习] _render(上)
- [Vue源码学习] _render(下)
- [Vue源码学习] _update(上)
- [Vue源码学习] _update(中)
- [Vue源码学习] _update(下)
- [Vue源码学习] 响应式原理(上)
- [Vue源码学习] 响应式原理(中)
- [Vue源码学习] 响应式原理(下)
- [Vue源码学习] props
- [Vue源码学习] computed
- [Vue源码学习] watch
- [Vue源码学习] 插槽(上)
- [Vue源码学习] 插槽(下)
前言
在上一章节中,经过编译阶段的处理,已经将模板生成了对应的渲染函数,那么接下来,就来看看在运行时中,Vue是如何处理插槽的。
运行时
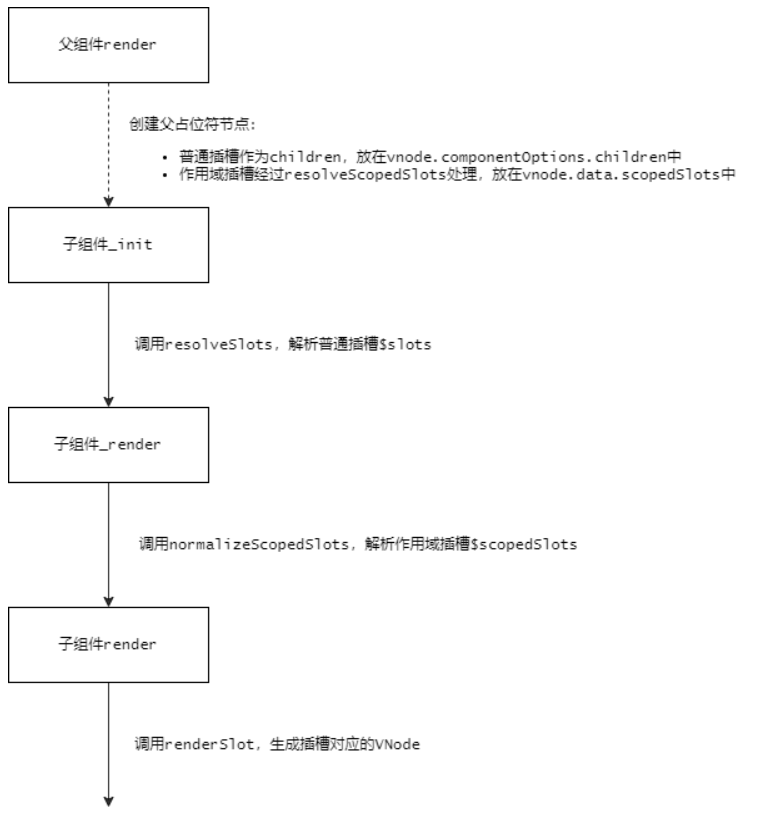
在初始渲染的时候,程序会先执行父组件的_render,用来生成VNode,而根据上一节中生成的渲染函数:
function anonymous() {
  with (this) {
    return _c('div', {
      staticClass: "parent"
    }, [_c('child', {
      scopedSlots: _u([{
        key: "header",
        fn: function () {
          return [_c('div', [_v("Parent Heaader")])]
        },
        proxy: true
      }, {
        key: "default",
        fn: function (slotProps) {
          return [_c('div', [_v("Parent " + _s(slotProps.message))])]
        }
      }, {
        key: "footer",
        fn: function () {
          return [_c('div', [_v("Parent Footer")])]
        },
        proxy: true
      }])
    })], 1)
  }
}
可以看到,在构造child父占位符节点时,会调用_u方法,对插槽进行处理:
/* core/instance/render-helpers/index.js */
export function installRenderHelpers(target: any) {
  // ...
  target._u = resolveScopedSlots
  // ...
}

/* core/instance/render-helpers/resolve-scoped-slots.js */
export function resolveScopedSlots(
  fns: ScopedSlotsData, // see flow/vnode
  res?: Object,
  // the following are added in 2.6
  hasDynamicKeys?: boolean,
  contentHashKey?: number
): { [key: string]: Function, $stable: boolean } {
  res = res || { $stable: !hasDynamicKeys }
  for (let i = 0; i < fns.length; i++) {
    const slot = fns[i]
    if (Array.isArray(slot)) {
      resolveScopedSlots(slot, res, hasDynamicKeys)
    } else if (slot) {
      // marker for reverse proxying v-slot without scope on this.$slots
      if (slot.proxy) {
        slot.fn.proxy = true
      }
      res[slot.key] = slot.fn
    }
  }
  if (contentHashKey) {
    (res: any).$key = contentHashKey
  }
  return res
}
可以看到,resolveScopedSlots方法只是简单的将作用域插槽从数组的形式转换成对象的形式,同时,在整个创建父占位符节点的过程中,都没有去执行对应的插槽函数,创建完父占位符节点后,就可以通过vnode.data.scopedSlots访问到这些插槽函数了。
在父组件执行patch的过程中,当解析到父占位符节点时,会去创建子组件的实例,在调用initRender方法时,会在子组件的实例上添加$slots和$scopedSlots属性,代码如下所示:
/* core/instance/render.js */
export function initRender(vm: Component) {
  // ...
  const parentVnode = vm.$vnode = options._parentVnode // the placeholder node in parent tree
  const renderContext = parentVnode && parentVnode.context
  vm.$slots = resolveSlots(options._renderChildren, renderContext)
  vm.$scopedSlots = emptyObject
  // ...
}

export function resolveSlots(
  children: ?Array<VNode>,
  context: ?Component
): { [key: string]: Array<VNode> } {
  if (!children || !children.length) {
    return {}
  }
  const slots = {}
  for (let i = 0, l = children.length; i < l; i++) {
    const child = children[i]
    const data = child.data
    // remove slot attribute if the node is resolved as a Vue slot node
    if (data && data.attrs && data.attrs.slot) {
      delete data.attrs.slot
    }
    // named slots should only be respected if the vnode was rendered in the
    // same context.
    if ((child.context === context || child.fnContext === context) &&
      data && data.slot != null
    ) {
      const name = data.slot
      const slot = (slots[name] || (slots[name] = []))
      if (child.tag === 'template') {
        slot.push.apply(slot, child.children || [])
      } else {
        slot.push(child)
      }
    } else {
      (slots.default || (slots.default = [])).push(child)
    }
  }
  // ignore slots that contains only whitespace
  for (const name in slots) {
    if (slots[name].every(isWhitespace)) {
      delete slots[name]
    }
  }
  return slots
}
可以看到,resolveSlots方法主要是用来处理组件的children,在新版本中,只有不使用v-slot指令时,children才有值,否则,所有的插槽都放在了data.scopedSlots中,此时的options._renderChildren为空。然后在子组件挂载的过程中,会执行子组件的渲染过程,首先会调用_render方法,代码如下所示:
/* core/instance/render.js */
Vue.prototype._render = function (): VNode {
  const vm: Component = this
  const { render, _parentVnode } = vm.$options

  if (_parentVnode) {
    vm.$scopedSlots = normalizeScopedSlots(
      _parentVnode.data.scopedSlots,
      vm.$slots,
      vm.$scopedSlots
    )
  }
  // ...
}
可以看到,对于子组件来说,这里的_parentVnode代表着父占位符节点,所以在调用渲染函数之前,会调用normalizeScopedSlots方法,解析插槽的内容,代码如下所示:
/* core/vdom/helpers/normalize-scoped-slots.js */
export function normalizeScopedSlots(
  slots: { [key: string]: Function } | void,
  normalSlots: { [key: string]: Array<VNode> },
  prevSlots?: { [key: string]: Function } | void
): any {
  let res
  const hasNormalSlots = Object.keys(normalSlots).length > 0
  const isStable = slots ? !!slots.$stable : !hasNormalSlots
  const key = slots && slots.$key
  if (!slots) {
    res = {}
  } else if (slots._normalized) {
    // fast path 1: child component re-render only, parent did not change
    return slots._normalized
  } else if (
    isStable &&
    prevSlots &&
    prevSlots !== emptyObject &&
    key === prevSlots.$key &&
    !hasNormalSlots &&
    !prevSlots.$hasNormal
  ) {
    // fast path 2: stable scoped slots w/ no normal slots to proxy,
    // only need to normalize once
    return prevSlots
  } else {
    res = {}
    for (const key in slots) {
      if (slots[key] && key[0] !== '$') {
        res[key] = normalizeScopedSlot(normalSlots, key, slots[key])
      }
    }
  }
  // expose normal slots on scopedSlots
  for (const key in normalSlots) {
    if (!(key in res)) {
      res[key] = proxyNormalSlot(normalSlots, key)
    }
  }
  // avoriaz seems to mock a non-extensible $scopedSlots object
  // and when that is passed down this would cause an error
  if (slots && Object.isExtensible(slots)) {
    (slots: any)._normalized = res
  }
  def(res, '$stable', isStable)
  def(res, '$key', key)
  def(res, '$hasNormal', hasNormalSlots)
  return res
}

function normalizeScopedSlot(normalSlots, key, fn) {
  const normalized = function () {
    let res = arguments.length ? fn.apply(null, arguments) : fn({})
    res = res && typeof res === 'object' && !Array.isArray(res)
      ? [res] // single vnode
      : normalizeChildren(res)
    return res && (
      res.length === 0 ||
      (res.length === 1 && res[0].isComment) // #9658
    ) ? undefined
      : res
  }
  // this is a slot using the new v-slot syntax without scope. although it is
  // compiled as a scoped slot, render fn users would expect it to be present
  // on this.$slots because the usage is semantically a normal slot.
  if (fn.proxy) {
    Object.defineProperty(normalSlots, key, {
      get: normalized,
      enumerable: true,
      configurable: true
    })
  }
  return normalized
}

function proxyNormalSlot(slots, key) {
  return () => slots[key]
}
可以看到,normalizeScopedSlots方法主要是用来从父占位符节点的data.scopedSlots中提取对应的插槽函数,同时,当遇到需要proxy的作用域插槽,通过在vm.$slots上定义访问器属性,从而达到兼容以前普通插槽的功能,额外的,还将this.$slots上多余的插槽添加到this.$scopedSlots中,所以以后可以直接使用this.$scopedSlots,它包含了所有的插槽内容,最终将处理好的数据赋值给vm.$scopedSlots。
接下来,就会执行子组件的渲染函数,通过上一章的分析,最终的渲染函数如下所示:
function anonymous() {
  with (this) {
    return _c('div', {
      staticClass: "child"
    }, [
      _t("header", [_c('div', [_v("Header")])]),
      _v(" "),
      _t("default", [_c('div', [_v("Main")])], {
        "message": message
      }),
      _v(" "),
      _t("footer", [_c('div', [_v("Footer")])])
    ], 2)
  }
}
可以看到,在子组件中会使用_t函数来处理插槽的内容,代码如下所示:
/* core/instance/render-helpers/index.js */
export function installRenderHelpers(target: any) {
  // ...
  target._t = renderSlot
  // ...
}

export function renderSlot(
  name: string,
  fallback: ?Array<VNode>,
  props: ?Object,
  bindObject: ?Object
): ?Array<VNode> {
  const scopedSlotFn = this.$scopedSlots[name]
  let nodes
  if (scopedSlotFn) { // scoped slot
    props = props || {}
    if (bindObject) {
      if (process.env.NODE_ENV !== 'production' && !isObject(bindObject)) {
        warn(
          'slot v-bind without argument expects an Object',
          this
        )
      }
      props = extend(extend({}, bindObject), props)
    }
    nodes = scopedSlotFn(props) || fallback
  } else {
    nodes = this.$slots[name] || fallback
  }

  const target = props && props.slot
  if (target) {
    return this.$createElement('template', { slot: target }, nodes)
  } else {
    return nodes
  }
}
可以看到,renderSlot方法的参数是在编译的时候就确定的,name表示插槽的名称,fallback表示插槽的后备内容,props和bindObject表示插槽props,在该方法中,首先从$scopedSlots中取出对应的插槽函数scopedSlotFn,然后传入相应的数据,从而生成插槽对应的VNode,如果没有取到数据,就使用插槽的后备内容,作为回退,最后,将生成的VNode返回。在这里需要注意的是,在子组件内部构造的插槽数据,是作为第一个参数传递给插槽函数的,但scopedSlotFn的执行环境是在父组件中,所以作用域插槽既可以访问子组件传入的数据,又可以访问父实例中的数据,而且可以做到延迟创建VNode。
prepatch
在组件占位符节点做更新操作时,会执行prepatch钩子函数,代码如下所示:
/* core\vdom\create-component.js */
prepatch(oldVnode: MountedComponentVNode, vnode: MountedComponentVNode) {
  const options = vnode.componentOptions
  const child = vnode.componentInstance = oldVnode.componentInstance
  updateChildComponent(
    child,
    options.propsData, // updated props
    options.listeners, // updated listeners
    vnode, // new parent vnode
    options.children // new children
  )
}
/* core/instance/lifecycle.js */
export function updateChildComponent(
  vm: Component,
  propsData: ?Object,
  listeners: ?Object,
  parentVnode: MountedComponentVNode,
  renderChildren: ?Array<VNode>
) {
  // determine whether component has slot children
  // we need to do this before overwriting $options._renderChildren.

  // check if there are dynamic scopedSlots (hand-written or compiled but with
  // dynamic slot names). Static scoped slots compiled from template has the
  // "$stable" marker.
  const newScopedSlots = parentVnode.data.scopedSlots
  const oldScopedSlots = vm.$scopedSlots
  const hasDynamicScopedSlot = !!(
    (newScopedSlots && !newScopedSlots.$stable) ||
    (oldScopedSlots !== emptyObject && !oldScopedSlots.$stable) ||
    (newScopedSlots && vm.$scopedSlots.$key !== newScopedSlots.$key)
  )

  // Any static slot children from the parent may have changed during parent's
  // update. Dynamic scoped slots may also have changed. In such cases, a forced
  // update is necessary to ensure correctness.
  const needsForceUpdate = !!(
    renderChildren ||               // has new static slots
    vm.$options._renderChildren ||  // has old static slots
    hasDynamicScopedSlot
  )

  // ...

  // resolve slots + force update if has children
  if (needsForceUpdate) {
    vm.$slots = resolveSlots(renderChildren, parentVnode.context)
    vm.$forceUpdate()
  }
}
可以看到,在updateChildComponent方法中,除了更新propsData、listeners外,还需要根据children做更新操作,不过在判断是否需要$forceUpdate时,这里只根据普通插槽和动态插槽来做判断,没有包含作用域插槽,这是因为作用域插槽是在子组件内部渲染的,如果作用域插槽内部使用了父组件中的数据,那么根据响应式系统,该数据的dep会将子组件的渲染Watcher加入到它的观察者列表中,所以当该数据发生改变时,第一时间就已经将子组件添加到更新列表了,所以在updateChildComponent方法中就不需要判断作用域插槽的逻辑了,同时,如果该数据没有发生改变,那么子组件也不需要重新渲染插槽中的内容,调用$forceUpdate也是浪费的。
总结
在编译的过程中,作用域插槽是以函数的形式创建的,所以在父组件执行渲染的过程中是不会立即创建其对应的VNode,而在子组件执行渲染的过程中,首先会通过resolveSlots和normalizeScopedSlots方法,构建$slots和$scopedSlots,然后在渲染函数中,使用renderSlot方法,传入插槽slotProps,去执行插槽函数,从而生成插槽对应的VNode。
