前言
由于之前项目搭建的是 MVP 架构,由RxJava + Glide + OKHttp + Retrofit 等开源框架组合而成,之前也都是停留在使用层面上,没有深入的研究,最近打算把它们全部攻下,还没有关注的同学可以先关注一波,看完这个系列文章,(不管是面试还是工作中处理问题)相信你都在知道原理的情况下,处理问题更加得心应手。
Android 图片加载框架 Glide 4.9.0 (一) 从源码的角度分析 Glide 执行流程
Android 图片加载框架 Glide 4.9.0 (二) 从源码的角度分析 Glide 缓存策略
从源码的角度分析 Rxjava2 的基本执行流程、线程切换原理
从源码的角度分析 OKHttp3 (一) 同步、异步执行流程
从源码的角度分析 Retrofit 网络请求,包含 RxJava + Retrofit + OKhttp 网络请求执行流程
interceptor 拦截器
在上一篇 从源码的角度分析 OKHttp3 (一) 同步、异步执行流程 文章中,最后我们知道是在 getResponseWithInterceptorChain() 函数中完成了最后的请求与响应,那么内部是怎么完成请求,并把服务端的响应数据回调给调用层,先来看一段代码:
  Response getResponseWithInterceptorChain() throws IOException {
    // 构建一个拦截器调用的容器栈
    List<Interceptor> interceptors = new ArrayList<>();
    //配置 OKHttpClient 的时候,以 addInterceptor 方式添加的全局拦截器
    interceptors.addAll(client.interceptors());
    //错误、重定向拦截器
    interceptors.add(new RetryAndFollowUpInterceptor(client));
    //桥接拦截器,桥接应用层与网络层,添加必要的头
    interceptors.add(new BridgeInterceptor(client.cookieJar()));
    //缓存处理,Last-Modified、ETag、DiskLruCache等
    interceptors.add(new CacheInterceptor(client.internalCache()));
    //连接拦截器
    interceptors.add(new ConnectInterceptor(client));
    //是否是 webSocket
    if (!forWebSocket) {
    //通过okHttpClient.Builder#addNetworkInterceptor()
    //传进来的拦截器只对非网页的请求生效
      interceptors.addAll(client.networkInterceptors());
    }
    //真正访问服务器的拦截器
    interceptors.add(new CallServerInterceptor(forWebSocket));

    //真正执行 拦截器的 调用者
    Interceptor.Chain chain = new RealInterceptorChain(interceptors, transmitter, null, 0,
        originalRequest, this, client.connectTimeoutMillis(),
        client.readTimeoutMillis(), client.writeTimeoutMillis());

    boolean calledNoMoreExchanges = false;
    try {
      //开始执行
      Response response = chain.proceed(originalRequest);
      //是否取消
      if (transmitter.isCanceled()) {
        //关闭
        closeQuietly(response);
        throw new IOException("Canceled");
      }
      return response;
    } catch (IOException e) {
      calledNoMoreExchanges = true;
      throw transmitter.noMoreExchanges(e);
    } finally {
      if (!calledNoMoreExchanges) {
        transmitter.noMoreExchanges(null);
      }
    }
  }
函数中代码不多,但确实精髓所在。通过上面代码跟注释我们知道
- 首先创建一个用来装拦截器的容器
- 添加全局拦截器跟应用拦截器
- 创建
RealInterceptorChain对象拦截器,并把 拦截器容器、发射器、请求数据等一些配置传入进去 - 最后调用
RealInterceptorChain的chain.proceed(originalRequest);函数, 才是真正使 这些拦截器执行起来。
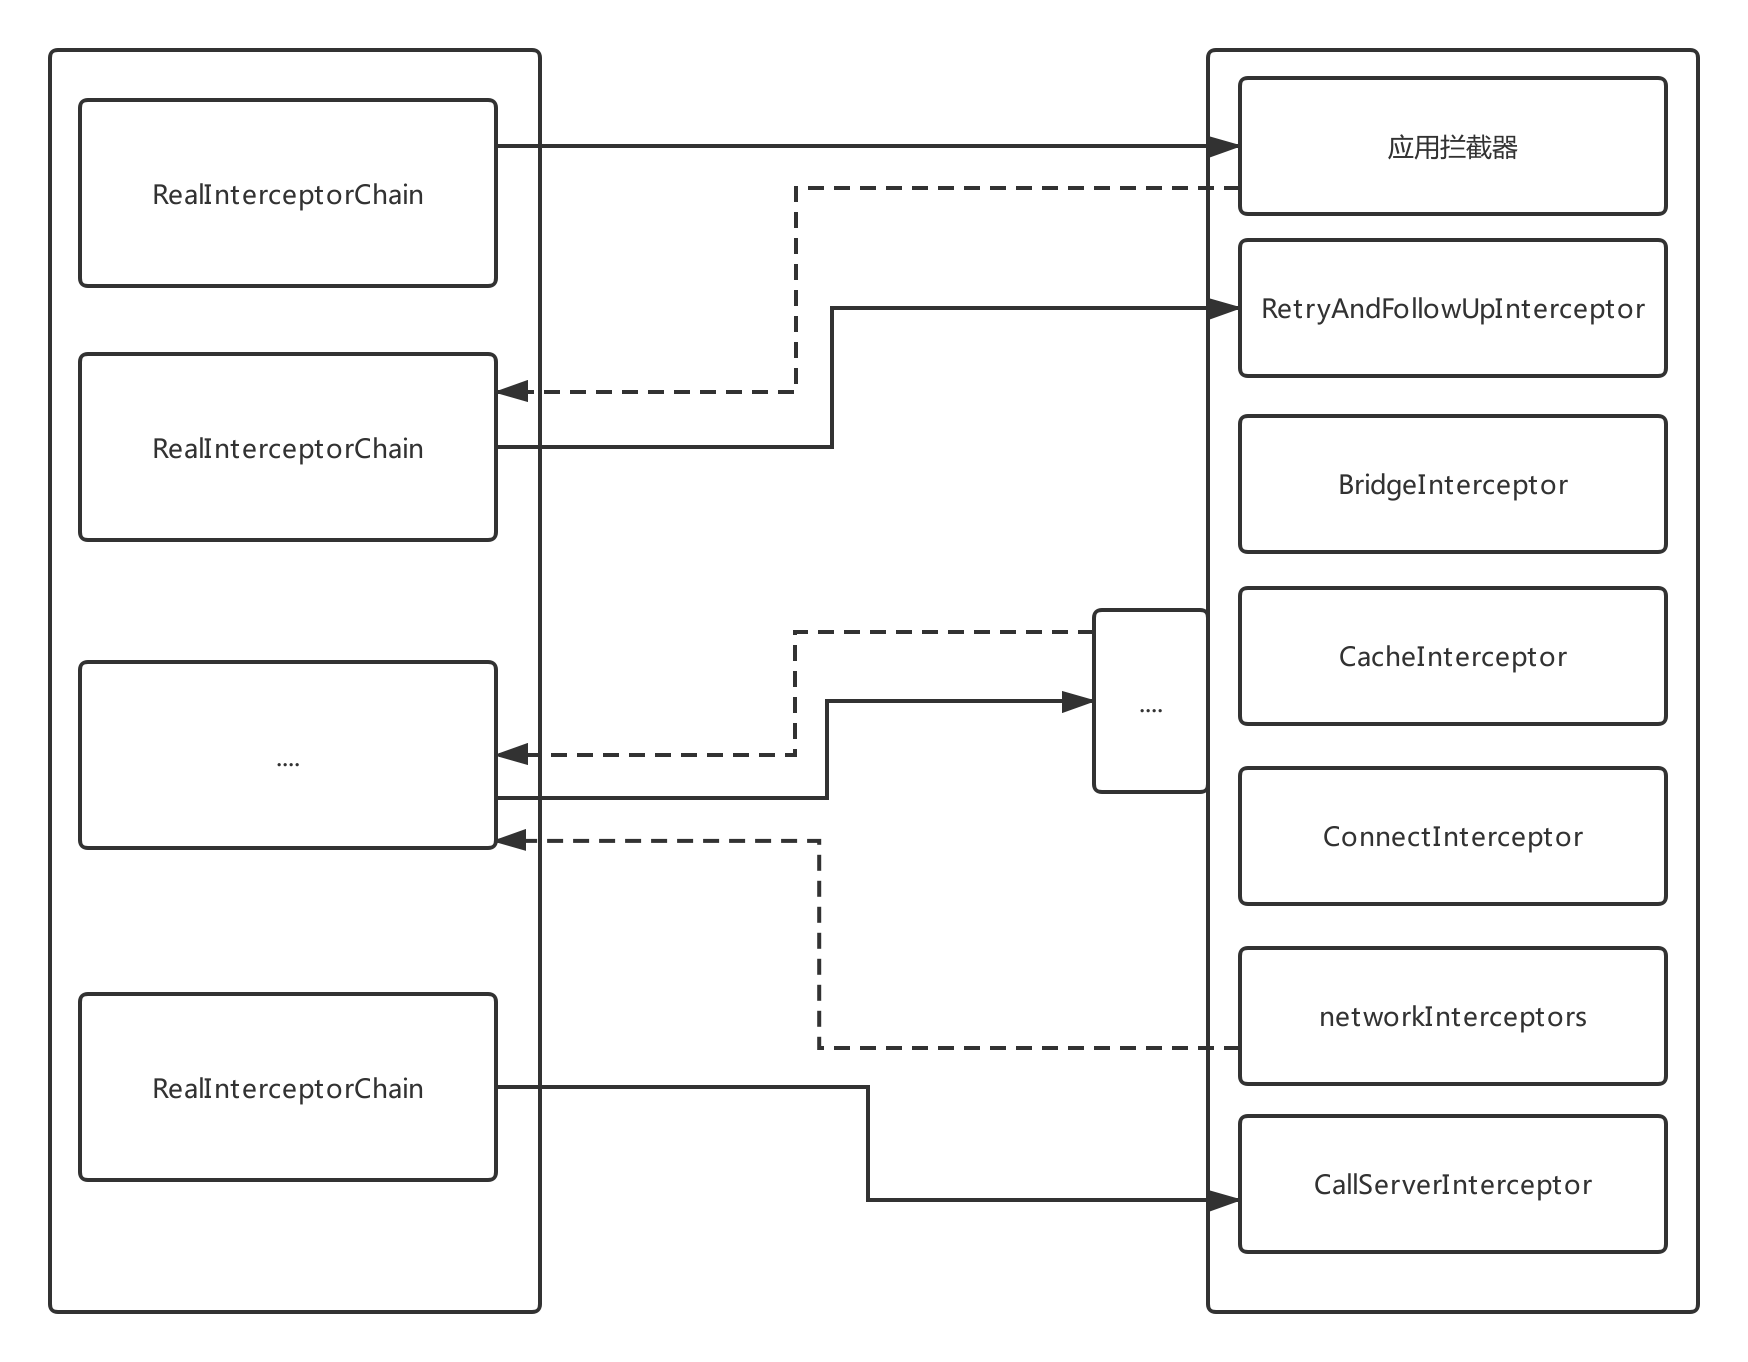
上一篇文章也简单的介绍了拦截器,提到了 责任链模式,但是这个拦截器它是通过 RealInterceptorChain 对象开启了责任链任务的下发,这里感觉是不是有点像一个 CEO 在下发任务并一层一层的传递,也有点像 Android 源码中 触摸反馈事件传递,OKHttp 的核心其实就在于拦截器。下面我们就开始一步一步分析 OKHttp 拦截器的精妙所在。
RealInterceptorChain
通过上一小节对拦截器的介绍,我们知道最后是在 RealInterceptorChain 的 chain.proceed(originalRequest) 开启执行的拦截任务,下面直接进入源码模式
public final class RealInterceptorChain implements Interceptor.Chain {
	...//省略成员变量属性

  public RealInterceptorChain(
    List<Interceptor> interceptors, //所有拦截器
    Transmitter transmitter,//发射器
    @Nullable Exchange exchange, //封装对 OKIO 的请求数据的操作
    int index, Request request, Call call,
    int connectTimeout, int readTimeout,
    int writeTimeout
  ){
	...//省略赋值代码
  }

  //外部  getResponseWithInterceptorChain 函数中调用
  public Response proceed(
    Request request, Transmitter transmitter,
    @Nullable Exchange exchange
  )throws IOException {

    //index 不能超过拦截器容器大小
    if (index >= interceptors.size()) throw new AssertionError();

 		//如果已经存在了一个 request 的请求连接就抛一个异常
    if (this.exchange != null && !this.exchange.connection().supportsUrl(request.url())) {
      ...//抛异常代码省略
    }

    // 保证开启调用的唯一性,否则抛一个异常,个人认为这样判断只是使得代码更加健壮,其实这里的 				Calls 只会是 1;
    if (this.exchange != null && calls > 1) {
       ...//抛异常代码省略
    }

    //1.  创建下一个拦截器执行的对象
    RealInterceptorChain next = new RealInterceptorChain(interceptors, transmitter, exchange,
        index + 1, request, call, connectTimeout, readTimeout, writeTimeout);
    //2. 取出当前的拦截器
    Interceptor interceptor = interceptors.get(index);
    //3. 调用下一个拦截器的 intercept(Chain) 方法,传入刚才新建的 RealInterceptorChain,		 //返回 Response
    Response response = interceptor.intercept(next);

		//限制做一些判断,保证程序健壮
    if (exchange != null && index + 1 < interceptors.size() && next.calls != 1) {
      ...//抛异常代码省略
    }

		//如果返回回来的 response 为空,那么就抛一个异常
    if (response == null) {
      ...//抛异常代码省略
    }

    //如果响应为空,也抛出一个异常
    if (response.body() == null) {
      ...//抛异常代码省略
    }

    //真正返回服务端的响应
    return response;
  }

}
请看上面代码注释 1,2,3 处,这三处代码就是分发拦截器执行的核心代码,首先看注释一 在 RealInterceptorChain 内部又创建一个 RealInterceptorChain 并传入 index + 1 等参数, 这里就是开始递归执行拦截器了,每次执行 get(index + 1)拦截器。注释 2 是取出当前拦截器,注释三是执行拦截器。
这里我们可以先小节总结下RealInterceptorChain 的作用, 可以把 RealInterceptorChain 这个类看做看一个递归函数 interceptor.intercept(next); 就是开始递归的入口,当然有入口肯定有出口,其实出口没有在这个类里面,这里我先透露下吧,其实是在 CallServerInterceptor 请求与响应处理的拦截器中,最后直接return response;相当于出口。所以 RealInterceptorChain 这个类个人理解就是负责 启动/停止 拦截器的作用,有点像拦截器的调用委托于 RealInterceptorChain 。
那么这里肯定是 list.get(index = 0) RetryAndFollowUpInterceptor 拦截器第一个执行了,下面就开始分析 错误、重定向拦截器。
RetryAndFollowUpInterceptor
在上面介绍拦截器的时候讲过,它是错误重连、重定向的拦截器,下面我们看它的核心代码
public final class RetryAndFollowUpInterceptor implements Interceptor {


  @Override public Response intercept(Chain chain) throws IOException {
    //拿到当前的请求
    Request request = chain.request();
    RealInterceptorChain realChain = (RealInterceptorChain) chain;
    //拿到 Transmitter 对象
    Transmitter transmitter = realChain.transmitter();

    int followUpCount = 0;
    Response priorResponse = null;
    while (true) {
      //准备连接工作
      transmitter.prepareToConnect(request);
			//判断是否取消
      if (transmitter.isCanceled()) {
        throw new IOException("Canceled");
      }

      Response response;
      boolean success = false;
      try {
        //将当前请求传递给下一个拦截器
        response = realChain.proceed(request, transmitter, null);
        success = true;
      } catch (RouteException e) {
        //检查是否可以继续使用
        if (!recover(e.getLastConnectException(), transmitter, false, request)) 				{
          throw e.getFirstConnectException();
        }
        continue;
      } catch (IOException e) {
        boolean requestSendStarted = !(e instanceof ConnectionShutdownException);
        //检查是否可以继续使用
        if (!recover(e, transmitter, requestSendStarted, request)) throw e;
        continue;
      } finally {
        //如果未成功 释放连接
        if (!success) {
          transmitter.exchangeDoneDueToException();
        }
      }

      //执行到这里说明没有出现异常
      if (priorResponse != null) {
        response = response.newBuilder()
            .priorResponse(priorResponse.newBuilder()
                    .body(null)
                    .build())
            .build();
      }
			...//省略代码
      //根据响应来处理请求头
      Request followUp = followUpRequest(response, route);
			//如果为空,不需要重定向,直接返回响应
      if (followUp == null) {
        if (exchange != null && exchange.isDuplex()) {
          transmitter.timeoutEarlyExit();
        }
        return response;
      }
			//不为空,需要重定向
      RequestBody followUpBody = followUp.body();
      if (followUpBody != null && followUpBody.isOneShot()) {
        return response;
      }

      closeQuietly(response.body());
      if (transmitter.hasExchange()) {
        exchange.detachWithViolence();
      }

      //重定向的次数不能大于 20
      if (++followUpCount > MAX_FOLLOW_UPS) {
        throw new ProtocolException("Too many follow-up requests: " + followUpCount);
      }
			//根据重定向之后的请求再次重试
      request = followUp;
      priorResponse = response;
    }
  }
}
根据上面代码分析可以知道,主要做了以下几点
- 拿到当前的请求对象,并拿到 Transmitter 对象
- 准备连接,其实真正连接是在
ConnectInterceptor拦截器中 - 调用下一个拦截器,也就是
BridgeInterceptor将请求交于它在预处理。 - 在连接的过程中是否出现异常,判断是否支持继续连接
- 如果没有成功就释放资源
- 根据响应码判断是否需要重连操作
- 如果重连次数大于 20 次则抛异常,否则就将重定向之后的请求重试。
当前 RetryAndFollowUpInterceptor 中的 realChain.proceed(request, transmitter, null); 调用走到了 BridgeInterceptor 应用与网络交互的拦截器。
BridgeInterceptor
当上一个拦截器调用了 proceed 函数之后就会走到当前 intercept 函数里面,里面具体操作我们看下源码处理
public final class BridgeInterceptor implements Interceptor {
  private final CookieJar cookieJar;

	...//省略构造函数

  @Override public Response intercept(Chain chain) throws IOException {
    //拿到当前请求 Request
    Request userRequest = chain.request();
    //拿到 Request 配置参数的 Builder
    Request.Builder requestBuilder = userRequest.newBuilder();
		//获取到请求体 body
    RequestBody body = userRequest.body();
    //判断请求体是否为空
    if (body != null) {//不为空的情况下
      //获取请求体类型
      MediaType contentType = body.contentType();
      if (contentType != null) {
        //将请求体类型添加 header
        requestBuilder.header("Content-Type", contentType.toString());
      }

      //处理请求体长度
      long contentLength = body.contentLength();
      if (contentLength != -1) {
        requestBuilder.header("Content-Length", Long.toString(contentLength));
        requestBuilder.removeHeader("Transfer-Encoding");
      } else {
        requestBuilder.header("Transfer-Encoding", "chunked");
        requestBuilder.removeHeader("Content-Length");
      }
    }

    //添加header HOST 主机
    if (userRequest.header("Host") == null) {
      requestBuilder.header("Host", hostHeader(userRequest.url(), false));
    }

    //添加连接状态
    if (userRequest.header("Connection") == null) {
      requestBuilder.header("Connection", "Keep-Alive");
    }

		//对数据是否开启 压缩--默认添加 Gzip
    boolean transparentGzip = false;
    if (userRequest.header("Accept-Encoding") == null && userRequest.header("Range") == null) {
      transparentGzip = true;
      //添加 gzip 压缩
      requestBuilder.header("Accept-Encoding", "gzip");
    }

    List<Cookie> cookies = cookieJar.loadForRequest(userRequest.url());
    if (!cookies.isEmpty()) {
     	//header 中添加 cookie
      requestBuilder.header("Cookie", cookieHeader(cookies));
    }
		//添加 user-agent
    if (userRequest.header("User-Agent") == null) {
      requestBuilder.header("User-Agent", Version.userAgent());
    }

    //执行下一个拦截器 CacheInterceptor
    Response networkResponse = chain.proceed(requestBuilder.build());
		//对 url 和 cookie 保存
    HttpHeaders.receiveHeaders(cookieJar, userRequest.url(), networkResponse.headers());

    //拿到响应,添加一些属性
    Response.Builder responseBuilder = networkResponse.newBuilder()
        .request(userRequest);

    if (transparentGzip
        && "gzip".equalsIgnoreCase(networkResponse.header("Content-Encoding"))
        && HttpHeaders.hasBody(networkResponse)) {
      GzipSource responseBody = new GzipSource(networkResponse.body().source());
      Headers strippedHeaders = networkResponse.headers().newBuilder()
          .removeAll("Content-Encoding")
          .removeAll("Content-Length")
          .build();
      responseBuilder.headers(strippedHeaders);
      String contentType = networkResponse.header("Content-Type");
      responseBuilder.body(new RealResponseBody(contentType, -1L, Okio.buffer(responseBody)));
    }
		//返回响应
    return responseBuilder.build();
  }

  ...//省略部分代码

}
从上面代码中,我们知道 BridgeInterceptor 主要是对请求头做一些预处理,之后就调用下一个拦截器。
CacheInterceptor
根据上一个拦截器 BridgeInterceptor 调用最后会走到当前的 intercept , 根据上面的拦截器介绍知道,它是获取缓存和更新缓存的作用。下面我们看下它具体实现
public final class CacheInterceptor implements Interceptor {
  final @Nullable InternalCache cache;

	...//构造函数省略

  @Override public Response intercept(Chain chain) throws IOException {
    //判断缓存如果不为空,就根据请求拿到缓存响应
    Response cacheCandidate = cache != null
        ? cache.get(chain.request())
        : null;

    long now = System.currentTimeMillis();
		//获取缓存策略
    CacheStrategy strategy = new CacheStrategy.Factory(now, chain.request(), cacheCandidate).get();
    //根据缓存策略拿到请求
    Request networkRequest = strategy.networkRequest;
    //拿到缓存响应
    Response cacheResponse = strategy.cacheResponse;

		...//省略部分代码
    //如果请求跟缓存响应为空的话,就强制使用缓存,返回错误码为 504
    if (networkRequest == null && cacheResponse == null) {
      return new Response.Builder()
          .request(chain.request())
          .protocol(Protocol.HTTP_1_1) //
          .code(504)
          .message("Unsatisfiable Request (only-if-cached)")
          .body(Util.EMPTY_RESPONSE)
          .sentRequestAtMillis(-1L)
          .receivedResponseAtMillis(System.currentTimeMillis())
          .build();
    }

    // 如果 networkRequest 为空的话,也强制获取缓存
    if (networkRequest == null) {
      return cacheResponse.newBuilder()
          .cacheResponse(stripBody(cacheResponse))
          .build();
    }


    Response networkResponse = null;
    try {
      //调用下一个拦截器
      networkResponse = chain.proceed(networkRequest);
    } finally {
     ...
    }

    // 如果缓存不为空
    if (cacheResponse != null) {
      //并且响应码 == 之前定义的 304
      if (networkResponse.code() == HTTP_NOT_MODIFIED) {
        //生成一个响应
        Response response = cacheResponse.newBuilder()
            .headers(combine(cacheResponse.headers(), networkResponse.headers()))
            .sentRequestAtMillis(networkResponse.sentRequestAtMillis())
            .receivedResponseAtMillis(networkResponse.receivedResponseAtMillis())
            .cacheResponse(stripBody(cacheResponse))
            .networkResponse(stripBody(networkResponse))
            .build();
        networkResponse.body().close();

        //更新响应
        cache.trackConditionalCacheHit();
        cache.update(cacheResponse, response);
        return response;
      } else {
        closeQuietly(cacheResponse.body());
      }
    }

    //没有缓存使用,读取网络响应
    Response response = networkResponse.newBuilder()
        .cacheResponse(stripBody(cacheResponse))
        .networkResponse(stripBody(networkResponse))
        .build();

    if (cache != null) {
      if (HttpHeaders.hasBody(response) && CacheStrategy.isCacheable(response, networkRequest)) {
        // 存入缓存
        CacheRequest cacheRequest = cache.put(response);
        return cacheWritingResponse(cacheRequest, response);
      }

      //检查缓存是否有效
      if (HttpMethod.invalidatesCache(networkRequest.method())) {
        try {
          //删除无效缓存
          cache.remove(networkRequest);
        } catch (IOException ignored) {

        }
      }
    }
    return response;
  }
可以看到这里主要是对缓存做处理,由于这里只讲拦截器的调用和一些基本处理逻辑,OKHttp 缓存机制后面会单独用一篇文章来介绍,在这里只要知道,如果外部 OKHttpClient 配置了缓存的话(看下面代码块,不然缓存都是空的,也不会默认添加缓存),才会执行缓存 put、get、update,由于这里我们没有配置缓存策略,所以直接调用下一个拦截器,也就是 ConnectInterceptor
File file = new File(Environment.getExternalStorageDirectory() + "/T01");
Cache cache = new Cache(file, 1024 * 1024 * 10);
OkHttpClient okHttpClient = new OkHttpClient.Builder().
                        addInterceptor(new LoggingInterceptor())
                        .cache(cache).
                        build();
ConnectInterceptor
(ps: 拦截拦截器主要参考了:juejin.cn/post/684490…
缓存拦截器执行完成之后, 下一个调用链就是连接拦截器了,看一下代码实现:
public final class ConnectInterceptor implements Interceptor {
  public final OkHttpClient client;

  public ConnectInterceptor(OkHttpClient client) {
    this.client = client;
  }

  @Override public Response intercept(Chain chain) throws IOException {
    RealInterceptorChain realChain = (RealInterceptorChain) chain;
    //拿到请求
    Request request = realChain.request();
    //拿到 Transmitter
    Transmitter transmitter = realChain.transmitter();

    boolean doExtensiveHealthChecks = !request.method().equals("GET");
    //重新创建一个 Exchange
    Exchange exchange = transmitter.newExchange(chain, doExtensiveHealthChecks);
		//调用proceed方法,里面调用下一个拦截器CallServerInterceptor的intercept方法
    return realChain.proceed(request, transmitter, exchange);
  }
}
通过上面代码可以看出 ConnectInterceptor 内部代码很简洁,首先拿到 Request 请求,获取 Transmitter 对象,其次是通过 transmitter 重新创建一个 Exchange , Exchange 是负责将数据写入到创建连接的 IO 流中的交互动作,最后在调用 CallServerInterceptor 拦截器。我们看下 transmitter.newExchange(chain, doExtensiveHealthChecks) 内部代码实现
  Exchange newExchange(Interceptor.Chain chain, boolean doExtensiveHealthChecks) {
    synchronized (connectionPool) {
      //如果没有 Exchanges 抛一个异常
      if (noMoreExchanges) {
        throw new IllegalStateException("released");
      }
      if (exchange != null) {
        ...//省略抛异常代码
    }

    //通过ExchangeFinder的find方法找到一个ExchangeCodec
    ExchangeCodec codec = exchangeFinder.find(client, chain, doExtensiveHealthChecks);
    //创建Exchange,并把ExchangeCodec实例codec传进去,所以Exchange内部持有ExchangeCodec实例
    Exchange result = new Exchange(this, call, eventListener, exchangeFinder, codec);

    synchronized (connectionPool) {
      this.exchange = result;
      this.exchangeRequestDone = false;
      this.exchangeResponseDone = false;
      return result;
    }
  }
ExchangeFinder 对象早在RetryAndFollowUpInterceptor中通过Transmitter的prepareToConnect方法创建,它的 find 方法是连接真正创建的地方,ExchangeFinder 是什么?ExchangeFinder 就是负责连接的创建,把创建好的连接放入连接池,如果连接池中已经有该连接,就直接取出复用,所以 ExchangeFinder 管理着两个重要的角色:RealConnection、RealConnectionPool,下面讲解一下 RealConnectionPool 和RealConnection,有助于连接机制的理解。
RealConnection
连接的真正实现,实现了 Connection 接口,内部利用 Socket 建立连接,如下:
public interface Connection {
    //返回这个连接使用的Route
    Route route();

    //返回这个连接使用的Socket
    Socket socket();

    //如果是HTTPS,返回TLS握手信息用于建立连接,否则返回null
    @Nullable Handshake handshake();

    //返回应用层使用的协议,Protocol是一个枚举,如HTTP1.1、HTTP2
    Protocol protocol();
}

public final class RealConnection extends Http2Connection.Listener implements Connection {

    public final RealConnectionPool connectionPool;
    //路由
    private final Route route;
    //内部使用这个rawSocket在TCP层建立连接
    private Socket rawSocket;
    //如果没有使用HTTPS,那么socket == rawSocket,否则这个socket == SSLSocket
    private Socket socket;
    //TLS握手
    private Handshake handshake;
    //应用层协议
    private Protocol protocol;
    //HTTP2连接
    private Http2Connection http2Connection;
    //okio库的BufferedSource和BufferedSink,相当于javaIO的输入输出流
    private BufferedSource source;
    private BufferedSink sink;


    public RealConnection(RealConnectionPool connectionPool, Route route) {
        this.connectionPool = connectionPool;
        this.route = route;
    }


    public void connect(int connectTimeout, int readTimeout, int writeTimeout, int pingIntervalMillis, boolean connectionRetryEnabled, Call call, EventListener eventListener) {
        //...
    }

    //...
}
RealConnection 中有一个 connect 方法,外部可以调用该方法建立连接,connect 方法如下:
//RealConnection.java
public void connect(int connectTimeout, int readTimeout, int writeTimeout, int pingIntervalMillis, boolean connectionRetryEnabled, Call call, EventListener eventListener) {
    if (protocol != null) throw new IllegalStateException("already connected");

    RouteException routeException = null;
    List<ConnectionSpec> connectionSpecs = route.address().connectionSpecs();
    ConnectionSpecSelector connectionSpecSelector = new ConnectionSpecSelector(connectionSpecs);

    //路由选择
    if (route.address().sslSocketFactory() == null) {
      if (!connectionSpecs.contains(ConnectionSpec.CLEARTEXT)) {
        throw new RouteException(new UnknownServiceException(
            "CLEARTEXT communication not enabled for client"));
      }
      String host = route.address().url().host();
      if (!Platform.get().isCleartextTrafficPermitted(host)) {
        throw new RouteException(new UnknownServiceException(
            "CLEARTEXT communication to " + host + " not permitted by network security policy"));
      }
    } else {
      if (route.address().protocols().contains(Protocol.H2_PRIOR_KNOWLEDGE)) {
        throw new RouteException(new UnknownServiceException(
            "H2_PRIOR_KNOWLEDGE cannot be used with HTTPS"));
      }
    }

    //开始连接
    while (true) {
      try {
        if (route.requiresTunnel()) {//如果是通道模式,则建立通道连接
          connectTunnel(connectTimeout, readTimeout, writeTimeout, call, eventListener);
          if (rawSocket == null) {
            // We were unable to connect the tunnel but properly closed down our resources.
            break;
          }
        } else {//1、否则进行Socket连接,大部分是这种情况
          connectSocket(connectTimeout, readTimeout, call, eventListener);
        }
        //建立HTTPS连接
        establishProtocol(connectionSpecSelector, pingIntervalMillis, call, eventListener);
        break;
      }
      //...省略异常处理

    if (http2Connection != null) {
      synchronized (connectionPool) {
        allocationLimit = http2Connection.maxConcurrentStreams();
      }
    }
  }
我们关注注释1,一般会调用 connectSocket 方法建立 Socket 连接,connectSocket 方法如下:
//RealConnection.java
private void connectSocket(int connectTimeout, int readTimeout, Call call,
                           EventListener eventListener) throws IOException {
    Proxy proxy = route.proxy();
    Address address = route.address();

    //根据代理类型的不同创建Socket
    rawSocket = proxy.type() == Proxy.Type.DIRECT || proxy.type() == Proxy.Type.HTTP
        ? address.socketFactory().createSocket()
        : new Socket(proxy);

    eventListener.connectStart(call, route.socketAddress(), proxy);
    rawSocket.setSoTimeout(readTimeout);
    try {
        //1、建立Socket连接
        Platform.get().connectSocket(rawSocket, route.socketAddress(), connectTimeout);
    }
    //...省略异常处理

    try {
        //获得Socket的输入输出流
        source = Okio.buffer(Okio.source(rawSocket));
        sink = Okio.buffer(Okio.sink(rawSocket));
    }
     //...省略异常处理
}
我们关注注释1,Platform 是 okhttp 中根据不同 Android 版本平台的差异实现的一个兼容类,这里就不细究,Platform 的 connectSocket 方法最终会调用 rawSocket 的 connect() 方法建立其Socket 连接,建立 Socket 连接后,就可以通过 Socket 连接获得输入输出流 source 和 sink,okhttp 就可以从 source 读取或往 sink 写入数据,source 和 sink 是 BufferedSource 和BufferedSink 类型,它们是来自于okio库,它是一个封装了 java.io 和 java.nio 的库,okhttp 底层依赖这个库读写数据,想要了解 okio 这个库可以看这篇文章拆轮子系列:拆 Okio。
RealConnectionPool
连接池,用来管理连接对象 RealConnection ,如下:
public final class RealConnectionPool {

    //线程池
    private static final Executor executor = new ThreadPoolExecutor(
        0 /* corePoolSize */,
        Integer.MAX_VALUE /* maximumPoolSize */,
        60L /* keepAliveTime */,
        TimeUnit.SECONDS,
        new SynchronousQueue<>(),
        Util.threadFactory("OkHttp ConnectionPool", true));

    boolean cleanupRunning;
    //清理连接任务,在executor中执行
    private final Runnable cleanupRunnable = () -> {
        while (true) {
            //调用cleanup方法执行清理逻辑
            long waitNanos = cleanup(System.nanoTime());
            if (waitNanos == -1) return;
            if (waitNanos > 0) {
                long waitMillis = waitNanos / 1000000L;
                waitNanos -= (waitMillis * 1000000L);
                synchronized (RealConnectionPool.this) {
                    try {
                        //调用wait方法进入等待
                        RealConnectionPool.this.wait(waitMillis, (int) waitNanos);
                    } catch (InterruptedException ignored) {
                    }
                }
            }
        }
    };

    //双端队列,保存连接
    private final Deque<RealConnection> connections = new ArrayDeque<>();

    void put(RealConnection connection) {
        if (!cleanupRunning) {
            cleanupRunning = true;
            //使用线程池执行清理任务
            executor.execute(cleanupRunnable);
        }
        //将新建连接插入队列
        connections.add(connection);
    }

    long cleanup(long now) {
        //...
    }

    //...
}
RealConnectionPool 在内部维护了一个线程池,用来执行清理连接任务 cleanupRunnable ,还维护了一个双端队列 connections ,用来缓存已经创建的连接。要知道创建一次连接要经历 TCP握手,如果是 HTTPS 还要经历 TLS 握手,握手的过程都是耗时的,所以为了提高效率,就需要connections 来对连接进行缓存,从而可以复用;还有如果连接使用完毕,长时间不释放,也会造成资源的浪费,所以就需要 cleanupRunnable 定时清理无用的连接,okhttp 支持 5 个并发连接,默认每个连接 keepAlive 为 5 分钟,keepAlive 就是连接空闲后,保持存活的时间。
当我们第一次调用 RealConnectionPool 的 put 方法缓存新建连接时,如果 cleanupRunnable 还没执行,它首先会使用线程池执行 cleanupRunnable ,然后把新建连接放入双端队列,cleanupRunnable 中会调用 cleanup 方法进行连接的清理,该方法返回现在到下次清理的时间间隔,然后调用 wiat 方法进入等待状态,等时间到了后,再次调用 cleanup 方法进行清理,就这样往复循环。我们来看一下 cleanup 方法的清理逻辑:
//RealConnectionPool.java
long cleanup(long now) {

    int inUseConnectionCount = 0;//正在使用连接数
    int idleConnectionCount = 0;//空闲连接数
    RealConnection longestIdleConnection = null;
    long longestIdleDurationNs = Long.MIN_VALUE;

    synchronized (this) {
        //遍历所有连接,记录空闲连接和正在使用连接各自的数量
        for (Iterator<RealConnection> i = connections.iterator(); i.hasNext(); ) {
            RealConnection connection = i.next();

            //如果该连接还在使用,pruneAndGetAllocationCount种通过引用计数的方式判断一个连接是否空闲
            if (pruneAndGetAllocationCount(connection, now) > 0) {
                //使用连接数加1
                inUseConnectionCount++;
                continue;
            }

            //该连接没有在使用

            //空闲连接数加1
            idleConnectionCount++;

            //记录keepalive时间最长的那个空闲连接
            long idleDurationNs = now - connection.idleAtNanos;
            if (idleDurationNs > longestIdleDurationNs) {
                longestIdleDurationNs = idleDurationNs;
                //这个连接很可能被移除,因为空闲时间太长
                longestIdleConnection = connection;
            }
        }

        //跳出循环后

        //默认keepalive时间keepAliveDurationNs最长为5分钟,空闲连接数idleConnectionCount最大为5个
        if (longestIdleDurationNs >= this.keepAliveDurationNs || idleConnectionCount > this.maxIdleConnections) {//如果longestIdleConnection的keepalive时间大于5分钟 或 空闲连接数超过5个
            //把longestIdleConnection连接从队列清理掉
            connections.remove(longestIdleConnection);
        } else if (idleConnectionCount > 0) {//如果空闲连接数小于5个 并且 longestIdleConnection连接还没到期清理
            //返回该连接的到期时间,下次再清理
            return keepAliveDurationNs - longestIdleDurationNs;
        } else if (inUseConnectionCount > 0) {//如果没有空闲连接 且 所有连接都还在使用
            //返回keepAliveDurationNs,5分钟后再清理
            return keepAliveDurationNs;
        } else {
            // 没有任何连接,把cleanupRunning复位
            cleanupRunning = false;
            return -1;
        }
    }

    //把longestIdleConnection连接从队列清理掉后,关闭该连接的socket,返回0,立即再次进行清理
    closeQuietly(longestIdleConnection.socket());

    return 0;
}
从 cleanup 方法得知,okhttp 清理连接的逻辑如下:
1、首先遍历所有连接,记录空闲连接数 idleConnectionCount 和正在使用连接数inUseConnectionCount ,在记录空闲连接数时,还要找出空闲时间最长的空闲连接longestIdleConnection,这个连接是很有可能被清理的;
2、遍历完后,根据最大空闲时长和最大空闲连接数来决定是否清理longestIdleConnection,
2.1、如果 longestIdleConnection 的空闲时间大于最大空闲时长 或 空闲连接数大于最大空闲连接数,那么该连接就会被从队列中移除,然后关闭该连接的 socket,返回 0,立即再次进行清理;
2.2、如果空闲连接数小于5个 并且 longestIdleConnection 的空闲时间小于最大空闲时长即还没到期清理,那么返回该连接的到期时间,下次再清理;
2.3、如果没有空闲连接 且 所有连接都还在使用,那么返回默认的 keepAlive 时间,5分钟后再清理;
2.4、没有任何连接,idleConnectionCount 和 inUseConnectionCount 都为0,把cleanupRunning 复位,等待下一次 put 连接时,再次使用线程池执行 cleanupRunnable。
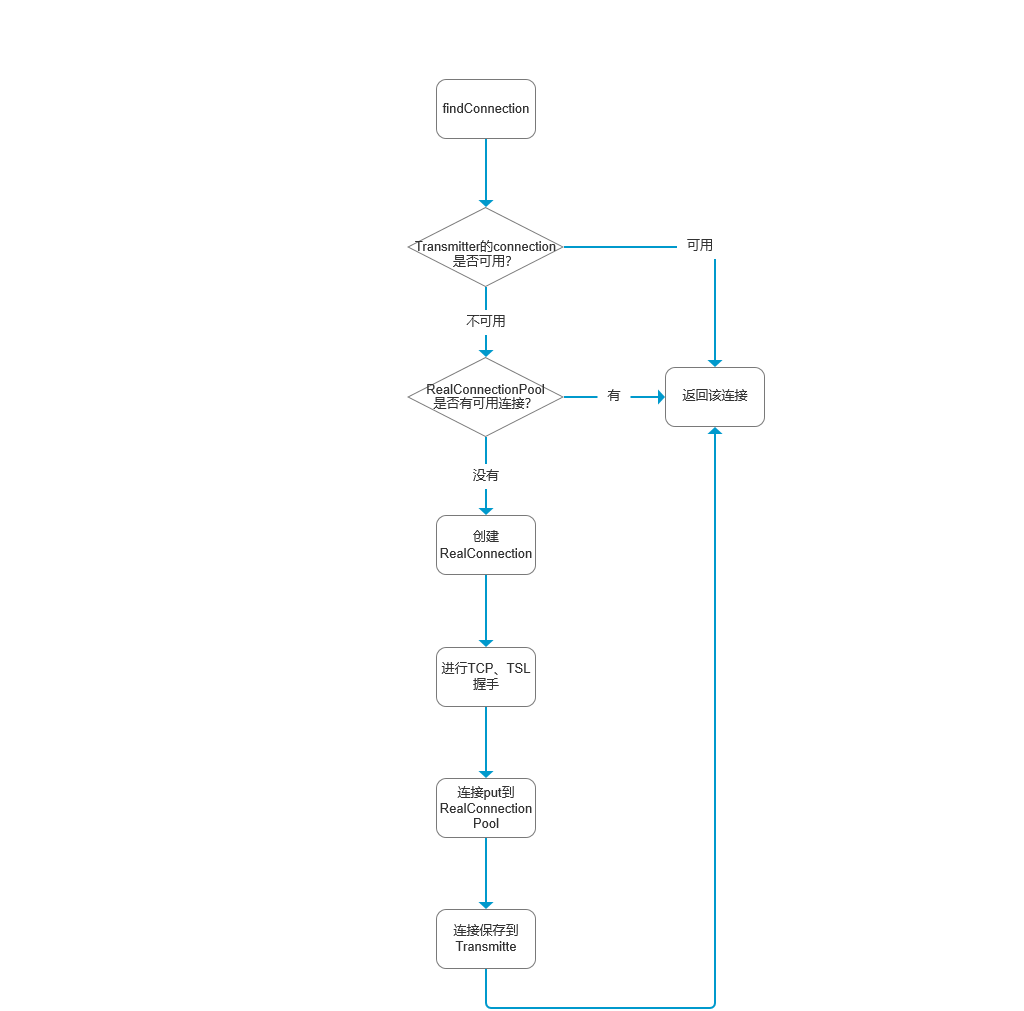
了解了 RealConnectionPool 和 RealConnection 后,我们再回到 ExchangeFinder 的 find 方法,这里是连接创建的地方。
连接机制
ExchangeFinder的fing方法如下:
//ExchangeFinder.java

  public ExchangeCodec find(
      OkHttpClient client, Interceptor.Chain chain, boolean doExtensiveHealthChecks) {
    int connectTimeout = chain.connectTimeoutMillis();
    int readTimeout = chain.readTimeoutMillis();
    int writeTimeout = chain.writeTimeoutMillis();
    int pingIntervalMillis = client.pingIntervalMillis();


    try {
      //1.内部调用 findHealthyConnection 函数返回 RealConnection 连接对象
      RealConnection resultConnection = findHealthyConnection(connectTimeout, readTimeout,
          writeTimeout, pingIntervalMillis, connectionRetryEnabled, doExtensiveHealthChecks);
      //2. 建立一个新的连接
      return resultConnection.newCodec(client, chain);
    } catch (RouteException e) {
      ...//省略异常处理
    }
  }
根据注释 1 我们知道创建一个 RealConnection ,我们看下 findHealthyConnection函数
  private RealConnection findHealthyConnection(int connectTimeout, int readTimeout,
      int writeTimeout, int pingIntervalMillis, boolean connectionRetryEnabled,
      boolean doExtensiveHealthChecks) throws IOException {
    while (true) {
      //找到一个连接
      RealConnection candidate = findConnection(connectTimeout, readTimeout, writeTimeout, pingIntervalMillis, connectionRetryEnabled);

      synchronized (connectionPool) {
        if (candidate.successCount == 0) {
          return candidate;
        }
      }

      //主要判断连接的可用性
      if (!candidate.isHealthy(doExtensiveHealthChecks)) {
        candidate.noNewExchanges();
        continue;
      }

      return candidate;
    }
  }
接着看 findConnection
//ExchangeFinder.java
private RealConnection findConnection(int connectTimeout, int readTimeout, int writeTimeout, int pingIntervalMillis, boolean connectionRetryEnabled) throws IOException {
    boolean foundPooledConnection = false;
    RealConnection result = null;//返回结果,可用的连接
    Route selectedRoute = null;
    RealConnection releasedConnection;
    Socket toClose;
    synchronized (connectionPool) {
       if (transmitter.isCanceled()) throw new IOException("Canceled");
      hasStreamFailure = false; .

	 //1、尝试使用已经创建过的连接,已经创建过的连接可能已经被限制创建新的流
      releasedConnection = transmitter.connection;
      //1.1、如果已经创建过的连接已经被限制创建新的流,就释放该连接(releaseConnectionNoEvents中会把该连接置空),并返回该连接的Socket以关闭
      toClose = transmitter.connection != null && transmitter.connection.noNewExchanges
          ? transmitter.releaseConnectionNoEvents()
          : null;

        //1.2、已经创建过的连接还能使用,就直接使用它当作结果、
        if (transmitter.connection != null) {
            result = transmitter.connection;
            releasedConnection = null;
        }

        //2、已经创建过的连接不能使用
        if (result == null) {
            //2.1、尝试从连接池中找可用的连接,如果找到,这个连接会赋值先保存在Transmitter中
            if (connectionPool.transmitterAcquirePooledConnection(address, transmitter, null, false)) {
                //2.2、从连接池中找到可用的连接
                foundPooledConnection = true;
                result = transmitter.connection;
            } else if (nextRouteToTry != null) {
                selectedRoute = nextRouteToTry;
                nextRouteToTry = null;
            } else if (retryCurrentRoute()) {
                selectedRoute = transmitter.connection.route();
            }
        }
    }
	closeQuietly(toClose);

	//...

    if (result != null) {
        //3、如果在上面已经找到了可用连接,直接返回结果
        return result;
    }

    //走到这里没有找到可用连接

    //看看是否需要路由选择,多IP操作
    boolean newRouteSelection = false;
    if (selectedRoute == null && (routeSelection == null || !routeSelection.hasNext())) {
        newRouteSelection = true;
        routeSelection = routeSelector.next();
    }
    List<Route> routes = null;
    synchronized (connectionPool) {
        if (transmitter.isCanceled()) throw new IOException("Canceled");

        //如果有下一个路由
        if (newRouteSelection) {
            routes = routeSelection.getAll();
            //4、这里第二次尝试从连接池中找可用连接
            if (connectionPool.transmitterAcquirePooledConnection(address, transmitter, routes, false)) {
                //4.1、从连接池中找到可用的连接
                foundPooledConnection = true;
                result = transmitter.connection;
            }
        }

        //在连接池中没有找到可用连接
        if (!foundPooledConnection) {
            if (selectedRoute == null) {
                selectedRoute = routeSelection.next();
            }

           //5、所以这里新创建一个连接,后面会进行Socket连接
            result = new RealConnection(connectionPool, selectedRoute);
            connectingConnection = result;
        }
    }

    // 4.2、如果在连接池中找到可用的连接,直接返回该连接
    if (foundPooledConnection) {
        eventListener.connectionAcquired(call, result);
        return result;
    }

    //5.1、调用RealConnection的connect方法进行Socket连接,这个在RealConnection中讲过
    result.connect(connectTimeout, readTimeout, writeTimeout, pingIntervalMillis, connectionRetryEnabled, call, eventListener);

    connectionPool.routeDatabase.connected(result.route());

    Socket socket = null;
    synchronized (connectionPool) {
        connectingConnection = null;
        //如果我们刚刚创建了同一地址的多路复用连接,释放这个连接并获取那个连接
        if (connectionPool.transmitterAcquirePooledConnection(address, transmitter, routes, true)) {
            result.noNewExchanges = true;
            socket = result.socket();
            result = transmitter.connection;
        } else {
            //5.2、把刚刚新建的连接放入连接池
            connectionPool.put(result);
            //5.3、把刚刚新建的连接保存到Transmitter的connection字段
            transmitter.acquireConnectionNoEvents(result);
        }
    }

    closeQuietly(socket);
    eventListener.connectionAcquired(call, result);

    //5.4、返回结果
    return result;
}
这个findConnection方法就是整个ConnectInterceptor的核心,我们忽略掉多IP操作和多路复用(HTTP2),假设现在我们是第一次请求,连接池和Transmitter中没有该连接,所以跳过1、2、3,直接来到5,创建一个新的连接,然后把它放入连接池和Transmitter中;接着我们用同一个Call进行了第二次请求,这时连接池和Transmitter中有该连接,所以就会走1、2、3,如果Transmitter中的连接还可用就返回,否则从连接池获取一个可用连接返回,所以整个连接机制的大概过程如下:
Transmitter 中的连接和连接池中的连接有什么区别?我们知道每创建一个 Call,就会创建一个对应的 Transmitter ,一个 Call 可以发起多次请求(同步、异步),不同的 Call 有不同的Transmitter ,连接池是在创建 OkhttpClient 时创建的,所以连接池是所有 Call 共享的,即连接池中的连接所有 Call 都可以复用,而 Transmitter 中的那个连接只是对应它相应的 Call,只能被本次 Call 的所有请求复用。
了解了 okhttp3 的连接机制后,我们接着下一个拦截器 networkInterceptors 。
networkInterceptors
networkInterceptors 它是 OKHttp 拦截器中的第 6 个拦截器,属于 网络拦截器,那么它的作用是什么请看下面 拦截器实战 中介绍。
最后执行到了 OKHttp 最后一个拦截器 CallServerInterceptor
CallServerInterceptor
根据源码中的介绍:它是链中的最后一个拦截器。它与服务器进行网络请求、响应操作。
  @Override public Response intercept(Chain chain) throws IOException {
    RealInterceptorChain realChain = (RealInterceptorChain) chain;
    //拿到 Exchange 与 网络交互
    Exchange exchange = realChain.exchange();
    //拿到请求数据
    Request request = realChain.request();
		//获取当前请求的时间
    long sentRequestMillis = System.currentTimeMillis();
		//写入请求头
    exchange.writeRequestHeaders(request);

    boolean responseHeadersStarted = false;
    Response.Builder responseBuilder = null;
    //如果可以写入请求体
    if (HttpMethod.permitsRequestBody(request.method()) && request.body() != null) {
      //如果请求头添加了 100-continue
      if ("100-continue".equalsIgnoreCase(request.header("Expect"))) {
        exchange.flushRequest(); //关闭 IO 流资源
        responseHeadersStarted = true;
        exchange.responseHeadersStart();
        responseBuilder = exchange.readResponseHeaders(true);
      }

      if (responseBuilder == null) { //如果为空
        if (request.body().isDuplex()) {
          exchange.flushRequest();
          BufferedSink bufferedRequestBody = Okio.buffer(
              exchange.createRequestBody(request, true));
          request.body().writeTo(bufferedRequestBody);
        } else { //一般走 else
          //写入请求体的操作
          BufferedSink bufferedRequestBody = Okio.buffer(
              exchange.createRequestBody(request, false));
          request.body().writeTo(bufferedRequestBody);
          bufferedRequestBody.close();
        }
      } else {
        exchange.noRequestBody();
        if (!exchange.connection().isMultiplexed()) {
          //
          exchange.noNewExchangesOnConnection();
        }
      }
    } else { //如果没有请求体 执行 noRequestBody
      exchange.noRequestBody();
    }

    //如果请求体为空 并且不支持 isDuplex = false IO 流
    if (request.body() == null || !request.body().isDuplex()) {
      exchange.finishRequest();
    }

    if (!responseHeadersStarted) {
      exchange.responseHeadersStart();
    }

    //读取响应的 head
    if (responseBuilder == null) {
      responseBuilder = exchange.readResponseHeaders(false);
    }

    //构建响应数据
    Response response = responseBuilder
        .request(request)
        .handshake(exchange.connection().handshake())
        .sentRequestAtMillis(sentRequestMillis)
        .receivedResponseAtMillis(System.currentTimeMillis())
        .build();

    //拿到响应码
    int code = response.code();
    if (code == 100) {
      // 构建响应
      response = exchange.readResponseHeaders(false)
          .request(request)
          .handshake(exchange.connection().handshake())
          .sentRequestAtMillis(sentRequestMillis)
          .receivedResponseAtMillis(System.currentTimeMillis())
          .build();

      code = response.code();
    }

    exchange.responseHeadersEnd(response);

    if (forWebSocket && code == 101) {
      // 构建空响应体
      response = response.newBuilder()
          .body(Util.EMPTY_RESPONSE)
          .build();
    } else {
      // 通过响应的 body 构造 响应体
      response = response.newBuilder()
          .body(exchange.openResponseBody(response))
          .build();
    }

   ...//省略部分代码

    return response;
  }
在当前拦截器中我们把请求 head /body 通过 okio 写入了服务端,然后根据服务端的响应数据构建响应头、响应体等一些响应数据。
到这里我们完成了拦截器所有操作,下面进入拦截器实战。
拦截器实战
自定义 Log 打印拦截器
/**
 * 打印日志拦截器
 */
class LoggingInterceptor implements Interceptor {
    private String TAG = "LoggingInterceptor";
    public static String requestBodyToString(RequestBody requestBody) throws IOException {
        if (requestBody == null)return "";
        Buffer buffer = new Buffer();
        requestBody.writeTo(buffer);
        return buffer.readUtf8();
    }

    @Override
    public Response intercept(Chain chain) throws IOException {
        //拿到请求数据
        Request request = chain.request();


        //可以在请求服务器之前添加请求头
        request =   request.newBuilder()
                .addHeader("head-1","1")
                .addHeader("head-2","2")
                .url("https://juejin.cn/user/3368559355637566")
                .build();


        HttpUrl url = request.url();
        String scheme = url.scheme();//  http https
        String host = url.host();//   127.0.0.1
        String path = url.encodedPath();//  /test/upload/img
        String query = url.encodedQuery();//  userName=DevYk&userPassword=12345
        RequestBody requestBody = request.body();
        String bodyToString = requestBodyToString(requestBody);

        Log.d(TAG,"scheme--》"+scheme);
        Log.d(TAG,"Host--->"+host);
        Log.d(TAG,"path--->"+path);
        Log.d(TAG,"query--->"+query);
        Log.d(TAG,"requestBody---->"+bodyToString+"");
        Log.d(TAG,"head---->"+request.headers().names());

        //调用下一个拦截器
        Response response = chain.proceed(request);

       //拿到响应
        ResponseBody responseBody = response.body();
        String body = responseBody.string();
        String type = responseBody.contentType().type();
        String subtype = responseBody.contentType().subtype();

        //打印响应
        Log.d(TAG,"contentType--->"+type+" "+subtype);
        Log.d(TAG,"responseBody--->"+body);

        return chain.proceed(request);
    }
}
添加配置
OkHttpClient okHttpClient = new OkHttpClient.Builder().
        addInterceptor(new LoggingInterceptor())
        build();
output:
LoggingInterceptor: scheme--》https
LoggingInterceptor: Host--->juejin.im
LoggingInterceptor: path--->/user/578259398ac2470061f3a3fb
LoggingInterceptor: query--->null

LoggingInterceptor: requestBody---->

LoggingInterceptor: head---->[head-1, head-2]
LoggingInterceptor: responseHeader--->text html
LoggingInterceptor: responseBody---><!DOCTYPE html><html ....
自定义 全局禁止网络请求拦截器
public class NetworkInterceptor implements Interceptor {
    @Override
    public okhttp3.Response intercept(Chain chain) throws IOException {
        if (true) {
            Response response = new Response.Builder()
                    .code(404) // 其实code可以随便给
                    .protocol(Protocol.HTTP_1_1)
                    .message("根据规定,暂时不能进行网络请求。")
                    .body(ResponseBody.create(MediaType.get("text/html; charset=utf-8"), "")) // 返回空页面
                    .request(chain.request())
                    .build();
            return response;
        } else {
            return chain.proceed(chain.request());
        }
    }
}
配置
OkHttpClient okHttpClient = new OkHttpClient.Builder().
        addInterceptor(new LoggingInterceptor()).
  			addInterceptor(new NetworkInterceptor()).
        build();
Output:
LoggingInterceptor: responseCode--->404
LoggingInterceptor: responseMessage--->根据规定,暂时不能进行网络请求。
LoggingInterceptor: responseisSuccessful--->false
小总结:拦截器分为 应用拦截器、网络拦截器 根据官网解释有这几点:
应用拦截器
- 无需担心中间响应,例如重定向和重试。
- 即使从缓存提供 HTTP 响应,也总是被调用一次。
- 遵守应用程序的原始意图。不关心 OkHttp 注入的标头,例如
If-None-Match。 - 允许短路而不是
Chain.proceed()。 - 允许重试并多次致电
Chain.proceed()。
网络拦截器
- 能够对诸如重定向和重试之类的中间响应进行操作。
- 不会为使网络短路的缓存响应调用。
- 观察数据,就像通过网络传输数据一样。
- 访问
Connection带有请求的。
所以怎么选择看自己需求了。
拦截器总结
根据上面的拦截器讲解和实战,相信大家对 OKHttp 拦截器有了一定的认识,这里我们根据分析来总结下:
其实每一个拦截器都对应一个 RealInterceptorChain ,然后每一个interceptor 再产生下一个RealInterceptorChain,直到 List 迭代完成。所以上面基本上就是递归,找了一些图片有助于大家理解如下图