

Java 设计模式(一)
一、单例模式
这一章涵盖了单例模式。
GoF 定义
确保一个类只有一个实例,并提供对它的全局访问点。
概念
一个类不能有多个实例。创建后,下一次开始,您将只使用现有的实例。这种方法有助于在集中式系统中限制不必要的对象创建。该方法还促进了容易的维护。
真实世界的例子
让我们假设你是一个运动队的成员,你的球队正在参加锦标赛。您的团队需要在整个锦标赛中与多个对手比赛。在每场比赛之前,按照比赛规则,双方队长必须掷硬币。如果你的团队没有队长,你需要选举一个人作为队长。在每场比赛和每次抛硬币之前,如果你已经提名了一个人作为队长,你就不能重复选举队长的过程。基本上,从每个团队成员的角度来看,团队应该只有一个队长。
计算机世界的例子
在某些特定的软件系统中,您可能更喜欢只使用一个文件系统来集中管理资源。此外,这种模式可以实现缓存机制。
注意
当您考虑 java.lang.Runtime 类的 getRuntime()方法时,您会注意到类似的模式。它被实现为一个单例类的急切初始化。您将很快了解到急切初始化。
说明
这些是以下实现中的关键特征。
-
构造函数是私有的,以防止使用“new”运算符。
-
您将创建该类的一个实例,如果您之前没有创建任何这样的实例;否则,您将简单地重用现有的。
-
为了保证线程安全,我使用了“synchronized”关键字。
类图
图 1-1 显示了单例模式的类图。
图 1-1
类图
包资源管理器视图
图 1-2 显示了程序的高层结构。
图 1-2
包资源管理器视图
讨论
我已经向您展示了一个简单的例子来说明单例模式的概念。
让我们用下面的方法来回顾一下显著的特征。
-
构造函数是私有的,所以不能在外部实例化单例类(Captain)。它帮助我们引用系统中存在的唯一实例,同时,您限制了 Captain 类的额外对象创建。
-
私有构造函数还确保不能扩展 Captain 类。所以,子类不能误用这个概念。
-
我用了“同步”这个关键词。因此,多线程不能同时参与实例化过程。我强迫每个线程等待轮到它来获取这个方法,所以线程安全得到了保证。但是同步是一个代价很高的操作,一旦实例被创建,它就是一个额外的开销。(我将在接下来的章节中讨论一些替代方法,但每种方法都有其优缺点)。
履行
下面是实现。
package jdp2e.singleton.demo;

final class Captain
{
    private static Captain captain;
    //We make the constructor private to prevent the use of "new"
    private Captain() {    }

    public static synchronized Captain getCaptain()
    {

        // Lazy initialization
        if (captain == null)
        {
            captain = new Captain();
            System.out.println("New captain is elected for your team.");
        }
        else
        {
            System.out.print("You already have a captain for your team.");
            System.out.println("Send him for the toss.");
        }
        return captain;
    }
}
// We cannot extend Captain class.The constructor is private in this case.
//class B extends Captain{}// error
public class SingletonPatternExample {
    public static void main(String[] args) {
        System.out.println("***Singleton Pattern Demo***\n");
        System.out.println("Trying to make a captain for your team:");
        //Constructor is private.We cannot use "new" here.
        //Captain c3 = new Captain();//error
        Captain captain1 = Captain.getCaptain();
        System.out.println("Trying to make another captain for your team:");
        Captain captain2 = Captain.getCaptain();
        if (captain1 == captain2)
        {
            System.out.println("captain1 and captain2 are same instance.");
        }

    }

}
输出
这是输出。
***Singleton Pattern Demo***

Trying to make a captain for your team:
New captain is elected for your team.
Trying to make another captain for your team:
You already have a captain for your team.Send him for the toss.
captain1 and captain2 are same instance.
问答环节
1.你为什么要把程序复杂化?您可以简单地编写 Singleton 类,如下所示。
class Captain
{
   private static Captain captain;
    //We make the constructor private to prevent the use of "new"
   private Captain() { }

   public static Captain getCaptain()
   {

             // Lazy initialization
             if (captain == null)
             {
                captain = new Captain();
                System.out.println("New captain is elected for your team.");
             }
             else
             {
                 System.out.print("You already have a captain for your team.");
                 System.out.println("Send him for the toss.");
             }
             return captain;
      }
}
这种理解正确吗?
它只能在单线程环境中工作,但在多线程环境中不能被认为是线程安全的实现。考虑下面的情况。假设在多线程环境中,两个(或更多)线程试图对此进行评估:
if (captain == null)
如果他们发现实例还没有被创建,他们每个人都会尝试创建一个新的实例。因此,您可能会得到该类的多个实例。
2.为什么在代码中使用了 懒惰初始化 这个术语?
因为在这里调用getCaptain()方法之前不会创建 singleton 实例。
3.什么意思 懒惰初始化 ?
简单地说,惰性初始化是一种延迟对象创建过程的技术。它说你应该只在需要的时候创建一个对象。当您处理创建对象的昂贵过程时,这种方法会很有帮助。
4.你为什么把这门课定为期末考试?您有一个私有构造函数,它可能会阻止继承。这是正确的吗?
子类化可以通过多种方式来避免。是的,在这个例子中,由于构造函数已经标记了“private”关键字,所以不需要它。但是如果您将 Captain 类设置为 final,如示例所示,这种方法被认为是更好的实践。当你考虑一个嵌套类时,它是有效的。例如,让我们修改私有构造函数体来检查创建的(Captain 类的)实例数量。让我们进一步假设在前面的例子中,您有一个非静态嵌套类(在 Java 中称为内部类),如下所示。(所有更改都以粗体显示。)
//final class Captain
class Captain
{
    private static Captain captain;
    //We make the constructor private to prevent the use of "new"
    static int numberOfInstance=0;
    private Captain()
    {
        numberOfInstance++;
        System.out.println("Number of instances at this moment="+ numberOfInstance);
    }

    public static synchronized Captain getCaptain()
    {

        // Lazy initialization
        if (captain == null)
        {
            captain = new Captain();
            System.out.println("New captain is elected for your team.");
        }
        else
        {
            System.out.print("You already have a captain for your team.");
            System.out.println("Send him for the toss.");
        }
        return captain;
    }
     //A non-static nested class (inner class)
   public class CaptainDerived extends Captain
   {
     //Some code
   }
}
现在在main()方法中添加另一行代码(以粗体显示),如下所示。
public class SingletonPatternExample {
    public static void main(String[] args) {
        System.out.println("***Singleton Pattern Demo***\n");
        System.out.println("Trying to make a captain for your team:");
        //Constructor is private.We cannot use "new" here.
        //Captain c3 = new Captain();//error
        Captain captain1 = Captain.getCaptain();
        System.out.println("Trying to make another captain for your team:");
        Captain captain2 = Captain.getCaptain();
        if (captain1 == captain2)
        {
            System.out.println("captain1 and captain2 are same instance.");
        }
        Captain.CaptainDerived derived=captain1.new CaptainDerived();
    }
}
现在请注意输出。
输出
现在,您可以看到程序违反了关键目标,因为我从未打算创建多个实例。
***Singleton Pattern Demo***

Trying to make a captain for your team:
Number of instances at this moment=1
New captain is elected for your team.
Trying to make another captain for your team:
You already have a captain for your team.Send him for the toss.
captain1 and captain2 are same instance.

Number of instances at this moment=2
5.有没有任何替代的方法来模拟单例设计模式?
有许多方法。各有利弊。你已经见过其中两个了。让我们讨论一些替代方法。
急切初始化
下面是急切初始化的一个示例实现。
class Captain
{
    //Early initialization
    private static final Captain captain = new Captain();
    //We make the constructor private to prevent the use of "new"
    private Captain()
    {
        System.out.println("A captain is elected for your team.");
    }
    /* Global point of access.The method getCaptain() is a public static method*/
    public static Captain getCaptain()
    {
        System.out.println("You have a captain for your team.");
        return captain;
    }

}
讨论
急切初始化方法有以下优点和缺点。
优点
-
它简单明了,也更干净。
-
它与惰性初始化相反,但仍然是线程安全的。
-
当应用程序处于执行模式时,它有一个小的延迟时间,因为所有的东西都已经加载到内存中了。
cons
- 应用程序需要更长的启动时间(与惰性初始化相比),因为所有东西都需要先加载。为了检查代价,让我们在 Singleton 类中添加一个虚拟方法(以粗体显示)。注意,在 main 方法中,我只调用了这个伪方法。现在检查输出。
package jdp2e.singleton.questions_answers;

class Captain
{
    //Early initialization
    private static final Captain captain = new Captain();
    //We make the constructor private to prevent the use of "new"
    private Captain()
    {
        System.out.println("A captain is elected for your team.");
    }
    /* Global point of access.The method getCaptain() is a public static method*/
    public static Captain getCaptain()
    {
        System.out.println("You have a captain for your team.");
        return captain;
    }
    public static void dummyMethod()
    {
        System.out.println("It is a dummy method");
    }
}
public class EagerInitializationExample {
    public static void main(String[] args) {
        System.out.println("***Singleton Pattern Demo With Eager Initialization***\n");
        Captain.dummyMethod();
        /*System.out.println("Trying to make a captain for your team:");
        Captain captain1 = Captain.getCaptain();
        System.out.println("Trying to make another captain for your team:");
        Captain captain2 = Captain.getCaptain();
            if (captain1 == captain2)
            {
                System.out.println("captain1 and captain2 are same instance.");
            }*/
    }
}
输出
***Singleton Pattern Demo With Eager Initialization***

A captain is elected for your team.

It is a dummy method
分析
注意为你的团队选出的队长仍然出现在输出中,尽管你可能不打算处理它。
因此,在前面的情况下,Singleton 类的对象总是被实例化。此外,在 Java 5 之前,有许多关于单例类的问题。
比尔·普格溶液
Bill Pugh 提出了一种不同的方法,使用静态嵌套 helper 类。
package jdp2e.singleton.questions_answers;

class Captain1
{
    private Captain1() {
        System.out.println("A captain is elected for your team.");
    }
    //Bill Pugh solution
    private static class SingletonHelper{
        /*Nested class is referenced after getCaptain() is called*/

        private static final Captain1 captain = new Captain1();
    }

    public static Captain1 getCaptain()
    {
        return SingletonHelper.captain;
    }
    /*public static void dummyMethod()
    {
        System.out.println("It is a dummy method");
    }  */
}
该方法不使用同步技术和急切初始化。注意,只有当有人调用getCaptain()方法时,SingletonHelper 类才会被考虑。如果您只是从main()调用任何dummyMethod(),这种方法不会产生任何不需要的输出,就像前面的例子一样(为了检查结果,您需要取消对dummyMethod()主体的注释)。它也被视为在 Java 中实现单件的一种常见的标准方法。
双重检查锁定
还有另一种流行的方法,叫做双重检查锁定。如果您注意到我们的 singleton 模式的同步实现,您可能会发现同步操作通常成本很高,并且该方法对于一些可能破坏 singleton 实现的初始线程很有用。但是在后面的阶段,同步操作可能会产生额外的开销。为了避免这个问题,您可以在一个if条件中使用一个 synchronized 块,如下面的代码所示,以确保不会创建不需要的实例。
package jdp2e.singleton.questions_answers;

final class Captain2
{
    private static Captain2 captain;
    //We make the constructor private to prevent the use of "new"
    static int numberOfInstance=0;
    private Captain2() {
        numberOfInstance++;
        System.out.println("Number of instances at this moment="+ numberOfInstance);
    }

    public static  Captain2 getCaptain(){
        if (captain == null) {
            synchronized (Captain2.class) {
                // Lazy initialization
                if (captain == null){
                    captain = new Captain2();
                    System.out.println("New captain is elected for your team.");
                }
                else
                {
                    System.out.print("You already have a captain for your team.");
                    System.out.println("Send him for the toss.");
                }
            }
        }
        return captain;
    }
}
如果你对单例模式更感兴趣,请阅读位于 www.journaldev.com/1377/java-singleton-design-pattern-best-practices-examples 的文章。
6.简言之,如果我需要创建同步代码,我可以在 Java 中使用 synchronized 关键字。这是正确的吗?
是的,JVM 确保了这一点。在内部,它使用类或对象上的锁来确保只有一个线程在访问数据。在 Java 中,您可以将该关键字应用于一个方法或语句(或代码块)。在这一章中,我从两个方面进行了练习。(在最初的实现中,您使用了 synchronized 方法,在双重检查锁定中,您看到了另一个版本的使用)。
7.为什么创建多个对象是一个大问题?
-
在现实世界的场景中,对象创建被视为代价高昂的操作。
-
有时你需要实现一个易于维护的集中式系统,因为它可以帮助你提供一个全局访问机制。
8.什么时候我应该考虑单例模式?
模式的使用取决于特定的用例。但是一般来说,您可以考虑使用单例模式来实现集中式管理系统、维护公共日志文件、在多线程环境中维护线程池、实现缓存机制或设备驱动程序等等。
9.我对急切初始化的例子有些担心。根据定义,它似乎不完全是急切初始化。这个类只有在应用程序执行期间被代码引用时才由 JVM 加载。这意味着这也是惰性初始化。这是正确的吗?
是的,在某种程度上你的观察是正确的。这个讨论有争论。简而言之,与以前的方法相比,它是热切的。当你只调用dummyMethod()时,你看到了这一点;尽管如此,你实例化了单例,尽管你并不需要它。因此,在这样的上下文中,它是渴望的,但它是懒惰的,因为在类被初始化之前,单体实例化不会发生。所以,懒惰的程度是这里的关键。
二、原型模式
本章涵盖了原型模式。
GoF 定义
使用原型实例指定要创建的对象种类,并通过复制该原型来创建新对象。
概念
一般来说,从头开始创建一个新实例是一项开销很大的操作。使用原型模式,您可以通过复制或克隆现有实例的实例来创建新的实例。这种方法节省了从头创建新实例的时间和金钱。
真实世界的例子
假设我们有一份有价值文件的主拷贝。我们需要对其进行一些更改,以查看更改的效果。在这种情况下,我们可以复印原始文档并编辑更改。
再考虑一个例子。假设一群人决定庆祝他们的朋友罗恩的生日。他们去面包店买了一个蛋糕。为了让蛋糕与众不同,他们要求卖家在蛋糕上写上“罗恩生日快乐”。从卖方的角度来看,他并没有制造任何新的模型。他已经定义了模型,每天按照相同的流程制作许多蛋糕(看起来都一样),最后通过一些小的变化使每个蛋糕都很特别。
计算机世界的例子
让我们假设您有一个非常稳定的应用程序。将来,您可能希望通过一些小的修改来更新应用程序。因此,您从原始应用程序的副本开始,进行更改,并进一步分析。当然,为了节省你的时间和金钱,你不希望从零开始。
注意
将 Object.clone()方法作为原型的一个例子。
说明
图 2-1 展示了一个简单的原型结构。
图 2-1
一个样本原型结构
在这里,BasicCar 是一个基本原型。Nano 和 Ford 是实现了 BasicCar 中定义的clone()方法的具体原型。在这个例子中,我们创建了一个带有默认价格(印度货币)的 BasicCar 类。后来,我们修改了每个型号的价格。PrototypePatternExample.java 是这个实现中的客户端。
类图
图 2-2 显示了原型模式的类图。
图 2-2
类图
包资源管理器视图
图 2-3 显示了程序的高层结构。
图 2-3
包资源管理器视图
履行
下面是实现。
//BasicCar.java
package jdp2e.prototype.demo;
import java.util.Random;

public abstract class BasicCar implements Cloneable
{
    public String modelName;
    public int basePrice,onRoadPrice;

    public String getModelname() {
        return modelName;
    }
    public void setModelname(String modelname) {
        this.modelName = modelname;
    }

    public static int setAdditionalPrice()
    {
        int price = 0;
        Random r = new Random();
        //We will get an integer value in the range 0 to 100000
        int p = r.nextInt(100000);
        price = p;
        return price;
    }
    public BasicCar clone() throws CloneNotSupportedException
    {
        return  (BasicCar)super.clone();
    }
}
//Nano.java
package jdp2e.prototype.demo;

class Nano extends BasicCar
{
    //A base price for Nano
    public int basePrice=100000;
    public Nano(String m)
    {
        modelName = m;
    }
    @Override
    public BasicCar clone() throws CloneNotSupportedException
    {
         return (Nano)super.clone();
         //return this.clone();
    }
}

//Ford.java

package jdp2e.prototype.demo;

class Ford extends BasicCar
{
    //A base price for Ford
    public int basePrice=100000;
    public Ford(String m)
    {
        modelName = m;
    }

    @Override
    public BasicCar clone() throws CloneNotSupportedException
    {
        return (Ford)super.clone();
    }
}
//Client
// PrototypePatternExample.java

package jdp2e.prototype.demo;

public class PrototypePatternExample
{
    public static void main(String[] args) throws CloneNotSupportedException
    {
        System.out.println("***Prototype Pattern Demo***\n");
        BasicCar nano = new Nano("Green Nano") ;
        nano.basePrice=100000;

        BasicCar ford = new Ford("Ford Yellow");
        ford.basePrice=500000;

        BasicCar bc1;
        //Nano
        bc1 =nano.clone();
        //Price will be more than 100000 for sure
        bc1.onRoadPrice = nano.basePrice+BasicCar.setAdditionalPrice();
        System.out.println("Car is: "+ bc1.modelName+" and it's price is Rs."+bc1.onRoadPrice);

        //Ford
        bc1 =ford.clone();
        //Price will be more than 500000 for sure
        bc1.onRoadPrice = ford.basePrice+BasicCar.setAdditionalPrice();
        System.out.println("Car is: "+ bc1.modelName+" and it's price is Rs."+bc1.onRoadPrice);
    }
}
输出
这是输出。
***Prototype Pattern Demo***

Car is: Green Nano and it's price is Rs.123806
Car is: Ford Yellow and it's price is Rs.595460
注意
您可以在您的系统中看到不同的价格,因为我们在 BasicCar 类中的 setAdditionalPrice()方法中生成了一个随机价格。但我保证福特的价格会比 Nano 高。
问答环节
-
使用原型设计模式的 优势 有哪些?
-
当创建一个类的实例是一个复杂(或者无聊)的过程时,这是很有用的。相反,你可以专注于其他关键活动。
-
您可以在运行时包含或丢弃产品。
-
您可以以更低的成本创建新的实例。
-
-
与使用原型设计模式相关的 挑战 有哪些?
-
每个子类都需要实现克隆或复制机制。
-
有时,从现有实例创建副本并不简单。例如,如果所考虑的对象不支持复制/克隆,或者存在循环引用,那么实现克隆机制可能会很困难。比如在 Java 中,带有
clone()方法的类需要实现可克隆的标记接口;否则,它将抛出 CloneNotSupportedException。 -
在这个例子中,我使用了在 Java 中执行浅层复制的
clone()方法。按照约定,我通过调用super.clone()获得了返回的对象。(如果您想了解更多这方面的内容,请将光标放在 eclipse 编辑器上,仔细阅读说明)。如果您的应用程序需要一个深层副本,那可能会很贵。
-
-
你能详细说明浅拷贝和深拷贝的区别吗?
一个浅拷贝创建一个新对象,然后将各种字段值从原始对象拷贝到新对象。所以,它也被称为逐场复制。如果原始对象包含作为字段的对其他对象的任何引用,则这些对象的引用被复制到新对象中(即,您不创建这些对象的副本)。
Let’s try to understand the mechanism with a simple diagram. Suppose we have an object,
X1, and it has a reference to another object,Y1. Further assume that objectY1has a reference to objectZ1.图 2-4
在引用的浅拷贝之前
现在,使用X1的浅层副本,创建了一个新对象X2;它也提到了Y1。
图 2-5
在引用的浅拷贝之后
您已经看到了在我们的实现中使用了clone()方法。它执行浅层复制。
对于X1的深度副本,创建一个新对象X3。X3引用了新对象Y3,实际上是Y1的副本。同样,Y3又引用了另一个新对象Z3,它是Z1的副本。
图 2-6
在引用的深层副本之后
在深层副本中,新对象与原始对象完全分离。在一个对象中进行的任何更改都不应反映在另一个对象上。要用 Java 创建深层副本,您可能需要覆盖clone()方法,然后继续。此外,深层拷贝的成本很高,因为您需要创建额外的对象。深度复制的完整实现在本书 Memento 模式的“Q & A Session ”(第十九章)中给出。
-
什么时候你会选择浅层拷贝而不是深层拷贝(反之亦然)?
浅层拷贝速度更快,成本更低。如果您的目标对象只有基本字段,那总是更好。
深层拷贝既昂贵又缓慢。但是,如果您的目标对象包含许多引用其他对象的字段,这是很有用的。
-
当我在 Java 中复制一个对象时,我需要使用 clone()方法。这种理解正确吗?
不,还有其他选择,其中之一就是使用序列化机制。但是你总是可以定义你自己的复制构造函数并使用它。
-
你能给出一个简单的例子来演示用户定义的复制构造函数吗?
Java 不支持默认的复制构造函数。你可能需要自己写。考虑下面的程序,它演示了这种用法。
示范
这是演示。
package jdp2e.prototype.questions_answers;

class Student
{
    int rollNo;
    String name;
    //Instance Constructor
    public Student(int rollNo, String name)
    {
        this.rollNo = rollNo;
        this.name = name;
    }
    //Copy Constructor
    public Student( Student student)
    {
        this.name = student.name;
        this.rollNo = student.rollNo;
    }
    public void displayDetails()
    {
        System.out.println(" Student name: " + name + ",Roll no: "+rollNo);
    }
}

class UserDefinedCopyConstructorExample {
    public static void main(String[] args) {
        System.out.println("***User defined copy constructor example in Java***\n");
        Student student1 = new Student(1, "John");
        System.out.println(" The details of Student1 is as follows:");
        student1.displayDetails();
        System.out.println("\n Copying student1 to student2 now");
        //Invoking the user-defined copy constructor
        Student student2 = new Student (student1);
        System.out.println(" The details of Student2 is as follows:");
        student2.displayDetails();
    }
}
输出
这是输出。
***User defined copy constructor example in Java***

 The details of Student1 is as follows:
 Student name: John,Roll no: 1

 Copying student1 to student2 now
 The details of Student2 is as follows:
 Student name: John,Roll no: 1
三、构建器模式
本章涵盖了构建器模式。
GoF 定义
将复杂对象的构造与其表示分离,以便相同的构造过程可以创建不同的表示。
概念
构建器模式对于创建包含多个部分的复杂对象非常有用。对象的创建机制应该独立于这些部分。构造过程并不关心这些部件是如何组装的。同样的构建过程必须允许我们创建对象的不同表示。
图 3-1 中的结构是构建器模式的一个例子。该结构采用了四人组的书,设计模式:可重用面向对象软件的要素 (Addison-Wesley,1995)。
图 3-1
构建器模式的一个例子
产品是您想要创建的复杂对象。ConcreteBuilder 通过实现抽象接口 Builder 来构造和组装产品的各个部分。ConcreteBuilder 对象构建产品的内部表示,并定义创建过程/组装机制。构建器还可以提供方法来获取一个已创建并可供使用的对象(注意下面实现中构建器接口中的getVehicle()方法)。Director 负责使用构建器界面创建最终对象。换句话说,Director 使用 Builder 并控制构建最终产品的步骤/顺序。构建者还可以保留他们构建的产品的引用,以便可以再次使用。
真实世界的例子
要完成计算机订单,需要根据客户偏好组装不同的部件(例如,一位客户可以选择采用英特尔处理器的 500 GB 硬盘,另一位客户可以选择采用 AMD 处理器的 250 GB 硬盘)。考虑另一个例子。假设你打算和一家旅游公司一起去旅游,这家旅游公司为同一次旅游提供各种套餐(例如,他们可以提供特殊安排、不同类型的观光交通工具等。).你可以根据自己的预算选择套餐。
计算机世界的例子
当我们想要将一种文本格式转换成另一种文本格式(例如,RTF 到 ASCII 文本)时,可以使用构建器模式。
注意
Java.util.Calendar.Builder 类就是这类的一个例子,但它只在 Java 8 及更高版本中可用。在这种情况下,java.lang.StringBuilder 类就是一个很好的例子。但是你需要记住,GoF 定义说这种模式允许你使用相同的构造过程来做出不同的表示。在这种情况下,这个例子并不完全符合这种模式。
说明
在这个例子中,我们有以下参与者:构建者、汽车、摩托车、产品和主管。前三个非常简单明了;汽车和摩托车是具体的类,它们实现了构建器接口。构建器用于创建产品对象的各个部分,其中产品表示正在构建的复杂对象。
因为汽车和摩托车是构建器接口的具体实现,所以它们需要实现在构建器接口中声明的方法。这就是为什么他们需要为 s tartUpOperations()、buildBody()、insertWheels()、addHeadlights()、endOperations()和getVehicle()方法提供身体。前五种方法很简单;它们用于在开始(或结束)时执行一个操作,构建车辆的车身,插入车轮,以及添加前灯。getVehicle()返回最终产品。在这种情况下,Director负责使用Builder接口构建这些产品的最终表示。(参见 GoF 定义的结构)。注意Director正在调用相同的construct()方法来创建不同类型的车辆。
现在浏览代码,看看不同的部分是如何为这个模式组装的。
类图
图 3-2 显示了构建器模式的类图。
图 3-2
类图
包资源管理器视图
图 3-3 显示了程序的高层结构。
图 3-3
包资源管理器视图
履行
下面是实现。
package jdp2e.builder.demo;

import java.util.LinkedList;

//The common interface
interface Builder
{
     void startUpOperations();
     void buildBody();
     void insertWheels();
     void addHeadlights();
     void  endOperations();
     /*The following method is used to retrieve the object that is constructed.*/
     Product getVehicle();
}
//Car class
class Car implements Builder
{
    private String brandName;
    private Product product;
    public Car(String brand)
    {
        product = new Product();
        this.brandName = brand;
    }
    public void startUpOperations()
    {
      //Starting with brand name
        product.add(String.format("Car model is :%s",this.brandName));
    }
    public void buildBody()
    {
        product.add("This is a body of a Car");
    }
    public void insertWheels()
    {
        product.add("4 wheels are added");
    }

    public void addHeadlights()
    {
        product.add("2 Headlights are added");
    }
    public void endOperations()
    {   //Nothing in this case
    }

    public Product getVehicle()
    {
        return product;
    }
}
//Motorcycle class

class MotorCycle implements Builder
{
    private String brandName;
    private Product product;
    public MotorCycle(String brand)
    {
        product = new Product();
        this.brandName = brand;
    }
    public void startUpOperations()
    {   //Nothing in this case
    }

    public  void buildBody()
    {
        product.add("This is a body of a Motorcycle");
    }

    public void insertWheels()
    {
        product.add("2 wheels are added");
    }

    public void addHeadlights()
    {
        product.add("1 Headlights are added");
    }
    public void endOperations()
    {
        //Finishing up with brand name
        product.add(String.format("Motorcycle model is :%s", this.brandName));
    }
    public Product getVehicle()
    {
        return product;
    }
}

// Product class

class Product
{
   /* You can use any data structure that you prefer.
       I have used LinkedList<String> in this case.*/
    private LinkedList<String> parts;
    public Product()
    {
        parts = new LinkedList<String>();
    }

    public void add(String part)
    {
       //Adding parts
        parts.addLast(part);
    }

    public void showProduct()
    {
      System.out.println("\nProduct completed as below :");
        for (String part: parts)
        System.out.println(part);
    }
}
// Director class

class Director
{
    Builder builder;
    // Director knows how to use the builder and the sequence of steps.
    public void construct(Builder builder)
    {
        this.builder = builder;
        builder.startUpOperations();
        builder.buildBody();
        builder.insertWheels();
        builder.addHeadlights();
        builder.endOperations();
    }
}
public class BuilderPatternExample {

      public static void main(String[] args) {
             System.out.println("***Builder Pattern Demo***");
        Director director = new Director();

        Builder fordCar = new Car("Ford");
        Builder hondaMotorycle = new MotorCycle("Honda");

        // Making Car
        director.construct(fordCar);
        Product p1 = fordCar.getVehicle();
        p1.showProduct();

        //Making MotorCycle
        director.construct(hondaMotorycle );
        Product p2 = hondaMotorycle.getVehicle();
        p2.showProduct();
      }
}
输出
这是输出。
***Builder Pattern Demo***

Product completed as below :

Car model is :Ford

This is a body of a Car
4 wheels are added
2 Headlights are added

Product completed as below :
This is a body of a Motorcycle
2 wheels are added
1 Headlights are added

Motorcycle model is :Honda
问答环节
-
使用构建器模式的 优势 是什么?
-
您可以一步一步地创建一个复杂的对象,并改变步骤。您通过隐藏复杂构造过程的细节来促进封装。整个施工结束后,主管可以从施工员那里取回最终产品。总的来说,在高层次上,你似乎只有一种方法来制造完整的产品。其他内部方法只涉及部分创建。因此,你可以更好地控制施工过程。
-
使用这种模式,相同的构建过程可以产生不同的产品。
-
因为你可以改变构造步骤,你可以改变产品的内部表现。
-
-
与构建者模式相关的 缺点/陷阱 有哪些?
-
如果你想处理易变的对象(可以在以后修改),它是不合适的。
-
您可能需要复制部分代码。这些重复可能会在某些上下文中产生重大影响,并变成反模式。
-
混凝土建筑商致力于特定类型的产品。所以,为了创造不同类型的产品,你可能需要不同的混凝土建筑商。
-
如果结构非常复杂,这种方法更有意义。
-
-
我可以用一个 抽象类 来代替这个模式的说明中的接口吗?
是的。在这个例子中,你可以使用一个抽象类来代替一个接口。
-
如何决定在应用程序中使用抽象类还是接口?
我相信,如果你想有一些集中或默认的行为,抽象类是一个更好的选择。在这些情况下,您可以提供一些默认的实现。另一方面,接口实现从零开始。它们在上指明了某种规则/契约,即要做什么(例如,你必须实现该方法),但它们不会强制执行如何的部分。此外,当您试图实现多重继承的概念时,最好使用接口。
但与此同时,如果你需要在一个接口中添加一个新的方法,那么你需要追踪这个接口的所有实现,并且你需要把这个方法的具体实现放在所有这些地方。你可以在一个抽象类中添加一个默认实现的新方法,现有的代码可以顺利运行。
Java 对这最后一点特别小心。Java 8 在接口中引入了‘default’关键字的使用。您可以在预期的方法签名前添加默认单词的前缀,并提供默认实现。默认情况下,接口方法是公共的,因此不需要用关键字 public 来标记它。
这些概括的建议来自位于
https://docs.oracle.com/javase/tutorial/java/IandI/abstract.html的 Oracle Java 文档。You should prefer the abstract class in the following scenarios:
-
您希望在多个密切相关的类之间共享代码。
-
扩展抽象类的类可以有许多公共方法或字段,或者它们需要内部的非公共访问修饰符。
-
您希望使用非静态或/和非最终字段,这使我们能够定义可以访问和修改它们所属对象的状态的方法。
On the other hand, you should prefer interfaces for these scenarios:
-
您期望几个不相关的类将实现您的接口(例如,类似的接口可以由许多不相关的类实现)。
-
您可以指定特定数据类型的行为,但实现者如何实现并不重要。
-
您希望在应用程序中使用多重继承的概念。
-
注意
在我的书Java 中的交互式面向对象编程 (Apress,2016)中,我讨论了抽象类、接口,以及使用“default”关键字的各种示例和输出。有关详细的讨论和分析,请参考该书。
-
我看到在汽车中,型号名称是加在开头的,但在摩托车中,型号名称是加在结尾的。是故意的吗?
是的。它被用来证明这样一个事实,即每一个混凝土建筑商可以决定如何生产他们想要的最终产品。他们有这种自由。
-
你为什么为导演单独上课?您可以使用客户端代码来扮演导演的角色。
没有人限制你这样做。在前面的实现中,我想在实现中将这个角色与客户端代码分开。但是在即将到来的/修改后的实现中,我将客户端用作了导演。
-
什么叫 客户代码 ?
包含
main()方法的类是客户端代码。在本书的大部分内容中,客户端代码的意思是一样的。 -
你几次提到不同的步骤。你能演示一个用不同的变化和步骤创建最终产品的实现吗?
接得好。您要求展示构建器模式的真正威力。那么,让我们考虑另一个例子。
修改后的插图
下面是修改后的实现的主要特征。
-
在这个修改后的实现中,我只考虑汽车作为最终产品。
-
我创建具有以下属性的定制汽车:启动消息(
startUpMessage)、流程完成消息(endOperationsMessage)、汽车的车身材料(bodyType)、汽车的车轮数量(noOfWheels)以及汽车的前灯数量(noOfHeadLights)。 -
在这个实现中,客户端代码扮演着导演的角色。
-
我已经将构建器接口重命名为 ModifiedBuilder。除了
constructCar()和getConstructedCar()方法,接口中的每个方法都有 ModifiedBuilder 返回类型,这有助于我们在客户端代码中应用方法链接机制。
已修改的包资源管理器视图
图 3-4 显示了修改后的包浏览器视图。
图 3-4
已修改的包资源管理器视图
修改的实现
下面是修改后的实现。
package jdp2e.builder.pattern;

//The common interface
interface ModifiedBuilder
{
       /*All these methods return type is ModifiedBuilder.
        * This will help us to apply method chaining*/
       ModifiedBuilder startUpOperations(String startUpMessage);
       ModifiedBuilder buildBody(String bodyType);
       ModifiedBuilder insertWheels(int noOfWheels);
       ModifiedBuilder addHeadlights(int noOfHeadLights);
       ModifiedBuilder endOperations(String endOperationsMessage);
       //Combine the parts and make the final product.
       ProductClass constructCar();
       //Optional method:To get the already constructed object
       ProductClass getConstructedCar();
}
//Car class
class CarBuilder implements ModifiedBuilder
{
       private String startUpMessage="Start building the product";//Default //start-up message
       private String  bodyType="Steel";//Default body
       private int noOfWheels=4;//Default number of wheels
       private int  noOfHeadLights=2;//Default number of head lights
       //Default finish up message private String  endOperationsMessage="Product creation completed";
       ProductClass product;
       @Override
       public ModifiedBuilder startUpOperations(String startUpMessage)
       {
             this.startUpMessage=startUpMessage;
             return this;
       }

       @Override
       public ModifiedBuilder buildBody(String bodyType)
       {
             this.bodyType=bodyType;
             return this;
       }

       @Override
       public ModifiedBuilder insertWheels(int noOfWheels)
       {
             this.noOfWheels=noOfWheels;
             return this;
       }

       @Override
       public ModifiedBuilder addHeadlights(int noOfHeadLights)
       {
             this.noOfHeadLights=noOfHeadLights;
             return this;
       }
       @Override
       public ModifiedBuilder endOperations(String endOperationsMessage)
       {       this.endOperationsMessage=endOperationsMessage;
       return this;
       }

       @Override
       public ProductClass constructCar() {

             product= new ProductClass(this.startUpMessage,this.bodyType,this.noOfWheels,this.noOfHeadLights,this.endOperationsMessage);
             return product;
       }

       @Override
       public ProductClass   getConstructedCar()
 {
       return product;
 }
}

//Product class
final class ProductClass
{
       private String startUpMessage;
       private String  bodyType;
       private int noOfWheels;
       private int  noOfHeadLights;
       private String  endOperationsMessage;
       public ProductClass(final String startUpMessage, String bodyType, int noOfWheels, int noOfHeadLights,
                   String endOperationsMessage) {
             this.startUpMessage = startUpMessage;
             this.bodyType = bodyType;
             this.noOfWheels = noOfWheels;
             this.noOfHeadLights = noOfHeadLights;
             this.endOperationsMessage = endOperationsMessage;
       }
       /*There is no setter methods used here to promote immutability.
       Since the attributes are private and there is no setter methods, the keyword "final" is not needed to attach with the attributes.
        */
       @Override
       public String toString() {
             return "Product Completed as:\n startUpMessage=" + startUpMessage + "\n bodyType=" + bodyType + "\n noOfWheels="
                          + noOfWheels + "\n noOfHeadLights=" + noOfHeadLights + "\n endOperationsMessage=" + endOperationsMessage
                          ;
       }

}
//Director class
public class BuilderPatternModifiedExample {

       public static void main(String[] args) {
             System.out.println("***Modified Builder Pattern Demo***");
             /*Making a custom car (through builder)
               Note the steps:
               Step1:Get a builder object with required parameters
               Step2:Setter like methods are used.They will set the optional fields also.
               Step3:Invoke the constructCar() method to get the final car.
              */
             final ProductClass customCar1 = new CarBuilder().addHeadlights(5)
                          .insertWheels(5)
                          .buildBody("Plastic")
                          .constructCar();
             System.out.println(customCar1);
             System.out.println("--------------");
             /* Making another custom car (through builder) with a different
              * sequence and steps.
              */
             ModifiedBuilder carBuilder2=new CarBuilder();
             final ProductClass customCar2 = carBuilder2.insertWheels(7)
                          .addHeadlights(6)
                          .startUpOperations("I am making my own car")
                          .constructCar();
             System.out.println(customCar2);
             System.out.println("--------------");

             //Verifying the getConstructedCar() method
             final ProductClass customCar3=carBuilder2.getConstructedCar();
             System.out.println(customCar3);

       }
}
修改输出
这是修改后的输出。(有些行是加粗的,以引起您注意输出中的差异)。
***Modified Builder Pattern Demo***
Product Completed as:
 startUpMessage=Start building the product
 bodyType=Plastic
 noOfWheels=5
 noOfHeadLights=5
 endOperationsMessage=Product creation completed
--------------
Product Completed as:
 startUpMessage=I am making my own car
 bodyType=Steel
 noOfWheels=7
 noOfHeadLights=6
 endOperationsMessage=Product creation completed
--------------
Product Completed as:
 startUpMessage=I am making my own car
 bodyType=Steel
 noOfWheels=7
 noOfHeadLights=6
 endOperationsMessage=Product creation completed
分析
请注意客户端代码中创建定制汽车的以下代码行(来自前面的实现)。
System.out.println("***Modified Builder Pattern Demo***");
             /*Making a custom car (through builder)
               Note the steps:
               Step1:Get a builder object with required parameters
               Step2:Setter like methods are used.They will set the optional fields also.
               Step3:Invoke the constructCar() method to get the final car.
              */
             final ProductClass customCar1 = new CarBuilder().addHeadlights(5)
                    .insertWheels(5)
                    .buildBody("Plastic")
                    .constructCar();
             System.out.println(customCar1);
       System.out.println("--------------");
             /* Making another custom car (through builder) with a different
              * sequence and steps.
              */
             ModifiedBuilder carBuilder2=new CarBuilder();
             final ProductClass customCar2 = carBuilder2.insertWheels(7)
              .addHeadlights(6)
              .startUpOperations("I am making my own car")
              .constructCar();
       System.out.println(customCar2);
通过在对“build”方法的调用之间改变生成器属性,您正在使用生成器创建多个对象;例如,在第一种情况下,您通过一个 builder 对象一个接一个地调用addHeadLights()、insertWheels()、buildBody()方法,然后您得到最终的汽车(customCar1)。但是在第二种情况下,当您创建另一个汽车对象(customCar2)时,您以不同的顺序调用这些方法。当您不调用任何方法时,会为您提供默认实现。
-
我在客户代码中看到了 final 关键字的使用。但是你还没有使用那些用于 的产品类属性 。这是什么原因呢?
在客户端代码中,我使用了 final 关键字来提高不变性。但是在 ProductClass 类中,属性已经用私有关键字标记了,并且没有 setter 方法,所以这些已经是不可变的。
-
不可变对象的主要好处是什么?
一旦构造好,就可以安全地共享它们,最重要的是,它们是线程安全的,因此在多线程环境中可以节省很多同步成本。
-
什么时候应该考虑使用构建器模式?
如果您需要制作一个复杂的对象,它涉及到构建过程中的各个步骤,同时,产品需要是不可变的,那么 builder 模式是一个不错的选择。
四、工厂方法模式
本章涵盖了工厂方法模式。
GoF 定义
定义一个创建对象的接口,但是让子类决定实例化哪个类。工厂方法让一个类将实例化推迟到子类。
要记住的要点
要理解这种模式,我建议你去第二十四章,其中涵盖了简单工厂模式。简单工厂模式并不直接属于四人组设计模式,所以我将该模式的讨论放在本书的第二部分。如果从简单的工厂模式开始,工厂方法模式会更有意义。
概念
在这里,您从定义应用程序基本结构的抽象 creator 类(creator)开始开发。从这个抽象类派生的子类执行实际的实例化过程。当你开始用下面的例子思考这个模式时,这个概念对你来说就有意义了。
真实世界的例子
考虑一家汽车制造公司,该公司生产不同型号的汽车,业务运营良好。基于汽车的模型,不同的零件被制造和组装。
在不久的将来,客户可以选择更好的型号,公司应该为这种变化做好准备。如果公司需要为一个新型号做一个全新的设置,只需要几个新功能,这可能会极大地影响其利润率。因此,该公司应该以这样一种方式建立工厂,使其能够为即将到来的车型生产零件。
计算机世界的例子
假设您正在构建一个需要支持两个不同数据库的应用程序,比如 Oracle 和 SQL Server。因此,无论何时向数据库中插入数据,都要创建特定于 SQL Server 的连接(SqlServerConnection )或特定于 Oracle server 的连接(OracleConnection )),然后才能继续。如果你把这些代码放到if-else(或 switch)语句中,你可能需要重复很多代码。这种代码不容易维护,因为每当需要支持新类型的连接时,都需要重新打开代码并进行修改。工厂方法模式专注于解决应用程序开发中的类似问题。
注由于简单工厂模式是工厂方法模式的最简单形式,所以您可以考虑这里的相同示例。因此,java.text.NumberFormat 类的静态 getInstance()方法就是这种类型的一个例子。Java . net . urlstreamhandlerfactory 接口的 createURLStreamHandler(字符串协议)是此类别中的另一个示例。您可以将 ftp、http 等作为不同的协议进行传递,该方法将返回特定协议的 URLStreamHandler。
说明
我继续讨论第二十四章中提到的简单工厂模式。所以,我会努力改进实现。为了简单起见,我将这个实现中的所有类放在一个文件中。因此,您不需要为单独的类创建任何单独的文件夹。我建议你参考相关评论,以便更好地理解。
类图
图 4-1 显示了工厂方法模式的类图。
图 4-1
类图
包资源管理器视图
图 4-2 显示了程序的高层结构。
图 4-2
包资源管理器视图
履行
下面是实现。
package jdp2e.factorymethod.demo;
interface Animal
{
       void speak();
       void preferredAction();
}
class Dog implements Animal
{
       public void speak()
       {
              System.out.println("Dog says: Bow-Wow.");
       }
       public void preferredAction()
       {
              System.out.println("Dogs prefer barking...\n");
       }
}
class Tiger implements Animal
{
       public void speak()
       {
              System.out.println("Tiger says: Halum.");
       }
       public void preferredAction()
       {
              System.out.println("Tigers prefer hunting...\n");
       }
}

abstract class AnimalFactory
{
/*Remember that the GoF definition says "....Factory method lets a class defer instantiation to subclasses."
In our case, the following method will create a Tiger or Dog but at this point it does not know whether it will get a Dog or a Tiger. This decision will be taken by the subclasses i.e. DogFactory or TigerFactory. So,in this implementation, the following method is playing the role of a factory (of creation)*/
       public abstract Animal createAnimal();
}
class DogFactory extends AnimalFactory
{
       public Animal createAnimal()
       {
              //Creating a Dog
              return new Dog();
       }
}
class TigerFactory extends AnimalFactory
{
       public Animal createAnimal()
       {
              //Creating a Tiger
              return new Tiger();
       }
}

class FactoryMethodPatternExample {
       public static void main(String[] args) {
              System.out.println("***Factory Pattern Demo***\n");
              // Creating a Tiger Factory
              AnimalFactory tigerFactory =new TigerFactory();
              // Creating a tiger using the Factory Method
              Animal aTiger = tigerFactory.createAnimal();
              aTiger.speak();
              aTiger.preferredAction();

              // Creating a DogFactory
              AnimalFactory dogFactory = new DogFactory();
              // Creating a dog using the Factory Method
              Animal aDog = dogFactory.createAnimal();
              aDog.speak();
              aDog.preferredAction();
       }
}
输出
这是输出。
***Factory Pattern Demo***

Tiger says: Halum.
Tigers prefer hunting...

Dog says: Bow-Wow.
Dogs prefer barking...
修改的实现
在这个实现中,AnimalFactory 类是一个抽象类。因此,让我们利用使用抽象类的优势。假设您希望一个子类遵循一个可以从其父类(或基类)强加的规则。所以,我在下面的设计中测试这样一个场景。
以下是该设计的主要特征。
-
只有 AnimalFactory 被修改如下(即,我引入了一个新的
makeAnimal()方法)。 -
客户端代码适应了这些变化:
//Modifying the AnimalFactory class.
abstract class AnimalFactory
{
    public Animal makeAnimal()
    {
      System.out.println("I am inside makeAnimal() of AnimalFactory.You cannot ignore my rules.");
        /*
        At this point, it doesn't know whether it will get a Dog or a Tiger. It will be decided by the subclasses i.e.DogFactory or TigerFactory.But it knows that it will Speak and it will have a preferred way of Action.
        */
        Animal animal = createAnimal();
        animal.speak();
        animal.preferredAction();
        return animal;
    }

/*Remember that the GoF definition says "....Factory method lets a class defer instantiation to subclasses."
In our case, the following method will create a Tiger or Dog but at this point it does not know whether it will get a Dog or a Tiger.
This decision will be taken by the subclasses i.e. DogFactory or TigerFactory. So,in this implementation, the following method is playing the role of a factory (of creation)*/
     public abstract Animal createAnimal();
}
class ModifiedFactoryMethodPatternExample {
       public static void main(String[] args) {
              System.out.println("***Modified Factory Pattern Demo***\n");
              // Creating a Tiger Factory
              AnimalFactory tigerFactory =new TigerFactory();
              // Creating a tiger using the Factory Method
              Animal aTiger = tigerFactory.makeAnimal();
              //aTiger.speak();
              //aTiger.preferredAction();

              // Creating a DogFactory
              AnimalFactory dogFactory = new DogFactory();
              // Creating a dog using the Factory Method
              Animal aDog = dogFactory.makeAnimal();
              //aDog.speak();
              //aDog.preferredAction();

       }
}
修改输出
这是修改后的输出。
***Modified Factory Pattern Demo***

I am inside makeAnimal() of AnimalFactory.You cannot ignore my rules.

Tiger says: Halum.
Tigers prefer hunting...

I am inside makeAnimal() of AnimalFactory.You cannot ignore my rules.

Dog says: Bow-Wow.
Dogs prefer barking...
分析
在每种情况下,您都会看到消息(或警告):“您不能忽略我的规则”
问答环节
图 4-3
我们例子中的两个类层次结构
-
为什么将 CreateAnimal()方法 从客户端代码中分离出来?
这是我的真实意图。我希望子类创建专门化的对象。如果你仔细观察,你会发现只有这个“创造性的部分”在不同的产品中是不同的。我将在简单工厂模式的问答环节中详细讨论这一点(参见第二十四章)。
-
使用这样的工厂有什么好处?
-
您将会变化的代码与不会变化的代码分离开来(也就是说,使用简单工厂模式的优势仍然存在)。这种技术有助于您轻松维护代码。
-
您的代码不是紧密耦合的;因此,您可以随时在系统中添加新的类,如 Lion、Beer 等,而无需修改现有的体系结构。所以,你遵循了“修改时封闭,扩展时开放”的原则。
-
-
使用这样的工厂有哪些挑战?
如果您需要处理大量的类,那么您可能会遇到维护开销。
-
我发现工厂模式支持两个并行的层次结构。这是正确的吗?
接得好。是的,从类图(见图 4-3 )可以明显看出,这种模式支持并行的类层次结构。
因此,在本例中,AnimalFactory、DogFactory 和 TigerFactory 位于一个层次结构中,而 Animal、Dog 和 Tiger 位于另一个层次结构中。因此,创作者和他们的创作/产品是平行运行的两个层次。
-
我应该总是用抽象关键字来标记工厂方法,这样子类就可以完成它们。这是正确的吗?
不。如果创建者没有子类,您可能会对默认的工厂方法感兴趣。在这种情况下,不能用 abstract 关键字标记工厂方法。
为了展示工厂方法模式的真正威力,您可能需要遵循类似的设计,这里实现了类似的设计。
-
在我看来,工厂方法模式和简单工厂没有太大区别。这是正确的吗?
如果你看看这两章的例子中的子类,你可能会发现一些相似之处。但是你不应该忘记工厂方法模式的关键目标是它提供了一个框架,通过这个框架不同的子类可以生产不同的产品。但是在一个简单的工厂中,您不能像使用工厂方法模式那样改变产品。把简单工厂想象成一次性交易但是最重要的是,你的创造部分不会因为修改而关闭。每当你想添加一个新东西时,你需要在你的简单工厂模式的工厂类中添加一个
if/else块或者一个 switch 语句。在这种情况下,记住 GoF 的定义:工厂方法让一个类将实例化推迟到子类。因此,在我们简单的工厂模式演示中,您只使用了一个具体的类(
SimpleFactory))。您不需要覆盖createAnimal()方法,并且没有子类参与最终的决策/产品制作过程。但是如果你试图编码到一个抽象类(或者接口),这总是被认为是一个好的实践,并且这个机制提供了你在抽象类中放置一些常见行为的灵活性。
*### 注意
在简单工厂模式中,您只需将实例化逻辑从客户端代码中分离出来。在这种情况下,它知道它可以创建其对象的所有类。另一方面,当使用工厂方法模式时,您将对象创建委托给子类。还有,工厂方法事先对产品子类没有绝对的把握。
-
在工厂方法模式中,我可以简单地使用一种子类化机制(即使用继承),然后实现工厂方法(在父类中定义)。这是正确的吗?
如果您想严格遵循 GoF 定义,这个问题的答案是肯定的。但重要的是要注意,在许多应用程序/实现中,没有使用抽象类或接口;例如,在 Java 中,XML reader 对象是这样使用的:
//Some code before…
XMLReader xmlReader1 = XMLReaderFactory.createXMLReader();
//Some code after
XMLReaderFactory 是 Java 中的最终类。所以,你不能继承它。
但是当您使用 SAXParserFactory 时,如下所示,您使用的是一个抽象类 SAXParserFactory。
//some code before….
SAXParserFactory factory = SAXParserFactory.newInstance();
SAXParser parser = factory.newSAXParser();
XMLReader xmlReader2 = parser.getXMLReader();
//Some code after
```*
# 五、抽象工厂模式
本章涵盖了抽象工厂模式。
## GoF 定义
提供一个接口,用于创建相关或依赖对象的系列,而无需指定它们的具体类*。*
### 注意
为了更好地理解这种模式,我建议您从第二十四章(简单工厂模式)开始,然后学习第四章(工厂方法模式)。简单工厂模式并不直接属于四人组设计模式,所以关于该模式的讨论放在本书的第二部分。
## 概念
这基本上是一个工厂的工厂,提供了比工厂方法模式更高的抽象层次。这种模式帮助我们交换特定的实现,而不改变使用它们的代码,甚至在运行时。
这种模式提供了一种封装一组具有共同主题的单个工厂的方法。这里,类不直接创建对象;相反,它将任务委托给工厂对象。
简单工厂方法模式创建一组相关的对象。类似地,由于抽象工厂基本上是工厂的工厂,它返回创建一组相关对象的工厂。(我将在“问答”部分详细讨论这些差异。)
## 真实世界的例子
假设我们用两张不同的桌子装饰房间:一张是木制的,一张是钢制的。对于木桌,我们需要去找木匠,对于另一张桌子,我们需要去五金商店。两者都是桌子工厂,所以基于我们的需求,我们决定我们需要什么样的工厂。
在这种背景下,你可能会考虑两家不同的汽车制造公司:本田和福特。本田制造诸如 CR-V、Jazz、布里奥等车型。福特生产不同的车型,如野马、菲戈、Aspire 等等。所以,如果你想买一辆 Jazz,你必须去本田展厅,但是如果你喜欢 Figo,你就去福特展厅。
## 计算机世界的例子
为了理解这个模式,我将扩展工厂方法模式中的需求。在工厂方法模式中,我们有两个工厂:一个创建狗,另一个创建老虎。但是现在,你想把狗和老虎进一步分类。你可以通过这些工厂选择家养动物(狗或老虎)或野生动物(狗或老虎)。为了满足这个需求,我引进了两个混凝土工厂:野生动物工厂和动物工厂。野生动物工厂负责创造野生动物,动物工厂负责创造家养动物或宠物。
### 注意
javax . XML . parsers . documentbuilderfactory 的 newInstance()方法是 JDK 中抽象工厂模式的一个例子。javax . XML . transform . transformer factory 的 newInstance()方法是这种情况下的另一个例子。如果你熟悉 C#,你可能会注意到 ADO.NET 已经实现了类似的概念来建立到数据库的连接。
## 说明
维基百科描述了抽象工厂模式的典型结构( [`https://en.wikipedia.org/wiki/Abstract_factory_pattern`](https://en.wikipedia.org/wiki/Abstract_factory_pattern) ),类似于图 5-1 所示。
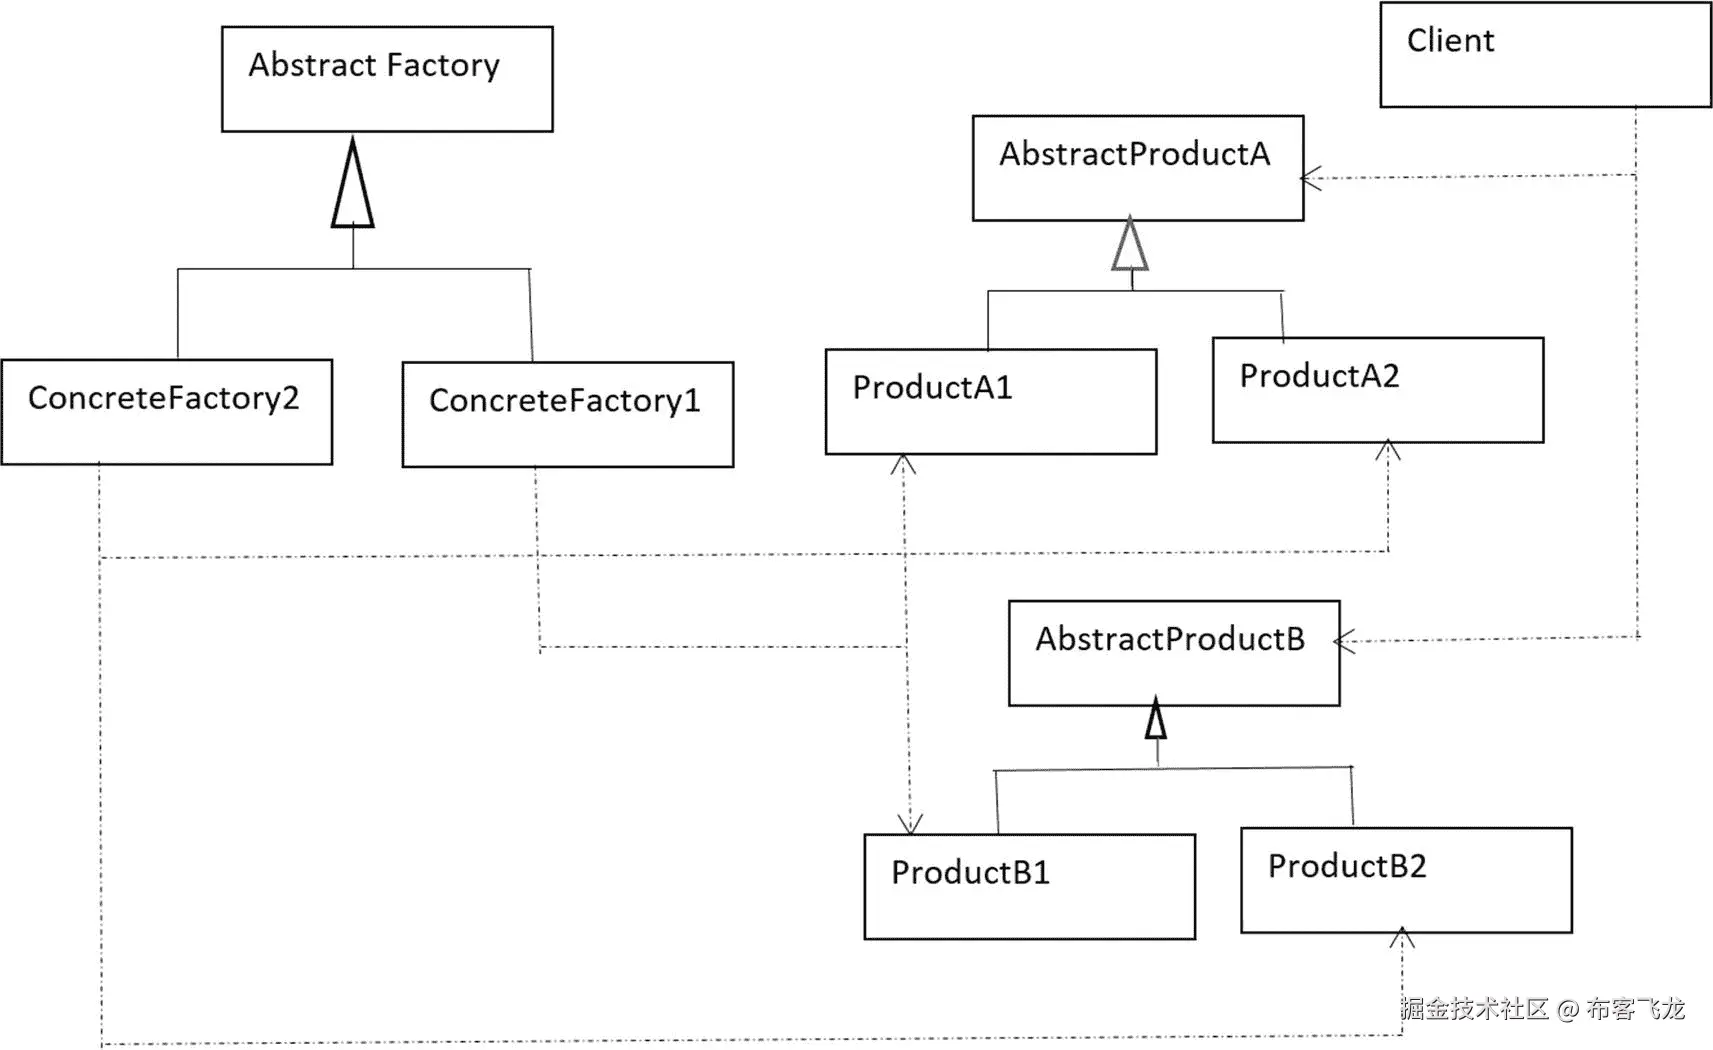
图 5-1
抽象工厂模式的典型例子
在我们的实现中,我将遵循类似的结构。因此,在下面的实现中,我使用了两个具体的工厂:WildAnimalFactory 和 PetAnimalFactory。他们负责创造具体的产品,狗和老虎。WildAnimalFactory 制造野生动物(野狗和野生老虎),PetAnimalFactory 制造家养宠物(宠物狗和宠物老虎)。为了便于参考,参与者及其角色总结如下。
* *AnimalFactory* :在下面的实现中被当作抽象工厂的接口。
* *WildAnimalFactory* :实现 AnimalFactory 接口的具体工厂。它创造了野狗和野生老虎。
* *PetAnimalFactory* :另一个实现 AnimalFactory 接口的具体工厂。它创造了宠物狗和宠物老虎。
* *老虎*和*狗*:两个接口,在本例中被视为抽象产品。
* *派蒂格*、*派蒂格*、*野虎*、*野狗*:以下实现中的具体产品。
这里客户端代码寻找动物(狗和老虎)。当我们使用抽象工厂的具体实例来构造类时,可以看到这种模式的一种常见用法。我也一样。注意,client 类包含 AnimalFactory 的组合实现。您可以在下面的实现中探索宠物和野生动物的构造过程。
### 类图
图 5-2 显示了类图。
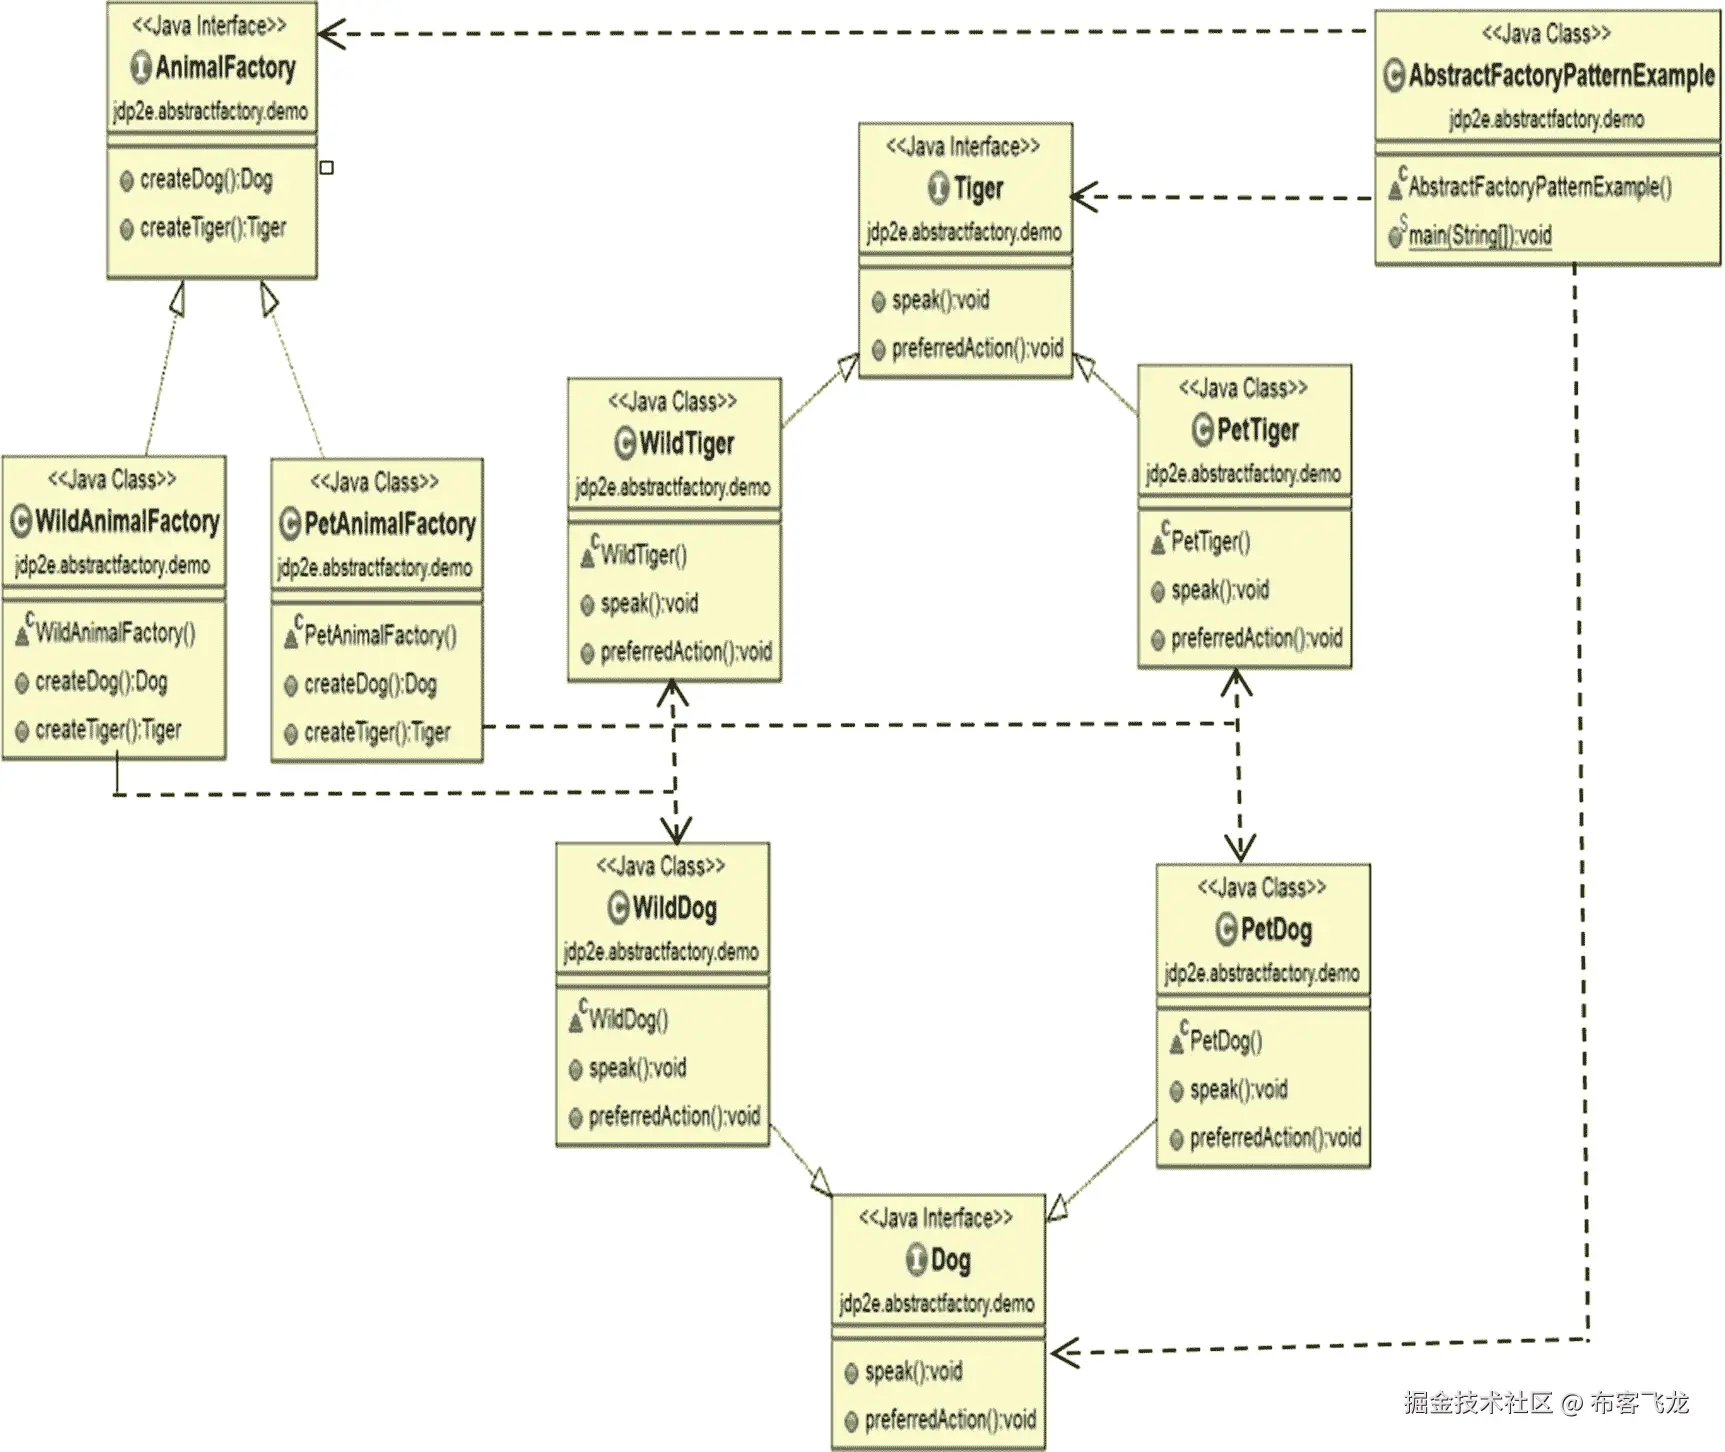
图 5-2
类图
### 包资源管理器视图
图 5-3 显示了程序的高层结构。

图 5-3
包资源管理器视图
### 履行
下面是实现。
```java
package jdp2e.abstractfactory.demo;
interface Dog
{
void speak();
void preferredAction();
}
interface Tiger
{
void speak();
void preferredAction();
}
//Types of Dogs-wild dogs and pet dogs
class WildDog implements Dog
{
@Override
public void speak()
{
System.out.println("Wild Dog says loudly: Bow-Wow.");
}
@Override
public void preferredAction()
{
System.out.println("Wild Dogs prefer to roam freely in jungles.\n");
}
}
class PetDog implements Dog
{
@Override
public void speak()
{
System.out.println("Pet Dog says softly: Bow-Wow.");
}
@Override
public void preferredAction()
{
System.out.println("Pet Dogs prefer to stay at home.\n");
}
}
//Types of Tigers-wild tigers and pet tigers
class WildTiger implements Tiger
{
@Override
public void speak()
{
System.out.println("Wild Tiger says loudly: Halum.");
}
@Override
public void preferredAction()
{
System.out.println("Wild Tigers prefer hunting in jungles.\n");
}
}
class PetTiger implements Tiger
{
@Override
public void speak()
{
System.out.println("Pet Tiger says softly: Halum.");
}
@Override
public void preferredAction()
{
System.out.println("Pet Tigers play in the animal circus.\n");
}
}
//Abstract Factory
interface AnimalFactory
{
Dog createDog();
Tiger createTiger();
}
//Concrete Factory-Wild Animal Factory
class WildAnimalFactory implements AnimalFactory
{
@Override
public Dog createDog()
{
return new WildDog();
}
@Override
public Tiger createTiger()
{
return new WildTiger();
}
}
//Concrete Factory-Pet Animal Factory
class PetAnimalFactory implements AnimalFactory
{
@Override
public Dog createDog()
{
return new PetDog();
}
@Override
public Tiger createTiger()
{
return new PetTiger();
}
}
//Client
class AbstractFactoryPatternExample {
public static void main(String[] args) {
AnimalFactory myAnimalFactory;
Dog myDog;
Tiger myTiger;
System.out.println("***Abstract Factory Pattern Demo***\n");
//Making a wild dog through WildAnimalFactory
myAnimalFactory = new WildAnimalFactory();
myDog = myAnimalFactory.createDog();
myDog.speak();
myDog.preferredAction();
//Making a wild tiger through WildAnimalFactory
myTiger = myAnimalFactory.createTiger();
myTiger.speak();
myTiger.preferredAction();
System.out.println("******************");
//Making a pet dog through PetAnimalFactory
myAnimalFactory = new PetAnimalFactory();
myDog = myAnimalFactory.createDog();
myDog.speak();
myDog.preferredAction();
//Making a pet tiger through PetAnimalFactory
myTiger = myAnimalFactory.createTiger();
myTiger.speak();
myTiger.preferredAction();
}
}
输出
这是输出。
***Abstract Factory Pattern Demo***

Wild Dog says loudly: Bow-Wow.
Wild Dogs prefer to roam freely in jungles.

Wild Tiger says loudly: Halum.
Wild Tigers prefer hunting in jungles.

******************
Pet Dog says softly: Bow-Wow.
Pet Dogs prefer to stay at home.

Pet Tiger says softly: Halum.
Pet Tigers play in the animal circus.
问答环节
-
我看到狗和老虎的接口都包含同名的方法(两个接口都包含 speak()和****preferredation()方法 )。它是强制性的吗?
不,你可以为你的方法使用不同的名字。此外,这些接口中方法的数量可以不同。但是我在本书中介绍了一个简单的工厂模式和工厂方法模式。你可能对它们之间的相似或不同之处感兴趣。所以,我从一个例子开始,不断修改。这就是为什么我在这个例子中保留了 s
peak()和 preferredAction()方法。注意这些方法在简单工厂模式(参见第二十四章)和工厂方法模式(参见第四章)中都有使用。 -
使用这样的抽象工厂有什么挑战?
-
抽象工厂的任何变化都迫使我们传播对具体工厂的修改。如果你遵循的设计理念是将编程为接口,而不是实现,你需要为此做好准备。这是开发人员始终牢记的关键原则之一。在大多数情况下,开发人员不想改变他们的抽象工厂。
-
整体架构可能看起来很复杂。此外,在某些情况下,调试变得很棘手。
-
-
如何区分简单工厂模式和工厂方法模式或抽象工厂模式?
我在第四章的“问答”部分讨论了简单工厂模式和工厂方法模式的区别。
让我们用下面的图表来修改所有三个工厂。
简单工厂模式代码片段
下面是代码片段。
Animal preferredType=null;
SimpleFactory simpleFactory = new SimpleFactory();
// The code that will vary based on users preference.
preferredType = simpleFactory.createAnimal();
图 5-4 显示了如何在简单工厂模式中获取动物对象。
图 5-4
简单工厂模式
工厂方法模式代码片段
下面是代码片段。
// Creating a Tiger Factory
AnimalFactory tigerFactory =new TigerFactory();
// Creating a tiger using the Factory Method
Animal aTiger = tigerFactory.createAnimal();

//...Some code in between...

// Creating a DogFactory
AnimalFactory dogFactory = new DogFactory();
// Creating a dog using the Factory Method
Animal aDog = dogFactory.createAnimal();
图 5-5 显示了如何在工厂方法模式中获取动物对象。
图 5-5
工厂方法模式
抽象工厂模式代码片段
下面是代码片段。
AnimalFactory myAnimalFactory;
Dog myDog;
Tiger myTiger;
System.out.println("***Abstract Factory Pattern Demo***\n");
//Making a wild dog through WildAnimalFactory
myAnimalFactory = new WildAnimalFactory();
myDog = myAnimalFactory.createDog();
//Making a wild tiger through WildAnimalFactory
myTiger = myAnimalFactory.createTiger();

//Making a pet dog through PetAnimalFactory
myAnimalFactory = new PetAnimalFactory();
myDog = myAnimalFactory.createDog();
//Making a pet tiger through PetAnimalFactory
myTiger = myAnimalFactory.createTiger();
myTiger.speak();
myTiger.preferredAction();
图 5-6 展示了如何在抽象工厂方法模式中获取动物对象。
图 5-6
抽象工厂方法模式
结论
使用简单工厂,您可以将不同于其他代码的代码分离出来(基本上,您可以将客户端代码解耦)。这种方法有助于您轻松管理代码。这种方法的另一个主要优点是客户端不知道对象是如何创建的。因此,它同时促进了安全性和抽象性。但是会违反开闭原则。
您可以使用工厂方法模式来克服这个缺点,该模式允许子类决定如何完成实例化过程。换句话说,您将对象创建委托给实现工厂方法来创建对象的子类。
抽象工厂基本上是工厂的工厂。它创建相关对象的系列,但是它不依赖于具体的类。
我试图保持彼此接近的简单例子。工厂方法促进继承;它们的子类需要实现工厂方法来创建对象。抽象工厂模式促进了对象组合,在这种模式下,您可以使用抽象工厂的具体实例来组合类。
这些工厂都通过减少对具体类的依赖来促进松散耦合。
-
在所有这些工厂例子中,你都避免使用参数化的构造函数。这是故意的吗?
在许多应用程序中,您会看到参数化构造函数的使用;许多专家更喜欢这种方法。但是我的重点纯粹是在设计上,所以,我忽略了参数化构造函数的使用。但是如果您是参数化构造函数的爱好者,让我们稍微修改一下实现,以便您可以对其余部分做同样的事情。
修改后的插图
假设您希望您的工厂用指定的颜色初始化 tigers,客户端可以选择这些颜色。
让我们修改以下几段代码(更改以粗体显示)。
修改的实现
下面是修改后的实现。
package jdp2e.abstractfactory.questions_answers;

interface Dog
{
      void speak();
      void preferredAction();
}

interface Tiger
{
      void speak();
      void preferredAction();
}

//Types of Dogs-wild dogs and pet dogs
class WildDog implements Dog
{
      @Override
      public void speak()
      {
            System.out.println("Wild Dog says loudly: Bow-Wow.");

      }
      @Override
      public void preferredAction()
      {
            System.out.println("Wild Dogs prefer to roam freely in jungles.\n");

      }
}
class PetDog implements Dog
{
      @Override
      public void speak()
      {
            System.out.println("Pet Dog says softly: Bow-Wow.");
      }
      @Override
      public void preferredAction()
      {
            System.out.println("Pet Dogs prefer to stay at home.\n");

      }
}
//Types of Tigers-wild tigers and pet tigers
class WildTiger implements Tiger
{
      public WildTiger(String color)
      {
            System.out.println("A wild tiger with "+ color+ " is created.");
      }
      @Override
      public void speak()
      {
            System.out.println("Wild Tiger says loudly: Halum.");

      }
      @Override
      public void preferredAction()
      {
            System.out.println("Wild Tigers prefer hunting in jungles.\n");

      }
}
class PetTiger implements Tiger
{
      public PetTiger(String color)
      {
            System.out.println("A pet tiger with "+ color+ " is created.");
      }
      @Override
      public void speak()
      {
            System.out.println("Pet Tiger says softly: Halum.");

      }
      @Override
      public void preferredAction()
      {
            System.out.println("Pet Tigers play in the animal circus.\n");
      }
}

//Abstract Factory
interface AnimalFactory
{
      Dog createDog();
      Tiger createTiger(String color);
}
//Concrete Factory-Wild Animal Factory
class WildAnimalFactory implements AnimalFactory
{
      @Override
      public Dog createDog()
      {
            return new WildDog();
      }
      @Override
      public Tiger createTiger(String color)
      {
            return new WildTiger(color);
      }

}
//Concrete Factory-Pet Animal Factory
class PetAnimalFactory implements AnimalFactory
{
      @Override
      public Dog createDog()
      {
            return new PetDog();
      }
      @Override
      public Tiger createTiger(String color)
      {
            return new PetTiger(color);
      }
}
//Client

class AbstractFactoryPatternModifiedExample {
          public static void main(String[] args) {
            AnimalFactory myAnimalFactory;
            Dog myDog;
            Tiger myTiger;
            System.out.println("***Abstract Factory Pattern Demo***\n");
            //Making a wild dog through WildAnimalFactory
            myAnimalFactory = new WildAnimalFactory();
            myDog = myAnimalFactory.createDog();
            myDog.speak();
            myDog.preferredAction();
            //Making a wild tiger through WildAnimalFactory
            //myTiger = myAnimalFactory.createTiger();
            myTiger = myAnimalFactory.createTiger("white and black stripes");
            myTiger.speak();
            myTiger.preferredAction();

            System.out.println("******************");

            //Making a pet dog through PetAnimalFactory
            myAnimalFactory = new PetAnimalFactory();
            myDog = myAnimalFactory.createDog();
            myDog.speak();
            myDog.preferredAction();
            //Making a pet tiger through PetAnimalFactory
            myTiger = myAnimalFactory.createTiger("golden and cinnamon stripes");
            myTiger.speak();
            myTiger.preferredAction();

      }

}
修改输出
这是修改后的输出。
***Abstract Factory Pattern Demo***

Wild Dog says loudly: Bow-Wow.
Wild Dogs prefer to roam freely in jungles.

A wild tiger with white and black stripes is created.

Wild Tiger says loudly: Halum.
Wild Tigers prefer hunting in jungles.

******************
Pet Dog says softly: Bow-Wow.
Pet Dogs prefer to stay at home.

A pet tiger with golden and cinnamon stripes is created.

Pet Tiger says softly: Halum.
Pet Tigers play in the animal circus.
