

NodeJS Web 开发第五版(二)
原文:
zh.annas-archive.org/md5/E4F616CD5ADA487AF57868CB589CA6CA译者:飞龙
HTTP 服务器和客户端
现在你已经了解了 Node.js 模块,是时候将这些知识应用到构建一个简单的 Node.js web 应用程序中了。本书的目标是学习使用 Node.js 进行 web 应用程序开发。在这个过程中的下一步是对HTTPServer和HTTPClient对象有一个基本的了解。为了做到这一点,我们将创建一个简单的应用程序,使我们能够探索 Node.js 中一个流行的应用程序框架——Express。在后面的章节中,我们将在应用程序上做更复杂的工作,但在我们能够行走之前,我们必须学会爬行。
本章的目标是开始了解如何在 Node.js 平台上创建应用程序。我们将创建一些小型的应用程序,这意味着我们将编写代码并讨论它的作用。除了学习一些具体的技术之外,我们还希望熟悉初始化工作目录、创建应用程序的 Node.js 代码、安装应用程序所需的依赖项以及运行/测试应用程序的过程。
Node.js 运行时包括诸如EventEmitter、HTTPServer和HTTPClient等对象,它们为我们构建应用程序提供了基础。即使我们很少直接使用这些对象,了解它们的工作原理也是有用的,在本章中,我们将涵盖使用这些特定对象的一些练习。
我们将首先直接使用HTTPServer对象构建一个简单的应用程序。然后,我们将使用 Express 来创建一个计算斐波那契数的应用程序。因为这可能是计算密集型的,我们将利用这一点来探讨为什么在 Node.js 中不阻塞事件队列是重要的,以及对这样做的应用程序会发生什么。这将给我们一个借口来开发一个简单的后台 REST 服务器,一个用于在服务器上发出请求的 HTTP 客户端,以及一个多层 web 应用程序的实现。
在今天的世界中,微服务应用架构实现了后台 REST 服务器,这就是我们在本章中要做的事情。
在本章中,我们将涵盖以下主题:
-
使用
EventEmitter模式发送和接收事件 -
通过构建一个简单的应用程序来理解 HTTP 服务器应用程序
-
Web 应用程序框架
-
使用 Express 框架构建一个简单的应用程序
-
在 Express 应用程序中处理计算密集型计算和 Node.js 事件循环。
-
发出 HTTP 客户端请求
-
使用 Express 创建一个简单的 REST 服务
通过学习这些主题,你将了解设计基于 HTTP 的 web 服务的几个方面。目标是让你了解如何创建或消费一个 HTTP 服务,并对 Express 框架有一个介绍。在本章结束时,你将对这两个工具有一个基本的了解。
这是很多内容,但这将为本书的其余部分奠定一个良好的基础。
第六章:使用 EventEmitter 发送和接收事件
EventEmitter是 Node.js 的核心习语之一。如果 Node.js 的核心思想是事件驱动的架构,那么从对象中发出事件是该架构的主要机制之一。EventEmitter是一个在其生命周期的不同阶段提供通知(事件)的对象。例如,一个HTTPServer对象会发出与服务器对象的启动/关闭以及处理来自 HTTP 客户端的 HTTP 请求的每个阶段相关的事件。
许多核心的 Node.js 模块都是EventEmitter对象,而EventEmitter对象是实现异步编程的一个很好的基础。EventEmitter对象在 Node.js 中非常常见,以至于你可能会忽略它们的存在。然而,因为它们随处可见,我们需要了解它们是什么,以及在必要时如何使用它们。
在本章中,我们将使用HTTPServer和HTTPClient对象。两者都是EventEmitter类的子类,并依赖于它来发送 HTTP 协议每个步骤的事件。在本节中,我们将首先学习使用 JavaScript 类,然后创建一个EventEmitter子类,以便我们可以学习EventEmitter。
JavaScript 类和类继承
在开始EventEmitter类之前,我们需要看一下 ES2015 的另一个特性:类。JavaScript 一直有对象和类层次结构的概念,但没有其他语言那样正式。ES2015 类对象建立在现有的基于原型的继承模型之上,但其语法看起来很像其他语言中的类定义。
例如,考虑以下类,我们将在本书的后面使用:
This should look familiar to anyone who's implemented a class definition in other languages. The class has a name—`Note`. There is also a constructor method and attributes for each instance of the class.

Once you've defined the class, you can export the class definition to other modules:
使用get或set关键字标记的函数是 getter 和 setter,用法如下:
New instances of a class are created with `new`. You access a getter or setter function as if it is a simple field on the object. Behind the scenes, the getter/setter function is invoked.

The preceding implementation is not the best because the `_title` and `_body` fields are publicly visible and there is no data-hiding or encapsulation. There is a technique to better hide the field data, which we'll go over in Chapter 5, *Your First Express Application*.

You can test whether a given object is of a certain class by using the `instanceof` operator:
最后,您可以使用extends运算符声明一个子类,类似于其他语言中的操作:
In other words, the `LoveNote` class has all the fields of `Note`, plus a new field named `heart`.

This was a brief introduction to JavaScript classes. By the end of this book, you'll have had lots of practice with this feature. The `EventEmitter` class gives us a practical use for classes and class inheritance.

## The EventEmitter class

The `EventEmitter` object is defined in the `events` module of Node.js. Using the `EventEmitter` class directly means performing `require('events')`. In most cases, we don't do this. Instead, our typical use of `EventEmitter` objects is via an existing object that uses `EventEmitter` internally. However, there are some cases where needs dictate implementing an `EventEmitter` subclass.

Create a file named `pulser.mjs`, containing the following code:
这是一个定义了名为Pulser的类的 ES6 模块。该类继承自EventEmitter并提供了一些自己的方法。
另一件要检查的事情是回调函数中的this.emit如何引用Pulser对象实例。这个实现依赖于 ES2015 箭头函数。在箭头函数之前,我们的回调使用了一个常规的function,而this不会引用Pulser对象实例。相反,this会引用与setInterval函数相关的其他对象。箭头函数的一个特性是,箭头函数内部的this与周围上下文中的this具有相同的值。这意味着,在这种情况下,this确实引用Pulser对象实例。
在我们必须使用function而不是箭头函数时,我们必须将this分配给另一个变量,如下所示:
What's different is the assignment of `this` to `self`. The value of `this` inside the function is different—it is related to the `setInterval` function—but the value of `self` remains the same in every enclosed scope. You'll see this trick used widely, so remember this in case you come across this pattern in code that you're maintaining.

If you want to use a simple `EventEmitter` object but with your own class name, the body of the extended class can be empty:
Pulser类的目的是每秒向任何监听器发送一个定时事件。start方法使用setInterval来启动重复的回调执行,计划每秒调用emit将pulse事件发送给任何监听器。
现在,让我们看看如何使用Pulser对象。创建一个名为pulsed.mjs的新文件,其中包含以下代码:
Here, we create a `Pulser` object and consume its `pulse` events. Calling `pulser.on('pulse')` sets up an event listener for the `pulse` events to invoke the callback function. It then calls the `start` method to get the process going.

When it is run, you should see the following output:
对于每个接收到的pulse事件,都会打印一个pulse received消息。
这为您提供了一些关于EventEmitter类的实际知识。现在让我们看一下它的操作理论。
EventEmitter 理论
使用EventEmitter类,您的代码会发出其他代码可以接收的事件。这是一种连接程序中两个分离部分的方式,有点像量子纠缠的方式,两个电子可以在任何距离上相互通信。看起来很简单。
事件名称可以是任何对您有意义的内容,您可以定义尽可能多的事件名称。事件名称是通过使用事件名称调用.emit来定义的。无需进行任何正式操作,也不需要注册事件名称。只需调用.emit就足以定义事件名称。
按照惯例,error事件名称表示错误。
一个对象使用.emit函数发送事件。事件被发送到任何已注册接收对象事件的监听器。程序通过调用该对象的.on方法注册接收事件,给出事件名称和事件处理程序函数。
所有事件没有一个中央分发点。相反,每个EventEmitter对象实例管理其自己的监听器集,并将其事件分发给这些监听器。
通常,需要在事件中发送数据。要这样做,只需将数据作为参数添加到.emit调用中,如下所示:
When the program receives the event, the data appears as arguments to the callback function. Your program listens to this event, as follows:
事件接收器和事件发送器之间没有握手。也就是说,事件发送器只是继续它的业务,不会收到任何关于接收到的事件、采取的任何行动或发生的任何错误的通知。
在这个例子中,我们使用了 ES2015 的另一个特性——rest运算符——在这里以...theArgs的形式使用。rest运算符将任意数量的剩余函数参数捕获到一个数组中。由于EventEmitter可以传递任意数量的参数,而rest运算符可以自动接收任意数量的参数,它们是天作之合,或者至少是在 TC-39 委员会中。
我们现在已经学会了如何使用 JavaScript 类以及如何使用EventEmitter类。接下来要做的是检查HTTPServer对象如何使用EventEmitter。
理解 HTTP 服务器应用程序
HTTPServer对象是所有 Node.js Web 应用程序的基础。这个对象本身非常接近 HTTP 协议,使用它需要对这个协议有所了解。幸运的是,在大多数情况下,您可以使用应用程序框架,比如 Express,来隐藏 HTTP 协议的细节。作为应用程序开发者,我们希望专注于业务逻辑。
我们已经在第二章中看到了一个简单的 HTTP 服务器应用程序,*设置 Node.js。*因为HTTPServer是一个EventEmitter对象,所以可以以另一种方式编写示例,以明确这一事实,通过分别添加事件监听器:
Here, we created an HTTP `server` object, then attached a listener to the `request` event, and then told the server to listen to connections from `localhost` (`127.0.0.1`) on port `8124`. The `listen` function causes the server to start listening and arranges to dispatch an event for every request arriving from a web browser.

The `request` event is fired any time an HTTP request arrives on the server. It takes a function that receives the `request` and `response` objects. The `request` object has data from the web browser, while the `response` object is used to gather data to be sent in the response.

Now, let's look at a server application that performs different actions based on the URL.

Create a new file named `server.mjs`, containing the following code:
request事件是由HTTPServer每次从 Web 浏览器接收到请求时发出的。在这种情况下,我们希望根据请求 URL 的不同而有不同的响应,请求 URL 以req.url的形式到达。这个值是一个包含来自 HTTP 请求的 URL 的字符串。由于 URL 有许多属性,我们需要解析 URL 以便正确匹配两个路径中的一个的路径名:/和/osinfo。
使用 URL 类解析 URL 需要一个基本 URL,我们在listenOn变量中提供了这个 URL。请注意,我们在其他地方多次重用了这个变量,使用一个字符串来配置应用程序的多个部分。
根据路径,要么调用homePage函数,要么调用osInfo函数。
这被称为请求路由,我们在其中查看传入请求的属性,比如请求路径,并将请求路由到处理程序函数。
在处理程序函数中,req和res参数对应于request和response对象。req包含有关传入请求的数据,我们使用res发送响应。writeHead函数设置返回状态(200表示成功,而404表示页面未找到),end函数发送响应。
如果请求的 URL 没有被识别,服务器将使用404结果代码发送回一个错误页面。结果代码通知浏览器有关请求状态,其中200代码表示一切正常,404代码表示请求的页面不存在。当然,还有许多其他 HTTP 响应代码,每个代码都有自己的含义。
这两个对象都附加了许多其他函数,但这已经足够让我们开始了。
要运行它,请输入以下命令:
Then, if we paste the URL into a web browser, we see something like this:

This application is meant to be similar to PHP's `sysinfo` function. Node.js's `os` module is consulted to provide information about the computer. This example can easily be extended to gather other pieces of data.
A central part of any web application is the method of routing requests to request handlers. The `request` object has several pieces of data attached to it, two of which are useful for routing requests: the `request.url` and `request.method` fields.
In `server.mjs`, we consult the `request.url` data to determine which page to show after parsing using the URL object. Our needs are modest in this server, and a simple comparison of the `pathname` field is enough. Larger applications will use pattern matching to use part of the request URL to select the request handler function and other parts to extract request data out of the URL. We'll see this in action when we look at Express later in the *Getting started with Express* section.
Some web applications care about the HTTP verb that is used (`GET`, `DELETE`, `POST`, and so on) and so we must consult the `request.method` field of the `request` object. For example, `POST` is frequently used for any `FORM` submissions.
That gives us a taste of developing servers with Node.js. Along the way, we breezed past one big ES2015 feature—template strings. The template strings feature simplifies substituting values into strings. Let's see how that works.
## ES2015 multiline and template strings
The previous example showed two of the new features introduced with ES2015: multiline and template strings. These features are meant to simplify our lives when creating text strings.
The existing JavaScript string representations use single quotes and double quotes. Template strings are delimited with the backtick character, which is also known as the **grave accent**:
在 ES2015 之前,实现多行字符串的一种方法是使用以下结构:
This is an array of strings that uses the `join` function to smash them together into one string. Yes, this is the code used in the same example in previous versions of this book. This is what we can do with ES2015:
这更加简洁和直接。开头引号在第一行,结束引号在最后一行,中间的所有内容都是我们的字符串的一部分。
模板字符串功能的真正目的是支持将值直接替换到字符串中。许多其他编程语言支持这种能力,现在 JavaScript 也支持了。
在 ES2015 之前,程序员会这样编写他们的代码:
Similar to the previous snippet, this relied on the `replace` function to insert values into the string. Again, this is extracted from the same example that was used in previous versions of this book. With template strings, this can be written as follows:
在模板字符串中,${..}括号中的部分被解释为表达式。这可以是一个简单的数学表达式、一个变量引用,或者在这种情况下,一个函数调用。
使用模板字符串插入数据存在安全风险。您是否验证了数据的安全性?它会成为安全攻击的基础吗?与始终如一的数据来自不受信任的来源,如用户输入,必须为数据要插入的目标上下文正确编码。在这个例子中,我们应该使用一个函数来将这些数据编码为 HTML,也许。但是对于这种情况,数据是简单的字符串和数字形式,并来自已知的安全数据源——内置的os模块,因此我们知道这个应用程序是安全的。
出于这个原因和许多其他原因,通常更安全使用外部模板引擎。诸如 Express 之类的应用程序可以轻松实现这一点。
现在我们有一个简单的基于 HTTP 的 Web 应用程序。为了更多地了解 HTTP 事件,让我们为监听所有 HTTP 事件的模块添加一个。
HTTP Sniffer - 监听 HTTP 对话
HTTPServer对象发出的事件可以用于除了传递 Web 应用程序的直接任务之外的其他目的。以下代码演示了一个有用的模块,它监听所有HTTPServer事件。这可能是一个有用的调试工具,还演示了HTTPServer对象的操作方式。
Node.js 的HTTPServer对象是一个EventEmitter对象,而 HTTP Sniffer 只是监听每个服务器事件,打印出与每个事件相关的信息。
创建一个名为httpsniffer.mjs的文件,其中包含以下代码:
The key here is the `sniffOn` function. When given an `HTTPServer` object, it attaches listener functions to each `HTTPServer` event to print relevant data. This gives us a fairly detailed trace of the HTTP traffic on an application.

In order to use it, make two simple modifications to `server.mjs`. To the top, add the following `import` statement:
然后,按照以下方式更改服务器设置:
Here, we're importing the `sniffOn` function and then using it to attach listener methods to the `server` object.

With this in place, run the server as we did earlier. You can visit `http://localhost:8124/` in your browser and see the following console output:
现在您有一个用于窥探HTTPServer事件的工具。这种简单的技术打印出事件数据的详细日志。这种模式可以用于任何EventEmitter对象。您可以使用这种技术来检查程序中EventEmitter对象的实际行为。
在我们继续使用 Express 之前,我们需要讨论为什么要使用应用程序框架。
Web 应用程序框架
HTTPServer对象与 HTTP 协议非常接近。虽然这在某种程度上很强大,就像驾驶手动挡汽车可以让您对驾驶体验进行低级控制一样,但典型的 Web 应用程序编程最好在更高的级别上完成。有人使用汇编语言来编写 Web 应用程序吗?最好将 HTTP 细节抽象出来,集中精力放在应用程序上。
Node.js 开发者社区已经开发了相当多的应用程序框架,以帮助抽象 HTTP 协议细节的不同方面。在这些框架中,Express 是最受欢迎的,而 Koa(koajs.com/)应该被考虑,因为它完全集成了对异步函数的支持。
Express.js 维基上列出了建立在 Express.js 之上或与其一起使用的框架和工具。这包括模板引擎、中间件模块等。Express.js 维基位于github.com/expressjs/express/wiki。
使用 Web 框架的一个原因是它们通常具有在 Web 应用程序开发中使用了 20 多年的最佳实践的经过充分测试的实现。通常的最佳实践包括以下内容:
-
提供一个用于错误 URL 的页面(
404页面) -
筛选 URL 和表单以防注入脚本攻击
-
支持使用 cookie 来维护会话
-
记录请求以进行使用跟踪和调试
-
认证
-
处理静态文件,如图像、CSS、JavaScript 或 HTML
-
提供缓存控制头以供缓存代理使用
-
限制页面大小或执行时间等事项
Web 框架帮助您将时间投入到任务中,而不会迷失在实现 HTTP 协议的细节中。抽象化细节是程序员提高效率的一种历史悠久的方式。当使用提供预打包函数来处理细节的库或框架时,这一点尤其正确。
考虑到这一点,让我们转向使用 Express 实现的一个简单应用程序。
开始使用 Express
Express 可能是最受欢迎的 Node.js Web 应用程序框架。Express 被描述为类似于 Sinatra,这是一个流行的 Ruby 应用程序框架。它也被认为不是一种武断的框架,这意味着框架作者不会对应用程序的结构施加自己的意见。这意味着 Express 对代码的结构并不严格;您只需按照您认为最好的方式编写即可。
您可以访问 Express 的主页expressjs.com/。
截至撰写本书时,Express 4.17 是当前版本,Express 5 正在进行 alpha 测试。根据 Express.js 网站,Express 4 和 Express 5 之间几乎没有什么区别。
让我们首先安装express-generator。虽然我们可以直接开始编写一些代码,但express-generator提供了一个空白的起始应用程序,我们将使用它并进行修改。
使用以下命令安装express-generator:
This is different from the suggested installation method on the Express website, which says to use the `-g` tag for a global installation. We're also using an explicit version number to ensure compatibility. As of the time of writing, `express-generator@5.x` does not exist, but it should exist sometime in the future. The instructions here are written for Express 4.x, and by explicitly naming the version, we're ensuring that we're all on the same page.

Earlier, we discussed how many people now recommend against installing modules globally. Maybe they would consider `express-generator` as an exception to that rule, or maybe not. In any case, we're not following the recommendation on the Express website, and toward the end of this section, we'll have to uninstall `express-generator`.

The result of this is that an `express` command is installed in the `./node_modules/.bin` directory:
运行express命令,如下所示:
We probably don't want to type `./node_modules/.bin/express` every time we run the `express-generator` application, or, for that matter, any of the other applications that provide command-line utilities. Refer back to the discussion we had in Chapter 3, *Exploring Node.js Modules*, about adding this directory to the `PATH` variable. Alternatively, the `npx` command, also described in Chapter 3, *Exploring Node.js Modules*, is useful for this.

For example, try using the following instead of installing `express-generator`:
这样执行完全相同,无需安装express-generator,并且(我们马上会看到)在使用命令结束时记得卸载它。
现在,您已经在fibonacci目录中安装了express-generator,使用它来设置空白框架应用程序:
This creates a bunch of files for us, which we'll walk through in a minute. We asked it to initialize the use of the Handlebars template engine and to initialize a `git` repository.

The `node_modules` directory still has the `express-generator` module, which is no longer useful. We can just leave it there and ignore it, or we can add it to `devDependencies` of the `package.json` file that it generated. Most likely, we will want to uninstall it:
这将卸载express-generator工具。接下来要做的是按照我们被告知的方式运行空白应用程序。npm start命令依赖于提供的package.json文件的一个部分:
It's cool that the Express team showed us how to run the server by initializing the `scripts` section in `package.json`. The `start` script is one of the scripts that correspond to the `npm` sub-commands. The instructions we were given, therefore, say to run `npm start`.

The steps are as follows:

1.  Install the dependencies with `npm install`.
2.  Start the application by using `npm start`.
3.  Optionally, modify `package.json` to always run with debugging.

To install the dependencies and run the application, type the following commands:
以这种方式设置DEBUG变量会打开调试输出,其中包括有关监听端口3000的消息。否则,我们不会得到这些信息。这种语法是在 Bash shell 中使用环境变量运行命令的方式。如果在运行npm start时出错,请参考下一节。
我们可以修改提供的npm start脚本,始终使用启用调试的应用程序。将scripts部分更改为以下内容:
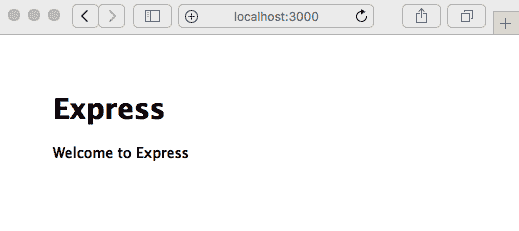
Since the output says it is listening on port `3000`, we direct our browser to
`http://localhost:3000/` and see the following output:
Cool, we have some running code. Before we start changing the code, we need to discuss how to set environment variables in Windows.
## Setting environment variables in the Windows cmd.exe command line
If you're using Windows, the previous example may have failed, displaying an error that says `DEBUG` is not a known command. The problem is that the Windows shell, the `cmd.exe` program, does not support the Bash command-line structure.
Adding `VARIABLE=value` to the beginning of a command line is specific to some shells, such as Bash, on Linux and macOS. It sets that environment variable only for the command line that is being executed and is a very convenient way to temporarily override environment variables for a specific command.
Clearly, a solution is required if you want to be able to use your `package.json` file across different operating systems.
The best solution appears to be using the `cross-env` package in the `npm` repository; refer to [`www.npmjs.com/package/cross-env`](https://www.npmjs.com/package/cross-env) for more information.
With this package installed, commands in the `scripts` section in `package.json` can set environment variables just as in Bash on Linux/macOS. The use of this package looks as follows:
然后,执行以下命令:
We now have a simple way to ensure the scripts in `package.json` are cross-platform. Our next step is a quick walkthrough of the generated application.

## Walking through the default Express application

We now have a working, blank Express application; let's look at what was generated for us. We do this to familiarize ourselves with Express before diving in to start coding our **Fibonacci** application.

Because we used the `--view=hbs` option, this application is set up to use the Handlebars.js template engine.

For more information about Handlebars.js, refer to its home page at [`handlebarsjs.com/`](http://handlebarsjs.com/). The version shown here has been packaged for use with Express and is documented at [`github.com/pillarjs/hbs`](https://github.com/pillarjs/hbs).

Generally speaking, a template engine makes it possible to insert data into generated web pages. The Express.js wiki has a list of template engines for Express ([`github.com/expressjs/express/wiki#template-engines`](https://github.com/expressjs/express/wiki#template-engines)).

Notice that the JavaScript files are generated as CommonJS modules. The `views` directory contains two files—`error.hbs` and `index.hbs`. The `hbs` extension is used for Handlebars files. Another file, `layout.hbs`, is the default page layout. Handlebars has several ways to configure layout templates and even partials (snippets of code that can be included anywhere).

The `routes` directory contains the initial routing setup—that is, code to handle specific URLs. We'll modify this later.

The `public` directory contains assets that the application doesn't generate but are simply sent to the browser. What's initially installed is a CSS file, `public/stylesheets/style.css`. The `package.json` file contains our dependencies and other metadata.

The `bin` directory contains the `www` script that we saw earlier. This is a Node.js script that initializes the `HTTPServer` objects, starts listening on a TCP port, and calls the last file that we'll discuss, `app.js`. These scripts initialize Express and hook up the routing modules, as well as other things.

There's a lot going on in the `www` and `app.js` scripts, so let's start with the application initialization. Let's first take a look at a couple of lines in `app.js`:
这意味着app.js是一个 CommonJS 模块,它导出了由express模块生成的应用程序对象。我们在app.js中的任务是配置该应用程序对象。但是,这个任务不包括启动HTTPServer对象。
现在,让我们转向bin/www脚本。在这个脚本中启动了 HTTP 服务器。首先要注意的是它以以下行开始:
This is a Unix/Linux technique to make a command script. It says to run the following as a script using the `node` command. In other words, we have Node.js code and we're instructing the operating system to execute that code using the Node.js runtime:
我们还可以看到该脚本是通过express-generator可执行的。
它调用app.js模块,如下所示:
Namely, it loads the module in `app.js`, gives it a port number to use, creates the `HTTPServer` object, and starts it up.

We can see where port `3000` comes from; it's a parameter to the `normalizePort` function. We can also see that setting the `PORT` environment variable will override the default port `3000`. Finally, we can see that the `HTTPServer` object is created here and is told to use the application instance created in `app.js`. Try running the following command:
通过为PORT指定环境变量,我们可以告诉应用程序监听端口4242,您可以在那里思考生活的意义。
接下来将app对象传递给http.createServer()。查看 Node.js 文档告诉我们,这个函数接受requestListener,它只是一个接受我们之前看到的request和response对象的函数。因此,app对象是相同类型的函数。
最后,bin/www脚本启动了服务器监听进程,监听我们指定的端口。
现在让我们更详细地了解app.js:
This tells Express to look for templates in the `views` directory and to use the Handlebars templating engine.

The `app.set` function is used to set the application properties. It'll be useful to browse the API documentation as we go through ([`expressjs.com/en/4x/api.html`](http://expressjs.com/en/4x/api.html)).

Next is a series of `app.use` calls:
app.use函数挂载中间件函数。这是 Express 术语中的重要部分,我们很快会讨论。目前,让我们说中间件函数在处理请求时被执行。这意味着app.js中启用了这里列出的所有功能:
-
使用
morgan请求记录器启用日志记录。请参考www.npmjs.com/package/morgan获取其文档。 -
body-parser模块处理解析 HTTP 请求主体。请参考www.npmjs.com/package/body-parser获取其文档。 -
cookie-parser模块用于解析 HTTP cookie。请参考www.npmjs.com/package/cookie-parser获取其文档。 -
配置静态文件 Web 服务器以提供
public目录中的资产文件。请参考expressjs.com/en/starter/static-files.html获取其文档。 -
两个路由模块——
routes和users——设置哪些函数处理哪些 URL。
静态文件 Web 服务器安排通过 HTTP 请求提供命名目录中的文件。使用此配置,public/stylesheets/style.css文件可在http://HOST/stylesheets/style.css上访问。
我们不应该感到受限于以这种方式设置 Express 应用程序。这是 Express 团队的建议,但我们并不受限于以另一种方式设置它。例如,在本书的后面部分,我们将完全将其重写为 ES6 模块,而不是坚持使用 CommonJS 模块。一个明显的遗漏是未捕获异常和未处理的 Promise 拒绝的处理程序。我们稍后会在本书中讨论这两者。
接下来,我们将讨论 Express 的中间件函数。
理解 Express 中间件
让我们通过讨论 Express 中间件函数为我们的应用程序做了什么来完成对app.js的漫游。中间件函数参与处理请求并将结果发送给 HTTP 客户端。它们可以访问request和response对象,并且预期处理它们的数据,也许向这些对象添加数据。例如,cookie 解析中间件解析 HTTP cookie 头,以记录浏览器发送的 cookie 在request对象中。
我们在脚本的最后有一个例子:
The comment says `catch 404 and forward it to the error handler`. As you probably know, an HTTP `404` status means the requested resource was not found. We need to tell the user that their request wasn't satisfied, and maybe show them something such as a picture of a flock of birds pulling a whale out of the ocean. This is the first step in doing this. Before getting to the last step of reporting this error, you need to learn how middleware works.

The name *middleware* implies software that executes in the middle of a chain of processing steps.

Refer to the documentation about middleware at [`expressjs.com/en/guide/writing-middleware.html`](http://expressjs.com/en/guide/writing-middleware.html).

Middleware functions take three arguments. The first two—`request` and `response`—are equivalent to the `request` and `response` objects of the Node.js HTTP request object. Express expands these objects with additional data and capabilities. The last argument, `next`, is a callback function that controls when the request-response cycle ends, and it can be used to send errors down the middleware pipeline.

As an aside, one critique of Express is that it was written prior to the existence of Promises and async functions. Therefore, its design is fully enmeshed with the callback function pattern. We can still use async functions, but integrating with Express requires using the callback functions it provides.

The overall architecture is set up so that incoming requests are handled by zero or more middleware functions, followed by a router function, which sends the response. The middleware functions call `next`, and in a normal case, provide no arguments by calling `next()`. If there is an error, the middleware function indicates the error by calling `next(err)`, as shown here.

For each middleware function that executes, there is, in theory, several other middleware functions that have already been executed, and potentially several other functions still to be run. It is required to call `next` to pass control to the next middleware function.

What happens if `next` is not called? There is one case where we must not call `next`. In all other cases, if `next` is not called, the HTTP request will hang because no response will be given.

What is the one case where we must not call `next`? Consider the following hypothetical router function:
这不调用next,而是调用res.send。对于response对象上的某些函数,如res.send或res.render,会发送 HTTP 响应。这是通过发送响应(res.send)来结束请求-响应循环的正确方法。如果既不调用next也不调用res.send,则请求永远不会得到响应,请求的客户端将挂起。
因此,中间件函数执行以下四种操作中的一种:
-
执行自己的业务逻辑。前面显示的请求记录中间件就是一个例子。
-
修改
request或response对象。body-parser和
cookie-parser执行此操作,查找要添加到request对象的数据。
-
调用
next以继续下一个中间件函数,或者以其他方式发出错误信号。 -
发送响应,结束循环。
中间件执行的顺序取决于它们添加到app对象的顺序。添加的第一个函数首先执行,依此类推。
接下来要理解的是请求处理程序以及它们与中间件函数的区别。
中间件和请求处理程序的对比
到目前为止,我们已经看到了两种中间件函数。在一种中,第一个参数是处理程序函数。在另一种中,第一个参数是包含 URL 片段的字符串,第二个参数是处理程序函数。
实际上,app.use有一个可选的第一个参数:中间件挂载的路径。该路径是对请求 URL 的模式匹配,并且如果 URL 匹配模式,则触发给定的函数。甚至有一种方法可以在 URL 中提供命名参数:
This path specification has a pattern, `id`, and the value will land in `req.params.id`. In an Express route, this `:id` pattern marks a **route parameter**. The pattern will match a URL segment, and the matching URL content will land and be available through the `req.params` object. In this example, we're suggesting a user profile service and that for this URL, we want to display information about the named user.

As Express scans the available functions to execute, it will try to match this pattern against the request URL. If they match, then the router function is invoked.

It is also possible to match based on the HTTP request method, such as `GET` or `PUT`. Instead of `app.use`, we would write `app.METHOD`—for example, `app.get` or `app.put`. The preceding example would, therefore, be more likely to appear as follows:
GET的所需行为是检索数据,而PUT的行为是存储数据。然而,如上所述的示例,当处理程序函数仅对GET动词正确时,它将匹配任一 HTTP 方法。但是,使用app.get,如本例中的情况,确保应用程序正确匹配所需的 HTTP 方法。
最后,我们来到了Router对象。这是一种专门用于根据其 URL 路由请求的中间件。看一下routes/users.js:
We have a module that creates a `router` object, then adds one or more `router` functions. It makes the `Router` object available through `module.exports` so that `app.js` can use it. This router has only one route, but `router` objects can have any number of routes that you think is appropriate.

This one route matches a `GET` request on the `/` URL. That's fine until you notice that in `routes/index.js`, there is a similar `router` function that also matches `GET` requests on the `/` URL.

Back in `app.js`, `usersRouter` is added, as follows:
这将router对象及其零个或多个路由函数挂载到/users URL 上。当 Express 寻找匹配的路由函数时,首先扫描附加到app对象的函数,对于任何路由器对象,它也会扫描其函数。然后调用与请求匹配的任何路由函数。
回到/ URL 的问题,router实际上挂载在/users URL 上是很重要的。这是因为它考虑匹配的实际 URL 是挂载点(/users)与router函数中的 URL 连接起来的。
效果是为了匹配附加到router对象的router函数,请求 URL 的挂载前缀被剥离。因此,使用该挂载点,/users/login的传入 URL 将被剥离为/login,以便找到匹配的router函数。
由于并非一切都按计划进行,我们的应用程序必须能够处理错误指示并向用户显示错误消息。
错误处理
现在,我们终于可以回到生成的app.js文件,404 Error page not found错误,以及应用程序可能向用户显示的任何其他错误。
中间件函数通过将值传递给next函数调用来指示错误,即通过调用next(err)。一旦 Express 看到错误,它将跳过任何剩余的非错误路由,并仅将错误传递给错误处理程序。错误处理程序函数的签名与我们之前看到的不同。
在我们正在检查的app.js中,以下是我们的错误处理程序,由express-generator提供:
Error handler functions take four parameters, with `err` added to the familiar `req`, `res`, and `next` functions.

Remember that `res` is the response object, and we use it to set up the HTTP response sent to the browser; even though there is an error, we still send a response.

Using `res.status` sets the HTTP response status code. In the simple application that we examined earlier, we used `res.writeHead` to set not only the status code but also the **Multipurpose Internet Mail Extensions** (**MIME**) type of the response.

The `res.render` function takes data and renders it through a template. In this case, we're using the template named `error`. This corresponds to the `views/error.hbs` file, which looks as follows:
在 Handlebars 模板中,{{value}}标记意味着将表达式或变量的值替换到模板中。此模板引用的message和error是通过设置res.locals提供的,如下所示。
要查看错误处理程序的操作,请将以下内容添加到routes/index.js:
This is a route handler, and going by what we've said, it simply generates an error indication. In a real route handler, the code would make some kind of query, gathering up data to show to the user, and it would indicate an error only if something happened along the way. However, we want to see the error handler in action.
By calling `next(err)`, as mentioned, Express will call the error handler function, causing an error response to pop up in the browser:
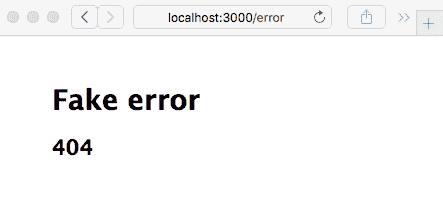
Indeed, at the `/error` URL, we get the Fake error message, which matches the error data sent by the route handler function.
In this section, we've created for ourselves a foundation for how Express works. Let's now turn to an Express application that actually performs a function.
# Creating an Express application to compute Fibonacci numbers
As we discussed in Chapter 1, *About Node.js* we'll be using an inefficient algorithm to calculate Fibonacci numbers to explore how to mitigate performance problems, and along the way, we'll learn how to build a simple REST service to offload computation to the backend server.
The Fibonacci numbers are the following integer sequence:
*0, 1, 1, 2, 3, 5, 8, 13, 21, 34, ... *
Each Fibonacci number is the sum of the previous two numbers in the sequence. This sequence was discovered in 1202 by Leonardo of Pisa, who was also known as Fibonacci. One method to calculate entries in the Fibonacci sequence is using the recursive algorithm, which we discussed in Chapter 1, *About Node.js*. We will create an Express application that uses the Fibonacci implementation and along the way, we will get a better understanding of Express applications, as well as explore several methods to mitigate performance problems in computationally intensive algorithms.
Let's start with the blank application we created in the previous step. We named that application `Fibonacci` for a reason—we were thinking ahead!
In `app.js`, make the following changes to the top portion of the file:
这大部分是express-generator给我们的。var语句已更改为const,以获得更多的舒适度。我们明确导入了hbs模块,以便进行一些配置。我们还导入了一个Fibonacci的路由模块,我们马上就会看到。
对于Fibonacci应用程序,我们不需要支持用户,因此已删除了路由模块。我们将在接下来展示的routes/fibonacci.js模块用于查询我们将计算斐波那契数的数字。
在顶级目录中,创建一个名为math.js的文件,其中包含以下极其简单的斐波那契实现:
In the `views` directory, look at the file named `layout.hbs`, which was created by `express-generator`:
该文件包含我们将用于 HTML 页面的结构。根据 Handlebars 语法,我们可以看到{{title}}出现在 HTMLtitle标记中。这意味着当我们调用res.render时,我们应该提供一个title属性。{{{body}}}标记是view模板内容的落脚点。
将views/index.hbs更改为只包含以下内容:
This serves as the front page of our application. It will be inserted in place of `{{{body}}}` in `views/layout.hbs`. The marker, `{{> navbar}}`, refers to a partially named `navbar` object. Earlier, we configured a directory named `partials` to hold partials. Now, let's create a file, `partials/navbar.html`, containing the following:
这将作为包含在每个页面上的导航栏。
创建一个名为views/fibonacci.hbs的文件,其中包含以下代码:
If `fiboval` is set, this renders a message that for a given number (`fibonum`), we have calculated the corresponding Fibonacci number. There is also an HTML form that we can use to enter a `fibonum` value.

Because it is a `GET` form, when the user clicks on the Submit button, the browser will issue an HTTP `GET` method to the `/fibonacci` URL. What distinguishes one `GET` method on `/fibonacci` from another is whether the URL contains a query parameter named `fibonum`. When the user first enters the page, there is no `fibonum` number and so there is nothing to calculate. After the user has entered a number and clicked on Submit, there is a `fibonum` number and so something to calculate.

Remember that the files in `views` are templates into which data is rendered. They serve the **v****iew**aspect of the **Model-View-Controller** (**MVC**) paradigm, hence the directory name.

In `routes/index.js`, change the `router` function to the following:
传递给res.render的匿名对象包含我们提供给布局和视图模板的数据值。我们现在传递了一个新的欢迎消息。
最后,在routes目录中,创建一个名为fibonacci.js的文件,其中包含以下代码:
This route handler says it matches the `/` route. However, there is a route handler in `index.js` that matches the same route. We haven't made a mistake, however. The `router` object created by this module becomes `fibonacciRouter` when it lands in `app.js`. Refer back to `app.js` and you will see that `fibonacciRouter` is mounted on `/fibonacci`. The rule is that the actual URL path matched by a router function is the path that the router is mounted on plus the path given for the router function. In this case, that is `/fibonacci` plus `/`, and for a URL, that equates to `/fibonacci`.

The handler checks for the existence of `req.query.fibonum`. Express automatically parses the HTTP request URL and any query parameters will land in `req.query`. Therefore, this will trigger a URL such as `/fibonacci?fibonum=5`.

If this value is present, then we call `res.render('fibonacci')` with data including `fibonum`, the number for which we want its Fibonacci number, and `fiboval`, the corresponding Fibonacci number. Otherwise, we pass `undefined` for `fiboval`. If you refer back to the template, if `fiboval` is not set, then the user only sees the form to enter a `fibonum` number. Otherwise, if `fiboval` is set, both `fibonum` and `fiboval` are displayed.

The `package.json` file is already set up, so we can use `npm start` to run the script and always have debugging messages enabled. Now, we're ready to do this:
正如这个示例所暗示的,您可以访问http://localhost:3000/,看看我们有什么:
这个页面是从views/index.hbs模板中渲染出来的。只需点击斐波那契的链接,就可以进入下一个页面,当然,这个页面是从views/fibonacci.hbs模板中渲染出来的。在那个页面上,您可以输入一个数字,点击提交按钮,然后得到一个答案(提示-如果您希望在合理的时间内得到答案,请选择一个小于40的数字):
我们要求您输入一个小于40的数字。继续输入一个更大的数字,比如50,但是请喝杯咖啡,因为这将需要一段时间来计算。或者,继续阅读下一节,我们将开始讨论使用计算密集型代码。
计算密集型代码和 Node.js 事件循环
这个斐波那契的例子故意效率低下,以演示应用程序的一个重要考虑因素。当长时间计算运行时,Node.js 事件循环会发生什么?为了看到效果,打开两个浏览器窗口,每个窗口查看斐波那契页面。在一个窗口中,输入数字55或更大,而在另一个窗口中,输入10。注意第二个窗口会冻结,如果您让它运行足够长的时间,答案最终会在两个窗口中弹出。Node.js 事件循环中发生的情况是,由于斐波那契算法正在运行并且从不让出事件循环,事件循环被阻塞无法处理事件。
由于 Node.js 具有单个执行线程,处理请求取决于请求处理程序快速返回到事件循环。通常,异步编码风格确保事件循环定期执行。
即使是从地球的另一端加载数据的请求,也是如此,因为异步请求是非阻塞的,并且控制很快返回到事件循环。我们选择的天真的斐波那契函数不符合这个模型,因为它是一个长时间运行的阻塞操作。这种类型的事件处理程序会阻止系统处理请求,并阻止 Node.js 做它应该做的事情-即成为一个速度极快的 Web 服务器。
在这种情况下,长响应时间的问题是显而易见的。计算斐波那契数的响应时间迅速上升到您可以去西藏度假,成为喇嘛,也许在这段时间内转世为秘鲁的羊驼!然而,也有可能创建一个长响应时间的问题,而不像这个问题那么明显。在大型 Web 服务中的无数异步操作中,哪一个既是阻塞的又需要很长时间来计算结果?像这样的任何阻塞操作都会对服务器吞吐量产生负面影响。
为了更清楚地看到这一点,创建一个名为fibotimes.js的文件,其中包含以下代码:
Now, run it. You will get the following output:
这个方法可以快速计算斐波那契数列的前 40 个成员,但是在第 40 个成员之后,每个结果开始花费几秒钟的时间,并且很快就会变得更糟。在依赖快速返回到事件循环的单线程系统上执行这种代码是不可行的。包含这种代码的 Web 服务会给用户带来糟糕的性能。
在 Node.js 中有两种一般的方法来解决这个问题:
-
算法重构:也许,就像我们选择的斐波那契函数一样,你的某个算法是次优的,可以重写为更快的。或者,如果不更快,它可以被拆分成通过事件循环分派的回调。我们马上就会看到其中一种方法。
-
创建后端服务:你能想象一个专门用于计算斐波那契数的后端服务器吗?好吧,也许不行,但实现后端服务器以卸载前端服务器的工作是非常常见的,我们将在本章末实现一个后端斐波那契服务器。
考虑到这一点,让我们来看看这些可能性。
算法重构
为了证明我们手头上有一个人为的问题,这里有一个更有效的斐波那契函数:
If we substitute a call to `math.fibonacciLoop` in place of `math.fibonacci`, the `fibotimes` program runs much faster. Even this isn't the most efficient implementation; for example, a simple, prewired lookup table is much faster at the cost of some memory.

Edit `fibotimes.js` as follows and rerun the script. The numbers will fly by so fast that your head will spin:
有时,你的性能问题会很容易优化,但有时则不会。
这里的讨论不是关于优化数学库,而是关于处理影响 Node.js 服务器事件吞吐量的低效算法。因此,我们将坚持使用低效的斐波那契实现。
可以将计算分成块,然后通过事件循环分派这些块的计算。将以下代码添加到math.js中:
This converts the `fibonacci` function from a synchronous function into a traditional callback-oriented asynchronous function. We're using `setImmediate` at each stage of the calculation to ensure that the event loop executes regularly and that the server can easily handle other requests while churning away on a calculation. It does nothing to reduce the computation required; this is still the inefficient Fibonacci algorithm. All we've done is spread the computation through the event loop.

In `fibotimes.js`, we can use the following:
我们又回到了一个低效的算法,但是其中的计算是通过事件循环分布的。运行这个fibotimes.js版本会展示它的低效性。为了在服务器中展示它,我们需要做一些改变。
因为它是一个异步函数,我们需要更改我们的路由器代码。创建一个名为routes/fibonacci-async1.js的新文件,其中包含以下代码:
This is the same code as earlier, just rewritten for an asynchronous Fibonacci calculation. The Fibonacci number is returned via a callback function, and even though we have the beginnings of a callback pyramid, it is still manageable.

In `app.js`, make the following change to the application wiring:
有了这个改变,服务器在计算一个大的斐波那契数时不再冻结。当然,计算仍然需要很长时间,但至少应用程序的其他用户不会被阻塞。
您可以通过再次在应用程序中打开两个浏览器窗口来验证这一点。在一个窗口中输入60,在另一个窗口中开始请求较小的斐波那契数。与原始的fibonacci函数不同,使用fibonacciAsync允许两个窗口都给出答案,尽管如果您确实在第一个窗口中输入了60,那么您可能会去西藏度个三个月的假期:
优化代码和处理可能存在的长时间运行的计算是由你和你的具体算法来选择的。
我们创建了一个简单的 Express 应用程序,并演示了一个影响性能的缺陷。我们还讨论了算法重构,这只剩下我们讨论如何实现后端服务了。但首先,我们需要学习如何创建和访问 REST 服务。
进行 HTTPClient 请求
另一种缓解计算密集型代码的方法是将计算推送到后端进程。为了探索这种策略,我们将使用HTTPClient对象从后端斐波那契服务器请求计算。然而,在讨论这个之前,让我们先一般性地讨论一下使用HTTPClient对象。
Node.js 包括一个HTTPClient对象,用于进行 HTTP 请求非常有用。它具有发出任何类型的 HTTP 请求的能力。在本节中,我们将使用HTTPClient对象来进行类似调用 REST web 服务的 HTTP 请求。
让我们从受wget或curl命令启发的一些代码开始,以便进行 HTTP 请求并显示结果。创建一个名为wget.js的文件,其中包含以下代码:
We invoke an HTTP request by using `http.request`, passing in an `options` object describing the request. In this case, we're making a `GET` request to the server described in a URL we provide on the command line. When the response arrives, the `response` event is fired and we can print out the response. Likewise, an `error` event is fired on errors, and we can print out the error.

This corresponds to the HTTP protocol, where the client sends a request and receives a response.

You can run the script as follows:
是的,example.com是一个真实的网站——有一天去访问它。在打印输出中还有更多内容,即http://example.com/页面的 HTML。我们所做的是演示如何使用http.request函数调用 HTTP 请求。
options对象非常简单,host、port和path字段指定了请求的 URL。method字段必须是 HTTP 动词之一(GET、PUT、POST等)。你还可以为 HTTP 请求中的头部提供一个headers数组。例如,你可能需要提供一个 cookie:
The `response` object is itself an `EventEmitter` object that emits the `data` and `error` events. The `data` event is called as data arrives and the `error` event is, of course, called on errors.

The `request` object is a `WritableStream` object, which is useful for HTTP requests containing data, such as `PUT` or `POST`. This means the `request` object has a `write` function, which writes data to the requester. The data format in an HTTP request is specified by the standard MIME type, which was originally created to give us a better email service. Around 1992, the **World Wide Web** (**WWW**) community worked with the MIME standard committee, who were developing a format for multi-part, multi-media-rich electronic mail. Receiving fancy-looking email is so commonplace today that you might not be aware that email used to come in plaintext. MIME types were developed to describe the format of each piece of data, and the WWW community adopted this for use on the web. HTML forms will post with a content type of `multipart/form-data`, for example.

The next step in offloading some computation to a backend service is to implement the REST service and to make HTTP client requests to that service.

# Calling a REST backend service from an Express application

Now that we've seen how to make HTTP client requests, we can look at how to make a REST query within an Express web application. What that effectively means is making an HTTP `GET` request to a backend server, which responds to the Fibonacci number represented by the URL. To do so, we'll refactor the Fibonacci application to make a Fibonacci server that is called from the application. While this is overkill for calculating Fibonacci numbers, it lets us see the basics of implementing a multi-tier application stack in Express.

Inherently, calling a REST service is an asynchronous operation. That means calling the REST service will involve a function call to initiate the request and a callback function to receive the response. REST services are accessed over HTTP, so we'll use the `HTTPClien`t object to do so. We'll start this little experiment by writing a REST server and exercising it by making calls to the service. Then, we'll refactor the Fibonacci service to call that server.

## Implementing a simple REST server with Express

While Express can also be used to implement a simple REST service, the parameterized URLs we showed earlier (`/user/profile/:id`) can act like parameters to a REST call. Express makes it easy to return data encoded in JSON format.

Now, create a file named `fiboserver.js`, containing the following code:
这是一个简化的 Express 应用程序,直接提供 Fibonacci 计算服务。它支持的一个路由使用了我们已经使用过的相同函数来处理 Fibonacci 计算。
这是我们第一次看到res.send的使用。这是一种灵活的发送响应的方式,可以接受一个头部值的数组(用于 HTTP 响应头)和一个 HTTP 状态码。在这里使用时,它会自动检测对象,将其格式化为 JSON 文本,并使用正确的Content-Type参数发送它。
在package.json中,将以下内容添加到scripts部分:
This automates launching our Fibonacci service.

Note that we're specifying the TCP/IP port via an environment variable and using that variable in the application. Some suggest that putting configuration data in the environment variable is the best practice.

Now, let's run it:
然后,在一个单独的命令窗口中,我们可以使用curl程序对这个服务发出一些请求:
Over in the window where the service is running, we'll see a log of `GET` requests and how long each request took to process:
这很简单——使用curl,我们可以发出 HTTP GET请求。现在,让我们创建一个简单的客户端程序fiboclient.js,以编程方式调用 Fibonacci 服务:
This is our good friend `http.request` with a suitable `options` object. We're executing it in a loop, so pay attention to the order that the requests are made versus the order the responses arrive.

Then, in `package.json`, add the following to the `scripts` section:
然后,运行client应用程序:
We're building our way toward adding the REST service to the web application. At this point, we've proved several things, one of which is the ability to call a REST service in our program.

We also inadvertently demonstrated an issue with long-running calculations. You'll notice that the requests were made from the largest to the smallest, but the results appeared in a very different order. Why? This is because of the processing time required for each request, and the inefficient algorithm we're using. The computation time increases enough to ensure that larger request values have enough processing time to reverse the order.

What happens is that `fiboclient.js` sends all of its requests right away, and then each one waits for the response to arrive. Because the server is using `fibonacciAsync`, it will work on calculating all the responses simultaneously. The values that are quickest to calculate are the ones that will be ready first. As the responses arrive in the client, the matching response handler fires, and in this case, the result prints to the console. The results will arrive when they're ready, and not a millisecond sooner.

We now have enough on our hands to offload Fibonacci calculation to a backend service.

## Refactoring the Fibonacci application to call the REST service

Now that we've implemented a REST-based server, we can return to the Fibonacci application, applying what we've learned to improve it. We will lift some of the code from `fiboclient.js` and transplant it into the application to do this. Create a new file, `routes/fibonacci-rest.js`, with the following code:
这是 Fibonacci 路由处理程序的一个新变体,这次调用 REST 后端服务。我们将fiboclient.js中的http.request调用移植过来,并将来自client对象的事件与 Express 路由处理程序集成。在正常的执行路径中,HTTPClient发出一个response事件,包含一个response对象。当该对象发出一个data事件时,我们就有了结果。结果是 JSON 文本,我们可以解析然后作为响应返回给浏览器。
在app.js中,进行以下更改:
This, of course, reconfigures it to use the new route handler. Then, in `package.json`, change the `scripts` entry to the following:
我们如何为所有三个scripts条目设置相同的SERVERPORT值?答案是该变量在不同的地方使用方式不同。在startrest中,该变量用于routes/fibonacci-rest.js中,以知道 REST 服务运行在哪个端口。同样,在client中,fiboclient.js使用该变量来达到相同的目的。最后,在server中,fiboserver.js脚本使用SERVERPORT变量来知道要监听哪个端口。
在start和startrest中,没有为PORT指定值。在这两种情况下,如果没有指定值,bin/www默认为PORT=3000。
在命令窗口中,启动后端服务器,在另一个窗口中,启动应用程序。像之前一样,打开一个浏览器窗口,并发出一些请求。你应该会看到类似以下的输出:
The output looks like this for the application:
因为我们没有改变模板,所以屏幕看起来和之前一样。
我们可能会在这个解决方案中遇到另一个问题。我们低效的 Fibonacci 算法的异步实现可能会导致 Fibonacci 服务进程耗尽内存。在 Node.js 的 FAQ 中,github.com/nodejs/node/wiki/FAQ,建议使用--max_old_space_size标志。你可以将这个标志添加到package.json中,如下所示:
然而,FAQ 中还说,如果你遇到最大内存空间问题,你的应用程序可能需要重构。这回到了我们之前提到的一点,解决性能问题有几种方法,其中之一是对应用程序进行算法重构。

为什么要费力开发这个 REST 服务器,而不直接使用`fibonacciAsync`呢?

主要优势是将这种繁重计算的 CPU 负载推送到一个单独的服务器上。这样做可以保留前端服务器的 CPU 容量,以便它可以处理 Web 浏览器。 GPU 协处理器现在广泛用于数值计算,并且可以通过简单的网络 API 访问。重计算可以保持分离,甚至可以部署一个位于负载均衡器后面的后端服务器集群,均匀分发请求。这样的决策一直在不断地制定,以创建多层系统。

我们所展示的是,在几行 Node.js 和 Express 代码中实现简单的多层 REST 服务是可能的。整个练习让我们有机会思考在 Node.js 中实现计算密集型代码的价值,以及将一个较大的服务拆分成多个服务的价值。

当然,Express 并不是唯一可以帮助我们创建 REST 服务的框架。

## 一些 RESTful 模块和框架

以下是一些可用的包和框架,可以帮助您的基于 REST 的项目:

+   **Restify** ([>http://restify.com/](http://restify.com/)):这为 REST 事务的两端提供了客户端和服务器端框架。服务器端 API 类似于 Express。

+   **Loopback** ([`loopback.io/`](http://loopback.io/)):这是 StrongLoop 提供的一个产品。它提供了许多功能,并且当然是建立在 Express 之上的。

在这一部分,我们在创建后端 REST 服务方面取得了很大的成就。

# 总结

在本章中,您学到了很多关于 Node.js 的`EventEmitter`模式、`HTTPClient`和服务器对象,至少有两种创建 HTTP 服务的方法,如何实现 Web 应用程序,甚至如何创建一个 REST 客户端和 REST 服务集成到面向客户的 Web 应用程序中。在这个过程中,我们再次探讨了阻塞操作的风险,保持事件循环运行的重要性,以及在多个服务之间分发工作的几种方法。

现在,我们可以继续实现一个更完整的应用程序:一个用于记笔记的应用程序。在接下来的几章中,我们将使用`Notes`应用程序作为一个工具来探索 Express 应用程序框架、数据库访问、部署到云服务或您自己的服务器、用户身份验证、用户之间的半实时通信,甚至加强应用程序对多种攻击的防御。最终,我们将得到一个可以部署到云基础设施的应用程序。

这本书还有很多内容要涵盖,下一章将从创建一个基本的 Express 应用程序开始。


# 第七章

第二部分:开发 Express 应用程序

本书的核心是从最初的概念开始开发一个 Express 应用程序,该应用程序可以将数据存储在数据库中并支持多个用户。

本节包括以下章节:

+   第五章,*你的第一个 Express 应用程序*

+   第六章,*实现移动优先的范例*

+   第七章,*数据存储和检索*

+   第八章,*使用微服务对用户进行身份验证*

+   第九章,*使用 Socket.IO 进行动态客户端/服务器交互*


您的第一个 Express 应用程序

现在我们已经开始为 Node.js 构建 Express 应用程序,让我们开始开发一个执行有用功能的应用程序。我们将构建的应用程序将保留一个笔记列表,并最终会有用户可以互发消息。在本书的过程中,我们将使用它来探索一些真实 Express Web 应用程序的方面。

在本章中,我们将从应用程序的基本结构、初始 UI 和数据模型开始。我们还将为添加持久数据存储和我们将在后续章节中涵盖的所有其他功能奠定基础。

本章涵盖的主题包括以下内容:

+   在 Express 路由器函数中使用 Promises 和 async 函数

+   JavaScript 类定义和 JavaScript 类中的数据隐藏

+   使用 MVC 范例的 Express 应用程序架构

+   构建 Express 应用程序

+   实现 CRUD 范例

+   Express 应用程序主题和 Handlebars 模板

首先,我们将讨论如何将 Express 路由器回调与 async 函数集成。

# 第八章:在 Express 路由器函数中探索 Promises 和 async 函数的主题

在我们开始开发应用程序之前,我们需要深入了解如何在 Express 中使用`Promise`类和 async 函数,因为 Express 是在这些功能存在之前发明的,因此它不直接与它们集成。虽然我们应该尽可能使用 async 函数,但我们必须了解如何在某些情况下正确使用它们,比如在 Express 应用程序中。

Express 处理异步执行的规则如下:

+   同步错误由 Express 捕获,并导致应用程序转到错误处理程序。

+   异步错误必须通过调用`next(err)`来报告。

+   成功执行的中间件函数告诉 Express 通过调用`next()`来调用下一个中间件。

+   返回 HTTP 请求结果的路由器函数不调用`next()`。

在本节中,我们将讨论三种使用 Promises 和 async 函数的方法,以符合这些规则。

Promise 和 async 函数都用于延迟和异步计算,并且可以使深度嵌套的回调函数成为过去的事情:

+   `Promise`类表示尚未完成但预计将来完成的操作。我们已经使用过 Promises,所以我们知道当承诺的结果(或错误)可用时,`.then`或`.catch`函数会异步调用。

+   在异步函数内部,`await`关键字可用于自动等待 Promise 解析。它返回 Promise 的结果,否则在下一行代码的自然位置抛出错误,同时也适应异步执行。

异步函数的魔力在于我们可以编写看起来像同步代码的异步代码。它仍然是异步代码——意味着它与 Node.js 事件循环正确工作——但是结果和错误不再落在回调函数内部,而是自然地作为异常抛出,结果自然地落在下一行代码上。

因为这是 JavaScript 中的一个新功能,所以我们必须正确地整合几种传统的异步编码实践。您可能会遇到一些其他用于管理异步代码的库,包括以下内容:

+   `async`库是一组用于各种异步模式的函数。它最初完全围绕回调函数范式实现,但当前版本可以处理 async 函数,并且作为 ES6 包可用。有关更多信息,请参阅[`www.npmjs.com/package/async`](https://www.npmjs.com/package/async)。

+   在 Promise 标准化之前,至少有两种实现可用:Bluebird ([`bluebirdjs.com/`](http://bluebirdjs.com/))和 Q ([`www.npmjs.com/package/q`](https://www.npmjs.com/package/q))。如今,我们专注于使用标准内置的`Promise`对象,但这两个包都提供了额外的功能。更有可能的是,我们会遇到使用这些库的旧代码。

这些和其他工具的开发是为了更容易编写异步代码并解决**末日金字塔**问题。这是根据代码在几层嵌套后采取的形状而命名的。任何以回调函数编写的多阶段过程都可能迅速升级为嵌套多层的代码。考虑以下例子:
We don't need to worry about the specific functions, but we should instead recognize that one callback tends to lead to another. Before you know it, you've landed in the middle of a deeply nested structure like this. Rewriting this as an async function will make it much clearer. To get there, we need to examine how Promises are used to manage asynchronous results, as well as get a deeper understanding of async functions.
A Promise is either in an unresolved or resolved state. This means that we create a Promise using new Promise, and initially, it is in the unresolved state. The Promise object transitions to the resolved state, where either its resolve or reject functions are called. If the resolve function is called, the Promise is in a successful state, and if instead its reject function is called, the Promise is in a failed state.
More precisely, Promise objects can be in one of three states:
- Pending: This is the initial state, which is neither fulfilled nor rejected.
- Fulfilled: This is the final state, where it executes successfully and produces a result.
- Rejected: This is the final state, where execution fails.
We generate a Promise in the following way:
这样的函数创建了`Promise`对象,给它一个回调函数,在其中是您的异步操作。`resolve`和`reject`函数被传递到该函数中,并在 Promise 解析为成功或失败状态时调用。`new Promise`的典型用法是这样的结构:
This is the pattern that we use when promisifying an asynchronous function that uses callbacks. The asynchronous code executes, and in the callback, we invoke either resolve or reject, as appropriate. We can usually use the util.promisify Node.js function to do this for us, but it's very useful to know how to construct this as needed.
Your caller then uses the function, as follows:
`Promise`对象足够灵活,传递给`.then`处理程序的函数可以返回一些东西,比如另一个 Promise,并且可以将`.then`调用链接在一起。在`.then`处理程序中返回的值(如果有的话)将成为一个新的`Promise`对象,通过这种方式,您可以构建一个`.then`和`.catch`调用链来管理一系列异步操作。

使用`Promise`对象,一系列异步操作被称为**Promise 链**,由链接的`.then`处理程序组成,我们将在下一节中看到。

## 在 Express 路由函数中的 Promise 和错误处理

重要的是要正确处理所有错误并将其报告给 Express。对于同步代码,Express 将正确捕获抛出的异常并将其发送到错误处理程序。看下面的例子:
Express catches that exception and does the right thing, meaning it invokes the error handler, but it does not see a thrown exception in asynchronous code. Consider the following error example:
这是一个错误指示器落在回调函数中不方便的地方的例子。异常在一个完全不同的堆栈帧中抛出,而不是由 Express 调用的堆栈帧。即使我们安排返回一个 Promise,就像异步函数的情况一样,Express 也不处理 Promise。在这个例子中,错误被丢失;调用者永远不会收到响应,也没有人知道为什么。

重要的是要可靠地捕获任何错误,并用结果或错误回应调用者。为了更好地理解这一点,让我们重新编写一下“末日金字塔”示例:
This is rewritten using a Promise chain, rather than nested callbacks. What had been a deeply nested pyramid of callback functions is now arguably a little cleaner thanks to Promises.
The Promise class automatically captures all the errors and searches down the chain of operations attached to the Promise to find and invoke the first .catch function. So long as no errors occur, each .then function in the chain is executed in turn.
One advantage of this is that error reporting and handling is much easier. With the callback paradigm, the nature of the callback pyramid makes error reporting trickier, and it's easy to miss adding the correct error handling to every possible branch of the pyramid. Another advantage is that the structure is flatter and, therefore, easier to read.
To integrate this style with Express, notice the following:
- The final step in the Promise chain uses
res.renderor a similar function to return a response to the caller. - The final
catchfunction reports any errors to Express usingnext(err).
If instead we simply returned the Promise and it was in the rejected state, Express would not handle that failed rejection and the error would be lost.
Having looked at integrating asynchronous callbacks and Promise chains with Express, let's look at integrating async functions.
Integrating async functions with Express router functions
There are two problems that need to be addressed that are related to asynchronous coding in JavaScript. The first is the pyramid of doom, an unwieldily nested callback structure. The second is the inconvenience of where results and errors are delivered in an asynchronous callback.
To explain, let's reiterate the example that Ryan Dahl gives as the primary Node.js idiom:
这里的目标是避免使用长时间操作阻塞事件循环。使用回调函数推迟处理结果或错误是一个很好的解决方案,也是 Node.js 的基本习惯用法。回调函数的实现导致了这个金字塔形的问题。Promise 帮助扁平化代码,使其不再呈现金字塔形状。它们还捕获错误,确保将其传递到有用的位置。在这两种情况下,错误和结果都被埋在一个匿名函数中,并没有传递到下一行代码。

生成器和迭代协议是一个中间的架构步骤,当与 Promise 结合时,会导致异步函数。我们在本书中不会使用这两者,但值得了解。

有关迭代协议的文档,请参阅[`developer.mozilla.org/en-US/docs/Web/JavaScript/Reference/Iteration_protocols`](https://developer.mozilla.org/en-US/docs/Web/JavaScript/Reference/Iteration_protocols)。

有关生成器函数的文档,请参阅[`developer.mozilla.org/en-US/docs/Web/JavaScript/Reference/Global_Objects/Generator`](https://developer.mozilla.org/en-US/docs/Web/JavaScript/Reference/Global_Objects/Generator)。

我们已经使用了异步函数,并了解了它们如何让我们编写看起来整洁的异步代码。例如,`db.query`作为异步函数的示例如下:
This is much cleaner, with results and errors landing where we want them to.
However, to discuss integration with Express, let's return to the pyramid of doom example from earlier, rewriting it as an async function:
除了`try/catch`,这个例子与之前的形式相比非常干净,无论是作为回调金字塔还是 Promise 链。所有样板代码都被抹去,程序员的意图清晰地展现出来。没有东西丢失在回调函数中。相反,一切都方便地落在下一行代码中。

`await`关键字寻找一个 Promise。因此,`doSomething`和其他函数都应该返回一个 Promise,而`await`管理其解析。这些函数中的每一个都可以是一个异步函数,因此自动返回一个 Promise,或者可以显式创建一个 Promise 来管理异步函数调用。生成器函数也涉及其中,但我们不需要知道它是如何工作的。我们只需要知道`await`管理异步执行和 Promise 的解析。

更重要的是,带有`await`关键字的每个语句都是异步执行的。这是`await`的一个副作用——管理异步执行以确保异步结果或错误被正确传递。然而,Express 无法捕获异步错误,需要我们使用`next()`通知它异步结果。

`try/catch`结构是为了与 Express 集成而需要的。基于刚才给出的原因,我们必须显式捕获异步传递的错误,并使用`next(err)`通知 Express。

在本节中,我们讨论了三种通知 Express 有关异步传递错误的方法。接下来要讨论的是一些架构选择,以便结构化代码。

# 在 MVC 范式中架构 Express 应用程序

Express 不会强制规定你应该如何构建应用程序的**模型**、**视图**和**控制器**(**MVC**)模块的结构,或者是否应该完全遵循任何 MVC 范式。MVC 模式被广泛使用,涉及三个主要的架构组件。**控制器**接受用户的输入或请求,将其转换为发送给模型的命令。**模型**包含应用程序操作的数据、逻辑和规则。**视图**用于向用户呈现结果。

正如我们在上一章中学到的,Express 生成器创建的空应用程序提供了 MVC 模型的两个方面:

+   `views`目录包含模板文件,控制显示部分,对应于视图。

+   `routes`目录包含实现应用程序识别的 URL 并协调生成每个 URL 响应所需的数据操作的代码。这对应于控制器。

由于路由器函数还调用函数来使用模板生成结果,我们不能严格地说路由器函数是控制器,`views`模板是视图。然而,这足够接近 MVC 模型,使其成为一个有用的类比。

这让我们面临一个问题,那就是在哪里放置模型代码。由于相同的数据操作可以被多个路由器函数使用,显然路由器函数应该使用一个独立的模块(或模块)来包含模型代码。这也将确保关注点的清晰分离,例如,以便轻松进行每个单元的测试。

我们将使用的方法是创建一个`models`目录,作为`views`和`routes`目录的同级目录。`models`目录将包含处理数据存储和其他我们可能称之为**业务逻辑**的代码的模块。`models`目录中模块的 API 将提供创建、读取、更新或删除数据项的函数——一个**C****reate,** **R****ead,** **Update, and D****elete**/**Destroy **(**CRUD**)模型——以及视图代码执行其任务所需的其他函数。

CRUD 模型包括持久数据存储的四个基本操作。`Notes`应用程序被构建为一个 CRUD 应用程序,以演示实现这些操作的过程。

我们将使用`create`、`read`、`update`和`destroy`函数来实现每个基本操作。

我们使用`destroy`动词,而不是`delete`,因为`delete`是 JavaScript 中的保留字。

考虑到这个架构决定,让我们继续创建`Notes`应用程序。

# 创建 Notes 应用程序

由于我们正在启动一个新的应用程序,我们可以使用 Express 生成器给我们一个起点。虽然不一定要使用这个工具,因为我们完全可以自己编写代码。然而,优点在于它给了我们一个完全成熟的起点:
As in the previous chapter, we will use cross-env to ensure that the scripts run cross-platform. Start by changing package.json to have the following scripts section:
提供的脚本使用`bin/www`,但很快,我们将重新构造生成的代码,将所有内容放入一个名为`app.mjs`的单个 ES6 脚本中。

然后,安装`cross-env`,如下所示:
With cross-env, the scripts are executable on either Unix-like systems or Windows.
If you wish, you can run npm start and view the blank application in your browser. Instead, let's rewrite this starting-point code using ES6 modules, and also combine the contents of bin/www with app.mjs.
Rewriting the generated router module as an ES6 module
Let's start with the routes directory. Since we won't have a Users concept right now, delete users.js. We need to convert the JavaScript files into ES6 format, and we can recall that the simplest way for a module to be recognized as an ES6 module is to use the .mjs extension. Therefore, rename index.js to index.mjs, rewriting it as follows:
我们稍后会完成这个,但我们所做的是重新构造我们得到的代码。我们可以导入 Express 包,然后导出`router`对象。添加路由函数当然是以相同的方式进行的,无论是 CommonJS 还是 ES6 模块。我们将路由回调设置为异步函数,因为它将使用异步代码。

我们需要遵循相同的模式来创建任何其他路由模块。

将其转换为 ES6 模块后,下一步是将`bin/www`和`app.js`的代码合并到一个名为`app.mjs`的 ES6 模块中。

## 创建 Notes 应用程序连接 - app.mjs

由于`express-generator`工具给了我们一个略显混乱的应用程序结构,没有使用 ES6 模块,让我们适当地重新构思它给我们的代码。首先,`app.mjs`包含了应用程序的“连接”,意味着它配置了构成应用程序的对象和函数,而不包含任何自己的函数。另一个代码`appsupport.mjs`包含了在生成的`app.js`和`bin/www`模块中出现的回调函数。

在`app.mjs`中,从这里开始:
The generated app.js code had a series of require statements. We have rewritten them to use corresponding import statements. We also added code to calculate the __filename and __dirname variables, but presented a little differently. To support this, add a new module, approotdir.mjs, containing the following:
在第三章的`dirname-fixed.mjs`示例中,我们从`path`和`url`核心模块中导入了特定的函数。我们使用了那段代码,然后将`__dirname`的值导出为`approotdir`。Notes 应用程序的其他部分只需要应用程序的根目录的路径名,以便计算所需的路径名。

回到`app.mjs`,你会看到路由模块被导入为`indexRouter`和`notesRouter`。目前,`notesRouter`被注释掉了,但我们将在后面的部分中处理它。

现在,让我们初始化`express`应用程序对象:
This should look familiar to the app.js code we used in the previous chapter. Instead of inline functions, however, they're pushed into appsupport.mjs.
The app and port objects are exported in case some other code in the application needs those values.
This section of code creates and configures the Express application instance. To make it a complete running server, we need the following code:
这段代码将 Express 应用程序包装在 HTTP 服务器中,并让它监听 HTTP 请求。`server`对象也被导出,以便其他代码可以访问它。

将`app.mjs`与生成的`app.js`和`bin/www`代码进行比较,你会发现我们已经覆盖了这两个模块中的所有内容,除了内联函数。这些内联函数可以写在`app.mjs`的末尾,但我们选择创建第二个模块来保存它们。

创建`appsupport.mjs`来保存内联函数,从以下开始:
This function handles safely converting a port number string that we might be given into a numerical value that can be used in the application. The isNaN test is used to handle cases where instead of a TCP port number, we want to use a named pipe. Look carefully at the other functions and you'll see that they all accommodate either a numerical port number or a string described as a pipe:
前面的代码处理了来自 HTTP 服务器对象的错误。其中一些错误将简单地导致服务器退出:
The preceding code prints a user-friendly message saying where the server is listening for HTTP connections. Because this function needs to reference the server object, we have imported it:
这些以前是实现 Express 应用程序的错误处理的内联函数。

这些更改的结果是`app.mjs`现在没有分散注意力的代码,而是专注于连接构成应用程序的不同部分。由于 Express 没有固定的意见,它并不在乎我们像这样重构代码。我们可以以任何对我们有意义并且正确调用 Express API 的方式来构建代码结构。

由于这个应用程序是关于存储数据的,让我们接下来谈谈数据存储模块。

## 实现 Notes 数据存储模型

请记住,我们之前决定将数据模型和数据存储代码放入一个名为`models`的目录中,以配合`views`和`routes`目录。这三个目录将分别存储 MVC 范例的三个方面。

这个想法是集中存储数据的实现细节。数据存储模块将提供一个 API 来存储和操作应用程序数据,在本书的过程中,我们将对这个 API 进行多次实现。要在不同的存储引擎之间切换,只需要进行配置更改。应用程序的其余部分将使用相同的 API 方法,无论使用的是哪种存储引擎。

首先,让我们定义一对类来描述数据模型。在`models/Notes.mjs`中创建一个名为`models/Notes.mjs`的文件,并在其中包含以下代码:
This defines two classes—Note and AbstractNotesStore—whose purpose is as follows:
- The
Noteclass describes a single note that our application will manage. - The
AbstractNotesStoreclass describes methods for managing some note instances.
In the Note class, key is how we look for the specific note, and title and body are the content of the note. It uses an important data hiding technique, which we'll discuss in a minute.
The AbstractNotesStore class documents the methods that we'll use for accessing notes from a data storage system. Since we want the Notes application to implement the CRUD paradigm, we have the create, read, update, and destroy methods, plus a couple more to assist in searching for notes. What we have here is an empty class that serves to document the API, and we will use this as the base class for several storage modules that we'll implement later.
The close method is meant to be used when we're done with a datastore. Some datastores keep an open connection to a server, such as a database server, and the close method should be used to close that connection.
This is defined with async functions because we'll store data in the filesystem or in databases. In either case, we need an asynchronous API.
Before implementing our first data storage model, let's talk about data hiding in JavaScript classes.
Data hiding in ES-2015 class definitions
In many programming languages, class definitions let us designate some data fields as private and others as public. This is so that programmers can hide implementation details. However, writing code on the Node.js platform is all about JavaScript, and JavaScript, in general, is very lax about everything. So, by default, fields in an instance of a JavaScript class are open to any code to access or modify.
One concern arises if you have several modules all adding fields or functions to the same object. How do you guarantee that one module won't step on fields added by another module? By default, in JavaScript, there is no such guarantee.
Another concern is hiding implementation details so that the class can be changed while knowing that internal changes won't break other code. By default, JavaScript fields are open to all other code, and there's no guarantee other code won't access fields that are meant to be private.
The technique used in the Note class gates access to the fields through getter and setter functions. These in turn set or get values stored in the instance of the class. By default, those values are visible to any code, and so these values could be modified in ways that are incompatible with the class. The best practice when designing classes is to localize all manipulation of class instance data to the member functions. However, JavaScript makes the fields visible to the world, making it difficult to follow this best practice. The pattern used in the Note class is the closest we can get in JavaScript to data hiding in a class instance.
The technique we use is to name the fields using instances of the Symbol class. Symbol, another ES-2015 feature, is an opaque object with some interesting attributes that make it attractive for use as keys for private fields in objects. Consider the following code:
创建`Symbol`实例是通过`Symbol('symbol-name')`完成的。生成的`Symbol`实例是一个唯一标识符,即使再次调用`Symbol('symbol-name')`,唯一性也得到保留。每个`Symbol`实例都是唯一的,即使是由相同的字符串形成的。在这个例子中,`b`和`b1`变量都是通过调用`Symbol('b')`形成的,但它们并不相等。

让我们看看如何使用`Symbol`实例来附加字段到一个对象上:
We've created a little object, then used those Symbol instances as field keys to store data in the object. Notice that when we dump the object's contents, the two fields both register as Symbol(b), but they are two separate fields.
With the Note class, we have used the Symbol instances to provide a small measure of data hiding. The actual values of the Symbol instances are hidden inside Notes.mjs. This means the only code that can directly access the fields is the code running inside Notes.mjs:
定义了`Note`类之后,我们可以创建一个`Note`实例,然后转储它并查看结果字段。这些字段的键确实是`Symbol`实例。这些`Symbol`实例被隐藏在模块内部。这些字段本身对模块外部的代码是可见的。正如我们在这里看到的,企图用`note[Symbol('key')] = 'new key'`来破坏实例并不会覆盖字段,而是会添加第二个字段。

定义了我们的数据类型,让我们从一个简单的内存数据存储开始实现应用程序。

## 实现内存中的笔记数据存储

最终,我们将创建一个`Notes`数据存储模块,将笔记持久化到长期存储中。但是为了让我们开始,让我们实现一个内存数据存储,这样我们就可以继续实现应用程序。因为我们设计了一个抽象基类,我们可以很容易地为各种存储服务创建新的实现。

在`models`目录中创建一个名为`notes-memory.mjs`的文件,其中包含以下代码:
This should be fairly self-explanatory. The notes are stored in a private array, named notes. The operations, in this case, are defined in terms of adding or removing items in that array. The key object for each Note instance is used as the index to the notes array, which in turn holds the Note instance. This is simple, fast, and easy to implement. It does not support any long-term data persistence, and any data stored in this model will disappear when the server is killed.
We need to initialize an instance of NotesStore so that it can be used in the application. Let's add the following to app.mjs, somewhere near the top:
这将创建一个类的实例并将其导出为`NotesStore`。只要我们有一个单一的`NotesStore`实例,这将起作用,但是在第七章中,*数据存储和检索*,我们将改变这一点,以支持动态选择`NotesStore`实例。

我们现在准备开始实现应用程序的网页和相关代码,从主页开始。

## 笔记主页

我们将修改起始应用程序以支持创建、编辑、更新、查看和删除笔记。让我们从更改主页开始,显示一个笔记列表,并在顶部导航栏中添加一个链接到添加笔记页面,这样我们就可以随时添加新的笔记。

`app.mjs`中不需要更改,因为主页是在这个路由模块中控制的。
In app.mjs, we configured the Handlebars template engine to use the partials directory to hold partial files. Therefore, make sure you create that directory.
To implement the home page, update routes/index.mjs to the following:
我们之前展示了这个概要,并且已经定义了`Notes`数据存储模型,我们可以填写这个函数。

这使用了我们之前设计的`AbstractNotesStore` API。`keylist`方法返回当前应用程序存储的笔记的键值列表。然后,它使用`read`方法检索每个笔记,并将该列表传递给一个模板,该模板呈现主页。这个模板将呈现一个笔记列表。

如何检索所有的笔记?我们可以编写一个简单的`for`循环,如下所示:
This has the advantage of being simple to read since it's a simple for loop. The problem is that this loop reads the notes one at a time. It's possible that reading the notes in parallel is more efficient since there's an opportunity to interweave the processing.
The Promise.all function executes an array of Promises in parallel, rather than one at a time. The keyPromises variable ends up being an array of Promises, each of which is executing notes.read to retrieve a single note.
The map function in the arrays converts (or maps) the values of an input array to produce an output array with different values. The output array has the same length as the input array, and the entries are a one-to-one mapping of the input value to an output value. In this case, we map the keys in keylist to a Promise that's waiting on a function that is reading each note. Then, Promise.all waits for all the Promises to resolve into either success or failure states.
The output array, notelist, will be filled with the notes once all the Promises succeed. If any Promises fail, they are rejected—in other words, an exception will be thrown instead.
The notelist array is then passed into the view template that we're about to write.
But first, we need a page layout template. Create a file, views/layout.hbs, containing the following:
这是由`express-generator`生成的文件,还添加了一个用于页面标题的`header`部分。

请记住,在斐波那契应用程序中,我们使用了一个*partial*来存储导航的 HTML 片段。部分是 HTML 模板片段,可以在一个或多个模板中重用。在这种情况下,`header`部分将出现在每个页面上,并作为应用程序中的通用导航栏。创建`partials/header.hbs`,包含以下内容:
This simply looks for a variable, title, which should have the page title. It also outputs a navigation bar containing a pair of links—one to the home page and another to /notes/add, where the user will be able to add a new note.
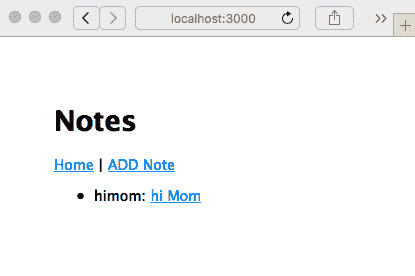
Now, let's rewrite views/index.hbs to this:
这只是简单地遍历笔记数据数组并格式化一个简单的列表。每个项目都链接到`/notes/view` URL,并带有一个`key`参数。我们还没有编写处理该 URL 的代码,但显然会显示笔记。另一个需要注意的是,如果`notelist`为空,将不会生成列表的 HTML。

当然,还有很多东西可以放进去。例如,通过在这里添加适当的`script`标签,可以很容易地为每个页面添加 jQuery 支持。

我们现在已经写了足够的内容来运行应用程序,让我们查看主页:
If we visit http://localhost:3000, we will see the following page:
Because there aren't any notes (yet), there's nothing to show. Clicking on the Home link just refreshes the page. Clicking on the ADD Note link throws an error because we haven't (yet) implemented that code. This shows that the provided error handler in app.mjs is performing as expected.
Having implemented the home page, we need to implement the various pages of the application. We will start with the page for creating new notes, and then we will implement the rest of the CRUD support.
Adding a new note – create
If we click on the ADD Note link, we get an error because the application doesn't have a route configured for the /notes/add URL; we need to add one. To do that, we need a controller module for the notes that defines all the pages for managing notes in the application.
In app.mjs, uncomment the two lines dealing with notesRouter:
我们最终会在`app.mjs`中得到这个。我们导入两个路由,然后将它们添加到应用程序配置中。

创建一个名为`routes/notes.mjs`的文件来保存`notesRouter`,并以以下内容开始:
This handles the /notes/add URL corresponding to the link in partials/header.hbs. It simply renders a template, noteedit, using the provided data.
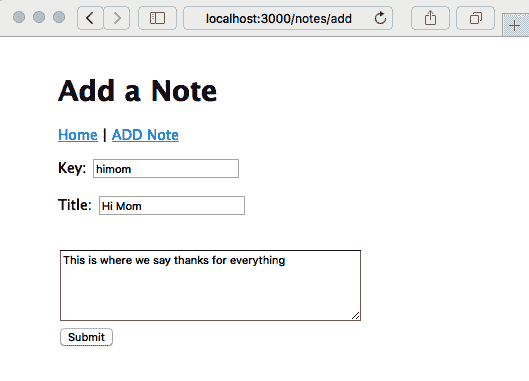
In the views directory, add the corresponding template, named noteedit.hbs, containing the following:
这个模板支持创建新笔记和更新现有笔记。我们将通过`docreate`标志重用这个模板来支持这两种情况。

请注意,在这种情况下,传递给模板的`note`和`notekey`对象是空的。模板检测到这种情况,并确保输入区域为空。此外,还传递了一个标志`docreate`,以便表单记录它是用于创建还是更新笔记。在这一点上,我们正在添加一个新的笔记,所以没有`note`对象存在。模板代码被防御性地编写,以避免抛出错误。

创建 HTML 表单时,必须小心使用包含值的元素中的空格。考虑一个情况,`<textarea>`元素被格式化如下:
By normal coding practices, this looks alright, right? It's nicely indented, with the code arranged for easy reading. The problem is that extra whitespace ends up being included in the body value when the form is submitted to the server. That extra whitespace is added because of the nicely indented code. To avoid that extra whitespace, we need to use the angle brackets in the HTML elements that are directly adjacent to the Handlebars code to insert the value. Similar care must be taken with the elements with the value= attributes, ensuring no extra whitespace is within the value string.
This template is a form that will post its data to the /notes/save URL. If you were to run the application now, it would give you an error message because no route is configured for that URL.
To support the /notes/save URL, add it to routes/notes.mjs:
因为这个 URL 也将用于创建和更新笔记,所以我们检查`docreate`标志来调用适当的模型操作。
`notes.create`和`notes.update`都是异步函数,这意味着我们必须使用`await`。
这是一个 HTTP `POST` 处理程序。由于`bodyParser`中间件,表单数据被添加到`req.body`对象中。附加到`req.body`的字段直接对应于 HTML 表单中的元素。
在这里,以及大多数其他路由函数中,我们使用了我们之前讨论过的`try/catch`结构,以确保错误被捕获并正确转发给 Express。这与前面的`/notes/add`路由函数的区别在于路由器是否使用异步回调函数。在这种情况下,它是一个异步函数,而对于`/notes/add`,它不是异步的。Express 知道如何处理非异步回调中的错误,但不知道如何处理异步回调函数中的错误。
现在,我们可以再次运行应用程序并使用“添加笔记”表单:
然而,点击提交按钮后,我们收到了一个错误消息。这是因为还没有任何东西来实现`/notes/view` URL。
您可以修改`Location`框中的 URL 以重新访问`http://localhost:3000`,然后在主页上看到类似以下截图的内容:
笔记实际上已经存在;我们只需要实现`/notes/view`。让我们继续进行。
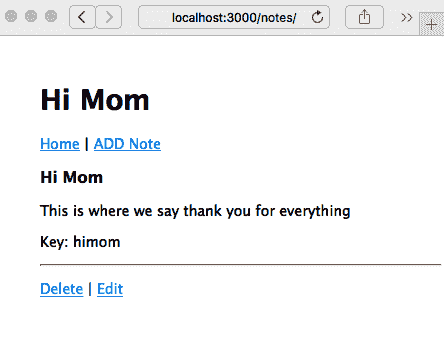
## 查看笔记-读取
现在我们已经了解了如何创建笔记,我们需要继续阅读它们。这意味着为`/notes/view` URL 实现控制器逻辑和视图模板。
将以下`router`函数添加到`routes/notes.mjs`中:
Because this route is mounted on a router handling, /notes, this route handles /notes/view.
The handler simply calls notes.read to read the note. If successful, the note is rendered with the noteview template. If something goes wrong, we'll instead display an error to the user through Express.
Add the noteview.hbs template to the views directory, referenced by the following code:
这很简单;我们从`note`对象中取出数据,并使用 HTML 显示它。底部有两个链接——一个是到`/notes/destroy`用于删除笔记,另一个是到`/notes/edit`用于编辑它。
这两个对应的代码目前都不存在,但这并不妨碍我们继续执行应用程序:
正如预期的那样,使用这段代码,应用程序会正确重定向到`/notes/view`,我们可以看到我们的成果。同样,预期之中,点击删除或编辑链接都会给我们一个错误,因为代码还没有被实现。
接下来我们将创建处理编辑链接的代码,稍后再创建处理删除链接的代码。
## 编辑现有的笔记 - 更新
现在我们已经看过了`create`和`read`操作,让我们看看如何更新或编辑一个笔记。
在`routes/notes.mjs`中添加以下路由函数:
This handles the /notes/edit URL.
We're reusing the noteedit.hbs template because it can be used for both the create and update/edit operations. Notice that we pass false for docreate, informing the template that it is to be used for editing.
In this case, we first retrieve the note object and then pass it through to the template. This way, the template is set up for editing, rather than note creation. When the user clicks on the Submit button, we end up in the same /notes/save route handler shown in the preceding screenshot. It already does the right thing—calling the notes.update method in the model, rather than notes.create.
Because that's all we need to do, we can go ahead and rerun the application:
Click on the Submit button here and you will be redirected to the /notes/view screen, where you will then be able to read the newly edited note. Back at the /notes/view screen, we've just taken care of the Edit link, but the Delete link still produces an error.
Therefore, we next need to implement a page for deleting notes.
Deleting notes – destroy
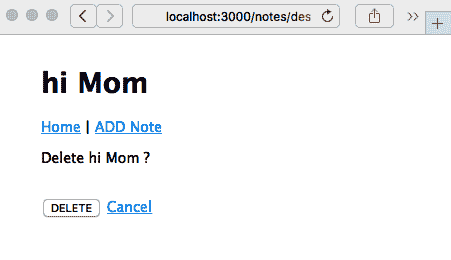
Now, let's look at how to implement the /notes/destroy URL to delete notes.
Add the following router function to routes/notes.mjs:
销毁一个笔记是一个重要的步骤,因为如果用户犯了错误,就没有垃圾桶可以从中恢复。因此,我们需要询问用户是否确定要删除笔记。在这种情况下,我们检索笔记,然后呈现以下页面,显示一个问题以确保他们确定要删除笔记。

在`views`目录中添加一个`notedestroy.hbs`模板:
This is a simple form that asks the user to confirm by clicking on the button. The Cancel link just sends them back to the /notes/view page. Clicking on the Submit button generates a POST request on the /notes/destroy/confirm URL.
This URL needs a request handler. Add the following code to routes/notes.mjs:
这调用模型中的`notes.destroy`函数。如果成功,浏览器将重定向到主页。如果不成功,会向用户显示错误消息。重新运行应用程序,我们现在可以看到它在运行中的样子:
现在应用程序中的一切都在运行,您可以点击任何按钮或链接,并保留所有想要的笔记。
我们已经实现了一个简单的笔记管理应用程序。现在让我们看看如何改变外观,因为在下一章中,我们将实现一个移动优先的用户界面。
# 为您的 Express 应用程序设置主题
Express 团队在确保 Express 应用程序一开始看起来不错方面做得相当不错。我们的`Notes`应用程序不会赢得任何设计奖,但至少它不丑陋。现在基本应用程序正在运行,有很多方法可以改进它。让我们快速看看如何为 Express 应用程序设置主题。在第六章*实现移动优先范式*中,我们将深入探讨这一点,重点关注解决移动市场这一重要目标。
如果您正在使用推荐的方法`npm start`运行`Notes`应用程序,控制台窗口中将打印出一条不错的活动日志。其中之一是以下内容:
This is due to the following line of code, which we put into layout.hbs:
这个文件是由 Express 生成器在一开始为我们自动生成的,并且被放在`public`目录中。`public`目录由 Express 静态文件服务器管理,使用`app.mjs`中的以下行:
Therefore, the CSS stylesheet is at public/stylesheets/style.css, so let's open it and take a look:
一个显眼的问题是应用程序内容在屏幕顶部和左侧有很多空白。原因是`body`标签有`padding: 50px`样式。更改它很快。

由于 Express 静态文件服务器中没有缓存,我们可以简单地编辑 CSS 文件并重新加载页面,CSS 也将被重新加载。

让我们做一些调整:
This changes the padding and also adds a gray box around the header area.
As a result, we'll have the following:
We're not going to win any design awards with this either, but there's the beginning of some branding and theming possibilities. More importantly, it proves that we can make edits to the theming.
Generally speaking, through the way that we've structured the page templates, applying a site-wide theme is just a matter of adding appropriate code to layout.hbs, along with appropriate stylesheets and other assets.
In Chapter 6, Implementing the Mobile-First Paradigm, we will look at a simple method to add these frontend libraries to your application.
Before closing out this chapter, we want to think ahead to scaling the application to handle multiple users.
Scaling up – running multiple Notes instances
Now that we've got ourselves a running application, you'll have played around a bit and created, read, updated, and deleted many notes.
Suppose for a moment that this isn't a toy application, but one that is interesting enough to draw millions of users a day. Serving a high load typically means adding servers, load balancers, and many other things. A core part of this is to have multiple instances of the application running at the same time to spread the load.
Let's see what happens when you run multiple instances of the Notes application at the same time.
The first thing is to make sure the instances are on different ports. In app.mjs, you'll see that setting the PORT environment variable controls the port being used. If the PORT variable is not set, it defaults to http://localhost:3000, or what we've been using all along.
Let's open up package.json and add the following lines to the scripts section:
`server1`脚本在`PORT 3001`上运行,而`server2`脚本在`PORT 3002`上运行。在一个地方记录所有这些是不是很好?

然后,在一个命令窗口中,运行以下命令:
In another command window, run the following:
这给了我们两个`Notes`应用程序的实例。使用两个浏览器窗口访问`http://localhost:3001`和`http://localhost:3002`。输入一些笔记,你可能会看到类似这样的东西:
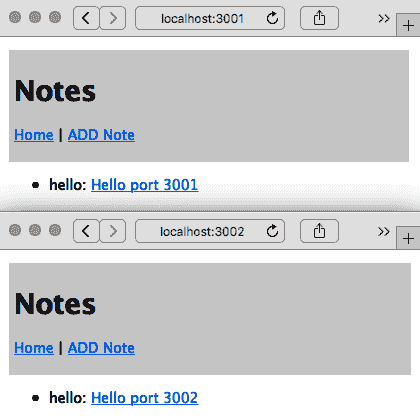
编辑和添加一些笔记后,您的两个浏览器窗口可能看起来像前面的截图。这两个实例不共享相同的数据池;每个实例都在自己的进程和内存空间中运行。您在一个上添加一个笔记,在另一个屏幕上不会显示。
另外,由于模型代码不会将数据持久化存储在任何地方,笔记也不会被保存。你可能已经写了有史以来最伟大的 Node.js 编程书,但一旦应用服务器重新启动,它就消失了。
通常情况下,你会运行多个应用实例以提高性能。这就是老生常谈的“增加服务器”的把戏。为了使其生效,数据当然必须共享,并且每个实例必须访问相同的数据源。通常情况下,这涉及到数据库,当涉及到用户身份信息时,甚至可能需要武装警卫。
所有这些意味着数据库、更多的数据模型、单元测试、安全实施、部署策略等等。等一下——我们很快就会涉及到所有这些!
# 总结
在本章中,我们走了很长的路。
我们首先看了一下回调地狱,以及 Promise 对象和 async 函数如何帮助我们驯服异步代码。因为我们正在编写一个 Express 应用,我们看了如何在 Express 中使用 async 函数。我们将在本书中始终使用这些技术。
我们迅速转向使用 Express 编写真实应用的基础。目前,我们的应用程序将数据保存在内存中,但它具有成为支持实时协作评论的笔记应用的基本功能。
在下一章中,我们将初步涉足响应式、移动友好的网页设计领域。由于移动计算设备的日益普及,有必要先考虑移动设备,而不是桌面电脑用户。为了每天能够触达数百万用户,"Notes"应用用户在使用智能手机时需要良好的用户体验。
在接下来的章节中,我们将继续扩展"Notes"应用的功能,首先是数据库存储模型。但首先,在下一章中,我们有一个重要的任务——使用 Bootstrap 实现移动优先的用户界面。
实施移动优先范式
现在我们的第一个 Express 应用程序可用,我们应该按照这个软件开发时代的口头禅行事:以移动设备为先。无论是智能手机、平板电脑、汽车仪表盘、冰箱门还是浴室镜子,移动设备正在占领世界。
在为移动设备设计时,主要考虑因素是小屏幕尺寸、触摸导向的交互、没有鼠标以及略有不同的**用户界面**(**UI**)期望。在 1997-8 年,当流媒体视频首次开发时,视频制作人员必须学会如何为视口大小与无花果(一种美国零食)大小相当的视频体验设计。今天,应用程序设计师必须应对与一张扑克牌大小相当的应用程序窗口。
对于*Notes*应用程序,我们的 UI 需求是简单的,而且没有鼠标对我们没有任何影响。
在本章中,我们不会进行太多的 Node.js 开发。相反,我们将进行以下操作:
+ 修改 Notes 应用程序模板以获得更好的移动呈现效果。
+ 编辑 Bootstrap SASS 文件以自定义应用程序主题。
+ 安装第三方 Bootstrap 主题。
+ 了解 Bootstrap 4.5,这是一个流行的响应式 UI 设计框架。
截至撰写本文时,Bootstrap v5 刚刚进入 alpha 阶段。这使得现在采用它为时尚早,但我们可能希望将来这样做。根据迁移指南,Bootstrap 的大部分内容在第 5 版中将保持不变,或者非常相似。然而,第 5 版中最大的变化是不再需要 jQuery。因为我们在第九章中相当频繁地使用 jQuery,这是一个重要的考虑因素,*使用 Socket.IO 进行动态客户端/服务器交互*。
通过完成前面列表中的任务,我们将初步了解成为全栈 Web 工程师意味着什么。本章的目标是获得应用程序开发的一个重要部分,即 UI 的介绍,以及 Web UI 开发的主要工具包之一。
与其仅仅因为它是流行的事物而进行移动优先开发,不如首先尝试理解正在解决的问题。
# 第九章:了解问题-Notes 应用程序不适合移动设备
让我们首先量化问题。我们需要探索应用在移动设备上的表现如何(或者不好)。这很容易做到:
1. 启动*Notes*应用程序。确定主机系统的 IP 地址。
1. 使用您的移动设备,使用 IP 地址连接到服务,并浏览*Notes*应用程序,对其进行测试并记录任何困难。
另一种方法是使用您的桌面浏览器,将其调整为非常窄。Chrome DevTools 还包括移动设备模拟器。无论哪种方式,您都可以在桌面上模拟智能手机的小屏幕尺寸。
要在移动屏幕上看到真正的 UI 问题,请编辑`views/noteedit.hbs`并进行以下更改:
What's changed is that we've added the cols=80 parameter to set its width to be fixed at 80 columns. We want this textarea element to be overly large so that you can experience how a non-responsive web app appears on a mobile device. View the application on a mobile device and you'll see something like one of the screens in this screenshot:
Viewing a note works well on an iPhone 6, but the screen for editing/adding a note is not good. The text entry area is so wide that it runs off the side of the screen. Even though interaction with FORM elements works well, it's clumsy. In general, browsing the Notes application gives an acceptable mobile user experience that doesn't suck, but won't make our users leave rave reviews.
In other words, we have an example of a screen that works well on the developers' laptop but is horrid on the target platform. By following the mobile-first paradigm, the developer is expected to constantly check the behavior in a mobile web browser, or else the mobile view in the Chrome developer tool, and to design accordingly.
This gives us an idea of the sort of problem that responsive web design aims to correct. Before implementing a mobile-first design in our Notes app, let's discuss some of the theory behind responsive web design.
Learning the mobile-first paradigm theory
Mobile devices have a smaller screen, are generally touch-oriented, and have different user experience expectations than a desktop computer.
To accommodate smaller screens, we use responsive web design techniques. This means designing the application to accommodate the screen size and ensuring websites provide optimal viewing and interaction across a wide range of devices. Techniques include changing font sizes, rearranging elements on the screen, using collapsible elements that open when touched, and resizing images or videos to fit available space. This is called responsive because the application responds to device characteristics by making these changes.
By mobile-first, we mean that you design the application to work well on a mobile device first, and then move on to devices with larger screens. It's about prioritizing mobile devices first.
The primary technique is using media queries in stylesheets to detect device characteristics. Each media query section targets a range of devices, using a CSS declaration to appropriately restyle content.
Let's consult a concrete example. The Twenty Twelve theme for WordPress has a straightforward responsive design implementation. It's not built with any framework, so you can see clearly how the mechanism works, and the stylesheet is small enough to be easily digestible. We're not going to use this code anywhere; instead, it is intended as a useful example of implementing a responsive design.
You can refer to the source code for the Twenty Twelve theme in the WordPress repository at themes.svn.wordpress.org/twentytwelve/1.9/style.css.
The stylesheet starts with a number of resets, where the stylesheet overrides some typical browser style settings with clear defaults. Then, the bulk of the stylesheet defines styling for mobile devices. Toward the bottom of the stylesheet is a section labeled Media queries where, for certain sized screens, the styles defined for mobile devices are overridden to work on devices with larger screens.
It does this with the following two media queries:
样式表的第一部分配置了所有设备的页面布局。接下来,对于任何至少宽度为`600px`的浏览器视口,重新配置页面以在较大屏幕上显示。然后,对于任何至少宽度为`960px`的浏览器视口,再次重新配置。样式表有一个最终的媒体查询来覆盖打印设备。

这些宽度被称为**断点**。这些阈值视口宽度是设计自身改变的点。您可以通过访问任何响应式网站,然后调整浏览器窗口大小来查看断点的作用。观察设计在特定尺寸处的跳跃。这些是该网站作者选择的断点。

关于选择断点的最佳策略有很多不同的意见。您是要针对特定设备还是要针对一般特征?Twenty Twelve 主题仅使用两个视口大小媒体查询在移动设备上表现得相当不错。CSS-Tricks 博客发布了一个针对每个已知设备的具体媒体查询的广泛列表,可在[`css-tricks.com/snippets/css/media-queries-for-standard-devices/`](https://css-tricks.com/snippets/css/media-queries-for-standard-devices/)上找到。

我们至少应该针对这些设备:

+   **小**:这包括 iPhone 5 SE。

+   **中等**:这可以指平板电脑或更大的智能手机。

+   **大**:这包括更大的平板电脑或更小的台式电脑。

+   **特大**:这指的是更大的台式电脑和其他大屏幕。

+   **横向/纵向**:您可能希望区分横向模式和纵向模式。在两者之间切换当然会改变视口宽度,可能会将其推过断点。但是,您的应用程序可能需要在这两种模式下表现不同。

这就足够让我们开始响应式网页设计的理论。在我们的*Notes*应用程序中,我们将致力于使用触摸友好的 UI 组件,并使用 Bootstrap 根据屏幕尺寸调整用户体验。让我们开始吧。

# 在 Notes 应用程序中使用 Twitter Bootstrap

Bootstrap 是一个移动优先的框架,包括 HTML5、CSS3 和 JavaScript 代码,提供了一套世界级的响应式网页设计组件。它是由 Twitter 的工程师开发的,然后于 2011 年 8 月发布到世界上。

该框架包括将现代功能应用于旧浏览器的代码,响应式的 12 列网格系统,以及用于构建 Web 应用程序和网站的大量组件(其中一些使用 JavaScript)。它旨在为您的应用程序提供坚实的基础。

有关 Bootstrap 的更多详细信息,请参考[`getbootstrap.com`](http://getbootstrap.com)。

通过这个对 Bootstrap 的介绍,让我们继续设置它。

## 设置 Bootstrap

第一步是复制您在上一章中创建的代码。例如,如果您创建了一个名为`chap05/notes`的目录,那么从`chap05/notes`的内容中创建一个名为`chap06/notes`的目录。

现在,我们需要开始在*Notes*应用程序中添加 Bootstrap 的代码。Bootstrap 网站建议从 Bootstrap(和 jQuery)公共 CDN 加载所需的 CSS 和 JavaScript 文件。虽然这很容易做到,但我们不会这样做,有两个原因:

+   这违反了将所有依赖项保持本地化到应用程序并且不依赖全局依赖项的原则。

+   这使我们的应用程序依赖于 CDN 是否正常运行。

+   这会阻止我们生成自定义主题。

相反,我们将安装 Bootstrap 的本地副本。有几种方法可以在本地安装 Bootstrap。例如,Bootstrap 网站提供可下载的 TAR/GZIP 存档(tarball)。更好的方法是使用自动化依赖管理工具,幸运的是,npm 存储库中有我们需要的所有包。

最直接的选择是在 npm 存储库中使用 Bootstrap ([`www.npmjs.com/package/bootstrap`](https://www.npmjs.com/package/bootstrap))、Popper.js ([`www.npmjs.com/package/popper.js`](https://www.npmjs.com/package/popper.js))和 jQuery ([`www.npmjs.com/package/jquery`](https://www.npmjs.com/package/jquery))包。这些包不提供 Node.js 模块,而是通过 npm 分发的前端代码。许多前端库都是通过 npm 存储库分发的。

我们使用以下命令安装包:
As we can see here, when we install Bootstrap, it helpfully tells us the corresponding versions of jQuery and Popper.js to use. But according to the Bootstrap website, we are to use a different version of jQuery than what's shown here. Instead, we are to use jQuery 3.5.x instead of 1.9.1, because 3.5.x has many security issues fixed.
On the npm page for the Popper.js package (www.npmjs.com/package/popper.js), we are told this package is deprecated, and that Popper.js v2 is available from the @popperjs/core npm package. However, the Bootstrap project tells us to use this version of Popper.js, so that's what we'll stick with.
The Bootstrap Getting Started documentation explicitly says to use jQuery 3.5.1 and Popper 1.16.0, as of the time time of writing, as you can see at getbootstrap.com/docs/4.5/getting-started/introduction/.
What's most important is to see what got downloaded:
在每个目录中都有用于在浏览器中使用的 CSS 和 JavaScript 文件。更重要的是,这些文件位于已知路径名的特定目录中,具体来说,就是我们刚刚检查过的目录。

让我们看看如何在浏览器端配置我们的 Notes 应用程序来使用这三个包,并在页面布局模板中设置 Bootstrap 支持。

## 将 Bootstrap 添加到 Notes 应用程序

在这一部分,我们将首先在页面布局模板中加载 Bootstrap CSS 和 JavaScript,然后确保 Bootstrap、jQuery 和 Popper 包可供使用。我们已经确保这些库安装在`node_modules`中,因此我们需要确保 Notes 知道将这些文件作为静态资产提供给 Web 浏览器。

在 Bootstrap 网站上,他们为页面提供了推荐的 HTML 结构。我们将从他们的建议中插入,以使用刚刚安装的 Bootstrap、jQuery 和 Popper 的本地副本。

请参阅[`getbootstrap.com/docs/4.5/getting-started/introduction/`](https://getbootstrap.com/docs/4.5/getting-started/introduction/)的*入门*页面。

我们将修改`views/layout.hbs`以匹配 Bootstrap 推荐的模板,通过进行粗体文本中显示的更改:
This is largely the template shown on the Bootstrap site, incorporated into the previous content of views/layout.hbs. Our own stylesheet is loaded following the Bootstrap stylesheet, giving us the opportunity to override anything in Bootstrap we want to change. What's different is that instead of loading Bootstrap, Popper.js, and jQuery packages from their respective CDNs, we use the path /assets/vendor/product-name instead.
This is the same as recommended on the Bootstrap website except the URLs point to our own site rather than relying on the public CDN. The pathname prefix, /assets/vendor, is routinely used to hold code provided by a third party.
This /assets/vendor URL is not currently recognized by the Notes application. To add this support, edit app.mjs to add these lines:
我们再次使用`express.static`中间件来为访问*Notes*应用程序的浏览器提供资产文件。每个路径名都是 npm 安装的 Bootstrap、jQuery 和 Popper 库的位置。

Popper.js 库有一个特殊的考虑。在`popper.js/dist`目录中,团队以 ES6 模块语法分发了一个库。此时,我们不能相信所有浏览器都支持 ES6 模块。在`popper.js/dist/umd`中是一个适用于所有浏览器的 Popper.js 库的版本。因此,我们已经适当地设置了目录。

在`public`目录中,我们需要做一些整理。当`express-generator`设置初始项目时,它生成了`public/images`、`public/javascripts`和`public/stylesheets`目录。因此,每个的 URL 都以`/images`、`/javascripts`和`/stylesheets`开头。给这些文件一个以`/assets`目录开头的 URL 更清晰。要实现这个改变,首先要移动文件如下:
We now have our asset files, including Bootstrap, Popper.js, and jQuery, all available to the Notes application under the /assets directory. Referring back to views/layout.hbs, notice that we said to change the URL for our stylesheet to /assets/stylesheets/style.css, which matches this change.
We can now try this out by running the application:
屏幕上的差异很小,但这是 CSS 和 JavaScript 文件被加载的必要证明。我们已经实现了第一个主要目标——使用现代的、移动友好的框架来实现移动优先设计。

在修改应用程序的外观之前,让我们谈谈其他可用的框架。

## 替代布局框架

Bootstrap 并不是唯一提供响应式布局和有用组件的 JavaScript/CSS 框架。当然,所有其他框架都有自己的特点。一如既往,每个项目团队都可以选择他们使用的技术,当然,市场也在不断变化,新的库不断出现。我们在这个项目中使用 Bootstrap 是因为它很受欢迎。这些其他框架也值得一看:

+   Pure.css ([`purecss.io/`](https://purecss.io/)):一个强调小代码占用空间的响应式 CSS 框架。

+   Picnic CSS ([`picnicss.com/`](https://picnicss.com/)):一个强调小尺寸和美观的响应式 CSS 框架。

+   Bulma ([`bulma.io/`](https://bulma.io/)):一个自称非常易于使用的响应式 CSS 框架。

+   Shoelace ([`shoelace.style/`](https://shoelace.style/)):一个强调使用未来 CSS 的 CSS 框架,意味着它使用 CSS 标准化的最前沿的 CSS 构造。由于大多数浏览器不支持这些功能,使用 cssnext ([`cssnext.io/`](http://cssnext.io/)) 来进行支持。Shoelace 使用基于 Bootstrap 网格的网格布局系统。

+   PaperCSS ([`www.getpapercss.com/`](https://www.getpapercss.com/)):一个看起来像手绘的非正式 CSS 框架。

+   Foundation ([`foundation.zurb.com/`](https://foundation.zurb.com/)):自称为世界上最先进的响应式前端框架。

+   Base([`getbase.org/`](http://getbase.org/)):一个轻量级的现代 CSS 框架。

HTML5 Boilerplate([`html5boilerplate.com/`](https://html5boilerplate.com/))是编写 HTML 和其他资产的极其有用的基础。它包含了网页 HTML 代码的当前最佳实践,以及用于规范化 CSS 支持和多个 Web 服务器的配置文件。

浏览器技术也在迅速改进,布局技术是其中之一。Flexbox 和 CSS Grid 布局系统在使 HTML 内容布局比以前的技术更容易方面是一个重大进步。

# Flexbox 和 CSS Grids

这两种新的 CSS 布局方法正在影响 Web 应用程序开发。CSS3 委员会一直在多个方面进行工作,包括页面布局。

在遥远的过去,我们使用嵌套的 HTML 表格进行页面布局。这是一个不愉快的回忆,我们不必再次回顾。最近,我们一直在使用使用`<div>`元素的盒模型,甚至有时使用绝对或相对定位技术。所有这些技术在多种方面都不够理想,有些更甚于其他。

一个流行的布局技术是将水平空间分成列,并为页面上的每个元素分配一定数量的列。使用一些框架,我们甚至可以有嵌套的`<div>`元素,每个都有自己的列集。Bootstrap 3 和其他现代框架使用了这种布局技术。

两种新的 CSS 布局方法,Flexbox([`en.wikipedia.org/wiki/CSS_flex-box_layout`](https://en.wikipedia.org/wiki/CSS_flex-box_layout))和 CSS Grids([`developer.mozilla.org/en-US/docs/Web/CSS/CSS_Grid_Layout`](https://developer.mozilla.org/en-US/docs/Web/CSS/CSS_Grid_Layout)),是对以往所有方法的重大改进。我们提到这些技术是因为它们都值得关注。

在 Bootstrap 4 中,Bootstrap 团队选择了 Flexbox。因此,在底层是 Flexbox CSS 构造。

在设置了 Bootstrap 并学习了一些响应式 Web 设计的背景之后,让我们立即开始在*Notes*中实现响应式设计。

# Notes 应用的移动优先设计

当我们为 Bootstrap 等添加了 CSS 和 JavaScript 时,那只是开始。为了实现响应式的移动友好设计,我们需要修改每个模板以使用 Bootstrap 组件。Bootstrap 的功能在 4.x 版本中分为四个领域:

+   **布局**:声明来控制 HTML 元素的布局,支持基于设备尺寸的不同布局

+   **内容**:用于规范化 HTML 元素、排版、图片、表格等外观

+   **组件**:包括导航栏、按钮、菜单、弹出窗口、表单、轮播图等全面的 UI 元素,使应用程序的实现变得更加容易

+   **实用工具**:用于调整 HTML 元素的呈现和布局的附加工具

Bootstrap 文档中充满了我们可以称之为*配方*的内容,用于实现特定 Bootstrap 组件或效果的 HTML 元素结构。实现的关键在于,通过向每个 HTML 组件添加正确的 HTML 类声明来触发 Bootstrap 效果。

让我们从使用 Bootstrap 进行页面布局开始。

## 奠定 Bootstrap 网格基础

Bootstrap 使用 12 列网格系统来控制布局,为应用程序提供了一个响应式的移动优先基础。当正确设置时,使用 Bootstrap 组件的布局可以自动重新排列组件,以适应从超小屏幕到大型台式电脑的不同尺寸屏幕。该方法依赖于带有类的`<div>`元素来描述布局中每个`<div>`的作用。

Bootstrap 中的基本布局模式如下:
This is a generic Bootstrap layout example, not anything we're putting into the Notes app. Notice how each layer of the layout relies on different class declarations. This fits Bootstrap's pattern of declaring behavior by using classes.
In this case, we're showing a typical page layout of a container, containing two rows, with two columns on the first row and three columns on the second. The outermost layer uses the .container or .container-fluid elements. Containers provide a means to center or horizontally pad the content. Containers marked as .container-fluid act as if they have width: 100%, meaning they expand to fill the horizontal space.
A .row is what it sounds like, a "row" of a structure that's somewhat like a table. Technically, a row is a wrapper for columns. Containers are wrappers for rows, and rows are wrappers for columns, and columns contain the content displayed to our users.
Columns are marked with variations of the .col class. With the basic column class, .col, the columns are divided equally into the available space. You can specify a numerical column count to assign different widths to each column. Bootstrap supports up to 12 numbered columns, hence each row in the example adds up to 12 columns.
You can also specify a breakpoint to which the column applies:
- Using
col-xstargets extra-small devices (smartphones,<576px). - Using
col-smtargets small devices (>= 576px). - Using
col-mdtargets medium devices (>= 768px). - Using
col-lgtargets large devices (>= 992px). - Using
col-xltargets extra-large devices (>= 1200px).
Specifying a breakpoint, for example, col-sm, means that the declaration applies to devices matching that breakpoint or larger. Hence, in the example shown earlier, the column definitions were applied to col-sm, col-md, col-lg, and col-xl devices, but not to col-xs devices.
The column count is appended to the class name. That means using col-# when not targeting a breakpoint, for example, col-4, or col-{breakpoint}-# when targeting a breakpoint, for example, col-md-4, to target a space four columns wide on medium devices. If the columns add up to more than 12, the columns beyond the twelfth column wrap around to become a new row. The word auto can be used instead of a numerical column count to size the column to the natural width of its contents.
It's possible to mix and match to target multiple breakpoints:
这声明了三种不同的布局,一种用于超小设备,另一种用于中等设备,最后一种用于大型设备。

网格系统可以做更多。详情请参阅[`getbootstrap.com/docs/4.5/layout/overview/`](https://getbootstrap.com/docs/4.5/layout/overview/)中的文档。

这个介绍给了我们足够的知识来开始修改*Notes*应用程序。我们下一个任务是更好地理解应用程序页面的结构。

## *Notes*应用程序的响应式页面结构

我们可以对*Notes*进行整个用户体验分析,或者让设计师参与,并为*Notes*应用程序的每个屏幕设计完美的页面设计。但是当前*Notes*应用程序的设计是开发人员编写的功能性而不是丑陋的页面设计的结果。让我们从讨论我们拥有的页面设计结构的逻辑开始。考虑以下结构:
This is the general structure of the pages in Notes. The page content has two visible rows: the header and the main content. At the bottom of the page are invisible things such as the JavaScript files for Bootstrap and jQuery.
As it currently stands, the header contains a title for each page as well as navigation links so the user can browse the application. The content area is what changes from page to page, and is either about viewing content or editing content. The point is that for every page we have two sections for which to handle layout.
The question is whether views/layout.hbs should have any visible page layout. This template is used for the layout of every page in the application. The content of those pages is different enough that it seems layout.hbs cannot have any visible elements.
That's the decision we'll stick with for now. The next thing to set up is an icon library we can use for graphical buttons.
Using icon libraries and improving visual appeal
The world around us isn't constructed of words, but instead things. Hence, pictorial elements and styles, such as icons, can help computer software to be more comprehensible. Creating a good user experience should make our users reward us with more likes in the app store.
There are several icon libraries that can be used on a website. The Bootstrap team has a curated list at getbootstrap.com/docs/4.5/extend/icons/. For this project, we'll use Feather Icons (feathericons.com/). It is a conveniently available npm package at www.npmjs.com/package/feather-icons.
To install the package, run this command:
然后您可以检查已下载的包,看到`./node_modules/feather-icons/dist/feather.js`包含了浏览器端的代码,使得使用图标变得容易。

我们通过在`app.mjs`中挂载它来使该目录可用,就像我们为 Bootstrap 和 jQuery 库所做的那样。将此代码添加到`app.mjs`中:
Going by the documentation, we must put this at the bottom of views/layout.hbs to enable feather-icons support:
这会加载浏览器端的库,然后调用该库来使用图标。

要使用其中一个图标,使用`data-feather`属性指定其中一个图标名称,就像这样:
As suggested by the icon name, this will display a circle. The Feather Icons library looks for elements with the data-feather attribute, which the Feather Icons library uses to identify the SVG file to use. The Feather Icons library completely replaces the element where it finds the data-feather attribute. Therefore, if you want the icon to be a clickable link, it's necessary to wrap the icon definition with an <a> tag, rather than adding data-feather to the <a> tag.
Let's now redesign the page header to be a navigation bar, and use one of the Feather icons.
Responsive page header navigation bar
The header section we designed before contains a page title and a little navigation bar. Bootstrap has several ways to spiff this up, and even give us a responsive navigation bar that neatly collapses to a menu on small devices.
In views/header.hbs, make this change:
添加`class="page-header"`告诉 Bootstrap 这是页面标题。在其中,我们有与之前一样的`<h1>`标题,提供页面标题,然后是一个响应式的 Bootstrap `navbar`。
默认情况下,`navbar`是展开的——这意味着`navbar`内部的组件是可见的——因为有`navbar-expand-md`类。这个`navbar`使用一个`navbar-toggler`按钮来控制`navbar`的响应性。默认情况下,这个按钮是隐藏的,`navbar`的主体是可见的。如果屏幕足够小,`navbar-toggler`会切换为可见状态,`navbar`的主体变为不可见,当点击现在可见的`navbar-toggler`时,会弹出一个包含`navbar`主体的菜单:
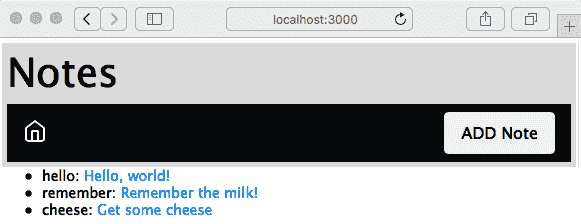
我们选择了 Feather Icons 的*home*图标,因为该链接指向*主页*。打算`navbar`的中间部分将包含一个面包屑路径,当我们在*Notes*应用程序中导航时。
添加笔记按钮与右侧粘合,使用一些 Flexbox 魔法。容器是 Flexbox,这意味着我们可以使用 Bootstrap 类来控制每个项目所占用的空间。面包屑区域是主页图标和添加笔记按钮之间的空白区域。在这种情况下是空的,但是包含它的`<div>`元素已经声明为`class="col"`,这意味着它占据一个列单位。另一方面,添加笔记按钮声明为`class="col-auto"`,这意味着它只占据自己所需的空间。因此,空的面包屑区域将扩展以填充可用空间,而添加笔记按钮只填充自己的空间,因此被推到一边。
因为它是同一个应用程序,所有功能都能正常工作;我们只是在处理演示。我们已经添加了一些笔记,但是在首页上的列表呈现还有很多需要改进的地方。标题的小尺寸不太适合触摸操作,因为它没有为手指提供一个大的目标区域。你能解释为什么`notekey`值必须显示在主页上吗?考虑到这一点,让我们继续修复首页。
## 在首页改进笔记列表
当前的主页有一些简单的文本列表,不太适合触摸操作,并且在行首显示*key*可能会让用户感到困惑。让我们来修复这个问题。
按照以下方式编辑`views/index.hbs`,修改的行用粗体显示:
The first change is to switch away from using a list and to use a vertical button group. The button group is a Bootstrap component that's what it sounds like, a group of buttons. By making the text links look and behave like buttons, we're improving the UI, especially its touch-friendliness. We chose the btn-outline-dark button style because it looks good in the UI. We use large buttons (btn-lg) that fill the width of the container (btn-block).
We eliminated showing the notekey value to the user. This information doesn't add anything to the user experience. Running the application, we get the following:
This is beginning to take shape, with a decent-looking home page that handles resizing very nicely and is touch-friendly. The buttons have been enlarged nicely to be large enough for big fingers to easily tap.
There's still something more to do with this since the header area is taking up a fair amount of space. We should always feel free to rethink a plan as we look at intermediate results. Earlier, we created a design for the header area, but on reflection, that design looks to be too large. The intention had been to insert a breadcrumb trail just to the right of the home icon, and to leave the <h1> title at the top of the header area. But this takes up too much vertical space, so we can tighten up the header and possibly improve the appearance.
Edit partials/header.hbs with the following line in bold:
这会移除页眉区域顶部的`<h1>`标签,立即收紧演示。
在`navbar-collapse`区域内,我们用一个简单的`navbar-text`组件替换了原本意为面包屑的内容,其中包含页面标题。为了保持“添加笔记”按钮固定在右侧,我们保持了`class="col"`和`class="col-auto"`的设置:
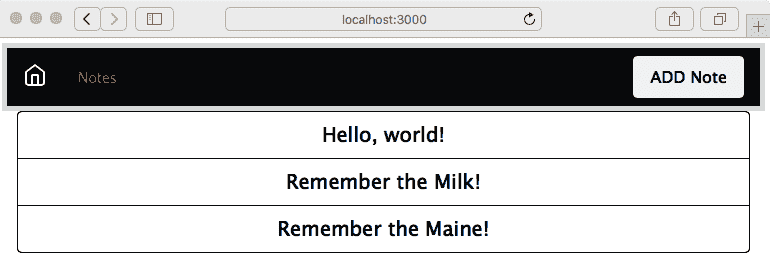
哪种页眉设计更好?这是一个很好的问题。因为美在于观者的眼中,两种设计可能同样好。我们展示的是通过编辑模板文件轻松更新设计的便利性。
现在让我们来处理查看笔记的页面。
## 清理笔记查看体验
查看笔记并不坏,但用户体验可以得到改善。例如,用户不需要看到`notekey`,这意味着我们可以从显示中删除它。此外,Bootstrap 有更漂亮的按钮可以使用。
在`views/noteview.hbs`中进行以下更改:
We have declared two rows, one for the note, and another for buttons for actions related to the note. Both are declared to consume all 12 columns, and therefore take up the full available width. The buttons are again contained within a button group, but this time a horizontal group rather than vertical.
Running the application, we get the following:
Do we really need to show the notekey to the user? We'll leave it there, but that's an open question for the user experience team. Otherwise, we've improved the note-reading experience.
Next on our list is the page for adding and editing notes.
Cleaning up the add/edit note form
The next major glaring problem is the form for adding and editing notes. As we said earlier, it's easy to get the text input area to overflow a small screen. Fortunately, Bootstrap has extensive support for making nice-looking forms that work well on mobile devices.
Change the form in views/noteedit.hbs to this:
这里有很多事情要做。我们重新组织了`form`,以便 Bootstrap 可以对其进行正确处理。首先要注意的是我们有几个这样的实例:
The entire form is contained within a container-fluid, meaning that it will automatically stretch to fit the screen. The form has three of these rows with the form-group class.
Bootstrap uses form-group elements to add structure to forms and to encourage proper use of <label> elements, along with other form elements. It's good practice to use a <label> element with every <input> element to improve assistive behavior in the browser, rather than simply leaving some dangling text.
For horizontal layout, notice that for each row there is a <label> with a col-1 class, and the <input> element is contained within a <div> that has a col class. The effect is that the <label> has a controlled width and that the labels all have the same width, while the <input> elements take up the rest of the horizontal space.
Every form element has class="form-control". Bootstrap uses this to identify the controls so it can add styling and behavior.
The placeholder='key' attribute puts sample text in an otherwise empty text input element. It disappears as soon as the user types something and is an excellent way to prompt the user with what's expected.
Finally, we changed the Submit button to be a Bootstrap button. These look nice, and Bootstrap makes sure that they work great:
The result looks good and works well on the iPhone. It automatically sizes itself to whatever screen it's on. Everything behaves nicely. In the preceding screenshot, we've resized the window small enough to cause the navbar to collapse. Clicking on the so-called hamburger icon on the right (the three horizontal lines) causes the navbar contents to pop up as a menu.
We have learned how to improve forms using Bootstrap. We have a similar task in the form to confirm deleting notes.
Cleaning up the delete-note window
The window used to verify the user's choice to delete a note doesn't look bad, but it can be improved.
Edit views/notedestroy.hbs to contain the following:
我们重新设计了它,以使用类似的 Bootstrap 表单标记。关于删除笔记的问题被包裹在`class="form-text"`中,以便 Bootstrap 可以正确显示它。
按钮与以前一样包裹在`class="btn-group"`中。按钮的样式与其他屏幕上完全相同,使应用程序在整体外观上保持一致:
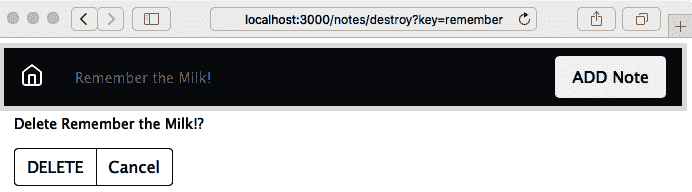
存在一个问题,即导航栏中的标题文本没有使用单词`Delete`。在`routes/notes.mjs`中,我们可以进行这个更改:
What we've done is to change the title parameter passed to the template. We'd done this in the /notes/edit route handler and seemingly missed doing so in this handler.
That handles rewriting the Notes application to use Bootstrap. Having a complete Bootstrap-based UI, let's look at what it takes to customize the Bootstrap look and feel.
Customizing a Bootstrap build
One reason to use Bootstrap is that you can easily build a customized version. The primary reason to customize a Bootstrap build is to adjust the theme from the default. While we can use stylesheet.css to adjust the presentation, it's much more effective to adjust theming the Bootstrap way. That means changing the SASS variables and recompiling Bootstrap to generate a new bootstrap.css file.
Bootstrap stylesheets are built using the build process described in the package.json file. Therefore, customizing a Bootstrap build means first downloading the Bootstrap source tree, making modifications, then using the npm run dist command to build the distribution. By the end of this section, you'll know how to do all that.
The Bootstrap uses SASS, which is one of the CSS preprocessors used to simplify CSS development. In Bootstrap's code, one file (scss/_variables.scss) contains variables used throughout the rest of Bootstrap's .scss files. Change one variable and it automatically affects the rest of Bootstrap.
The official documentation on the Bootstrap website (getbootstrap.com/docs/4.5/getting-started/build-tools/) is useful for reference on the build process.
If you've followed the directions given earlier, you have a directory, chap06/notes, containing the Notes application source code. Create a directory named chap06/notes/theme, within which we'll set up a custom Bootstrap build process.
In order to have a clear record of the steps involved, we'll use a package.json file in that directory to automate the build process. There isn't any Node.js code involved; npm is also a convenient tool to automate the software build processes.
To start, we need a script for downloading the Bootstrap source tree from github.com/twbs/bootstrap. While the bootstrap npm package includes SASS source files, it isn't sufficient to build Bootstrap, and therefore we must download the source tree. What we do is navigate to the GitHub repository, click on the Releases tab, and select the URL for the most recent release. But instead of downloading it manually, let's automate the process.
With theme/package.json can contain this scripts section:
这将自动下载并解压 Bootstrap 源代码分发包,然后`postdownload`步骤将运行`npm install`来安装 Bootstrap 项目声明的依赖项。这样就可以设置好源代码树,准备修改和构建。

输入以下命令:
This executes the steps to download and unpack the Bootstrap source tree. The scripts we gave will work for a Unix-like system, but if you are on Windows it will be easiest to run this in the Windows Subsystem for Linux.
This much only installs the tools necessary to build Bootstrap. The documentation on the Bootstrap website also discusses installing Bundler from the Ruby Gems repository, but that tool only seems to be required to bundle the built distribution. We do not need that tool, so skip that step.
To build Bootstrap, let's add the following lines to the scripts section in our theme/package.json file:
显然,当发布新的 Bootstrap 版本时,您需要调整这些目录名称。

在 Bootstrap 源代码树中,运行`npm run dist`将使用 Bootstrap`package.json`文件中记录的过程构建 Bootstrap。同样,`npm run watch`设置了一个自动化过程,用于扫描更改的文件并在更改任何文件时重新构建 Bootstrap。运行`npm run clean`将删除 Bootstrap 源代码树。通过将这些行添加到我们的`theme/package.json`文件中,我们可以在终端中启动这个过程,现在我们可以根据需要重新运行构建,而不必绞尽脑汁,努力记住该做什么。

为了避免将 Bootstrap 源代码检入到 Git 存储库中,添加一个`theme/.gitignore`文件:
This will tell Git to not commit the Bootstrap source tree to the source repository. There's no need to commit third-party sources to your source tree since we have recorded in the package.json file the steps required to download the sources.
Now run a build with this command:
构建文件位于`theme/bootstrap-4.5.0/dist`目录中。该目录的内容将与 Bootstrap 的 npm 包的内容相匹配。

在继续之前,让我们看看 Bootstrap 源代码树。`scss`目录包含了将被编译成 Bootstrap CSS 文件的 SASS 源代码。要生成一个定制的 Bootstrap 构建,需要在该目录中进行一些修改。

`bootstrap-4.5.0/scss/bootstrap.scss`文件包含`@import`指令,以引入所有 Bootstrap 组件。文件`bootstrap-4.5.0/scss/_variables.scss`包含了在其余 Bootstrap SASS 源代码中使用的定义。编辑或覆盖这些值将改变使用生成的 Bootstrap 构建的网站的外观。

例如,这些定义确定了主要的颜色值:
These are similar to normal CSS statements. The !default attribute designates these values as the default. Any !default values can be overridden without editing _values.scss.
To create a custom theme we could change _variables.scss, then rerun the build. But what if Bootstrap makes a considerable change to _variables.scss that we miss? It's better to instead create a second file that overrides values in _variables.scss.
With that in mind, create a file, theme/_custom.scss, containing the following:
这会颠倒`_variables.scss`中`$body-bg`和`$body-color`设置的值。Notes 应用现在将使用黑色背景上的白色文本,而不是默认的白色背景和黑色文本。因为这些声明没有使用`!default`,它们将覆盖`_variables.scss`中的值。

然后,在`theme`目录中复制`scss/bootstrap.scss`并进行修改:
This adds an @import header for the _custom.scss file we just created. That way, Bootstrap will load our definitions during the build process.
Finally, add this line to the scripts section of theme/package.json:
使用这些脚本,在构建 Bootstrap 之前,这两个文件将被复制到指定位置,之后,构建后的文件将被复制到名为`dist`的目录中。`prebuild`步骤让我们可以将`_custom.scss`和`bootstrap.scss`的副本提交到我们的源代码库中,同时可以随时删除 Bootstrap 源。同样,`postbuild`步骤让我们可以将构建的自定义主题提交到源代码库中。

接下来,重新构建 Bootstrap:
While that's building, let's modify notes/app.mjs to mount the build directory:
我们所做的是从`node_modules`中的 Bootstrap 配置切换到我们刚在`theme`目录中构建的内容。

然后重新加载应用程序,您将看到颜色的变化。

要获得这个确切的演示,需要进行两个更改。我们之前使用的按钮元素具有`btn-outline-dark`类,这在浅色背景上效果很好。因为背景现在是黑色,这些按钮需要使用浅色着色。

要更改按钮,在`views/index.hbs`中进行以下更改:
Make a similar change in views/noteview.hbs:
很酷,我们现在可以按自己的意愿重新设计 Bootstrap 的颜色方案。不要向您的用户体验团队展示这一点,因为他们会大发雷霆。我们这样做是为了证明我们可以编辑`_custom.scss`并改变 Bootstrap 主题。

接下来要探索的是使用预先构建的第三方 Bootstrap 主题。

## 使用第三方自定义 Bootstrap 主题

如果所有这些对您来说太复杂了,一些网站提供了预先构建的 Bootstrap 主题,或者简化的工具来生成 Bootstrap 构建。让我们先尝试从 Bootswatch([`bootswatch.com/`](https://bootswatch.com/))下载一个主题。这既是一个免费开源主题的集合,也是一个用于生成自定义 Bootstrap 主题的构建系统([`github.com/thomaspark/bootswatch/`](https://github.com/thomaspark/bootswatch/))。

让我们使用 Bootswatch 的**Minty**主题来探索所需的更改。您可以从网站下载主题,或者将以下内容添加到`package.json`的`scripts`部分:
This will download the prebuilt CSS files for our chosen theme. In passing, notice that the Bootswatch website offers _variables.scss and _bootswatch.scss files, which should be usable with a workflow similar to what we implemented in the previous section. The GitHub repository matching the Bootswatch website has a complete build procedure for building custom themes.
Perform the download with the following command:
在`app.mjs`中,我们需要更改 Bootstrap 挂载点,分别挂载 JavaScript 和 CSS 文件。使用以下内容:
Instead of one mount for /vendor/bootstrap, we now have two mounts for each of the subdirectories. While the Bootswatch team provides bootstrap.css and bootstrap.min.css, they do not provide the JavaScript source. Therefore, we use the /vendor/bootstrap/css mount point to access the CSS files you downloaded from the theme provider, and the /vendor/bootstrap/js mount point to access the JavaScript files in the Bootstrap npm package.
Because Minty is a light-colored theme, the buttons now need to use the dark style. We had earlier changed the buttons to use a light style because of the dark background. We must now switch from btn-outline-light back to btn-outline-dark. In partials/header.hbs, the color scheme requires a change in the navbar content:
我们选择了`text-dark`和`btn-dark`类来提供一些与背景的对比。
重新运行应用程序,您将看到类似于这样的东西:
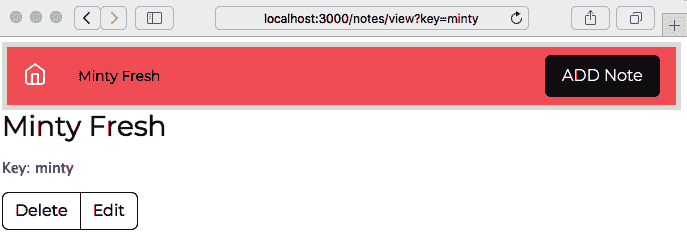
有了这个,我们已经完成了对基于 Bootstrap 的应用程序外观和感觉的定制探索。我们现在可以结束本章了。
# 总结
使用 Bootstrap 的可能性是无穷的。虽然我们涵盖了很多内容,但我们只是触及了表面,我们可以在*Notes*应用程序中做更多的事情。但由于本书的重点不是 UI,而是后端 Node.js 代码,我们故意限制了自己,使应用程序在移动设备上能够正常工作。
通过使用 Twitter Bootstrap 框架来实现简单的响应式网站设计,您了解了 Bootstrap 框架的功能。即使我们所做的小改动也改善了*Notes*应用程序的外观和感觉。我们还创建了一个定制的 Bootstrap 主题,并使用了第三方主题,来探索如何轻松地使 Bootstrap 构建看起来独特。
现在,我们想要回到编写 Node.js 代码。我们在第五章中停下,*你的第一个 Express 应用程序*,遇到了持久性的问题,*Notes*应用程序可以在不丢失笔记的情况下停止和重新启动。在第七章中,*数据存储和检索*,我们将深入使用几种数据库引擎来存储我们的数据。
