

Angular 专家级编程(三)
原文:
zh.annas-archive.org/md5/EE5928A26B54D366BD1C7A331E3448D9译者:飞龙
第六章:创建指令和实现变更检测
在本章中,我们将学习和理解关于 Angular 指令和变更检测的所有内容。
我们将学习 Angular 提供的不同类型的指令,并创建一些自定义用户定义的指令。我们将深入学习 Angular 如何处理变更检测以及如何在我们的应用程序中利用变更检测。
在本章结束时,您将能够做到以下几点:
-
理解 Angular 指令
-
理解并实现内置组件指令
-
理解并实现内置结构指令
-
理解并实现内置属性指令
-
创建自定义属性指令
-
理解 Angular 中的变更检测工作原理
Angular 指令
指令允许我们扩展元素的行为。我们可以使用不同类型的指令定义来操纵 HTML 页面的文档对象模型(DOM)。
Angular 使用@Directive元数据来告诉应用程序它们具有的指令类型以及每个指令定义的功能能力。
以下图表显示了不同类型的指令:
主要有三种类型的 Angular 指令:
-
组件指令:我们可以将其定义为用户定义的指令,类似于 Angular 1.x 中的自定义指令
-
结构指令:在运行时改变或转换 DOM 元素(一个或多个)的指令
-
属性指令:扩展元素的行为或外观
在 Angular 1.x 中,我们有 A(属性)、E(元素)、C(类)、M(匹配注释)指令。
Angular 带有许多内置指令,我们将在前面提到的类别中对其进行分类。
Angular 使用使用ng的指令,因此避免在自定义指令中使用ng;这可能会导致未知问题。例如,ng-changeColor是一个不好的样式实例。
组件指令
组件指令是用户定义的指令,用于扩展功能并创建小型可重用功能。
将组件指令视为附加了模板的指令,因为组件指令具有自己的视图或模板定义。
在之前的章节中,我们创建了许多组件。如果您已经掌握了创建组件并在布局中使用它们的艺术,您将已经知道如何创建组件指令。
关于 Angular 组件的快速回顾:组件是可以在整个应用程序中重复使用的小型代码片段。
在以下代码片段中,我们将看到组件的基本语法。创建一个名为my-template.component.ts的文件:
import {Component} from "@angular/core";

@Component({
 selector: 'my-app',
 template: `<h2>{{ title }}</h2>`
})

export class MyTemplateComponent {
 title = 'Learning Angular!!!'
}
导入新创建的组件:
import {MyTemplate} from "./my-app.component"
然后,在我们的index.html文件中调用组件指令*:*
<my-app>Loading...</my-app>
以下是您将看到的最简单和最简单的组件示例;就是这么简单:
因此,到目前为止我们创建的所有组件都是组件指令。如果您想深入学习更多并创建组件,请参考第四章,使用组件。
结构指令
顾名思义,结构指令通过在运行时添加、附加或删除 DOM 元素来改变 DOM 结构。
Angular 结构指令在指令名称之前显示为(*)星号符号。
一些常用的结构指令如下:
-
ngFor:重复器指令通常用于循环并显示元素列表。 -
ngIf:根据表达式评估的结果显示或隐藏 DOM 元素;结果要么是 true,要么是 false。 -
ngSwitch:如果匹配表达式的值与开关表达式的值匹配,则返回。返回的结果可以是任何值;匹配值进行条件检查。
每个元素只允许一个结构指令。
让我们详细了解每个结构指令,并使用它们创建一些示例:
ngFor 指令
ngFor指令将帮助我们迭代项目并在运行时将它们附加到列表中。
我们需要在StructureDirectiveComponent类中声明一个数组,然后使用ngFor来循环这些值并在模板中显示它们。
列表<li>元素会在运行时附加到<ul>元素上。
以下是ngFor指令用法的组件片段:
import {Component} from '@angular/core';

@Component({
   selector: 'my-app',
   template: `

   <h4>{{title}}</h4>

   <strong>Using ngFor directive</strong>
   <ul>
<li *ngFor="let language of languages">{{ language.name }}</li>
</ul>
   `
 })
export class StructureDirectiveComponent {
  title = 'Structural Directives';

 public languages = [
  { name: "PHP"},
  { name: "JavaScript"},
  { name: "Ruby"},
  { name: "Java"},
  { name: "HTML5"}
];

}
上述组件的输出如下所示:
ngIf 指令
ngIf指令帮助我们根据条件评估表达式,非常类似于任何编程语言中的if语句。
通用语法如下代码片段所示:
 <div *ngIf="!isLoggedIn">
   <p>Hello Guest user</p>
 </div>
前面的代码片段有一个*ngIf条件;如果isLoggedIn为true,指令将渲染内部的语句;否则,它将跳过并继续。
让我们创建一个示例,同时使用*ngFor和*ngIf语句,如下所示:
import {Component} from '@angular/core';

@Component({
  selector: 'my-app',
  template: `
    <h4>{{title}}</h4>
    <strong>Using ngIf directive</strong>
    <div *ngIf="isLoggedIn">
      <p>Hello Packt Author</p>
    </div>

   <div *ngIf="!isLoggedIn">
      <p>Hello Guest user</p>
   </div>

  <strong>Using ngFor directive - Programming Languages </strong>

  <ul>
    <li *ngFor="let language of languages">{{ language.name }}</li>
  </ul>
`
})

export class StructureDirectiveComponent {
 title = 'Structural Directives';
 isLoggedIn= true;

 public languages = [
  { name: "PHP"},
  { name: "JavaScript"},
  { name: "Ruby"},
  { name: "Java"},
  { name: "HTML5"}
];

}
让我们详细分析前面的代码片段:
-
我们在
view模板中使用了*ngFor和*ngIf。 -
在组件类中,我们使用布尔值定义了一个
isLoggedIn变量。 -
我们创建了一个团队名称列表的数组,我们将迭代并在视图中显示。
运行应用程序,我们应该看到如下截图所示的输出:
ngSwitch 指令
当我们需要根据多个值来评估表达式时,我们使用ngSwitch。ngSwitch的示例如下代码片段所示:
<div [ngSwitch]="taxRate">
  <p *ngSwitchCase="'state'">State Tax</p>
  <p *ngSwitchCase="'fedral'">Fedral Tax</p>
  <p *ngSwitchCase="'medical'">Medical Tax</p>
  <p *ngSwitchDefault>Default</p>
</div>
根据taxRate的值,我们的应用程序将决定显示哪个元素。让我们更新我们的示例并添加一个*ngSwitch语句。
更新后的示例代码如下所示:
import {Component} from "@angular/core";
@Component({
    selector: 'structure-directive',
    templateUrl: 'structure-directive.component.html'
})

export class StructureDirectiveComponent {
 title = 'Structural Directives';

 username = "Sridhar Rao";
 taxRate = "state";
 isLoggedIn= true;

 public languages = [
  { name: "PHP"},
  { name: "JavaScript"},
  { name: "Ruby"},
  { name: "Java"},
  { name: "HTML5"}
 ];
}
前面代码示例的输出如下:
属性指令
属性指令扩展了给定元素的行为或外观。属性指令与 HTML 属性非常相似,与元素一起定义。
属性指令可以分为两种类型:
-
内置属性指令
-
自定义或用户定义的属性指令
现在让我们在以下章节中详细查看它们。
内置属性指令
如前所述,属性是页面中元素的属性。HTML 元素的属性示例包括 class、style 等。
同样,Angular 提供了几个内置的属性指令。这些指令包括ngModel、ngClass、ngStyle等等。
让我们通过创建一些示例来了解每个属性指令,如下所示:
ngModel:使用ngModel,我们可以实现双向数据绑定。要了解更多关于数据绑定和模板语法的内容,请参考第八章,模板和数据绑定语法。
ngModel指令写在带有事件绑定[()]的括号内。
记得从 Angular 表单中导入表单模块,否则你会收到错误消息。
ngModel属性指令的一个示例如下:
<input [(ngModel)]="username">
<p>Hello {{username}}!</p>
ngClass:当我们想要向 DOM 元素添加或移除任何 CSS 类时,最好使用ngClass属性指令。我们可以以不同的方式为ngClass分配类名。
我们可以使用string、object或组件method来分配类名
ngClass属性指令的一个示例如下:
//passing string to assign class name
<p [ngClass]="'warning'" >Sample warning message</p>
 //passing array to assign class name
<p [ngClass]="['error', 'success']" > Message </p>

//Passing object to assign class name
<p [ngClass]="{'error': true, 'success': false }"> Message</p>

//Passing component method to assign class name
<p [ngClass]="getClassName('error')"> </p>
记得将 CSS 类名用单引号括起来;否则,你将看不到样式。
记得在index.html或你的相应组件中包含样式表。
ngStyle:当我们想要操纵任何 DOM 元素的一些样式属性时,我们可以使用ngStyle。你可以将其与 CSS 世界中的内联样式相关联。
ngStyle属性指令的一个示例如下:
<p [ngStyle]="{ 'font-size': '13px', 'background-color':'#c5e1a5'}" >Sample success message</p>
好了,现在我们已经了解了内置属性指令,让我们在一个示例中将它们全部放在一起。
以下是一个使用ngModel、ngClass和ngStyle的代码示例:
import { Component} from '@angular/core';

@Component({
 selector: 'my-app',
 styleUrls: ['./attribute-directive.component.css'],
 template:`
 <h4>Welcome to Built-In {{title}}</h4>

 <strong>using ngModel</strong>
 <div><label for="username">Enter username</label>
 <input type="text" [(ngModel)]="username" placeholder="enter username"
    id="username">
 <p>username is: {{username}}</p>
 </div>

<strong>Notification example using ngStyle</strong>
 <p [ngStyle]="{ 'font-size': '13px', 'background-color':'#c5e1a5'}"
>Sample success message</p>

<strong>Notification example using ngClass</strong>
    <p [ngClass]="'warning'" >Sample warning message</p>
    <p [ngClass]="'error'" >Sample error message</p>
   `
})
export class AttributeDirectiveComponent {
 title = 'Attribute Directive';
 public username="Packt Author";
}
查看以下屏幕截图,显示了前面代码示例的输出:
创建自定义指令-结构和属性指令
到目前为止,在之前的章节中,我们已经学习并实现了 Angular 提供的内置指令。
通过创建自定义用户定义的指令,Angular 允许我们定义和扩展页面中元素的行为和功能。
要创建自定义指令,我们必须使用@Directive装饰器并在类定义中实现逻辑。
我们可以创建自定义组件、结构和属性指令。
任何用户定义的 HTML 标记都是组件属性(例如,<my-app>)。在本书的每一章中,我们一直在创建自定义组件。
Angular CLI-生成指令
我们将使用 Angular CLI 工具为我们的示例生成指令。
导航到项目目录并运行以下ng命令:
ng generate directive highlightDirective
我们应该看到以下屏幕截图中显示的输出:
正如你在前面的屏幕截图中看到的,新生成的指令highlightDirective已经创建,并且app.module.ts文件已经更新。
在继续实现我们的指令之前,让我们快速回顾一下结构和属性指令:
-
结构指令:顾名思义,结构属性影响 HTML 布局的结构,因为它塑造或重塑了 DOM 结构。它可以影响页面中的一个或多个元素。
-
属性指令:定义并扩展页面中元素的外观或行为。
我们学会了使用 Angular CLI 生成自定义指令,现在我们清楚地知道结构指令和属性指令是如何工作的。
现在是时候创建我们自己的自定义指令了。继续阅读。
创建自定义属性指令
我们将从创建自定义属性指令开始。我们将继续使用前一节中创建的示例highlightDirective。
顾名思义,我们将使用这个指令来突出显示附加到这个属性的元素的更改文本颜色。
现在是时候定义我们的指令highlightDirective的功能和行为了。
在highlight-directive.ts文件中,添加以下代码行:
import { Directive, ElementRef } from '@angular/core';

@Directive({
 selector: '[appHighlightDirective]'
})
export class HighlightDirectiveDirective{

 constructor(private elRef: ElementRef) {
  this.elRef.nativeElement.style.color = 'orange';
 }
}
让我们详细分析前面的代码片段:
-
我们需要导入 Angular 提供的必要工具来处理指令。
-
我们将从
@angular/core中导入Directive,ElementRef和AfterViewInit。 -
如前所述,我们使用
@Directive装饰器定义指令,并在元数据选择器中传递名称appHighlightDirective。 -
我们正在导出
appHighlightDirective类。 -
如前所述,属性指令特定于一个元素,因此我们需要创建
ElementRef变量elRef的实例,我们将使用它来定位和更新附加到我们自定义指令的元素。 -
在
constructor中,我们使用nativeElement方法来定位特定的元素,并使用一个值orange更新style属性color。
现在我们已经创建了我们的指令,我们需要将其应用到应用程序组件模板app.component.html文件中的元素上:
<div appHighlightDirective> Custom Directive </div>
现在运行应用程序,我们应该看到如下截图所示的输出:
看看创建自定义属性指令是多么简单和容易。
如果你仔细观察,它是一个非常基本的属性,可以改变文本的颜色。现在,如果我们想要动态地传递颜色的值而不是静态地传递呢?
我们必须使我们的属性能够传递值。让我们看看我们需要对我们的指令进行哪些更改,使其成为更合适的候选者。
让我们首先在我们的组件app.component.html模板中进行编辑,我们想要使用该属性的地方:
<div appHighlightDirective highlightColor="green">Custom
    Directive</div>
您会看到,我们现在通过highlightColor变量为我们的属性appHighlightDirective传递了一个值green。
现在更新我们的highlight-directive.ts文件,并向其中添加以下代码行:
import { Directive, ElementRef, Input, AfterViewInit } from '@angular/core';

@Directive({
 selector: '[appHighlightDirective]'
})
export class HighlightDirectiveDirective{

 @Input() highlightColor : string;

 constructor(private elRef: ElementRef) {
   this.elRef.nativeElement.style.color = 'orange';
 }

 ngAfterViewInit(): void {
   this.elRef.nativeElement.style.color = this.highlightColor;
 }
}
让我们看看我们在highlight-directive.ts文件中所做的更改:
-
此外,我们还从
@angular/core库中导入了Input和AfterViewInit模块。 -
我们使用
@Input装饰器告诉 Angular 我们希望通过定义为highlightColor的变量动态传递值。 -
在
ngAfterViewInit方法中,我们使用ElementRef实例elRef创建了元素的对象实例,并使用nativeElement方法来更新元素的style属性color。 -
文本的
color将更改为通过元素的appHighlightDirective属性的值传递的highlightColor。
运行应用程序,我们应该看到以下截图中显示的输出:
好吧,到目前为止还不错。我们的属性正在变得非常完善。
让我们看看您在实现我们的自定义指令方面取得的进展:
-
我们创建了一个自定义属性指令
highlightDirective。 -
我们学会了使用
highlightColor变量将值传递给自定义属性指令
这是很好的东西。但是,如果我们想要将Javascript事件(如mouseover,mouseout,click等)绑定到我们的属性呢?
让我们进行必要的更改,以实现与我们的属性附加的事件。为此,我们将需要一张漂亮的图片,并将附加一些事件以及自定义属性指令。
让我们在组件app.component.html文件模板中添加一张图片:
<img [src]="imageUrl" width="100" height="100" appHighlightDirective
    showOpacity="0.5" hideOpacity="1">
关于前面代码片段的重要说明:
-
我们已将我们的自定义属性组件
appHighlightDirective添加到元素中。 -
此外,我们添加了两个属性,
showOpacity和hideOpacity,它们将具有元素的不透明度样式属性。 -
我们将为这些属性附加
onmouseover和onmouseout事件,并动态更改图像的不透明度。
现在我们已经将图像添加到组件视图模板中,更新后的输出如下截图所示:
让我们转到自定义指令highlight-directive.directive.ts文件:
import { Directive, ElementRef, Input, HostListener, AfterViewInit }
  from '@angular/core';

@Directive({
 selector: '[appHighlightDirective]'
})
export class HighlightDirectiveDirective{
 @Input() highlightColor : string;
 @Input() showOpacity : string;
 @Input() hideOpacity : string;

 constructor(private elRef: ElementRef) {
   this.elRef.nativeElement.style.color = 'orange';
 }
 ngAfterViewInit(): void {
   this.elRef.nativeElement.style.color = this.highlightColor;
 }

@HostListener('mouseover') onmouseover() {
  this.elRef.nativeElement.style.opacity = this.hideOpacity;
 }

@HostListener('mouseout') onmouseout() {
  this.elRef.nativeElement.style.opacity = this.showOpacity;
 }
}
让我们分析我们在前面的代码中所做的更新:
-
我们从
@angular/core中导入了所需的模块Directive、ElementRef、Input、HostListener和AfterViewInit。 -
请注意,为了将事件绑定和实现到元素上,我们特别需要导入
HostListener。 -
使用
@HostListener装饰器,我们将mouseover和mouseout事件绑定到我们附加自定义属性的元素上。 -
请注意,当我们使用
this.elRef.nativeElement时,我们是在引用附加了自定义属性的元素。 -
当用户将鼠标悬停在元素上时,我们为
this.hideOpacity变量赋值。 -
当用户将鼠标移出元素时,我们为
this.showOpacity变量赋值。
现在运行应用程序,您应该看到以下截图中显示的输出:
太棒了。现在让我们看看您在实现我们的自定义指令方面取得的进展:
-
我们已经创建了一个自定义属性指令
highlightDirective -
我们学会了使用
highlightColor变量向自定义属性指令传递值 -
我们已经学会了将诸如
mouseover和mouseout这样的事件附加到我们的自定义属性highlightDirective上。
在本节中,您已经学会了创建和使用具有属性和方法的自定义属性指令。
在下一节中,您将学习创建自定义结构型指令。
创建自定义结构型指令
到目前为止,您已经学习并实现了内置指令--组件、结构型和属性指令。
我们还学会了在Angular CLI - 生成指令部分使用 Angular CLI 生成自定义指令。
在上一节中,我们学习并实现了自定义属性指令。在本节中,我们将学习创建结构型指令。
让我们使用 Angular CLI 创建一个新的指令:
ng generate directive custom-structural
您应该看到前面命令的输出,如下截图所示:
运行前面的ng命令,我们应该看到指令已创建,并且app.module.ts已更新为新创建的指令。
好了,是时候创建和实现我们的自定义结构型指令了。以下是我们将使用自定义结构型指令构建的用例:
-
我们将使用我们的结构指令来循环遍历产品列表。
-
该指令应该只显示
isAvailable设置为true的元素。
首先让我们在app.component.ts文件中定义我们的产品 JSON:
public products = [{
 productName: 'Shoes',
 isAvailable : true
 },
 {
 productName: 'Belts',
 isAvailable : true
 },
 {
 productName: 'Watches',
 isAvailable : false
 }]
我们刚刚创建了一个产品的 JSON 列表,其中包含productName和isAvailable两个键。
还没有超级英雄般的事情,还不是时候!
是时候使用*ngFor循环并在app.component.html文件中显示产品列表了:
<ul *ngFor="let product of products">
  <li *appCustomStructural="product">{{product.productName}}</li>
</ul>
让我们快速分析前面的代码
-
我们正在使用内置的结构指令
*ngFor来循环遍历产品列表,并使用键product.productName显示名称。 -
我们正在定义我们自定义的结构指令
appCustomStructural,并传递product对象进行分析。 -
由于我们将整个产品对象传递给我们的属性,我们现在可以在
appCustomStructural中定义我们的自定义逻辑,并根据我们的应用程序需求进行转换。
在我们的指令custom-structural.directive.ts文件中进行一些超级英雄般的工作:
import { Directive, Input, TemplateRef, ViewContainerRef, AfterViewInit
    } from '@angular/core';

@Directive({
 selector: '[appCustomStructural]'
})
export class CustomStructuralDirective {
 @Input()
 set appCustomStructural(product){
  if(product.isAvailable == true)
  {
    this.viewContainerRef.createEmbeddedView(this.templateRef );
  }
 }

 constructor(
   private templateRef : TemplateRef<any>,
   private viewContainerRef : ViewContainerRef
 ) { }
}
让我们详细分析前面的代码:
-
我们从
@angular/core中导入所需的模块Directive、Input、TemplateRef、ViewContainerRef和AfterViewInit。 -
我们正在为我们的自定义结构指令
appCustomStructural定义 CSSselector。 -
通过使用
@Input装饰器,我们明确告诉 Angular 我们的自定义指令将通过appCustomStructural获得输入。 -
在构造函数中,我们注入了
TemplateRef<any>和ViewContainerRef的实例。 -
使用
TemplateRef<any>,我们指定这是一个嵌入式模板,可以用于实例化嵌入式视图。 -
由于结构指令涉及在页面中塑造或重塑 DOM 结构,我们正在注入
ViewContainerRef。 -
我们正在检查
product.isAvailable的值是否等于true。 -
如果
product.isAvailable的值为 true,则使用ViewContainerRef的实例--一个可以附加一个或多个视图的容器,通过使用createEmbeddedView方法--我们将元素附加到视图中。
运行应用程序,我们应该看到如下截图所示的输出:
我们只看到鞋子和腰带被显示,因为只有这些产品的isAvailable键设置为 true。尝试改变其他产品的值并查看输出显示。
在本节中,我们学习了自定义结构指令。我们学习了 Angular 提供的重要工具--createEmbeddedView、ViewContainerRef 和 TemplateRef。
迄今为止,我们已经学习和实现了自定义指令的一些要点。
我们创建了一个自定义属性指令 highlightDirective。我们学会了使用 highlightColor 变量向自定义属性指令传递值。我们学会了将事件(如 mouseover 和 mouseout)附加到我们的自定义属性 highlightDirective。
我们已经学会了创建一个自定义结构指令 appCustomStructural。我们已经学会了使用 createEmbeddedView、ViewContainerRef 和 TemplateRef。
在下一节中,我们将学习变化检测,这是 Angular 框架内部工作的一个重要方面,我们还将学习如何在我们的应用程序中使用它。
在 Angular 中实现变化检测
变化检测是检测模型或组件类中的任何内部状态变化,然后将其反映到视图中的过程,主要是通过操作 DOM。
变化检测是从 Angular 1.x 到 2.x 中最重要的变化之一。
应用程序状态的变化发生在模型到视图或视图到模型之间。为了更好地理解,看一下下面的图表:
应用程序状态的变化可以以两种方式发生:
-
从模型到视图模板(DOM)
-
从视图(DOM)到模型(组件类)
既然我们知道状态变化发生在模型或 DOM 中,让我们分析一下是什么触发了变化检测。
变化检测是由以下触发的:
-
JavaScript 事件(
click、mouseover、keyup等) -
setTimeout()和setInterval() -
异步请求
请注意,前面列出的三种方式都是异步过程。因此可以说,在 Angular 中,每当我们有异步方法/请求时,变化检测就会发生。
在我们深入了解变化检测的更多内容之前--它是如何工作的,如何处理的等等--让我们快速创建一个示例来理解是什么触发了变化检测。
看一下下面的代码片段:
import { Component} from '@angular/core';
@Component({
  selector: 'my-app',
  template:`
  <h4>Learning Angular {{title}}</h4>

  <button (click)="toggleUser()"> Toggle User </button>
  <div *ngIf="isLoggedIn">
    <b>Hello Packt Author</b>
  </div>

  <div *ngIf="!isLoggedIn">
    <b>Hello Guest user</b>
  </div>
 `
 ]
})
export class AppComponent {
 title = 'Change Detection';
 isLoggedIn = true;
 toggleUser(){
 if (this.isLoggedIn)
   this.isLoggedIn = false
 else
   this.isLoggedIn = true
 }
}
上述代码片段可以解释如下:
-
我们创建了一个按钮,点击事件调用了
toggleUser方法。 -
在
toggleUser的点击事件中,变量isLoggedIn的值被设置为true或false。 -
根据变量,在视图中
isLoggedIn的值会更新。如果值为true,则显示“Hello Packt Author”,如果值为 false,则显示Hello Guest user。
在下一节中,我们将学习 Angular 如何在内部处理变化检测以及 Angular 提供的工具来帮助我们实现更好的变化检测。
变化检测 - Angular 和 ZoneJS
ZoneJS 的官方网站描述了该库如下:
Zone 是一个跨异步任务持续存在的执行上下文。
Angular 使用 ZoneJS 来检测变化,然后调用这些事件的监听方法。
Angular 利用 zone 来处理所有内部状态变化和变化检测。Zone 理解异步操作和状态变化的上下文。
Angular 内置了ngZone,用于跟踪所有已完成的异步操作,并通过onTurnDone事件通知它们。每个组件都有一个变化检测器,它在树形结构中跟踪组件上附加的所有绑定。
我们不再有像在以前版本的 Angular 中的$scope.apply或$digest。
默认情况下,Angular 变化检测总是会检查值是否发生了变化。变化检测总是从根组件顶部到树形结构中的内部组件执行相同的操作。
这是通过变化检测器对象为所有组件执行的操作。
使用ngZones,Angular 应用的性能大大提高了。
变化检测策略
默认情况下,Angular 为我们应用中的每个组件定义了一个变化检测策略--这意味着每当模板发生任何变化时,它会遍历到树形结构中的最后一个组件,检查是否有任何变化,并进行必要的更新。
这会带来性能损耗!
因此,Angular 为我们提供了明确定义我们想要为组件实现的变化检测策略的选项。
Angular 提供了一个ChangeDetectionStrategy模块,通过它我们可以定义我们想要使用的变化检测策略。
ChangeDetectionStrategy有两个不同的值:
-
Default -
OnPush
让我们详细分析每个选项,以了解它们的工作原理。
ChangeDetectionStrategy - 默认
这是 Angular 实现的默认机制--变化由事件触发,变化的传播从视图模板到模型。根据实现的逻辑,DOM 结构会更新。
这里需要注意的一点是,使用这种策略时,每次 Angular 都会遍历所有组件,从根组件到最后一个组件,以检查是否需要更新所有属性。
参考我们在前面部分创建的示例,在 Angular 中实现变更检测。我们正在更新属性,Angular 默认使用Default值的ChangeDetectionStrategy。
ChangeDetectionStrategy - OnPush
我们使用OnPush来提高我们的 Angular 应用程序的性能。我们必须明确指出我们要使用ChangeDetectionStrategy的OnPush值。
更改由事件触发,更改的传播适用于在view模板中呈现的整个对象,而不是每个属性。
当我们使用OnPush值时,我们强制 Angular 仅依赖于输入。我们通过@Input装饰器传递对象,只有完整的对象及其属性会受到影响,而不会影响任何单个属性的更改。
ChangeDetectionStrategy - OnPush 的优势
在前面的部分中,您已经学习了使用default和OnPush选项的 ChangeDetectionStrategy。
使用OnPush选项而不是default的一些优势包括:
-
它有助于提高我们的 Angular 应用程序的性能。
-
Angular 不必遍历整个组件树结构以检测属性的单个更改。
-
当输入属性不发生变化时,Angular 内部可以跳过嵌套的树结构。
为了更好地理解它,让我们创建一个用例。首先,我们需要使用 Angular CLI ng命令创建一个名为change-detect的新组件。
组件创建后,您应该看到如下截图所示的输出:
让我们在user.ts文件中创建一个class用户,并具有userName和userId属性:
export class User {
 constructor(
 public userName: string,
 public userId: number) {}
}
现在让我们编辑我们生成的Component类,并添加以下代码片段:
import { Component, Input, ChangeDetectionStrategy  } from '@angular/core';
import { User } from '../shared/user';

@Component({
 selector: 'app-change-detect',
 template: `
 <h3>{{ title }}</h3>
 <p>
 <label>User:</label>
 <span>{{user.userName}} {{user.userId}}</span>
</p>`,
 changeDetection: ChangeDetectionStrategy.OnPush,
 styleUrls: ['./change-detect.component.css']
})

export class ChangeDetectComponent{
 title = "Change Detection";
 @Input() user: User;
 constructor() { }
}
让我们详细分析前面的代码:
-
我们从
@angular/core库中导入了Input、Component和ChangeDetectionStrategy所需的模块。 -
我们将新创建的
User类导入到组件类中。 -
我们明确指定
changeDetection的值为ChangeDetectionStrategy.OnPush。 -
我们使用 CSS 的
selectorapp-change-detect,在那里我们将显示组件的输出。 -
由于我们告诉 Angular 使用
OnPush选项,我们需要使用@Input并传递在我们的情况下是User的对象。 -
根据模板部分,我们在
view模板中绑定了用户属性userName和userId。
很好。到目前为止,我们已经创建了我们的组件,并明确指出,每当检测到变化时,应更新整个对象,即user对象,而不仅仅是单个属性。
现在是时候创建方法来测试我们的逻辑了。因此,在AppComponent类中,添加以下代码:
 changeDetectionDefault(): void {
   this.user.userName = 'Packt Publications';
   this.user.userId = 10;
 }

 changeDetectionOnPush(): void {
   this.user = new User('Mike', 10);
 }
对于我们的组件,我们已经指定了要使用的selector为app-change-detect。我们需要在模板app.component.html文件中使用该组件。
我们还指定了该组件将以user作为输入,因此我们将用户对象传递给该组件。
将以下代码行添加到app.component.html模板文件中的app-change-detect组件中。
<button type="button" (click)="changeDetectionDefault()">
  Change Detection: Default
 </button>
 <button type="button" (click)="changeDetectionOnPush()">
 Change Detection: OnPush
 </button>

<app-change-detect [user]="user"></app-change-detect>
好了,一切都准备就绪。运行应用程序,您应该看到如下屏幕截图中显示的输出:
应用程序功能可以总结如下:
-
app-change-detect组件加载到AppComponent模板中。 -
默认值传递给对象在
view模板中显示。 -
单击
Change Detection: OnPush按钮,我们会看到更新后的用户加载到视图中。 -
当我们点击
Change Detection: Default时,与我们之前创建的示例不同,我们不会看到任何属性发生变化。这是因为我们明确指出,任何变化检测都应通过对象而不是属性传递,使用ChangeDetectionStrategy的OnPush选项。
在本节中,我们已经了解了 Angular 提供的变化检测策略。我们已经探讨了如何通过使用OnPush选项来改善应用程序的性能,强制 Angular 仅检查作为输入传递的对象而不是单个属性。
更新属性将告诉 Angular 遍历整个应用程序组件树结构,并对性能造成影响。
摘要
在本章中,我们学习了指令,以及不同类型的指令,即组件指令、结构指令和属性指令。
我们实现了自定义用户指令,以了解如何扩展指令并更有效地使用它们。
我们简要了解了 ZoneJS,以及区域如何帮助我们处理现代应用程序框架中的“异步”任务。
最后,我们了解了 Angular 如何处理变化检测,以及如何使用变化检测方法来提高整体应用程序性能。
在下一章中,我们将学习使用 Observables 进行异步编程。在本章中,我们将学习如何利用 Observable 和 Promises 在 Angular 中利用异步编程。
此外,我们将学习如何构建一个基本但可扩展的异步 JSON API,用于查询漫威电影宇宙。
使用 Observable 进行异步编程
如果我们仔细想想,没有什么是瞬间的。 实时不是一个事物。 我刚才失去了理智吗? 现在,你可以按下一个按钮,感觉像是瞬间的,但是,在你内心深处,作为程序员的你知道那不是真的。 信息已经传输,代码已被执行,数据库已被获取,等等。 在这段时间里,无论它是多短还是多长,你都在等待。 更准确地说,你的代码让用户等待。 您宁愿有一个基于异步概念构建的代码库,并且可以在等待时执行其他任务,或者至少警告用户我们正在等待某件事情发生吗? 这就是这一章的基本思想。 这一章将帮助您理解异步编程的概念,并在 Angular 中使用 Observable 实现相同的功能。
在这一章中,我们将涵盖以下主题:
-
观察者模式
-
异步编程
-
HTTP 客户端
-
订阅可观察对象
-
承诺
观察者模式
Observable 模式允许一个称为subject的对象跟踪对其状态感兴趣的其他对象,称为observers。 当主题状态改变时,它会通知观察者。 其背后的机制非常简单。
TypeScript 可观察对象
让我们看一下纯 TypeScript 中的以下Observer/Subject实现(即没有任何 Angular 或任何框架,只有 TypeScript)。
首先,我定义了一个Observer接口,任何具体实现都必须实现:
export interface Observer{

   notify();
}
这个接口只定义了notify()方法。 当其状态改变时,该方法将被主题(即被Observer观察的Object)调用。
然后,我有一个名为HumanObserver的这个接口的实现:
export class HumanObserver implements Observer{

   constructor(private name:string){}

   notify(){

               console.log(this.name, 'Notified');
   }
}
这个实现利用了typescript属性构造函数,其中你可以在构造函数内定义你的类的属性。 这种表示法与以下表示法完全等效,而且更短:
private name: string;

constructor(name:string){
      this.name = name;
}
根据Observer接口和HumanObserver的定义,我们可以继续进行主题的定义。 我定义了一个管理observers的Subject类。 这个类有三个方法:attachObserver,detachObserver和notifyObservers:
export class Subject{

   private observers:Observer[] = [];

   /**
   * Adding an observer to the list of observers
   */
   attachObserver(observer:Observer):void{

               this.observers.push(observer);
   }

   /**
   * Detaching an observer
   */
   detachObserver(observer:Observer):void{
      let index:number = this.observers.indexOf(observer);
      if(index > -1){
          this.observers.splice(index, 1);
        }
      else{
       throw "Unknown observer";
       }
}

   /**
   * Notify all the observers in this.observers
   */
   protected notifyObservers(){
   for (var i = 0; i < this.observers.length; ++i) {
      this.observers[i].notify();
       }
    }
}
attachObserver方法将新的观察者推送到观察者属性中,而detachObserver则将它们移除。
主题实现通常带有附加/分离,订阅/取消订阅或添加/删除前缀。
最后一个方法是notifyObservers,它遍历观察者并调用它们的notify()方法。 允许我们展示Observable机制的最后一个类是IMDB,它扩展了Subject。 当添加电影时,它将通知观察者:
export class IMDB extends Subject{

   private movies:string[] = [];

   public addMovie(movie:string){

         this.movies.push(movie);
         this.notifyObservers();
   }
}
要使各个部分相互通信,我们必须:
-
创建一个
Subject -
创建一个
Observer -
将
Observer附加到Subject -
通过
addMovie方法改变Subject的状态
更具体地说,这是先前列表的一个实现:
let imdb:IMDB = new IMDB();
let mathieu:HumanObserver = new HumanObserver("Mathieu");
imbd.attachObserver(mathieu);
imbd.addMovie("Jaws");
为了加快我们的开发流程,我们将安装ts-node。这个节点包将把typescript文件转换成 JavaScript,并解决这些文件之间的依赖关系。
要快速编译和执行typescript应用程序,我推荐使用优秀的ts-node包。这个包将转换以下命令:
$ npm install -g  typescript ts-node
$ ts-node myFile.ts
输出是Mathieu Notified。我们可以测试将mathieu分离并添加另一个电影:
imdb.detachObserver(mathieu);
imdb.addMovie("Die Hard");
输出仍然是Mathieu Notified,这发生在我们添加了大白鲨电影之后。第二部电影的添加(也就是《虎胆龙威》)并没有触发控制台打印Mathieu Notified,因为它已经分离了。
具有参数的 TypeScript Observable
因此,这是观察者模式的一个基本实现。然而,它并不完整,因为HumanObserver只知道它观察的主题中出现了一些变化。因此,它必须迭代它所观察到的所有主题,并检查它们的先前状态与当前状态来识别发生了什么变化以及在哪里发生了变化。更好的做法是修改Observer的通知,使其包含更多的信息。例如,我们可以添加可选参数,如下:
export interface Observer{

   notify(value?:any, subject?:Subject);
}

export class HumanObserver implements Observer{

   constructor(private name:string){}

   notify(value?:any, subject?:Subject){

         console.log(this.name, 'received', value, 'from', subject);
   }
}
notify()方法现在接受一个可选的值参数,该参数表征了Subject对象的新状态。我们还可以接收到Subject对象本身的引用。如果观察者观察了许多主题,这是很有用的。在这种情况下,我们需要能够区分它们。
因此,我们必须稍微改变Subject和IMDB,使它们使用新的notify:
export class Subject{

   private observers:Observer[] = [];

   attachObserver(oberver:Observer):void{

         this.obervers.push(oberver);
   }

   detachObserver(observer:Observer):void{
         let index:number = this.obervers.indexOf(observer);
         if(index > -1){
         this.observers.splice(index, 1);

         }else{

         throw "Unknown observer";
         }
   }

   protected notifyObservers(value?:any){

         for (var i = 0; i < this.obervers.length; ++i) {

         this.observers[i].notify(value, this);
         }
   }
}

export class IMDB extends Subject{

   private movies:string[] = [];

   public addMovie(movie:string){

         this.movies.push(movie);
         this.notifyObservers(movie);
   }
}
最后,输出如下:
 Mathieu received Jaws from IMDB {

  observers: [ HumanObserver { name: 'Mathieu' } ],
  movies: [ 'Jaws' ] }
这比Mathieu Notified更有表现力。
现在,当我们习惯于用于异步编程的Observer模式时,我们真正的意思是,我们要求某事,并且在其处理过程中我们不想等待去做任何事情。相反,我们订阅响应事件以在响应到达时得到通知。
在接下来的章节中,我们将使用相同的模式和机制在 Angular2 中。
此观察者实现的代码位于bit.ly/mastering-angular2-chap7-part1。
观察 HTTP 响应
在本节中,我们将构建一个返回根据搜索参数返回电影的 JSON API。我们将利用观察者设计模式的力量,而不是简单地等待 HTTP 查询完成,让用户知道我们正在等待,并且如果需要的话,执行其他流程。
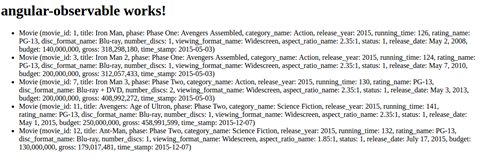
首先要做的是:为我们的 IMDB 类似应用程序准备一个数据源。构建和部署一个能够解释 HTTP 查询并相应地发送结果的服务器端应用程序现在相对简单。然而,这超出了本书的范围。相反,我们将获取托管在bit.ly/mastering-angular2-marvel的静态 JSON 文件。该文件包含漫威电影宇宙最新电影的一些信息。它包含一个描述十四部电影的 JSON 对象的 JSON 数组。以下是第一部电影:
{
     "movie_id" : 1,
     "title" : "Iron Man",
     "phase" : "Phase One: Avengers Assembled",
     "category_name" : "Action",
     "release_year" : 2015,
     "running_time" : 126,
     "rating_name" : "PG-13",
     "disc_format_name" : "Blu-ray",
     "number_discs" : 1,
     "viewing_format_name" : "Widescreen",
     "aspect_ratio_name" : " 2.35:1",
     "status" : 1,
     "release_date" : "May 2, 2008",
     "budget" : "140,000,000",
     "gross" : "318,298,180",
     "time_stamp" : "2015-05-03"
},
您可以找到类似 IMDB 的应用程序提供的经典信息,例如发行年份、播放时间等。我们的目标是设计一个异步的 JSON API,使这些字段中的每一个都可以搜索。
因为我们要获取一个静态的 JSON 文件(也就是说我们不会插入、更新或删除任何元素),可接受的 API 调用将是以下内容:
IMDBAPI.fetchOneById(1);
IMDBAPI.fetchByFields(MovieFields.release_date, 2015);
第一个调用只是获取movie_id: 1的电影;第二个调用是一个更通用的调用,在任何字段中都适用。为了防止 API 消费者请求我们电影中不存在的字段,我们使用在Movie类内部定义的枚举器限制field的值。
现在,这里的重要部分是这些调用的实际返回。事实上,它们将触发一个Observable机制,调用方将自己附加到Observable HTTP 调用上。然后,当 HTTP 调用完成并根据查询参数过滤结果后,被调用方将通知调用方关于响应。因此,调用方不必等待被调用方(IMDBAPI);它将在请求完成时收到通知。
实施
让我们深入了解实现。首先,我们需要使用 Angular CLI 创建一个新的 Angular2 项目:
    ng new angular-observable
    ng init
    ng serve
然后,为了确保一切顺利,您可以浏览到localhost:4200并查看是否得到类似以下内容:
接下来,我们需要一个代表电影概念的模型。我们将使用命令行ng g class models/Movie生成这个类。然后,我们可以添加一个构造函数,定义Movie模型的所有私有字段,以及相同的 getters 和 setters:
export class Movie {

   public constructor(
         private _movie_id:number,
         private _title: string,
         private _phase: string,
         private _category_name: string,
         private _release_year: number,
         private _running_time: number,
         private _rating_name: string,
         private _disc_format_name: string,
         private _number_discs: number,
         private _viewing_format_name: string,
         private _aspect_ratio_name: string,
         private _status: string,
         private _release_date: string,
         private _budget: number,
         private _gross: number,
         private _time_stamp:Date){
   }

   public toString = () : string => {

         return `Movie (movie_id: ${this._movie_id},
         title: ${this._title},
         phase: ${this._phase},
         category_name: ${this._category_name},
         release_year: ${this._release_year},
         running_time: ${this._running_time},
         rating_name: ${this._rating_name},
         disc_format_name: ${this._disc_format_name},
          number_discs: ${this._number_discs},
         viewing_format_name: ${this._viewing_format_name},
         aspect_ratio_name: ${this._aspect_ratio_name},
         status: ${this._status},
         release_date: ${this._release_date},
         budget: ${this._budget},
         gross: ${this._gross},
         time_stamp: ${this._time_stamp})`;

   }
   //GETTER
   //SETTER
}

export enum MovieFields{
   movie_id,
   title,
   phase,
   category_name,
   release_year,
   running_time,
   rating_name,
   disc_format_name,
   number_discs,
   viewing_format_name,
   aspect_ratio_name,
   status,
   release_date,
   budget,
   gross,
   time_stamp
}
在这里,电影 JSON 定义的每个字段都使用 typescript 的构造函数属性声明映射到 Movie 类的私有成员中。此外,我们重写了toString方法,所以它会打印出每个字段。在toString方法中,我们利用了反引号提供的多行字符串。
IMDBAPI.fetchOneById(1);
IMDBAPI.fetchByFields(MovieFields.release_date, 2015);
Here's `IMDBAPIService` with the `fetchOneById` method:
import { Injectable } from '@angular/core';
import { Http } from '@angular/http';
import { Movie, MovieFields } from '../models/movie';
import { Observable } from 'rxjs/Rx';
import 'rxjs/Rx';
@Injectable()
导出类 IMDBAPIService {
私有 moviesUrl:string = "assets/marvel-cinematic-universe.json";
constructor(private http: Http) { }
/**
-
Return an Observable to a Movie matching id
-
@param {number} id
-
@return {Observable}
*/
public fetchOneById(id:number):Observable{
console.log('fetchOneById', id);
    return this.http.get(this.moviesUrl)

    /**

    * Transforms the result of the http get, which is observable

    * into one observable by item.

    */

.flatMap(res => res.json().movies)

    /**

    * Filters movies by their movie_id

    */

    .filter((movie:any)=>{

    console.log("filter", movie);

    return (movie.movie_id === id)

    })

    /**

    * Map the JSON movie item to the Movie Model

    */

    .map((movie:any) => {

    console.log("map", movie);

    return new Movie(

        movie.movie_id,

        movie.title,

        movie.phase,

        movie.category_name,

        movie.release_year,

        movie.running_time,

        movie.rating_name,

        movie.disc_format_name,

        movie.number_discs,

        movie.viewing_format_name,

        movie.aspect_ratio_name,

        movie.status,

        movie.release_date,

        movie.budget,

        movie.gross,

        movie.time_stamp

    );

    });
}
}
# Understanding the implementation

Let's break it down chunk by chunk. First, the declaration of the service is pretty standard:
import { Injectable } from '@angular/core';
import { Http } from '@angular/http';
import { Movie, MovieFields } from '../models/movie';
import { Observable } from 'rxjs/Rx';
import 'rxjs/Rx';
@Injectable()
export class IMDBAPIService {
private moviesUrl:string = "app/marvel-cinematic-universe.json";
constructor(private http: Http) { }
Services are injectable. Consequently, we need to import and add the `@Injectable` annotation. We also import `Http`, `Movie`, `MovieFields`, `Observable`, and the operators of RxJS. **RxJS** stands for **Reactive Extensions for JavaScript**. It is an API to do `Observer`, iterator, and functional programming. When it comes to asynchronism in Angular2, you rely on RxJS for the most part.

One important thing to note is that we use RxJS 5.0, which is a complete rewrite, based on the same concept as RxJS 4.0.

The `IMDBAPIService` also has a reference to the path of our JSON file and a constructor to receive an injection of the `http` service. On the implementation of the `fetchOneById` method, we can see four distinct operations chained with each other: `get`, `flatMap`, `filter`, and `map`.

*   Get returns an `Observable` onto the body of the `http` request.
*   `flatMap` transforms the get `Observable` by applying a function that you specify to each item emitted by the source `Observable`, where that function returns an `Observable` that itself emits items. `flatMap` then merges the emissions of these resulting observables, emitting these merged results as its sequence. In our case, it means that we will apply the next two operations (that is `filter` and `map`) on all the items received from the `http` get.
*   `filter` checks if the ID of the current movie is the one we are looking for
*   `map` transforms the JSON representation of a movie into the `typescript` representation of a movie (that is the `Movie` class).

This last operation, while counter-intuitive, is mandatory. Indeed, one could think that the JSON representation and the `typescript` representation are identical, as they own the same fields. However, the `typescript` representation, also to its properties, defines functions such as `toString`, the getters, and the setters. Removing the map would return an `Object` instance--containing all the fields of a `Movie` without being one. Also, a typecast will not help you there. Indeed, the `typescript` transpiler will allow you to cast an `Object` into a `Movie`, but it still won't have the methods defined in the `Movie` class, as the concept of static typing disappears when the `typescript` is transpiled in JavaScript. The following would transpile fail at execution time with; `movie.movie_id(25)` TypeError: `movie.movie_id` is not a function at `Object.<anonymous>`.
movie:Movie = JSON.parse(`{
        "movie_id" : 1,

        "title" : "Iron Man",

        "phase" : "Phase One: Avengers Assembled",

        "category_name" : "Action",

        "release_year" : 2015,

        "running_time" : 126,

        "rating_name" : "PG-13",

        "disc_format_name" : "Blu-ray",

        "number_discs" : 1,

        "viewing_format_name" : "Widescreen",

        "aspect_ratio_name" : " 2.35:1",

        "status" : 1,

        "release_date" : "May 2, 2008",

        "budget" : "140,000,000",

        "gross" : "318,298,180",

        "time_stamp" : "2015-05-03"

    }`);
Console.log(movie.movie_id(25));
Now, if we want to use our `IMDB` service, further modifications are required in the code that was generated by the Angular CLI. First, we need to modify `app.module.ts` so it looks like this:
import { BrowserModule } from '@angular/platform-browser';
import { NgModule } from '@angular/core';
import { FormsModule } from '@angular/forms';
import { HttpModule } from '@angular/http';
import { IMDBAPIService } from './services/imdbapi.service';
import { AppComponent } from './app.component';
@NgModule({
declarations: [
AppComponent
],
imports: [
BrowserModule,

FormsModule,

HttpModule
],
providers: [IMDBAPIService],
bootstrap: [AppComponent]
})
export class AppModule { }
The lines in bold represent what have been added. We import our `IMDBAPIService` and `HTTP_PROVIDERS`. Both providers are declared at the application level, meaning that the instance that will be injected in the component or directive will always be the same.

Then, we modify the `app.component.ts` file that was generated and add the following:
import { Component } from '@angular/core';
import { IMDBAPIService } from './services/imdbapi.service';
import { Movie } from './models/movie';
@Component({
selector: 'app-root',
templateUrl: './app.component.html',
styleUrls: ['./app.component.css']
})
export class AngularObservableAppComponent {
title = 'angular-observable works!';
private movies:Movie[] = []; private error:boolean = false; private finished:boolean = false;
constructor(private IMDBAPI:IMDBAPIService){
this.IMDBAPI.fetchOneById(1).subscribe( value => {this.movies.push(value); console.log("Component",
value)}, error => this.error = true, () => this.finished = true ) }
}
Once again, the bold lines of code represent the lines that were added in comparison to the generated file. We have added several properties to the `AppComponent`: movies, error, and finished. The first property is an array of Movie that will store the result of our queries, the second and the third flag for error and termination. In the constructor, we have an injection of the `IMDBAPIService`, and we subscribe to the result of the `fetchOneById` method. The `subscribe` method expects three callbacks:

*   `Observer`: Receive the value yielded by the `Observer` method. It is the RxJs equivalent of the `notify()` method we saw earlier in this chapter.
*   `onError` (Optional): Triggered if the `Observer` object yields an error.
*   `onComplete` (Optional): Triggered on completion.

Finally, we can modify the `app.component.html` file to map the movies property of the `AppComponent` array:
{{title}}
- {{movie}}
The produced output of our code is:

We can see that the first movie item has been correctly inserted into our `ul`/`li` HTML structure. What's really interesting about this code is the order in which things execute. Analyzing the log helps us to grasp the true power of asynchronism in Angular with RxJs. Here's what the console looks like after the execution of our code:
fetchOneById 1
:4200/app/services/imdbapi.service.js:30 过滤对象
:4200/app/services/imdbapi.service.js:34 映射对象
:4200/app/angular-observable.component.js:21 组件
电影宽高比名称:" 2.35:1"_ 预算:
"140,000,000"_ 类别名称:"动作"_ 光盘格式名称:"蓝光-
光盘"总收入:"318,298,180"_ 电影 id:1_ 光盘数量:1_ 阶段:"第
一个:复仇者联盟成立"_ 评分名称:"PG-13"_ 发布日期:"5 月 2 日,
2008"_ 发布年份: 2015_ 播放时长: 126_ 状态: 1_ 时间戳:
"2015-05-03"_ 标题:"钢铁侠"_ 查看格式名称:
"宽屏"宽高比名称:(...)预算:(...)类别名称:
(...)光盘格式名称:(...)总收入:(...)电影 id:(...)光盘数量:
(...)阶段:(...)评分名称:(...)发布日期:(...)发布年份:
(...)播放时长:(...)状态:(...)时间戳:(...)标题:
(...)ToString:()查看格式名称:(...)proto:对象
:4200/app/services/imdbapi.service.js:30 过滤对象
:4200/app/services/imdbapi.service.js:30 过滤对象
:4200/app/services/imdbapi.service.js:30 过滤对象
:4200/app/services/imdbapi.service.js:30 过滤对象
:4200/app/services/imdbapi.service.js:30 过滤对象
:4200/app/services/imdbapi.service.js:30 过滤对象
:4200/app/services/imdbapi.service.js:30 过滤对象
:4200/app/services/imdbapi.service.js:30 过滤对象
:4200/app/services/imdbapi.service.js:30 过滤对象
:4200/app/services/imdbapi.service.js:30 过滤对象
:4200/app/services/imdbapi.service.js:30 过滤对象
:4200/app/services/imdbapi.service.js:30 过滤对象
:4200/app/services/imdbapi.service.js:30 过滤对象
As you can see, `AngularObservableAppComponent` was notified that a movie matching the query was found before the `filter` function had analyzed all the items. As a reminder, the order to the operations inside the `fetchOneById` by `id` was: `get`, `flatMap`, `filter`, `map`, and we have logging statements in the `filter` and `map` methods. So, here, the filter operation analyzes the first item, which happens to be the one we are looking for `(movie_id===1)` and forwards it to the map operation that transforms it into a `Movie`. This `Movie` is sent right away to `AngularObservableAppComponent`. We clearly see that the received object in the `AngularObservableAppComponent` component is from type movie, as the console gives us our overriding of the `toString` method. Then, the `filter` operation continues with the rest of the items. None of them match; consequently, we do not have any more notifications.

Let's test this further with a second method: `IMDBAPI.fetchByField`:
public fetchByField(field:电影字段, value:任意){
console.log('fetchByField', field, value);
返回 this.http.get(this.moviesUrl)
    .flatMap(res => res.json().movies)

    /**

    * 根据它们的字段过滤电影

    */

    .filter((电影:任意)=>{

    console.log("过滤", 电影);

    返回 (电影[电影字段[field]] === value)

    })

    /**

    * 将 JSON 电影项目映射到电影模型

    */

    .map((电影:任意) => {

    console.log("映射", 电影);

    返回新电影(

        电影电影 id,

        电影标题,

        电影阶段,

        电影类别名称,

        电影发布年份,

        电影播放时长,

        电影评分名称,

        电影光盘格式名称,

        电影光盘数量,

        电影查看格式名称,

        电影宽高比名称,

        电影状态,

        电影发布日期,

        电影预算,

        电影总收入,

        电影时间戳

    );

    });
}
For the `fetchByField` method, we use the same mechanisms as `fetchById`. Unsurprisingly, the operations stay the same: `get`, `flatMap`, `filter`, and `map`. The only change is in the `filter` operation, where we now have to `filter` on a `field` received as parameter `return (movie[MovieFields[field]] === value)`.

This statement can be a bit overwhelming to the TypeScript or JavaScript newcomer. First, the `MovieFields[field]` part is explained by the fact that `enum` will be transpiled into the following JavaScript function:
(function (电影字段) {
电影字段[电影字段["电影 id"] = 0] = "电影 id";
电影字段[电影字段["标题"] = 1] = "标题";
电影字段[电影字段["阶段"] = 2] = "阶段";
电影字段[电影字段["类别名称"] = 3] = "类别名称";
电影字段[电影字段["发布年份"] = 4] = "发布年份";
电影字段[电影字段["播放时长"] = 5] = "播放时长";
电影字段[电影字段["评分名称"] = 6] = "评分名称";
电影字段[电影字段["光盘格式名称"] = 7] =
"光盘格式名称";
电影字段[电影字段["光盘数量"] = 8] = "光盘数量";
电影字段[电影字段["查看格式名称"] = 9] =
"查看格式名称";
电影字段[电影字段["宽高比名称"] = 10] =
"aspect_ratio_name";
MovieFields[MovieFields["status"] = 11] = "status";
MovieFields[MovieFields["release_date"] = 12] = "release_date";
MovieFields[MovieFields["budget"] = 13] = "budget";
MovieFields[MovieFields["gross"] = 14] = "gross";
MovieFields[MovieFields["time_stamp"] = 15] = "time_stamp";
})
(exports.MovieFields || (exports.MovieFields = {}));
var MovieFields = exports.MovieFields;
Consequently, the value of `MovieFields.release_year` is, in fact, `4` and `MovieFields` is a static array. So, `movie[MovieFields[field]]` is interpreted as a `movie["release_year is"]` in our current example.

The next subtlety is that every object in JavaScript is represented as an associative array, where the variable name acts as a key. Therefore, `movie["release_year"]` is equivalent to `movie.release_year`. This allows us to retrieve the value of any property only by knowing its name. Modify the constructor of `AngularObservableAppComponent` to look like the following:
constructor(private IMDBAPI:IMDBAPIService){
this.IMDBAPI.fetchByField(MovieFields.release_year, 2015).subscribe(
    value => {this.movies.push(value); console.log("组件",

    value)},

    error => this.error = true,

    () => this.finished = true
)
}
This will have the impact shown in the following screenshot:
Now we have five matches instead of one. On the analysis of the console, we can see that the notifications still come as soon as a suitable object is found, and not when they have all been filtered:
fetchByField 4 2015
imdbapi.service.js:43 过滤对象 {movie_id: 1, title: "钢铁侠",
phase: "第一阶段: 复仇者联盟组装", category_name: "动作",
release_year: 2015...}
imdbapi.service.js:47 映射对象 {movie_id: 1, title: "钢铁侠",
phase: "第一阶段: 复仇者联盟组装", category_name: "动作",
release_year: 2015...}
angular-observable.component.js:22 组件 电影 {_movie_id: 1,
_title: "钢铁侠", _phase: "第一阶段: 复仇者联盟组装",
_category_name: "动作", _release_year: 2015...}
imdbapi.service.js:43 过滤对象 {movie_id: 2, title: "The
难以置信的绿巨人", phase: "第一阶段: 复仇者联盟组装",
category_name: "动作", release_year: 2008...}
imdbapi.service.js:43 过滤对象 {movie_id: 3, title: "钢铁侠 2",
phase: "第一阶段: 复仇者联盟组装", category_name: "动作",
release_year: 2015...}
imdbapi.service.js:47 映射对象 {movie_id: 3, title: "钢铁侠 2",
phase: "第一阶段: 复仇者联盟组装", category_name: "动作",
release_year: 2015...}
angular-observable.component.js:22 组件 电影 {_movie_id: 3,
_title: "钢铁侠 2", _phase: "第一阶段: 复仇者联盟组装",
_category_name: "动作", _release_year: 2015...}
imdbapi.service.js:43 过滤对象 {movie_id: 4, title: "雷神", phase:
"第一阶段: 复仇者联盟组装", category_name: "动作",
release_year: 2011...}
imdbapi.service.js:43 过滤对象 {movie_id: 5, title: "Captain
America", phase: "第一阶段: 复仇者联盟组装", category_name:
"动作", release_year: 2011...}
imdbapi.service.js:43 过滤对象 {movie_id: 6, title: "复仇者联盟,
The", phase: "第一阶段: 复仇者联盟组装", category_name: "科幻
Fiction", release_year: 2012...}
imdbapi.service.js:43 过滤对象 {movie_id: 7, title: "钢铁侠 3",
phase: "第二阶段", category_name: "动作", release_year: 2015...}
imdbapi.service.js:47 映射对象 {movie_id: 7, title: "钢铁侠 3",
phase: "第二阶段", category_name: "动作", release_year: 2015...}
angular-observable.component.js:22 组件 电影 {_movie_id: 7,
_title: "钢铁侠 3", _phase: "第二阶段", _category_name: "动作",
_release_year: 2015...}
imdbapi.service.js:43 过滤对象 {movie_id: 8, title: "雷神: 黑暗世界",
黑暗世界", phase: "第二阶段", category_name: "科幻",
release_year: 2013...}
imdbapi.service.js:43 过滤对象 {movie_id: 9, title: "Captain
发布年份:"2015..."}
派两:复仇者联盟",类别名称:"动作",发布年份:"2014..."}
imdbapi.service.js:43 过滤对象{电影 _ID: 10,标题:"银河护卫队"
Fiction", _release_year: 2015...}
let imdbSubscription =
imdbapi.service.js:43filter Object {movie_id: 1, title: "Iron Man",
阶段:"第一阶段:复仇者联盟",类别名称:"动作"
阶段:"第一阶段:复仇者联盟",类别名称:"动作"
imdbSubscription.unsubscribe();
_title: "复仇者联盟:奥创时代",_phase: "第二阶段"
}
constructor(private IMDBAPI:IMDBAPIService){
imdbapi.service.js:43 过滤对象{电影 _ID: 12,标题:"蚁人"
imdbapi.service.js:43 过滤对象{电影 _ID: 11,标题:"复仇者联盟
angular-observable.component.js:24 组件电影{_ 电影 ID: 3,
"动作",发布年份:"2014..."}
imdbapi.service.js:43 过滤对象{电影 _ID: 14,标题:"奇异博士
_ 标题:"钢铁侠",_ 阶段:"第一阶段:复仇者联盟"
阶段:"第二阶段",类别名称:"科幻",发布年份:"2015..."
console.log("组件", value)
Age of Ultron",阶段:"第二阶段",类别名称:"科幻"
America: The Winter Soldier", phase: "Phase Two", category_name:
_title: "Ant-Man", _phase: "Phase Two", _category_name: "Science
发布年份:"2015..."
"美国队长:内战",阶段:"第三阶段",类别名称:"科学"
category_name: "Action", release_year: 2008...}
发布年份:"2014..."}
angular-observable.component.js:22 组件电影{_ 电影 ID: 11,
value => {
Now, the other strength of this design pattern is the ability to unsubscribe yourself. To do so, you only have to acquire a reference to your subscription and call the `unsubscribe()` method, shown as follows:
发布年份:"2015..."}
imdbapi.service.js:43 过滤对象{电影 _ID: 2,标题:"银河护卫队"
this.movies.push(value);

2015..."}

_ 标题:"钢铁侠 2",_ 阶段:"第一阶段:复仇者联盟"

    发布年份:"2015..."

    imdbapi.service.js:49 映射对象{电影 _ID: 3,标题:"钢铁侠 2"

    发布年份:"2015..."

        subscribe(

    imdbapi.service.js:47 映射对象{电影 _ID: 11,标题:"复仇者联盟:奥创时代

    阶段:"第一阶段:复仇者联盟",类别名称:"动作"

_ 类别名称:"动作",_ 发布年份:"2015..."}

error => this.error = true,

angular-observable.component.js:22 组件电影{_ 电影 ID: 12,
Fiction", release_year: 2016...}
Here, we unsubscribe after the third notification. To add to all this, the `Observable` object will even detect that nobody's observing anymore and will stop whatever it was doing. Indeed, the previous code with `unsubscribe` produces:
}
the Galaxy", phase: "Phase Two", category_name: "Science Fiction",
2015..."}
angular-observable.component.js:24 组件电影{_movie_id: 1,
if(this.movies.length > 2){
Strange",阶段:"第二阶段",类别名称:"科幻"
imdbapi.service.js:43 过滤对象{电影 _ID: 3,标题:"钢铁侠 2"
阶段:"第一阶段:复仇者联盟",类别名称:"动作"
);
_ 类别名称:"科幻",_ 发布年份:"2015..."}
},
"神奇的浩克",阶段:"第一阶段:复仇者联盟"
phase: "Phase Two", category_name: "Science Fiction", release_year:
发布年份:"2016..."}
imdbapi.service.js:49 映射对象{电影 _ID: 1,标题:"钢铁侠"
imdbapi.service.js:47 映射对象{电影 _ID: 12,标题:"蚁人"
() => this.finished = true
of Ultron",阶段:"第二阶段",类别名称:"科幻"
this.IMDBAPI.fetchByField(MovieFields.release_year, 2015).
imdbapi.service.js:43 过滤对象{电影 _ID: 13,标题:"美国队长
fetchByField 4 2015
_category_name: "动作", _release_year: 2015...}
imdbapi.service.js:43 filter Object {movie_id: 4, title: "雷神", phase:
"第一阶段:复仇者联盟", category_name: "动作",
release_year: 2011...}
imdbapi.service.js:43 filter Object {movie_id: 5, title: "美国队长
America", phase: "第一阶段:复仇者联盟", category_name:
"动作", release_year: 2011...}
imdbapi.service.js:43 filter Object {movie_id: 6, title: "复仇者联盟
The", phase: "第一阶段:复仇者联盟", category_name: "科幻
Fiction", release_year: 2012...}
imdbapi.service.js:43 filter Object {movie_id: 7, title: "钢铁侠 3",
phase: "第二阶段", category_name: "动作", release_year: 2015...}
imdbapi.service.js:49 map Object {movie_id: 7, title: "钢铁侠 3",
phase: "第二阶段", category_name: "动作", release_year: 2015...}
angular-observable.component.js:24 组件 电影 {_movie_id: 7,
_title: "钢铁侠 3", _phase: "第二阶段", _category_name: "动作",
_release_year: 2015...}
Everything stops after the third notification.

The code for this `Observer` implementation is at [`bit.ly/mastering-angular2-chap7-part2`](http://bit.ly/mastering-angular2-chap7-part2).

# Promises

Promises are another useful asynchronous concept available in Angular. Conceptually, promises implement a totally different pattern. A `Promise` is a value that will be resolved or rejected in the future. Like the `Observer` pattern, they can be used to manage async programming. So, why bother to have two concepts to do the same thing? Well, the verbosity of `Observer` allows one thing that `Promise` does not: unsubscribe. The main difference that may lead to a decision about which one to use is the ability of `Observable` to catch many subsequent asynchronous events, while `Promise` can manage a single asynchronous event. To emphasise the differences between `Observer` and `Promise`, we will take the same example as before, fetching movies from a JSON API.

The `AngularObservableAppComponent` component will make an asynchronous call to the `IMDBAPIService` and, upon the answer, will update the HTML view.

Here's the `fetchOneById` method using `Promise` instead of `Observable`:
/** ,
-
返回匹配 id 的电影的 Promise
-
@param {number} id
-
@return {Promise}
*/
public fetchOneById(id:number):Promise{
console.log('fecthOneById', id);
    return this.http.get(this.moviesUrl)

    /**

    * 转换 http get 的结果,它是 observable

    * 转换成一个 observable

    */

    .flatMap(res => res.json().movies)

    /**

    * 通过它们的 movie_id 来过滤电影

    */

    .filter((movie:any)=>{

    console.log("filter", movie);

    return (movie.movie_id === id)

    })

    .toPromise()

    /**

    * 将 JSON 电影项映射到电影模型

    */

    .then((movie:any) => {

    console.log("map", movie);

    return new Movie(

        movie.movie_id,

        movie.title,

        movie.phase,

        movie.category_name,

        movie.release_year,

        movie.running_time,

        movie.rating_name,

        movie.disc_format_name,

        movie.number_discs,

        movie.viewing_format_name,

        movie.aspect_ratio_name,

        movie.status,

        movie.release_date,

        movie.budget,

        movie.gross,

        movie.time_stamp

    )

    });
}
As shown by this code, we went from `flatMap`, `filter`, `map` to `flatMap`, `filter`, `toPromise`, and `then`. The new operations, `toPromise` and `then` create a `Promise` object that will contain the result of the `filter` operation and, on completion of the `filter` operation, the `then` operation will be executed. The `then` operation can be thought of as a map; it does the same thing. To use this code, we also have to change the way we call `IMDBAPIService` in `AngularObservableAppComponent`, to the following:
this.IMDBAPI.fetchOneById(1).then(
    value => {

        this.movies.push(value);

        console.log("Component", value)

    },

    error => this.error = true
);
Once again, we can see a `then` operation that will be executed when the promise from `IMDBAPIService.FetchOneById` has completed. The `then` operation accepts two callbacks: `onCompletion` and `onError`. The second callback, `onError`, is optional.

Now, `onCompletion` callback will only be executed once `Promise` has completed, as shown in the console:
imdbapi.service.js:30 filter Object {movie_id: 2, title: "复仇者联盟"
狂野的绿巨人", phase: "第一阶段:复仇者联盟",
category_name: "动作", release_year: 2008...}
imdbapi.service.js:30 filter Object {movie_id: 3, title: "钢铁侠 2",
phase: "第一阶段:复仇者联盟", category_name: "动作",
release_year: 2015...}
imdbapi.service.js:30 filter Object {movie_id: 4, title: "雷神", phase:
"第一阶段:复仇者联盟", category_name: "动作",
release_year: 2011...}
imdbapi.service.js:30 filter Object {movie_id: 5, title: "美国队长"
America", phase: "第一阶段:复仇者联盟", category_name:
"动作", release_year: 2011...}
imdbapi.service.js:30 filter Object {movie_id: 6, title: "复仇者联盟
The", phase: "第一阶段:复仇者联盟", category_name: "科幻
Fiction", release_year: 2012...}
imdbapi.service.js:30 filter Object {movie_id: 7, title: "钢铁侠 3",
phase: "第二阶段", category_name: "动作", release_year: 2015...}
imdbapi.service.js:30 filter Object {movie_id: 8, title: "Thor: The
Dark World", phase: "Phase Two", category_name: "Science Fiction",
release_year: 2013...}
imdbapi.service.js:30 filter Object {movie_id: 9, title: "Captain
America: The Winter Soldier", phase: "Phase Two", category_name:
"Action", release_year: 2014...}
imdbapi.service.js:30 filter Object {movie_id: 10, title: "Guardians of
the Galaxy", phase: "Phase Two", category_name: "Science Fiction",
release_year: 2014...}
imdbapi.service.js:30 filter Object {movie_id: 11, title: "Avengers:
Age of Ultron", phase: "Phase Two", category_name: "Science Fiction",
release_year: 2015...}
imdbapi.service.js:30 filter Object {movie_id: 12, title: "Ant-Man",
phase: "Phase Two", category_name: "Science Fiction", release_year:
2015...}
imdbapi.service.js:30 filter Object {movie_id: 13, title: "Captain
America: Civil War", phase: "Phase Three", category_name: "Science
Fiction", release_year: 2016...}
imdbapi.service.js:30 filter Object {movie_id: 14, title: "Doctor
Strange", phase: "Phase Two", category_name: "Science Fiction",
release_year: 2016...}
imdbapi.service.js:35 map Object {movie_id: 1, title: "Iron Man",
phase: "Phase One: Avengers Assembled", category_name: "Action",
release_year: 2015...}
angular-observable.component.js:23 Component Movie {_movie_id: 1,
_title: "Iron Man", _phase: "Phase One: Avengers Assembled",
_category_name: "Action", _release_year: 2015...}
While the modification of `IMDBAPIService` was minimal for the `fetchOneById` method, we will have to change `fetchByField` more consequently. Indeed, `onComplete` callback will only be executed once, so we need to return an array of `Movie`, and not only one `Movie`. Here's the implementation of the `fetchByField` method:
public fetchByField(field:MovieFields, value:any):Promise<Movie[]>{
console.log('fetchByField', field, value);
return this.http.get(this.moviesUrl)
    .map(res => res.json().movies.filter(

    (movie)=>{

        return (movie[MovieFields[field]] === value)

    })

    )

.toPromise()

    /**

    * Map the JSON movie items to the Movie Model

    */

    .then((jsonMovies:any[]) => {

    console.log("map", jsonMovies);

    let movies:Movie[] = [];

    for (var i = 0; i < jsonMovies.length; i++) {

        movies.push(

                new Movie(

                jsonMovies[i].movie_id,

                jsonMovies[i].title,

                jsonMovies[i].phase,

                jsonMovies[i].category_name,

                jsonMovies[i].release_year,

                jsonMovies[i].running_time,

                jsonMovies[i].rating_name,

                jsonMovies[i].disc_format_name,

                jsonMovies[i].number_discs,

                jsonMovies[i].viewing_format_name,

                jsonMovies[i].aspect_ratio_name,

                jsonMovies[i].status,

                jsonMovies[i].release_date,

                jsonMovies[i].budget,

                jsonMovies[i].gross,

                jsonMovies[i].time_stamp

                )

        )

    }

    return movies;

    });
}
To implement this, I trade `flatMap` for a classical map as the first operation. In the map, I acquire the reference to the JSON movie array directly and apply the `field` filter. The result is transformed into a promise and processed in the `then` operation. The `then` operation receives an array of JSON movies and transforms it into an array of `Movie`. This produces an array of `Movie` which is returned, as the promised result, to the caller. The call in `AngularObservableAppComponent` is also a bit different, as we now expect an array:
this.IMDBAPI.fetchByField(MovieFields.release_year, 2015).then(
    value => {

        this.movies = value;

        console.log("Component", value)

    },

    error => this.error = true
)
Another way to use `Promise` is through the `fork`/`join` paradigm. Indeed, it is possible to launch many processes (`fork`) and wait for all the promises to complete before sending the aggregated result to the caller (`join`). It is therefore relatively easy to supercharge the `fetchByField` method, as it can run in many fields with logic or.

Here are the three very short methods we need to implement to the logic or:
/**
- Private member storing pending promises
*/
private promises:Promise<Movie[]>[] = [];
/**
-
Register one promise for field/value. Returns this
-
for chaining that is
-
byField(Y, X)
-
.or(...)
-
.fetch()
-
@param {MovieFields} field
-
@param {any} value
-
@return {IMDBAPIService}
*/
public byField(field:MovieFields, value:any):IMDBAPIService{
this.promises.push(this.fetchByField(field, value));
return this;
}
/**
-
便于使调用更容易阅读的方便方法,即
-
byField(Y, X)
-
.or(...)
-
.fetch()
-
instead of
-
byField(Y, X)
-
.byField(...)
-
.fetch()
-
@param {MovieFields} field
-
@param {any} value
-
@return {IMDBAPIService}
*/
public or(field:MovieFields, value:any):IMDBAPIService{
return this.byField(field, value);
}
/**
-
加入所有的 promises 并返回聚合结果。
-
@return {Promise<Movie[]>}
*/
public fetch():Promise<Movie[]>{
return Promise.all(this.promises).then((results:any) => {
    //result is an array of movie arrays. One array per

    //promise. We need to flatten it.

    return [].concat.apply([], results);
});
}
Here, I provide two convenient methods, `byfield` and/or that take a `MovieField` and a value as an argument and create a new `Promise`. They both return this for chaining. The `fetch` method joins all the `Promise` together and merges their respective results. In `AngularObservableAppComponent`, we can now have the following:
this.IMDBAPI.byField(MovieFields.release_year, 2015)
        .or(MovieFields.release_year, 2014)

        .or(MovieFields.phase, "Phase Two")

        .fetch()

        .then(

                value => {

                this.movies = value;

                console.log("Component", value)

                },

                error => this.error = true

        );
这个非常简单易懂,保持了 Angular 的所有异步能力。

针对 promises 的代码可在此处找到:[`bit.ly/mastering-angular2-chap7-part3`](http://bit.ly/mastering-angular2-chap7-part3)。

# Summary

在这一章节中,我们利用了 Angular 的异步编程,使用了`Observable`和`Promise`。

更具体地,我们学习了如何在`typescript`中实现`Observable`模式,然后利用了 Angular 框架,同时仍然使用`Observable`的特性。

同样,我们看到如何在 Angular 中利用`Promises`,并构建了一个基本但可扩展的用于查询漫威电影宇宙的 JSON API。

在下一章中,我们将在此示例的基础上构建高级表单。实际上,我们将创建添加、删除和更新漫威电影宇宙电影所需的内容。此外,我们还将学习关于 FormBuilder,控制组和自定义验证。
