

因为公司把这个预研任务交给我才开始学习的webRTC,在此之前我对它一无所知,中间的艰辛过程就不描述了。虽然有前辈给我的demo,但是我学习来还是非常吃力(在此我体会到了英语的重要性...)。下面是我为了自己做的webRTC学习总结以便于自己复习。
项目背景
公司需要做一个基于webRTC的直播、点播页面,方便做视频监控和视频回放,并且不需要做NAT穿透,分配给我的任务是做一个关于webRTC直播的demo页面,要实现接收码流(直播)、断开码流、多屏播放功能。我拿到了一份cto几年前写的纯js的webRTCdemo,里面通过ajax请求来做接口通讯,里面封装的方法非常多,我花了三天时间才看明白...公司要求我改成基于webSocket的方式来做通讯,借此我学习了一下webSocket...后来发现用webSocket果然比使用ajax简单许多(少了发送请求的封装方法操作,接收也简单了许多)。
技术背景
webRTC的技术背景我就不做赘述了,本人小白一个,描述的也不好,借此搬来前辈写的,希望可乐爸前辈勿怪。juejin.cn/post/684490…
学习笔记
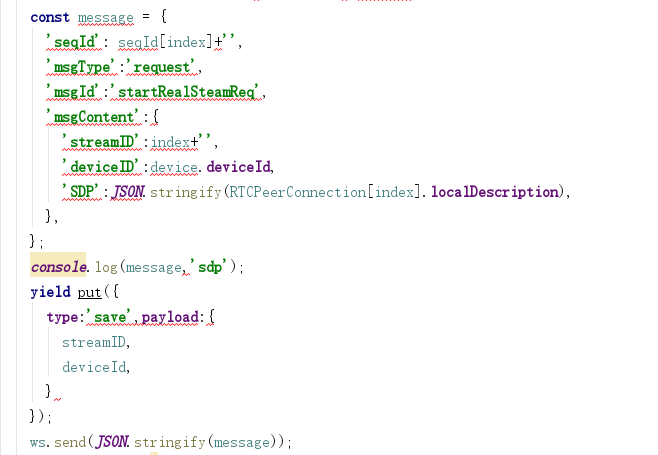
首先我前端需要创建一个RTCPeerConnection对象,然后创建一个offer,再将offer添加到本地描述里。
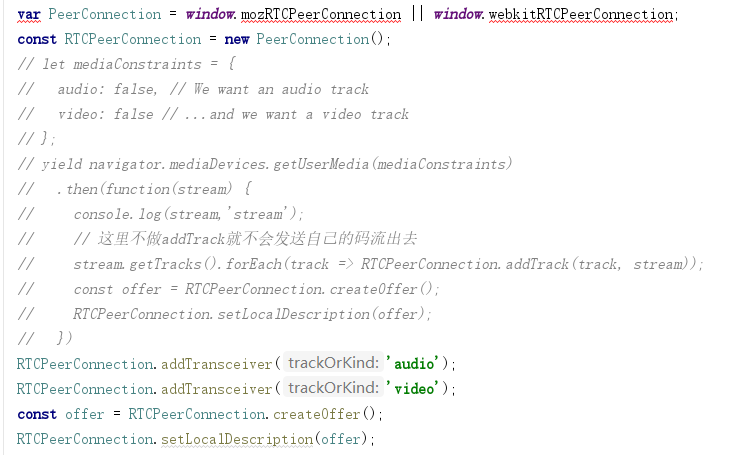
创建完RTCPeerConnection对象之后我需要添加它对应的诸多回调函数
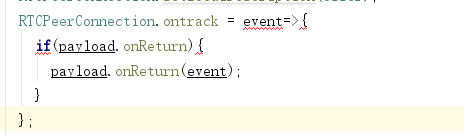
其中,最重要的是RTCPeerConnection.ontrack:
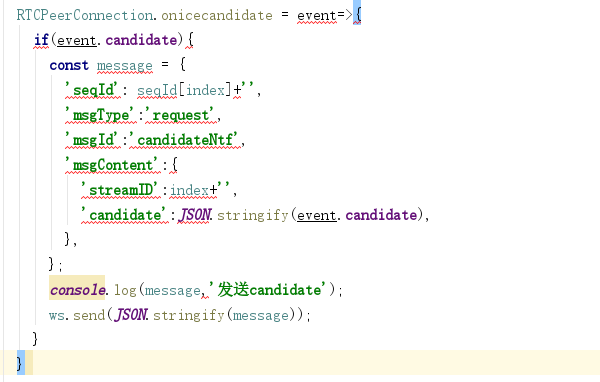
接着我需要要将LocalDescription作为SDP发送给流媒体服务器。
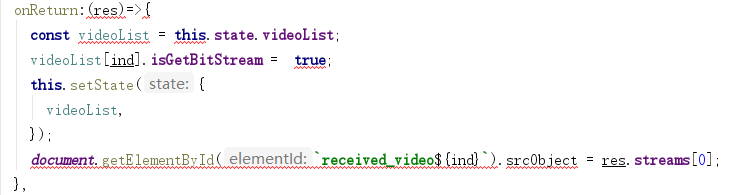
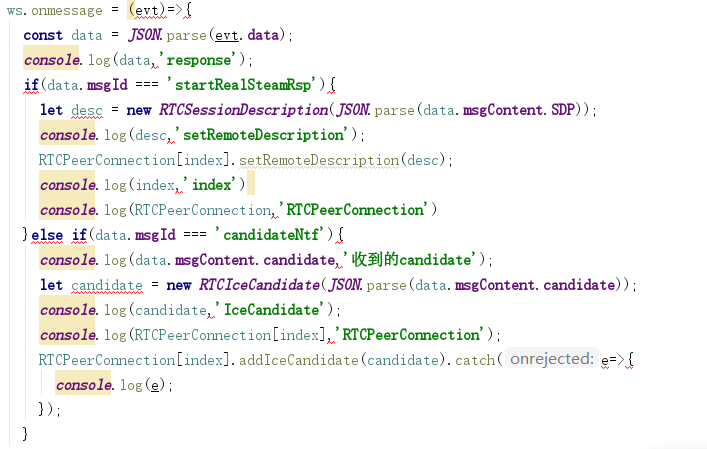
处理回复
我将打包好的数据发送给流媒体服务器之后,要再处理服务器给我的回复
断开码流
断开码流我会向服务器发送一个断开请求,接着销毁当前的RTCPeerConnection对象中的所有回调,再销毁当前的RTCPeerConnection对象,最后停止video的播放
const { dispatch,streamID} = this.props;
dispatch({
  type:'videoDemo/BreakBitStream',payload:{
    streamID:streamID[ind],
    index:ind
  },
});
const videoList = this.state.videoList;
videoList[ind].isGetBitStream =  false;
this.setState({
  videoList,
});
document.getElementById(`received_video${ind}`).srcObject.getTracks().forEach(track => track.stop());
RTCList[index].ontrack = null;
RTCList[index].onremovetrack = null;
RTCList[index].onremovestream = null;
RTCList[index].onicecandidate = null;
RTCList[index].oniceconnectionstatechange = null;
RTCList[index].onsignalingstatechange = null;
RTCList[index].onicegatheringstatechange = null;
RTCList[index].onnegotiationneeded = null;
if(payload.onBreak){
  payload.onBreak();
}
RTCList[index].close();
RTCList[index] = null;
const message = {
    'seqId': 1,
    'msgType':'notify',
    'msgId':'closeRealStreamNtf',
    'msgContent':{
      'streamID':payload.streamID+'',
    },
  }
ws.send(JSON.stringify(message));
