

conda 国内镜像源下载慢
- 一开始使用
conda install pytorch torchvision cudatoolkit=10.1 -c pytorch因为加了-c pytorch没有从国内镜像中下载,所以巨慢 - 去除后,是从国内源下载了,但是每次下载到 30% 多就会发生
CondaHTTPError: HTTP 000 CONNECTION FAILED重新下载仍然是这样,吐血. - 原因在于 国内源中都使用了
https把"s" 去掉即可.具体原因也不太清楚为什么,总之就是解决了.
pytorch 和 cuda 版本不对应
pycharm path mappings 无法删除
- 现象:造成远程调试的时候没法用,本地与远程服务器的路径映射不对,又无法删除重新设置.
- 原因:一开始设置
ssh interpreter的时候,同步文件夹sync folders没有进行设置. - 解决:重新添加一遍
ssh interpreter,把sync folders设置正确即可.
detectron2配置采坑记录
- 安装
pytorch版本不对应: 本地cuda的版本为10.0,驱动为410.93,而安装的pytorch的命令行中conda install pytorch torchvision cudatoolkit=10.1,安装cudatoolkit=10.1为更高版本,无法兼容Driver Version 410.93.能向下兼容cuda,无法向上兼容. - 正确的应该是:
conda install pytorch torchvision cudatoolkit=9.2 -c pytorch
detectron2 指定GPU训练.
- 命令行
export CUDA_VISIBLE_DEVICES=1没有效果.github.com/facebookres… - 这种方式才有效:
import os
os.environ["CUDA_VISIBLE_DEVICES"] = "1"
报错1:
python -m pip install -e detectron2 报错:
 raise RuntimeError(message)
    RuntimeError: Error compiling objects for extension
原因: gcc 版本问题,detectron2 构建so包,需要 gcc & g++ 版本大于 5.0.
yum install centos-release-scl
yum install devtoolset-7
scl enable devtoolset-7 -- bash
source /opt/rh/devtoolset-7/enable
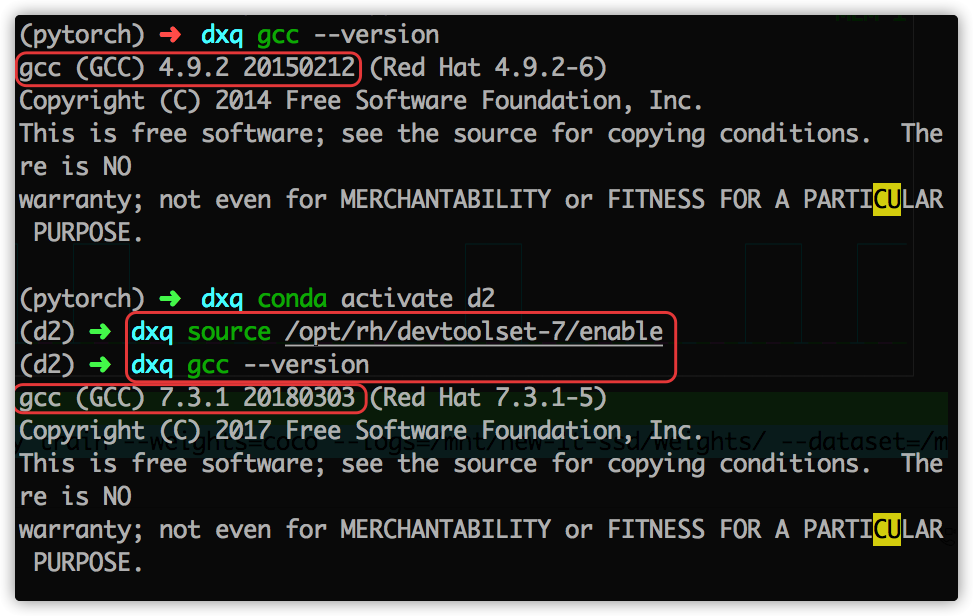
fvcc
ImportError                               Traceback (most recent call last)
<ipython-input-4-bcc67a24373b> in <module>
      3 from torch.utils.cpp_extension import CUDA_HOME;
      4
----> 5 from detectron2.data import MetadataCatalog, DatasetCatalog
      6 from detectron2.engine import DefaultTrainer
      7 from detectron2.config import get_cfg

~/dxq/detectron2/detectron2/data/__init__.py in <module>
      1 # Copyright (c) Facebook, Inc. and its affiliates. All Rights Reserved
----> 2 from . import transforms  # isort:skip
      3
      4 from .build import (
      5     build_detection_test_loader,

~/dxq/detectron2/detectron2/data/transforms/__init__.py in <module>
      2 from .transform import *
      3 from fvcore.transforms.transform import *
----> 4 from .transform_gen import *
      5
      6 __all__ = [k for k in globals().keys() if not k.startswith("_")]

~/dxq/detectron2/detectron2/data/transforms/transform_gen.py in <module>
      8 import sys
      9 from abc import ABCMeta, abstractmethod
---> 10 from fvcore.transforms.transform import (
     11     BlendTransform,
     12     CropTransform,

ImportError: cannot import name 'VFlipTransform'
pip install git+https://github.com/facebookresearch/fvcore.git
切换 nvcc ,cuda版本
移动硬盘挂载问题
/sbin/mount.ntfs-3g: symbol lookup error:
/sbin/mount.ntfs-3g:
undefined symbol: ntfs_xattr_build_mapping
重新编译即可: www.jianshu.com/p/795201a2b…
jupyter notebook 无法显示cv.imshow
cv2.imshow()
#报错.
#TypeError: Required argument 'mat' (pos 2) not found
使用plt显示
%matplotlib inline
from matplotlib import pyplot as plt

plt.figure(figsize=(8, 4),dpi=300)
    plt.imshow(img_array)
    plt.show()
ImportError: cannot import name '_C' detectron2
未构建造成 github.com/facebookres…
新增 jupyter kernel 服务
stackoverflow.com/questions/2…
gcc & g++ > 5.0
解决: stackoverflow.com/questions/5… medium.com/@bipul.k.ku…
快速获得图片尺寸
通过opencv或PIL加载图片到内存,然后再获取图片尺寸,耗时非常大,而我只是单纯想获得图片的宽高尺寸而已.
3万多张图片,直接读取要1,2个小时.
直接告诉我,肯定也有人遇到和我一样的问题,并且解决得很好的,果然一google,找到两种方法.
有两种方法:
- 高大上,字节读取,寻找宽高尺寸.只有对各种图片格式保存方式非常了解才能撸出这样的代码.
import os
import struct

class UnknownImageFormat(Exception):
    pass

def get_image_size(file_path):
    """
    Return (width, height) for a given img file content - no external
    dependencies except the os and struct modules from core
    """
    size = os.path.getsize(file_path)

    with open(file_path) as input:
        height = -1
        width = -1
        data = input.read(25)

        if (size >= 10) and data[:6] in ('GIF87a', 'GIF89a'):
            # GIFs
            w, h = struct.unpack("<HH", data[6:10])
            width = int(w)
            height = int(h)
        elif ((size >= 24) and data.startswith('\211PNG\r\n\032\n')
              and (data[12:16] == 'IHDR')):
            # PNGs
            w, h = struct.unpack(">LL", data[16:24])
            width = int(w)
            height = int(h)
        elif (size >= 16) and data.startswith('\211PNG\r\n\032\n'):
            # older PNGs?
            w, h = struct.unpack(">LL", data[8:16])
            width = int(w)
            height = int(h)
        elif (size >= 2) and data.startswith('\377\330'):
            # JPEG
            msg = " raised while trying to decode as JPEG."
            input.seek(0)
            input.read(2)
            b = input.read(1)
            try:
                while (b and ord(b) != 0xDA):
                    while (ord(b) != 0xFF): b = input.read(1)
                    while (ord(b) == 0xFF): b = input.read(1)
                    if (ord(b) >= 0xC0 and ord(b) <= 0xC3):
                        input.read(3)
                        h, w = struct.unpack(">HH", input.read(4))
                        break
                    else:
                        input.read(int(struct.unpack(">H", input.read(2))[0])-2)
                    b = input.read(1)
                width = int(w)
                height = int(h)
            except struct.error:
                raise UnknownImageFormat("StructError" + msg)
            except ValueError:
                raise UnknownImageFormat("ValueError" + msg)
            except Exception as e:
                raise UnknownImageFormat(e.__class__.__name__ + msg)
        else:
            raise UnknownImageFormat(
                "Sorry, don't know how to get information from this file."
            )

    return width, height
- 有人已经封装好类似的方法,直接拿来就用.和方法1类似. 同时加入了本地缓冲,发生异常时可恢复,不至于重头再来.

pip install imagesize

# usage:
width, height = imagesize.get(image_path)
总得来说,比opencv or PIL直接读取的速度快上 10 倍左右

原文链接: stackoverflow
coco 数据集格式
搭建detectron2 大体流程
训练自己的数据集
via 数据集转换成 coco格式
步骤:
- 下载数据集json到本地(耗时久)

存在问题: 数据集下载速度慢.
2. 通过via标注工具提供的功能进行转换
coco格式的json
- 添加宽高信息
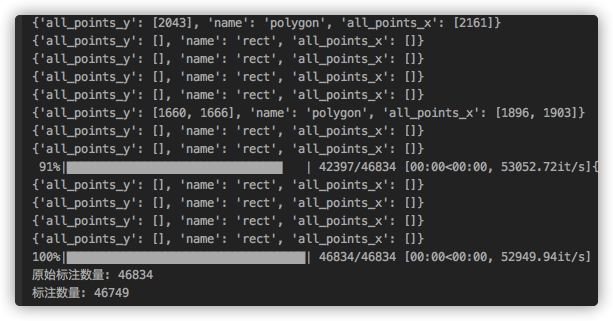
- 清洗异常数据:
categories异常,image_id异常,segmentation异常,空数据等
def handle_coco():
    json_path = '../page/46837-20.5.13-v12.0-2-coco.json'

    coco_json = json.load(open(json_path, encoding='utf-8'))
    # 转换annotations中的id 为 int
    change_image_id_to_int(coco_json)
    # 添加宽高信息
    add_height_width(coco_json)
    # 去除冗余categories
    remove_redundancy_categories(coco_json)
    # 去除空数据
    remove_abnormal_values(coco_json)
    # 更改segmentation为正常的格式 一位数组变成二位
    change_segmentation(coco_json)


    save_path = '../page/46837-20.5.13-v12.0-2-coco-clean.json'
    with open(save_path, encoding='utf-8', mode='w') as save_file:
        save_file.write(json.dumps(coco_json))
via标注工具的坑
网页工具提供了将json直接转换成 coco格式.
- 直接导出后
categories会为空,需要导入json之后,设置一下attributes - 这样导出的
json仍然有问题:categories大量重复出现,处理方式:手动删除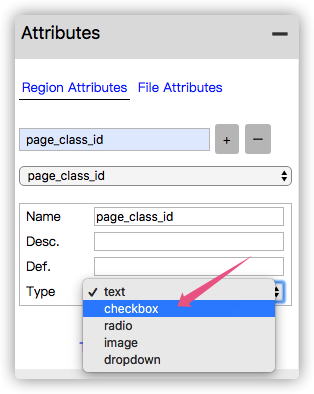
annotations中的image_id是str类型. 需要遍历一遍转换成int.否则读取该数据集时annotation会为空
分析:
- 该方式手动操作,步骤多,耗时久(特别是下载数据集)
- 需要进一步优化,需要写一个脚本,将这些步骤全部集成到一起,运行一下即可.
- 同时标注上也需要考虑一开始就输出
coco格式数据集.不过会有不少历史遗留问题.
detectron2 zoo
detectron2 文档
detectron2.readthedocs.io/index.html
模型下载慢解决
wget 下载模型出奇地快.

训练过程报错1
[05/15 16:21:35 d2.engine.hooks]: Total training time: 0:31:52 (0:00:02 on hooks)
Traceback (most recent call last):
  File "/root/dxq/detectron2/right_wrong/train.py", line 43, in <module>
    trainer.train()
  File "/root/dxq/detectron2/detectron2/engine/defaults.py", line 401, in train
    super().train(self.start_iter, self.max_iter)
  File "/root/dxq/detectron2/detectron2/engine/train_loop.py", line 132, in train
    self.run_step()
  File "/root/dxq/detectron2/detectron2/engine/train_loop.py", line 209, in run_step
    data = next(self._data_loader_iter)
  File "/root/dxq/detectron2/detectron2/data/common.py", line 142, in __iter__
    for d in self.dataset:
  File "/root/anaconda3/envs/pytorch/lib/python3.6/site-packages/torch/utils/data/dataloader.py", line 345, in __next__
    data = self._next_data()
  File "/root/anaconda3/envs/pytorch/lib/python3.6/site-packages/torch/utils/data/dataloader.py", line 856, in _next_data
    return self._process_data(data)
  File "/root/anaconda3/envs/pytorch/lib/python3.6/site-packages/torch/utils/data/dataloader.py", line 881, in _process_data
    data.reraise()
  File "/root/anaconda3/envs/pytorch/lib/python3.6/site-packages/torch/_utils.py", line 395, in reraise
    raise self.exc_type(msg)
RuntimeError: Caught RuntimeError in DataLoader worker process 0.
Original Traceback (most recent call last):
  File "/root/anaconda3/envs/pytorch/lib/python3.6/site-packages/torch/utils/data/_utils/worker.py", line 178, in _worker_loop
    data = fetcher.fetch(index)
  File "/root/anaconda3/envs/pytorch/lib/python3.6/site-packages/torch/utils/data/_utils/fetch.py", line 44, in fetch
    data = [self.dataset[idx] for idx in possibly_batched_index]
  File "/root/anaconda3/envs/pytorch/lib/python3.6/site-packages/torch/utils/data/_utils/fetch.py", line 44, in <listcomp>
    data = [self.dataset[idx] for idx in possibly_batched_index]
  File "/root/dxq/detectron2/detectron2/data/common.py", line 41, in __getitem__
    data = self._map_func(self._dataset[cur_idx])
  File "/root/dxq/detectron2/detectron2/utils/serialize.py", line 23, in __call__
    return self._obj(*args, **kwargs)
  File "/root/dxq/detectron2/detectron2/data/dataset_mapper.py", line 130, in __call__
    for obj in dataset_dict.pop("annotations")
  File "/root/dxq/detectron2/detectron2/data/dataset_mapper.py", line 131, in <listcomp>
    if obj.get("iscrowd", 0) == 0
  File "/root/dxq/detectron2/detectron2/data/detection_utils.py", line 214, in transform_instance_annotations
    bbox = BoxMode.convert(annotation["bbox"], annotation["bbox_mode"], BoxMode.XYXY_ABS)
  File "/root/dxq/detectron2/detectron2/structures/boxes.py", line 63, in convert
    arr = torch.tensor(box)[None, :]
RuntimeError: Could not infer dtype of NoneType


Process finished with exit code 1
数据集中存在异常值:
bbox数值
- 是否有负数
- 是否超出图片尺寸
- 是否为空
- 是否长度为 4
训练错误2
~/anaconda3/envs/d2/lib/python3.6/site-packages/torch/utils/tensorboard/__init__.py in <module>
      2     from tensorboard.summary.writer.record_writer import RecordWriter  # noqa F401
      3 except ImportError:
----> 4     raise ImportError('TensorBoard logging requires TensorBoard with Python summary writer installed. '
      5                       'This should be available in 1.14 or above.')
      6 from .writer import FileWriter, SummaryWriter  # noqa F401

ImportError: TensorBoard logging requires TensorBoard with Python summary writer installed. This should be available in 1.14 or above.
解决:
训练报错3:
ImportError: cannot import name 'UserAgentMixin'
解决:
conda install  Werkzeug
# pip install Werkzeug 无效.
训练报错4:
/anaconda3/envs/d2/lib/python3.6/site-packages/torch/_ops.py in __getattr__(self, op_name)
     59         # for overloads and raise an exception if there are more than one.
     60         qualified_op_name = '{}::{}'.format(self.name, op_name)
---> 61         op = torch._C._jit_get_operation(qualified_op_name)
     62         # let the script frontend know that op is identical to the builtin op
     63         # with qualified_op_name

RuntimeError: No such operator torchvision::nms
解决:
github.com/facebookres…
torchvision和 pytorch版本不对应问题,pytorch版本太高(1.5.0),降级处理:conda install pytorch==1.4.0 torchvision cudatoolkit=9.2
训练NaN
ERROR [05/15 20:05:42 d2.engine.train_loop]: Exception during training:
Traceback (most recent call last):
  File "/root/dxq/detectron2/detectron2/engine/train_loop.py", line 132, in train
    self.run_step()
  File "/root/dxq/detectron2/detectron2/engine/train_loop.py", line 217, in run_step
    self._detect_anomaly(losses, loss_dict)
  File "/root/dxq/detectron2/detectron2/engine/train_loop.py", line 240, in _detect_anomaly
    self.iter, loss_dict
FloatingPointError: Loss became infinite or NaN at iteration=2488!
loss_dict = {'loss_cls': tensor(nan, device='cuda:0', grad_fn=<NllLossBackward>), 'loss_box_reg': tensor(nan, device='cuda:0', grad_fn=<DivBackward0>), 'loss_rpn_cls': tensor(18.3054, device='cuda:0', grad_fn=<MulBackward0>), 'loss_rpn_loc': tensor(0.0628, device='cuda:0', grad_fn=<MulBackward0>)}
[05/15 20:05:42 d2.engine.hooks]: Overall training speed: 2486 iterations in 0:22:17 (0.5380 s / it)
[05/15 20:05:42 d2.engine.hooks]: Total training time: 0:22:19 (0:00:02 on hooks)
Traceback (most recent call last):
  File "/root/dxq/detectron2/right_wrong/train.py", line 43, in <module>
    trainer.train()
  File "/root/dxq/detectron2/detectron2/engine/defaults.py", line 401, in train
    super().train(self.start_iter, self.max_iter)
  File "/root/dxq/detectron2/detectron2/engine/train_loop.py", line 132, in train
    self.run_step()
  File "/root/dxq/detectron2/detectron2/engine/train_loop.py", line 217, in run_step
    self._detect_anomaly(losses, loss_dict)
  File "/root/dxq/detectron2/detectron2/engine/train_loop.py", line 240, in _detect_anomaly
    self.iter, loss_dict
FloatingPointError: Loss became infinite or NaN at iteration=2488!
loss_dict = {'loss_cls': tensor(nan, device='cuda:0', grad_fn=<NllLossBackward>), 'loss_box_reg': tensor(nan, device='cuda:0', grad_fn=<DivBackward0>), 'loss_rpn_cls': tensor(18.3054, device='cuda:0', grad_fn=<MulBackward0>), 'loss_rpn_loc': tensor(0.0628, device='cuda:0', grad_fn=<MulBackward0>)}
分析:
'loss_box_reg': tensor(nan, device='cuda:0', grad_fn=<DivBackward0>), 是 loss_box_reg NaN导致的,推测bbox数值有可能超出图片边界导致的?
验证:
再次筛选数据,发现并无该异常.排除 bbox原因导致 nan
    for annotation in tqdm(annotations):
        # 矩形框,[x0,y0,w,h]
        bbox = annotation['bbox']
        image_id = annotation['image_id']
        image = images[image_id]
        height = image['height']
        width = image['width']

        try:
            if bbox == None or len(bbox) < 4:
                print('bbox 小于4:', bbox)
            elif len([b for b in bbox if b >= 0]) < 4:
                print('数值为负:', bbox)
                new_bbox = []
                for index, b in enumerate(bbox):
                    if b < 0:
                        b = 0
                    # x 宽
                    if index == 0:
                        if b > width:
                            b = width
                            print('x超出宽', image['file_name'])
                    elif index == 1:
                        if b > height:
                            b = height
                            print('y超出宽', image['file_name'])
                    elif index == 2:
                        if b + bbox[0] > width:
                            b = width - bbox[0] - 1
                            print('x超出宽', image['file_name'])
                    elif index == 3:
                        if b + bbox[1] > height:
                            b = height - bbox[1] - 1
                            print('y超出宽', image['file_name'])
                    new_bbox.append(b)
                annotation['bbox'] = new_bbox
                # print('new_bbox:', new_bbox)
                new_annotations.append(annotation)
            else:
                new_annotations.append(annotation)
        except:
            print('数值异常:', bbox)
重新猜测:
有可能是learning rate过大导致,将learning rate从0.02调整到0.01进行训练.
猜想验证成功,顺利训练完成,耗时 11:37:15.

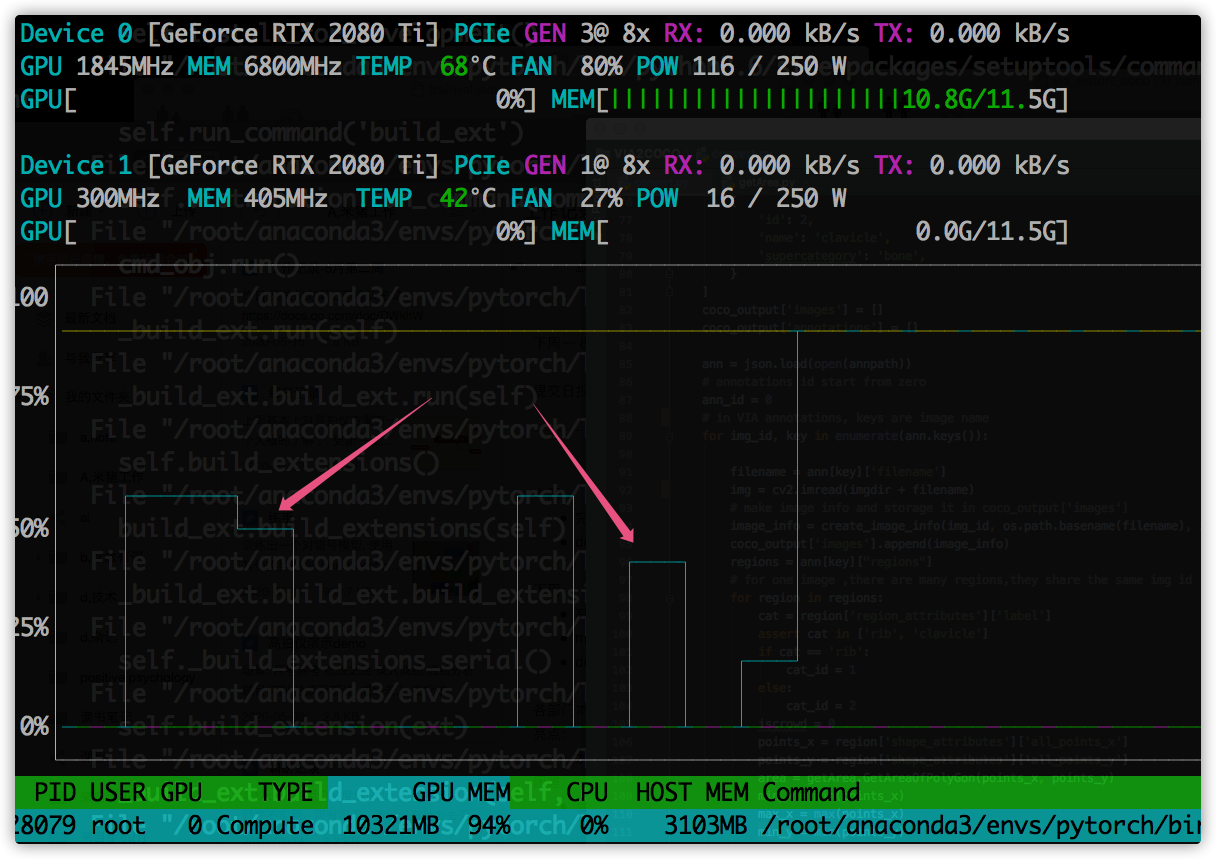
训练速度变慢
训练命令行:
nohup /root/anaconda3/envs/pytorch/bin/python3 /root/xxx/detectron2/xxx/train.py >> train_log_0515.txt &
推测:
日志输出有本地读写操作,导致GPU计算有间隙.因为没有日志输出,直接训练的时候,GPU的计算并不会出现这种波谷,一直是占满的.
detecron2 vs mask rcnn
- 训练速度上,
detectron2完胜.GPU利用率更高.
维护旧项目,训练中断
现象:
训练中断,报错信息如下
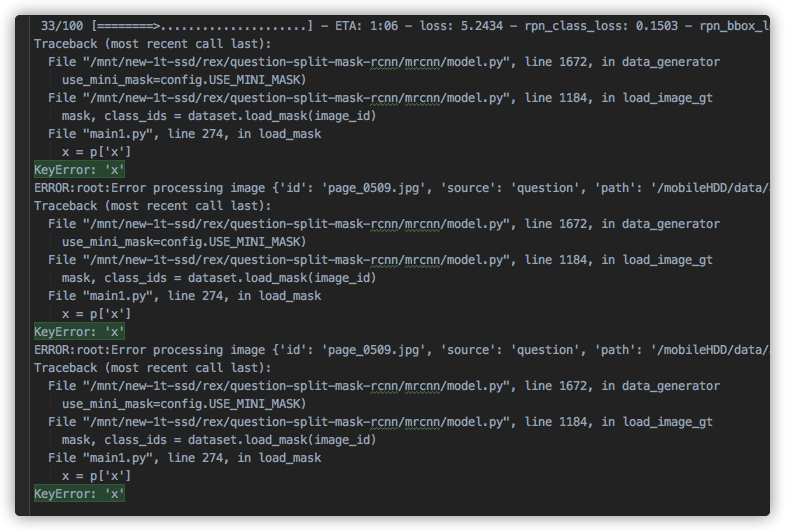
经过排查,是有数据为空造成.

处理:
经过筛选,还真是有不少异常数据.
现象2:
训练停滞,进程不退出,log 无报错信息.
训练技巧
Finetune
- 网络层分部训练
Heads(450epochs) ---> '4+'(150epochs) ---->'all'(200epochs) - 重点微调第四层以上的网络结构:
res4,res5, fpn, rpn, mrcnn
# Training - Stage 1
print("Training network heads")
model.train(dataset_train, dataset_val,
            learning_rate=model.config.LEARNING_RATE,
            epochs=450,
            layers='heads',
            augmentation=augmentation)

# Training - Stage 2
# Finetune layers from ResNet stage 4 and up
print("Fine tune Resnet stage 4 and up")
model.train(dataset_train, dataset_val,
            learning_rate=model.config.LEARNING_RATE,
            epochs=600,
            layers='4+',
            augmentation=augmentation)

# Training - Stage 3
# Fine tune all layers
print("Fine tune all layers")
model.train(dataset_train, dataset_val,
            learning_rate=model.config.LEARNING_RATE / 10,
            epochs=800,
            layers='all',
            augmentation=augmentation)
各个网络层说明:
layer_regex = {
    # all layers but the backbone
    "heads": r"(mrcnn\_.*)|(rpn\_.*)|(fpn\_.*)",
    # From a specific Resnet stage and up
    "3+": r"(res3.*)|(bn3.*)|(res4.*)|(bn4.*)|(res5.*)|(bn5.*)|(mrcnn\_.*)|(rpn\_.*)|(fpn\_.*)",
    "4+": r"(res4.*)|(bn4.*)|(res5.*)|(bn5.*)|(mrcnn\_.*)|(rpn\_.*)|(fpn\_.*)",
    "5+": r"(res5.*)|(bn5.*)|(mrcnn\_.*)|(rpn\_.*)|(fpn\_.*)",
    # All layers
    "all": ".*",
}
结果:

从loss中分析,该训练技巧是挺实用的.
高质量数据集
数据集迭代到v12版本,清洗了不少异常数据,当前模型训练的loss显著低于之前.

Mask RCNN 训练无报错中断
猜想:
- GPU过热? 换一个也还是一样.
- worker 过多,多线程造成的.
# Work-around for Windows: Keras fails on Windows when using
# multiprocessing workers. See discussion here:
# https://github.com/matterport/Mask_RCNN/issues/13#issuecomment-353124009
if os.name is 'nt':
    workers = 0
else:
    workers = multiprocessing.cpu_count()

self.keras_model.fit_generator(
    train_generator,
    initial_epoch=self.epoch,
    epochs=epochs,
    steps_per_epoch=self.config.STEPS_PER_EPOCH,
    callbacks=callbacks,
    validation_data=val_generator,
    validation_steps=self.config.VALIDATION_STEPS,
    max_queue_size=workers * 2,
    workers= 1,  # 4--->1
    use_multiprocessing=False, # True---> False
)
验证下来,长时间未中断,但是训练速度比原来的慢了2倍左右.
训练结果比之前差
- 数据集更高质量了,数量也更多了,是什么原因导致的?
- 有可能是没有把上一次训练的模型作为初始化的参数
- 得重新训练,验证该猜想.
- 重新训练过程中完善
evaluate代码,不然究竟是哪个模型好,有点抓瞎,不能单纯看loss
旧项目Mask RCNN 问题
- evaluate 缺少,模型好坏判断单一,单纯看
loss不够客观.肉眼看很low. - 验证集比较随意,需要挑选出一个典型数据集
jupyter 卡死
现象:
一直卡死在那,重启也没有用
kernel有问题,换成默认的,就不会出现该现象.
查看log,发现:
[I 16:42:32.553 NotebookApp] KernelRestarter: restarting kernel (2/5), new random ports
Traceback (most recent call last):
  File "/root/anaconda3/envs/pytorch/lib/python3.6/runpy.py", line 193, in _run_module_as_main
    "__main__", mod_spec)
  File "/root/anaconda3/envs/pytorch/lib/python3.6/runpy.py", line 85, in _run_code
    exec(code, run_globals)
  File "/root/anaconda3/envs/pytorch/lib/python3.6/site-packages/ipykernel_launcher.py", line 15, in <module>
    from ipykernel import kernelapp as app
  File "/root/anaconda3/envs/pytorch/lib/python3.6/site-packages/ipykernel/__init__.py", line 2, in <module>
    from .connect import *
  File "/root/anaconda3/envs/pytorch/lib/python3.6/site-packages/ipykernel/connect.py", line 13, in <module>
    from IPython.core.profiledir import ProfileDir
  File "/root/anaconda3/envs/pytorch/lib/python3.6/site-packages/IPython/__init__.py", line 55, in <module>
    from .terminal.embed import embed
  File "/root/anaconda3/envs/pytorch/lib/python3.6/site-packages/IPython/terminal/embed.py", line 16, in <module>
    from IPython.terminal.interactiveshell import TerminalInteractiveShell
  File "/root/anaconda3/envs/pytorch/lib/python3.6/site-packages/IPython/terminal/interactiveshell.py", line 22, in <module>
    from prompt_toolkit.shortcuts import create_prompt_application, create_eventloop, create_prompt_layout, create_output
ImportError: cannot import name 'create_prompt_application'
解决过程:
- conda 升级
prompt_toolkit到3.0以上,版本又过高了. - pip 升级
prompt_toolkit升级到正确版本了,但好像没用.各种折腾之后都没搞定. - 更换思路:不和这个问题死磕, 根据
jupyter启动的环境进行拷贝:conda create -n xxx --clone yyy;重新配置detectron2环境.
参考资料:
cloud.tencent.com/developer/a… blog.csdn.net/weixin_3667… cloud.tencent.com/developer/a… www.aiuai.cn/aifarm1288.… blog.csdn.net/happyday_d/… github.com/facebookres… zhuanlan.zhihu.com/p/106133822
