

在 类结构分析中 知道了属性和方法是如何获取的,但是为了看 class_data_bits_t bits; 中的内容,仅仅计算了 cache_t cache; 的大小,并没有认真的了解和研究过 cache_t ,当前内容就是对 Cache_t 的分析。
1、认识 cache_t
cache_t 是对 OC 程序中使用过方法的缓存,以便于下次调用方便。每次调用方法之前都需要先从 cache_t 中查找,如果有缓存,就不需要经过漫长的方法查找而直接调用了,如果没有就给 cache_t 中缓存一份。
struct cache_t {
    struct bucket_t *_buckets;
    mask_t _mask;
    mask_t _occupied;

    //...
}


struct bucket_t {
private:
    // IMP-first is better for arm64e ptrauth and no worse for arm64.
    // SEL-first is better for armv7* and i386 and x86_64.
#if __arm64__
    uintptr_t _imp;
    SEL _sel;
#else
    SEL _sel;
    uintptr_t _imp;
#endif

    //...

}
上方代码就是 struct cache_t 中所有的成员,结构体中 _buckets 是 bucket_t * 的结构体指针类型, 存储的是缓存方法的 SEL 方法编号和 IMP 方法实现的指针地址;_mask 代表的是当前能缓存的方法的个数;_occupied 代表的是当前已经缓存的方法数。
2、LLDB 打印 cache_t
既然知道 cache_t 成员所代表的含义,那现在通过 lldb 调试一下,main.m 文件中,写入下方代码。
int main(int argc, const char * argv[]) {
    @autoreleasepool {
        // insert code here...
        TestClass *object = [TestClass alloc];
        Class pClass = object_getClass(object);
        NSLog(@"%@ - %p",object,pClass);
    }
    return 0;
}
lldb 调试结果如下:
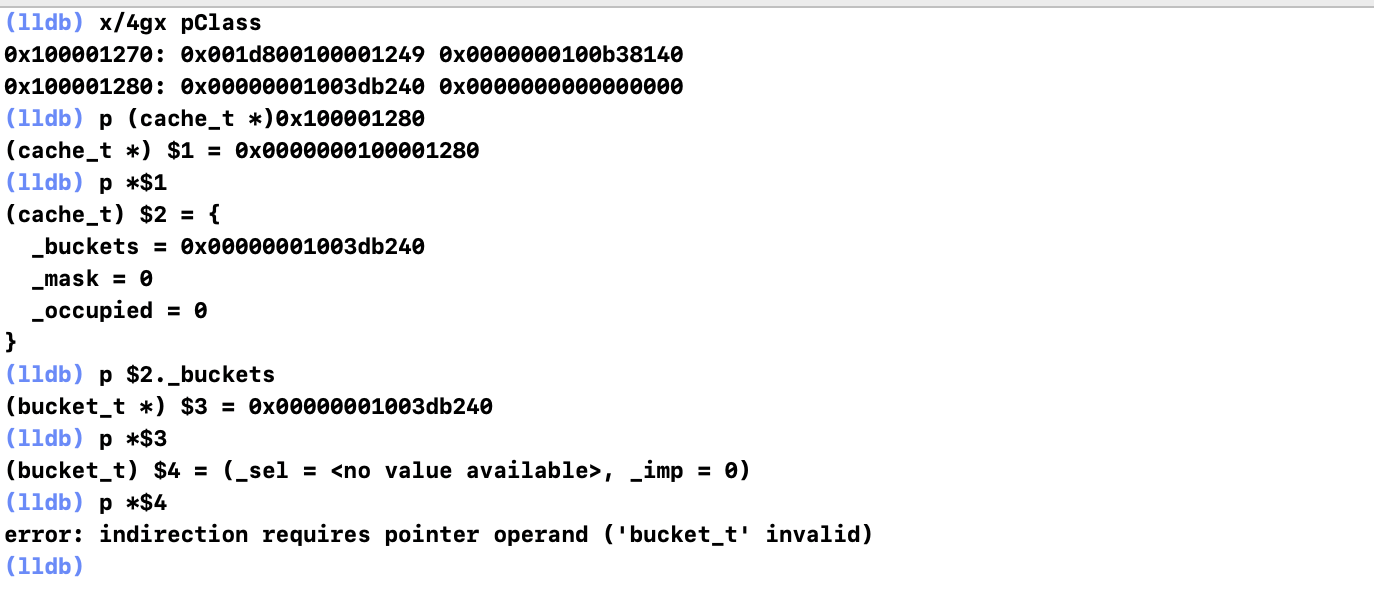
在类结构分析中 中说过:执行 x/4gx 后,第一个 8 字节代表 isa ,第二个 8 字节代表 superClass,所以首地址偏移 16 个字节就是 cache_t 的首地址,一系列的取值后发现是空的,没有缓存,那明明调用了 alloc 方法了啊,就算 alloc 方法特殊,但是也是方法啊,怎么没有缓存呢?
原因是:alloc 是类方法,类方法存储在当前类的元类里面,类里面存储的是实例方法。
明白了上述原因,尝试添加实例方法再次打印。
int main(int argc, const char * argv[]) {
@autoreleasepool {
// insert code here...
TestClass *object = [TestClass alloc];
Class pClass = object_getClass(object);
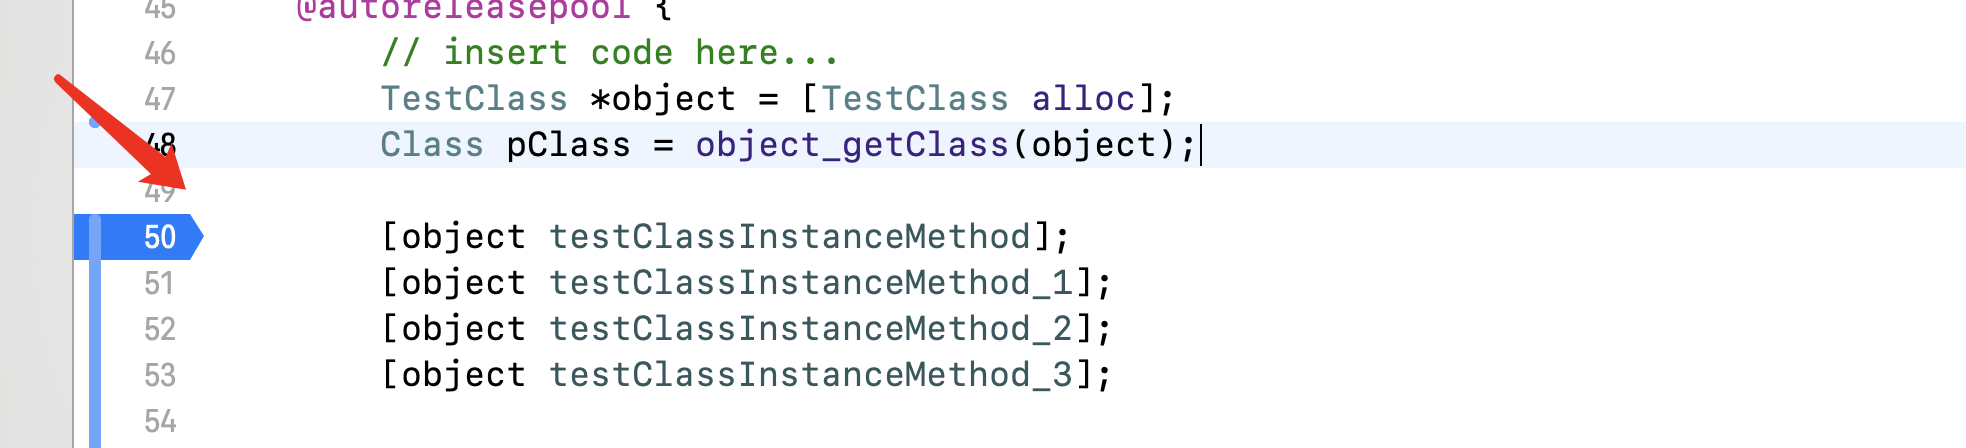
[object testClassInstanceMethod];
NSLog(@"%@ - %p",object,pClass);
}
return 0;
}
打印结果如下:
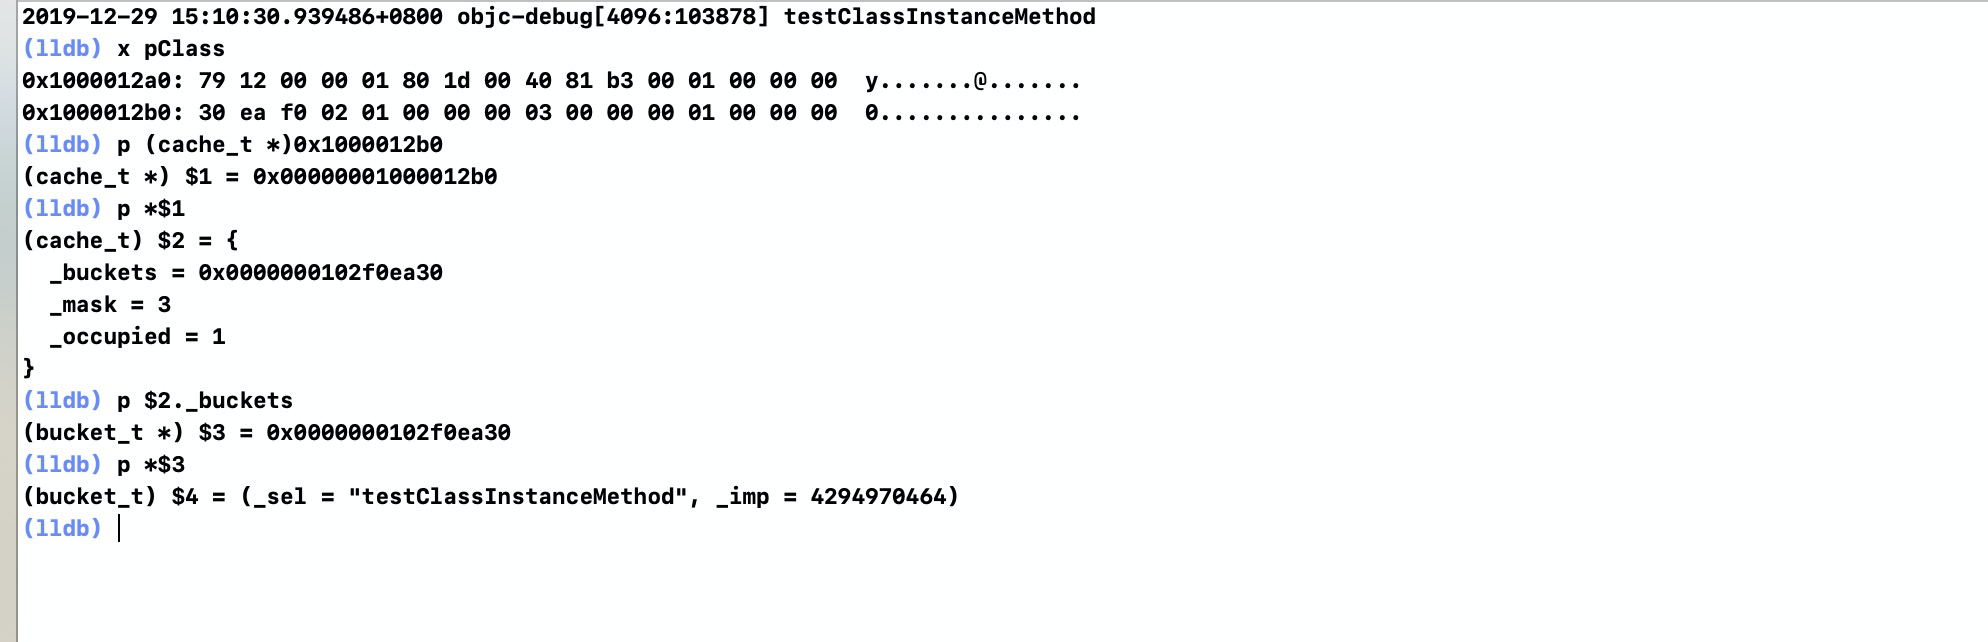
上方截图打印出来发现,_mask 为 3,_occupied 为 1,打印出了上方代码调用过的 testClassInstanceMethod 了,发现确实类的 cache_t 只是缓存的类的实例方法,并且调用一次后就会缓存。
3、自定义输出 cache_t
每次都使用上方 lldb 都累的够呛,当前使用一个自定义的方式去打印一下。自定义代码如下:
typedef unsigned long           uintptr_t;
typedef uint32_t mask_t;

struct custom_bucket_t {
#if __arm64__
    uintptr_t _imp;
    SEL _sel;
#else
    SEL _sel;
    uintptr_t _imp;
#endif
};

struct cache_t {
    struct custom_bucket_t *_buckets;
    mask_t _mask;
    mask_t _occupied;
};

struct custom_class_data_bits_t {

    // Values are the FAST_ flags above.
    uintptr_t bits;
};

struct custom_objc_class  {
    Class ISA;
    Class superclass;
    struct cache_t cache;             // formerly cache pointer and vtable
    struct custom_class_data_bits_t bits;    // class_rw_t * plus custom rr/alloc flags
};

int main(int argc, const char * argv[]) {
    @autoreleasepool {
        // insert code here...
        TestClass *object = [TestClass alloc];
        Class pClass = object_getClass(object);

        [object testClassInstanceMethod];
        [object testClassInstanceMethod_1];
        [object testClassInstanceMethod_2];

        struct custom_objc_class *custom_pClass = (__bridge struct custom_objc_class *)(pClass);

        for (mask_t i = 0; i < custom_pClass->cache._mask; i++) {
            struct custom_bucket_t bucket = custom_pClass->cache._buckets[i];
            NSLog(@"%s ---- %lu",bucket._sel,bucket._imp);
        }

        NSLog(@"结束打印:%@ - %p",object,pClass);
    }
    return 0;
}
打印结果如下:

这样就能很清晰的看到 cache_t 中的缓存方法。
4、多个方法调用自定义输出 cache_t
上方代码调用了3个实例方法,那我们调用4个或者多个呢?上方代码再添加一个调用 [object testClassInstanceMethod_3]; 打印结果如下:

发现竟然只有一个缓存方法打印了,其他的呢?还有这里调用 4 个方法的打印了 7 条,上个调用 3 个方法的就打印了 3 条呢?
带着疑问接着看 cache_t, 之前都是只看了成员是什么?成员的含义是什么?但是没有看过这些值是怎么赋值的吧。
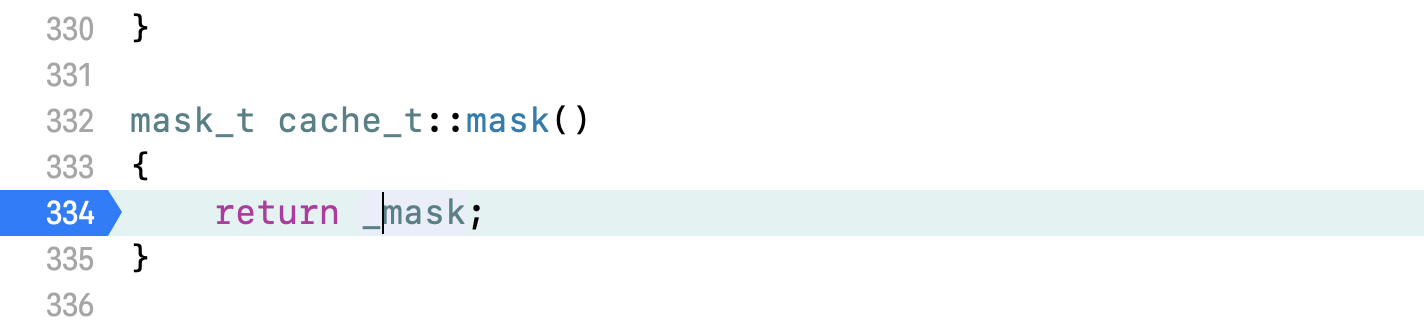
5、对 cache_t 结构体中的方法追踪
随意个 cache_t 的 mask_t cache_t::mask() 方法打个断点 ,然后再在我们调用方法前打个断点,先让程序走到我们调用方法之前,否则就会不断的进入系统方法的调用。
程序进入了 mask() 的断点,看下调用队栈信息:
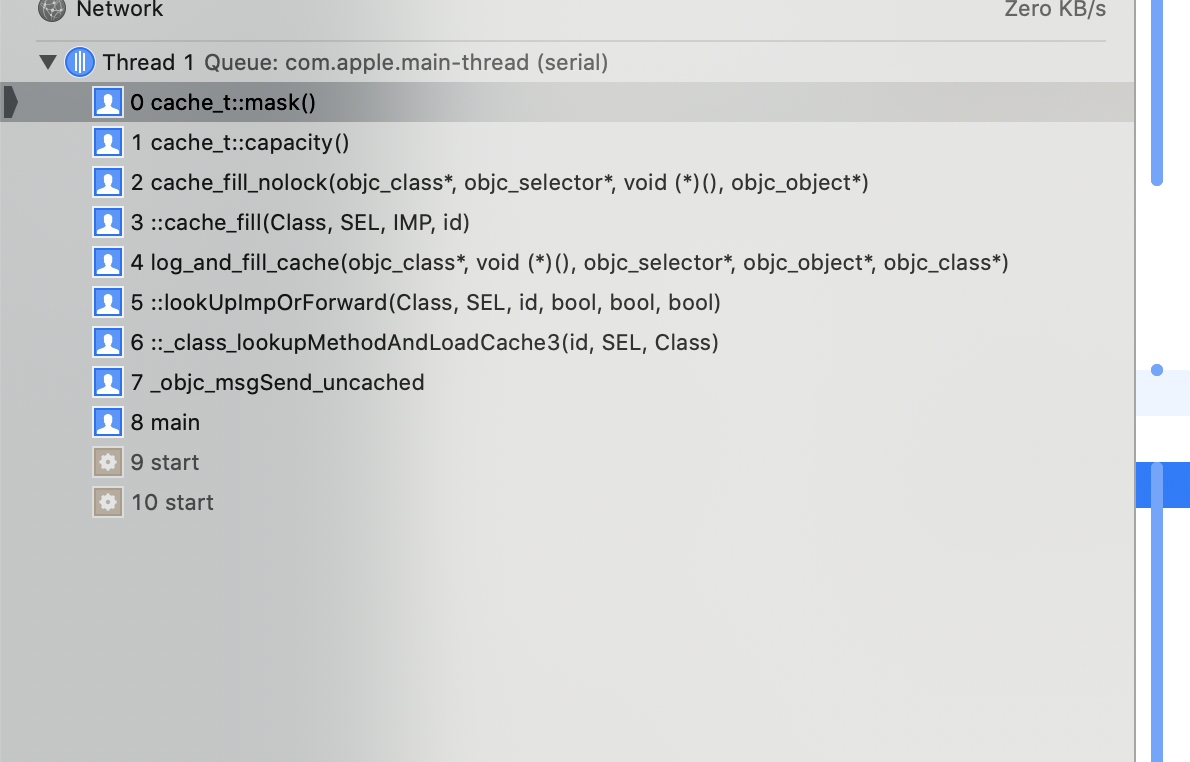
从上方队栈信息能看到,先开始查找方法,然后缓存方法,这里只关注方法缓存,看到关于缓存的字样 cache_fill() 继续上述操作,断点进入 cache_fill(),再下一步进入 cache_fill_nolock(),发现此时才是当前 cache_t 的重头戏。
void cache_fill(Class cls, SEL sel, IMP imp, id receiver)
{
#if !DEBUG_TASK_THREADS
    mutex_locker_t lock(cacheUpdateLock);
    cache_fill_nolock(cls, sel, imp, receiver);
#else
    _collecting_in_critical();
    return;
#endif
}
6、对 cache_t 缓存源码 cache_fill_nolock 的分析
static void cache_fill_nolock(Class cls, SEL sel, IMP imp, id receiver)
{
    //加锁
    cacheUpdateLock.assertLocked();

    // Never cache before +initialize is done
    //在初始化之前不需要缓存
    if (!cls->isInitialized()) return;

    // Make sure the entry was not added to the cache by some other thread
    // before we grabbed the cacheUpdateLock.
    //确保在获取cacheUpdateLock之前,条目没有被其他线程添加到缓存中。


    //如果缓存中找到了,就 return 什么也不需要干
    if (cache_getImp(cls, sel)) return;

    //取出类对象中的 cache_t
    cache_t *cache = getCache(cls);

    // Use the cache as-is if it is less than 3/4 full
    //如果缓存不足3/4,则按原样使用缓存

    //获取当前保存的缓存已经使用的大小,然后进行 + 1 ,因为当前需要缓存新的。
    mask_t newOccupied = cache->occupied() + 1;

    //获取当前 cache 的最大容量 _mask + 1
    mask_t capacity = cache->capacity();

    //如果是一个只读的空缓存就进入
    if (cache->isConstantEmptyCache()) {
        // Cache is read-only. Replace it.
        //缓存是只读的。取代它

        //开辟一个缓存空间 capacity > 0 ? capacity : 4
        // INIT_CACHE_SIZE : (1 << INIT_CACHE_SIZE_LOG2) -----> 4
        cache->reallocate(capacity, capacity ?: INIT_CACHE_SIZE);
    }
    else if (newOccupied <= capacity / 4 * 3) {
        // Cache is less than 3/4 full. Use it as-is.
        //缓存小于3/4满。按原样使用它。
    }
    else {
        // Cache is too full. Expand it.

        //超出了缓存大小的 4分之3 就需要 扩容
        cache->expand();
    }

    // Scan for the first unused slot and insert there.
    // There is guaranteed to be an empty slot because the
    // minimum size is 4 and we resized at 3/4 full.

    //扫描第一个未使用的插槽并插入。
    //保证有一个空槽,因为最小尺寸是4,我们调整了3/4满的尺寸。

    //哈希去查找
    bucket_t *bucket = cache->find(sel, receiver);

    if (bucket->sel() == 0) {
        // 如果 _sel 没找到
        /**
         *  incrementOccupied() {
         *    //当前已经缓存的方法总数+1;
         *     _occupied++;
         *  }
         */
        cache->incrementOccupied();
    }

    //将当前要调用方法缓存
    bucket->set<Atomic>(sel, imp);
}
7、对 cache_t 缓存源码 expand 扩容的分析
void cache_t::expand()
{
    //锁
    cacheUpdateLock.assertLocked();

    //获取原来缓存的最大容量
    uint32_t oldCapacity = capacity();

    //如果原来缓存的最大容量 > 0,就在原来的容量上 * 2,否则就返回 4
    uint32_t newCapacity = oldCapacity ? oldCapacity*2 : INIT_CACHE_SIZE;

    //如果新容量不等于旧容量就赋值
    if ((uint32_t)(mask_t)newCapacity != newCapacity) {
        // mask overflow - can not grow further
        // fixme this wastes one bit of mask
        newCapacity = oldCapacity;
    }

    reallocate(oldCapacity, newCapacity);
}
8、对 cache_t 缓存源码 reallocate 的分析
void cache_t::reallocate(mask_t oldCapacity, mask_t newCapacity)
{
    bool freeOld = canBeFreed();

    //获取旧的缓存池
    bucket_t *oldBuckets = buckets();

    //开辟新的缓存池
    bucket_t *newBuckets = allocateBuckets(newCapacity);

    // Cache is old contents are not propagated.
    // This is thought to save cache memory at the cost of extra cache fills.
    // fixme re-measure this

    assert(newCapacity > 0);
    assert((uintptr_t)(mask_t)(newCapacity-1) == newCapacity-1);

    //给cache 重新赋值缓存池 _buckets,能存储的_mask = newCapacity - 1 的值,然后把当前已经缓存的方法个数置为0
    setBucketsAndMask(newBuckets, newCapacity - 1);

    //如果可以释放就释放掉旧的缓存池
    if (freeOld) {
        cache_collect_free(oldBuckets, oldCapacity);
        cache_collect(false);
    }
}
上述代码中调用了 cache_collect_free 清除了旧的内存,原因是因为在 objc_msgSend 的时候速度相当的快,做缓存池就是为了让程序更加高效,如果在这里再进行开辟新空间将旧值复制进新的开辟的空间,不仅耗时非常严重,并且快速进行方法调用的时候会不安全,如果既影响速度又不安全,那这缓存还有什么意义呢?还不如直接丢弃来的快。
9、对 cache->find 哈希流程的分析
bucket_t * cache_t::find(SEL s, id receiver)
{
    assert(s != 0);

    //返回缓存池数组
    bucket_t *b = buckets();

    //返回当前最大缓存数 - 1
    mask_t m = mask();

    //用SEL 强转的数值 & _mask
    mask_t begin = cache_hash(s, m);

    mask_t i = begin;
    do {
        if (b[i].sel() == 0  ||  b[i].sel() == s) {
            return &b[i];
        }
    } while ((i = cache_next(i, m)) != begin);

    // hack
    Class cls = (Class)((uintptr_t)this - offsetof(objc_class, cache));
    cache_t::bad_cache(receiver, (SEL)s, cls);
}
分析过程如下:
//这里是哈希查找的源码
mask_t begin = //cache_hash (s, m);
mask_t i = begin;
do {
    if (b[i].sel() == 0  ||  b[i].sel() == s) {
        return &b[i];
    }
} while ((i = cache_next(i, m)) != begin);

//cache_hash 获取 begin 的方法
static inline mask_t cache_hash(cache_key_t key, mask_t mask) {
    return (mask_t)(key & mask);
}

//cache_next 获取 i 的方法
static inline mask_t cache_next(mask_t i, mask_t mask) {
    return (i+1) & mask;
}


---------------------- 分析过程  -----------------------

假设:SEL s = 1; mask_t m = 3;

  s : 1 (0001)
  m : 3 (0011)
&---------------
begin: 0001 -> 1

获得 :begin = 1;

do - while 循环的跳出条件是:当 begin = i 是结束。

在判断 while((i = cache_next(i, m)) != begin) 先计算 i 的值,赋值给 i 再和 begin 比较

进入 do - while 循环,如果发现找到了哈希对应的值或者是一个空的卡槽就返回了,如果没有找到就 cache_next。

这里假设没有:
(i + 1) & mask = (1 + 1) & mask

i = 2 , m = 3;

2 : 0010
3 : 0011
&--------
    0010 -> i = 2

继续 (i + 1) & mask = 3 & 3

3 : 0011
3 : 0011
&---------
    0011 -> i = 3

继续 (i + 1) & mask = 4 & 3
4: 0100
3: 0011
&-------
   0000  -> i = 0

继续 (i + 1) & mask = 1 & 3 就和开始的第一行算法一样了。
上方的分析过程能看到其实这里将查找过程做成了一个圆,每次 i+1 查找新的位置或者之前之前存储过的位置,如果找到了就返回,没找到就说明是一个 bad_cache,找到了进行了下一步将方法缓存的过程。
10、cache_t 的整体流程说明
在源码中一些东西都是不完全开放的但是苹果又想让开发者知道这些是什么,苹果将一些东西写入了注释。
 * Cache readers (PC-checked by collecting_in_critical())
 * objc_msgSend*
 * cache_getImp
 *
 * Cache writers (hold cacheUpdateLock while reading or writing; not PC-checked)
 * cache_fill         (acquires lock)
 * cache_expand       (only called from cache_fill)
 * cache_create       (only called from cache_expand)
 * bcopy               (only called from instrumented cache_expand)
 * flush_caches        (acquires lock)
 * cache_flush        (only called from cache_fill and flush_caches)
 * cache_collect_free (only called from cache_expand and cache_flush)
能从上述注释中看到流程,其实 cache_t 是在 objc_msgSend 时候进行,先查找再缓存,也就是上方第5点调用队栈的信息了。
以上就是对 cache_t 的缓存方法的流程了。
PS:可以运行的并且不断进行注释的objc_756.2 源码地址。
