想必大家都知道在 Activity 的 onCreate 通过 setContentView(R.layout.xxx) ,然后就能自己编写界面被加载显示啦! 却对它源码是如何实现的不得而知吧! 这篇文章就是对 setContentView 的分析。
人狠话不多,直接进入主题。来看我们的 Activity 的 onCreate 方法,
public class MainActivity extends Activity {

   @SuppressLint("ClickableViewAccessibility")
   @Override
   protected void onCreate(Bundle savedInstanceState) {
       super.onCreate(savedInstanceState);
       setContentView(R.layout.activity_main);

   }
}
请注意,我这里是继承自 Activity 而没有继承 AppCompatActivity。这是谷歌在后续增加新功能引入的,在这里为了先分析简化的版本,分析完了再去分析 AppCompatActivity 额外做了那些工作。
点击 setContentView 进入到 Activity 的 setContentView。
public void setContentView(@LayoutRes int layoutResID) {
        getWindow().setContentView(layoutResID);
        initWindowDecorActionBar();
    }
可以看到第一行代码 getWindow(), 这个方法返回的什么呢?跟进去看看。
public Window getWindow() {
        return mWindow;
    }
返回的是一个 mWindow, 这个 mWindow 又是什么呢?可以看到它是 Window 对象。Window 又是又是一个抽象类如下:
/**
 * Abstract base class for a top-level window look and behavior policy.  An
 * instance of this class should be used as the top-level view added to the
 * window manager. It provides standard UI policies such as a background, title
 * area, default key processing, etc.
 *
 * <p>The only existing implementation of this abstract class is
 * android.view.PhoneWindow, which you should instantiate when needing a
 * Window.
 */
public abstract class Window {
.....
}
从注释中可以看到,它有唯一的实现类 PhoneWindow,说明 setContentView 是在 PhoneWindow 实现的。
 @Override
    public void setContentView(int layoutResID) {
        // Note: FEATURE_CONTENT_TRANSITIONS may be set in the process of installing the window
        // decor, when theme attributes and the like are crystalized. Do not check the feature
        // before this happens.

        // 当一个 Activity 的 onCreate 方法被调用时,mContentParent 为空。
        if (mContentParent == null) {
            // 这个方法非常关键,稍后讲
            installDecor();
        } else if (!hasFeature(FEATURE_CONTENT_TRANSITIONS)) {
            mContentParent.removeAllViews();
        }

        if (hasFeature(FEATURE_CONTENT_TRANSITIONS)) {
            final Scene newScene = Scene.getSceneForLayout(mContentParent, layoutResID,
                    getContext());
            transitionTo(newScene);
        } else {

          // 这个方法也是非常重要,它是将我们布局中的写的组件,解析并加载到  mContentParent 中, 会分单独的文章来讲,见布局中的 xml 文件中的加载过程
            mLayoutInflater.inflate(layoutResID, mContentParent);
        }
        mContentParent.requestApplyInsets();
        final Callback cb = getCallback();
        if (cb != null && !isDestroyed()) {
            cb.onContentChanged();
        }
        mContentParentExplicitlySet = true;
    }
来看 installDecor 做了什么?
 private void installDecor() {
        mForceDecorInstall = false;
        if (mDecor == null) {
           //  这个方法用来创建 mDecor
            mDecor = generateDecor(-1);
            mDecor.setDescendantFocusability(ViewGroup.FOCUS_AFTER_DESCENDANTS);
            mDecor.setIsRootNamespace(true);
            if (!mInvalidatePanelMenuPosted && mInvalidatePanelMenuFeatures != 0) {
                mDecor.postOnAnimation(mInvalidatePanelMenuRunnable);
            }
        } else {
            mDecor.setWindow(this);
        }

        if (mContentParent == null) {
            // 生成 mContentParent
            mContentParent = generateLayout(mDecor);

            ..... 省略了部分代码
        }
    }
先看 mDecor 的创建,mDecor 是 DecorView 的实例。generateDecor 方法就创建出 mDecor 而已。
protected DecorView generateDecor(int featureId) {
        // System process doesn't have application context and in that case we need to directly use
        // the context we have. Otherwise we want the application context, so we don't cling to the
        // activity.
        Context context;
        if (mUseDecorContext) {
            Context applicationContext = getContext().getApplicationContext();
            if (applicationContext == null) {
                context = getContext();
            } else {
                context = new DecorContext(applicationContext, getContext());
                if (mTheme != -1) {
                    context.setTheme(mTheme);
                }
            }
        } else {
            context = getContext();
        }

  // 创建 DecorView 返回
        return new DecorView(context, featureId, this, getAttributes());
    }
mDecor 以及被实例化了,接下来就是看 generateLayout 方法。前方高能,代码多到怀疑人生,不过我们只找我们关系的部分。分析源码就是这个过程,如果要每行都看懂。呵呵哒,不存在的,如果追求每一行都看懂,最终就会入门到放弃。
 protected ViewGroup generateLayout(DecorView decor) {
        // Apply data from current theme.

        TypedArray a = getWindowStyle();

        .....  省略部分代码, 这部分代码主要是 window 属性的设置,比如 FEATURE_NO_TITLE,
FEATURE_ACTION_BAR 我们比较熟悉的

       // 看到这个注释了么,告诉我们开始填充 decor
        // Inflate the window decor.

        int layoutResource;
        int features = getLocalFeatures();
        // System.out.println("Features: 0x" + Integer.toHexString(features));
        if ((features & (1 << FEATURE_SWIPE_TO_DISMISS)) != 0) {
            layoutResource = R.layout.screen_swipe_dismiss;
            setCloseOnSwipeEnabled(true);
        } else if ((features & ((1 << FEATURE_LEFT_ICON) | (1 << FEATURE_RIGHT_ICON))) != 0) {
            if (mIsFloating) {
                TypedValue res = new TypedValue();
                getContext().getTheme().resolveAttribute(
                        R.attr.dialogTitleIconsDecorLayout, res, true);
                layoutResource = res.resourceId;
            } else {
                layoutResource = R.layout.screen_title_icons;
            }
            // XXX Remove this once action bar supports these features.
            removeFeature(FEATURE_ACTION_BAR);
            // System.out.println("Title Icons!");
        } else if ((features & ((1 << FEATURE_PROGRESS) | (1 << FEATURE_INDETERMINATE_PROGRESS))) != 0
                && (features & (1 << FEATURE_ACTION_BAR)) == 0) {
            // Special case for a window with only a progress bar (and title).
            // XXX Need to have a no-title version of embedded windows.
            layoutResource = R.layout.screen_progress;
            // System.out.println("Progress!");
        } else if ((features & (1 << FEATURE_CUSTOM_TITLE)) != 0) {
            // Special case for a window with a custom title.
            // If the window is floating, we need a dialog layout
            if (mIsFloating) {
                TypedValue res = new TypedValue();
                getContext().getTheme().resolveAttribute(
                        R.attr.dialogCustomTitleDecorLayout, res, true);
                layoutResource = res.resourceId;
            } else {
                layoutResource = R.layout.screen_custom_title;
            }
            // XXX Remove this once action bar supports these features.
            removeFeature(FEATURE_ACTION_BAR);
        } else if ((features & (1 << FEATURE_NO_TITLE)) == 0) {
            // If no other features and not embedded, only need a title.
            // If the window is floating, we need a dialog layout
            if (mIsFloating) {
                TypedValue res = new TypedValue();
                getContext().getTheme().resolveAttribute(
                        R.attr.dialogTitleDecorLayout, res, true);
                layoutResource = res.resourceId;
            } else if ((features & (1 << FEATURE_ACTION_BAR)) != 0) {
                layoutResource = a.getResourceId(
                        R.styleable.Window_windowActionBarFullscreenDecorLayout,
                        R.layout.screen_action_bar);
            } else {
                layoutResource = R.layout.screen_title;
            }
            // System.out.println("Title!");
        } else if ((features & (1 << FEATURE_ACTION_MODE_OVERLAY)) != 0) {
            layoutResource = R.layout.screen_simple_overlay_action_mode;
        } else {
            // Embedded, so no decoration is needed.
            layoutResource = R.layout.screen_simple;
            // System.out.println("Simple!");
        }


        mDecor.startChanging();
        // 看到这个方法,或许就该庆贺了,因为要结束啦。关键的是  layoutResource 这是啥?
       // 其实从上面一段代码中可以看到赋值的地方有好几处, 这里我们以 layoutResource = R.layout.screen_simple; 为例。其实说白了就是将这个布局作为 DecorView 的根视图。
        mDecor.onResourcesLoaded(mLayoutInflater, layoutResource);

  //  在 R.layout.screen_simple 中有一个 ID 名为 ID_ANDROID_CONTENT, 其实值为:  com.android.internal.R.id.content, 这个时候就得到了 contentParent。
        ViewGroup contentParent = (ViewGroup)findViewById(ID_ANDROID_CONTENT);
        if (contentParent == null) {
            throw new RuntimeException("Window couldn't find content container view");
        }

        ...... 省略部分代码
        mDecor.finishChanging();

      // 将创建好的 contentParent 返回
        return contentParent;
    }
我们可以举个例子来看看系统提供的布局,在源码中 res/layout/ 找到,是不是发现前面的 content 的 ID, 它是一个 FrameLayout 容器。
<LinearLayout xmlns:android="http://schemas.android.com/apk/res/android"
    android:layout_width="match_parent"
    android:layout_height="match_parent"
    android:fitsSystemWindows="true"
    android:orientation="vertical">
    <ViewStub android:id="@+id/action_mode_bar_stub"
              android:inflatedId="@+id/action_mode_bar"
              android:layout="@layout/action_mode_bar"
              android:layout_width="match_parent"
              android:layout_height="wrap_content"
              android:theme="?attr/actionBarTheme" />
    <FrameLayout
         android:id="@android:id/content"
         android:layout_width="match_parent"
         android:layout_height="match_parent"
         android:foregroundInsidePadding="false"
         android:foregroundGravity="fill_horizontal|top"
         android:foreground="?android:attr/windowContentOverlay" />
</LinearLayout>
最终返回到 PhoneWindow 的 setContentView 的方法,再看一遍:
@Override
    public void setContentView(int layoutResID) {
        // Note: FEATURE_CONTENT_TRANSITIONS may be set in the process of installing the window
        // decor, when theme attributes and the like are crystalized. Do not check the feature
        // before this happens.
        if (mContentParent == null) {
            installDecor();
        } else if (!hasFeature(FEATURE_CONTENT_TRANSITIONS)) {
            mContentParent.removeAllViews();
        }

        if (hasFeature(FEATURE_CONTENT_TRANSITIONS)) {
            final Scene newScene = Scene.getSceneForLayout(mContentParent, layoutResID,
                    getContext());
            transitionTo(newScene);
        } else {

           // 到了这儿,又将我们在 Activity 调用 setContentView 的布局填充到 mContentParent
            mLayoutInflater.inflate(layoutResID, mContentParent);
        }
        mContentParent.requestApplyInsets();
        final Callback cb = getCallback();
        if (cb != null && !isDestroyed()) {
            cb.onContentChanged();
        }
        mContentParentExplicitlySet = true;
    }
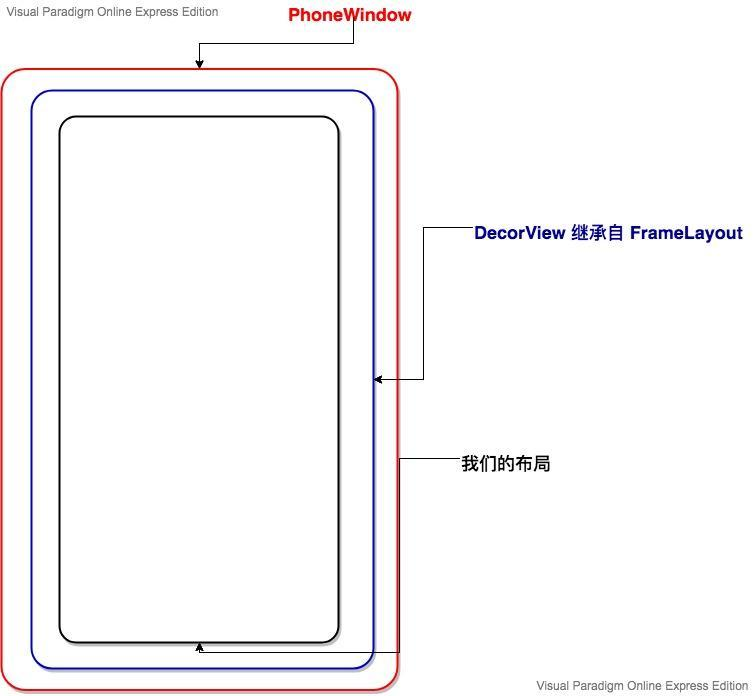
好像很简单吧!确实不难。通过 mLayoutInflater.inflate(layoutResID, mContentParent) 将我们的布局添加进去。给出它的层次图1-1
通过继承 Activity 设置 setContentView 分析完毕。接下来就是来看继承 AppCompatActivity 又做了什么?首先将之前继承自 Activity 的改为 AppCompatActivity, 点击 setContentView 进入源码,会看到如下的方法:
 public void setContentView(@LayoutRes int layoutResID) {
        this.getDelegate().setContentView(layoutResID);
    }
这里的 getDelegate 是引入代理类来实现 setContentView 逻辑,最终到 AppCompatDelegateImpl 的 setContentView 方法。
   public void setContentView(int resId) {
        this.ensureSubDecor();
        // 由于下载这部分源码,如果只能看到 16908290 这样的数字,不过不要紧,问题不大
        // 只需知道 mSubDecor 干了什么即可推理出来。
        ViewGroup contentParent = (ViewGroup)this.mSubDecor.findViewById(16908290);
        contentParent.removeAllViews();
        LayoutInflater.from(this.mContext).inflate(resId, contentParent);
        this.mOriginalWindowCallback.onContentChanged();
    }
留意到第一方代码了吗? this.ensureSubDecor(); 进去看看。
 private void ensureSubDecor() {
        if (!this.mSubDecorInstalled) {
          // 来看看怎么创建的 mSubDecor, 这个就是我们想要知道的。
            this.mSubDecor = this.createSubDecor();

            CharSequence title = this.getTitle();
            if (!TextUtils.isEmpty(title)) {
                if (this.mDecorContentParent != null) {
                    this.mDecorContentParent.setWindowTitle(title);
                } else if (this.peekSupportActionBar() != null) {
                    this.peekSupportActionBar().setWindowTitle(title);
                } else if (this.mTitleView != null) {
                    this.mTitleView.setText(title);
                }
            }

            this.applyFixedSizeWindow();
            this.onSubDecorInstalled(this.mSubDecor);
            this.mSubDecorInstalled = true;
            AppCompatDelegateImpl.PanelFeatureState st = this.getPanelState(0, false);
            if (!this.mIsDestroyed && (st == null || st.menu == null)) {
                this.invalidatePanelMenu(108);
            }
        }
    }
createSubDecor 这个方也很长啊,怎么感觉我们在前面是不是看到过,其实和前面看到的原理很像。
 private ViewGroup createSubDecor() {
        TypedArray a = this.mContext.obtainStyledAttributes(styleable.AppCompatTheme);
        if (!a.hasValue(styleable.AppCompatTheme_windowActionBar)) {
            a.recycle();
            throw new IllegalStateException("You need to use a Theme.AppCompat theme (or descendant) with this activity.");
        } else {
            if (a.getBoolean(styleable.AppCompatTheme_windowNoTitle, false)) {
                this.requestWindowFeature(1);
            } else if (a.getBoolean(styleable.AppCompatTheme_windowActionBar, false)) {
                this.requestWindowFeature(108);
            }

            if (a.getBoolean(styleable.AppCompatTheme_windowActionBarOverlay, false)) {
                this.requestWindowFeature(109);
            }

            if (a.getBoolean(styleable.AppCompatTheme_windowActionModeOverlay, false)) {
                this.requestWindowFeature(10);
            }

            this.mIsFloating = a.getBoolean(styleable.AppCompatTheme_android_windowIsFloating, false);
            a.recycle();
            this.mWindow.getDecorView();
            LayoutInflater inflater = LayoutInflater.from(this.mContext);

          // subDecor 等着被赋值.
            ViewGroup subDecor = null;

  //  选择没有标题的主题
            if (!this.mWindowNoTitle) {
                if (this.mIsFloating) {
                    subDecor = (ViewGroup)inflater.inflate(layout.abc_dialog_title_material, (ViewGroup)null);
                    this.mHasActionBar = this.mOverlayActionBar = false;
                } else if (this.mHasActionBar) {
                    TypedValue outValue = new TypedValue();
                    this.mContext.getTheme().resolveAttribute(attr.actionBarTheme, outValue, true);
                    Object themedContext;
                    if (outValue.resourceId != 0) {
                        themedContext = new ContextThemeWrapper(this.mContext, outValue.resourceId);
                    } else {
                        themedContext = this.mContext;
                    }

                    subDecor = (ViewGroup)LayoutInflater.from((Context)themedContext).inflate(layout.abc_screen_toolbar, (ViewGroup)null);
                    this.mDecorContentParent = (DecorContentParent)subDecor.findViewById(id.decor_content_parent);
                    this.mDecorContentParent.setWindowCallback(this.getWindowCallback());
                    if (this.mOverlayActionBar) {
                        this.mDecorContentParent.initFeature(109);
                    }

                    if (this.mFeatureProgress) {
                        this.mDecorContentParent.initFeature(2);
                    }

                    if (this.mFeatureIndeterminateProgress) {
                        this.mDecorContentParent.initFeature(5);
                    }
                }
            } else {  // 有标题的主题
                if (this.mOverlayActionMode) {
                    subDecor = (ViewGroup)inflater.inflate(layout.abc_screen_simple_overlay_action_mode, (ViewGroup)null);
                } else {
                    subDecor = (ViewGroup)inflater.inflate(layout.abc_screen_simple, (ViewGroup)null);
                }

                if (VERSION.SDK_INT >= 21) {
                    ViewCompat.setOnApplyWindowInsetsListener(subDecor, new OnApplyWindowInsetsListener() {
                        public WindowInsetsCompat onApplyWindowInsets(View v, WindowInsetsCompat insets) {
                            int top = insets.getSystemWindowInsetTop();
                            int newTop = AppCompatDelegateImpl.this.updateStatusGuard(top);
                            if (top != newTop) {
                                insets = insets.replaceSystemWindowInsets(insets.getSystemWindowInsetLeft(), newTop, insets.getSystemWindowInsetRight(), insets.getSystemWindowInsetBottom());
                            }

                            return ViewCompat.onApplyWindowInsets(v, insets);
                        }
                    });
                } else {
                    ((FitWindowsViewGroup)subDecor).setOnFitSystemWindowsListener(new OnFitSystemWindowsListener() {
                        public void onFitSystemWindows(Rect insets) {
                            insets.top = AppCompatDelegateImpl.this.updateStatusGuard(insets.top);
                        }
                    });
                }
            }


      // 到这儿 subDecor 就应该不为空,否则 Activity 就会启动失败,因为没有找到相关主题。
            if (subDecor == null) {
                throw new IllegalArgumentException("AppCompat does not support the current theme features: { windowActionBar: " + this.mHasActionBar + ", windowActionBarOverlay: " + this.mOverlayActionBar + ", android:windowIsFloating: " + this.mIsFloating + ", windowActionModeOverlay: " + this.mOverlayActionMode + ", windowNoTitle: " + this.mWindowNoTitle + " }");
            } else {
                if (this.mDecorContentParent == null) {
                    this.mTitleView = (TextView)subDecor.findViewById(id.title);
                }

                ViewUtils.makeOptionalFitsSystemWindows(subDecor);

            //  找到 subDecor 的内容 contentView
                ContentFrameLayout contentView = (ContentFrameLayout)subDecor.findViewById(id.action_bar_activity_content);

               // 各位,看到这儿明白什么了吗? 这个方法找到的是我们前面的 DecorView, 然后将它添加到 contentView 中,就是在外面套了一层 AppCompatActivity 的主题。
                ViewGroup windowContentView = (ViewGroup)this.mWindow.findViewById(16908290);
                if (windowContentView != null) {
                    while(windowContentView.getChildCount() > 0) {
                        View child = windowContentView.getChildAt(0);
                        windowContentView.removeViewAt(0);
                        contentView.addView(child);
                    }

                    windowContentView.setId(-1);
                    contentView.setId(16908290);
                    if (windowContentView instanceof FrameLayout) {
                        ((FrameLayout)windowContentView).setForeground((Drawable)null);
                    }
                }

              // 偷梁换柱手法,将自己注入到原来的体系中,即多了一层 subDecor.
                this.mWindow.setContentView(subDecor);
                contentView.setAttachListener(new OnAttachListener() {
                    public void onAttachedFromWindow() {
                    }

                    public void onDetachedFromWindow() {
                        AppCompatDelegateImpl.this.dismissPopups();
                    }
                });
                return subDecor;
            }
        }
    }
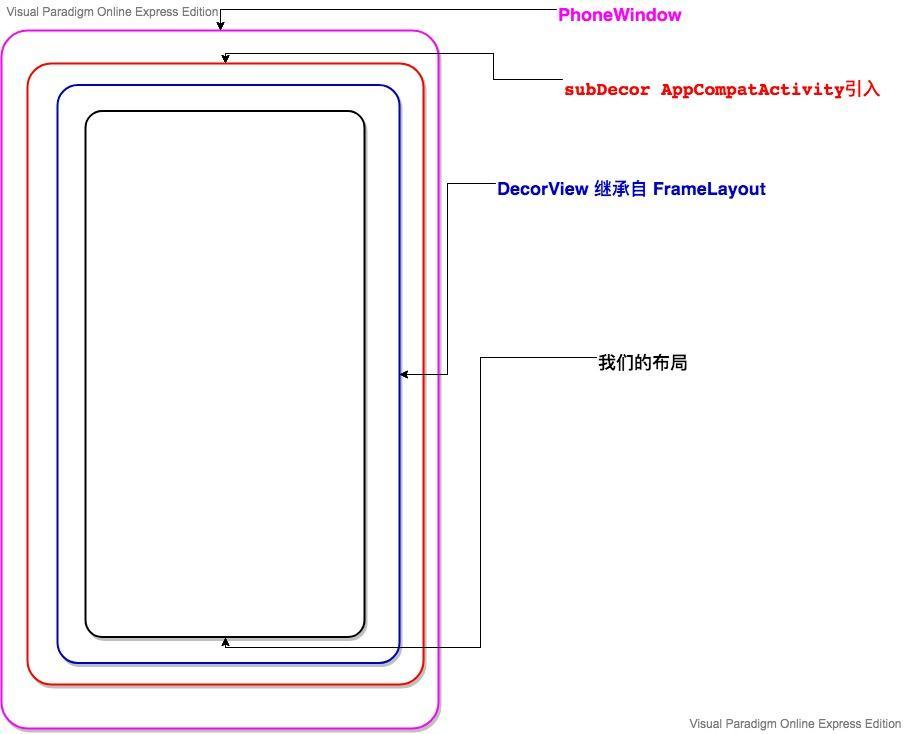
然我们再回到 AppDelegateImpl 的 setContentView 中 contentParent 是不应该知道是什么了吧! 接下来的就是将我们在 Activity 设置的布局文件加载到 contentParent 中。
  public void setContentView(int resId) {
        this.ensureSubDecor();
        ViewGroup contentParent = (ViewGroup)this.mSubDecor.findViewById(16908290);
        contentParent.removeAllViews();
        LayoutInflater.from(this.mContext).inflate(resId, contentParent);
        this.mOriginalWindowCallback.onContentChanged();
    }
总结一下, 其实 AppCompatActivity 只是在 Activity 外面套了直接的一层主题。来个最终层次图吧!