

前情提要
ps: 因为余下的源码皆是短篇幅,于是一并合为一文进行书写,如有不足之处望各位指正。
bindActionCreators
什么是actionCreators
相信大家在阅读了之前的文章之后,对什么是action已经很熟悉了,我们的action其实就是一个object,通常其中会包含一个type参数和一个数据载体payload参数,用来给redux在使用dispatch更新状态树时指一条明路。
那么什么是actionCreators呢?
那么从字面而言,actionCreators可以理解为:动作创建器,也就是说我们的actionCreators是用来生成action(动作)的。我们在业务开发的时候,通常会使用很多不同的action,但是这些action很多时候都会包括一个不定变量,比如我们在更新一个列表的时候,我们可能会使用这样一个action:
async function getListData() {...}
await const listData = getListData();

dispatch({
    type: 'updateList',
    data: listData
});
虽然写一个匿名的action也ok,但是在大型项目这样写的话维护将存在极大问题的,你根本就不知道这个action有什么作用(大部分情况下),所以我们在统一管理这类action时通常使用actionCreators(当然也为了让action变得更加灵活):
// actionCreator通常为纯函数
function updateList(listData) {
    return {
        type: 'updateList',
        data: listData
    }
}
为什么需要bindActionCreators
我们在书写页面组件的时候,如果要用react-redux更新我们的状态树然后重渲染页面,通常会使用redux绑定在页面的props上的dispatch方法触发action。
当我们的页面上不存在子组件,或者子组件中不需要使用redux时这样做是没有任何问题的,但是当我们需要在子组件中使用dispatch时,我们就会发现,子组件的Props是纯净的,没有任何地方可以调用dispatch。
当然你也可以把父组件中的dispatch方法通过props传递到子组件中使用,但是正确的操作,还是使用我们的bindActionCreators:
我们可以将我们需要使用的actionCreators封装至一个对象中,key值就是actionCreators的函数名,值就是对应其函数:
function action1(param){...}
function action2(param){...}

const actionCreators = {
    action1,
    action2
}
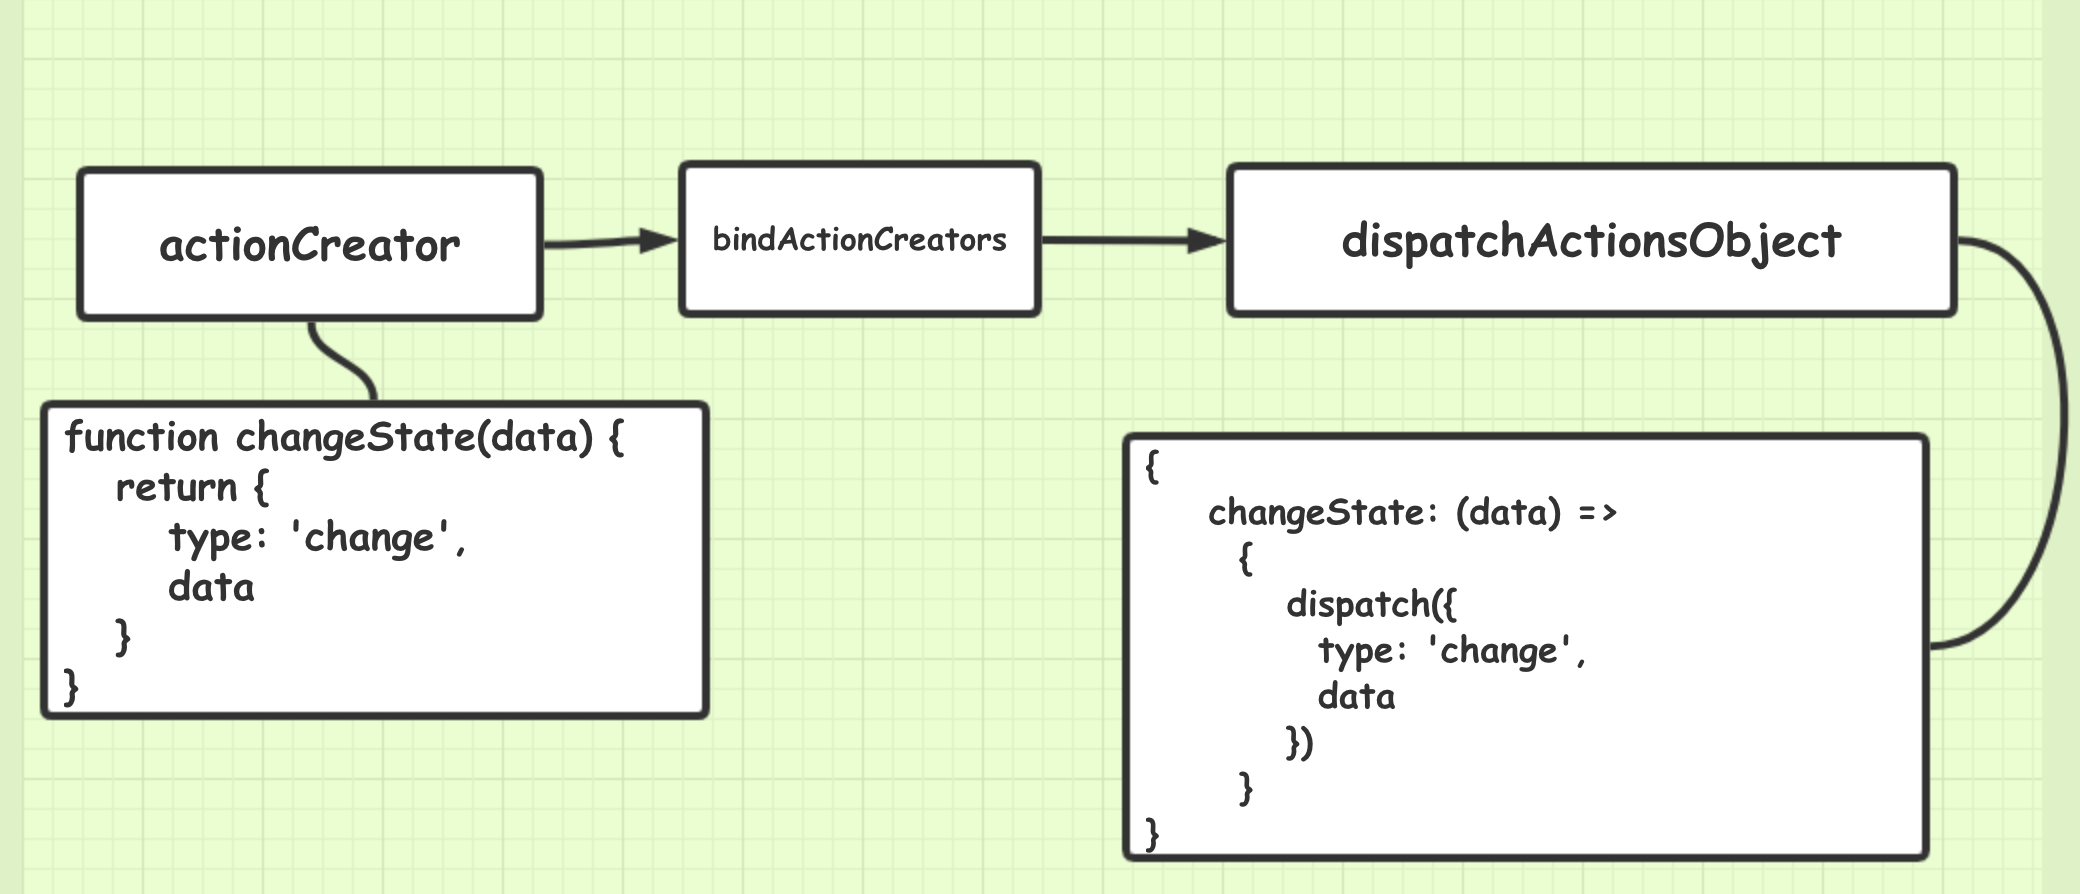
然后我们使用bindActionCreators:
const { dispatch } = this.props;

const dispatchActionsObject = bindActionCreators(actionCreators, dispatch);
//dispatchActionsObject为:
{
    action1: (param) => {dispatch(action1(param))},
    action2: (param) => {dispatch(action2(param))}
}
我们只需要将dispatchActionsObject通过props绑定到子组件上,那么子组件就可以在不知道是否存在redux的情况下使用我们提供的函数来更新状态树了。
// 父组件
...
class Parent extends React.Component {
    ...
    render(
        <Parent>
            <Child {...dispatchActionsObject}></Child>
        </Parent>
    )
}


// 子组件
class Child extends React.Component {
  ...
  doAction1(data) {
      this.props.action1(data)
  },
  doAction2(data) {
      this.props.action2(data)
  }
}
源码
bindActionCreator
function bindActionCreator(actionCreator, dispatch) {
  return function() {
    return dispatch(actionCreator.apply(this, arguments))
  }
}
在bindActionCreators的开始部分,我们会发现这个方法bindActionCreator接受了两个参数,一个actionCreator,一个dispatch。
随后其作为高阶函数,返回了一个新的匿名函数,并在匿名函数中执行了dispatch操作,使用Function.prototype.apply,接受了外部的传参值,并传入actionCreator中生成action。
所以这个函数的功能就是:将传入的单个actionCreator封装成dispatch这个actionCreator的函数。
例如:
const actionCreator(data) {
    return {
        type: 'create',
        data
    }
};

const dispatch = this.props.dispatch;

const dispatchActionCreatorFn = bindActionCreator(actionCreator, dispatch);
// 这个方法会返回一个function
// actionObj = (data) => {
//    dispatch(actionCreator(data);
// }
bindActionCreators
我们的bindActionCreators与bindActionCreator入参的差别就在于第一个参数,bindActionCreator接受的是一个function,而bindActionCreators则接受的是function或者object:
export default function bindActionCreators(actionCreators, dispatch) {
  if (typeof actionCreators === 'function') {
    return bindActionCreator(actionCreators, dispatch)
  }

  if (typeof actionCreators !== 'object' || actionCreators === null) {
    throw new Error(
      `bindActionCreators expected an object or a function, instead received ${
        actionCreators === null ? 'null' : typeof actionCreators
      }. ` +
        `Did you write "import ActionCreators from" instead of "import * as ActionCreators from"?`
    )
  }
  ...
}
从源码上看,我们的bindActionCreators做了一些简单的防错和兼容处理,当接受的是function时,其作用和直接bindActionCreator是一致的,都是返回一个隐式调用dispatch的方法,而当其传入的是一个object时,会强制阻止用户使用null为参数传入。
const keys = Object.keys(actionCreators)
const boundActionCreators = {}
for (let i = 0; i < keys.length; i++) {
const key = keys[i]
const actionCreator = actionCreators[key]
if (typeof actionCreator === 'function') {
  boundActionCreators[key] = bindActionCreator(actionCreator, dispatch)
}
}
return boundActionCreators
在防错处理之后,便是我们整个bindActionCreators的核心部分。我们会通过Object.keys()遍历获取actionCreators对象的key值数组,并声明一个空对象boundActionCreators准备用来存放我们即将生成的隐式调用dispatch的方法。
其后我们通过遍历key值数组,将每个key值对应的actionCreator取出,简单的判断actionCreator是否合规,然后使用bindActionCreator生成对应的匿名函数,并存放在我们之前声明的boundActionCreators的同key值之下,这之后,我们的bindActionCreators完成了~
compose
因为applyMiddleware依赖于函数式编程的compose(组合),我们先从compose入手吧~
export default function compose(...funcs) {
  if (funcs.length === 0) {
    return arg => arg
  }

  if (funcs.length === 1) {
    return funcs[0]
  }

  return funcs.reduce((a, b) => (...args) => a(b(...args)))
}
compose是个非常简单的纯函数,其作用是通过reduce将传入的方法按照从右到左的顺序组合起来。
实现过程让我们一步一步来尝试:
ps: 希望你在阅读compose源码之前先了解rest和箭头函数
- 首先是一些兼容性处理,避免函数报错
- 使用
reduce遍历数组中的function,我们可以用简单的例子来看看到底发生了什么
function addOne(x) {
return x+1;
}
function double(x) {
return x*2;
}
function println(x) {
retrun x;
}
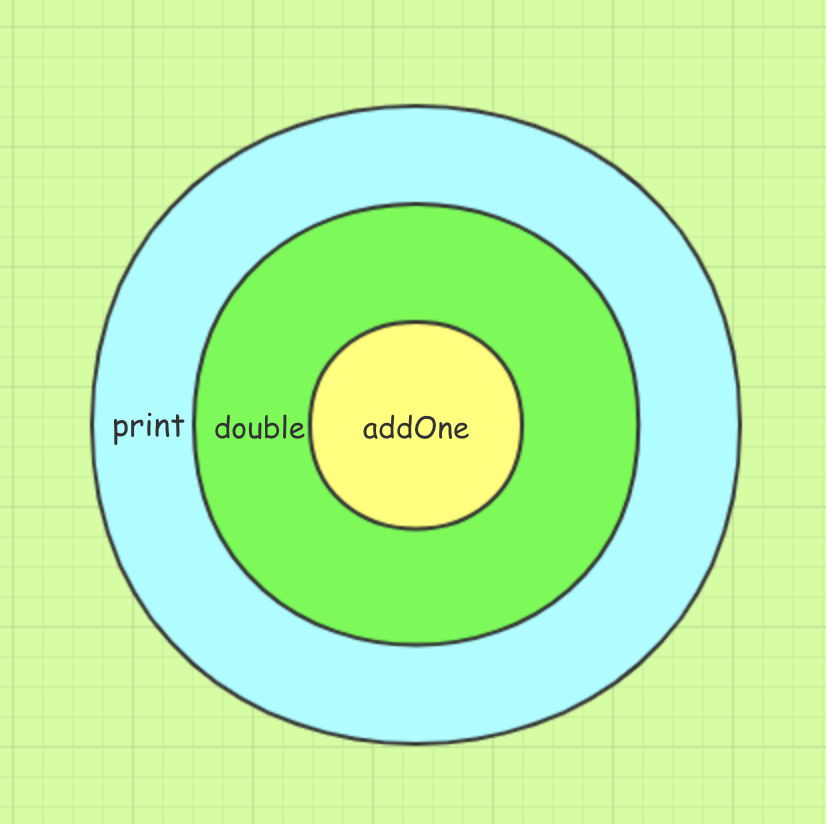
const funcs = [println, double, addOne];
当我们第一次reduce的时候:
// 因为不存在 `initialValue`
// 所以第一次reduce的第一个参数可以视作`currentValue`
// 第二个参数视作`nextValue`

[println, double, addOne].reduce((a,b) => {
    return (...args) => {a(b(...args))}
})

// 得出的结果是
[println, double, addOne].reduce((a,b) => {
    return (...args) => {print(double(...args))}
})
此时我们的reduce可以看作是:
[ (...args) => {print(double(...args))}, addOne].reduce((a,b) => {...})
因为此时reduce回调中的第一个参数会变成上一次遍历时的返回值,所以接下来的reduce会变成这样:
[ (...args) => {print(double(...args))}, addOne].reduce((a,b) => {
    // 此时 a = (...args) => {print(double(...args));
    // b = addOne
    // 所以 a(b(..args)) = print(double(addOne(...args)))
    return (...args) => {
        print(double(addOne(..args)))
    }
})
由此可以看出,我们的compose虽然简单,但是实现的功能确是很强大的,其像洋葱一样,一层一层的向外调用,每一个函数的结果都作为上外层函数的入参被调用,直到最后得出结果。
applyMiddleware
在说applyMiddlewares之前,让我们先回忆一下我们的createStore中传入了enhancer后的处理过程:
if (
    (typeof preloadedState === 'function' && typeof enhancer === 'function') ||
    (typeof enhancer === 'function' && typeof arguments[3] === 'function')
  ) {
    throw new Error(
      'It looks like you are passing several store enhancers to ' +
        'createStore(). This is not supported. Instead, compose them ' +
        'together to a single function'
    )
  }

  if (typeof preloadedState === 'function' && typeof enhancer === 'undefined') {
    enhancer = preloadedState
    preloadedState = undefined
  }

  if (typeof enhancer !== 'undefined') {
    if (typeof enhancer !== 'function') {
      throw new Error('Expected the enhancer to be a function.')
    }

    return enhancer(createStore)(reducer, preloadedState)
  }
可以看到,当createStore接收到可用的enhancer时,会将creteStore作为参数传入高阶函数enhancer中,并使用之前传入的reducer/preloadedState继续进行创建store.
而实现enhancer的方法,就是applyMiddleware.
export default function applyMiddleware(...middlewares) {
  return createStore => (...args) => {
    const store = createStore(...args)
    let dispatch = () => {
      throw new Error(
        `Dispatching while constructing your middleware is not allowed. ` +
          `Other middleware would not be applied to this dispatch.`
      )
    }

    const middlewareAPI = {
      getState: store.getState,
      dispatch: (...args) => dispatch(...args)
    }
    const chain = middlewares.map(middleware => middleware(middlewareAPI))
    dispatch = compose(...chain)(store.dispatch)

    return {
      ...store,
      dispatch
    }
  }
}
可以从源码看到,我们的applyMiddleware返回的便是一个柯里化的高阶函数,其接受入参的顺序也符合enhancer在被调用时的顺序,所以我们不妨直接把...args直接替换成reducer, preloadedState.此时,我们的createStore会变成这样:
const store = createStore(reducer, preloadedState)
let dispatch = () => {
  throw new Error(
    `Dispatching while constructing your middleware is not allowed. ` +
      `Other middleware would not be applied to this dispatch.`
  )
}

const middlewareAPI = {
  getState: store.getState,
  dispatch: (...args) => dispatch(...args)
}
const chain = middlewares.map(middleware => middleware(middlewareAPI))
dispatch = compose(...chain)(store.dispatch)

return {
  ...store,
  dispatch
}
接下来会创建一个抛错的dispatch,阻止用户在没有处理完middleware时调用真正的dispatch影响状态树导致中间件middleware不能获取实时的状态值。
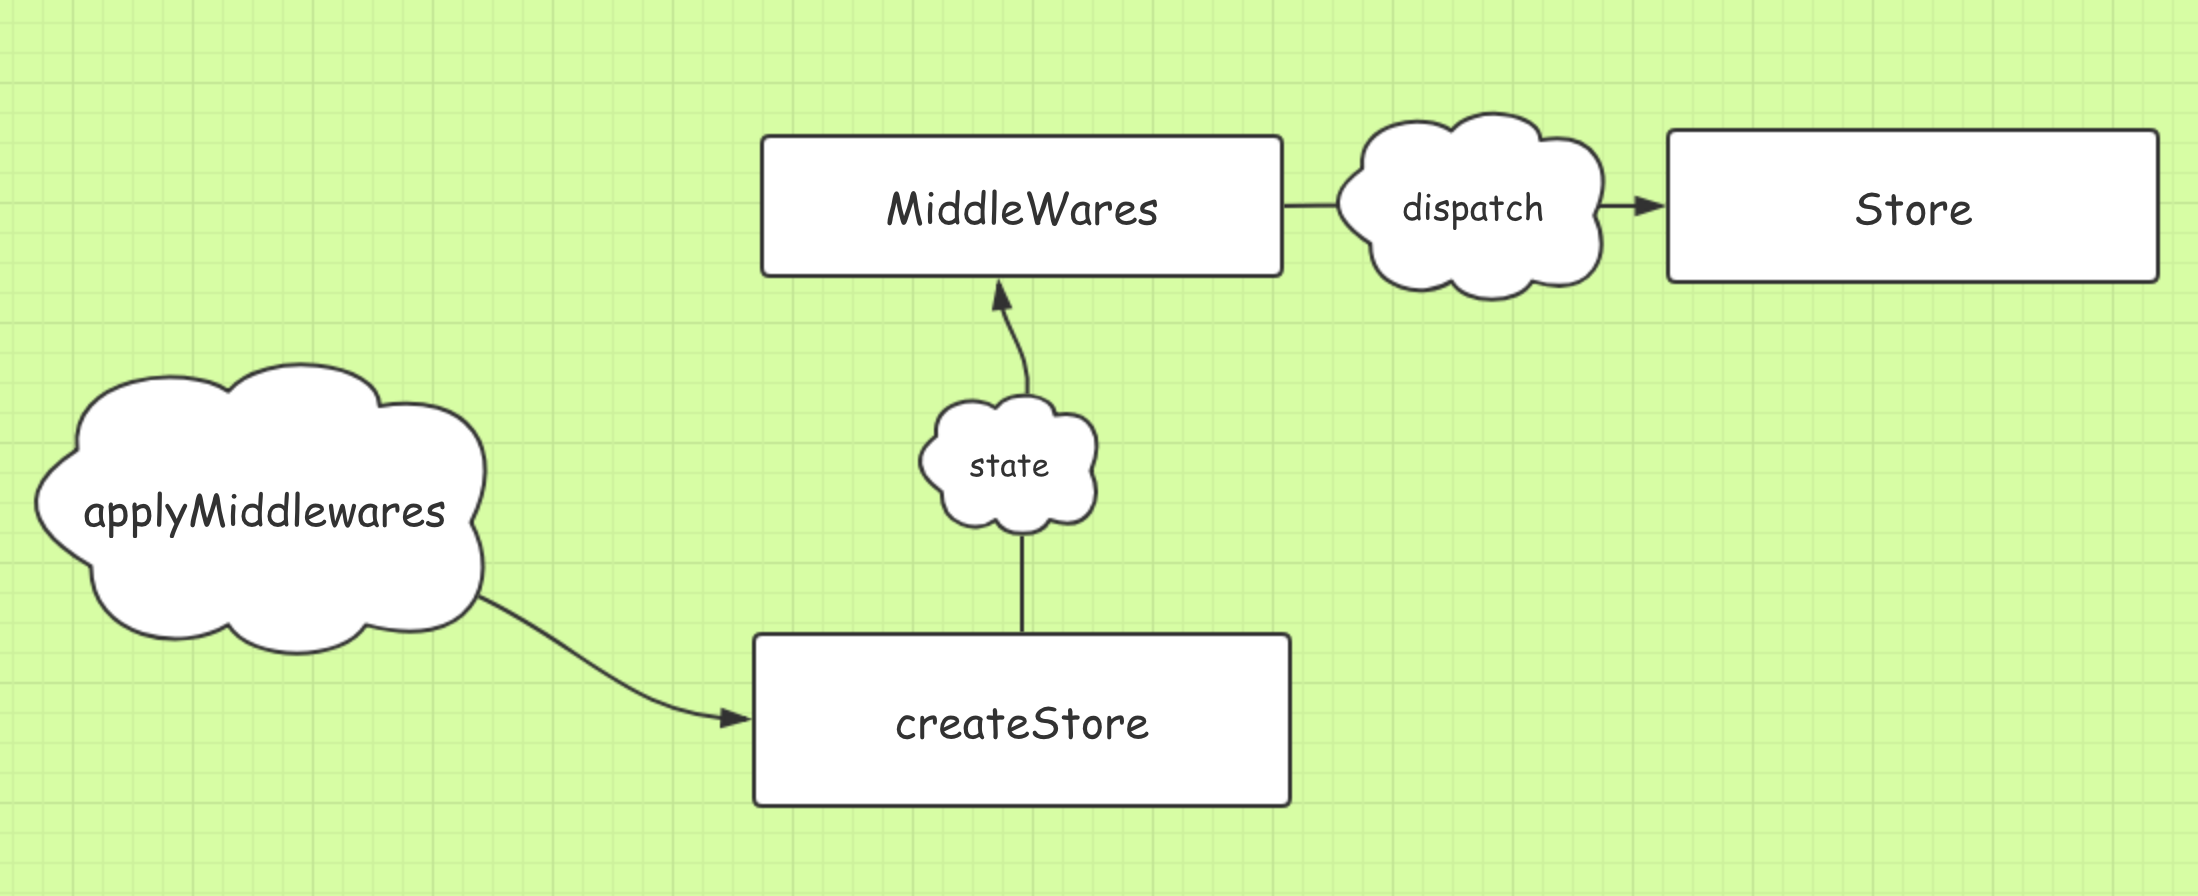
接下来,其创建了一个middlewareAPI,用来存放当前store的状态值和之前会抛错的dispatch,并作为参数,结合middlewares生成一组匿名函数,每个匿名函数的返回值都是通过当前middleware处理了middlewareAPI的返回值,之后通过compose,将这些匿名函数组合,让其能够从右到左的链式调用,最后再为组合生成的函数传入store.dispatch(真正的disaptch)作为参数值,其过程如下:
// 假设我有两个middleware: mdw1, mdw2
// compose过程如下:
// 而mdw1, mdw2经过遍历是如下的数组
[mdw1(middlewareAPI), mdw2(middlwwareAPI)]
// 经过compose后
return (...args) => mdw1(middlewareAPI)(mdw2(middlwwareAPI)(...args))

// 传入store.dispatch之后
return mdw1(middlewareAPI)(mdw2(middlwwareAPI)(store.dispatch))
这样处理之后,我们通过链式调用中间件处理完成的dispatch才能正式return出去,作为store的一部分。
结语
本文至此,redux的5个文件的源码也算是告一段落,从阅读redux的源码中,学到了很多关于函数式编程的思路和一些技巧,以及对各种边界情况的重视。以前并不注重其中实现,觉得让自己来也能写出来,但是真到了自己看的时候才发现,原来还是图样图森破,也只有感叹一句:任重道远啊...
最后,感谢你的阅读~
