写在最前面
本文面对有redux使用经验,熟知redux用法且想了解redux到底是什么样的一个工具的读者,so,希望你有一定的:
- 工程结构基础
- redux(react-redux)使用基础
这会帮助你更快的理解。
redux是什么
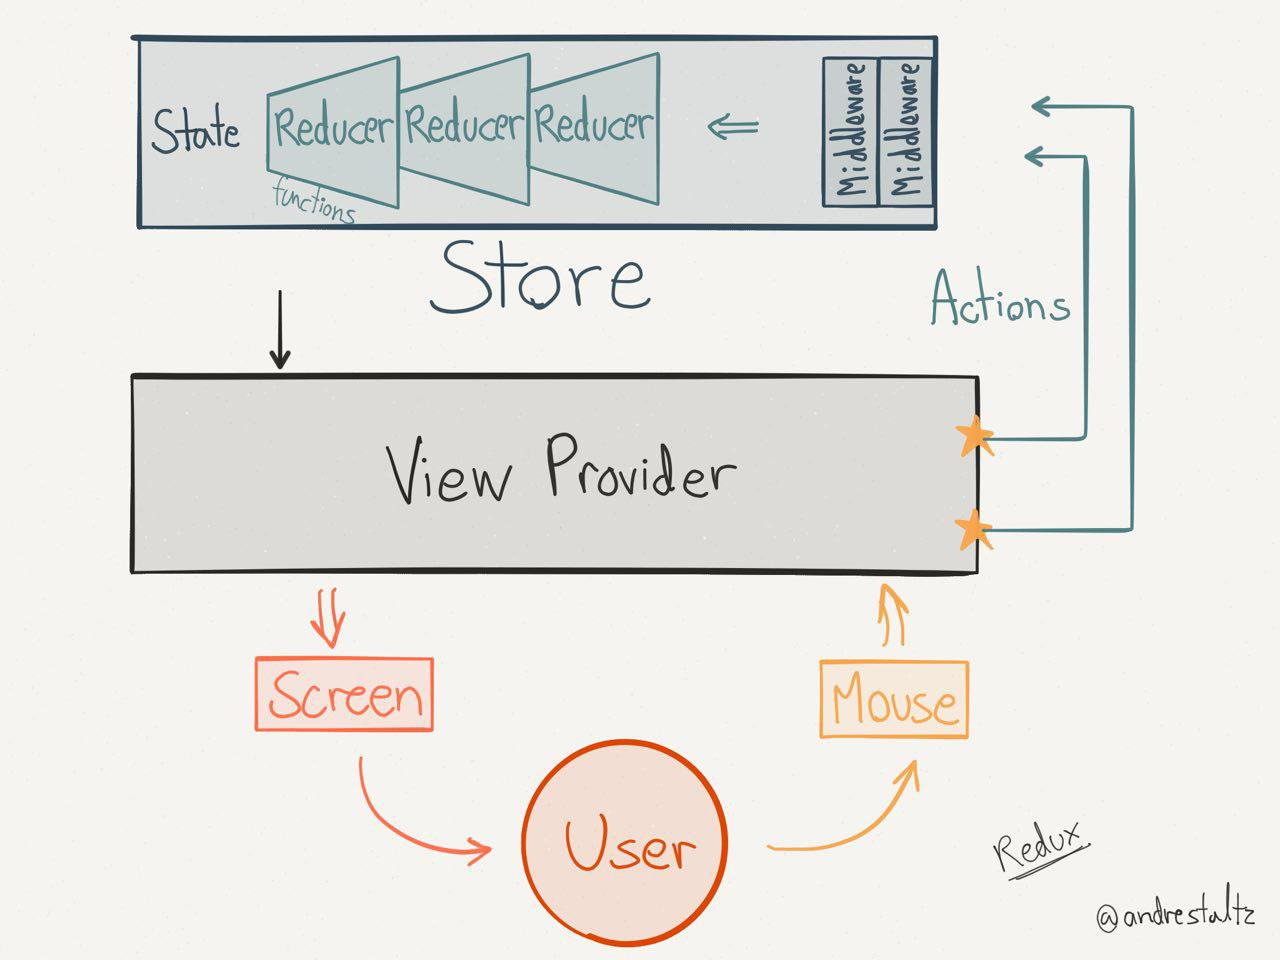
Redux是一个应用状态管理工具,其工作流程可以参照下图:

从图中可以大概了解,通过user触发(dispatch)的行为(action),redux会在通过middleware以及reducer的处理后更新整个状态树(state),从而达到更新视图view的目标。这就是Redux的工作流程,接下来让我们慢慢细说这之中到底发生了什么。
从index开始
找到根源
首先我们打开redux的github仓库,查看整个项目的目录结构:
.
+-- .github/ISSUE_TEMPLATE  // GITHUB issue 模板
|   +-- Bug_report.md  // bug 提交模板
|   +-- Custom.md    // 通用模板
+-- build
|   +-- gitbooks.css // 未知,猜测为gitbook的样式
+-- docs             // redux的文档目录,本文不展开详细
+-- examples         // redux的使用样例,本文不展开详细
+-- logo             // redux的logo静态资源目录
+-- src              // redux的核心内容目录
|   +-- utils        // redux的核心工具库
|   |   +-- actionTypes.js // 一些默认的随机actionTypes
|   |   +-- isPlainObject.js // 判断是否是字面变量或者new出来的object
|   |   +-- warning.js // 打印警告的工具类
|   +-- applyMiddleware.js // 神秘的魔法
|   +-- bindActionCreator.js // 神秘的魔法
|   +-- combineReducers.js // 神秘的魔法
|   +-- compose.js // 神秘的魔法
|   +-- createStore.js // 神秘的魔法
|   +-- index.js // 神秘的魔法
+-- test            // redux 测试用例
+-- .bablerc.js // bable编译配置
+-- .editorconfig   // 编辑器配置,方便用户在使用不同IDE时进行统一
+-- .eslintignore   // eslint忽略的文件目录声明
+-- .eslintrc.js    // eslint检查配置
+-- .gitbook.yaml   // gitbook的生成配置
+-- .gitignore      // git提交忽略的文件目录声明
+-- .prettierrc.json  // prettier代码自动重新格式化配置
+-- .travis.yml     // travis CI的配置工具
+-- index.d.ts       // redux的typescript变量声明
+-- package.json     // npm 命令以及包管理
+-- rollup.config.js  // rollup打包编译配置
当然,实际上redux的工程目录中还包括了许多的md文档,这些我们也就不一一赘述了,我们要关注的是redux的根源到底在哪,那就让我们从package.json开始吧:
"scripts": {
    "clean": "rimraf lib dist es coverage",
    "format": "prettier --write \"{src,test}/**/*.{js,ts}\" index.d.ts \"**/*.md\"",
    "format:check": "prettier --list-different \"{src,test}/**/*.{js,ts}\" index.d.ts \"**/*.md\"",
    "lint": "eslint src test",
    "pretest": "npm run build",
    "test": "jest",
    "test:watch": "npm test -- --watch",
    "test:cov": "npm test -- --coverage",
    "build": "rollup -c",
    "prepare": "npm run clean && npm run format:check && npm run lint && npm test",
    "examples:lint": "eslint examples",
    "examples:test": "cross-env CI=true babel-node examples/testAll.js"
},
从package.json中我们可以找到其npm命令配置,我们可以发现redux的build(项目打包)命令使用了rollup进行打包编译(不了解rollup的同学请看这里),那么我们的目光就可以转向到rollup的配置文件rollup.config.js中来寻找redux的根源到底在哪里,通过阅读config文件,我们能找到如下代码:
{
    input: 'src/index.js', // 入口文件
    output: { file: 'lib/redux.js', format: 'cjs', indent: false },
    external: [
      ...Object.keys(pkg.dependencies || {}),
      ...Object.keys(pkg.peerDependencies || {})
    ],
    plugins: [babel()]
},
这里为我们指明了整个项目的入口:src/index.js,根源也就在此,神秘的魔法也揭开了一点面纱,接下来,不妨让我们更进一步:
import createStore from './createStore'
import combineReducers from './combineReducers'
import bindActionCreators from './bindActionCreators'
import applyMiddleware from './applyMiddleware'
import compose from './compose'
import warning from './utils/warning'
import __DO_NOT_USE__ActionTypes from './utils/actionTypes'
首先是index的依赖部分,我们可以看到其使用了同目录下的createStore、combineReducers、bindActionCreators、applyMiddleware、compose这几个模块,同时引入了utils文件夹下的工具模块warning、__DO_NOT_USE__ActionTypes,这两个工具类显而易见一个是用来进行打印警告,另一个是用来声明不能够使用的默认actionTypes的,接下来看看我们的index到底做了什么:
function isCrushed() {}

if (
  process.env.NODE_ENV !== 'production' &&
  typeof isCrushed.name === 'string' &&
  isCrushed.name !== 'isCrushed'
) {
  warning(
    ...
  )
}

export {
  createStore,
  combineReducers,
  bindActionCreators,
  applyMiddleware,
  compose,
  __DO_NOT_USE__ActionTypes
}
首先让我们注意到这个声明的空函数isCrushed,这其实是一个断言函数,因为在进行产品级(production)构建的时候,这种函数名都会被混淆,反言之如果这个函数被混淆了,其name已经不是isCrushed,但是你的环境却不是production,也就是说你在dev环境下跑的却是生产环境下的redux,如果出现这种情况,redux会进行提示。接下来便是 export 的时间,我们会看到,这里把之前引入了的createStore、combineReducers、bindActionCreators、applyMiddleware、compose以及__DO_NOT_USE__ActionTypes。这些就是我们在使用redux的时候,经常会用的一些API和常量。接下来让我们继续追根溯源,一个一个慢慢详谈。
createStore
首先,让我们看看我们声明 redux store 的方法createStore,正如大家所知,我们每次去初始化redux的store时,都会这样使用:
import { createStore, applyMiddleware } from 'redux';
import thunk from 'redux-thunk';
import rootReducer from './reducers';

// 在reducers中,我们使用了combinedReducer将多个reducer合并成了一个并export
// 使用 thunk 中间件让dispatch接受函数,方便异步操作,在此文不过于赘述

export default createStore(rootReducer, applyMiddleware(thunk));
那么createStore到底是怎么去实现的呢?让我们先找到createStore函数
export default function createStore(reducer, preloadedState, enhancer) {
...
}
接受参数
首先从其接受参数谈起吧:
reducer一个函数,可以通过接受一个state tree然后返回一个新的state treepreloadedState初始化的时候生成的state treeenhancer一个为redux提供增强功能的函数
createStore之前
在函数的顶部,会有一大段的判断:
if (
    (typeof preloadedState === 'function' && typeof enhancer === 'function') ||
    (typeof enhancer === 'function' && typeof arguments[3] === 'function')
) {
    throw new Error(
      '...'
    )
}

if (typeof preloadedState === 'function' && typeof enhancer === 'undefined') {
    enhancer = preloadedState
    preloadedState = undefined
}

if (typeof enhancer !== 'undefined') {
    if (typeof enhancer !== 'function') {
      throw new Error('...')
    }

    return enhancer(createStore)(reducer, preloadedState)
}

if (typeof reducer !== 'function') {
    throw new Error('...')
}
通过这些判断,我们能发现createStore的一些小规则:
- 第二个参数
preloadedState和第三个参数enhancer不能同时为函数类型 - 不能存在第四个参数,且该参数为函数类型
- 在不声明
preloadedState的状态下可以直接用enhancer代替preloadedState,该情况下preloadedState默认为undefined - 如果存在
enhancer,且其为函数的情况下,会调用使用createStore作为参数的enhancer高阶函数对原有createState进行处理,并终止之后的createStore流程 reducer必须为函数。
当满足这些规则之后,我们方才正式进入createStore的流程。
开始createStore
let currentReducer = reducer
let currentState = preloadedState
let currentListeners = []
let nextListeners = currentListeners
let isDispatching = false
接下来便是对函数类的初始变量的声明,我们可以清楚的看见,reducer和preloadedState都被存储到了当前函数中的变量里,此外还声明了当前的监听事件的队列,和一个用来标识当前正在dispatch的状态值isDispatching。
然后在接下来,我们先跳过在源码中作为工具使用的函数,直接进入正题:
在首当其冲的subscribe方法之前,我们不妨先瞧瞧用来在触发subscribe(订阅)的监听事件listener的dispatch:
function dispatch(action) {
    // action必须是一个对象
    if (!isPlainObject(action)) {
      throw new Error(
        'Actions must be plain objects. ' +
          'Use custom middleware for async actions.'
      )
    }

    // action必须拥有一个type
    if (typeof action.type === 'undefined') {
      throw new Error(
        'Actions may not have an undefined "type" property. ' +
          'Have you misspelled a constant?'
      )
    }

    // 如果正在dispatching,那么不执行dispatch操作。
    if (isDispatching) {
      throw new Error('Reducers may not dispatch actions.')
    }

    // 设置dispatching状态为true,并使用reducer生成新的状态树。
    try {
      isDispatching = true
      currentState = currentReducer(currentState, action)
    } finally {
      // 当获取新的状态树完成后,设置状态为false.
      isDispatching = false
    }

    // 将目前最新的监听方法放置到即将执行的队列中遍历并且执行
    const listeners = (currentListeners = nextListeners)
    for (let i = 0; i < listeners.length; i++) {
      const listener = listeners[i]
      listener()
    }

    // 将触发的action返回
    return action
}
根据上面的代码,我们会发现我们注册的监听事件会在状态树更新之后进行遍历调用,这个时候我们再来继续看subscribe函数:
function subscribe(listener) {
    // listener必须为函数
    if (typeof listener !== 'function') {
      throw new Error(...)
    }

    // 如果正在dispatch中则抛错
    if (isDispatching) {
      throw new Error(
        ...
      )
    }

    let isSubscribed = true

    ensureCanMutateNextListeners()
    nextListeners.push(listener)

    return function unsubscribe() {
      if (!isSubscribed) {
        return
      }

      if (isDispatching) {
        throw new Error(
          'You may not unsubscribe from a store listener while the reducer is executing. ' +
            'See https://redux.js.org/api-reference/store#subscribe(listener) for more details.'
        )
      }

      isSubscribed = false

      ensureCanMutateNextListeners()
      const index = nextListeners.indexOf(listener)
      nextListeners.splice(index, 1)
    }
  }
在这里我们就会用到一个方法ensureCanMutateNextListeners,这个方法是用来做什么的呢?让我们看看代码:
function ensureCanMutateNextListeners() {
    if (nextListeners === currentListeners) {
      nextListeners = currentListeners.slice()
    }
}
在定义变量的阶段,我们发现我们将currentListeners定义为了[],并将nextLiteners指向了这个currentListeners的引用(如果不清楚引用赋值和传值赋值的区别的同学请看这里),也就是说如果我改变nextListeners,那么也会同步改变currentListeners,这样会造成我们完全无法区分当前正在执行的监听队列和上一次的监听队列,而ensureCanMutateNextListeners正是为了将其区分开来的一步处理。
再经过这样的处理之后,每次执行监听队列里的函数之前,currentListeners始终是上一次的执行dispatch时的nextListeners:
// 将目前最新的监听方法放置到即将执行的队列中遍历并且执行
const listeners = (currentListeners = nextListeners)
只有当再次执行subscribe去更新nextListeners和后,再次执行dispatch这个currentListeners才会被更新。因此,我们需要注意:
- 在
listener中执行unsubscribe是不会立即生效的,因为每次dispatch执行监听队列的函数使用的队列都是执行dispatch时nextListeners的快照,你在函数里更新的队列要下次dispatch才会执行,所以尽量保证unsubscribe和subscribe在dispatch之前执行,这样才能保证每次使用的监听队列都是最新的。 - 在
listener执行时,直接取到的状态树可能并非最新的状态树,因为你的listener并不能清楚在其执行的过程中是否又执行了dispatch(),所以我们需要一个方法:
function getState() {
    if (isDispatching) {
      throw new Error(
        'You may not call store.getState() while the reducer is executing. ' +
          'The reducer has already received the state as an argument. ' +
          'Pass it down from the top reducer instead of reading it from the store.'
      )
    }

    return currentState
}
来获取当前真实完整的state.
通过以上代码,我相信大家已经对subscribe和dispatch以及listener已经有一定的认识,那么让我们继续往下看:
function replaceReducer(nextReducer) {
    if (typeof nextReducer !== 'function') {
      throw new Error('...')
    }

    currentReducer = nextReducer
    dispatch({ type: ActionTypes.REPLACE })
}
这是redux抛出的一个方法,其作用是替换当前整个redux中正在执行的reducer为新传入的reducer,同时其会默认触发一次内置的replace事件。
接下来便是最后的波纹(雾,在这个方法里,其提供了一个预留给遵循observable/reactive(观察者模式/响应式编程)的类库用于交互的api,我们可以看看这个api代码的核心部分:
const outerSubscribe = subscribe
return {
      subscribe(observer) {
        if (typeof observer !== 'object' || observer === null) {
          throw new TypeError('Expected the observer to be an object.')
        }

        function observeState() {
          if (observer.next) {
            observer.next(getState())
          }
        }

        observeState()
        const unsubscribe = outerSubscribe(observeState)
        return { unsubscribe }
      },

      [$$observable]() {
        return this
      }
}
这里的outerSubscribe就是之前redux暴露的的subscribe方法,当外部的类库使用暴露对象中的subscribe方法进行订阅时,其始终能通过其传入的观察者对象,获取当前最新的state(通过其观察者对象上的next和getState方法),同时其也将类库获取最新的state的方法放入了redux的监听队列nextListeners中,以期每次发生dispatch操作的时候,都会去通知该观察者状态树的更新,最后又返回了取消该订阅的方法(subscribe方法的返回值就是取消当前订阅的方法)。
至此,createStore的面纱终于完全被揭开,我们现在终于认识了所有createStore的方法:
dispatch用于触发action,通过reducer将state更新subscribe用于订阅dispatch,当使用dispatch时,会通知所有的订阅者,并执行其内部的listenergetState用于获取当前redux中最新的状态树replaceReducer用于将当前redux中的reducer进行替换,并且其会触发默认的内置REPLACEaction.[?observable]([Symbol.observable])(不了解Symbol.observable的同学可以看这里),其可以提供observable/reactive(观察者模式/响应式编程)类库以订阅redux中dispatch方法的途径,每当dispatch时都会将最新的state传递给订阅的observer(观察者)。
结语
在工作之余断断续续的书写中通读redux源码的第一篇终于完成,通过一个方法一个方法的分析,虽然有诸多缺漏,但是笔者也算是从其中加深了对redux的理解,希望本文也能给诸位也带来一些读源码的思路和对redux的认识。
非常感谢你的阅读~