

一、初始化项目
//创建文件夹并进入
mkdir vueblog
cd vueblog
//初始化文件
npm init
// 安装为本地依赖项
npm install -D vuepress
// 创建一个 docs 目录
mkdir docs
// 创建一个 markdown 文件
echo '# Hello VuePress' > docs/README.md
给 package.json 添加一些 scripts 脚本
{
  "scripts": {
    "docs:dev": "vuepress dev docs",
    "docs:build": "vuepress build docs"
  }
}
运行编辑命令
npm run docs:dev生成静态资源命令
npm run docs:build
二、运行项目
1、执行运行命令
npm run docs:dev 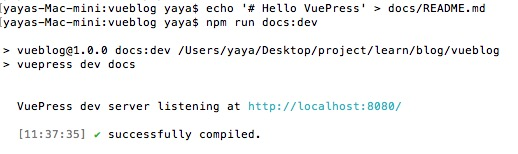
打开 http://localhost:8080/ 查看
2、配置全栈
在docs 文件夹下面新建vuepress目录,在该目录下新建config.js文件
module.exports = {
  title: "Yaya's blog", //标题
  description: "个人博客,文档分享", //描述
  head: [["link", { rel: "icon", href: `/new2.png` }]], //被注入页面 HTML <head> 额外的标签
  host: "0.0.0.0", //访问路径
  port: "5555", //端口
  dest: ".vuepress/dist" //输出目录
};
编辑完成后,再次启动项目,访问链接 http://localhost:5555/
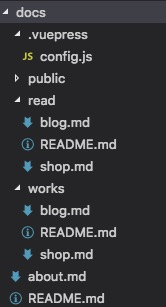
3、主题配置
添加文件,目录如下
在config.js里面增加
themeConfig: {
    nav: [
      { text: "Home", link: "/" },
      { text: "Works", link: "/works/" },
      { text: "Read", link: "/read/" },
      { text: "About", link: "/about" },
      {
        text: "Languages",
        items: [
          { text: "Chinese", link: "/language/chinese" },
          { text: "Japanese", link: "/language/japanese" }
        ]
      }
    ], //导航菜单
    // sidebar: ["/", "/about"] //侧边栏
    sidebar: {
      "/works/": ["", "shop", "blog"],
      "/read/": ["", "shop", "blog"]
    } //根据栏目筛选侧边栏
}
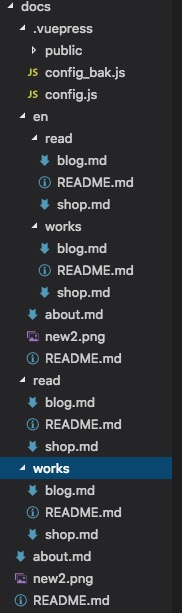
4、多语言设置,增加英文,访问目录en
在docs下面新建文件夹en,将最初中文版的文字目录及相关文件复制到en文件夹内,文件目录结构
更改网站配置config.js
module.exports = {
  head: [["link", { rel: "icon", href: `/new2.png` }]], //被注入页面 HTML <head> 额外的标签
  host: "0.0.0.0", //访问路径
  port: "5555", //端口
  dest: ".vuepress/dist", //输出目录
  configureWebpack: {
    resolve: {
      alias: {
        "@img": "public"
      }
    }
  }, //设置别名
  locales: {
    // 每个语言对象的键(key),是语言的访问路径。
    // 然而,一种特例是将 '/' 作为默认语言的访问路径。
    "/": {
      lang: "zh-CN", // 这个值会被设置在 <html> 的 lang 属性上
      title: "Yaya's 博客",
      description: "个人博客,文档分享"
    },
    "/en/": {
      lang: "en-US",
      title: "Yaya's blog",
      description: "Personal blog, document sharing."
    }
  }, //多语言
  //   theme: "awesome",
  themeConfig: {
    locales: {
      "/": {
        // 语言下拉菜单的展示文本
        selectText: "选择语言",
        // 该语言在下拉菜单中的 label 标签
        label: "简体中文",
        // github 编辑链接的文字
        editLinkText: "在 GitHub 上编辑此页",
        nav: [
          { text: "首页", link: "/" },
          { text: "作品", link: "/works/" },
          { text: "读书", link: "/read/" },
          { text: "关于", link: "/about" }
        ],
        sidebar: {
          "/works/": ["", "shop", "blog"],
          "/read/": ["", "shop", "blog"]
        }
      },
      "/en/": {
        // text for the language dropdown
        selectText: "Languages",
        // label for this locale in the language dropdown
        label: "English",
        // text for the edit-on-github link
        editLinkText: "Edit this page on GitHub",
        nav: [
          { text: "Home", link: "/en/" },
          { text: "Works", link: "/en/works/" },
          { text: "Read", link: "/en/read/" },
          { text: "About", link: "/en/about" }
        ],
        sidebar: {
          "/en/works/": ["", "shop", "blog"],
          "/en/read/": ["", "shop", "blog"]
        }
      }
    }
  }
};
重启项目,访问网站
三、部署到GitHub
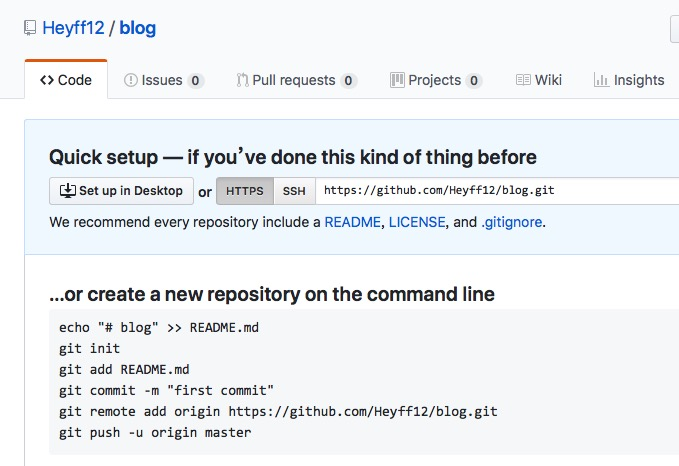
1、在GitHub新建项目blog,改项目的链接为 https://github.com/yours/blog.git (yous值得你自己的项目名称)
2、在config.js中设置
base:'blog',部署后的访问链接为 https://yours.github.com/blog
3、执行命令生成静态资源
npm run docs:build
4、发布信息
# 导航到构建输出目录
cd .vuepress/dist

git init
git add -A
git commit -m 'deploy'

# 推到你仓库的的 gh-page 分支
# 将 <USERNAME>/<REPO> 替换为你的信息
git push -f git@github.com:<USERNAME>/<REPO>.git master:gh-pages
例如
git push -f git@github.com:Heyff12/blog.git master:master
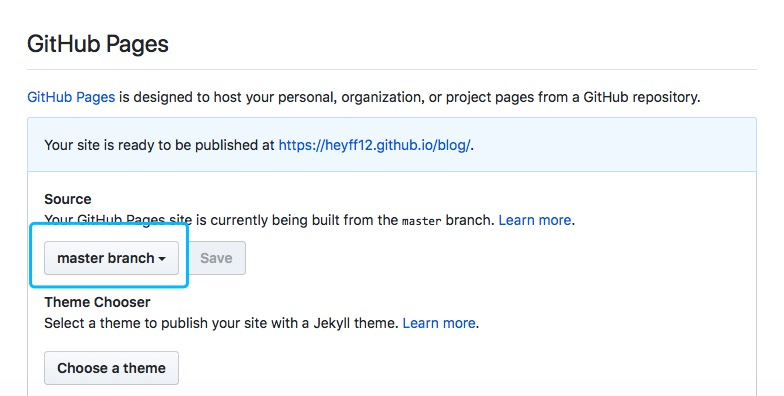
5、在github的项目中,点击setting,滚动到 GitHub Pages,设置source
6、访问
