

作者:小白君
欢迎访问个人github仓库
转载请标明出处

引言
自从入了vue的坑后,对vue的热爱犹如滔滔江水,一发不可收拾(哈哈哈哈,骚比一下)。公司开发,编写组件基本上都用伟大的vue,虽然目前在公司主要从事移动端app开发,虽说vue官网有推荐vue-cli,其提供了init,build,list等命令,但并没有提供生成新的组件文件的命令,每次只能手动添加一个新的组件文件,感觉比较麻烦,于是就想动手写一个生成新的组件文件的cli,嗯,可能作用不大,全当熟悉nodejs以及学习怎样写一个cli tool.
开发
第一步: 肯定是安装nodejs了,这步很简单就不用说了,我电脑安装的是最新的LTS版本。
第二步: 创建一个vue-generate-cli目录,npm初始化 命令如下:
npm init
执行上述命令的时候,可以使用默认值,也可以自定义。此时此目录下会生成一个package.json文件,存储项目信息。
{
  "name": "vue-generate-cli",
  "version": "1.0.0",
  "description": "A cli tool for auto-generating vue template component",
  "author": "bingrui_yuan0721@163.com",
  "engines": {
    "node": ">=6.0.0"
  },
  "license": "MIT"
}
第三步: 引入必要的依赖nodejs插件,我这里主要用到了以下几个插件
"dependencies": {
    "chalk": "^2.4.0",
    "commander": "^2.15.1",
    "ora": "^2.0.0"
  }
chalk是一个颜色的插件,可以用来指定回显的字体颜色,粗细及背景色。
ora主要用来实现node.js命令行环境的loading效果,和显示各种状态的图标等。
commander实现命令行功能。
第四步: 在当前目录下创建vue和vue-generate文件,实现cli主要的功能
vue文件:
#!/usr/bin/env node

require('commander')
  .version(require('../package').version, '-v, --version')
  .description('quick generate vue file')
  .usage('<command> [options]')
  .command('generate', 'generate one new vue component file')
  .alias('g')
  .parse(process.argv)
注:第一行的#!/usr/bin/env node很重要,表示用node来执行这个文件
vue-generate文件:
#!/usr/bin/env node

var program = require('commander');
const chalk = require('chalk');
const ora = require('ora');
const spinnerstyle = require('../libs/spinners.json');
const path = require('path');
const fs = require('fs');

const spinner = ora({
  text: chalk.blue('generate template begin'),
  spinner: spinnerstyle.dots
});

program.on('--help', function() {
  console.log('  Examples:');
  console.log('');
  console.log('    $ vue-g g --help');
  console.log('    $ vue-g g -h');
  console.log('');
  console.log(chalk.gray('    # create a new my-component.vue file with an template in components directory'));
  console.log('    $ vue-g g my-component');
  console.log(chalk.gray('    # create a new my-component.vue file with an template in libs directory'));
  console.log('    $ vue-g g libs my-component');
  console.log(chalk.gray('    # create more new my-component01.vue, my-component02.vue and my-component03.vue files with an template in libs directory'));
  console.log('    $ vue-g g libs my-component01 my-component02 my-component03');
  console.log(chalk.gray('    # create more new my-component01.vue, my-component02.vue and my-component03.vue files with an template in ./components/libs directory'));
  console.log('    $ vue-g g ./components/libs my-component01 my-component02 my-component03');
  console.log('');
});

program.parse(process.argv);

/**
 * Help
 */
(function help () {
  if (program.args.length < 1) return program.help();
})()

/**
 * Generate
 */
const suffix = '.vue';
const baseDir = './src';
const basePath = path.join(process.cwd(), baseDir);

console.log('');
spinner.start('Generating, please wait......');
console.log('');

checkBasePathIsexists(basePath, baseDir);

// check basepath
function checkBasePathIsexists(currentPath, currentDir) {
  if (fs.existsSync(currentPath)) {
    generate();
  } else {
    spinner.fail(chalk.red(currentDir + ' directory does not exist'));
  }
}

// check path
function checkPathIsexists(currentDir, filename) {
  let currentPath = path.join(basePath, currentDir);
  if(fs.existsSync(currentPath)) {
    checkVueFileIsexists(currentPath, filename);
  } else {
    console.log(currentPath);
    fs.mkdirSync(currentPath);
    checkVueFileIsexists(currentPath, filename);
  }
}

function checkVueFileIsexists(currentPath, filename) {
  if(Object.prototype.toString.call(filename) === '[object Array]') {
    filename.forEach(function(onefile) {
      onefile = onefile.replace(/([A-Z])/g,"-$1").toLowerCase();
      let file = path.join(currentPath, './' + onefile);
      generateVueFile(file, onefile);
    })
  } else {
    filename = filename.replace(/([A-Z])/g,"-$1").toLowerCase();
    let file = path.join(currentPath, './' + filename);
    generateVueFile(file, filename);
  }
}

function generateVueFile(file, filename) {
  console.log('');
  spinner.start(filename + suffix + ' is generating......');
  if(fs.existsSync(file + suffix)) {
    spinner.fail(chalk.red(filename + suffix + ' exists.'));
  } else {
    fs.writeFileSync(file + suffix, generateTemplate(filename));
    spinner.succeed(filename + suffix + ' generated successfully');
  }
}

function generate() {
  if (program.args.length === 1) {
    checkPathIsexists('./components', program.args[0]);
  } else if(program.args.length === 2) {
    checkPathIsexists(program.args[0], program.args[1]);
  } else {
    checkPathIsexists(program.args.shift(), program.args);
  }
  console.log('');
  spinner.stop();
}

function generateTemplate(filename) {
  return `<template>\n  <div class="${filename}"></div>\n</template>\n\n`
          + `<script>\nexport default {\n  name: '${filename}',\n  data () {\n    return {\n\n    }\n  },\n  created () {},\n  mounted () {},\n  methods: {}\n}\n</script>\n\n`
          + `<style scoped>\n.${filename} {\n\n}\n</style>\n`;
}
第五步: 编写可执行文件
在package.json中有一个"bin"字段,配置后才可以在控制台使用你的命令
"bin": {
    "vue-g": "bin/vue"
 }
第六步: 发布到npm仓库
将模块发布到npm上,首先得有一个npm账号,注册账号npm adduser,如果已有账号,直接登录npm login
// 注册
npm adduser
// 登录
npm login
注册或登录成功后,直接npm publish发布
// 发布
npm publish
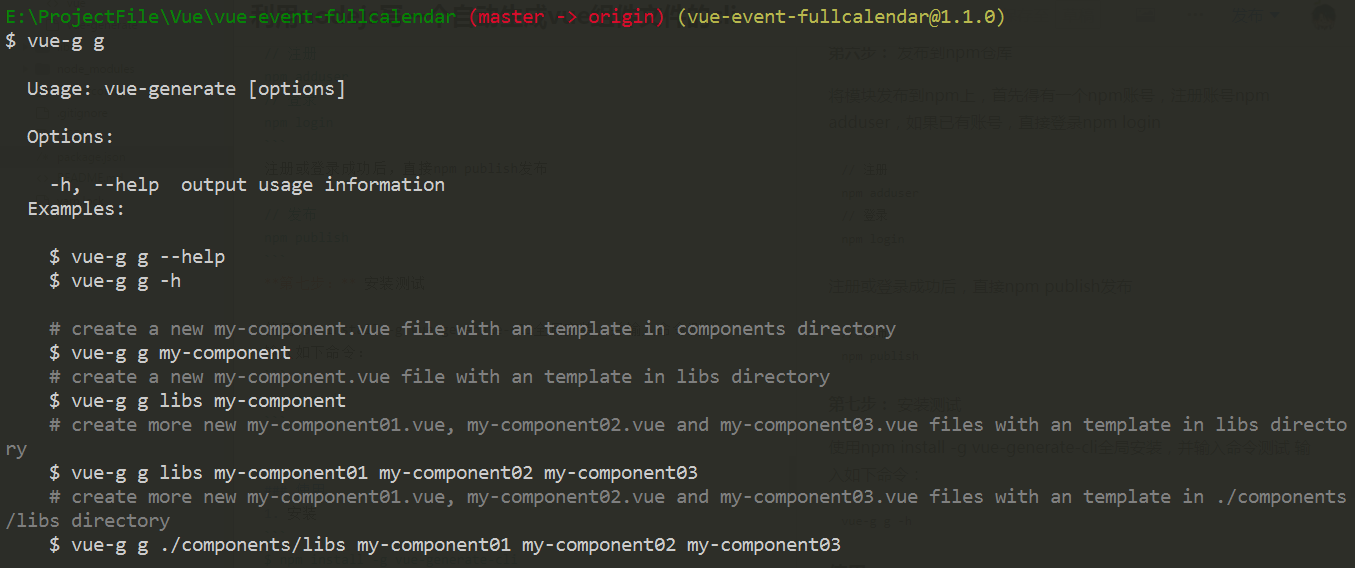
第七步: 安装测试
使用npm install -g vue-generate-cli全局安装,并输入命令测试 输入如下命令:
vue-g g -h
使用
- 安装
$ npm install -g vue-generate-cli
or
$ yarn global add vue-generate-cli
- 使用
// default generate a new file in components directory
$ vue-g g <filename>
or
// generate a new file in custom directory
$ vue-g g <dirname> <filename>
or
// generate more new files in custom directory
$ vue-g g <dirname> <filename01> <filename02> <filename03> <filename(2N+1)>
or
// generate more new files in custom path
$ vue-g g path <filename01> <filename02> <filename03> <filename(2N+1)>
- 例子
$ vue-g g my-component
or
$ vue-g g libs my-component
or
$ vue-g g libs my-component01 my-component02 my-component03
or
$ vue-g g ./components/libs my-component01 my-component02 my-component03
总结
通过一天的捣鼓,vue-generate-cli基本上实现了最初设想的功能,代码也不是很复杂,而且已发布到npm上,需要的可以自行安装使用。 最后,感觉功能还比较简单,更多高大上的功能还需码友共同努力。
