

 <img class="alignnone size-full wp-image-576" src="https://ios.devdon.com/wp-content/uploads/2017/03/banner.jpg" alt="" width="1024" height="576" srcset="https://ios.devdon.com/wp-content/uploads/2017/03/banner.jpg 1024w, https://ios.devdon.com/wp-content/uploads/2017/03/banner-300x169.jpg 300w, https://ios.devdon.com/wp-content/uploads/2017/03/banner-768x432.jpg 768w" sizes="(max-width: 1024px) 100vw, 1024px" />
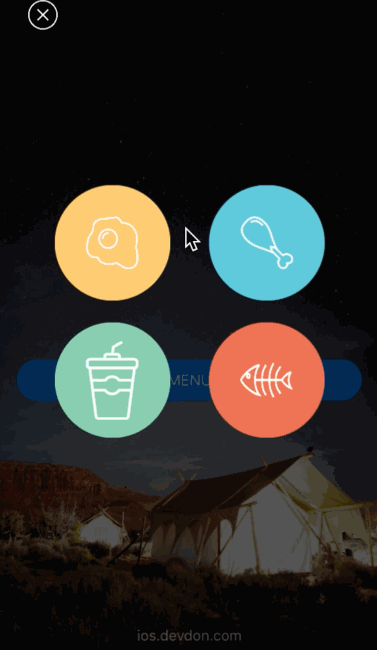
今天我們要來實現上面這一個簡單的轉場動畫,非常的容易實現,剛開始接觸轉場動畫的同學可以拿來練手一下。
這一篇文章將不會很仔細地說明轉場動畫的邏輯,所以如果還不了解如何自定義轉場動畫或者它的原理,
請跳轉至:Swift 自订义非交互转场动画(Custom Transition ViewController)。
準備動作
我們通過實現UINavigationControllerDelegate來自定義Navigation的轉場方法,並且告訴Transition我們進行的是push還是pop,
並且告知是哪一個按鈕被點了(selectedView)
    func navigationController(_ navigationController: UINavigationController, animationControllerFor operation: UINavigationControllerOperation, from fromVC: UIViewController, to toVC: UIViewController) -> UIViewControllerAnimatedTransitioning? {

        if selectedView != nil {
            transition.selectedView = selectedView!
        }

        if fromVC is MenuViewController {
            transition.isPush = true
        } else {
            transition.isPush = false
        }

        return transition
    }
創建SKDiffusionTransition.swift來實現轉場動畫協議的方法
// 動畫時間
func transitionDuration(using transitionContext: UIViewControllerContextTransitioning?) -> TimeInterval

// 具體動畫內容
func animateTransition(using transitionContext: UIViewControllerContextTransitioning)
在animateTransition中準備好fromView, toView, containerView
        // from view
        let fromVC = transitionContext.viewController(forKey: .from)!
        let fromView = fromVC.view!

        // to view
        let toVC = transitionContext.viewController(forKey: .to)!
        let toView = toVC.view!

        // container view
        let containerView = transitionContext.containerView
實現Push展開動畫
 <img class="alignnone wp-image-577" src="https://ios.devdon.com/wp-content/uploads/2017/03/push-transition.gif" alt="" width="236" height="407" />
當使用者點下黃色按鈕時,我們將toView從按鈕的位置展開至全畫面。
        if isPush {
            containerView.addSubview(fromView)

            toView.frame = selectedView.frame
            toView.clipsToBounds = true
            containerView.addSubview(toView)

            UIView.animate(withDuration: 2, animations: {
                toView.frame = UIScreen.main.bounds

            }, completion: { finished in
                fromView.removeFromSuperview()
                transitionContext.completeTransition(true)

            })
        }
實現Pop收縮動畫
 <img class="alignnone wp-image-578" src="https://ios.devdon.com/wp-content/uploads/2017/03/pop-transition.gif" alt="" width="304" height="524" />
將充滿畫面的圖,縮小到之前所點的按鈕位置。
這裡是通過遮罩層(Mask)來做的,不過不太清楚的是,為什麼打算從SuperView移出maskView的時候會Crash,需要再研究下引用關係。
            let maskView = UIView(frame: fromView.frame)
            maskView.backgroundColor = UIColor.black
            maskView.clipsToBounds = true

            containerView.addSubview(toView)
            containerView.addSubview(maskView)
            containerView.addSubview(fromView)

            fromView.mask = maskView

            UIView.animate(withDuration: 0.2, animations: {
                maskView.frame = self.selectedView.frame
                maskView.layer.cornerRadius = self.selectedView.frame.width/2

            }, completion: { finished in
                // don't know why it will crash
//                maskView.removeFromSuperview()

                fromView.removeFromSuperview()
                transitionContext.completeTransition(true)

            })
如果在自定義轉場動畫的時候發現畫面卡住不動,看看是不是忘記使用下面的方法通知系統完成動畫了,
或者是忘記將哪一個畫面從containerView中移除了。
transitionContext.completeTransition(true)推薦和參考
- 歡迎分享本文「Swift實現Menu擴散轉場動畫」連結 https://ios.devdon.com/archives/547
- 本文在Github上相關的SourceCode。
- 了解自定義轉場動畫:Swift 自订义非交互转场动画(Custom Transition ViewController)
