

智慧城市着色器 · SmartCity · ▶ 在线运行案例
-
案例合集: 三维可视化功能案例(threehub.cn)
-
开源仓库github地址: github.com/z2586300277…
-
**400个案例代码: ** 网盘链接
你将学到什么
- Cesium3DTileset 加载 3D Tiles 倾斜摄影
- 3D Tiles 流式 LOD 场景
requestAnimationFrame渲染循环与resize自适应
效果说明
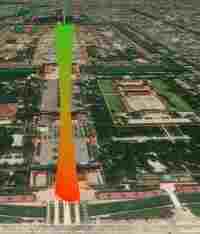
本案例演示 智慧城市着色器 效果:加载倾斜摄影或人工 3D Tiles 白膜并自动定位相机;核心用到 Cesium3DTileset、3D。建议先打开文首在线案例查看动态画面,再对照下方源码逐步理解。
核心概念
- Viewer 聚合 Scene、Camera、Clock 与渲染循环,是 Cesium 应用入口。
- Cesium3DTileset 流式加载 LOD 瓦片,适合城市倾斜摄影;常用
viewer.zoomTo(tileset)或viewBoundingSphere定位。 - 阅读下方完整源码时,建议从
init/load/animate三条主线入手,再深入 shader 与工具函数。
实现步骤
- 创建 Viewer,配置地形/影像(若案例需要)并设置初始相机
- 异步加载模型 / 3D Tiles / GeoJSON 等资源并加入 scene 或 entities
- 在
requestAnimationFrame循环中更新状态并 render(Cesium 为viewer.render或自动渲染)
代码要点
import * as Cesium from 'cesium'

const box = document.getElementById('box')

const viewer = new Cesium.Viewer(box, {

    animation: false,//是否创建动画小器件,左下角仪表

    baseLayerPicker: false,//是否显示图层选择器,右上角图层选择按钮

    baseLayer: Cesium.ImageryLayer.fromProviderAsync(Cesium.ArcGisMapServerImageryProvider.fromUrl('https://server.arcgisonline.com/arcgis/rest/services/World_Imagery/MapServer')),

    fullscreenButton: false,//是否显示全屏按钮,右下角全屏选择按钮

    timeline: false,//是否显示时间轴

    infoBox: false,//是否显示信息框

})

const tileset = await Cesium.Cesium3DTileset.fromUrl(`https://g2657.github.io/gz-city/tileset.json`)

viewer.scene.primitives.add(tileset)

viewer.camera.viewBoundingSphere(tileset.boundingSphere, new Cesium.HeadingPitchRange(0, -0.1, tileset.boundingSphere.radius * 0.5))

class SweepShader extends Cesium.CustomShader {

    constructor(opt = {}) {
        const { sweepColor = new Cesium.Color.fromCssColorString('green'),
            mixColor1 = new Cesium.Color.fromCssColorString('red'),
            mixColor2 = new Cesium.Color.fromCssColorString('white')
        } = opt;

        super({
            vertexShaderText: `void vertexMain(VertexInput vsInput, inout czm_modelVertexOutput vsOutput) {
                // 注意这里的uv,详情看本系列第一篇文章
                v_uv = vec2(vsInput.attributes.positionMC.z / 80., vsInput.attributes.positionMC.z / 250.);
              }`,
            fragmentShaderText: `float random(vec2 st) {

                return fract(sin(dot(st.xy, vec2(12.9898, 78.233))) * 43758.5453123);
              }

              void fragmentMain(FragmentInput fsInput, inout czm_modelMaterial material) {
                vec3 color = vec3(0);
                vec3 originColor = mix(u_mix_color1, u_mix_color2, v_uv.y);
                float t = fract(u_time * 2.) * 2.;
                vec2 absUv = abs(v_uv - t);

                vec2 st = v_uv * 15.;
                vec2 ipos = floor(st + u_time * 5.);
                float r = random(ipos)+.2;

                float d = clamp(distance(0., absUv.y) / .2, 0., 1.);
                float diffuse = dot(czm_sunDirectionEC, fsInput.attributes.normalEC);
                diffuse = clamp(-diffuse, 0., .45);
                color += originColor;
                color = mix(u_sweep_color * r + u_sweep_color * .8, color, d);
                material.diffuse = color;

                material.emissive = vec3(diffuse) * (1. - d);
              }`,
            uniforms: {
                u_sweep_color: {
                    value: sweepColor,
                    type: Cesium.UniformType.VEC3
                },
                u_mix_color1: {
                    value: mixColor1,
                    type: Cesium.UniformType.VEC3
                },
                u_mix_color2: {
                    value: mixColor2,
                    type: Cesium.UniformType.VEC3
                },
                u_time: {
                    value: 0, // initial value
                    type: Cesium.UniformType.FLOAT
                },

            },
            varyings: {
                v_selectedColor: Cesium.VaryingType.VEC3,
                v_uv: Cesium.VaryingType.VEC2,
            },
        })


        this.sweepColor = sweepColor
        this.mixColor1 = mixColor1
        this.mixColor2 = mixColor2

        const task = (t) => {
            this.setUniform("u_time", t * .0001)
            requestAnimationFrame(task)
        }
        requestAnimationFrame(task)
    }
}

tileset.customShader = new SweepShader()
完整源码:GitHub
小结
- 本文提供 智慧城市着色器 完整 Cesium.js 源码与在线 Demo,建议先运行案例再改 uniform/参数做二次实验
- 更多 Cesium.js 实战案例见 three-cesium-examples 合集 与 GitHub 开源仓库
