基础概念
const objects = [];
const radius = 1;
const widthSegments = 6;
const heightSegments = 6;
const sphereGeometry = new THREE.SphereGeometry(
radius,
widthSegments,
heightSegments
);
- 材质
前面物体的材质,有很多种;
MeshBasicMaterial 不受光照的影响。MeshLambertMaterial 只在顶点计算光照,而 MeshPhongMaterial 则在每个像素计算光照。MeshPhongMaterial 还支持镜面高光....
const sunMaterial = new THREE.MeshPhongMaterial({ emissive: 0xffff00 });
- 层次
将形状和材质进行结合
const mesh = new THREE.Mesh(sphereGeometry, sumMaterial)
- 场景
3D引擎中一个图中节点的层次结构,代表一个局部空间
const scene = new THREE.Scene()
scene.add(sunMesh);
- 摄像机
PerspectiveCamera,提供一个近大远小的3d视觉效果,near视锥的前端,far视锥的后端,for视野角度,aspect视锥前端和后端宽度,
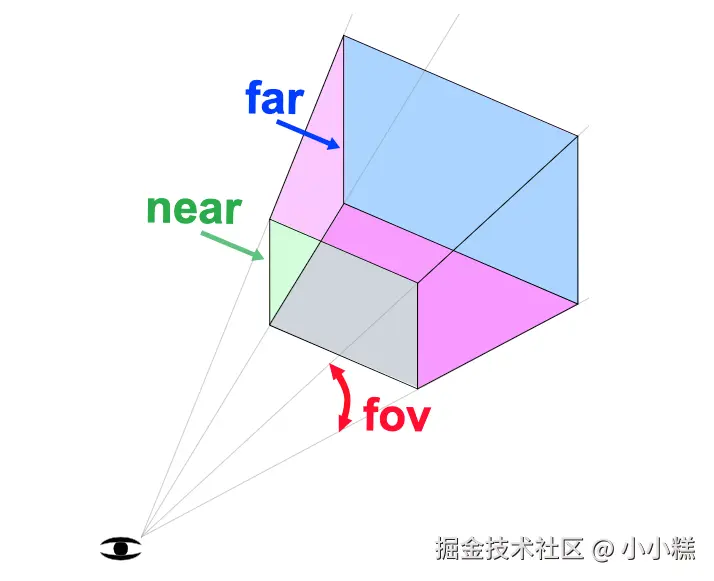
const camera2 = new THREE.PerspectiveCamera(
60,
2,
0.1,
500,
);
camera2.position.set(40, 10, 30);
camera2.lookAt(0, 5, 0);
- 渲染目标 THREE.WebGLRenderer,需要传入dom等参数
const renderer = new THREE.WebGLRenderer({
canvas: canvas,
antialias: true,
alpha: true
})
renderer.render(scene, camera)
const controls = new OrbitControls(camera, canvas)
controls.enableDamping = true
controls.dampingFactor = 0.05
controls.minDistance = 2
controls.maxDistance = 10
- 坐标 在页面上显示x y z轴
- 红色:X轴(向右)
- 绿色:Y轴(向上)
- 蓝色:Z轴(向前/向屏幕外)
const axesHelper = new THREE.AxesHelper(5);
scene.add(axesHelper);
const axesHelper = new THREE.AxesHelper(1);
scene.add(axesHelper);
   const color = 0xFFFFFF;
   const intensity = 1;
   const light = new THREE.AmbientLight(color, intensity);
   scene.add(light);
const getCanvasSize = () => {
const parent = canvas.parentElement
return {
width: parent?.clientWidth || window.innerWidth,
height: parent?.clientHeight || window.innerHeight
}
}
let sizes = getCanvasSize()
render.setSize(siezs.width, sizes.height)
renderer.setPixelRatio(Math.min(window.devicePixelRatio, 2))
let rgbeLoader = new RGBELoader();
rgbeLoader.load('./XXX/sky.hdr', (texture) => {
texture.mapping = THREE.EquiretangularReflectionMapping;
scene.background = texture;
scene.enviroment = texture;
})
写一个完整的例子
'use client'
import { useEffect } from 'react'
import * as THREE from 'three'
import { GLTFLoader } from 'three/examples/jsm/loaders/GLTFLoader.js'
import { OrbitControls } from 'three/examples/jsm/controls/OrbitControls.js'
import GUI from 'lil-gui'
const Page = () => {
const init = () => {
const canvas = document.querySelector('canvas.webgl') as HTMLCanvasElement | null
if (!canvas) return
const scene = new THREE.Scene()
const gui = new GUI()
gui.close()
const debugObject = {
wireframe: true
}
const gltfLoader = new GLTFLoader()
let donut: THREE.Object3D | null = null
gltfLoader.setPath('/api/static/assets/donut/')
gltfLoader.load(
'scene.gltf',
(gltf) => {
donut = gltf.scene as THREE.Object3D
const updateWireframe = () => {
if (!donut) return
donut.traverse((child) => {
if ((child as THREE.Mesh).isMesh) {
const mesh = child as THREE.Mesh
const materials = Array.isArray(mesh.material) ? mesh.material : [mesh.material]
materials.forEach((m: THREE.Material) => {
if ('wireframe' in m) {
;(m as THREE.MeshStandardMaterial).wireframe = debugObject.wireframe
}
})
}
})
}
updateWireframe()
gui.add(debugObject, 'wireframe')
.name('显示线性')
.onChange(updateWireframe)
const radius = 8.5
donut.position.x = 0
donut.scale.set(radius, radius, radius)
scene.add(donut)
},
undefined,
(error) => { console.error('模型加载失败:', error) }
)
const ambientLight = new THREE.AmbientLight(0xffffff, 1.2)
scene.add(ambientLight)
const directionalLight = new THREE.DirectionalLight(0xffffff, 1.5)
directionalLight.position.set(2, 4, 1)
directionalLight.castShadow = true
scene.add(directionalLight)
const getCanvasSize = () => {
const parent = canvas.parentElement
return {
width: parent?.clientWidth || window.innerWidth,
height: parent?.clientHeight || window.innerHeight
}
}
let sizes = getCanvasSize()
const camera = new THREE.PerspectiveCamera(35, sizes.width / sizes.height, 0.1, 1000)
camera.position.z = 5
camera.lookAt(0, 0, 0)
scene.add(camera)
const renderer = new THREE.WebGLRenderer({
canvas: canvas,
antialias: true,
alpha: true
})
renderer.shadowMap.enabled = true
renderer.shadowMap.type = THREE.PCFSoftShadowMap
renderer.setSize(sizes.width, sizes.height)
renderer.setPixelRatio(Math.min(window.devicePixelRatio, 2))
const controls = new OrbitControls(camera, canvas)
controls.enableDamping = true
controls.dampingFactor = 0.05
controls.minDistance = 2
controls.maxDistance = 10
const clock = new THREE.Clock()
const tick = () => {
const elapsedTime = clock.getElapsedTime()
if (donut) {
const baseRotationX = 0.8
const baseRotationY = 0.8
donut.rotation.y = baseRotationY + Math.sin(elapsedTime * 0.4) * 0.1
donut.rotation.x = baseRotationX + Math.sin(elapsedTime * 0.2) * 0.05
donut.position.y = Math.sin(elapsedTime * 0.5) * 0.1
}
controls.update()
renderer.render(scene, camera)
window.requestAnimationFrame(tick)
}
const handleResize = () => {
sizes = getCanvasSize()
camera.aspect = sizes.width / sizes.height
camera.updateProjectionMatrix()
renderer.setSize(sizes.width, sizes.height)
renderer.setPixelRatio(Math.min(window.devicePixelRatio, 2))
}
window.addEventListener('resize', handleResize)
tick()
return () => {
gui.destroy()
window.removeEventListener('resize', handleResize)
}
}
useEffect(() => {
const cleanup = init()
return () => {
if (cleanup) cleanup()
}
}, [])
return (
<div className="min-h-screen w-full flex flex-col lg:flex-row bg-[#fdf2f8]">
<canvas className="webgl w-full h-full block"></canvas>
</div>
)
}
export default Page


