

SpringCloudAlibaba微服务整合微信用户信息授权和获取手机号,实战。小程序使用
Spring Cloud全栈实战:手撸企业级项目,从入门到架构师!
1. 微信小程序授权文档
developers.weixin.qq.com/miniprogram…
Spring Cloud全栈实战:手撸企业级项目,从入门到架构师!
2. 登陆流程
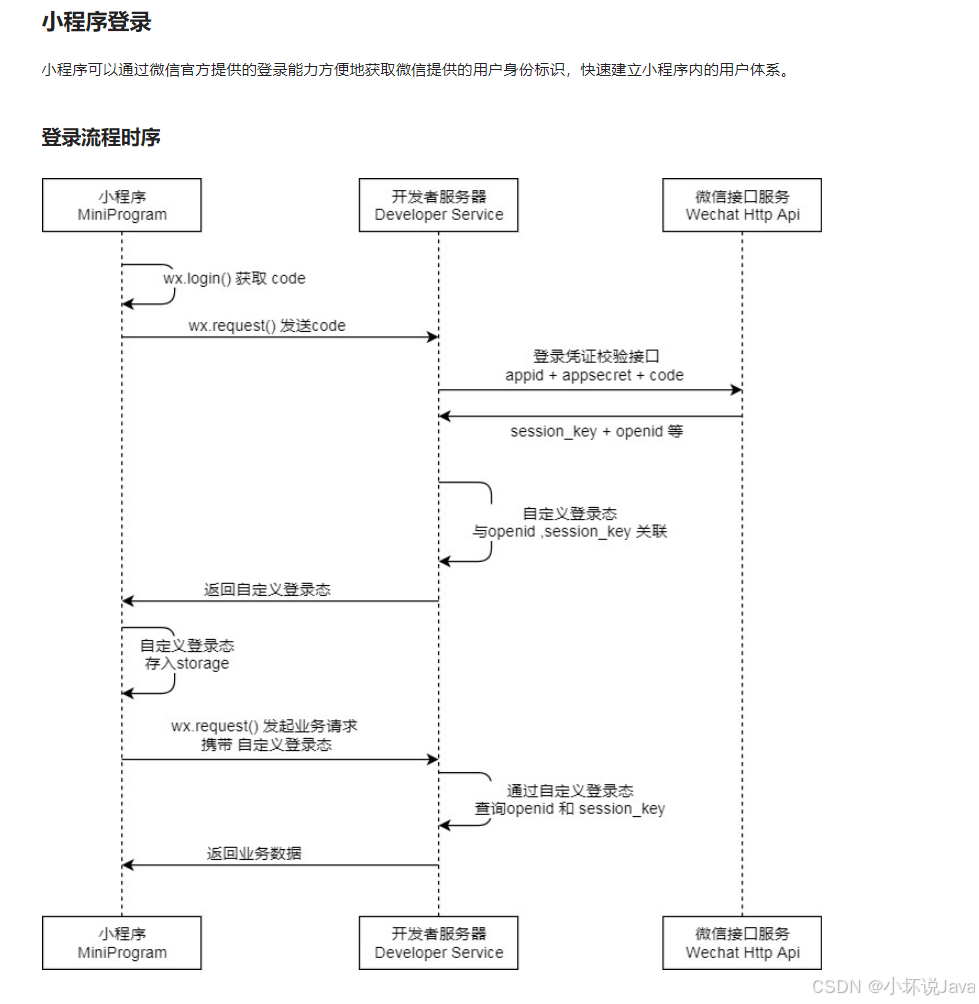
3. 登陆说明
Spring Cloud全栈实战:手撸企业级项目,从入门到架构师!
1. 调用 wx.login() 获取 临时登录凭证code ,并回传到开发者服务器。
2. 调用 auth.code2Session 接口,换取 用户唯一标识 OpenID 、 用户在微信开放平台帐号下的唯一标识UnionID(若当前小程序已绑定到微信开放平台帐号) 和 会话密钥 session_key。之后开发者服务器可以根据用户标识来生成自定义登录态,用于后续业务逻辑中前后端交互时识别用户身份。
注意事项
3. 会话密钥 session_key 是对用户数据进行 加密签名 的密钥。为了应用自身的数据安全,开发者服务器不应该把会话密钥下发到小程序,也不应该对外提供这个密钥。
4. 临时登录凭证 code 只能使用一次
4. 创建后端接口
Spring Cloud全栈实战:手撸企业级项目,从入门到架构师!
1. 创建存储密钥的数据库
CREATE TABLE `api_wx` (
  `id` varchar(255) COLLATE utf8_bin NOT NULL,
  `app_id` varchar(255) COLLATE utf8_bin DEFAULT NULL,
  `secret` varchar(255) COLLATE utf8_bin DEFAULT NULL,
  `js_code` varchar(255) COLLATE utf8_bin DEFAULT NULL,
  `grant_type` varchar(255) COLLATE utf8_bin DEFAULT NULL,
  `wx_url` varchar(255) COLLATE utf8_bin DEFAULT NULL,
  `name` varchar(255) COLLATE utf8_bin DEFAULT NULL COMMENT '小程序名称',
  `type` varchar(255) COLLATE utf8_bin DEFAULT NULL COMMENT ',
  `status` varchar(255) COLLATE utf8_bin DEFAULTm>?                  '0' COMMENT '状态',
  `create_time` datetime DEFAULT NULL,
  PRIMARY KEY (`id`) USING BTREE
) ENGINE=InnoDB DEFAULT CHARSET=utf8 COLLATE=utf8_bin ROW_FORMAT=DYNAMIC;
2. 整合MybatisPlus
Spring Cloud全栈实战:手撸企业级项目,从入门到架构师!
        <dependency>
            <groupId>com.baomidou</groupId>
            <artifactId>mybatis-plus-boot-starter</artifactId>
            <version>3.2.0</version>
        </dependency>
4. 生成小程序密钥代码
![[图片]](https://i-blog.csdnimg.cn/direct/6f012230683d4f5389d0ea3e2b6d7ef7.png)
5. 获取微信授权用户信息
Spring Cloud全栈实战:手撸企业级项目,从入门到架构师!
![[图片]](https://i-blog.csdnimg.cn/direct/a418c182bc024403a8278f13f0e4b0d2.png)
1. 创建code换取Token的接口
Spring Cloud全栈实战:手撸企业级项目,从入门到架构师!
    /**
     * 微信小程序code换取Token
     * QQ小程序code换取Token
     *
     * @param code
     * @param type
     * @return
     */
    @GetMapping("/loginCode")
    public R wxlogin(@RequestParam("code") String code, @RequestParam("type") String type) {
        return apiWxService.queryApiWx(code, type);

    }
2. 实现类编写
Spring Cloud全栈实战:手撸企业级项目,从入门到架构师!
    /**
     * 动态获取各个小程序授权
     * @param code
     * @param type
     * @return
     */
    @Override
    public R queryApiWx(String code, String type) {

        ApiWxEntity one = this.baseMapper.selectOne(new QueryWrapper<ApiWxEntity>().eq("type", type));

        if (one == null) {
            return R.error("该小程序不存在!");
        }

        String data = (String) HttpUtil.HttpGet(one.getWxUrl().
                concat("appid=").concat(one.getAppId())
                .concat("&secret=").concat(one.getSecret())
                .concat("&js_code=").concat(code)
                .concat("&grant_type=").concat(one.getGrantType()), String.class);

        WxEntityVo wxEntityVo = JSONObject.parseObject(data, WxEntityVo.class);
        System.out.println(wxEntityVo);
        return R.ok(wxEntityVo);
    }
3. 小程序获取Token
![[图片]](https://i-blog.csdnimg.cn/direct/83663c72436a4c4199f5cb66bcbbe1ab.png)
4. 小程序获取微信用户信息
Spring Cloud全栈实战:手撸企业级项目,从入门到架构师!
getUserInfo(e) {
// 推荐使用 wx.getUserProfile 获取用户信息,开发者每次通过该接口获取用户个人信息均需用户确认
// 开发者妥善保管用户快速填写的头像昵称,避免重复弹窗
        wx.getUserProfile({
         desc: '用于完善会员资料', // 声明获取用户个人信息后的用途,后续会展示在弹窗中,请谨慎填写
         success: (res) => {
       console.log(res)
   }
   })
},
5. 效果展示
![[图片]](https://i-blog.csdnimg.cn/direct/cfae41a3728c462fa8b5a07203f4f2a1.png)
6. 打印授权信息
打印信息
![[图片]](https://i-blog.csdnimg.cn/direct/1972072f55e9449a8a99cb531228a397.png)
6. 小程序获取微信用户手机号
1. 获取手机号按钮
<button open-type="getPhoneNumber" @getphonenumber="getPhoneNumber">微信小程序唤起授权手机号</button>
2. 获取手机号函数
Spring Cloud全栈实战:手撸企业级项目,从入门到架构师!
getPhoneNumber(e) {
console.log(e)
console.log("...", e.detail.encryptedData)
if (e.detail.errMsg == "getPhoneNumber:ok") {
let pc = new WXBizDataCrypt("wxbfedc5544fee04f6", this.session_key);
let data = pc.decryptData(e.detail.encryptedData, e.detail.iv);
console.log(data) //data就是最终解密的用户信息

// console.log("用户点击了接受")
// console.log(e.detail);
// let encryptedData = e.detail.encryptedData
// let errMsg = e.detail.errMsg
// let iv = e.detail.iv

} else {
console.log("用户点击了拒绝")
}
},
3. 效果
![[图片]](https://i-blog.csdnimg.cn/direct/660c0c75c1c747428b2655daf18c9fb4.png)
4. 打印信息
![[图片]](https://i-blog.csdnimg.cn/direct/080f5ecebaf240499a588c2d426b32f7.png)
5. 整合用户信息和手机号发送到后台
Spring Cloud全栈实战:手撸企业级项目,从入门到架构师!
1. 前端代码处理
<template>
	<view>
		<view style="display: flex;justify-content: center;">我的微信小程序</view>

		<view style="display: flex;justify-content: center; margin-top: 200rpx;" @click="getUserInfo">
			<u-avatar :src="src" mode="square"></u-avatar>
		</view>

		<view>
			<u-popup v-model="show" mode="center">
				<view style="height: 200rpx;width: 580rpx;">
					<view style="display: flex; margin-top: 20rpx; ">
						<button open-type="getPhoneNumber" @getphonenumber="getPhoneNumber">授权手机号</button>
					</view>
				</view>
			</u-popup>
			<!-- <u-button @click="show = true">打开</u-button> -->
		</view>
	</view>
</template>

<script>
	import WXBizDataCrypt from "../../config/WXBizDataCrypt.js"
	import api from '@/config/api.js'
	export default {
		data() {
			return {
				src: '../../static/1.jpg',
				show: false,

				session_key: "",
				openid: "",

				nickName: "",
				avatarUrl: "",
				city: "",
				country: "",
				gender: "",
				gender: "",
				language: "",
				province: ""
			}
		},
		methods: {

			getUserInfo() {

				wx.getUserProfile({
					desc: '用于完善会员资料', // 声明获取用户个人信息后的用途,后续会展示在弹窗中,请谨慎填写
					success: (res) => {
						console.log(res.userInfo)
						this.src = res.userInfo.avatarUrl
						this.avatarUrl = res.userInfo.avatarUrl
						this.city = res.userInfo.city
						this.country = res.userInfo.country
						this.nickName = res.userInfo.nickName
						this.gender = res.userInfo.gender
						this.language = res.userInfo.language
						this.province = res.userInfo.province


						this.show = true
					}
				})
			},


			getPhoneNumber(e) {
				console.log(e)
				console.log("...", e.detail.encryptedData)
				if (e.detail.errMsg == "getPhoneNumber:ok") {
					let pc = new WXBizDataCrypt("自己的", this.session_key);
					let data = pc.decryptData(e.detail.encryptedData, e.detail.iv);
					console.log(data) //data就是最终解密的用户信息

					let phone = data.phoneNumber


					this.show = false

					api.saveLogin({
						"nickName": this.nickName,
						"avatarUrl": this.avatarUrl,
						"openId": this.openid,
						"gender": this.gender,
						"province": this.prototype,
						"city": this.city,
						"type": "微信小程序",
						"phone": phone

					}).then(res => {
						console.log(res)

					}).catch(err => {
						console.log(err)
					})


				} else {
					console.log("用户点击了拒绝")
				}
			},


		},


		onLoad() {
			let that = this
			wx.login({
				success(res) {
					console.log("wx", res)
					if (res.code) {
						api.loginCode({
							"code": res.code,
							"type": "xcx_wx_0"
						}).then(res => {
							console.log(res)
							that.session_key = res.data.session_key
							that.openid = res.data.openid
						}).catch(err => {
							console.log(err)
						})

					} else {
						console.log('登录失败!' + res.errMsg)
					}
				}
			})
		}

	}
</script>

<style>

</style>
2. 后端代码处理唯一
Spring Cloud全栈实战:手撸企业级项目,从入门到架构师!
    @Override
    public ApiUserEntity getOpenId(String openId) {
        ApiUserEntity apiUser = this.baseMapper.selectOne(new QueryWrapper<ApiUserEntity>().eq("open_id", openId));
        return apiUser;
    }

  3. 接口判断
    /**
     * 保存
     */
    @RequestMapping("/save")
    public R save(@RequestBody ApiUserEntity apiUser) {
        apiUser.setCreateTime(new Date());


        ApiUserEntity openId = apiUserService.getOpenId(apiUser.getOpenId());
        if (openId == null) {
            apiUserService.save(apiUser);
            return R.ok();
        }
        return R.ok();

    }
