

定义多线程的三种方式
继承Thread类
// 1.定义一个类继承自Thread
class MyThread extends Thread {
    // 2.重写run()方法
    @Override
    public void run() {
        for (int i = 0; i < 100; i++) {
            System.out.println(getName()+"run()...");
        }
    }
}
public class ThreadDemo01 {
    public static void main(String[] args) {
        // 3.创建对象
        MyThread t1 = new MyThread();
        MyThread t2 = new MyThread();
        t1.setName("线程1");
        t2.setName("线程2");
        // 4.启动线程
        t1.start();
        t2.start();
    }
}
实现Runnable接口的方式
// 1.定义一个类实现Runnable接口
class MyRun implements Runnable {
    // 2.重写run()方法
    @Override
    public void run() {
        for (int i = 0; i < 100; i++) {
            // 获取当前线程对象
            Thread thread = Thread.currentThread();
            System.out.println(thread.getName()+"run()...");
        }
    }
}
public class ThreadDemo02 {
    public static void main(String[] args) {
        // 3.创建对象(表示多线程要执行的任务)
        MyRun mr1 = new MyRun();
        MyRun mr2 = new MyRun();
        // 4.创建线程对象
        Thread t1 = new Thread(mr1);
        Thread t2 = new Thread(mr2);
        t1.setName("线程1");
        t2.setName("线程2");
        // 5.启动线程
        t1.start();
        t2.start();
    }
}
利用Callable接口和Future接口[可以获取多线程的结果]
// 1.创建一个MyCallable类实现Callable接口
class MyCallable implements Callable<Integer> { // Callable的泛型表示这个线程返回的结果
    //2.重写call方法,返回值表示多线程运行结果
    @Override
    public Integer call() {
        int sum = 0;
        for (int i = 0; i < 100; i++) {
            sum += i;
        }
        return sum;
    }

}
public class ThreadDemo03 {
    public static void main(String[] args) throws ExecutionException, InterruptedException {
        // 3.创建MyCallable对象【表示多线程要执行的任务】
        MyCallable mc =  new MyCallable();
        // 4.创建FutureTask对象【管理多线程运行的结果】
        FutureTask<Integer> ft = new FutureTask<>(mc);
        // 5.创建线程对象
        Thread thread = new Thread(ft);
        // 6.启动线程
        thread.start();
        // 获取线程的返回结果(这里会阻塞等待子线程的返回结果)
        Integer result = ft.get();
        System.out.println("result = " + result);
    }
}
主线程调用start()方法时,此时子线程已经在异步执行;
主线程调用ft.get()方法时,会去查看子线程是否执行完毕,如果没有执行完毕,主线程会等待子线程执行完毕后得到返回结果。
常见的成员方法
编辑
setPriority(int newPriority)【设置线程的优先级】 和 final int getPriority()【获取线程的优先级】
- 优先级不是绝对的,只是表示线程有很大的概率能抢到CPU
final void setDaemon(boolean on):设置为守护线程
- 当其他非守护线程结束了,守护线程也会陆续结束
- 应用场景:线程1(聊天)、线程2(传输文件-守护线程)
- JDK的垃圾回收线程、tomcat用来接收处理外部请求的线程
class MyThread1 extends Thread{
    @Override
    public void run() {
        for (int i = 0 ; i < 10 ; i++) {
            System.out.println(getName() + i);
        }
    }
}

class MyThread2 extends Thread{
    @Override
    public void run() {
        for (int i = 0 ; i < 100 ; i++) {
            System.out.println(getName() + i);
        }
    }
}
public class ThreadDemo {
    public static void main(String[] args) {
        MyThread1 t1 = new MyThread1();
        MyThread2 t2 = new MyThread2();

        t2.setDaemon(true); // 设置为守护线程

        t1.setName("非守护线程");
        t2.setName("守护线程");

        t1.start();
        t2.start();
    }
}
线程的生命周期【5种】
编辑
线程安全的问题
线程在执行的时候会有随机性,CPU的执行权随时有可能被其他线程抢走
买票问题:三个窗口同时卖100张票
class MyThread extends Thread {
    static int ticket = 0;
    @Override
    public void run() {
        while(true) {
            if(ticket < 100) {
                try {
                    Thread.sleep(1000);
                } catch (InterruptedException e) {
                    throw new RuntimeException(e);
                }
                ++ticket;
                System.out.println(getName() + "卖第" + ticket + "张票");
            }else {
                break;
            }
        }
    }
}
public class ThreadDemo01 {
    public static void main(String[] args) {
        MyThread t1 = new MyThread();
        MyThread t2 = new MyThread();
        MyThread t3 = new MyThread();
        t1.setName("窗口1");
        t2.setName("窗口2");
        t3.setName("窗口3");
        t1.start();
        t2.start();
        t3.start();
    }
}
同步代码块:把操作共享数据的代码锁起来
- 锁默认打开,有一个线程进去,锁自动关闭
- 里面的代码全部执行完毕,线程出来,锁自动打开
synchronized (锁) {
    操作共享数据的代码;
}
更新上边买票代码:
class MyThread extends Thread {
    static int ticket = 0;
    // 锁对象一定要是唯一的
    static Object obj = new Object();
    @Override
    public void run() {
        while(true) {
            // 同步代码块
            synchronized (obj) { // 锁对象一般可以写成【当前类的字节码文件对象MyThraed.class】
                if(ticket < 100) {
                    try {
                        Thread.sleep(10);
                    } catch (InterruptedException e) {
                        throw new RuntimeException(e);
                    }
                    ++ticket;
                    System.out.println(getName() + "卖第" + ticket + "张票");
                }else {
                    break;
                }
            }
        }
    }
}
同步方法
把synchronized关键字加到方法上
修饰符 synchronized 返回值类型 方法名(方法参数){
    ...
}
-
同步方法是锁住方法里面的所有代码
-
锁对象不能自己指定
- 非静态:this
- 静态:当前类的字节码文件对象
更新上边买票代码:
class MyRunnable implements Runnable {
    int ticket = 0; // 如果是继承Runnable接口的方式定义的线程,不需要加static,因为只会定义一个MyRunnable对象
    @Override
    public void run() {
        while(true) {
            if (method()) break;
        }
    }

    private synchronized boolean method() {
        if(ticket == 100) {
            return true;
        }else {
            try {
                Thread.sleep(10);
            } catch (InterruptedException e) {
                throw new RuntimeException(e);
            }
            ++ticket;
            System.out.println(Thread.currentThread().getName() + "卖第" + ticket + "张票");
        }
        return false;
    }
}
public class ThreadDemo02 {
    public static void main(String[] args) {
        MyRunnable mr = new MyRunnable();
        Thread t1 = new Thread(mr);
        Thread t2 = new Thread(mr);
        Thread t3 = new Thread(mr);
        t1.setName("窗口1");
        t2.setName("窗口2");
        t3.setName("窗口3");
        t1.start();
        t2.start();
        t3.start();
    }
}
Lock锁
void lock():获得锁
void unlock():释放锁
Lock是接口,不能直接实例化,需要采用他的实现类ReentrantLock来实例化
class MyThread1 extends Thread {
    // 因为使用继承Thread的方式,所以ticket和lock都会创建多次,要保证只会创建一次,就要加上static关键字
    static int ticket = 0;
    static Lock lock = new ReentrantLock();
    @Override
    public void run() {
        while(true) {
            // 加锁
            lock.lock();
            try {
                if(ticket < 100) {
                    Thread.sleep(10);
                    ++ticket;
                    System.out.println(getName() + "卖第" + ticket + "张票");
                }else {
                    break;
                }
            } catch (InterruptedException e) {
                throw new RuntimeException(e);
            } finally {
                // 释放锁【如果不写在finally里,达到100张票后,其中一个线程会经过break跳出循环,就无法释放锁,程序无法停止】
                lock.unlock();
            }
        }
    }
}
public class ThreadDemo03 {
    public static void main(String[] args) {
        MyThread1 t1 = new MyThread1();
        MyThread1 t2 = new MyThread1();
        MyThread1 t3 = new MyThread1();
        t1.setName("窗口1");
        t2.setName("窗口2");
        t3.setName("窗口3");
        t1.start();
        t2.start();
        t3.start();
    }
}
死锁
死锁是一个错误,在写锁的时候,不要让两个锁嵌套写
编辑
等待唤醒机制
生产者和消费者
常见方法
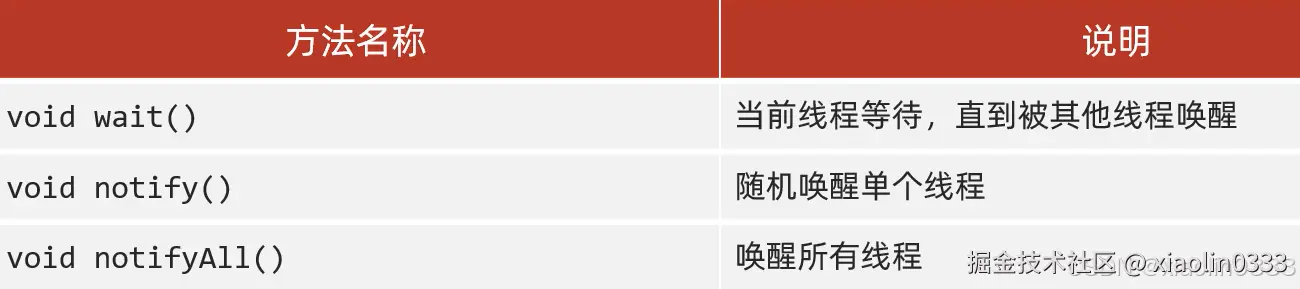
 编辑
编辑
场景:有一个桌子(Desk)、厨师(Cook)、吃货(Foodie);要求厨师做一碗,吃货吃一碗。
// 【厨师】:生产者
class Cook extends Thread {
    @Override
    public void run() {
        while(true) {
            synchronized(Desk.lock) {
                if(Desk.count == 0) {
                    break;
                }else {
                    // 判断桌子上是否有食物
                    if(Desk.foodFlag == 1) {
                        // 没有-等待
                        try {
                            Desk.lock.wait();
                        } catch (InterruptedException e) {
                            throw new RuntimeException(e);
                        }
                    }else {
                        // 有-制作食物,修改食物状态、叫醒消费者
                        System.out.println("厨师正在做");
                        Desk.foodFlag = 1;
                        Desk.lock.notifyAll();
                    }
                }
            }
        }
    }
}

// 【吃货】:消费者
class Foodie extends Thread {
    @Override
    public void run() {
        while(true) {
            synchronized (Desk.lock) {
                if(Desk.count == 0) {
                    break;
                }else {
                    // 判断桌子上是否有面条
                    if(Desk.foodFlag == 0) {
                        // 没有 - 等待
                        try {
                            Desk.lock.wait();// 要用锁对象调用wait方法,让当前线程和锁进行绑定
                        } catch (InterruptedException e) {
                            throw new RuntimeException(e);
                        }
                    }else {
                        // 有 - 开吃、唤醒厨师、总数-1、更改桌子的状态
                        Desk.count--;
                        System.out.println("吃货正在吃,还能吃:"+ Desk.count);
                        Desk.lock.notifyAll();// 唤醒绑定在这把锁上的所有线程
                        Desk.foodFlag = 0;
                    }
                }
            }
        }
    }
}

// 【桌子】:控制生产者和消费者的执行
class Desk {
    // 桌子上是否有食物 0-没有食物、1-有食物
    public static int foodFlag = 0;
    // 总个数
    public static int count = 10;
    // 锁对象
    public static Object lock = new Object();
}

public class ThreadDemo01 {
    public static void main(String[] args) {
        Cook cook = new Cook();
        Foodie foodie = new Foodie();
        cook.setName("厨师");
        foodie.setName("吃货");
        cook.start();
        foodie.start();
    }
}
利用阻塞队列方式实现
阻塞队列:连接生产者和消费者之间的管道。
- put数据:放不进去,会等着,叫做阻塞
- take数据:取出第一个数据,取不到会等着,也叫阻塞
写的时候可以不用加锁,put()和take()底层就已经有锁了
阻塞队列的继承结构
编辑
// 【厨师】:生产者
class Cook extends Thread {
    ArrayBlockingQueue<String> queue;
    public Cook(ArrayBlockingQueue queue) {
        this.queue = queue;
    }
    @Override
    public void run() {
        while (true) {
            // 不断地把面条放入阻塞队列中
            try {
                queue.put("面条");
                System.out.println("厨师放了一碗面条");
            } catch (InterruptedException e) {
                throw new RuntimeException(e);
            }
        }
    }
}
// 【吃货】:消费者
class Foodie extends Thread {
    ArrayBlockingQueue<String> queue;
    public Foodie(ArrayBlockingQueue queue) {
        this.queue = queue;
    }
    @Override
    public void run() {
        while (true) {
            // 不断地从阻塞队列中获取面条
            try {
                String food = queue.take();
                System.out.println(food);
            } catch (InterruptedException e) {
                throw new RuntimeException(e);
            }

        }
    }
}

public class ThreadDemo02 {
    public static void main(String[] args) {
        // 创建阻塞队列
        ArrayBlockingQueue<String> queue = new ArrayBlockingQueue<>(1);
        // 创建线程的对象,并把阻塞队列传过去
        Thread cook = new Cook(queue);
        Thread foodie = new Foodie(queue);
        cook.setName("厨师");
        foodie.setName("吃货");
        cook.start();
        foodie.start();
    }
}
线程的状态【7种】
编辑
注:在Java虚拟机种只有六种状态,没有运行状态,因为线程抢到CPU的执行权进入运行状态,虚拟机就会把当前线程交给操作系统管理
编辑
线程栈
编辑
线程1和线程2的run()方法里的存储空间是相互独立的。
线程池
使用线程的使用就去创建一个线程,线程需要频繁的创建和销毁,大大降低系统的效率。
如果有了线程池,线程可以复用,执行完一个任务后并不会被销毁,而是继续执行其他任务。(降低资源消耗、提高响应速度、提高线程的可管理性)
- 创建一个池子,池子是空的
- 提交任务,池子会创建新的线程对象,任务执行完毕,线程归还给池子,下回再次提交任务时,不需要创建新的线程,直接服用已有的线程即可。
- 如果提交任务时,池子里没有空闲的线程,也无法创建新的线程,任务就会排队等待。
Executors:线程池的工具类,通过调用方法返回不同类型的线程池对象
编辑
创建没有上限的线程池
class MyRunnable implements Runnable {

    @Override
    public void run() {
        System.out.println(Thread.currentThread().getName());
    }
}
public class ThreadDemo01 {
    public static void main(String[] args) throws InterruptedException {
        // 获取线程池对象
        ExecutorService pool = Executors.newCachedThreadPool();
        // 提交任务
        pool.submit(new MyRunnable());
        Thread.sleep(1000);
        pool.submit(new MyRunnable());
        Thread.sleep(1000);
        pool.submit(new MyRunnable());
        Thread.sleep(1000);
        pool.submit(new MyRunnable());
        Thread.sleep(1000);
        pool.submit(new MyRunnable());
        // 销毁线程池
        pool.shutdown();
    }
}
线程是可以复用的,代码中让提交任务后,让main线程睡1秒中,此时上一个线程执行完毕,就会把线程重新放入线程池中
创建有上限的线程池
public class ThreadDemo02 {
    public static void main(String[] args) {
        // 获取线程池对象
        ExecutorService pool = Executors.newFixedThreadPool(3);
        // 提交任务
        pool.submit(new MyRunnable());
        pool.submit(new MyRunnable());
        pool.submit(new MyRunnable());
        pool.submit(new MyRunnable());
        pool.submit(new MyRunnable());
        // 销毁线程池
        pool.shutdown();
    }
}
上边的代码相当于是3个线程在执行5个任务。因为创建了多个线程,所以当代码一步一步往下走的时候,上一步可能是还没执行完的。所以运行到第四个提交任务的时候,就会有一个任务在排队了,到第五个提交任务,就有两个任务在排队。
线程池多大合适?
编辑
自定义线程池
编辑
编辑
编辑
核心线程都在处理任务,队伍中也已经排满了,此时才会创建临时线程去处理任务。
任务的执行不会按照提交的顺序去执行。
编辑
核心线程和临时线程都在工作,队伍中也排满了,此时线程池就会触发任务拒绝策略。
任务拒绝策略
编辑
代码实现
编辑
public class ThreadDemo03 {
    public static void main(String[] args) {
        ThreadPoolExecutor pool = new ThreadPoolExecutor(
                3, // 核心线程数量
                6,// 最大线程数量
                60,// 空闲线程最大存活时间
                TimeUnit.SECONDS, // 时间单位
                new ArrayBlockingQueue<>(3), // 任务队列
                Executors.defaultThreadFactory(), // 创建线程工厂
                new ThreadPoolExecutor.AbortPolicy() // 任务的拒绝策略
        );
    }
}
