环境要求
环境&工具              | 版本(or later) |
| ------------------ | ------------ |
| SpringBoot         | 3.0.5+       |
| IDEA               | 2021.2.1+    |
| Java               | 17+          |
| Maven              | 3.5+         |
| Tomcat             | 10.0+        |
| Servlet            | 5.0+         |
| GraalVM Community  | 22.3+        |
| Native Build Tools | 0.9.19+
SpringBoot是什么
SpringBoot是一个简化快捷可迅速构建Spring 应用的Spring框架。

***SpringBoot底层是Spring

特性:
1.提供可选的starter,简化应用整合。web-starter,mybatis-starter等等。
2.内置Tomcat容器
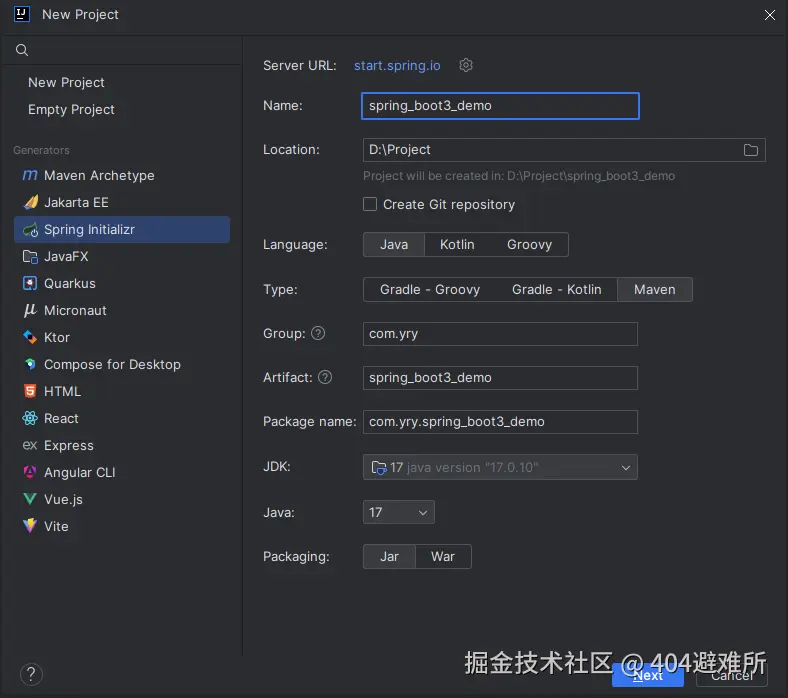
入门Demo
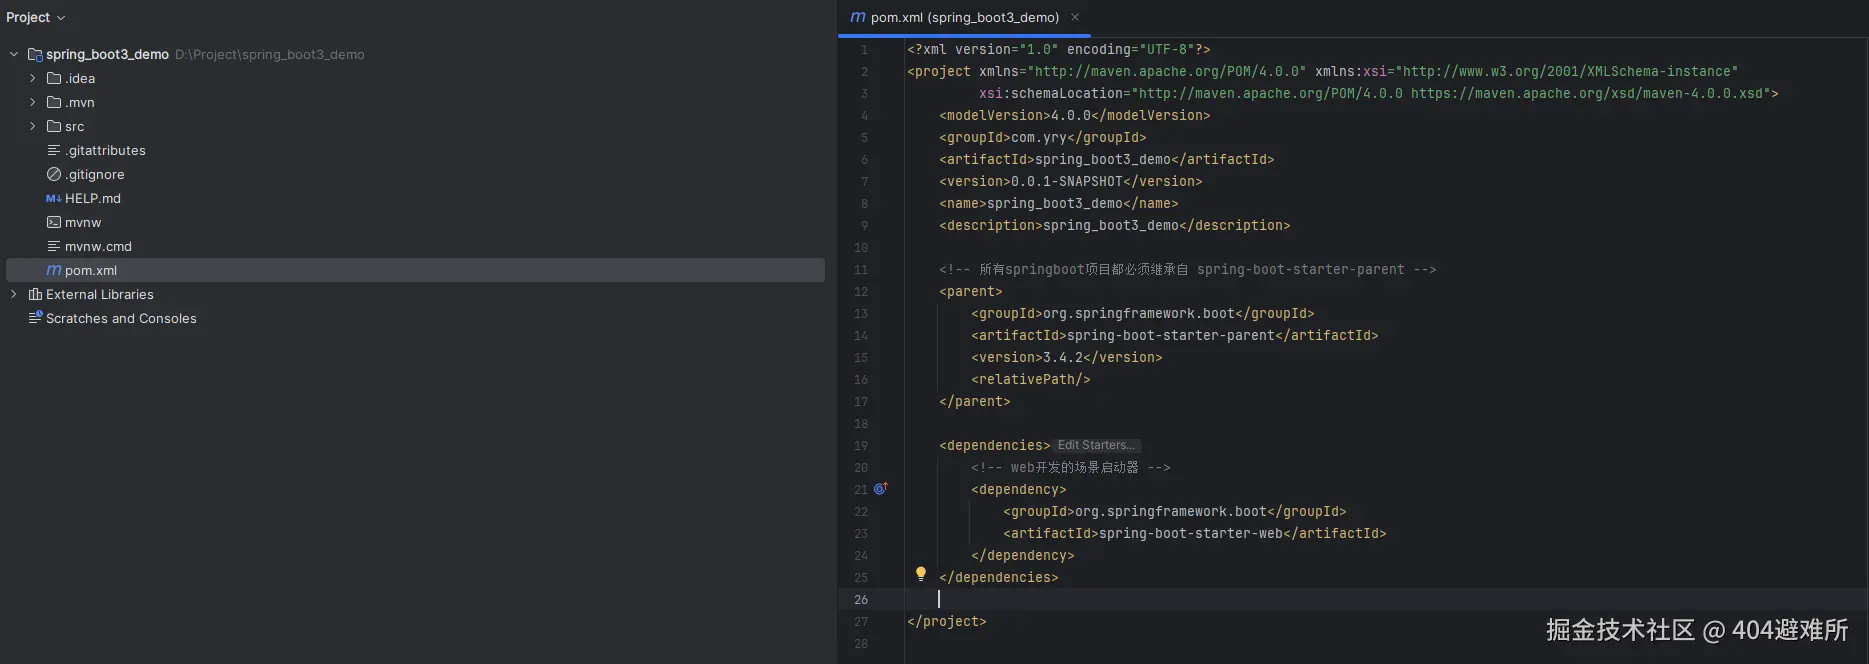

<?xml version="1.0" encoding="UTF-8"?>
<project xmlns="http://maven.apache.org/POM/4.0.0" xmlns:xsi="http://www.w3.org/2001/XMLSchema-instance"
xsi:schemaLocation="http://maven.apache.org/POM/4.0.0 https://maven.apache.org/xsd/maven-4.0.0.xsd">
<modelVersion>4.0.0</modelVersion>
<groupId>com.yry</groupId>
<artifactId>spring_boot3_demo</artifactId>
<version>0.0.1-SNAPSHOT</version>
<name>spring_boot3_demo</name>
<description>spring_boot3_demo</description>
<parent>
<groupId>org.springframework.boot</groupId>
<artifactId>spring-boot-starter-parent</artifactId>
<version>3.4.2</version>
<relativePath/>
</parent>
<dependencies>
<dependency>
<groupId>org.springframework.boot</groupId>
<artifactId>spring-boot-starter-web</artifactId>
</dependency>
</dependencies>
<build>
<plugins>
<plugin>
<groupId>org.springframework.boot</groupId>
<artifactId>spring-boot-maven-plugin</artifactId>
</plugin>
</plugins>
</build>
</project>
******
- 官方提供的场景:命名为:`spring-boot-starter-*`
- 第三方提供场景:命名为:`*-spring-boot-starter`
******
package com.yry.spring_boot3_demo.controller;

import org.springframework.web.bind.annotation.GetMapping;
import org.springframework.web.bind.annotation.RestController;

@RestController
public class HelloController {

    @GetMapping("/hello")
    public String hello(){
        return "Hello,Spring Boot 3!";
    }
}
package com.yry.spring_boot3_demo;

import org.springframework.boot.SpringApplication;
import org.springframework.boot.autoconfigure.SpringBootApplication;

@SpringBootApplication
public class SpringBoot3DemoApplication {
    public static void main(String[] args) {
        SpringApplication.run(SpringBoot3DemoApplication.class, args);
    }
}
依赖管理机制
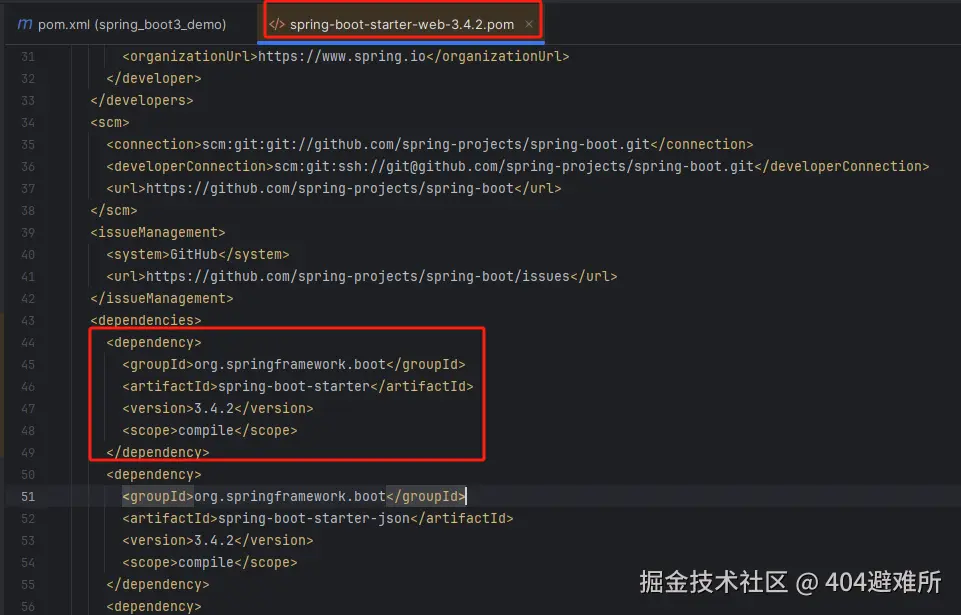
1、为什么导入`starter-web`所有相关依赖都导入进来?
-   开发什么场景,导入什么场景启动器。
-   maven依赖传递原则。A-B-C: A就拥有B和C
-   导入场景启动器,场景启动器自动把这个场景的所有核心依赖全部导入进来。

2、为什么版本号都不用写?
-   每个boot项目都有一个父项目`spring-boot-starter-parent`
-   parent的父项目是`spring-boot-dependencies`
-   父项目 **版本仲裁中心**,把所有常见的jar的依赖版本都声明好了。
自动配置机制
1.默认的包扫描规则
-   -   `@SpringBootApplication` 标注的类就是主程序类
    -   **SpringBoot只会扫描主程序所在的包及其下面的子包,自动的component-scan功能**
    -   **自定义扫描路径**
     @SpringBootApplication(scanBasePackages = "com.yry")
     @ComponentScan("com.yry")` 直接指定扫描的路径
2.配置默认值
    -   配置文件的所有配置项是和某个类的对象值进行一一绑定的。
    -   绑定了配置文件中每一项值的类:属性类。
比如:
 `ServerProperties`绑定了所有Tomcat服务器有关的配置
 `MultipartProperties`绑定了所有文件上传相关的配置
3.按需加载自动配置
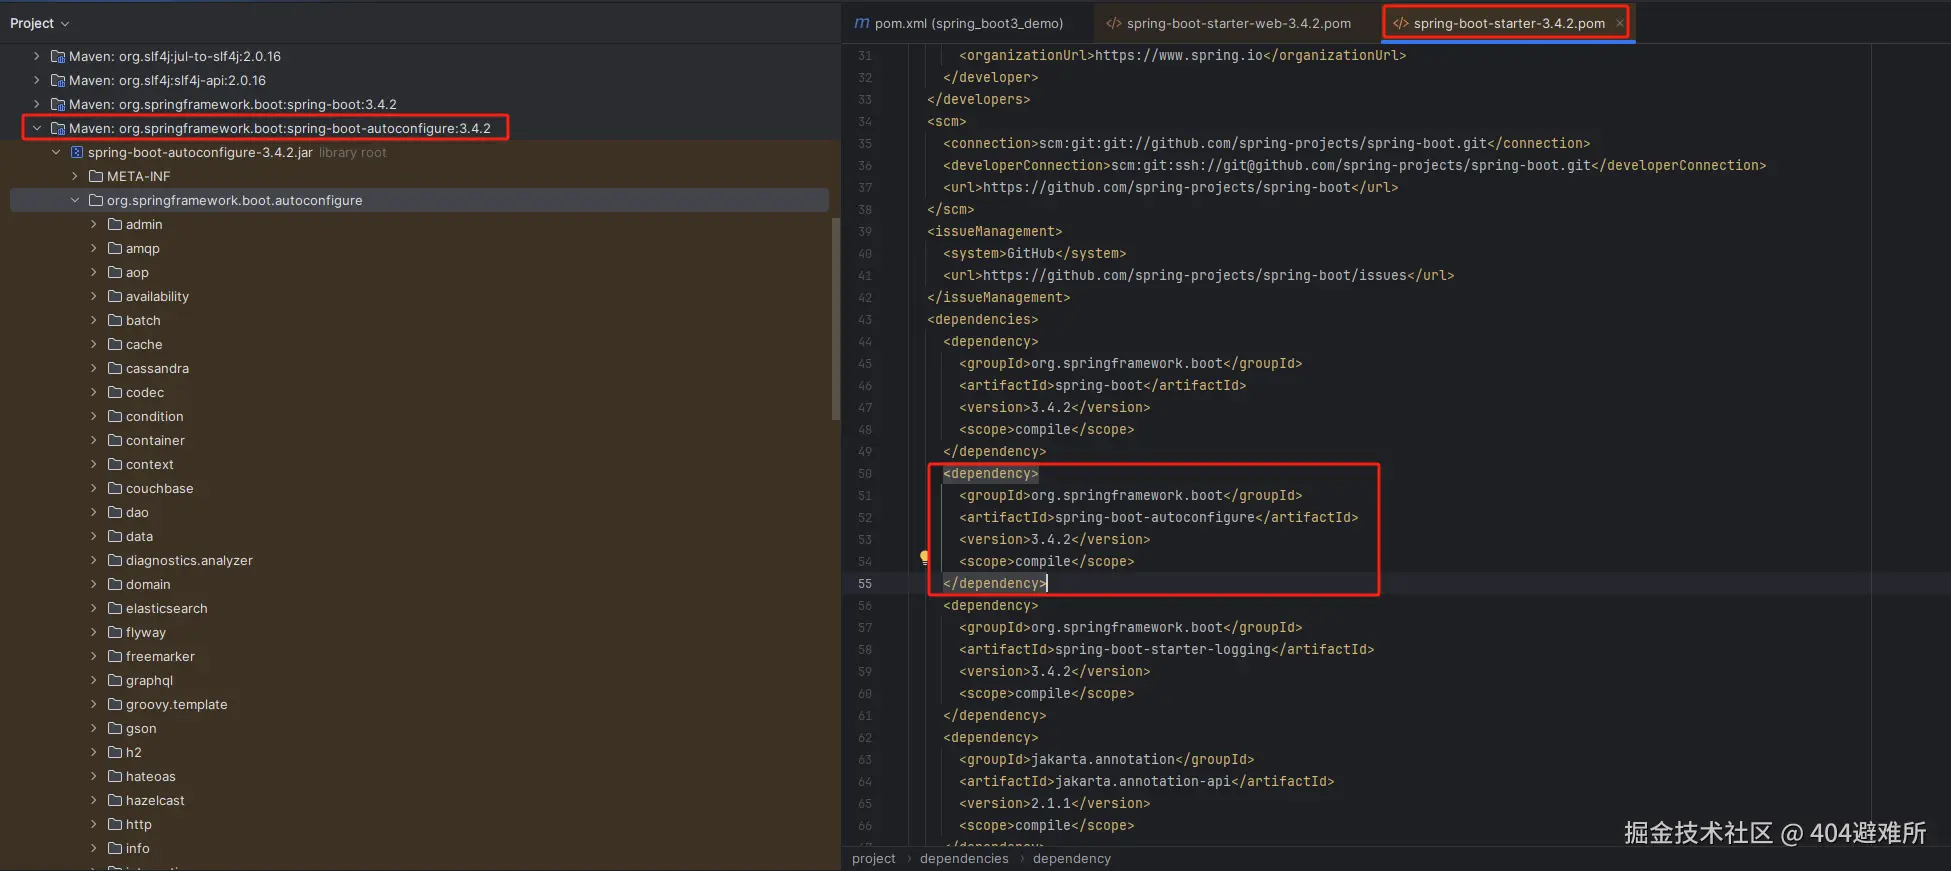
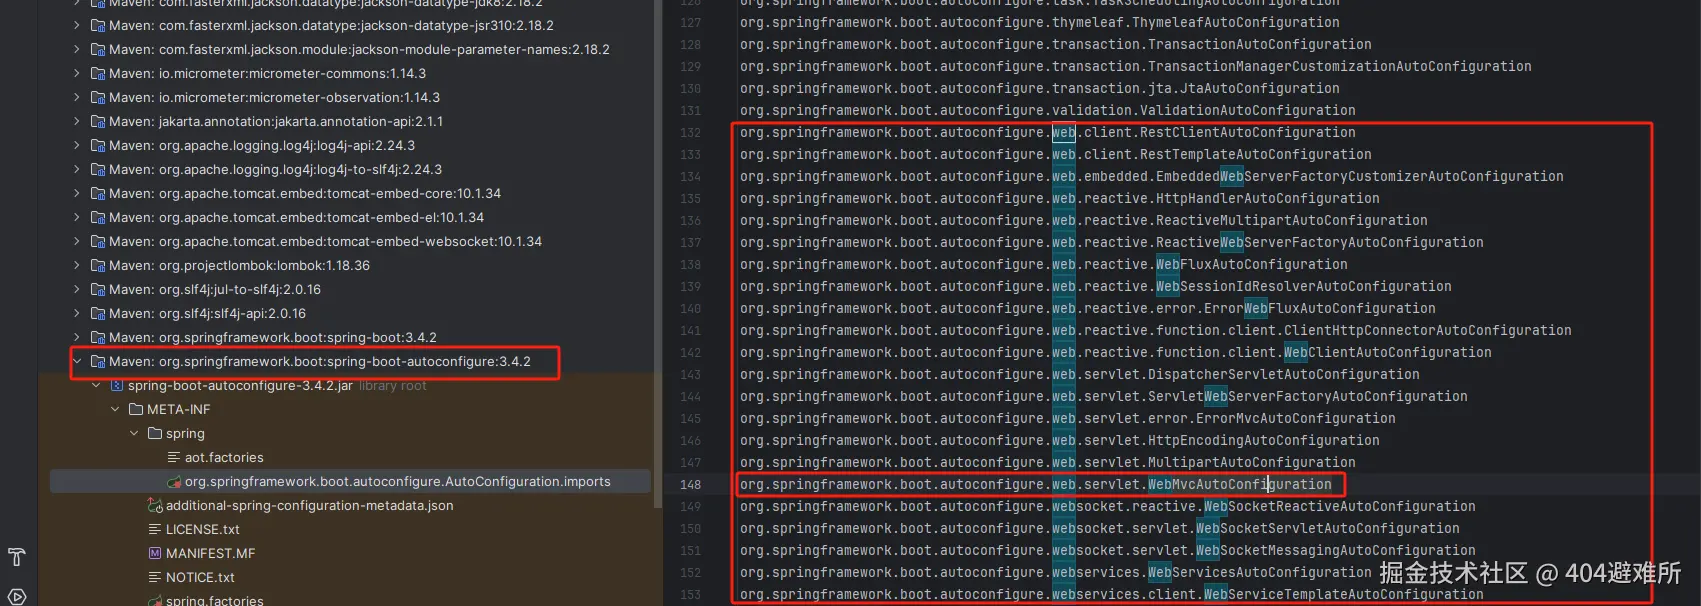
- 导入场景`spring-boot-starter-*`,场景启动器除了会导入相关功能依赖,还会导入一个`spring-boot-starter`,
是所有`starter`的`starter`,基础核心starter。 `spring-boot-starter`导入了一个包 `spring-boot-autoconfigure`。
包里面都是各种场景的`AutoConfiguration`自动配置类。
- 虽然全场景的自动配置都在 `spring-boot-autoconfigure`这个包,但是不是全都开启的。
**导入哪个场景就开启哪个自动配置,导入场景启动器触发 `spring-boot-autoconfigure`这个包的自动配置生
效、容器中就会具有相关场景的功能。
@SpringBootApplication注解
 @SpringBootApplication
`@SpringBootApplication`由三个注解组成`@SpringBootConfiguration`、`@EnableAutoConfiguratio`、
`@ComponentScan`

`@EnableAutoConfiguration`:SpringBoot开启自动配置的核心。
-   -   是由`@Import(AutoConfigurationImportSelector.class)`提供功能:批量给容器中导入组件。
    -   SpringBoot启动会默认加载 142个配置类。这142个配置类来自于`spring-boot-autoconfigure`下
        `METAINF/spring/org.springframework.boot.autoconfigure.AutoConfiguration.imports`文件指定的。
    -   项目启动的时候利用 @Import 批量导入组件机制把 `autoconfigure` 包下的142
        `xxxxAutoConfiguration`类导入进来(自动配置类)。虽然导入了`142`个自动配置类,但是并不是这
        `142`个自动配置类都能生效,每一个自动配置类,都有条件注解`@ConditionalOnxxx`,只有条件成
        立,才能生效。
`xxxxAutoConfiguration`**自动配置类**
每个自动配置类都可能有这个注解`@EnableConfigurationProperties(ServerProperties.class)`,用来把配
置文件中配的指定前缀的属性值封装到 `xxxProperties`属性类中。以Tomcat为例:把服务器的所有配置都是
以`server`开头的。配置都封装到了属性类中。给**容器**中放的所有组件的一些核心参数,都来自于
`xxxProperties` 。 `xxxProperties`都是和配置文件绑定。
条件注解
如果注解指定的条件成立,则触发指定行为
@ConditionalOnClass:如果类路径中存在这个类,则触发指定行为
@ConditionalOnMissingClass:如果类路径中不存在这个类,则触发指定行为
@ConditionalOnBean:如果容器中存在这个Bean(组件),则触发指定行为
@ConditionalOnMissingBean:如果容器中不存在这个Bean(组件),则触发指定行为
案列展示:
package com.yry.spring_boot3_demo.config;
import com.yry.spring_boot3_demo.bean.Cat;
import com.yry.spring_boot3_demo.bean.Dog;
import org.springframework.boot.SpringBootConfiguration;
import org.springframework.boot.autoconfigure.condition.ConditionalOnClass;
import org.springframework.boot.autoconfigure.condition.ConditionalOnMissingClass;
import org.springframework.context.annotation.Bean;
@SpringBootConfiguration
public class AppConfiguration {
@ConditionalOnClass(name = "com.yry.spring_boot3_demo.bean.User")
@Bean
public Cat cat(){
Cat cat = new Cat();
return cat;
}
@ConditionalOnMissingClass(value = "com.yry.spring_boot3_demo.bean.User")
@Bean
public Dog dog(){
Dog dog = new Dog();
return dog;
}
}
@SpringBootApplication
public class SpringBoot3DemoApplication {
public static void main(String[] args) {
ConfigurableApplicationContext run =
SpringApplication.run(SpringBoot3DemoApplication.class, args);
String[] cats = run.getBeanNamesForType(Cat.class);
for(String s :cats){
System.out.println("cat:"+s);
}
String[] dogs = run.getBeanNamesForType(Dog.class);
for(String s :dogs){
System.out.println("dog:"+s);
}
}
}
输出:cat:cat
其他条件注解
@ConditionalOnRepositoryType (org.springframework.boot.autoconfigure.data)
@ConditionalOnDefaultWebSecurity (org.springframework.boot.autoconfigure.security)
@ConditionalOnSingleCandidate (org.springframework.boot.autoconfigure.condition)
@ConditionalOnWebApplication (org.springframework.boot.autoconfigure.condition)
@ConditionalOnWarDeployment (org.springframework.boot.autoconfigure.condition)
@ConditionalOnJndi (org.springframework.boot.autoconfigure.condition)
@ConditionalOnResource (org.springframework.boot.autoconfigure.condition)
@ConditionalOnExpression (org.springframework.boot.autoconfigure.condition)
@ConditionalOnClass (org.springframework.boot.autoconfigure.condition)
@ConditionalOnEnabledResourceChain (org.springframework.boot.autoconfigure.web)
@ConditionalOnMissingClass (org.springframework.boot.autoconfigure.condition)
@ConditionalOnNotWebApplication (org.springframework.boot.autoconfigure.condition)
@ConditionalOnProperty (org.springframework.boot.autoconfigure.condition)
@ConditionalOnCloudPlatform (org.springframework.boot.autoconfigure.condition)
@ConditionalOnBean** (org.springframework.boot.autoconfigure.condition)
@ConditionalOnMissingBean (org.springframework.boot.autoconfigure.condition)
@ConditionalOnMissingFilterBean (org.springframework.boot.autoconfigure.web.servlet)
@Profile (org.springframework.context.annotation)
@ConditionalOnInitializedRestarter (org.springframework.boot.devtools.restart)
@ConditionalOnGraphQlSchema (org.springframework.boot.autoconfigure.graphql)
@ConditionalOnJava (org.springframework.boot.autoconfigure.condition)
属性绑定
@ConfigurationProperties: 声明组件的属性和配置文件哪些前缀开始项进行绑定
@EnableConfigurationProperties:快速注册注解
-场景:SpringBoot默认只扫描自己主程序所在的包。如果导入第三方包,即使组件上标注了 @Component、
@ConfigurationProperties 注解也没用。因为组件都扫描不进来,此时使用这个注解就可以快速进行属性绑定并
把组件注册进容器。
将容器中任意组件(Bean)的属性值和配置文件的配置项的值进行绑定
-  1、给容器中注册组件(@Component、@Bean)
-  2、使用@ConfigurationProperties 声明组件和配置文件的哪些配置项进行绑定
@ConfigurationProperties(prefix = "user")
@Component
public class User {
    private String userName;
    private int age;

    public String getUserName() {
        return userName;
    }
    public void setUserName(String userName) {
        this.userName = userName;
    }
    public int getAge() {
        return age;
    }
    public void setAge(int age) {
        this.age = age;
    }

    @Override
    public String toString() {
        return "User{" +
                "userName='" + userName + ''' +
                ", age=" + age +
                '}';
    }
}
application.properties
user.user-name=张三
user.age=18
@SpringBootApplication
public class SpringBoot3DemoApplication {

    public static void main(String[] args) {

        ConfigurableApplicationContext run =
                SpringApplication.run(SpringBoot3DemoApplication.class, args);

        User user = run.getBean(User.class);
        System.out.println(user.toString());
    }

}
输出:User{userName='张三', age=18}
@EnableConfigurationProperties:快速注册注解
@EnableConfigurationProperties(value = Dog.class)
@SpringBootConfiguration
public class AppConfiguration {
}
@ConfigurationProperties(prefix = "dog")
public class Dog {
private String name;
public String getName() {
return name;
}
public void setName(String name) {
this.name = name;
}
@Override
public String toString() {
return "Dog{" +
"name='" + name + ''' +
'}';
}
}
application.properties
dog.name=小黄
@SpringBootApplication
public class SpringBoot3DemoApplication {
public static void main(String[] args) {
ConfigurableApplicationContext run =
SpringApplication.run(SpringBoot3DemoApplication.class, args);
Dog dog = run.getBean(Dog.class);
System.out.println(dog.toString());
}
}
输出:Dog{name='小黄'}
复杂对象properties和yml表示法
@Component
@ConfigurationProperties(prefix = "person")
@Data
public class Person {
private String name;
private Integer age;
private Date birthDay;
private Boolean like;
private Child child;
private List<Dog> dogs;
private Map<String,Cat> cats;
}
@Data
public class Dog {
private String name;
private Integer age;
}
@Data
public class Child {
private String name;
private Integer age;
private Date birthDay;
private List<String> text;
}
@Data
public class Cat {
private String name;
private Integer age;
}
properties表示法
person.name=张三
person.age=18
person.birthDay=2010/10/12 12:12:12
person.like=true
person.child.name=李四
person.child.age=12
person.child.birthDay=2018/10/12
person.child.text[0]=abc
person.child.text[1]=def
person.dogs[0].name=小黑
person.dogs[0].age=3
person.dogs[1].name=小白
person.dogs[1].age=2
person.cats.c1.name=小蓝
person.cats.c1.age=3
person.cats.c2.name=小灰
person.cats.c2.age=2
yml表示法
person:
  name: 张三
  age: 18
  birthDay: 2010/10/10 12:12:12
  like: true
  child:
    name: 李四
    age: 20
    birthDay: 2018/10/10
    text: ["abc","def"]
  dogs:
    - name: 小黑
      age: 3
    - name: 小白
      age: 2
  cats:
    c1:
      name: 小蓝
      age: 3
    c2: {name: 小绿,age: 2} #对象也可用{}表示
细节注意:
**文本**:
-   **单引号**不会转义【\n 则为普通字符串显示】
-   **双引号**会转义【\n会显示为**换行符**】
**大文本**
-   `|`开头,大文本写在下层,保留文本格式,换行符正确显示
-   `>`开头,大文本写在下层,折叠换行符
**多文档合并**
-   使用`---`可以把多个yaml文档合并在一个文档中,每个文档区依然认为内容独立
日志配置
日志门面(接口)
JCL(Jakarta Commons Logging)
SLF4J(Simple Logging Facade)
jboss-logging

日志实现
Log4j
JUL(java.util.logging)
Log4j2
Logback
1.Spring使用commons-logging作为内部日志,但底层日志实现是开放的。可对接其他日志框架。
spring5及以后 commons-logging被spring直接自己写了。
2.支持 jul,log4j2,logback。SpringBoot 提供了默认的控制台输出配置,也可以配置输出为文件。
3.logback是默认使用的。
4.虽然日志框架很多,但是我们不用担心,使用 SpringBoot的默认配置就能工作的很好
SpringBoot怎么把日志默认配置好的
1、每个`starter`场景,都会导入一个核心场景`spring-boot-starter`
2、核心场景引入了日志的所用功能`spring-boot-starter-logging`
3、默认使用了`logback + slf4j` 组合作为默认底层日志
4、`日志是系统一启动就要用`,`xxxAutoConfiguration`是系统启动好了以后放好的组件,后来用的。
5、日志是利用**监听器机制**配置好的。`ApplicationListener`。
6、日志所有的配置都可以通过修改配置文件实现。以`logging`开始的所有配置。
日志格式
2023-03-31T13:56:17.511+08:00  INFO 4944 --- [           main] o.apache.catalina.core.StandardService   : Starting service [Tomcat]
2023-03-31T13:56:17.511+08:00  INFO 4944 --- [           main] o.apache.catalina.core.StandardEngine    : Starting Servlet engine: [Apache Tomcat/10.1.7]
默认输出格式:

-   时间和日期:毫秒级精度
-   日志级别:ERROR, WARN, INFO, DEBUG, or TRACE.
-   进程 ID
-   ---: 消息分割符
-   线程名: 使用[]包含
-   Logger 名: 通常是产生日志的**类名**
-   消息: 日志记录的内容

注意: logback 没有FATAL级别,对应的是ERROR
日志级别
-   由低到高:`ALL,TRACE, DEBUG, INFO, WARN, ERROR,FATAL,OFF`;

    -   只会打印指定级别及以上级别的日志
    -   ALL:打印所有日志
    -   TRACE:追踪框架详细流程日志,一般不使用
    -   DEBUG:开发调试细节日志
    -   INFO:关键、感兴趣信息日志
    -   WARN:警告但不是错误的信息日志,比如:版本过时
    -   ERROR:业务错误日志,比如出现各种异常
    -   FATAL:致命错误日志,比如jvm系统崩溃
    -   OFF:关闭所有日志记录

-   不指定级别的所有类,都使用root指定的级别作为默认级别
-   SpringBoot日志默认级别是INFO

1.  在application.properties/yaml中配置logging.level.<logger-name>=<level>指定日志级别
2.  level可取值范围:`TRACE, DEBUG, INFO, WARN, ERROR, FATAL, or OFF`,定义在 `LogLevel`类中
3.  root 的logger-name叫root,可以配置logging.level.root=warn,代表所有未指定日志级别都使用 root 的 warn 级别
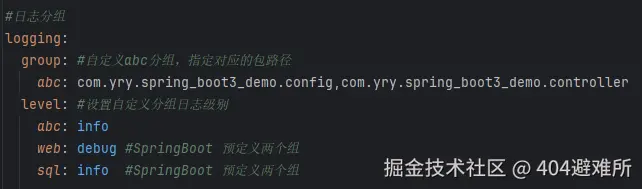
日志分组
将相关的logger分组在一起,统一配置。

#日志分组
logging:
  group: #自定义abc分组,指定对应的包路径
    abc: com.yry.spring_boot3_demo.config,com.yry.spring_boot3_demo.controller
  level: #设置自定义分组日志级别
    abc: info
SpringBoot 预定义两个组
Name | Loggers
| ---- | ------------------------------------------------------------------- |
| web  | org.springframework.core.codec
         org.springframework.http, org.springframework.web
         org.springframework.boot.actuate.endpoint.web
         org.springframework.boot.web.servlet.ServletContextInitializerBeans |
| sql  | org.springframework.jdbc.core
         org.hibernate.SQL, org.jooq.tools.LoggerListener
日志文件输出
SpringBoot 默认只把日志写在控制台,如果想额外记录到文件,可以在application.properties中添加
logging.file.name 或 logging.file.path配置项。

logging.file.name   | logging.file.path | 示例     | 效果
| ----------------- | ----------------- | -------- | ---------------------
| 未指定            | 未指定             |          | 仅控制台输出
| 指定              | 未指定             | my.log   | 写入指定文件。可以加路径
| 未指定            | 指定               | /var/log | 写入指定目录,文件名为spring.log(默认的名称为spring.log)
| 指定              | 指定               |          | 以logging.file.name为准
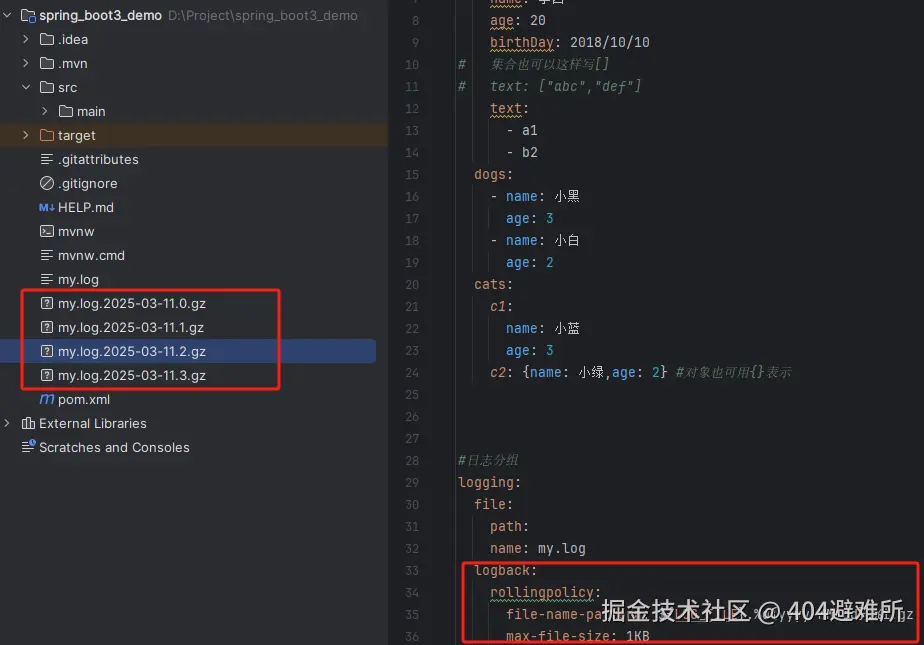
文件归档与滚动切割
归档:每天的日志单独存到一个文档中。
切割:每个文件10MB,超过大小切割成另外一个文件。
1.每天的日志应该独立分割出来存档。如果使用logback(SpringBoot 默认整合),可以通过
  application.properties/yaml文件指定日志滚动规则。
2.如果是其他日志系统,需要自行配置(添加log4j2.xml或log4j2-spring.xml)
3.支持的滚动规则设置如下
| 配置项 | 描述 |
|---|
| logging.logback.rollingpolicy.file-name-pattern | 日志存档的文件名格式(默认值:${LOG_FILE}.%d{yyyy-MM-dd}.%i.gz) |
| logging.logback.rollingpolicy.clean-history-on-start | 应用启动时是否清除以前存档(默认值:false) |
| logging.logback.rollingpolicy.max-file-size | 存档前,每个日志文件的最大大小(默认值:10MB) |
| logging.logback.rollingpolicy.total-size-cap | 日志文件被删除之前,可以容纳的最大大小(默认值:0B)。设置1GB则磁盘存储超过 1GB 日志后就会删除旧日志文件 |
| logging.logback.rollingpolicy.max-history | 日志文件保存的最大天数(默认值:7). |
自定义日志配置
| 日志系统 | 自定义 |
|---|
| Logback | logback-spring.xml 或 logback.xml |
| Log4j2 | log4j2-spring.xml 或 log4j2.xml |
| JDK(Java Util Logging) | logging.properties |
如果可能,我们建议您在⽇志配置中使⽤ -spring 变量(例如, logback-spring.xml ⽽
不是 logback.xml )。如果您使⽤标准配置⽂件,spring ⽆法完全控制⽇志初始化。
最佳实战:⾃⼰要写配置,配置⽂件名加上 xx-spring.xml
切换日志组合
使用log4j2就需要先移除默认logback日志框架,然后引入对应的log4j2-spring.xml配置文件,实现日志自定义配置。
<dependencies>
    <!-- web开发的场景启动器 -->
    <dependency>
        <groupId>org.springframework.boot</groupId>
        <artifactId>spring-boot-starter-web</artifactId>
    </dependency>
    <!-- 在starter中移除spring默认的logback日志-->
    <dependency>
        <groupId>org.springframework.boot</groupId>
        <artifactId>spring-boot-starter</artifactId>
        <exclusions>
            <exclusion>
                <groupId>org.springframework.boot</groupId>
                <artifactId>spring-boot-starter-logging</artifactId>
            </exclusion>
        </exclusions>
    </dependency>
</dependencies>
1. 导⼊任何第三⽅框架,先排除它的⽇志包,因为SpringBoot底层控制好了⽇志
2. 修改 application.properties 配置⽂件,就可以调整⽇志的所有⾏为。如果不够,可
以编写⽇志框架⾃⼰的配置⽂件放在类路径下就⾏,⽐如 logback-spring.xml、log4j2-spring.xml
SpringBoot3-web开发
SpringBoot的Web开发能力,由SpringMvc提供。

<dependency>
    <groupId>org.springframework.boot</groupId>
    <artifactId>spring-boot-starter-web</artifactId>
</dependency>
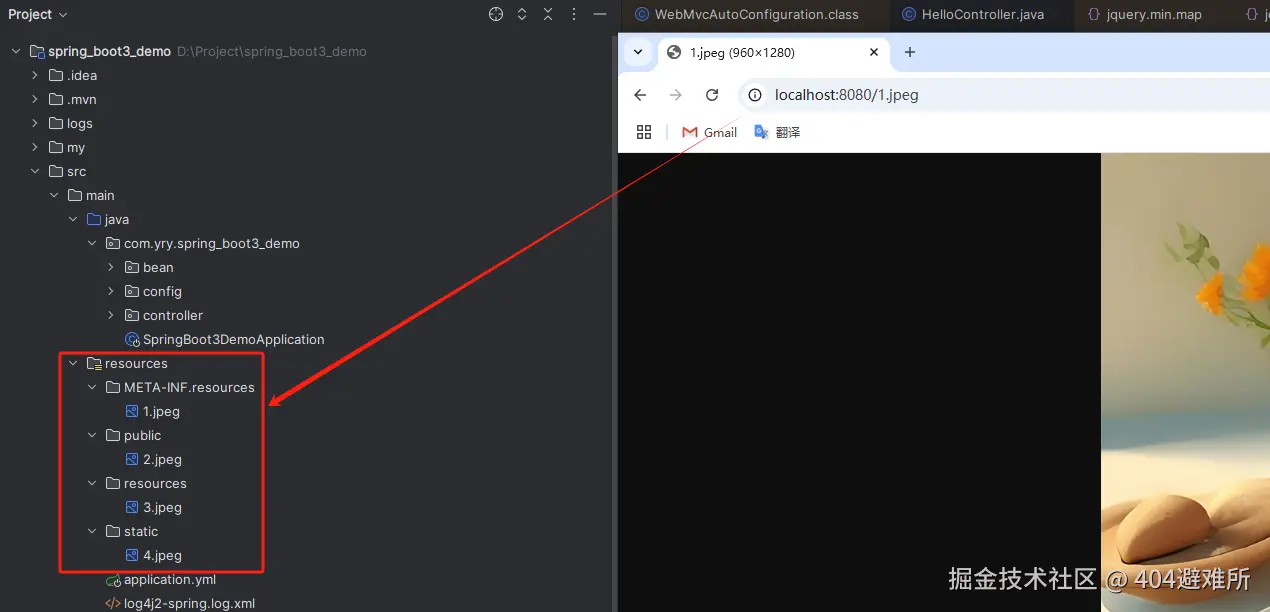
静态资源
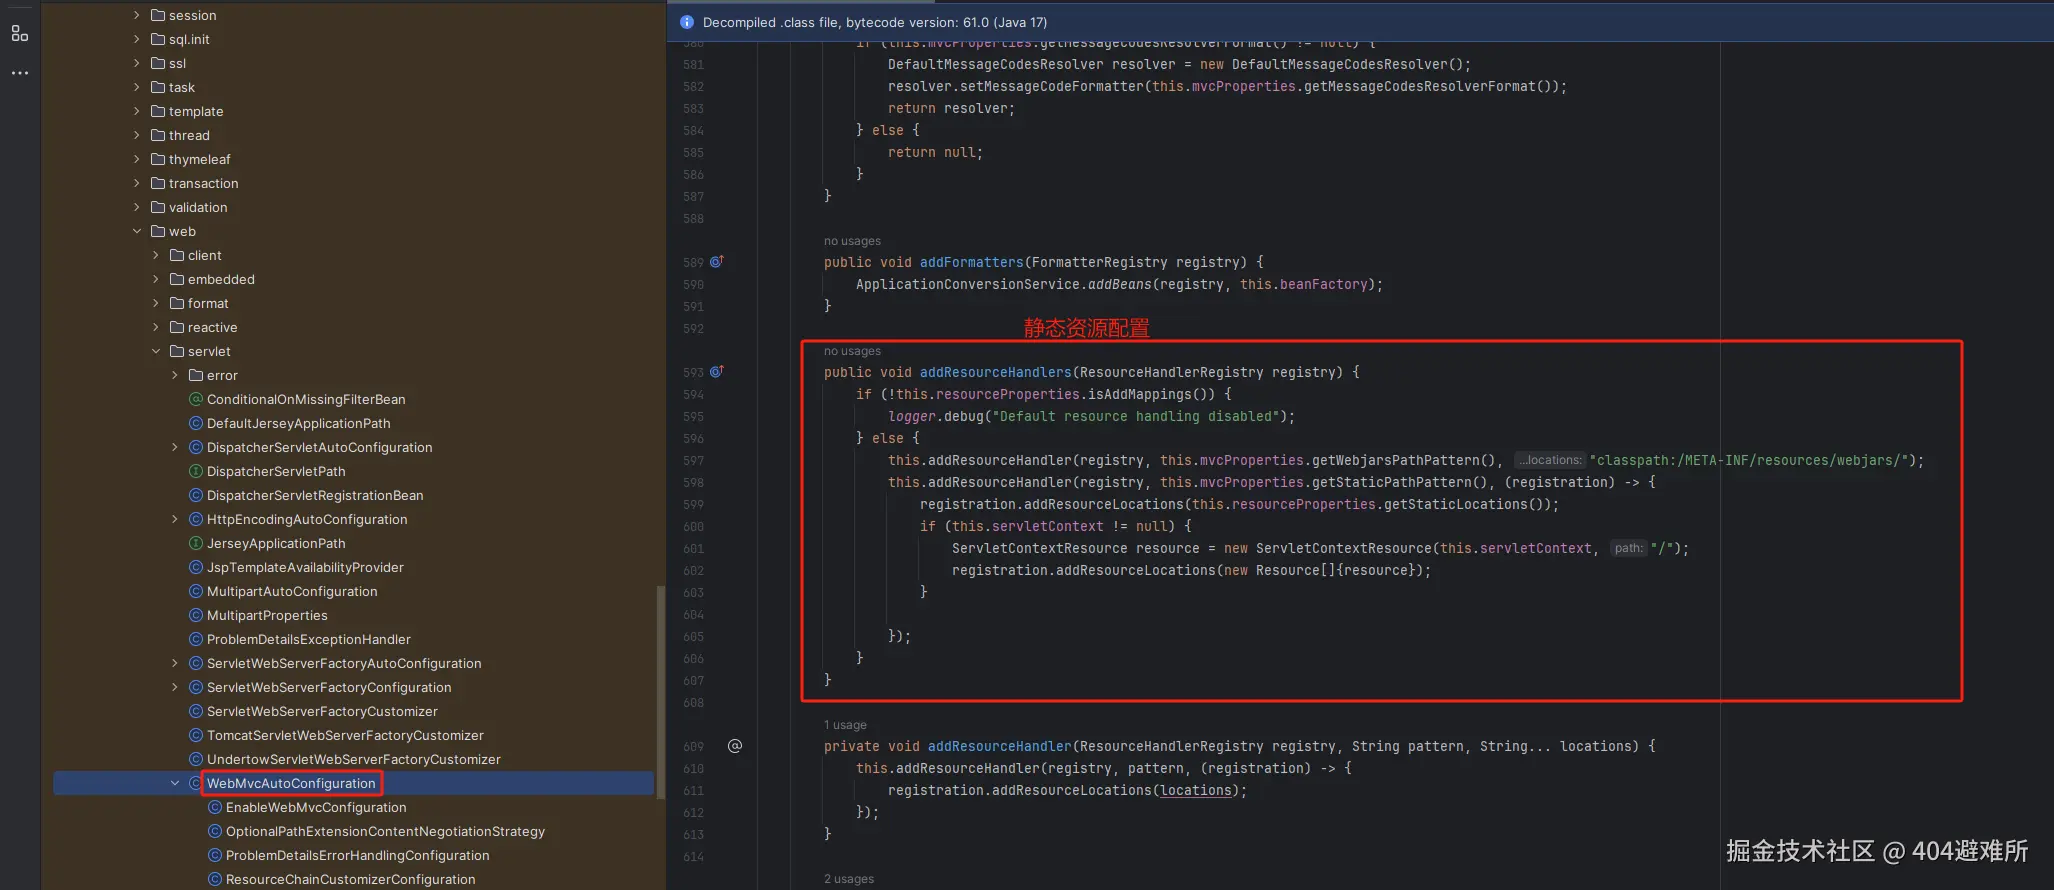
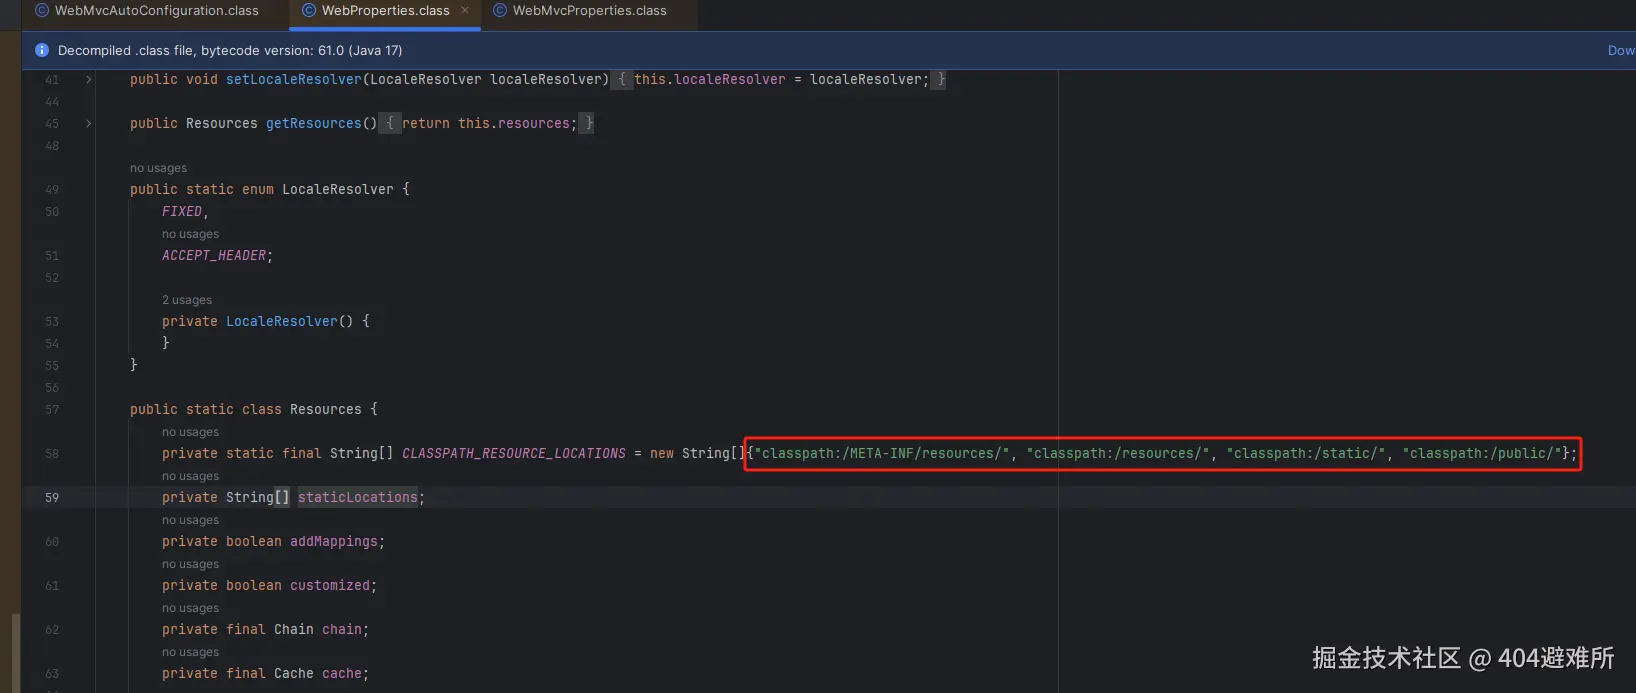
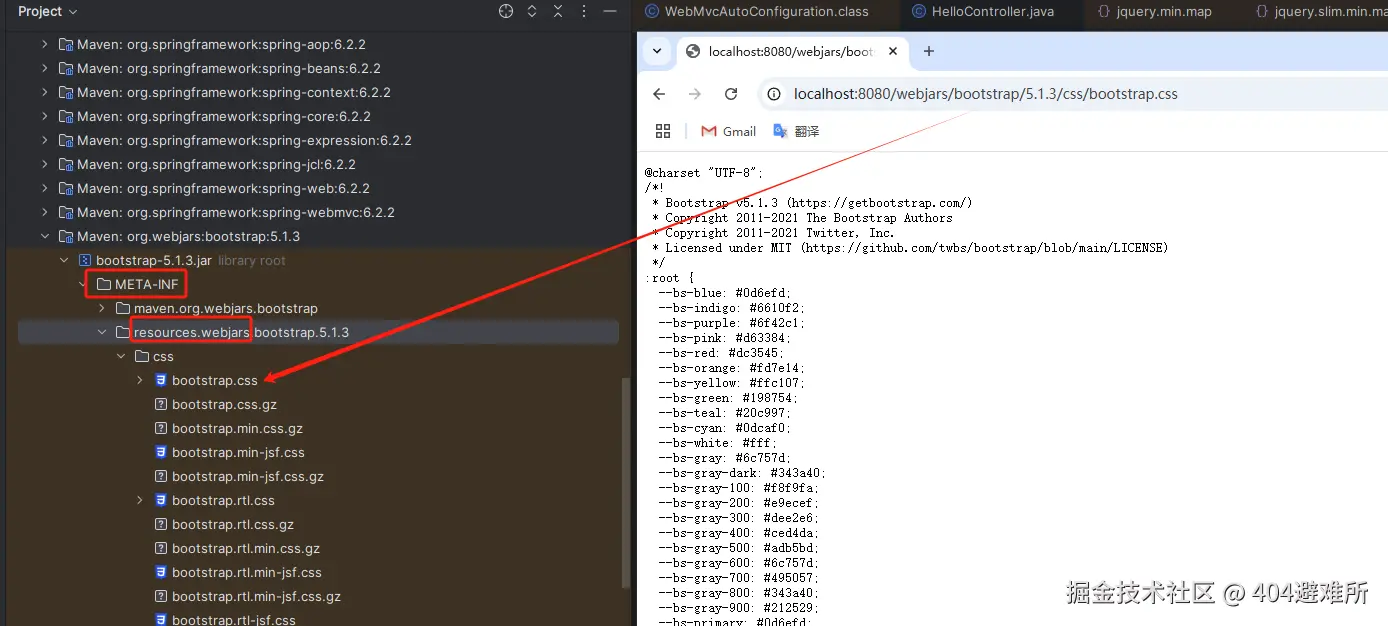
规则一:访问:/webjars/** 路径就去 classpath:/META-INF/resources/webjar
规则则⼆:访问:
自定义静态资源规则配置
#开启静态资源映射规则 默认true,false静态资源无法访问
spring.web.resources.add-mappings=true
#⾃定义webjars资源访问路径前缀
spring.mvc.webjars-path-pattern=/wj/**
#静态资源访问路径前缀,当开启前缀配置后,访问静态资源就必须带上前缀,否则无法访问
#http:
#http:
spring.mvc.static-path-pattern=/agent/**
#自定义静态资源文件路径
spring.web.resources.static-locations=classpath:/my/,classpath:/dwp/
Ant⻛格路径⽤法
Ant ⻛格的路径模式语法具有以下规则:
*:表示任意数量的字符。
?:表示任意⼀个字符。
**:表示任意数量的⽬录。
{}:表示⼀个命名的模式占位符。
[]:表示字符集合,例如[a-z]表示⼩写字⺟。
例如:
*.html 匹配任意名称,扩展名为.html的⽂件。
/folder1*.jsp 匹配在folder2⽬录下任意⽬录深度的.jsp⽂件。
/{type}/{id}.html 匹配任意⽂件名为{id}.html,在任意命名的{type}⽬录下的⽂件。
注意:Ant ⻛格的路径模式语法中的特殊字符需要转义,
如:
要匹配⽂件路径中的星号,则需要转义为\\*。
要匹配⽂件路径中的问号,则需要转义为\\?。
AntPathMatcher 与 PathPatternParser
PathPatternParser 在 jmh 基准测试下,有 6~8 倍吞吐量提升,降低 30%~40%空间分配 率
PathPatternParser 兼容 AntPathMatcher语法,并⽀持更多类型的路径模式
总结:
使⽤默认的路径匹配规则,是由 PathPatternParser 提供的。
# 改变路径匹配策略:
# ant_path_matcher ⽼版策略;
# path_pattern_parser 新版策略;
spring.mvc.pathmatch.matching-strategy=ant_path_matcher
多端内容适配
1.1. 基于请求头内容协商:(默认开启)
1.2. 客户端向服务端发送请求,携带HTTP标准的Accept请求头。
1.3. Accept: application/json 、 text/xml 、 text/yaml
1.4. 服务端根据客户端请求头期望的数据类型进⾏动态返回
2.1. 基于请求参数内容协商:(需要开启)
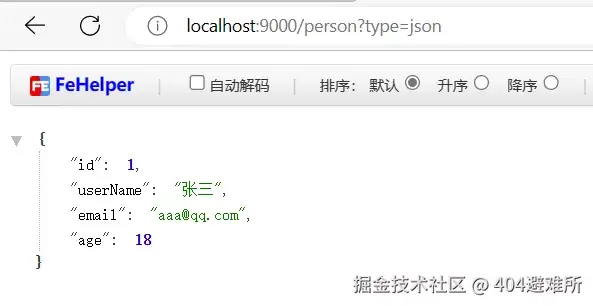
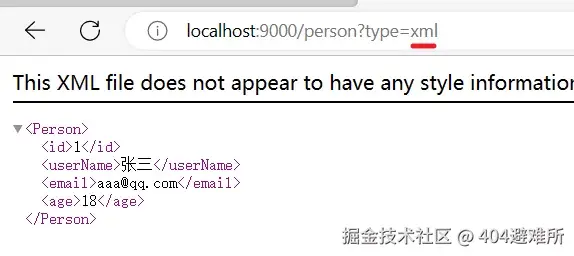
2.2. 发送请求 GET /xxx?format=json
2.3. 匹配到 @GetMapping("/xxx")
2.4. 根据参数协商,优先返回 json 类型数据【需要开启参数匹配设置】
2.5. 发送请求 GET /xxx?format=xml,优先返回 xml 类型数据
1. 引⼊⽀持写出xml内容依赖
<dependency>
<groupId>com.fasterxml.jackson.dataformat</groupId>
<artifactId>jackson-dataformat-xml</artifactId>
</dependency>
2.创建返回xml模型
@JacksonXmlRootElement
@Data public class Person {
private Long id;
private String userName;
private String email;
private Integer age;
}
3. 开启基于请求参数的内容协商
# 开启基于请求参数的内容协商功能。 默认参数名:format。 默认此功能不开启
spring.mvc.contentnegotiation.favor-parameter=true
# 指定内容协商时使⽤的参数名。默认是 format
spring.mvc.contentnegotiation.parameter-name=type