

创作不易,方便的话点点关注,谢谢
本文是经过严格查阅相关权威文献和资料,形成的专业的可靠的内容。全文数据都有据可依,可回溯。特别申明:数据和资料已获得授权。本文内容,不涉及任何偏颇观点,用中立态度客观事实描述事情本身。
文章结尾有最新热度的文章,感兴趣的可以去看看。
文章有点长(1500字阅读时长:3分),期望您能坚持看完,并有所收获
车牌识别(LPR)在计算机视觉领域是一个强大的工具,常用于自动收费、交通监控以及安全监控等应用场景。本篇文章将带你逐步构建一个使用Python、OpenCV以及Tesseract OCR的车牌识别系统。如果你对这些技术不太熟悉也不用担心,每个步骤都会详细讲解,以确保清晰易懂。
先决条件
要跟随本教程学习,你需要具备Python基础知识。你将安装一些必要的库,使用OpenCV进行图像处理,并利用Tesseract OCR从图像中提取文本。
所需库
pip install opencv-python-headless opencv-python opencv-contrib-python pytesseract ipywidgets matplotlib seaborn
项目概述
我们将使用OpenCV处理车牌图像,检测车牌区域,然后使用Tesseract OCR从中提取文本。该项目主要包含以下步骤:
-
加载车辆车牌图像。
-
对图像进行预处理(灰度转换、模糊处理、边缘检测)。
-
检测车牌区域。
-
使用OCR从车牌中提取文本。
-
展示结果,包括OCR准确率指标。
步骤一:加载并展示车牌图像
我们首先使用Python的PIL(Python Imaging Library,Python图像库)和URL相关库从URL加载图像,并将其转换为数组以便OpenCV进行处理。
import cv2
import pytesseract
import numpy as np
import matplotlib.pyplot as plt
from urllib.request import urlopen
from PIL importImage
import ipywidgets as widgets
fromIPython.display import display

# Load an image from a URL (replace with an appropriate dataset URL)
defload_image_from_url(url):
    response = urlopen(url)
    img =Image.open(response)
    img = np.array(img)
return img

# URL for a sample license plate image (replace with an actual dataset URL)
img_url ='https://upload.wikimedia.org/wikipedia/commons/1/14/FI_license_plate.jpg'
original_image = load_image_from_url(img_url)

# Display the image
plt.imshow(cv2.cvtColor(original_image, cv2.COLOR_BGR2RGB))
plt.title("Original Image")
plt.axis("off")
plt.show()

# Load an example image (using a sample dataset URL)
url ='https://upload.wikimedia.org/wikipedia/commons/1/14/FI_license_plate.jpg'
resp = urlopen(url)
image = np.asarray(bytearray(resp.read()), dtype="uint8")
image = cv2.imdecode(image, cv2.IMREAD_COLOR)
plt.imshow(cv2.cvtColor(image, cv2.COLOR_BGR2RGB))
plt.title("Sample License Plate Image")
plt.axis("off")
plt.show()
在上述代码中,load_image_from_url函数从URL获取图像,稍后我们将把它用于车牌识别模型。
步骤二:图像预处理
为了更高效地提取文本,我们将使用灰度转换、高斯模糊以及边缘检测对图像进行预处理。
# Convert image to grayscale
gray_image = cv2.cvtColor(image, cv2.COLOR_BGR2GRAY)
plt.imshow(gray_image, cmap="gray")
plt.title("Grayscale Image")
plt.axis("off")
plt.show()

# Apply Gaussian Blur
blurred_image = cv2.GaussianBlur(gray_image,(5,5),0)
plt.imshow(blurred_image, cmap="gray")
plt.title("Blurred Image")
plt.axis("off")
plt.show()

# Edge Detection using Canny
edged_image = cv2.Canny(blurred_image,30,150)
plt.imshow(edged_image, cmap="gray")
plt.title("Edge Detected Image")
plt.axis("off")
plt.show()
-
灰度转换:通过去除颜色通道简化图像处理过程。
-
高斯模糊:减少噪声,以便更好地检测轮廓。
-
边缘检测:有助于识别车牌的边缘。
步骤三:检测车牌区域
现在我们将通过查找轮廓来定位车牌区域。
# Find contours based on edged image
contours, _ = cv2.findContours(edged_image, cv2.RETR_TREE, cv2.CHAIN_APPROX_SIMPLE)
contours =sorted(contours, key=cv2.contourArea, reverse=True)[:10]
plate_contour =None

for contour in contours:
# Approximate the contour
    perimeter = cv2.arcLength(contour,True)
    approx = cv2.approxPolyDP(contour,0.02* perimeter,True)
iflen(approx)==4:# Looks for 4-sided polygon (rectangle)
        plate_contour = approx
break

# Draw contour on the image
detected_plate = image.copy()
if plate_contour isnotNone:
    cv2.drawContours(detected_plate,[plate_contour],-1,(0,255,0),3)

plt.imshow(cv2.cvtColor(detected_plate, cv2.COLOR_BGR2RGB))
plt.title("Detected License Plate")
plt.axis("off")
plt.show()
在这里,我们对轮廓进行近似处理,专门寻找四边形(也就是车牌的形状)。如果找到了,就在图像上突出显示它。
步骤四:使用Tesseract OCR提取文本
在分离出车牌区域后,我们将应用Tesseract OCR来读取上面的字符。
# Install Tesseract OCR
!sudo apt-get update
!sudo apt-get install -y tesseract-ocr
!pip install pytesseract

# Import libraries
import pytesseract
pytesseract.pytesseract.tesseract_cmd = '/usr/bin/tesseract'
Mask and crop the license plate area
mask = np.zeros_like(gray_image) cv2.drawContours(mask,[plate_contour],-1,255,-1) plate_image = cv2.bitwise_and(gray_image, gray_image, mask=mask)
x, y, w, h = cv2.boundingRect(plate_contour) cropped_plate = gray_image[y:y+h, x:x+w]
OCR on cropped license plate
plate_text = pytesseract.image_to_string(cropped_plate, config='--psm 8') print("Detected License Plate Text:", plate_text)
plt.imshow(cropped_plate, cmap="gray") plt.title(f"OCR Result: {plate_text.strip()}") plt.axis("off") plt.show()
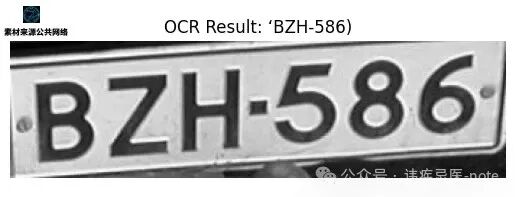
使用Tesseract,我们提取出车牌文本。在这里,`config='--psm 8'`这个配置参数可优化Tesseract,使其专注于单行文本的识别。
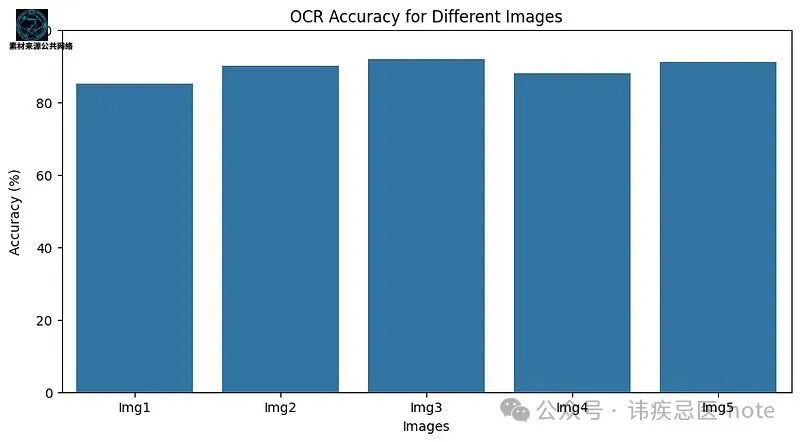
### 步骤五:展示OCR准确率仪表盘(仅作演示)
为了形成一个完整的解决方案,我们还要展示一个仪表盘,展示在多张图像上的OCR准确率情况。
import pandas as pd import seaborn as sns # Import seaborn
Sample DataFrame to simulate results
data ={ 'Image':['Img1','Img2','Img3','Img4','Img5'], 'OCR_Accuracy':[85,90,92,88,91] } df = pd.DataFrame(data)
Plot the dashboard
plt.figure(figsize=(10,5)) sns.barplot(x='Image', y='OCR_Accuracy', data=df) plt.title("OCR Accuracy for Different Images") plt.ylim(0,100) plt.xlabel("Images") plt.ylabel("Accuracy (%)") plt.show()
### 步骤六:使用ipywidgets创建交互式图形用户界面(GUI)
最后,我们将创建一个图形用户界面(GUI),以便实时反馈地测试模型。用户可以上传自己的图像,模型会在一个带有交互主题的较大窗口中展示预测结果。
import cv2 import numpy as np import matplotlib.pyplot as plt from urllib.request import urlopen from ipywidgets import interact, widgets,Layout,VBox,HBox fromIPython.display import display, clear_output
Sample images list
sample_images =[ "upload.wikimedia.org/wikipedia/c…", "upload.wikimedia.org/wikipedia/c…", "upload.wikimedia.org/wikipedia/c…", "upload.wikimedia.org/wikipedia/c…", "upload.wikimedia.org/wikipedia/c…" ]
Title and Developer Signature
title_label = widgets.HTML( value="
License Plate Recognition
", layout=Layout(width="100%") ) dev_signature = widgets.HTML( value="Created by AI Innovators
", layout=Layout(width="100%") )Prediction Output Label
prediction_output = widgets.HTML( value="", layout=Layout(width="100%", height="60px") )
Function to load and preprocess images for display
defload_image_from_url(url): resp = urlopen(url) image = np.asarray(bytearray(resp.read()), dtype="uint8") return cv2.imdecode(image, cv2.IMREAD_COLOR)
OCR function using Tesseract
defdetect_license_plate(image): gray_image = cv2.cvtColor(image, cv2.COLOR_BGR2GRAY) blurred_image = cv2.GaussianBlur(gray_image,(5,5),0) edged_image = cv2.Canny(blurred_image,30,150)
contours, _ = cv2.findContours(edged_image, cv2.RETR_TREE, cv2.CHAIN_APPROX_SIMPLE) contours =sorted(contours, key=cv2.contourArea, reverse=True)[:10] plate_contour =None
for contour in contours: perimeter = cv2.arcLength(contour,True) approx = cv2.approxPolyDP(contour,0.02* perimeter,True) iflen(approx)==4: plate_contour = approx break
mask = np.zeros_like(gray_image) if plate_contour isnotNone: cv2.drawContours(mask,[plate_contour],-1,255,-1) x, y, w, h = cv2.boundingRect(plate_contour) cropped_plate = gray_image[y:y+h, x:x+w]if plate_contour isnotNoneelse gray_image
Perform OCR on the cropped license plate
plate_text = pytesseract.image_to_string(cropped_plate, config='--psm 8').strip() return plate_text, cropped_plate
Display function
defdisplay_prediction(url): image = load_image_from_url(url) plate_text, cropped_plate = detect_license_plate(image)
Display the results in a stylized format
fig, ax = plt.subplots(1,2, figsize=(12,6)) ax[0].imshow(cv2.cvtColor(image, cv2.COLOR_BGR2RGB)) ax[0].set_title("Selected Image", fontsize=14, fontweight="bold") ax[0].axis("off")
ax[1].imshow(cropped_plate, cmap="gray") ax[1].set_title("License Plate Area", fontsize=14, fontweight="bold") ax[1].axis("off")
Show the prediction as highlighted text
prediction_output.value =f"
Predicted Text: {plate_text}
"plt.show()
Create a grid of sample images with buttons for selection
sample_buttons =[] for idx, img_url inenumerate(sample_images): button = widgets.Button( description=f"Sample {idx+1}", layout=Layout(width="19%", height="40px", margin="5px"), style={"button_color":"#4CAF50","font_weight":"bold","font_size":"14px"} )
Display the image upon clicking
defon_button_clicked(b, img_url=img_url): clear_output(wait=True) display(title_label, sample_buttons_box, upload_box, prediction_output, dev_signature) display_prediction(img_url)
button.on_click(on_button_clicked) sample_buttons.append(button)
sample_buttons_box =HBox(sample_buttons, layout=Layout(width="100%", justify_content="space-around"))
Option to upload an image through URL input
upload_widget = widgets.Text( placeholder='Enter image URL', description='Custom Image:', style={'description_width':'initial'}, layout=Layout(width='65%') ) display_button = widgets.Button( description="Process Uploaded Image", layout=Layout(width='30%', height='40px', margin="5px"), style={"button_color":"#FF4500","font_weight":"bold","font_size":"14px"} )
Display uploaded image upon clicking "Process Uploaded Image"
defon_upload_button_clicked(b): url = upload_widget.value if url: clear_output(wait=True) display(title_label, sample_buttons_box, upload_box, prediction_output, dev_signature) display_prediction(url)
display_button.on_click(on_upload_button_clicked)
upload_box =HBox([upload_widget, display_button], layout=Layout(width="100%", justify_content="space-around"))
Assemble the GUI layout and display

这段代码展示了不同图像上OCR准确率的可视化情况,有助于评估模型的性能。
### 常见问题解答
1. **什么是车牌识别(LPR)?**车牌识别是利用图像处理和OCR技术识别并读取车辆车牌的过程,在安全和交通应用领域广泛使用。
2. **为什么我们使用Tesseract OCR?**Tesseract是一款强大的开源OCR工具,能够准确地将图像中的文本转换为可读文本。它免费且得到广泛支持,非常适合车牌识别这类应用。
3. **这个项目能否扩展用于实时车牌识别?**可以,通过处理视频流以及采用更快的模型,你可以调整这段代码来处理实时车牌识别,适用于收费站和停车场管理等应用场景。
4. **影响OCR准确率的常见问题有哪些?**光线不佳、图像模糊或者背景嘈杂都可能降低OCR准确率。像模糊处理和边缘检测这类预处理步骤对于获取可靠的结果至关重要。
### 结论
本项目展示了如何使用Python、OpenCV以及Tesseract OCR构建一个简单的车牌识别(LPR)系统。你已经学习了加载和处理图像、分离车牌区域以及使用OCR提取文本的相关知识,为创建更复杂的计算机视觉应用奠定了基础。
如果你一直读到这儿,那谢谢你花时间读。希望你在阅读时能有收获。
以上就是我的分享。这些分析皆源自我的个人经验,希望上面分享的这些东西对大家有帮助,感谢大家!

**点个“在看”不失联**
参考文献:《图片来源公共网络》
> 本文使用 [文章同步助手](https://juejin.cn/post/6940875049587097631) 同步
