

创作不易,方便的话点点关注,谢谢
文章结尾有最新热度的文章,感兴趣的可以去看看。
本文是经过严格查阅相关权威文献和资料,形成的专业的可靠的内容。全文数据都有据可依,可回溯。特别申明:数据和资料已获得授权。本文内容,不涉及任何偏颇观点,用中立态度客观事实描述事情本身
文章有点长(12300字阅读时长:30分),期望您能坚持看完,并有所收获。
基于 C/C++、CUDA 和 Python 构建自己的深度学习框架,并支持 GPU 和自动区分功能。 多年来,我一直使用 PyTorch 来构建和训练深度学习模型。尽管我已经学会了它的语法和规则,但有些事情总是引起我的好奇:在这些操作过程中,内部发生了什么?这一切是如何进行的? 如果你来到这里,你可能也有同样的问题。如果我问你如何在 PyTorch 中创建和训练一个模型,你可能会想到与下面代码类似的东西:
import torch
import torch.nn as nn
import torch.optim as optim

classMyModel(nn.Module):
def__init__(self):
super(MyModel, self).__init__()
        self.fc1 = nn.Linear(1,10)
        self.sigmoid = nn.Sigmoid()
        self.fc2 = nn.Linear(10,1)

defforward(self, x):
        out = self.fc1(x)
        out = self.sigmoid(out)
        out = self.fc2(out)

return out

...

model =MyModel().to(device)
criterion = nn.MSELoss()
optimizer = optim.SGD(model.parameters(), lr=0.001)

for epoch inrange(epochs):
for x, y in...

        x = x.to(device)
        y = y.to(device)

        outputs = model(x)
        loss = criterion(outputs, y)

        optimizer.zero_grad()
        loss.backward()
        optimizer.step()
但是,如果我问你这个后退步骤是如何工作的呢?或者,举个例子,当你重塑一个张量时会发生什么?数据在内部重新排列了吗?这是如何发生的?PyTorch 为什么这么快?PyTorch 如何处理 GPU 操作?这些问题一直困扰着我,我想它们也困扰着你。因此,为了更好地理解这些概念,还有什么比从头开始构建自己的张量库更好的呢?这就是你将在本文中学到的!
1、Tensor
要构建一个张量库,首先需要学习的概念显然是:什么是张量? 你可能有一个直观的概念,即张量是一个包含一些数字的 n 维数据结构的数学概念。但在这里,我们需要了解如何从计算角度为这种数据结构建模。我们可以认为张量由数据本身和一些描述张量各方面的元数据组成,例如张量的形状或张量所在的设备(如 CPU 内存、GPU 内存......)。
还有一种不太流行的元数据,你可能从未听说过,叫做 stride。这个概念对于理解张量数据重排的内部结构非常重要,因此我们需要对它多做一些讨论。想象一个形状为 [4, 8] 的二维张量,如下图所示。
张量的数据(即浮点数)实际上是以一维数组的形式存储在内存中的:
因此,为了将这个一维数组表示为 N 维张量,我们使用了跨步。其基本思想如下:我们有一个 4 行 8 列的矩阵。考虑到矩阵的所有元素都在一维数组上按行排列,如果我们要访问位置 [2, 3] 上的值,就需要遍历 2 行(每行 8 个元素)加 3 个位置。用数学术语来说,我们需要遍历一维数组上的 3 + 2 * 8 个元素:
因此,这个 "8 "就是第二个维度的跨距。在这种情况下,它就是我需要遍历数组中多少个元素才能 "跳转 "到第二个维度上其他位置的信息。
因此,要访问形状为 [shape_0, shape_1] 的二维张量中的元素 [i, j],我们基本上需要访问位置为 j + i * shape_1 的元素。现在,让我们想象一个三维张量:
你可以把这个三维张量看作是一个矩阵序列。例如,你可以把 [5, 4, 8] 张量看作 5 个形状为 [4, 8] 的矩阵。
现在,为了访问位置 [1, 2, 7] 上的元素,需要遍历形状 [4,8] 的 1 个完整矩阵、形状 [8] 的 2 行和形状 [1] 的 7 列。因此,您需要遍历一维数组上的 (1 * 4 * 8) + (2 * 8) + (7 * 1) 个位置。
因此,要访问一维数据数组中带有 [shape_0,shape_1,shape_2] 的三维张量元素 [i][j][k],就必须这样做:
其中 shape_1 * shape_2 是第一个维度的跨距,shape_2 是第二个维度的跨距,1 是第三个维度的跨距。然后,为了概括
其中,每个维度的步长可以通过下一维度张量形状的乘积来计算:
然后,我们设置 stride[n-1] = 1。
在形状为 [5, 4, 8] 的张量示例中,我们可以得到步长 = [4*8, 8, 1] = [32, 8, 1] 。您可以自行测试:
import torch

torch.rand([5, 4, 8]).stride()
#(32, 8, 1)
好吧,但我们为什么需要形状和步长呢?除了访问存储为一维数组的 N 维张量元素外,这一概念还可用于轻松操作张量排列。
例如,要重塑一个张量,只需设置新的形状,然后根据它计算新的步长!(因为新形状能保证元素数量不变)
import torch

t = torch.rand([5,4,8])

print(t.shape)
# [5, 4, 8]

print(t.stride())
# [32, 8, 1]

new_t= t.reshape([4,5,2,2,2])

print(new_t.shape)
# [4, 5, 2, 2, 2]

print(new_t.stride())
# [40, 8, 4, 2, 1]
在内部,张量仍然存储为相同的一维数组。重塑方法没有改变数组中元素的顺序!太神奇了,不是吗?😁
您可以使用以下函数访问 PyTorch 的内部一维数组来自行验证:
import ctypes

defprint_internal(t: torch.Tensor):
print(
        torch.frombuffer(
            ctypes.string_at(t.data_ptr(), t.storage().nbytes()), dtype=t.dtype
)
)

print_internal(t)
# [0.0752, 0.5898, 0.3930, 0.9577, 0.2276, 0.9786, 0.1009, 0.138, ...

print_internal(new_t)
# [0.0752, 0.5898, 0.3930, 0.9577, 0.2276, 0.9786, 0.1009, 0.138, ...
例如,您想对两个轴进行转置。在内部,您只需交换各自的步长!
t = torch.arange(0,24).reshape(2,3,4)
print(t)
# [[[ 0,  1,  2,  3],
#   [ 4,  5,  6,  7],
#   [ 8,  9, 10, 11]],

#  [[12, 13, 14, 15],
#   [16, 17, 18, 19],
#   [20, 21, 22, 23]]]

print(t.shape)
# [2, 3, 4]

print(t.stride())
# [12, 4, 1]

new_t= t.transpose(0,1)
print(new_t)
# [[[ 0,  1,  2,  3],
#   [12, 13, 14, 15]],

#  [[ 4,  5,  6,  7],
#   [16, 17, 18, 19]],

#  [[ 8,  9, 10, 11],
#   [20, 21, 22, 23]]]

print(new_t.shape)
# [3, 2, 4]

print(new_t.stride())
# [4, 12, 1]
如果打印内部数组,两者的值相同:
print_internal(t)
# [ 0,  1,  2,  3,  4,  5,  6,  7,  8,  9, 10, 11, 12, 13, 14, 15, 16, 17, 18, 19, 20, 21, 22, 23]

print_internal(new_t)
# [ 0,  1,  2,  3,  4,  5,  6,  7,  8,  9, 10, 11, 12, 13, 14, 15, 16, 17, 18, 19, 20, 21, 22, 23]
但是,现在 new_t 的跨距与我上面展示的等式不符。这是因为现在的张量不是连续的。这意味着,虽然内部数组保持不变,但内存中数值的顺序与张量的实际顺序并不一致。
t.is_contiguous()
# True

new_t.is_contiguous()
# False
这意味着依次访问非连续元素的效率较低(因为内存中的实张量元素不是依次排序的)。为了解决这个问题,我们可以这样做
new_t_contiguous = new_t.contiguous()

print(new_t_contiguous.is_contiguous())
# True
如果我们对内部数组进行分析,它的顺序现在与实际的张量顺序相匹配,可以提供更好的内存访问效率:
print(new_t)
# [[[ 0,  1,  2,  3],
#   [12, 13, 14, 15]],

#  [[ 4,  5,  6,  7],
#   [16, 17, 18, 19]],

#  [[ 8,  9, 10, 11],
#   [20, 21, 22, 23]]]

print_internal(new_t)
# [ 0,  1,  2,  3,  4,  5,  6,  7,  8,  9, 10, 11, 12, 13, 14, 15, 16, 17, 18, 19, 20, 21, 22, 23]

print_internal(new_t_contiguous)
# [ 0,  1,  2,  3, 12, 13, 14, 15,  4,  5,  6,  7, 16, 17, 18, 19,  8,  9, 10, 11, 20, 21, 22, 23]
现在,我们已经了解了张量的建模方式,让我们开始创建我们的库吧! 我将把它命名为 Norch,代表 NOT PyTorch,同时也暗指我的姓氏 Nogueira 😁。首先要知道的是,虽然 PyTorch 是通过 Python 来使用的,但其内部运行的是 C/C++。因此,我们首先要创建内部的 C/C++ 函数。我们可以先将张量定义为一个结构体来存储其数据和元数据,然后创建一个函数来将其实例化:
//norch/csrc/tensor.cpp

#include <stdio.h>
#include <stdlib.h>
#include <string.h>
#include <math.h>

typedef struct {
float* data;
int* strides;
int* shape;
int ndim;
int size;
    char* device;
}Tensor;

Tensor* create_tensor(float* data,int* shape,int ndim){

Tensor* tensor =(Tensor*)malloc(sizeof(Tensor));
if(tensor == NULL){
        fprintf(stderr,"Memory allocation failed\n");
        exit(1);
}
    tensor->data = data;
    tensor->shape = shape;
    tensor->ndim = ndim;

    tensor->size =1;
for(int i =0; i < ndim; i++){
        tensor->size *= shape[i];
}

    tensor->strides =(int*)malloc(ndim * sizeof(int));
if(tensor->strides == NULL){
        fprintf(stderr,"Memory allocation failed\n");
        exit(1);
}
int stride =1;
for(int i = ndim -1; i >=0; i--){
        tensor->strides[i]= stride;
        stride *= shape[i];
}

return tensor;
}
为了访问某个元素,我们可以利用步长,正如我们之前所学的那样:
//norch/csrc/tensor.cpp

float get_item(Tensor* tensor,int* indices){
int index =0;
for(int i =0; i < tensor->ndim; i++){
        index += indices[i]* tensor->strides[i];
}

float result;
    result = tensor->data[index];

return result;
}
现在,我们可以创建张量运算。我将展示一些示例,你可以在本文末尾链接的软件仓库中找到完整版本。
//norch/csrc/cpu.cpp

void add_tensor_cpu(Tensor* tensor1,Tensor* tensor2,float* result_data){

for(int i =0; i < tensor1->size; i++){
        result_data[i]= tensor1->data[i]+ tensor2->data[i];
}
}

void sub_tensor_cpu(Tensor* tensor1,Tensor* tensor2,float* result_data){

for(int i =0; i < tensor1->size; i++){
        result_data[i]= tensor1->data[i]- tensor2->data[i];
}
}

void elementwise_mul_tensor_cpu(Tensor* tensor1,Tensor* tensor2,float* result_data){

for(int i =0; i < tensor1->size; i++){
        result_data[i]= tensor1->data[i]* tensor2->data[i];
}
}

void assign_tensor_cpu(Tensor* tensor,float* result_data){

for(int i =0; i < tensor->size; i++){
        result_data[i]= tensor->data[i];
}
}

...
之后,我们就可以创建其他张量函数,调用这些操作:
//norch/csrc/tensor.cpp

Tensor* add_tensor(Tensor* tensor1,Tensor* tensor2){
if(tensor1->ndim != tensor2->ndim){
        fprintf(stderr,"Tensors must have the same number of dimensions %d and %d for addition\n", tensor1->ndim, tensor2->ndim);
        exit(1);
}

int ndim = tensor1->ndim;
int* shape =(int*)malloc(ndim * sizeof(int));
if(shape == NULL){
        fprintf(stderr,"Memory allocation failed\n");
        exit(1);
}

for(int i =0; i < ndim; i++){
if(tensor1->shape[i]!= tensor2->shape[i]){
            fprintf(stderr,"Tensors must have the same shape %d and %d at index %d for addition\n", tensor1->shape[i], tensor2->shape[i], i);
            exit(1);
}
        shape[i]= tensor1->shape[i];
}
float* result_data =(float*)malloc(tensor1->size * sizeof(float));
if(result_data == NULL){
        fprintf(stderr,"Memory allocation failed\n");
        exit(1);
}
    add_tensor_cpu(tensor1, tensor2, result_data);

return create_tensor(result_data, shape, ndim, device);
}
如前所述,张量重塑不会修改内部数据数组:
//norch/csrc/tensor.cpp

Tensor* reshape_tensor(Tensor* tensor,int* new_shape,int new_ndim){

int ndim = new_ndim;
int* shape =(int*)malloc(ndim * sizeof(int));
if(shape == NULL){
        fprintf(stderr,"Memory allocation failed\n");
        exit(1);
}

for(int i =0; i < ndim; i++){
        shape[i]= new_shape[i];
}

//Calculate the total number of elements in the new shape
int size =1;
for(int i =0; i < new_ndim; i++){
        size *= shape[i];
}

//Checkif the total number of elements matches the current tensor's size
    if (size != tensor->size) {
        fprintf(stderr, "Cannot reshape tensor. Total number of elements in new shape does not match the current size of the tensor.\n");
        exit(1);
    }

    float* result_data = (float*)malloc(tensor->size * sizeof(float));
    if (result_data == NULL) {
        fprintf(stderr, "Memory allocation failed\n");
        exit(1);
    }
    assign_tensor_cpu(tensor, result_data);
    return create_tensor(result_data, shape, ndim, device);
}
虽然我们现在可以进行一些张量运算,但没人愿意用 C/C++ 运行它,不是吗?让我们开始构建 Python 封装程序!
使用 Python 运行 C/C++ 代码有很多选择,例如 Pybind11 和 Cython。在我们的例子中,我将使用 ctypes。
ctypes 的基本结构如下所示:
//C code
#include <stdio.h>

float add_floats(float a, float b) {
    return a + b;
}
Compile
gcc -shared -o add_floats.so -fPIC add_floats.c
# Python code
import ctypes

# Load the shared library
lib = ctypes.CDLL('./add_floats.so')

# Define the argument and return types for the function
lib.add_floats.argtypes =[ctypes.c_float, ctypes.c_float]
lib.add_floats.restype = ctypes.c_float

# Convert python float to c_float type
a = ctypes.c_float(3.5)
b = ctypes.c_float(2.2)

# Call the C function
result = lib.add_floats(a, b)
print(result)
# 5.7
```

正如您所看到的,它非常直观。编译完 C/C++ 代码后,您就可以在 Python 上使用 ctypes 了。您只需定义函数的参数和返回 c\_types,将变量转换为相应的 c\_types,然后调用函数。对于更复杂的类型,如数组(浮点列表),您可以使用指针。

```
data = [1.0, 2.0, 3.0]
data_ctype = (ctypes.c_float * len(data))(*data)

lib.some_array_func.argstypes = [ctypes.POINTER(ctypes.c_float)]

...

lib.some_array_func(data)
```

对于结构类型,我们可以创建自己的 c\_type:

```
class CustomType(ctypes.Structure):
    _fields_ = [
        ('field1', ctypes.POINTER(ctypes.c_float)),
        ('field2', ctypes.POINTER(ctypes.c_int)),
        ('field3', ctypes.c_int),
    ]

# Can be used as ctypes.POINTER(CustomType)
```

简要说明之后,让我们为张量 C/C++ 库构建 Python 封装!

```
# norch/tensor.py

import ctypes

classCTensor(ctypes.Structure):
    _fields_ =[
('data', ctypes.POINTER(ctypes.c_float)),
('strides', ctypes.POINTER(ctypes.c_int)),
('shape', ctypes.POINTER(ctypes.c_int)),
('ndim', ctypes.c_int),
('size', ctypes.c_int),
]

classTensor:
    os.path.abspath(os.curdir)
    _C = ctypes.CDLL("COMPILED_LIB.so"))

def__init__(self):

        data, shape = self.flatten(data)
        self.data_ctype =(ctypes.c_float *len(data))(*data)
        self.shape_ctype =(ctypes.c_int *len(shape))(*shape)
        self.ndim_ctype = ctypes.c_int(len(shape))

        self.shape = shape
        self.ndim =len(shape)

Tensor._C.create_tensor.argtypes =[ctypes.POINTER(ctypes.c_float), ctypes.POINTER(ctypes.c_int), ctypes.c_int]
Tensor._C.create_tensor.restype = ctypes.POINTER(CTensor)

        self.tensor =Tensor._C.create_tensor(
            self.data_ctype,
            self.shape_ctype,
            self.ndim_ctype,
)

defflatten(self, nested_list):
"""
        This method simply convert a list type tensor to a flatten tensor with its shape

        Example:

        Arguments:
            nested_list: [[1, 2, 3], [-5, 2, 0]]
        Return:
            flat_data: [1, 2, 3, -5, 2, 0]
            shape: [2, 3]
        """
defflatten_recursively(nested_list):
            flat_data =[]
            shape =[]
ifisinstance(nested_list,list):
for sublist in nested_list:
                    inner_data, inner_shape = flatten_recursively(sublist)
                    flat_data.extend(inner_data)
                shape.append(len(nested_list))
                shape.extend(inner_shape)
else:
                flat_data.append(nested_list)
return flat_data, shape

        flat_data, shape = flatten_recursively(nested_list)
return flat_data, shape
```

现在,我们加入 Python 张量运算,以调用 C/C++ 运算。

```
# norch/tensor.py

def__getitem__(self, indices):
"""
    Access tensor by index tensor[i, j, k...]
    """

iflen(indices)!= self.ndim:
raiseValueError("Number of indices must match the number of dimensions")

Tensor._C.get_item.argtypes =[ctypes.POINTER(CTensor), ctypes.POINTER(ctypes.c_int)]
Tensor._C.get_item.restype = ctypes.c_float

    indices =(ctypes.c_int *len(indices))(*indices)
    value =Tensor._C.get_item(self.tensor, indices)

return value

defreshape(self, new_shape):
"""
    Reshape tensor
    result = tensor.reshape([1,2])
    """
    new_shape_ctype =(ctypes.c_int *len(new_shape))(*new_shape)
    new_ndim_ctype = ctypes.c_int(len(new_shape))

Tensor._C.reshape_tensor.argtypes =[ctypes.POINTER(CTensor), ctypes.POINTER(ctypes.c_int), ctypes.c_int]
Tensor._C.reshape_tensor.restype = ctypes.POINTER(CTensor)
    result_tensor_ptr =Tensor._C.reshape_tensor(self.tensor, new_shape_ctype, new_ndim_ctype)

    result_data =Tensor()
    result_data.tensor = result_tensor_ptr
    result_data.shape = new_shape.copy()
    result_data.ndim =len(new_shape)
    result_data.device = self.device

return result_data

def__add__(self, other):
"""
    Add tensors
    result = tensor1 + tensor2
    """

if self.shape != other.shape:
raiseValueError("Tensors must have the same shape for addition")

Tensor._C.add_tensor.argtypes =[ctypes.POINTER(CTensor), ctypes.POINTER(CTensor)]
Tensor._C.add_tensor.restype = ctypes.POINTER(CTensor)

    result_tensor_ptr =Tensor._C.add_tensor(self.tensor, other.tensor)

    result_data =Tensor()
    result_data.tensor = result_tensor_ptr
    result_data.shape = self.shape.copy()
    result_data.ndim = self.ndim
    result_data.device = self.device

return result_data

# Include the other operations:
# __str__
# __sub__ (-)
# __mul__ (*)
# __matmul__ (@)
# __pow__ (**)
# __truediv__ (/)
# log
# ...
```

如果你到了这里,现在就可以运行代码,开始进行一些张量运算了!

```
import norch

tensor1 = norch.Tensor([[1,2,3],[3,2,1]])
tensor2 = norch.Tensor([[3,2,1],[1,2,3]])

result = tensor1 + tensor2
print(result[0,0])
# 4
```

2、GPU 支持
========

在创建了库的基本结构后,现在我们将把它提升到一个新的水平。众所周知,您可以调用 .to("cuda") 向 GPU 发送数据,从而更快地运行数学运算。我假设你对 CUDA 的工作原理有基本的了解,如果没有,可以阅读我的另一篇文章:CUDA 教程。我在此稍候。

对于那些匆忙的人,这里有一个简单的介绍:

基本上,在此之前,我们所有的代码都是在 CPU 内存上运行的。尽管 CPU 的单次运算速度更快,但 GPU 的优势在于其并行化能力。CPU 的设计目标是快速执行一连串操作(线程)(但只能执行其中的几十个),而 GPU 的设计目标是并行执行数百万个操作(牺牲单个线程的性能)。

因此,我们可以利用这种能力来执行并行操作。例如,在一个百万级的张量加法运算中,我们不需要在一个循环中按顺序添加每个索引的元素,而是使用 GPU 一次并行添加所有索引的元素。为此,我们可以使用英伟达™(NVIDIA®)公司开发的 CUDA 平台,使开发人员能够将 GPU 支持集成到他们的软件应用程序中。

为此,您可以使用 CUDA C/C++,这是一个基于 C/C++ 的简单接口,旨在运行特定的 GPU 操作(例如将数据从 CPU 内存复制到 GPU 内存)。

下面的代码基本上是使用一些 CUDA C/C++ 函数将数据从 CPU 复制到 GPU,并在总共 N 个 GPU 线程上并行运行 AddTwoArrays 函数(也称为内核),每个线程负责添加数组中的不同元素。

```
#include <stdio.h>

// CPU version for comparison
voidAddTwoArrays_CPU(flaot A[],float B[],float C[]){
for(int i =0; i < N; i++){
        C[i]= A[i]+ B[i];
}
}

// Kernel definition
__global__ voidAddTwoArrays_GPU(float A[],float B[],float C[]){
int i = threadIdx.x;
    C[i]= A[i]+ B[i];
}

intmain(){

int N =1000;// Size of the arrays
float A[N], B[N], C[N];// Arrays A, B, and C

...

float*d_A,*d_B,*d_C;// Device pointers for arrays A, B, and C

// Allocate memory on the device for arrays A, B, and C
cudaMalloc((void**)&d_A, N *sizeof(float));
cudaMalloc((void**)&d_B, N *sizeof(float));
cudaMalloc((void**)&d_C, N *sizeof(float));

// Copy arrays A and B from host to device
cudaMemcpy(d_A, A, N *sizeof(float), cudaMemcpyHostToDevice);
cudaMemcpy(d_B, B, N *sizeof(float), cudaMemcpyHostToDevice);

// Kernel invocation with N threads
AddTwoArrays_GPU<<<1, N>>>(d_A, d_B, d_C);

// Copy vector C from device to host
cudaMemcpy(C, d_C, N *sizeof(float), cudaMemcpyDeviceToHost);

}
```

正如你所注意到的,我们不再每次都对每个元素进行加法运算,而是并行运行所有加法运算,从而摆脱了循环指令。

简单介绍之后,我们可以回到张量库。 第一步是创建一个函数,将张量数据从 CPU 发送到 GPU,反之亦然。

```
//norch/csrc/tensor.cpp

void to_device(Tensor* tensor, char* target_device) {
if((strcmp(target_device,"cuda")==0)&&(strcmp(tensor->device,"cpu")==0)){
cpu_to_cuda(tensor);
}

elseif((strcmp(target_device,"cpu")==0)&&(strcmp(tensor->device,"cuda")==0)){
cuda_to_cpu(tensor);
}
}
//norch/csrc/cuda.cu
host voidcpu_to_cuda(Tensor* tensor){
float* data_tmp; cudaMalloc((void**)&data_tmp, tensor->size *sizeof(float)); cudaMemcpy(data_tmp, tensor->data, tensor->size *sizeof(float), cudaMemcpyHostToDevice);
tensor->data = data_tmp;
constchar* device_str ="cuda"; tensor->device =(char*)malloc(strlen(device_str)+1); strcpy(tensor->device, device_str);
printf("Successfully sent tensor to: %s\n", tensor->device); }
host voidcuda_to_cpu(Tensor* tensor){ float* data_tmp =(float*)malloc(tensor->size *sizeof(float));
cudaMemcpy(data_tmp, tensor->data, tensor->size *sizeof(float), cudaMemcpyDeviceToHost); cudaFree(tensor->data);
tensor->data = data_tmp;
constchar* device_str ="cpu"; tensor->device =(char*)malloc(strlen(device_str)+1); strcpy(tensor->device, device_str);
printf("Successfully sent tensor to: %s\n", tensor->device); }
Python 包装器
norch/tensor.py
def to(self, device): self.device = device self.device_ctype = self.device.encode('utf-8')
Tensor._C.to_device.argtypes =[ctypes.POINTER(CTensor), ctypes.c_char_p] Tensor._C.to_device.restype =None Tensor._C.to_device(self.tensor, self.device_ctype)
return self
然后,我们为所有的张量运算创建 GPU 版本。我将编写加法和减法的示例:
//norch/csrc/cuda.cu
#define THREADS_PER_BLOCK 128
global voidadd_tensor_cuda_kernel(float* data1,float* data2,float* result_data,int size){
int i = blockIdx.x * blockDim.x + threadIdx.x; if(i < size){ result_data[i]= data1[i]+ data2[i]; } }
host voidadd_tensor_cuda(Tensor* tensor1,Tensor* tensor2,float* result_data){
int number_of_blocks =(tensor1->size + THREADS_PER_BLOCK -1)/ THREADS_PER_BLOCK; add_tensor_cuda_kernel<<<number_of_blocks, THREADS_PER_BLOCK>>>(tensor1->data, tensor2->data, result_data, tensor1->size);
cudaError_t error =cudaGetLastError(); if(error != cudaSuccess){ printf("CUDA error: %s\n",cudaGetErrorString(error)); exit(-1); }
cudaDeviceSynchronize(); }
global voidsub_tensor_cuda_kernel(float* data1,float* data2,float* result_data,int size){
int i = blockIdx.x * blockDim.x + threadIdx.x; if(i < size){ result_data[i]= data1[i]- data2[i]; } }
host voidsub_tensor_cuda(Tensor* tensor1,Tensor* tensor2,float* result_data){
int number_of_blocks =(tensor1->size + THREADS_PER_BLOCK -1)/ THREADS_PER_BLOCK; sub_tensor_cuda_kernel<<<number_of_blocks, THREADS_PER_BLOCK>>>(tensor1->data, tensor2->data, result_data, tensor1->size);
cudaError_t error =cudaGetLastError(); if(error != cudaSuccess){ printf("CUDA error: %s\n",cudaGetErrorString(error)); exit(-1); }
cudaDeviceSynchronize(); }
...
随后,我们在 tensor.cpp 中加入了一个新的张量属性 char\* device,我们可以用它来选择运行操作的位置(CPU 或 GPU):
//norch/csrc/tensor.cpp
Tensoradd_tensor(Tensor tensor1,Tensor* tensor2){ if(tensor1->ndim != tensor2->ndim){ fprintf(stderr,"Tensors must have the same number of dimensions %d and %d for addition\n", tensor1->ndim, tensor2->ndim); exit(1); }
if(strcmp(tensor1->device, tensor2->device)!=0){ fprintf(stderr,"Tensors must be on the same device: %s and %s\n", tensor1->device, tensor2->device); exit(1); }
char* device =(char*)malloc(strlen(tensor1->device)+1); if(device !=NULL){ strcpy(device, tensor1->device); }else{ fprintf(stderr,"Memory allocation failed\n"); exit(-1); } int ndim = tensor1->ndim; int* shape =(int*)malloc(ndim *sizeof(int)); if(shape ==NULL){ fprintf(stderr,"Memory allocation failed\n"); exit(1); }
for(int i =0; i < ndim; i++){ if(tensor1->shape[i]!= tensor2->shape[i]){ fprintf(stderr,"Tensors must have the same shape %d and %d at index %d for addition\n", tensor1->shape[i], tensor2->shape[i], i); exit(1); } shape[i]= tensor1->shape[i]; }
if(strcmp(tensor1->device,"cuda")==0){
float* result_data; cudaMalloc((void**)&result_data, tensor1->size sizeof(float)); add_tensor_cuda(tensor1, tensor2, result_data); returncreate_tensor(result_data, shape, ndim, device); } else{ float result_data =(float*)malloc(tensor1->size *sizeof(float)); if(result_data ==NULL){ fprintf(stderr,"Memory allocation failed\n"); exit(1); } add_tensor_cpu(tensor1, tensor2, result_data); returncreate_tensor(result_data, shape, ndim, device); } }
现在我们的库有GPU支持!
import norch
tensor1 = norch.Tensor([[1, 2, 3], [3, 2, 1]]).to("cuda") tensor2 = norch.Tensor([[3, 2, 1], [1, 2, 3]]).to("cuda")
result = tensor1 + tensor2
3、自动差异化 (Autograd)
==================

PyTorch 如此受欢迎的主要原因之一是它的 Autograd 模块。它是一个核心组件,允许自动微分以计算梯度(对于使用梯度下降等优化算法训练模型至关重要)。通过调用单个方法 .backward(),它可以计算之前张量运算的所有梯度:
x = torch.tensor([[1.,2,3],[3.,2,1]], requires_grad=True)
[[1, 2, 3],
[3, 2., 1]]
y = torch.tensor([[3.,2,1],[1.,2,3]], requires_grad=True)
[[3, 2, 1],
[1, 2, 3]]
L =((x - y)**3).sum()
L.backward()
You can access gradients of x and y
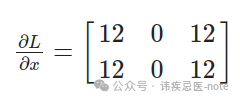
print(x.grad)
[[12, 0, 12],
[12, 0, 12]]
print(y.grad)
[[-12, 0, -12],
[-12, 0, -12]]
In order to minimize z, you can use that for gradient descent:
x = x - learning_rate * x.grad
y = y - learning_rate * y.grad
为了了解发生了什么,让我们尝试手动复制相同的程序: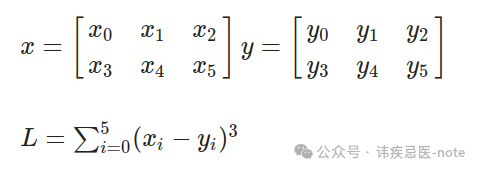
让我们先计算一下:
请注意,x 是一个矩阵,因此我们需要单独计算 L 相对于每个元素的导数。此外,L 是对所有元素的求和,但重要的是要记住,对于每个元素,其他元素并不影响其导数。因此,我们可以得到以下项:
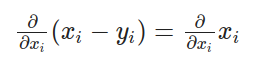
通过对每个项应用链式法则,我们对外层函数进行微分,然后乘以内层函数的导数:
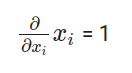
在哪里?
最后
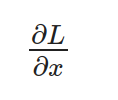
因此,我们可以用下面的最终方程来计算 L 相对于 x 的导数:
将数值代入方程:
计算结果与 PyTorch 得出的值相同:
现在,让我们来分析一下我们刚才所做的:基本上,我们按保留顺序观察了所有相关运算:求和、3 的幂运算和减法运算。然后,我们应用连锁规则,计算每个运算的导数,并递归计算下一个运算的导数。因此,我们首先需要实现不同数学运算的导数:
用于补充:
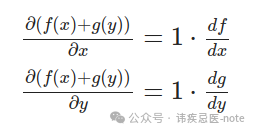
norch/autograd/functions.py
classAddBackward: def__init__(self, x, y): self.input=[x, y]
defbackward(self, gradient): return[gradient, gradient]
For sin:
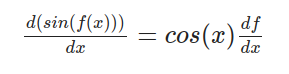
norch/autograd/functions.py
classSinBackward: def__init__(self, x): self.input=[x]
defbackward(self, gradient): x = self.input[0] return[x.cos()* gradient]
For cosine:
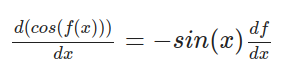
norch/autograd/functions.py
classCosBackward: def__init__(self, x): self.input=[x]
defbackward(self, gradient): x = self.input[0] return[- x.sin()* gradient]
用于元素相乘:
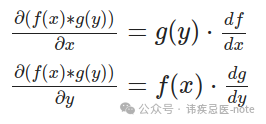
norch/autograd/functions.py
classElementwiseMulBackward: def__init__(self, x, y): self.input=[x, y]
defbackward(self, gradient): x = self.input[0] y = self.input[1] return[y * gradient, x * gradient]
总结一下:
norch/autograd/functions.py
classSumBackward: def__init__(self, x): self.input=[x]
defbackward(self, gradient):
Since sum reduces a tensor to a scalar, gradient is broadcasted to match the original shape.
return[float(gradient.tensor.contents.data[0])* self.input[0].ones_like()]
现在,我们已经有了每个操作的导数表达式,可以继续执行递归后向链式法则了。我们可以为我们的张量设置一个 requires\_grad 参数,表示我们希望存储这个张量的梯度。如果为 true,我们将为每个张量运算存储梯度。例如:
norch/tensor.py
def__add__(self, other):
if self.shape != other.shape: raiseValueError("Tensors must have the same shape for addition")
Tensor._C.add_tensor.argtypes =[ctypes.POINTER(CTensor), ctypes.POINTER(CTensor)] Tensor._C.add_tensor.restype = ctypes.POINTER(CTensor)
result_tensor_ptr =Tensor._C.add_tensor(self.tensor, other.tensor)
result_data =Tensor() result_data.tensor = result_tensor_ptr result_data.shape = self.shape.copy() result_data.ndim = self.ndim result_data.device = self.device
result_data.requires_grad = self.requires_grad or other.requires_grad if result_data.requires_grad: result_data.grad_fn =AddBackward(self, other)
然后,执行 .backward() 方法:
norch/tensor.py
defbackward(self, gradient=None): ifnot self.requires_grad: return
if gradient isNone: if self.shape ==[1]: gradient =Tensor([1])# dx/dx = 1 case else: raiseRuntimeError("Gradient argument must be specified for non-scalar tensors.")
if self.grad isNone: self.grad = gradient
else: self.grad += gradient
if self.grad_fn isnotNone:# not a leaf grads = self.grad_fn.backward(gradient)# call the operation backward for tensor, grad inzip(self.grad_fn.input, grads): ifisinstance(tensor,Tensor): tensor.backward(grad) # recursively call the backward again for the gradient expression (chain rule)
最后,只需实施 .zero\_grad() 将张量的梯度归零,以及 .detach() 删除张量的自动梯度历史记录:
norch/tensor.py
def zero_grad(self): self.grad = None
def detach(self): self.grad = None self.grad_fn = None
恭喜您您刚刚创建了一个支持 GPU 和自动微分的完整张量库!现在,我们可以创建 nn 和 optim 模块,更轻松地训练一些深度学习模型。

4、nn 和 optim 模块
===============

nn 是构建神经网络和深度学习模型的模块,optim 则与训练这些模型的优化算法有关。为了重新创建这些模型,首先要做的是实现一个参数(Parameter),简单地说,它是一个可训练的张量,具有相同的操作,但将 requires\_grad 设置为 True,并采用一些随机初始化技术。
norch/nn/parameter.py
from norch.tensor importTensor from norch.utils import utils import random
classParameter(Tensor): """ A parameter is a trainable tensor. """ def__init__(self, shape): data = utils.generate_random_list(shape=shape) super().init(data, requires_grad=True)
# norch/utisl/utils.py

defgenerate_random_list(shape):
"""
    Generate a list with random numbers and shape 'shape'
    [4, 2] --> [[rand1, rand2], [rand3, rand4], [rand5, rand6], [rand7, rand8]]
    """
iflen(shape)==0:
return[]
else:
        inner_shape = shape[1:]
iflen(inner_shape)==0:
return[random.uniform(-1,1)for _ inrange(shape[0])]
else:
return[generate_random_list(inner_shape)for _ inrange(shape[0])]
```

通过使用参数,我们可以开始构建模块:

```
# norch/nn/module.py

from.parameter importParameter
from collections importOrderedDict
from abc import ABC
import inspect

classModule(ABC):
"""
    Abstract class for modules
    """
def__init__(self):
        self._modules =OrderedDict()
        self._params =OrderedDict()
        self._grads =OrderedDict()
        self.training =True

defforward(self,*inputs,**kwargs):
raiseNotImplementedError

def__call__(self,*inputs,**kwargs):
return self.forward(*inputs,**kwargs)

deftrain(self):
        self.training =True
for param in self.parameters():
            param.requires_grad =True

defeval(self):
        self.training =False
for param in self.parameters():
            param.requires_grad =False

defparameters(self):
for name, value in inspect.getmembers(self):
ifisinstance(value,Parameter):
yield self, name, value
elifisinstance(value,Module):
yieldfrom value.parameters()

defmodules(self):
yieldfrom self._modules.values()

defgradients(self):
for module in self.modules():
yield module._grads

defzero_grad(self):
for _, _, parameter in self.parameters():
            parameter.zero_grad()

defto(self, device):
for _, _, parameter in self.parameters():
            parameter.to(device)

return self

definner_repr(self):
return""

def__repr__(self):
        string =f"{self.get_name()}("
        tab ="   "
        modules = self._modules
if modules =={}:
            string +=f'\n{tab}(parameters): {self.inner_repr()}'
else:
for key, module in modules.items():
                string +=f"\n{tab}({key}): {module.get_name()}({module.inner_repr()})"
returnf'{string}\n)'

defget_name(self):
return self.__class__.__name__

def__setattr__(self, key, value):
        self.__dict__[key]= value

ifisinstance(value,Module):
            self._modules[key]= value
elifisinstance(value,Parameter):
            self._params[key]= value
```

例如,我们可以通过继承 nn.Module 来构建自定义模块,也可以使用之前创建的模块,如实现 y = Wx + b 运算的线性模块。

```
# norch/nn/modules/linear.py

from..module importModule
from..parameter importParameter

classLinear(Module):
def__init__(self, input_dim, output_dim):
super().__init__()
        self.input_dim = input_dim
        self.output_dim = output_dim
        self.weight =Parameter(shape=[self.output_dim, self.input_dim])
        self.bias =Parameter(shape=[self.output_dim,1])

defforward(self, x):
        z = self.weight @ x + self.bias
return z

definner_repr(self):
returnf"input_dim={self.input_dim}, output_dim={self.output_dim}, " \
               f"bias={True if self.bias is not None else False}"
```

现在,我们可以实现一些损失和激活函数。例如,均方误差损失和 sigmoid 函数:

```
# norch/nn/loss.py

from.module importModule

classMSELoss(Module):
def__init__(self):
pass

defforward(self, predictions, labels):
assert labels.shape == predictions.shape, \
"Labels and predictions shape does not match: {} and {}".format(labels.shape, predictions.shape)

return((predictions - labels)**2).sum()/ predictions.numel

def__call__(self,*inputs):
return self.forward(*inputs)
norch/nn/activation.py
from.module importModule import math
classSigmoid(Module): def__init__(self): super().init()
defforward(self, x): return1.0/(1.0+(math.e)**(-x))
最后,创建优化器。在我们的示例中,我将采用随机梯度下降算法:
norch/optim/optimizer.py
from abc import ABC from norch.tensor importTensor
classOptimizer(ABC): """ Abstract class for optimizers """
def__init__(self, parameters): ifisinstance(parameters,Tensor): raiseTypeError("parameters should be an iterable but got {}".format(type(parameters))) elifisinstance(parameters,dict): parameters = parameters.values()
self.parameters =list(parameters)
defstep(self): raiseNotImplementedError
defzero_grad(self): for module, name, parameter in self.parameters: parameter.zero_grad()
classSGD(Optimizer): def__init__(self, parameters, lr=1e-1, momentum=0): super().init(parameters) self.lr = lr self.momentum = momentum self.cache ={'velocity':[p.zeros_like()for(, _, p)in self.parameters]}
defstep(self): for i,(module, name, _)inenumerate(self.parameters): parameter =getattr(module, name)
velocity = self._cache['velocity'][i]
velocity = self.momentum * velocity - self.lr * parameter.grad
updated_parameter = parameter + velocity
setattr(module, name, updated_parameter)
self._cache['velocity'][i]= velocity
parameter.detach() velocity.detach()
就是这样!我们刚刚创建了自己的深度学习框架!🥳 我们来做一些训练:
import norch import norch.nn as nn import norch.optim as optim import random import math
random.seed(1)
classMyModel(nn.Module): def__init__(self): super(MyModel, self).init() self.fc1 = nn.Linear(1,10) self.sigmoid = nn.Sigmoid() self.fc2 = nn.Linear(10,1)
defforward(self, x): out = self.fc1(x) out = self.sigmoid(out) out = self.fc2(out)
return out
device ="cuda" epochs =10
model =MyModel().to(device) criterion = nn.MSELoss() optimizer = optim.SGD(model.parameters(), lr=0.001) loss_list =[]
x_values =[0.,0.4,0.8,1.2,1.6,2.,2.4,2.8,3.2,3.6,4., 4.4,4.8,5.2,5.6,6.,6.4,6.8,7.2,7.6,8.,8.4, 8.8,9.2,9.6,10.,10.4,10.8,11.2,11.6,12.,12.4,12.8, 13.2,13.6,14.,14.4,14.8,15.2,15.6,16.,16.4,16.8,17.2, 17.6,18.,18.4,18.8,19.2,19.6,20.]
y_true =[] for x in x_values: y_true.append(math.pow(math.sin(x),2))
for epoch inrange(epochs): for x, target inzip(x_values, y_true): x = norch.Tensor([[x]]).T target = norch.Tensor([[target]]).T
x = x.to(device) target = target.to(device)
outputs = model(x) loss = criterion(outputs, target)
optimizer.zero_grad() loss.backward() optimizer.step()
print(f'Epoch [{epoch + 1}/{epochs}], Loss: {loss[0]:.4f}') loss_list.append(loss[0])
Epoch [1/10], Loss: 1.7035
Epoch [2/10], Loss: 0.7193
Epoch [3/10], Loss: 0.3068
Epoch [4/10], Loss: 0.1742
Epoch [5/10], Loss: 0.1342
Epoch [6/10], Loss: 0.1232
Epoch [7/10], Loss: 0.1220
Epoch [8/10], Loss: 0.1241
Epoch [9/10], Loss: 0.1270
Epoch [10/10], Loss: 0.1297
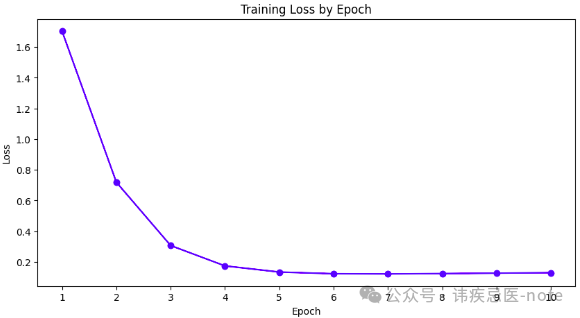
我们使用定制的深度学习框架成功创建并训练了该模型!
结尾
==
在这篇文章中,我们介绍了什么是张量、如何建模等基本概念,以及 CUDA 和 Autograd 等更高级的主题。我们成功创建了一个支持 GPU 和自动微分的深度学习框架。希望这篇文章能帮助您简要了解 PyTorch 在引擎盖下是如何工作的。 在今后的文章中,我将尝试介绍更高级的主题,例如分布式训练(多节点/多 GPU)和内存管理。请在评论中告诉我您的想法或您希望我接下来写些什么!感谢您的阅读! 😊

**点个“在看”不失联**
最新热门文章推荐:
[国外Rust程序员分享:Rust与C++的完美结合](https://mp.weixin.qq.com/s?__biz=MzkzNjI3ODkyNQ==&mid=2247486074&idx=1&sn=2770aefeb2110c3353590daa43184bf6&scene=21#wechat_redirect)
[国外C++程序员分享:2024/2025年C++是否还值得学习?](https://mp.weixin.qq.com/s?__biz=MzkzNjI3ODkyNQ==&mid=2247486076&idx=1&sn=d646c8a6c06a3a95a2ced4094c021aa2&scene=21#wechat_redirect)
[外国人眼中的贾扬清:从清华到阿里,再创业LeptonAI](https://mp.weixin.qq.com/s?__biz=MzkzNjI3ODkyNQ==&mid=2247486075&idx=1&sn=9f8ce330fcc87e908b523df3afaa104e&scene=21#wechat_redirect)
[白宫关注下,C++的内存安全未来走向何方?](https://mp.weixin.qq.com/s?__biz=MzkzNjI3ODkyNQ==&mid=2247486035&idx=1&sn=f6ce5327b66d91a36cd4fa1d9b8a9f80&scene=21#wechat_redirect)
[国外Python程序员分享:如何用Python构建一个多代理AI应用](https://mp.weixin.qq.com/s?__biz=MzkzNjI3ODkyNQ==&mid=2247485989&idx=1&sn=439789fd8492ee8bda40fef51d3e6145&scene=21#wechat_redirect)
[本地部署六款大模型:保护隐私、节省成本,特定环境首选](https://mp.weixin.qq.com/s?__biz=MzkzNjI3ODkyNQ==&mid=2247485969&idx=1&sn=54c20e46c70172307c72026abbf2755b&scene=21#wechat_redirect)
[国外CUDA程序员分享:2024年GPU编程CUDA C++(从环境安装到进阶技巧)](https://mp.weixin.qq.com/s?__biz=MzkzNjI3ODkyNQ==&mid=2247485788&idx=1&sn=77e8feae61345b275e8e5a8ee400b2bb&scene=21#wechat_redirect)
[我卸载了VSCode,我的生产力大幅提升](https://mp.weixin.qq.com/s?__biz=MzkzNjI3ODkyNQ==&mid=2247485827&idx=1&sn=5e9f02fdd3959cb427f15c70d9203122&scene=21#wechat_redirect)
[国外Python程序员分享:2024年NumPy高性能计算库(高级技巧)](https://mp.weixin.qq.com/s?__biz=MzkzNjI3ODkyNQ==&mid=2247485735&idx=1&sn=99586afdf165f53caeb4cf7a9062cfde&scene=21#wechat_redirect)
[外国人眼中的程明明:从“电脑小白”到CV领域领军者](https://mp.weixin.qq.com/s?__biz=MzkzNjI3ODkyNQ==&mid=2247485725&idx=1&sn=1a74cb4c9ea6f868ff5a88d91338718d&scene=21#wechat_redirect)
[外国人眼中的周志华:人工智能奖获得者、人工智能学院院长](https://mp.weixin.qq.com/s?__biz=MzkzNjI3ODkyNQ==&mid=2247485669&idx=1&sn=85842c2b4802ecc9dc988bab8394772f&scene=21#wechat_redirect)
[国外C++程序员分享:C++多线程实战掌握图像处理高级技巧](https://mp.weixin.qq.com/s?__biz=MzkzNjI3ODkyNQ==&mid=2247485687&idx=1&sn=6e1634cea46c7aacf3759d77a2d64338&scene=21#wechat_redirect)
[外国人眼中的卢湖川:从大连理工到全球舞台,他的科研成果震撼世界!](https://mp.weixin.qq.com/s?__biz=MzkzNjI3ODkyNQ==&mid=2247485650&idx=1&sn=396801f5408a194aee956a3acd30129b&scene=21#wechat_redirect)
[外国人眼中的张祥雨:交大90后男神博士,3年看1800篇论文,还入选福布斯精英榜](https://mp.weixin.qq.com/s?__biz=MzkzNjI3ODkyNQ==&mid=2247485593&idx=1&sn=cba8bf9d52b4a63321cd07afd88efa43&scene=21#wechat_redirect)
参考文献: 《图片来源网络》 《PyNorch — GitHub repository of this project.》 《Tutorial CUDA — A brief introduction on how CUDA works.》 《PyTorch — PyTorch documentation.》 《MartinLwx’s blog — Tutorial on strides.》 《Strides tutorial — Another tutorial about strides.》 《PyTorch internals — A guide on how PyTorch is structured.》 《Nets — A PyTorch recreation using NumPy.》 《Autograd — A live coding of an Autograd library.》
> 本文使用 [文章同步助手](https://juejin.cn/post/6940875049587097631) 同步
