通知
- 显示接收到的短消息、即时消息等。
- 显示应用的推送消息,如广告、版本更新等。
- 显示当前正在进行的事件,如下载等。
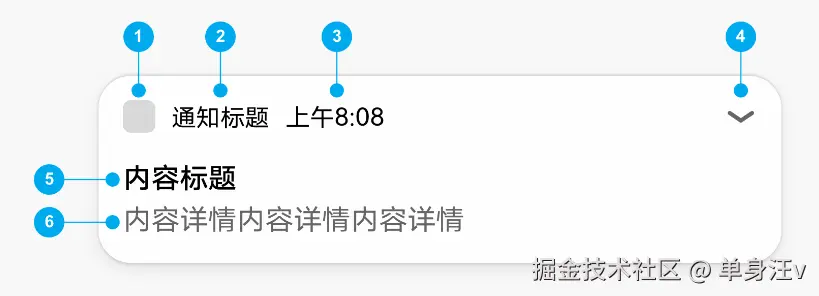
- 通知小图标:表示通知的功能与类型。
- 通知名称:应用名称或功能名称。
- 时间:发送通知的时间,系统默认显示。
- 展开箭头:点击标题区,展开被折叠的内容和按钮
- 内容标题:描述简明概要。
- 内容详情:描述具体内容或详情。
基础类型
import { notificationManager } from '@kit.NotificationKit'
const notificationRequest: notificationManager.NotificationRequest = {
id: 1,
largeIcon: '',
content: {
notificationContentType: notificationManager.ContentType.NOTIFICATION_CONTENT_BASIC_TEXT,
normal: {
title: '通知的标题',
text: '通知的详情'
}
}
}
notificationManager.publish(notificationRequest).then(() => {
console.info('publish success')
}).catch((err: Error) => {
console.error(`publish failed,message is ${err}`);
})
进度类型
const isSupport = await notificationManager.isSupportTemplate('downloadTemplate')
const template: notificationManager.NotificationTemplate = {
name: 'downloadTemplate',
data: {
progressValue: progress,
progressMaxValue: 100
}
}
const notificationRequest: notificationManager.NotificationRequest = {
id: 1,
template: template,
content: {
notificationContentType: notificationManager.ContentType.NOTIFICATION_CONTENT_BASIC_TEXT,
normal: {
title: '文件下载:music.mp4',
text: 'senTemplate',
additionalText: '60%'
}
}
}
notificationManager.publish(notificationRequest).then(() => {
console.info(`publish success`);
}).catch((err: Error) => {
console.error(`publish failed,message is ${err}`);
})
更新通知
- 在发出通知后,使用您之前使用的相同通知 ID
- 再次调用 notificationManager.publish 来实现通知的更新
- 如果之前的通知是关闭的,将会创建新通知
取消通知
notificationManager.cancel(notificationId)
notificationManager.cancelAll()
通知表现形式
- 通知通道,可以让通知有不同的表现形式
- 比如社交类型的通知是横幅显示的,并且有提示音
- 而一般的通知则不会横幅显示
slotType: SlotType.SOCIAL_COMMUNICATION
slotType: SlotType.SERVICE_INFORMATION
slotType: SlotType.CONTENT_INFORMATION
slotType: SlotType.OTHER_TYPES
notificationManager.addSlot(notificationManager.SlotType.SOCIAL_COMMUNICATION)
通知组
- 将不同类型的通知分为不同的组,以便用户可以更好的管理他们
- 当同组的通知有多条的时候,会自动折叠起来
- 避免通知比较多的时候,界面比较杂乱
const notifyId = 0;
const chatRequest: notificationManager.NotificationRequest = {
id: notifyId++,
groupName: 'ChatGroup',
content: {
}
}
const productRequest: notificationManager.NotificationRequest = {
id: notifyId++,
groupName: 'ProductGroup',
content: {
}
}
通知的点击事件
import { notificationManager } from '@kit.NotificationKit'
import { wantAgent, WantAgent } from '@kit.AbilityKit'
const wantAgentInfo = {
wants: [
{
bundleName: "com.example.notification",
abilityName: "EntryAbility"
}
],
operationType: wantAgent.OperationType.START_ABILITY,
requestCode: 100
}
const wantAgentInfo = {
wants: [
{
action: 'event_name',
parameters: {},
}
],
operationType: wantAgent.OperationType.SEND_COMMON_EVENT,
requestCode: 100,
wantAgentFlags: [wantAgent.WantAgentFlags.CONSTANT_FLAG],
}
const wantAgentObj = await wantAgent.getWantAgent(wantAgentInfo)
const notificationRequest: notificationManager.NotificationRequest = {
id: 1,
wantAgent: wantAgentObj,
content: {
notificationContentType: notificationManager.ContentType.NOTIFICATION_CONTENT_BASIC_TEXT,
normal: {
title: "通知标题",
text: "通知内容"
}
}
}
notificationManager.publish(notificationRequest)
提醒
- 倒计时类:适用于短时的计时提醒业务
- 日历类:适用于较长时间的提醒业务
- 闹钟类:适用于指定时刻的提醒业务
申请权限
"module": {
"requestPermissions": [
{
"name": "ohos.permission.PUBLISH_AGENT_REMINDER"
}
]
}
使用示例
import { reminderAgentManager } from '@kit.BackgroundTasksKit'
const item = {
remindType: 'alarm',
hour: 8,
minute: 30,
repeatDays: [1, 3, 5],
name: 'Morning Exercise',
duration: 5,
intervalTimes: 3,
intervalMinute: 10,
notificationId: 'reminder_12345'
}
const reminder = {
reminderType: item.remindType,
hour: item.hour,
minute: item.minute,
daysOfWeek: item.repeatDays,
title: item.name,
ringDuration: item.duration * CommonConstants.DEFAULT_TOTAL_MINUTE,
snoozeTimes: item.intervalTimes,
timeInterval: item.intervalMinute * CommonConstants.DEFAULT_TOTAL_MINUTE,
notificationId: item.notificationId,
actionButton: [
{
title: '关闭',
type: reminderAgentManager.ActionButtonType.ACTION_BUTTON_TYPE_CLOSE
},
],
wantAgent: {
pkgName: CommonConstants.BUNDLE_NAME,
abilityName: CommonConstants.ABILITY_NAME
},
}
reminderAgentManager.publishReminder(reminder, (err, reminderId) => {
if (callback != null) {
callback(reminderId);
}
})
reminderAgentManager.cancelReminder(reminderId)
系列文章
参考资料
写在最后
- 不是教程,只是学习记录
- 包含了一些自己的理解,一边学一边写的,难免有不对的地方
- 写出来希望能与大家探讨,看到有错误的地方,望大家指正~


