

数据库备份及ansible自动化
数据库配置备份及ansible自动化
1.如果主节点已经运行了一段时间,且有大量数据时,配置并启动slave节点步骤
#主节点master 10.0.0.17

#新增从节点slave 10.0.0.27

#已存在并运行的主节点
[root@ centos17 ~]#vim /etc/my.cnf.d/server.cnf
[mysqld]
server-id=17
log_bin

[root@ centos17 ~]#mysql
MariaDB [(none)]> show master logs;
+--------------------+-----------+
| Log_name           | File_size |
+--------------------+-----------+
| mariadb-bin.000004 |       393 |
+--------------------+-----------+

MariaDB [(none)]> grant replication slave on . to users@'10.0.0.%' identified by 'magedu';

#在主服务器完全备份 数据库
[root@ centos17 ~]#mysqldump -A -F --single-transaction --master-data=1 > /backup/full_`date +%F`.sql

[root@master ~]#ll /backup/
total 10
-rw-r--r-- 1 root root 3055918 Oct 27 17:41 full_2020-10-13.sql

[root@ centos17 ~]#scp /backup/full_2020-10-13.sql 10.0.0.27 :/data/

#建议优化主和从节点服务器的性能
[root@ centos17 ~]#mysql
MariaDB [hellodb]> set global sync_binlog=0
MariaDB [hellodb]> set global innodb_flush_log_at_trx_commit=2;
Query OK, 0 rows affected (0.001 sec)

MariaDB [hellodb]> show variables like 'sync_binlog';
+---------------------+-------+
| Variable_name     | Value |
+---------------------+-------+
| sync_binlog        | 0  |
|---------------------+-------+
5 rows in set (0.001 sec)

#将完全备份还原到新的从节点
[root@ centos27 ~]# yum -y install mariadb-server
[root@ centos27 ~]#vim /etc/my.cnf.d/mariadb-server.cnf
[mysqld]
server-id= 27
read-only

#重启服务
[root@slave ~]#systemctl restart mariadb

#配置从节点,从完全备份的位置之后开始复制

[root@slave ~]#grep '^CHANGE MASTER' /data/full_2020-10-13.sql
CHANGE MASTER TO MASTER_LOG_FILE='mariadb-bin.000003', MASTER_LOG_POS=389;
[root@slave ~]#vim /data/full_2020-10-13.sql
CHANGE MASTER TO
MASTER_HOST=' 10.0.0.17 ',
MASTER_USER=' users ',
MASTER_PASSWORD='magedu',
MASTER_PORT=3306,
MASTER_LOG_FILE='mariadb-bin.000004', MASTER_LOG_POS= 393 ;

[root@slave ~]#mysql < /data/full_2020-10-13.sql
[root@slave ~]#mysql
MariaDB [(none)]> show slave status\G;
Slave_IO_State: Waiting for master to send event
..............略............
Master_Host: 10.0.0.17
Master_User: users
Master_Port: 3306
Connect_Retry: 60
Master_Log_File: mariadb-bin.000004
Read_Master_Log_Pos: 393
Relay_Log_File: mariadb-relay-bin.000002
Relay_Log_Pos: 531
Relay_Master_Log_File: mariadb-bin.000004
Slave_IO_Running: Yes
Slave_SQL_Running: Yes
Replicate_Do_DB:
Replicate_Ignore_DB:
Replicate_Do_Table:
Replicate_Ignore_Table:
Replicate_Wild_Do_Table:
Replicate_Wild_Ignore_Table:
Last_Errno: 0
Last_Error:
Skip_Counter: 0
Exec_Master_Log_Pos: 393
Relay_Log_Space: 827
Until_Condition: None
Until_Log_File:
Until_Log_Pos: 0
Master_SSL_Allowed: No
Master_SSL_CA_File:
Master_SSL_CA_Path:
Master_SSL_Cert:
Master_SSL_Cipher:
Master_SSL_Key:
Seconds_Behind_Master: 0     #复制的延迟时间
Master_SSL_Verify_Server_Cert: No
Last_IO_Errno: 0
Last_IO_Error:
Last_SQL_Errno: 0
Last_SQL_Error:
Replicate_Ignore_Server_Ids:
Master_Server_Id: 17

MariaDB [(none)]> start slave;
#若报错可重启slave线程,即:stop  slave;----->  start slave;
#测试主从服务器数据同步,创建数据库,查看同步即可
2.当master服务器宕机时,提升一个slave成为新的master(写出操作步骤)
#找到哪个从节点的数据库是最新的,让它成为新master

[root@centos17 ~]#cat /var/lib/mysql/relay-log.info
./mariadb-relay-bin.000015531
mariadb-bin.000011245

#新master修改配置文件,关闭read-only配置
[root@centos17 ~]#vim /etc/my.cnf.d/server.cnf
[mysqld]
server-id=37
read-only=off
log_bin=/data/mysql/mysql-bin

[root@centos17 ~]#systemctl restart mariadb

#清除旧的master 复制信息
[root@centos17 ~]#mysql
MariaDB [(none)]> set global read_only=off;
MariaDB [(none)]> stop slave;
MariaDB [(none)]> reset slave all;

#再新master上完全备份,并拷贝到其他从服务器
[root@centos17 ~]#mysqldump -A -F --single-transaction  --master-data=1 > full_`date +%F`.sql
[root@centos17 ~]#scp full_2020-10-13.sql 10.0.0.27:

#分析旧的master的二进制日志,将未同步到新master的二进制日志导出来,恢复到新master,尽可能恢复数据

#为其他所有slave重新还原数据,指向新的master
[root@centos27 ~]#vim full_2020-10-13.sql
CHANGE MASTER TO
MASTER_HOST='10.0.0.17',
MASTER_USER='users',
MASTER_PASSWORD='magedu',
MASTER_PORT=3306,
MASTER_LOG_FILE='mariadb-bin.000002',
MASTER_LOG_POS=245;

[root@centos7 ~]#mysql
MariaDB [(none)]> stop slave;
MariaDB [(none)]> reset  slave all;
MariaDB [(none)]> set sql_log_bin=off;
MariaDB [(none)]> source full_2020-10-13.sql ;
MariaDB [(none)]>  set sql_log_bin=on;
MariaDB [(none)]> start slave;
MariaDB [test]> show slave status\G;

#测试新master数据库是否同步数据还原
[root@centos17 ~]#mysql
MariaDB [hellodb]> create table swt select  from teachers;
MariaDB [hellodb]> select  from swt;

[root@centos27 ~]#mysql
MariaDB [hellodb]> show tables ;
3.通过MHA0.58搭建一个数据库集群结构
环境要求:
MHA: 10.0.0.7
master:10.0.0.17
slave1:10.0.0.27
slave2:10.0.0.37
关闭防火墙、selinux、时间同步
主从服务器安装mysql5.7.29
在管理节点上安装两个包: Mha4mysql-manger Mha4sql-node
在被管理节点上安装:mha4mysql-node
[root@centos7 ~]#yum -y install mha4mysql-manager-0.58-0.el7.centos.noarch.rpm
[root@centos7 ~]# yum -y install mha4mysql-node-0.58-0.el7.centos.noarch.rpm
在所有节点上实现相互之间ssh key验证
[root@centos7 ~]# ssh-keygen
[root@centos7 ~]# ssh-copy-id 127.0.0.1
[root@centos7 ~]# rsync -av .ssh 10.0.0.17:/root/
[root@centos7 ~]# rsync -av .ssh 10.0.0.27:/root/
[root@centos7 ~]# rsync -av .ssh 10.0.0.37:/root/
主节点master:10.0.0.17
[root@centos17 ~]#vim /etc/my.cnf
[mysqld]
server-id=17
log_bin=/data/mysql/mysql-bin datadir=/data/mysql
socket=/data/mysql/mysql.sock
log-error=/data/mysql/mysql.log
pid-file=/data/mysql/mysql.pid
general_log #非必须项
#systemctl restart mysqld
#创建账号,并授权
[root@centos7 ~]#mysql -uroot -p
mysql> show master logs;
+------------------+-----------+
| Log_name | File_size |
+------------------+-----------+
| mysql-bin.000001 | 154 |
+------------------+-----------+
mysql> grant replication slave on . to repluser@'10.0.0.%' identified by '123456';
mysql> grant all on . to mhauser@'10.0.0.%' identified by '123456';
从节点slave1:10.0.0.27
[root@centos27 ~]#vim /etc/my.cnf
[mysqld]
server-id=27 #不同节点各不相同
log-bin
datadir=/data/mysql
socket=/data/mysql/mysql.sock
read-only
relay_log_purge=0
skip_name_resolve=1 #禁止反向解析
log_bin=/data/mysql/mysql-bin
log-error=/data/mysql/mysql.log
pid-file=/data/mysql/mysql.pid
mysql> CHANGE MASTER TO
MASTER_HOST='10.0.0.17',
MASTER_USER='repluser',
MASTER_PASSWORD='123456',
MASTER_LOG_FILE='mysql-bin.000001',
MASTER_LOG_POS=154;
#systemctl restart mysqld
[root@centos27 ~]#mysql -uroot -p
CHANGE MASTER TO
MASTER_HOST='10.0.0.17',
MASTER_USER='repluser',
MASTER_PASSWORD='123456',
MASTER_LOG_FILE='mysql-bin.000001',
MASTER_LOG_POS=154;
mysql> start slave ;
mysql> show slave status\G;
从节点slave2:10.0.0.37
[root@centos37 ~]# vim /etc/my.cnf
[mysqld]
server-id=37
log-bin
datadir=/data/mysql
socket=/data/mysql/mysql.sock
read-only
relay_log_purge=0
skip_name_resolve=1
log_bin=/data/mysql/mysql-bin
log-error=/data/mysql/mysql.log
pid-file=/data/mysql/mysql.pid
#systemctl restart mysqld
[root@centos37 ~]#mysql -uroot -p
CHANGE MASTER TO
MASTER_HOST='10.0.0.17',
MASTER_USER='repluser',
MASTER_PASSWORD='123456',
MASTER_LOG_FILE='mysql-bin.000001',
MASTER_LOG_POS=154;
mysql> start slave ;
mysql> show slave status\G;
管理节点上配置manange:10.0.0.7
[root@centos7 ~]#mkdir -p /etc/mastermha
[root@centos7 ~]#vim /etc/mastermha/app1.cnf
[server default]
user=mhauser
password=123456
manager_workdir=/data/mastermha/app1/
master_binlog_dir=/data/mysql/
manager_log=/data/mastermha/app1/manager.log
remote_workdir=/data/mastermha/app1/
ssh_user=root
repl_user=repluser
repl_password=123456
ping_interval=1
[server1]
hostname=10.0.0.17
candidate_master=1
[server2]
hostname=10.0.0.27
candidate_master=1
[server3]
hostname=10.0.0.37
candidate_master=1
#MHA验证,检查MHA环境
[root@centos7 ~]#masterha_check_ssh --conf=/etc/mastermha/app1.cnf
Sat Oct 17 09:33:05 2020 - [info] All SSH connection tests passed successfully.
[root@centos7 ~]#masterha_check_repl --conf=/etc/mastermha/app1.cnf
MySQL Replication Health is OK.
#查看状态
[root@mha-manager ~]#masterha_check_status --conf=/etc/mastermha/app1.cnf
app1 is stopped(2:NOT_RUNNING).
宕机主节点:10.0.0.17,自动提升一个从节点为主
#主节点:10.0.0.17,查找进程,关闭
[root@centos17 ~]#ps -aux|grep mysql
[root@centos17 ~]#kill -9 12658
[root@centos17 ~]# killall -9 mysqld
#开启MHA,默认前台执行
[root@centos7 ~]#nohup masterha_manager --conf=/etc/mastermha/app1.cnf &> /dev/null
#查看状态
[root@centos7 ~]masterha_check_status --conf=/etc/mastermha/app1.cnf
#在管理节点查看分析错误日志
[root@centos7 ~]#tail -f /data/mastermha/app1/manager.log
Started automated(non-interactive) failover.
The latest slave 10.0.0.27(10.0.0.27:3306) has all relay logs for recovery.
Selected 10.0.0.27(10.0.0.27:3306) as a new master.
10.0.0.27(10.0.0.27:3306): OK: Applying all logs succeeded.
10.0.0.37(10.0.0.37:3306): This host has the latest relay log events.
Generating relay diff files from the latest slave succeeded.
10.0.0.37(10.0.0.37:3306): OK: Applying all logs succeeded. Slave started, replicating from 10.0.0.27(10.0.0.27:3306)
10.0.0.27(10.0.0.27:3306): Resetting slave info succeeded.
Master failover to 10.0.0.27(10.0.0.27:3306) completed successfully.
方法二:{脚本执行IP漂移,随主服务转换而变化}
MHA实现高可用
环境要求:
MHA: 10.0.0.7
master:10.0.0.17
slave1:10.0.0.27
slave2:10.0.0.37
关闭防火墙、selinux、时间同步
主从服务器安装mysql5.7.29
在管理节点上安装两个包: Mha4mysql-manger Mha4sql-node
在被管理节点上安装:mha4mysql-node
[root@centos7 ~]#yum -y install mha4mysql-manager-0.58-0.el7.centos.noarch.rpm
[root@centos7 ~]# yum -y install mha4mysql-node-0.58-0.el7.centos.noarch.rpm
在所有节点上实现相互之间ssh key验证
[root@centos7 ~]# ssh-keygen
[root@centos7 ~]# ssh-copy-id 127.0.0.1
[root@centos7 ~]# rsync -av .ssh 10.0.0.17:/root/
[root@centos7 ~]# rsync -av .ssh 10.0.0.27:/root/
[root@centos7 ~]# rsync -av .ssh 10.0.0.37:/root/
在管理节点上建立配置文件
[root@centos7 ~]#mkdir -p /etc/mastermha
[root@centos7 ~]#vim /etc/mastermha/app1.cnf
[server default]
# 登陆mysql数据库账户及密码,缺省为root,因为需要STOP SLAVE, CHANGE MASTER, RESET SLAVE等。
user=mhauser #用于远程连接MySQL所有节点的用户,需要有管理员的权限
password=123456
# working directory on the manager #位于管理节点工作目录
manager_workdir=/data/masterha/app1 #目录会自动生成,无需手动创建
# manager log file #位于管理节点工作日志文件
manager_log=/data/mastermha/app1/manager.log
# working directory on MySQL servers
# node 上用于产生日志的工作目录,如果不存在,MHA node会自动创建,前提需要有相应的权限,否则node会终止。
# 缺省目录为 "/var/tmp".
remote_workdir=/data/masterha/app1
ssh_user=root #用于实现远程ssh基于KEY的连接,访问二进制日志
repl_user=repluser #主从复制的用户信息
repl_password=123456
ping_interval=1 #健康性检查的时间间隔
master_ip_failover_script=/usr/local/bin/master_ip_failover.pl #切换VIP的perl脚本
report_script=/usr/local/bin/sendmail.sh #切换VIP的perl脚本
check_repl_delay=0 #默认如果slave中从库落后主库relaylog超过100M,主库不会选择这个从库为新的master,因为这个从库进行恢复需要很长的时间.通过这个参数,mha触发主从切换的时候会忽略复制的延时,通过check_repl_delay=0这个参数,mha触发主从切换时会忽略复制的延时,对于设置candidate_master=1的从库非常有用,这样确保这个从库一定能成为最新的master
master_binlog_dir=/data/mysql/ #指定二进制日志存放的目录,mha4mysql-manager-0.58必须指定,之前版本不需要指定
#[serverN] 部分,为各节点配置信息,作用域为各单独节点,各节点书写顺序影响成为新master的顺序
#也可以通过配置candidate_master参数来影响哪个节点具有优先级成为新master
[server1]
hostname=10.0.0.17
candidate_master=1 #设置为优先候选master,即使不是集群中事件最新的slave,也会优先当选master
[server2]
hostname=10.0.0.27
[server3]
hostname=10.0.0.37
candidate_master=1 #设置为优先候选master,即使不是集群中事件最新的slave,也会优先当选master
说明:主库宕机谁接新的master
1.所有从节点都是一致的,默认会配置文件的顺序去选择一个脚本
2.从节点日志不一致,自动选择最接近于主库信息的从库充当主库
3.如果对于某节点设定了权重(candidate_master=1),权重节点会优先选择。但是此节点日志量落后主库超过100M日志的话,也不会被选择。可以配合check_repl_delay=0,关闭日志量的检查,强制选择候
选节点
相关脚本
[root@centos7 ~]#cat /usr/local/bin/sendmail.sh
echo 'MySQL is down ' |mail -s 'MHA waring' 1655841639@qq.com
[root@centos7 ~]#chmod +x /usr/local/bin/sendmail.sh
[root@centos7 ~]#vim .mailrc
set from=1655841639@qq.com
set smtp=smtp.qq.com
set smtp-auth-user=1655841639@qq.com
set smtp-auth-password=voubowyealfqdeh
set smtp-auth=login
set ssl-verify=ignore
[root@centos7 ~]#cat /usr/local/bin/master_ip_failover
#!/usr/bin/env perl
use strict;
use warnings FATAL => 'all';
use Getopt::Long;
my (
$command, $ssh_user, $orig_master_host, $orig_master_ip,
$orig_master_port, $new_master_host, $new_master_ip, $new_master_port
);
my $vip = '10.0.0.100';#设置Virtual IP
my $gateway = '10.0.0.2';#网关Gateway IP
my $interface = 'eth0';
my $key = "1";
my $ssh_start_vip = "/sbin/ifconfig $interface:$key $vip;/sbin/arping -I $interface -c 3 -s $vip $gateway >/dev/null 2>&1";
my $ssh_stop_vip = "/sbin/ifconfig $interface:$key down";
GetOptions(
'command=s' => \$command,
'ssh_user=s' => \$ssh_user,
'orig_master_host=s' => \$orig_master_host,
'orig_master_ip=s' => \$orig_master_ip,
'orig_master_port=i' => \$orig_master_port,
'new_master_host=s' => \$new_master_host,
'new_master_ip=s' => \$new_master_ip,
'new_master_port=i' => \$new_master_port,
);
exit &main();
sub main {
print "\n\nIN SCRIPT TEST====$ssh_stop_vip==$ssh_start_vip===\n\n";
if ( $command eq "stop" || $command eq "stopssh" ) {
# $orig_master_host, $orig_master_ip, $orig_master_port are passed.
# If you manage master ip address at global catalog database,
# invalidate orig_master_ip here.
my $exit_code = 1;
eval {
print "Disabling the VIP on old master: $orig_master_host \n";
&stop_vip();
$exit_code = 0;
};
if ($@) {
warn "Got Error: $@\n";
exit $exit_code;
}
exit $exit_code;
}
elsif ( $command eq "start" ) {
# all arguments are passed.
# If you manage master ip address at global catalog database,
# activate new_master_ip here.
# You can also grant write access (create user, set read_only=0, etc) here.
my $exit_code = 10;
eval {
print "Enabling the VIP - $vip on the new master - $new_master_host \n";
&start_vip();
$exit_code = 0;
};
if ($@) {
warn $@;
exit $exit_code;
}
exit $exit_code;
}
elsif ( $command eq "status" ) {
print "Checking the Status of the script.. OK \n";
`ssh $ssh_user\@$orig_master_host \" $ssh_start_vip \"`;
exit 0;
}
else {
&usage();
exit 1;
}
}
# A simple system call that enable the VIP on the new master
sub start_vip() {
`ssh $ssh_user\@$new_master_host \" $ssh_start_vip \"`;
}
# A simple system call that disable the VIP on the old_master
sub stop_vip() {
`ssh $ssh_user\@$orig_master_host \" $ssh_stop_vip \"`;
}
sub usage {
print
"Usage: master_ip_failover --command=start|stop|stopssh|status --orig_master_host=host --orig_master_ip=ip --orig_master_port=port --new_master_host=host --new_master_ip=ip --new_master_port=port\n";
}
[root@centos7 ~]#chmod +x /usr/local/bin/master_ip_failover
实现Master
[root@centos17 ~]#mkdir /data/mysql/
[root@centos17 ~]#chown mysql.mysql /data/mysql/
[root@centos17 ~]#vim /etc/my.cnf
[mysqld]
server-id=17
log-bin=/data/mysql/mysql-bin
skip_name_resolve=1
general_log
datadir=/data/mysql
[root@centos17 ~]#mysql -uroot -p
mysql> show master logs;
+------------------+-----------+
| Log_name | File_size |
+------------------+-----------+
| mysql-bin.000001 | 8839 |
+------------------+-----------+
mysql> grant replication slave on . to repluser@'10.0.0.%' identified by '123456';
Query OK, 0 rows affected, 1 warning (0.00 sec)
mysql> grant all on . to mhauser@'10.0.0.%' identified by '123456';
#配置VIP
[root@centos17 ~]#ifconfig eth0:1 10.0.0.100/24
实现slave
[root@centos27 ~]#mkdir /data/mysql
[root@centos27 ~]#chown mysql.mysql /data/mysql/
[root@centos27 ~]#vim /etc/my.cnf
[mysqld]
server-id=27
log-bin=/data/mysql/mysql-bin
skip_name_resolve=1
general_log
datadir=/data/mysql
[root@centos27 ~]#mysql -uroot -p
mysql> CHANGE MASTER TO
MASTER_HOST='10.0.0.17',
MASTER_USER='repluser',
MASTER_PASSWORD='123456',
MASTER_LOG_FILE='mysql-bin.000001',
MASTER_LOG_POS=8839;
mysql> start slave ;
检查MHA环境
#检查环境
[root@mha-manager ~]#masterha_check_ssh --conf=/etc/mastermha/app1.cnf
All SSH connection tests passed successfully.
[root@mha-manager ~]#masterha_check_repl --conf=/etc/mastermha/app1.cnf
MySQL Replication Health is OK.
#查看状态
[root@mha-manager ~]#masterha_check_status --conf=/etc/mastermha/app1.cnf
app1 is stopped(2:NOT_RUNNING).
启动MHA
#开启MHA,默认是前台运行
nohup masterha_manager --conf=/etc/mastermha/app1.cnf &> /dev/null
#查看状态
masterha_check_status --conf=/etc/mastermha/app1.cnf
app1 (pid:25994) is running(0:PING_OK), master:10.0.0.17
#查看到健康性检查
[root@centos17 ~]#tail -f /var/lib/mysql/centos8.log
排错日志
tail /data/mastermha/app1/manager.log
模拟故障,master:centos17宕机,自动提升1从为主
#主节点:10.0.0.17,查找进程,关闭
[root@centos17 ~]#ps -aux|grep mysql
[root@centos17 ~]#kill -9 12658
[root@centos17 ~]# killall -9 mysqld
#开启MHA,默认前台执行
[root@centos7 ~]#nohup masterha_manager --conf=/etc/mastermha/app1.cnf &> /dev/null
#查看状态
[root@centos7 ~]masterha_check_status --conf=/etc/mastermha/app1.cnf
#在管理节点查看分析错误日志
[root@centos7 ~]#tail -f /data/mastermha/app1/manager.log
Started automated(non-interactive) failover.
The latest slave 10.0.0.27(10.0.0.27:3306) has all relay logs for recovery.
Selected 10.0.0.27(10.0.0.27:3306) as a new master.
10.0.0.27(10.0.0.27:3306): OK: Applying all logs succeeded.
10.0.0.37(10.0.0.37:3306): This host has the latest relay log events.
Generating relay diff files from the latest slave succeeded.
10.0.0.37(10.0.0.37:3306): OK: Applying all logs succeeded. Slave started, replicating from 10.0.0.27(10.0.0.27:3306)
10.0.0.27(10.0.0.27:3306): Resetting slave info succeeded.
Master failover to 10.0.0.27(10.0.0.27:3306) completed successfully.
[root@centos 17 ~]#masterha_check_status --conf=/etc/mastermha/app1.cnf
app1 is stopped(2:NOT_RUNNING).
#验证VIP漂移至新的Master上
[root@slave1 ~]#ip a
收到报警邮件
如果再次运行MHA,需要删除下面文件
[root@centos7 ~]# ll  /data/mastermha/app1/app1.failover.complete
-rw-r--r-- 1 root root 0 Oct 17 10:19 /data/mastermha/app1/app1.failover.complete
[root@centos7 ~]#rm -rf   /data/mastermha/app1/app1.failover.complete
4.实战案例:Percona XtraDB Cluster (PXC5.7)
环境准备
四台主机:
pxc1:10.0.0.7
pxc2:10.0.0.17
pxc3:10.0.0.27
pxc4:10.0.0.37
OS 版本目前不支持CentOS 8
[root@pxc1 ~]#cat /etc/redhat-release
CentOS Linux release 7.6.1810 (Core)
关闭防火墙和selinux保证时间同步
注:如果已经安装MYSQL,必须卸载
安装 Percona XtraDB Cluster 5.7
#此处使用清华大学yum源,官方源太慢了
[root@pxc1 ~]#vim /etc/yum.repos.d/pxc.repo
[percona]
name=percona_repo
baseurl =
https://mirrors.tuna.tsinghua.edu.cn/percona/release/$releasever/RPMS/$basearch
enabled = 1
gpgcheck = 0
[root@pxc1 ~]#scp /etc/yum.repos.d/pxc.repo 10.0.0.17:/etc/yum.repos.d
[root@pxc1 ~]#scp /etc/yum.repos.d/pxc.repo 10.0.0.27:/etc/yum.repos.d
#在三个节点都安装好PXC 5.7
[root@pxc1 ~]#yum -y install Percona-XtraDB-Cluster-57
[root@pxc2 ~]#yum -y install Percona-XtraDB-Cluster-57
[root@pxc3 ~]#yum -y install Percona-XtraDB-Cluster-57
在各个节点上分别配置mysql及集群配置文件
/etc/my.cnf为主配置文件,当前版本中,其余的配置文件都放在/etc/percona-xtradb-cluster.conf.d目录里,包括mysqld.cnf,mysqld_safe.cnf,wsrep.cnf 三个文件
#主配置文件不需要修改
[root@pxc1 ~]#cat /etc/my.cnf
# The Percona XtraDB Cluster 5.7 configuration file.
...省略...
!includedir /etc/my.cnf.d/
!includedir /etc/percona-xtradb-cluster.conf.d/
[root@pxc1 ~]#ls /etc/my.cnf.d/
[root@pxc1 ~]#ls /etc/percona-xtradb-cluster.conf.d/
mysqld.cnf mysqld_safe.cnf wsrep.cnf
#下面配置文件不需要修改
[root@pxc1 ~]#cat /etc/percona-xtradb-cluster.conf.d/mysqld.cnf
...省略...
[client]
socket=/var/lib/mysql/mysql.sock
[mysqld]
server-id=1 #建议各个节点不同
datadir=/var/lib/mysql
socket=/var/lib/mysql/mysql.sock
log-error=/var/log/mysqld.log
pid-file=/var/run/mysqld/mysqld.pid
log-bin #建议启用,非必须项
log_slave_updates
expire_logs_days=7
# Disabling symbolic-links is recommended to prevent assorted security risks
symbolic-links=0
#下面配置文件不需要修改
[root@pxc1 ~]#cat /etc/percona-xtradb-cluster.conf.d/mysqld_safe.cnf
...省略...
[mysqld_safe]
pid-file = /var/run/mysqld/mysqld.pid
socket = /var/lib/mysql/mysql.sock
nice = 0
#PXC的配置文件必须修改
[root@pxc1 ~]#vim /etc/percona-xtradb-cluster.conf.d/wsrep.cnf
[root@pxc1 ~]#grep -Ev "^#|^$" /etc/percona-xtradb-cluster.conf.d/wsrep.cnf
[mysqld]
wsrep_provider=/usr/lib64/galera3/libgalera_smm.so
wsrep_cluster_address=gcomm://10.0.0.7,10.0.0.17,10.0.0.27 #三个节点的IP
binlog_format=ROW
default_storage_engine=InnoDB
wsrep_slave_threads= 8
wsrep_log_conflicts
innodb_autoinc_lock_mode=2
wsrep_node_address=10.0.0.7 #各个节点,指定自已的IP
wsrep_cluster_name=pxc-cluster
wsrep_node_name=pxc-cluster-node-1 #各个节点,指定自已节点名称
pxc_strict_mode=ENFORCING
wsrep_sst_method=xtrabackup-v2
wsrep_sst_auth="sstuser:s3cretPass" #取消本行注释
[root@pxc2 ~]#grep -Ev "^#|^$" /etc/percona-xtradb-cluster.conf.d/wsrep.cnf
[mysqld]
wsrep_provider=/usr/lib64/galera3/libgalera_smm.so
wsrep_cluster_address=gcomm://10.0.0.7,10.0.0.17,10.0.0.27
binlog_format=ROW
default_storage_engine=InnoDB
wsrep_slave_threads= 8
wsrep_log_conflicts
innodb_autoinc_lock_mode=2
wsrep_node_address=10.0.0.17 #各个节点,指定自已的IP
wsrep_cluster_name=pxc-cluster
wsrep_node_name=pxc-cluster-node-2 #各个节点,指定自已节点名称
pxc_strict_mode=ENFORCING
wsrep_sst_method=xtrabackup-v2
wsrep_sst_auth="sstuser:s3cretPass" #取消本行注释
[root@pxc3 ~]#grep -Ev "^#|^$" /etc/percona-xtradb-cluster.conf.d/wsrep.cnf
[mysqld]
wsrep_provider=/usr/lib64/galera3/libgalera_smm.so
wsrep_cluster_address=gcomm://10.0.0.7,10.0.0.17,10.0.0.27
binlog_format=ROW
default_storage_engine=InnoDB
wsrep_slave_threads= 8
wsrep_log_conflicts
innodb_autoinc_lock_mode=2
wsrep_node_address=10.0.0.27 #各个节点,指定自已的IP
wsrep_cluster_name=pxc-cluster
wsrep_node_name=pxc-cluster-node-3 #各个节点,指定自已的IP
pxc_strict_mode=ENFORCING
wsrep_sst_method=xtrabackup-v2
wsrep_sst_auth="sstuser:s3cretPass" #取消本行注释
注意:尽管Galera Cluster不再需要通过binlog的形式进行同步,但还是建议在配置文件中开启二进制日志功能,原因是后期如果有新节点需要加入,老节点通过SST全量传输的方式向新节点传输数据,很可能会拖垮集群性能,所以让新节点先通过binlog方式完成同步后再加入集群会是一种更好的选择
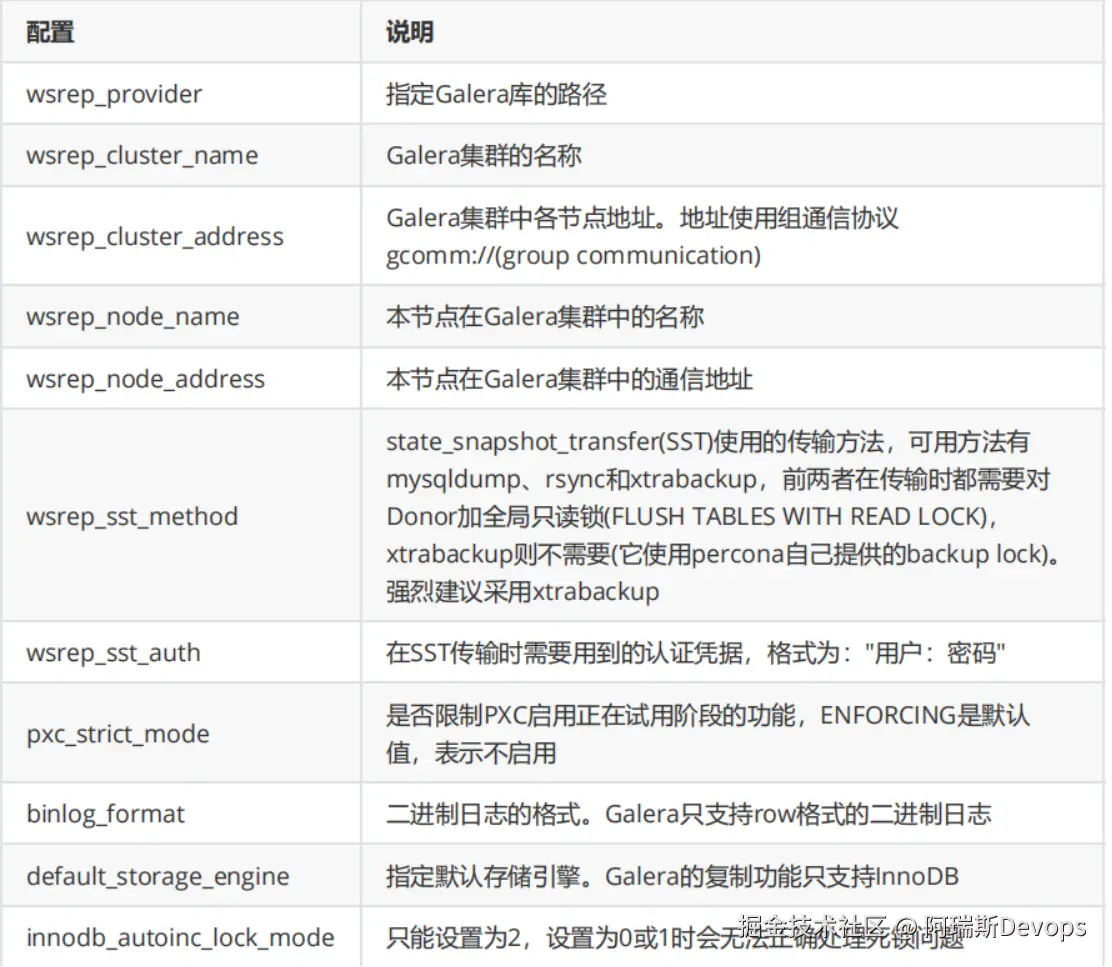
配置文件各项配置意义
启动PXC集群中第一个节点
root@pxc1 ~]#ss -ntul
Netid State Recv-Q Send-Q Local Address:Port
Peer Address:Port
udp UNCONN 0 0 127.0.0.1:323
:
udp UNCONN 0 0 ::1:323
:::
tcp LISTEN 0 128 :22
: tcp LISTEN 0 100
127.0.0.1:25 :
tcp LISTEN 0 128 :::22
:::
tcp LISTEN 0 100 ::1:25
:::
#启动第一个节点
[root@pxc1 ~]#systemctl start mysql@bootstrap.service
[root@pxc1 ~]#ss -ntul
Netid State Recv-Q Send-Q Local Address:Port Peer
Address:Port
udp UNCONN 0 0 127.0.0.1:323
:
udp UNCONN 0 0 ::1:323
:::
tcp LISTEN 0 128 :22
:
tcp LISTEN 0 128 :4567
:
tcp LISTEN 0 100 127.0.0.1:25
:
tcp LISTEN 0 80 :::3306
:::
tcp LISTEN 0 128 :::22
:::
tcp LISTEN 0 100 ::1:25
:::
#查看root密码
[root@pxc1 ~]#grep "temporary password" /var/log/mysqld.log
A temporary password is generated for root@localhost: =tWFP0oRJl8t
[root@pxc1 ~]#mysql -uroot -p'=tWFP0oRJl8t'
#修改root密码
mysql> alter user 'root'@'localhost' identified by 'magedu';
Query OK, 0 rows affected (0.01 sec)
#创建相关用户并授权
mysql> CREATE USER 'sstuser'@'localhost' IDENTIFIED BY 's3cretPass';
Query OK, 0 rows affected (0.00 sec)
mysql> GRANT RELOAD, LOCK TABLES, PROCESS, REPLICATION CLIENT ON . TO
'sstuser'@'localhost';
Query OK, 0 rows affected (0.01 sec)
#查看相关变量
mysql> SHOW VARIABLES LIKE 'wsrep%'\G
#重点关注下面内容
mysql> show status like 'wsrep%';
+----------------------------+--------------------------------------+
| Variable_name | Value |
+----------------------------+--------------------------------------+
| wsrep_local_state_uuid | aad2c02e-131c-11ea-9294-b2e80a6c08c4 |
| ... | ... |
| wsrep_local_state | 4 |
| wsrep_local_state_comment | Synced |
| ... | ... |
| wsrep_cluster_size | 1 |
| wsrep_cluster_status | Primary |
| wsrep_connected | ON |
| ... | ... |
| wsrep_ready | ON |
+----------------------------+--------------------------------------+
说明:
wsrep_cluster_size表示,该Galera集群中只有一个节点
wsrep_local_state_comment 状态为Synced(4),表示数据已同步完成(因为是第一个引导节点,无数据需要同步)。 如果状态是Joiner, 意味着 SST 没有完成. 只有所有节点状态是Synced,才可以加新节点wsrep_cluster_status为Primary,且已经完全连接并准备好启动PXC集群中其它所有节点
[root@pxc2 ~]#ss -ntul
Netid State Recv-Q Send-Q Local Address:Port Peer
Address:Port
udp UNCONN 0 0 127.0.0.1:323
:
udp UNCONN 0 0 ::1:323
:::
tcp LISTEN 0 128 :22
:
tcp LISTEN 0 100 127.0.0.1:25
:
tcp LISTEN 0 128 :::22
:::
tcp LISTEN 0 100 ::1:25
:::
[root@pxc2 ~]#systemctl start mysql
[root@pxc2 ~]#ss -ntulp
Netid State Recv-Q Send-Q Local Address:Port Peer
Address:Port
udp UNCONN 0 0 127.0.0.1:323
: users:(("chronyd",pid=6289,fd=1))
udp UNCONN 0 0 ::1:323
::: users:(("chronyd",pid=6289,fd=2))
tcp LISTEN 0 128 :22
: users:(("sshd",pid=6617,fd=3))
tcp LISTEN 0 128 :4567
: users:(("mysqld",pid=7754,fd=11))
tcp LISTEN 0 100 127.0.0.1:25
: users:(("master",pid=6752,fd=13))
tcp LISTEN 0 80 :::3306
::: users:(("mysqld",pid=7754,fd=34))
tcp LISTEN 0 128 :::22
::: users:(("sshd",pid=6617,fd=4))
tcp LISTEN 0 100 ::1:25
::: users:(("master",pid=6752,fd=14))
查看集群状态,验证集群是否成功
#在任意节点,查看集群状态
[root@pxc1 ~]#mysql -uroot -pmagedu
mysql> SHOW VARIABLES LIKE 'wsrep_node_name';
+-----------------+--------------------+
| Variable_name | Value |
+-----------------+--------------------+
| wsrep_node_name | pxc-cluster-node-1 |
+-----------------+--------------------+
1 row in set (0.00 sec)
mysql> SHOW VARIABLES LIKE 'wsrep_node_address';
+--------------------+----------+
| Variable_name | Value |
+--------------------+----------+
| wsrep_node_address | 10.0.0.7 |
+--------------------+----------+
1 row in set (0.01 sec)
mysql> SHOW VARIABLES LIKE 'wsrep_on';
+---------------+-------+
| Variable_name | Value |
+---------------+-------+
| wsrep_on | ON |
+---------------+-------+
1 row in set (0.00 sec)
mysql> SHOW STATUS LIKE 'wsrep_cluster_size';
+--------------------+-------+
| Variable_name | Value |
+--------------------+-------+
| wsrep_cluster_size | 3 |
+--------------------+-------+
1 row in set (0.01 sec)
#在任意节点查看数据库
mysql> show databases;
+--------------------+
| Database |
+--------------------+
| information_schema |
| mysql |
| performance_schema |
| sys |
+--------------------+
4 rows in set (0.00 sec)
#在任意节点创建数据库
mysql> create database testdb1;
Query OK, 1 row affected (0.00 sec)
mysql> show databases;
+--------------------+
| Database |
+--------------------+
| information_schema |
| mysql |
| performance_schema |
| sys |
| testdb1 |
+--------------------+
5 rows in set (0.00 sec
mysql>
#在任意其它节点验证数据是否同步
[root@pxc2 ~]#mysql -uroot -pmagedu
mysql> show databases;
+--------------------+
| Database |
+--------------------+
| information_schema |
| mysql |
| performance_schema |
| sys |
| testdb1 |
+--------------------+
5 rows in set (0.01 sec)
#利用Xshell软件,同时在三个节点数据库,在其中一个节点成功
mysql> create database testdb2;
Query OK, 1 row affected (0.01 sec)
#在其它节点都提示失败
mysql> create database testdb2;
ERROR 1007 (HY000): Can't create database 'testdb2'; database exists
在PXC集群中加入节点
一个节点加入到Galera集群有两种情况:新节点加入集群、暂时离组的成员再次加入集群1)新节点加入Galera集群新节点加入集群时,需要从当前集群中选择一个Donor节点来同步数据,也就是所谓的state_snapshot_tranfer(SST)过程。SST同步数据的方式由选项wsrep_sst_method决定,一般选择的是xtrabackup。
必须注意,新节点加入Galera时,会删除新节点上所有已有数据,再通过xtrabackup(假设使用的是该方式)从Donor处完整备份所有数据进行恢复。所以,如果数据量很大,新节点加入过程会很慢。而且,在一个新节点成为Synced状态之前,不要同时加入其它新节点,否则很容易将集群压垮。如果是这种情况,可以考虑使用wsrep_sst_method=rsync来做增量同步,既然是增量同步,最好保证新节点上已经有一部分数据基础,否则和全量同步没什么区别,且这样会对Donor节点加上全局read only锁。
2)旧节点加入Galera集群
如果旧节点加入Galera集群,说明这个节点在之前已经在Galera集群中呆过,有一部分数据基础,缺少的只是它离开集群时的数据。这时加入集群时,会采用IST(incremental snapshot transfer)传输机制,即使用增量传输。但注意,这部分增量传输的数据源是Donor上缓存在GCache文件中的,这个文件有大小限制,如果缺失的数据范围超过已缓存的内容,则自动转为SST传输。如果旧节点上的数据和Donor上的数据不匹配(例如这个节点离组后人为修改了一点数据),则自动转为SST传输。
#在PXC集群中再加一台新的主机PXC4:10.0.0.37
[root@pxc4 ~]#yum install Percona-XtraDB-Cluster-57 -y
[root@pxc4 ~]#vim /etc/percona-xtradb-cluster.conf.d/wsrep.cnf
[root@pxc4 ~]#grep -Ev "^#|^$" /etc/percona-xtradb-cluster.conf.d/wsrep.cnf
[mysqld]
wsrep_provider=/usr/lib64/galera3/libgalera_smm.so
wsrep_cluster_address=gcomm://10.0.0.7,10.0.0.17,10.0.0.27,10.0.0.37
binlog_format=ROW
default_storage_engine=InnoDB
wsrep_slave_threads= 8
wsrep_log_conflicts
innodb_autoinc_lock_mode=2
wsrep_node_address=10.0.0.37
wsrep_cluster_name=pxc-cluster
wsrep_node_name=pxc-cluster-node-4
pxc_strict_mode=ENFORCING
wsrep_sst_method=xtrabackup-v2
wsrep_sst_auth="sstuser:s3cretPass"
[root@pxc4 ~]#systemctl start mysql
[root@pxc4 ~]#mysql -uroot -pmagedu
Server version: 5.7.27-30-57-log Percona XtraDB Cluster (GPL), Release rel30,
Revision
mysql> SHOW STATUS LIKE 'wsrep_cluster_size';
+--------------------+-------+
| Variable_name | Value |
+--------------------+-------+
| wsrep_cluster_size | 4 |
+--------------------+-------+
1 row in set (0.00 sec)
mysql> show databases;
+--------------------+
| Database |
+--------------------+
| information_schema |
| mysql |
| performance_schema |
| sys |
| testdb1 |
| testdb2 |
| testdb3 |
+--------------------+
8 rows in set (0.00 sec)
#将其它节点的配置文件加以修改
[root@pxc1 ~]#vim /etc/percona-xtradb-cluster.conf.d/wsrep.cnf
wsrep_cluster_address=gcomm://10.0.0.7,10.0.0.17,10.0.0.27,10.0.0.37
[root@pxc2 ~]#vim /etc/percona-xtradb-cluster.conf.d/wsrep.cnf
[root@pxc3 ~]#vim /etc/percona-xtradb-cluster.conf.d/wsrep.cnf
8 在PXC集群中修复故障节点
#在任意节点停止服务
[root@pxc4 ~]#systemctl stop mysql
#在其它任意节点查看wsrep_cluster_size变量少了一个节点
[root@pxc1 ~]#mysql -uroot -pmagedu
Server version: 5.7.27-30-57-log Percona XtraDB Cluster (GPL), Release rel30,
Revision
mysql> SHOW STATUS LIKE 'wsrep_cluster_size';
+--------------------+-------+
| Variable_name | Value |
+--------------------+-------+
| wsrep_cluster_size | 3 |
+--------------------+-------+
1 row in set (0.01 sec)
mysql> create database testdb4;
#在其它任意节点可看到数据已同步
mysql> show databases;
+--------------------+
| Database |
+--------------------+
| information_schema |
| mysql |
| performance_schema |
| sys |
| testdb1 |
| testdb2 |
| testdb3 |
| testdb4 |
+--------------------+
10 rows in set (0.00 sec)
#恢复服务,数据同步
[root@pxc4 ~]#systemctl start mysql
[root@pxc4 ~]#mysql -uroot -pmagedu
mysql> show databases;
+--------------------+
| Database |
+--------------------+
| information_schema |
| mysql |
| performance_schema |
| sys |
| testdb1 |
| testdb2 |
| testdb3 |
| testdb4 |
+--------------------+
10 rows in set (0.00 sec)
mysql> SHOW STATUS LIKE 'wsrep_cluster_size';
+--------------------+-------+
| Variable_name | Value |
+--------------------+-------+
| wsrep_cluster_size | 4 |
+--------------------+-------+
1 row in set (0.01 sec)
5.通过ansible部署二进制mysql 8
#vim /etc/ansible/hosts

[dbsrvs]
10.0.0.18
10.0.0.17
10.0.0.28


#dbsrvs中的主机基于 key验证
[root@centos7 ~]#ssh- keygen
[root@centos7 ~]#ssh-copy-id 10.0.0.18 (或 ssh 127.0.0.1 将.ssh文件发送到其他主机上即可)

[root@centos7 ~]#ll /data/ansible/files/mysql-8.0.19-linux-glibc2.12-x86_64.tar.xz
-rw-r--r-- 1 root root 485074552 Oct 18 09:48 /data/ansible/files/mysql-8.0.19-linux-glibc2.12-x86_64.tar.xz

[root@centos7 ~]#tree /data/ansible/files/
/data/ansible/files/
├── install_mysql8.0.yml
├── my.cnf
└── mysql-8.0.19-linux-glibc2.12-x86_64.tar.xz
0 directories, 3 files

[root@centos7 files]#cat /data/ansible/files/my.cnf
[mysqld]
server-id=8
user=mysql
symbolic-links=0
innodb_file_per_table=1
datadir=/data/mysql
socket=/data/mysql/mysql.sock
pid-file=/data/mysql/mysql.pid
log-error=/data/mysql/mysql.log

[client]
port=3306
socket=/data/mysql/mysql.sock

注:centos7依赖libncurses安装包为 ncurses-libs ,centos8依赖libncurses安装包为 ncurses-c++-libs,ncurses-compat-libs

#centos8 安装MYSQL8.0剧本为


方式一:

[root@centos7 ~]#cat /data/ansible/files/install_mysql8.0.yml

---
# install mysql-8.0.19-linux-glibc2.12-x86_64.tar.xz
- hosts: dbsrvs
remote_user: root
gather_facts: no
tasks:
- name: install packages
yum: name=libaio,numactl-libs,libaio,ncurses-c++-libs,ncurses-compat-libs
- name: create mysql group
group: name=mysql gid=360
- name: create mysql user
user: name=mysql uid=360 group=mysql shell=/sbin/nologin system=yes create_home=no home=/data/mysql
- name: copy tar to remote host and file mode
unarchive: src=/data/ansible/files/mysql-8.0.19-linux-glibc2.12-x86_64.tar.xz dest=/usr/local/ owner=root group=root
- name: create linkfile /usr/local/mysql
file: src=/usr/local/mysql-8.0.19-linux-glibc2.12-x86_64 dest=/usr/local/mysql state=link
- name: config my.cnf
copy: src=/data/ansible/files/my.cnf dest=/etc/my.cnf
- name: data dir
shell: /usr/local/mysql/bin/mysqld --initialize --user=mysql --datadir=/data/mysql
tags: data
- name: service script
shell: /bin/cp /usr/local/mysql/support-files/mysql.server /etc/init.d/mysqld
- name: enable service
shell: /etc/init.d/mysqld  start;chkconfig --add mysqld;chkconfig mysqld on
tags: service
- name: PATH variable
copy: content='PATH=/usr/local/mysql/bin/:$PATH' dest=/etc/profile.d/mysql.sh
- name: password
shell: mysqladmin -uroot -p`awk '/A temporary password/{print $NF}' /data/mysql/mysql.log` password magedu

方式二:

ansible的centos8安装mysql8.0,安装完毕退出终端重新登录即可登录MYSQL用户。
#方式一:
[root@centos7 files]#cat install_mysql8.0.yml
---
# install mysql-8.0.19-linux-glibc2.12-x86_64.tar.xz
- hosts: dbsrvs
  remote_user: root
  gather_facts: no
  tasks:
    - name: install packages
      yum: name=libaio,numactl-libs,libaio,ncurses-c++-libs,ncurses-compat-libs
    - name: create mysql group
      group: name=mysql gid=360
    - name: create mysql user
      user: name=mysql uid=360 group=mysql shell=/sbin/nologin system=yes create_home=no home=/data/mysql
    - name: copy tar to remote host and file mode
      unarchive: src=/data/ansible/files/mysql-8.0.19-linux-glibc2.12-x86_64.tar.xz dest=/usr/local/ owner=root group=root
    - name: create linkfile /usr/local/mysql
      file: src=/usr/local/mysql-8.0.19-linux-glibc2.12-x86_64 dest=/usr/local/mysql state=link
    - name: config my.cnf
      copy: src=/data/ansible/files/my.cnf dest=/etc/my.cnf
    - name: data dir
      shell: /usr/local/mysql/bin/mysqld --initialize --user=mysql --datadir=/data/mysql --basedir=/usr/local/mysql
    - name: service script
      shell: cp /usr/local/mysql/support-files/mysql.server /etc/init.d/mysqld
    - name: enable service
      shell: /etc/init.d/mysqld start;chkconfig --add mysqld;chkconfig mysqld on
    - name: PATH variable
      copy: content='PATH=/usr/local/mysql/bin/:$PATH' dest=/etc/profile.d/mysql.sh
    - name: effective PATH
      shell: source /etc/profile.d/mysql.sh
    - name: password
      shell: mysqladmin -uroot -p`awk '/A temporary password/{print $NF}' /data/mysql/mysql.log` password magedu

#指定dbsrvs中10.0.0.18安装mysql8.0
[root@centos7 ~]#ansible-playbook /data/ansible/files/install_mysql8.0.yml   --limit 10.0.0. 1 8
centos7安装MYSQL8.0剧本为:
方式一:

[root@centos7 ~]#cat  /data/ansible/files/install_mysql8.0.yml
---
# install mysql-8.0.19-linux-glibc2.12-x86_64.tar.xz
- hosts:  dbsrvs
remote_user: root
gather_facts: no
tasks:
- name: install packages
yum: name=libaio,numactl-libs,libaio,ncurses-libs
- name: create mysql group
group: name=mysql gid=360
- name: create mysql user
user: name=mysql uid=360 group=mysql shell=/sbin/nologin system=yes create_home=no home=/data/mysql
- name: copy tar to remote host and file mode
unarchive: src=/data/ansible/files/mysql-8.0.19-linux-glibc2.12-x86_64.tar.xz dest=/usr/local/ owner=root group=root
- name: create linkfile /usr/local/mysql
file: src=/usr/local/mysql-8.0.19-linux-glibc2.12-x86_64 dest=/usr/local/mysql state=link
- name: config my.cnf
copy: src=/data/ansible/files/my.cnf dest=/etc/my.cnf
- name: data dir
shell: /usr/local/mysql/bin/mysqld --initialize --user=mysql --datadir=/data/mysql --basedir=/usr/local/mysql
- name: service script
shell: cp /usr/local/mysql/support-files/mysql.server /etc/init.d/mysqld
- name: enable service
shell: /etc/init.d/mysqld start;chkconfig --add mysqld;chkconfig mysqld on
- name: PATH variable
copy: content='PATH=/usr/local/mysql/bin/:$PATH' dest=/etc/profile.d/mysql.sh
- name: effective PATH
shell: source /etc/profile.d/mysql.sh
- name: password
shell: mysqladmin -uroot -p`awk '/A temporary password/{print $NF}' /data/mysql/mysql.log` password magedu

方式二:

[root@centos7 ~]#cat  /data/ansible/files/C7_install_mysql.yaml
---
- hosts: dbsrvs
remote_user: root
gather_facts: no
tasks:
- name: 创建Mysql用户
shell: id mysql &> /dev/null || useradd -r -d /data/mysql -s /sbin/nologin mysql
- name: 安装依赖包
yum: name=libaio,perl-Data-Dumper,ncurses-libs
- name: 创建mysql的家目录文件夹
file: path=/data/mysql state=directory owner=mysql group=mysql
- name: 解压二进制程序
unarchive: src=/data/ansible/files/mysql-8.0.19-linux-glibc2.12-x86_64.tar.xz dest=/usr/local owner=root group=root
- name: 将压缩后的文件设置为软链接
file: src=/usr/local/mysql-8.0.19-linux-glibc2.12-x86_64 dest=/usr/local/mysql state=link
- name: 环境变量
copy: content='PATH=/usr/local/mysql/bin/:$PATH' dest=/etc/profile.d/mysql.sh
- name: 同步环境变量
shell: source /etc/profile.d/mysql.sh
- name: 准备MySQL配置文件
copy: content='[mysqld]\ndatadir = /data/mysql\nsocket=/data/mysql/mysql.sock\nlog-error=/data/mysql/mysql.log\npid-file=/data/mysql/mysql.pid\n\n[client]\nport=3306\nsocket=/data/mysql/mysql.sock\n' dest=/etc/my.cnf
- name: 生成数据库文件
shell: /usr/local/mysql/bin/mysqld --initialize --user=mysql --datadir=/data/mysql
- name: 复制服务启动文件
shell: /bin/cp /usr/local/mysql/support-files/mysql.server  /etc/init.d/mysqld
- name: 启动mysql服务并设置开机启动
shell: chkconfig --add mysqld;chkconfig mysqld on;service mysqld start
- name: 修改mysql默认密码
shell: mysqladmin  -uroot -p`awk '/A temporary password/{print $NF}' /data/mysql/mysql.log` password 123456

#指定dbsrvs中10.0.0.17安装mysql8.0
[root@centos7 ~]#ansible-playbook /data/ansible/files/install_mysql8.0.yml   --limit 10.0.0. 17
