

// Index.ets @Entry @Component struct Index { @State message: string = 'Hello World'
build() { Row() { Column() { Text(this.message) .fontSize(50) .fontWeight(FontWeight.Bold) } .width('100%') } .height('100%') } }
1. 添加按钮。 在默认页面基础上,我们添加一个Button组件,作为按钮响应用户点击,从而实现跳转到另一个页面。“Index.ets”文件的示例如下:
// Index.ets @Entry @Component struct Index { @State message: string = 'Hello World'
build() { Row() { Column() { Text(this.message) .fontSize(50) .fontWeight(FontWeight.Bold) // 添加按钮,以响应用户点击 Button() { Text('Next') .fontSize(30) .fontWeight(FontWeight.Bold) } .type(ButtonType.Capsule) .margin({ top: 20 }) .backgroundColor('#0D9FFB') .width('40%') .height('5%') } .width('100%') } .height('100%') } }
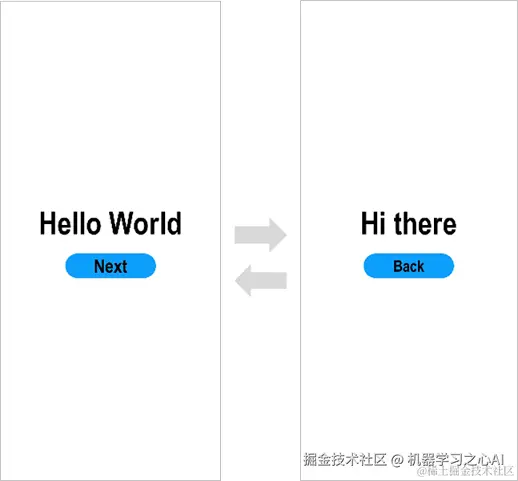
1. 在编辑窗口右上角的侧边工具栏,点击Previewer,打开预览器。第一个页面效果如下图所示:

### 构建第二个页面
1. 创建第二个页面。
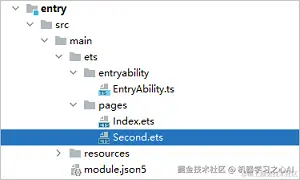
* 新建第二个页面文件。在“Project”窗口,打开“entry > src > main > ets ”,右键点击“pages”文件夹,选择“New > ArkTS File”,命名为“Second”,点击“Finish”。可以看到文件目录结构如下:
说明 开发者也可以在右键点击“pages”文件夹时,选择“New > Page”,则无需手动配置相关页面路由。
* 配置第二个页面的路由。在“Project”窗口,打开“entry > src > main > resources > base > profile”,在main\_pages.json文件中的“src”下配置第二个页面的路由“pages/Second”。示例如下:
{ "src": [ "pages/Index", "pages/Second" ] }
1. 添加文本及按钮。 参照第一个页面,在第二个页面添加Text组件、Button组件等,并设置其样式。“Second.ets”文件的示例如下:
// Second.ets @Entry @Component struct Second { @State message: string = 'Hi there'
build() { Row() { Column() { Text(this.message) .fontSize(50) .fontWeight(FontWeight.Bold) Button() { Text('Back') .fontSize(25) .fontWeight(FontWeight.Bold) } .type(ButtonType.Capsule) .margin({ top: 20 }) .backgroundColor('#0D9FFB') .width('40%') .height('5%') } .width('100%') } .height('100%') } }
### 实现页面间的跳转


页面间的导航可以通过[页面路由router](https://gitee.com/vip204888)来实现。页面路由router根据页面url找到目标页面,从而实现跳转。使用页面路由请导入router模块。


1. 第一个页面跳转到第二个页面。 在第一个页面中,跳转按钮绑定onClick事件,点击按钮时跳转到第二页。“Index.ets”文件的示例如下:
// Index.ets // 导入页面路由模块 import router from '@ohos.router';
@Entry @Component struct Index { @State message: string = 'Hello World'
build() {
Row() {
Column() {
Text(this.message)
.fontSize(50)
.fontWeight(FontWeight.Bold)
// 添加按钮,以响应用户点击
Button() {
Text('Next')
.fontSize(30)
.fontWeight(FontWeight.Bold)
}
.type(ButtonType.Capsule)
.margin({
top: 20
})
.backgroundColor('#0D9FFB')
.width('40%')
.height('5%')
// 跳转按钮绑定onClick事件,点击时跳转到第二页
.onClick(() => {
console.info(Succeeded in clicking the 'Next' button.)
// 跳转到第二页
router.pushUrl({ url: 'pages/Second' }).then(() => {
console.info('Succeeded in jumping to the second page.')
}).catch((err) => {
console.error(Failed to jump to the second page.Code is ${err.code}, message is ${err.message})
})
})
}
.width('100%')
}
.height('100%')
}
}
1. 第二个页面返回到第一个页面。 在第二个页面中,返回按钮绑定onClick事件,点击按钮时返回到第一页。“Second.ets”文件的示例如下:
// Second.ets // 导入页面路由模块 import router from '@ohos.router';
@Entry @Component struct Second { @State message: string = 'Hi there'
build() {
Row() {
Column() {
Text(this.message)
.fontSize(50)
.fontWeight(FontWeight.Bold)
Button() {
Text('Back')
.fontSize(25)
.fontWeight(FontWeight.Bold)
}
.type(ButtonType.Capsule)
.margin({
top: 20
})
.backgroundColor('#0D9FFB')
.width('40%')
.height('5%')
// 返回按钮绑定onClick事件,点击按钮时返回到第一页
.onClick(() => {
console.info(Succeeded in clicking the 'Back' button.)
try {
// 返回第一页
router.back()
console.info('Succeeded in returning to the first page.')
} catch (err) {
console.error(Failed to return to the first page.Code is ${err.code}, message is ${err.message})
}
})
}
.width('100%')
}
.height('100%')
}
}
1. 打开“Index.ets”文件,点击预览器中的按钮进行刷新。效果如下图所示:
### 使用真机运行应用
运行HarmonyOS应用可以使用远程模拟器和物理真机设备,区别在于使用远程模拟器运行应用不需要对应用进行签名。接下来将以物理真机设备为例,介绍HarmonyOS应用的运行方法,关于模拟器的使用请参考[使用Remote Emulator运行应用/服务](https://gitee.com/vip204888)。
1. 将搭载HarmonyOS系统的真机与电脑连接。具体指导及要求,可查看[使用本地真机运行应用/服务](https://gitee.com/vip204888)。
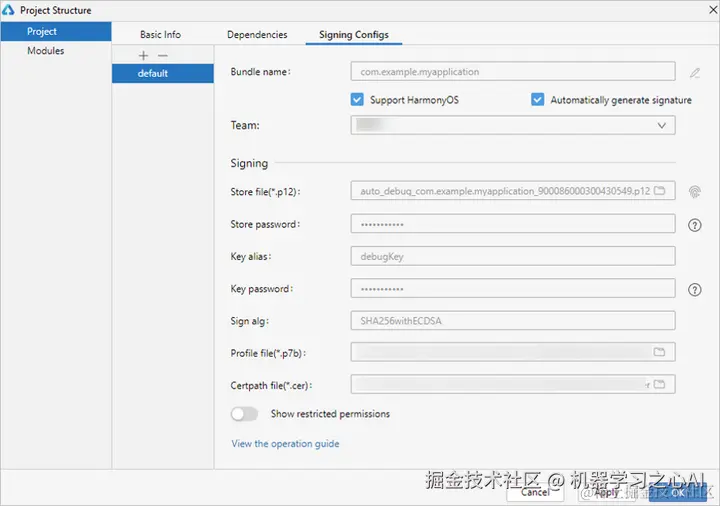
2. 点击File > Project Structure… > Project > SigningConfigs界面勾选“Support HarmonyOS”和“Automatically generate signature”,点击界面提示的“Sign In”,使用华为帐号登录。等待自动签名完成后,点击“OK”即可。如下图所示:
1. 在编辑窗口右上角的工具栏,点击按钮运行。效果如下图所示:


**既有适合小白学习的零基础资料,也有适合3年以上经验的小伙伴深入学习提升的进阶课程,涵盖了95%以上物联网嵌入式知识点,真正体系化!**
**由于文件比较多,这里只是将部分目录截图出来,全套包含大厂面经、学习笔记、源码讲义、实战项目、大纲路线、电子书籍、讲解视频,并且后续会持续更新**
**[如果你需要这些资料,可以戳这里获取](https://gitee.com/vip204888)**
