1. 训练卷积神经网络(CNN)模型
样本:github.com/mc6666/Kera…
# 手写阿拉伯数字识别

本项目将使用 TensorFlow 和 Keras 构建一个卷积神经网络(CNN)模型来识别手写阿拉伯数字。以下是各个步骤的详细说明。
import tensorflow as tf
import numpy as np
import matplotlib.pyplot as plt
from tensorflow.keras.preprocessing.image import ImageDataGenerator
from skimage import io
from skimage.transform import resize
plt.rcParams['font.sans-serif'] = ['SimHei']
plt.rcParams['axes.unicode_minus'] = False
## 步骤1:加载 MNIST 手写阿拉伯数字数据
我们将使用 Keras 提供的 MNIST 数据集,它包含了 60000 个训练样本和 10000 个测试样本,每个样本是一个 28x28 像素的灰度图像。
mnist = tf.keras.datasets.mnist
(x_train, y_train), (x_test, y_test) = mnist.load_data()
## 步骤2:数据清理
此步骤无需进行,因为 MNIST 数据集已经过清理和处理。
## 步骤3:特征工程
将图像数据的像素值缩放到 (0, 1) 之间,以提高模型的训练效果。
x_train_norm, x_test_norm = x_train / 255.0, x_test / 255.0
## 步骤4:数据分割
加载 MNIST 数据时已经完成了数据分割。
## 步骤5:建立改进的模型结构
我们将构建一个卷积神经网络(CNN),包含多个卷积层、池化层和全连接层。
model = tf.keras.models.Sequential([
    tf.keras.layers.Reshape((28, 28, 1), input_shape=(28, 28)),
    tf.keras.layers.Conv2D(32, (3, 3), activation='relu'),
    tf.keras.layers.MaxPooling2D((2, 2)),
    tf.keras.layers.Conv2D(64, (3, 3), activation='relu'),
    tf.keras.layers.MaxPooling2D((2, 2)),
    tf.keras.layers.Conv2D(64, (3, 3), activation='relu'),
    tf.keras.layers.Flatten(),
    tf.keras.layers.Dense(256, activation='relu'),
    tf.keras.layers.BatchNormalization(),
    tf.keras.layers.Dropout(0.3),
    tf.keras.layers.Dense(128, activation='relu'),
    tf.keras.layers.BatchNormalization(),
    tf.keras.layers.Dropout(0.3),
    tf.keras.layers.Dense(10, activation='softmax')
])
## 编译模型
我们使用 Adam 优化器和稀疏分类交叉熵损失函数来编译模型,并选择准确率作为评估指标。
model.compile(optimizer='adam',
              loss='sparse_categorical_crossentropy',
              metrics=['accuracy'])
## 步骤6:使用数据增强进行模型训练
我们将使用图像数据生成器对训练数据进行数据增强,以提高模型的泛化能力。
datagen = ImageDataGenerator(
rotation_range=10,
width_shift_range=0.1,
height_shift_range=0.1,
zoom_range=0.1,
shear_range=0.1
)
history = model.fit(datagen.flow(x_train_norm.reshape(-1, 28, 28, 1), y_train, batch_size=128),
steps_per_epoch=len(x_train_norm) // 128,
epochs=20,
validation_data=(x_test_norm.reshape(-1, 28, 28, 1), y_test))
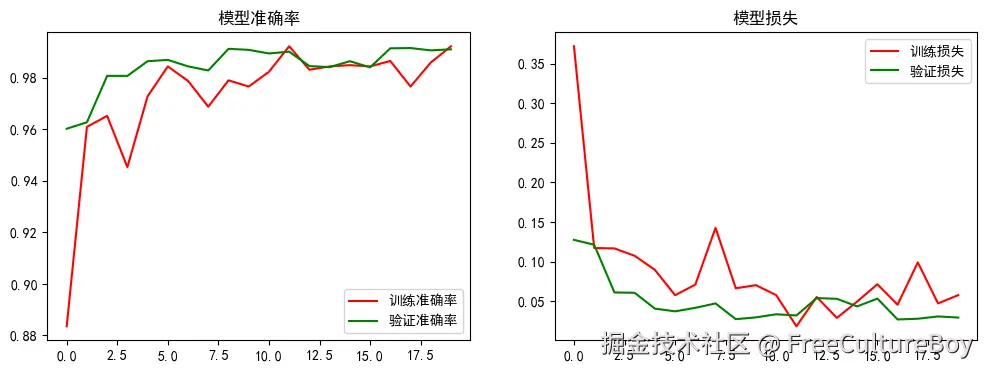
## 绘制训练过程的准确率和损失
我们将绘制模型在训练过程中的准确率和损失,以便于观察模型的训练情况。
plt.figure(figsize=(12, 4))
plt.subplot(1, 2, 1)
plt.plot(history.history['accuracy'], 'r', label='训练准确率')
plt.plot(history.history['val_accuracy'], 'g', label='验证准确率')
plt.title('模型准确率')
plt.legend()

plt.subplot(1, 2, 2)
plt.plot(history.history['loss'], 'r', label='训练损失')
plt.plot(history.history['val_loss'], 'g', label='验证损失')
plt.title('模型损失')
plt.legend()
plt.show()
## 步骤7:评分
我们将使用测试数据集对模型进行评分,以评估其性能。
score = model.evaluate(x_test_norm.reshape(-1, 28, 28, 1), y_test, verbose=0)
print(f'测试准确率: {score[1]:.4f}')
## 步骤8:评估
我们将使用测试数据集对模型进行预测,并显示前 20 个测试样本的实际值和预测值。
predictions = np.argmax(model.predict(x_test_norm.reshape(-1, 28, 28, 1)), axis=-1)
print('实际值    :', y_test[:20])
print('预测值    :', predictions[:20])
## 步骤9:模型部署
将训练好的模型保存到文件,以便在后续的预测任务中使用。
model.save('models/DigitSense_model_improved.keras')
## 步骤10:新数据预测
定义一个函数,用于对新图像进行预测。
def predict_digit(file_path):
image = io.imread(file_path, as_gray=True)
image_resized = resize(image, (28, 28), anti_aliasing=True)
X = np.abs(1 - image_resized).reshape(1, 28, 28, 1)
prediction = np.argmax(model.predict(X), axis=-1)
plt.imshow(image, cmap='gray')
plt.title(f'预测结果: {prediction[0]}')
plt.axis('off')
plt.show()
return prediction[0]
## 测试自定义图像
使用自定义图像进行测试,并显示预测结果。
for i in range(10):
    file_path = f'./data/images/{i}.png'
    predicted_digit = predict_digit(file_path)
    print(f'图像 {i}.png 的预测结果: {predicted_digit}')
## 显示模型汇总信息
显示模型的结构和参数数量。
model.summary()
2. streamlit 创建验证页面
import streamlit as st
from streamlit_drawable_canvas import st_canvas
from skimage.color import rgb2gray, rgba2rgb
from skimage.transform import resize
import numpy as np
import tensorflow as tf
model = tf.keras.models.load_model("models/DigitSense_model_improved.keras", compile=False)
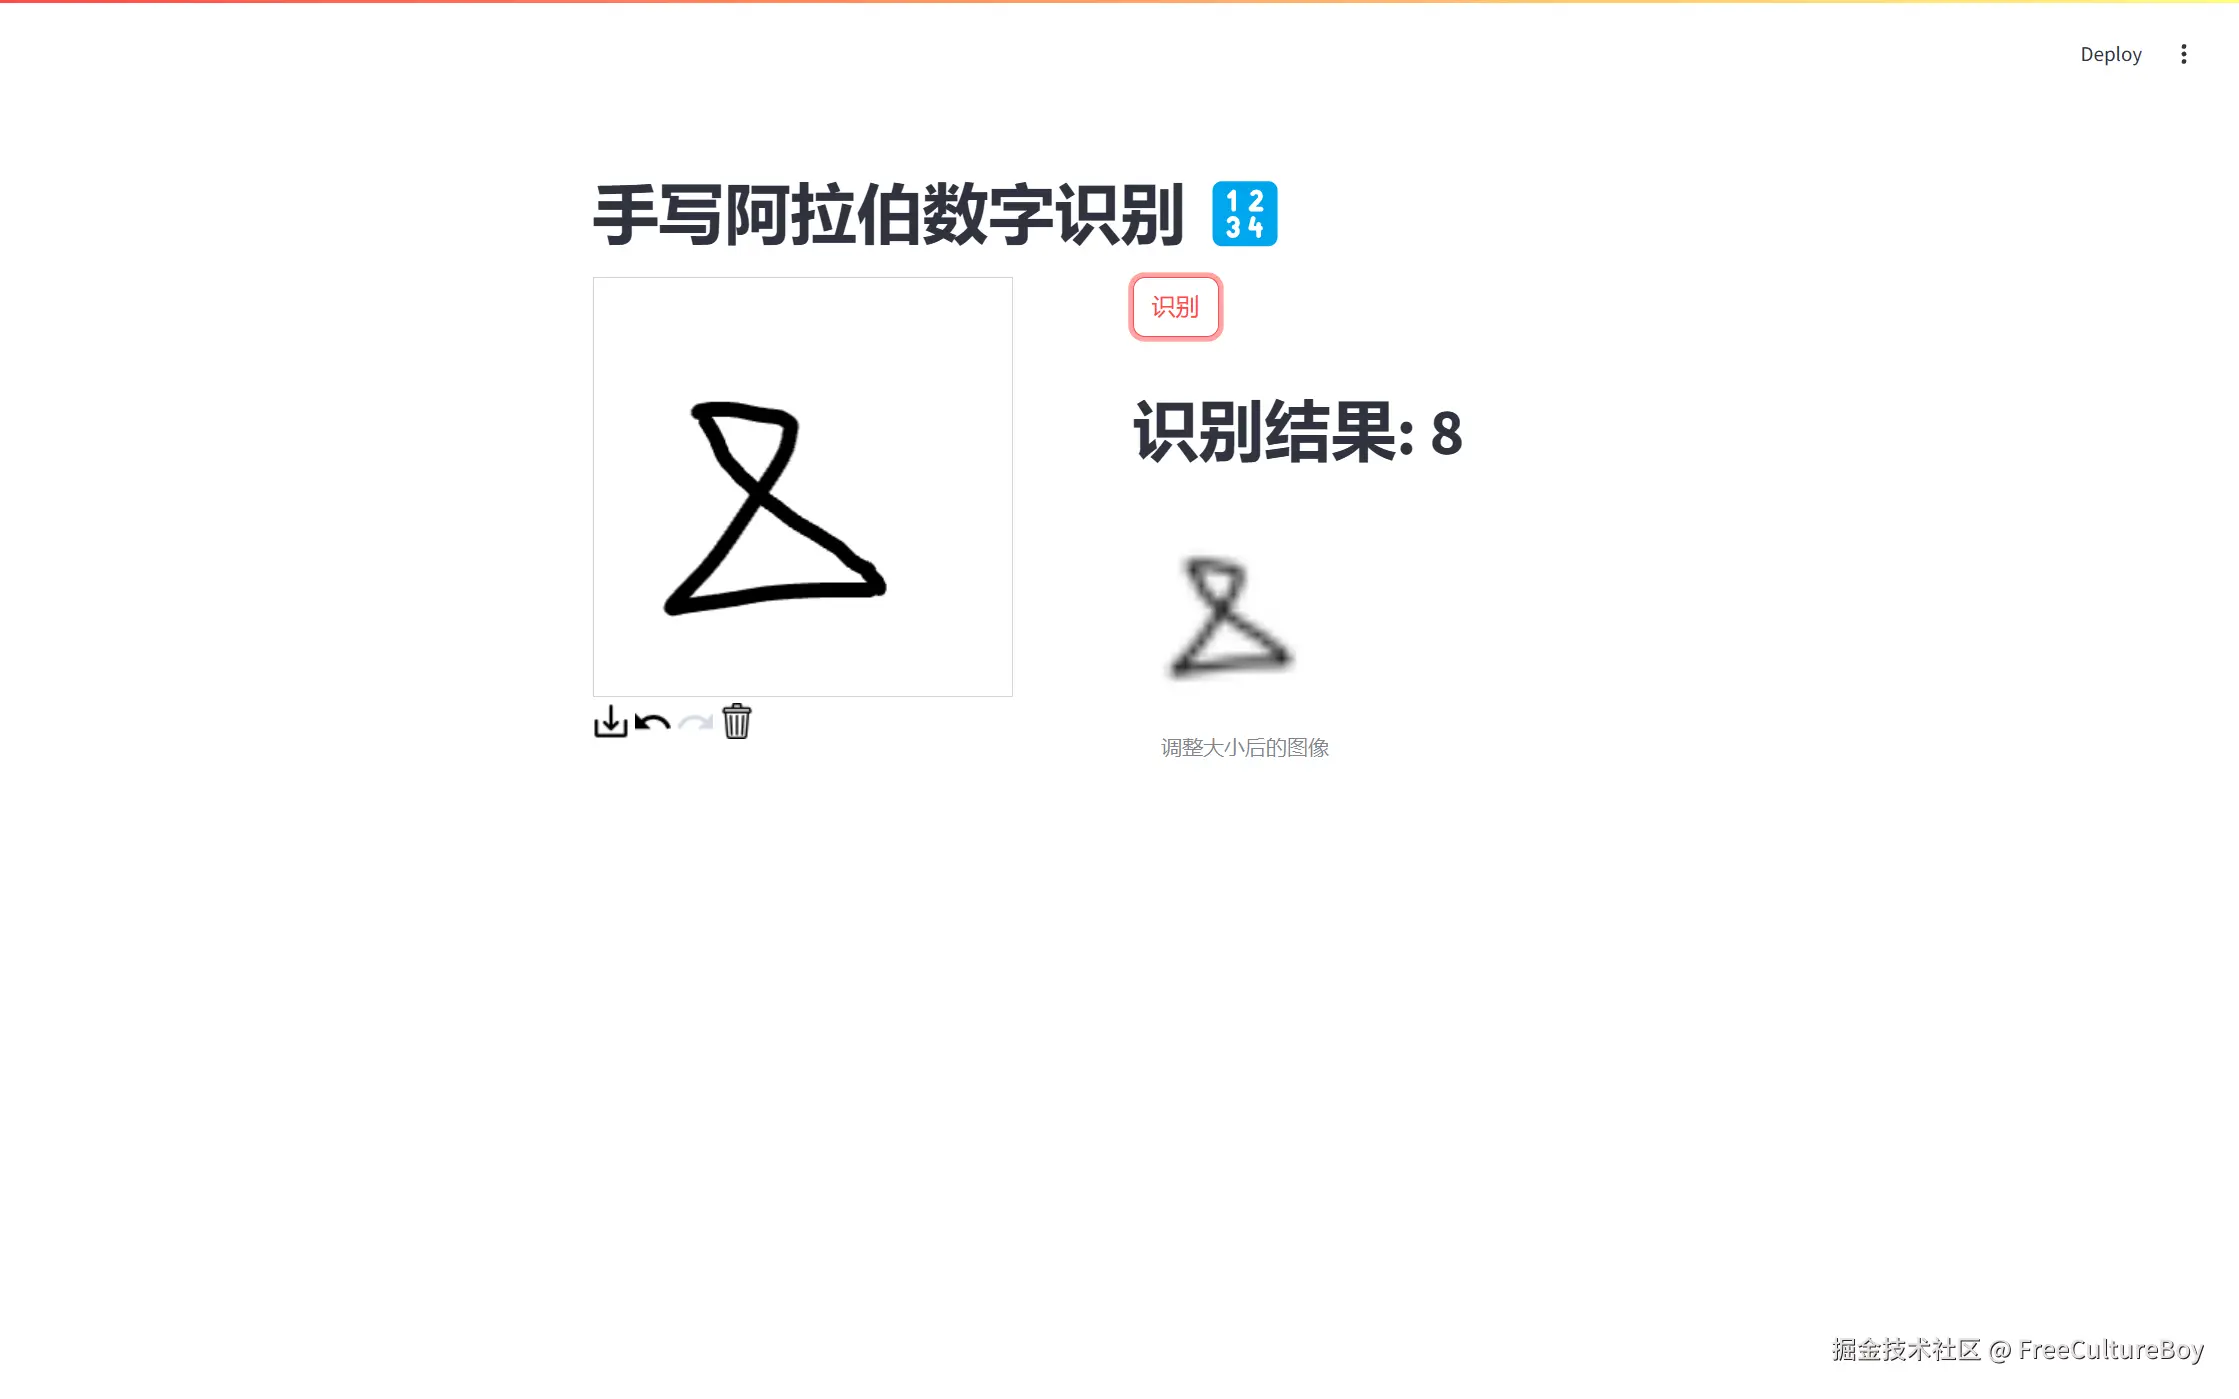
st.title("手写阿拉伯数字识别 🔢")
col1, col2 = st.columns(2)
with col1:
canvas_result = st_canvas(
fill_color="rgba(0, 0, 0, 1)",
stroke_width=10,
stroke_color="rgba(0, 0, 0, 1)",
update_streamlit=True,
width=280,
height=280,
drawing_mode="freedraw",
key="canvas1",
)
with col2:
if st.button("识别"):
if canvas_result.image_data is not None:
gray_image = rgb2gray(rgba2rgb(canvas_result.image_data))
resized_image = resize(gray_image, (28, 28), anti_aliasing=True)
processed_image = np.abs(1 - resized_image).reshape(1, 28, 28)
prediction_status = st.empty()
prediction_status.write("预测中...")
predictions = np.argmax(model.predict(processed_image), axis=-1)
prediction_status.write(f"# 识别结果: {predictions[0]}")
st.image(resized_image, caption="调整大小后的图像", width=150)
else:
st.warning("请先在画布上绘制数字。")