一、前言
上一篇 vue3源码之createApp 中,简单分析了createApp()和mount()两个方法的来源和大致执行流程,这里我们首先也引用一下之前的图例:
创建好app后执行mount函数,通过createVNode()将入口文件App.vue转换为VNode树,然后使用patch()函数将VNode树转换为真实DOM渲染到页面。
Vue3的diff算法其实跟Vue2类似,都是在patch()中进行。
那么我们一步一步来看如果走到diff算法。
二、createVNode(生成虚拟节点)
createVNode:创建一个vnode虚拟节点。
export const createVNode = (
  __DEV__ ? createVNodeWithArgsTransform : _createVNode
) as typeof _createVNode

function _createVNode(
  type: VNodeTypes | ClassComponent | typeof NULL_DYNAMIC_COMPONENT,
  props: (Data & VNodeProps) | null = null,
  children: unknown = null,
  patchFlag: number = 0,
  dynamicProps: string[] | null = null,
  isBlockNode = false,
): VNode {
  if (!type || type === NULL_DYNAMIC_COMPONENT) {
    if (__DEV__ && !type) {
      warn(`Invalid vnode type when creating vnode: ${type}.`)
    }
    type = Comment
  }

  if (isVNode(type)) {
    // createVNode receiving an existing vnode. This happens in cases like
    // <component :is="vnode"/>
    // #2078 make sure to merge refs during the clone instead of overwriting it
    const cloned = cloneVNode(type, props, true /* mergeRef: true */)
    if (children) {
      normalizeChildren(cloned, children)
    }
    if (isBlockTreeEnabled > 0 && !isBlockNode && currentBlock) {
      if (cloned.shapeFlag & ShapeFlags.COMPONENT) {
        currentBlock[currentBlock.indexOf(type)] = cloned
      } else {
        currentBlock.push(cloned)
      }
    }
    cloned.patchFlag |= PatchFlags.BAIL
    return cloned
  }

  // class component normalization.
  if (isClassComponent(type)) {
    type = type.__vccOpts
  }

  // 2.x async/functional component compat
  if (__COMPAT__) {
    type = convertLegacyComponent(type, currentRenderingInstance)
  }

  // class & style normalization.
  if (props) {
    // for reactive or proxy objects, we need to clone it to enable mutation.
    props = guardReactiveProps(props)!
    let { class: klass, style } = props
    if (klass && !isString(klass)) {
      props.class = normalizeClass(klass)
    }
    if (isObject(style)) {
      // reactive state objects need to be cloned since they are likely to be
      // mutated
      if (isProxy(style) && !isArray(style)) {
        style = extend({}, style)
      }
      props.style = normalizeStyle(style)
    }
  }

  // encode the vnode type information into a bitmap
  const shapeFlag = isString(type)
    ? ShapeFlags.ELEMENT
    : __FEATURE_SUSPENSE__ && isSuspense(type)
      ? ShapeFlags.SUSPENSE
      : isTeleport(type)
        ? ShapeFlags.TELEPORT
        : isObject(type)
          ? ShapeFlags.STATEFUL_COMPONENT
          : isFunction(type)
            ? ShapeFlags.FUNCTIONAL_COMPONENT
            : 0

  if (__DEV__ && shapeFlag & ShapeFlags.STATEFUL_COMPONENT && isProxy(type)) {
    type = toRaw(type)
    warn(
      `Vue received a Component that was made a reactive object. This can ` +
        `lead to unnecessary performance overhead and should be avoided by ` +
        `marking the component with \`markRaw\` or using \`shallowRef\` ` +
        `instead of \`ref\`.`,
      `\nComponent that was made reactive: `,
      type,
    )
  }

  return createBaseVNode(
    type,
    props,
    children,
    patchFlag,
    dynamicProps,
    shapeFlag,
    isBlockNode,
    true,
  )
}
在createApp()时,他只有一个参数type(传入App.vue),其中type可以为字符串、也可以为组件,甚至是一个VNode对象。
- 首先会对
type进行判断,在没有传入type或指定为v-ndc,会将其转化为注释节点类型 - 然后会判断此时
type是否是VNode对象- 如果是,则返回传入的
VNode对象的拷贝(大部分属性是浅拷贝) - 如果不是,则进入后续处理(
App.vue就不是)
- 如果是,则返回传入的
- 然后进行类组件判断处理
- 之后会处理组件的
class和style - 最后通过
createBaseVnode()创建VNode返回
然后,mount函数内部会通过render函数对VNode进行真实DOM的解析和渲染。
render函数内部是通过Vnode对象是否存在来判断是进行挂载/更新还是卸载dom节点。如果有vnode对象,则调用patch进行vnode的解析和渲染,否则调用unmount进行卸载。
const render: RootRenderFunction = (vnode, container, namespace) => {
    if (vnode == null) {
    if (container._vnode) {
    unmount(container._vnode, null, null, true)
    }
    } else {
    patch(
    container._vnode || null,
    vnode,
    container,
    null,
    null,
    null,
    namespace,
    )
    }
    if (!isFlushing) {
    isFlushing = true
    flushPreFlushCbs()
    flushPostFlushCbs()
    isFlushing = false
    }
    container._vnode = vnode
}
三、patch(vnode节点处理)
vue项目中,模版中除了元素和组件之外,还会有注释节点等内容,所以在解析时,需要对其进行分类处理。
patch函数根据vnode对象的不同类型调用不同的处理方法,如果有绑定ref属性,还会将绑定的ref元素(dom节点或组件实例)添加到当前的vue实例上。
patch方法的调用可能会在以下几个地方:
- 在组件初始化时,调用
mount方法挂载组件到容器中。- 在组件更新时,调用
render函数生成新的虚拟 DOM 树,并将新的虚拟 DOM 树与旧的虚拟 DOM 树进行对比,并通过patch方法将变化更新到实际的 DOM 上总之,
patch方法是在渲染过程中被调用的,用于将虚拟 DOM 更新到实际的 DOM 上,保持页面的视图与数据的同步。
patch大致流程如下:
- 判断新旧vnode对象是否完全相等,相等时退出
旧vnode存在且新旧vnode对象的类型不一致时,会卸载旧节点,并将旧节点设置为null- 根据新节点的
patchFlag判断是否需要优化 - 根据新节点的不同类型(
type),调用不同的处理方法 - 如果设置了
ref属性,则调用setRef处理对应绑定关系
四、processFunctions (节点处理过程)
之前说过,在patch中,会根据节点类型来调用不同方法进行虚拟节点的实际处理和dom更新。
1、processText、processCommentNode
processText:纯文本节点
processCommentNode:注释节点
const processText: ProcessTextOrCommentFn = (n1, n2, container, anchor) => {
    if (n1 == null) {
      hostInsert(
        (n2.el = hostCreateText(n2.children as string)),
        container,
        anchor,
      )
    } else {
      const el = (n2.el = n1.el!)
      if (n2.children !== n1.children) {
        hostSetText(el, n2.children as string)
      }
    }
  }

  const processCommentNode: ProcessTextOrCommentFn = (
    n1,
    n2,
    container,
    anchor,
  ) => {
    if (n1 == null) {
      hostInsert(
        (n2.el = hostCreateComment((n2.children as string) || '')),
        container,
        anchor,
      )
    } else {
      // there's no support for dynamic comments
      n2.el = n1.el
    }
  }
**纯文本节点:**如果不存在旧节点,就在container(父级节点)中插入节点的文本内容;反之,比较值是否相等,若不相等则直接更新。
**注释节点:**第一步跟纯文本节点一致,不同的是若旧节点存在,直接更新el属性。
举个例子:
编译前:
<div>
  <p>{{ message }}</p>
  <!-- This is a comment -->
</div>
编译后的VNode树:
{
  type: 'div',
  children: [
    {
      type: 'p',
      children: [
        {
          type: 'text',
          content: '{{ message }}'
        }
      ]
    },
    {
      type: 'comment',
      content: ' This is a comment '
    }
  ]
}
在这个示例中,processText 方法将模板中的 {{ message }} 文本内容转换成了文本节点 VNode,并放置在 p 元素节点的 children 属性中。而 processCommentNode 方法将模板中的注释内容转换成了注释节点 VNode,并放置在 div 元素节点的 children 属性中。
2、mountStaticNode
mountStaticNode:挂载静态节点,直接将这个节点的内容插入到父级元素的指定位置下
case Static:
    if (n1 == null) {
        mountStaticNode(n2, container, anchor, namespace)
    } else if (__DEV__) {
        patchStaticNode(n1, n2, container, namespace)
    }
    break

// -------------------

const mountStaticNode = (
    n2: VNode,
    container: RendererElement,
    anchor: RendererNode | null,
    namespace: ElementNamespace,
  ) => {
    // static nodes are only present when used with compiler-dom/runtime-dom
    // which guarantees presence of hostInsertStaticContent.
    ;[n2.el, n2.anchor] = hostInsertStaticContent!(
      n2.children as string,
      container,
      anchor,
      namespace,
      n2.el,
      n2.anchor,
    )
  }

  /**
   * Dev / HMR only
   */
  const patchStaticNode = (
    n1: VNode,
    n2: VNode,
    container: RendererElement,
    namespace: ElementNamespace,
  ) => {
    // static nodes are only patched during dev for HMR
    if (n2.children !== n1.children) {
      const anchor = hostNextSibling(n1.anchor!)
      // remove existing
      removeStaticNode(n1)
      // insert new
      ;[n2.el, n2.anchor] = hostInsertStaticContent!(
        n2.children as string,
        container,
        anchor,
        namespace,
      )
    } else {
      n2.el = n1.el
      n2.anchor = n1.anchor
    }
  }
如果是 开发环境,内容更新时还会用 patchStaticNode 来进行更新,但是 生产环境下只会在原节点被销毁之后才会进行挂载,也就是在 Vue 3 中提到的 静态提升,用来进行性能优化
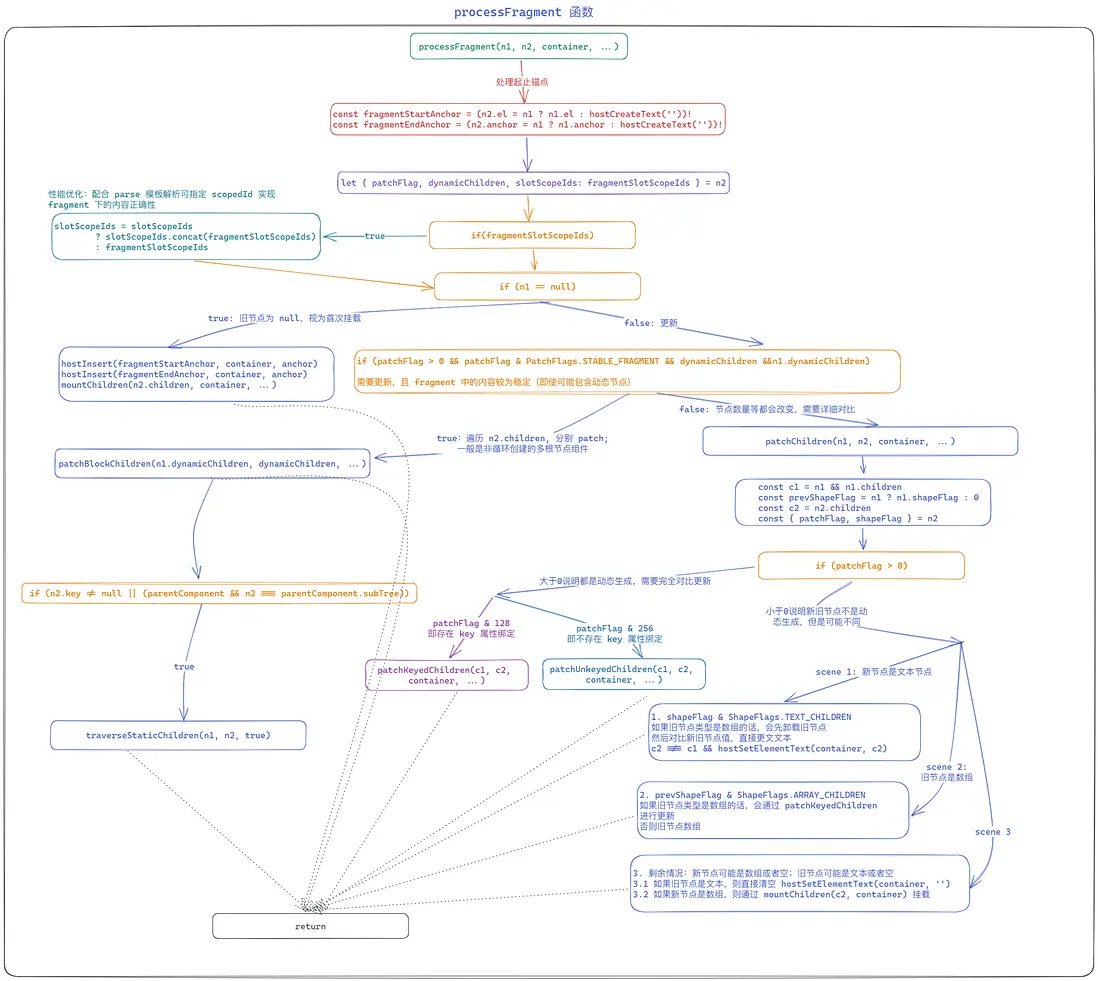
3、processFragment
processFragment:多根节点处理
Vue2中,template下只能有一个根组件,但Vue3中,进行了优化,支持添加多个根节点。
1)首次渲染
const processFragment = (
    n1: VNode | null,
    n2: VNode,
    container: RendererElement,
    anchor: RendererNode | null,
    parentComponent: ComponentInternalInstance | null,
    parentSuspense: SuspenseBoundary | null,
    namespace: ElementNamespace,
    slotScopeIds: string[] | null,
    optimized: boolean,
  ) => {
    const fragmentStartAnchor = (n2.el = n1 ? n1.el : hostCreateText(''))!
    const fragmentEndAnchor = (n2.anchor = n1 ? n1.anchor : hostCreateText(''))!

    let { patchFlag, dynamicChildren, slotScopeIds: fragmentSlotScopeIds } = n2

    // check if this is a slot fragment with :slotted scope ids
    if (fragmentSlotScopeIds) {
      slotScopeIds = slotScopeIds
        ? slotScopeIds.concat(fragmentSlotScopeIds)
        : fragmentSlotScopeIds
    }

    if (n1 == null) {
      hostInsert(fragmentStartAnchor, container, anchor)
      hostInsert(fragmentEndAnchor, container, anchor)
      mountChildren(
        (n2.children || []) as VNodeArrayChildren,
        container,
        fragmentEndAnchor,
        parentComponent,
        parentSuspense,
        namespace,
        slotScopeIds,
        optimized,
      )
    } else {
      ......
    }
  }
首次渲染与更新都有共同逻辑,即 设置多根节点组件的开始与终止锚点,然后将组件的每个根节点按顺序向中间插入。
示例:
<template>
  <div class="fragment-1">
    <h1>{{ name }} Page</h1>
  </div>
  <div class="fragment-2">
    <h1>Fragment Page</h1>
  </div>
  <div class="fragment-3">
    <h1>Fragment Page</h1>
  </div>
</template>

<script lang="ts" setup>
import {ref} from 'vue'
const name = ref<string | undefined>('FragmentOne')
</script>
这个组件会被解析为:
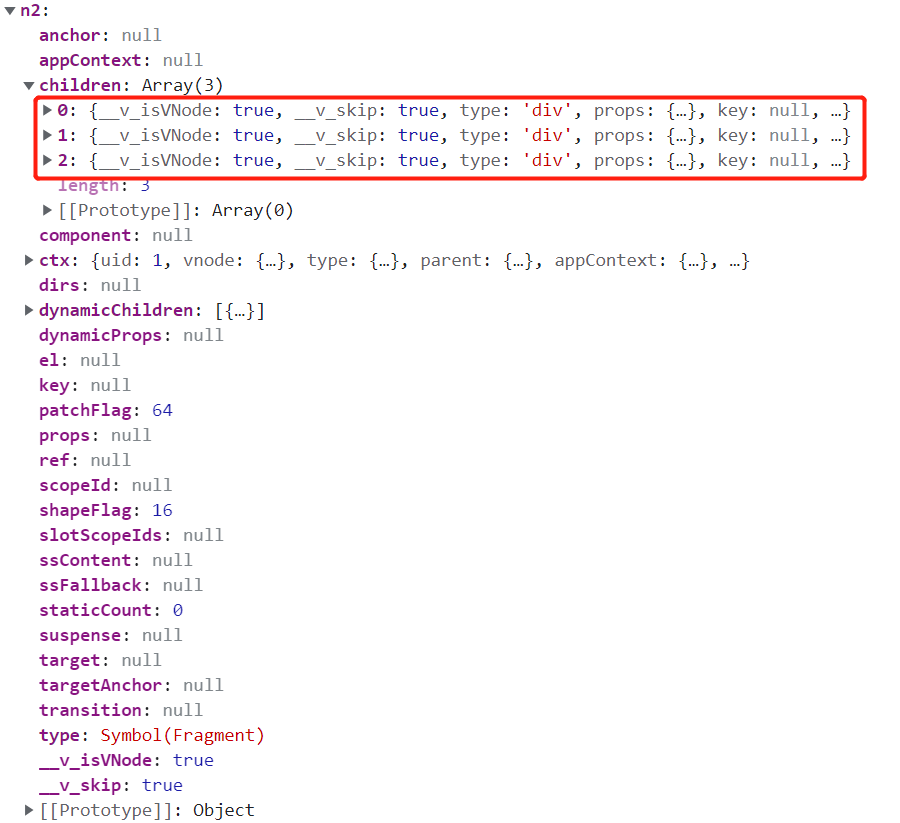
children 数组中就是每一个根节点,然后在处理锚点时,因为是首次渲染,两个锚点会直接设置为两个空文本节点:

最后,会通过 mountChildren 方法遍历 children 数组,依次执行 patch() 处理每一个子元素。
2)派发更新
if (n1 == null) {
    ......
} else {
      if (
        patchFlag > 0 &&
        patchFlag & PatchFlags.STABLE_FRAGMENT &&
        dynamicChildren &&
        // #2715 the previous fragment could've been a BAILed one as a result
        // of renderSlot() with no valid children
        n1.dynamicChildren
      ) {
        // a stable fragment (template root or <template v-for>) doesn't need to
        // patch children order, but it may contain dynamicChildren.
        patchBlockChildren(
          n1.dynamicChildren,
          dynamicChildren,
          container,
          parentComponent,
          parentSuspense,
          namespace,
          slotScopeIds,
        )
        if (__DEV__) {
          // necessary for HMR
          traverseStaticChildren(n1, n2)
        } else if (
          // #2080 if the stable fragment has a key, it's a <template v-for> that may
          //  get moved around. Make sure all root level vnodes inherit el.
          // #2134 or if it's a component root, it may also get moved around
          // as the component is being moved.
          n2.key != null ||
          (parentComponent && n2 === parentComponent.subTree)
        ) {
          traverseStaticChildren(n1, n2, true /* shallow */)
        }
      } else {
        // keyed / unkeyed, or manual fragments.
        // for keyed & unkeyed, since they are compiler generated from v-for,
        // each child is guaranteed to be a block so the fragment will never
        // have dynamicChildren.
        patchChildren(
          n1,
          n2,
          container,
          fragmentEndAnchor,
          parentComponent,
          parentSuspense,
          namespace,
          slotScopeIds,
          optimized,
        )
      }
    }
这里分两种情况:
- 是稳定节点且具有动态节点(v-for等),通过
patchBlockChildren单独处理动态节点,然后通过traverseStaticChildren遍历所有子节点进行对el属性处理 - 不是稳定节点,则通过
patchChildren来对比更新每个子节点
patchChildren最终就会进入Vue3的核心diff过程 ——patchKeyedChildren
4、processElement
processElement:HTML元素处理
在解析模板生成 VNode 的过程中,没有指定节点类型是默认都会设置 shapeFlag 为 ShapeFlags.ELEMENT,也就是原生的 HTML 节点类型;大部分时候,我们所说的 diff 算法核心部分也发生在这个过程中。
与 processComponent 类似,Element 元素的处理主要也只区分 oldVnode (也就是方法中的 n1)是否为 null,如果是,则代表是首次渲染;如果不是,则代表是对这个节点进行更新。
根据这两种情况,源码中分别定义了两个方法:mountElement 挂载节点、patchElement 更新节点。
mountElement 的过程比较复杂,包含了根节点(这个元素节点)创建、内容(文本还是包含子节点)处理、样式和类名绑定、自定义指令、生命周期监听等。
而 patchElement 的过程也同样复杂,除了与 mount 阶段一样需要处理样式类名绑定、自定义指令等内容之外,还要比较新旧节点内容进行 patch 相关更新函数的处理。

5、processComponent
processComponent:组件处理
const processComponent = (
    n1: VNode | null,
    n2: VNode,
    container: RendererElement,
    anchor: RendererNode | null,
    parentComponent: ComponentInternalInstance | null,
    parentSuspense: SuspenseBoundary | null,
    namespace: ElementNamespace,
    slotScopeIds: string[] | null,
    optimized: boolean,
  ) => {
    n2.slotScopeIds = slotScopeIds
    if (n1 == null) {
      if (n2.shapeFlag & ShapeFlags.COMPONENT_KEPT_ALIVE) {
        ;(parentComponent!.ctx as KeepAliveContext).activate(
          n2,
          container,
          anchor,
          namespace,
          optimized,
        )
      } else {
        mountComponent(
          n2,
          container,
          anchor,
          parentComponent,
          parentSuspense,
          namespace,
          optimized,
        )
      }
    } else {
      updateComponent(n1, n2, optimized)
    }
  }
对 Component 自定义 Vue 组件的处理,同样会区分 n1 == null 的情况来确认是挂载还是更新;Vue 中内置的 KeepAlive、Translation 等组件也一样会在这里进行处理。
如果是 KeepAlive 组件中包装的组件,会设置标志位 shapeFlag 为 ShapeFlags.COMPONENT_KEPT_ALIVE,因为 KeepAlive 中的组件会被缓存,如果再次切换的话,需要恢复缓存状态,所以在组件重新 挂载 时会执行另外的逻辑 parent.ctx.activate();非 KeepAlive 包裹的组件则直接调用 mountComponent 执行组件挂载。
而组件 更新 时,则只需要直接调用 updateComponent 更新组件内容。

五、patchChildren(两种 diff 方式)
在上面的不同类型的 VNode 节点的处理过程中,自定义组件 Component、传送组件 Teleport、多根节点 Fragment 和 原始 HTML 节点 Element 在 patch 更新过程中,在处理子节点时 都有可能会调用 patchChildren 来处理子节点的更新。
在 patchChildren 过程中,会判断节点的 patchFlag 标志位,来确定 子节点数组是否配置了 key 属性。如果 存在 key,则会通过 patchKeyedChildren 对 新旧所有子节点进行 diff 处理,详细对比可复用节点并调用 patch 进行节点的最小量更新;而对于 不存在 key 的子节点数组,则调用 patchUnkeyedChildren 方法 按照新旧子节点数组中的最小长度,遍历最小长度下 新旧节点同位置的元素调用 patch 方法进行对比,遍历结束后在处理剩余节点元素(新的挂载旧的移除)。
1、patchUnkeyedChildren (无key子节点处理)
patchUnkeyedChildren 会按照新旧子节点数组的 最小长度 进行遍历,所以首先会获取他们的长度进行对比得到较小的那个 length:
c1 = c1 || EMPTY_ARR
c2 = c2 || EMPTY_ARR
const oldLength = c1.length
const newLength = c2.length
const commonLength = Math.min(oldLength, newLength)
然后通过这个最小长度 commonLength 来进行遍历,处理 新旧数组的同位置的子节点:
for (i = 0; i < commonLength; i++) {
    const nextChild = (c2[i] = optimized ? cloneIfMounted(c2[i] as VNode) : normalizeVNode(c2[i]))
    patch(
        c1[i],
        nextChild,
        container,
        null,
        parentComponent,
        parentSuspense,
        namespace,
        slotScopeIds,
        optimized,
    )
}
最后在处理剩余元素,移除旧的添加新的:
if (oldLength > newLength) {
    // remove old
    unmountChildren(
        c1,
        parentComponent,
        parentSuspense,
        true,
        false,
        commonLength,
    )
} else {
    // mount new
    mountChildren(
        c2,
        container,
        anchor,
        parentComponent,
        parentSuspense,
        namespace,
        slotScopeIds,
        optimized,
        commonLength,
    )
}
因为不存在
key,所以深入对比新旧节点的变化更加消耗性能,不如直接 当做位置没有发生改变,直接更新同位置节点。
2、patchKeyedChildren (核心)
当节点 具有 key 属性时,节点更新时就会进行我们常说的 diff 过程,核心也就是为了 dom 节点复用,把相同 key 属性的节点视为同一节点,根据属性的实际变化来更新具体的 dom 属性,以达到最少操作的目的。
在 Vue 2 中,对于这种情况采用的是 双端对比算法 来完成 新旧节点数组的全量对比,但是这种方法不是最快的。
Vue 3 在此基础上,借鉴了 ivi 和 inferno 两个框架所用到的 快速 Diff 算法,并在此基础上进行了扩展,得到了如今源码中使用的 diff 算法。
简化源码后以两个字符串数组进行比较:
const list = document.querySelector('#process');

const isSameVNodeType = (n1, n2) => (n1 === n2);
const unmount = (node) => {
  console.log('unmount', node);
};
const patch = (n1, n2) => {
  console.log('patch', n1, n2);
};
const move = (node, anchor) => {
  console.log('move', node, 'anchor', anchor);
};

// https://en.wikipedia.org/wiki/Longest_increasing_subsequence
function getSequence(arr) {
  const p = arr.slice();
  const result = [0];
  let i;let j;let u;let v;let c;
  const len = arr.length;
  for (i = 0;i < len;i++) {
    const arrI = arr[i];
    if (arrI !== 0) {
      j = result[result.length - 1];
      if (arr[j] < arrI) {
        p[i] = j;
        result.push(i);
        continue;
      }
      u = 0;
      v = result.length - 1;
      while (u < v) {
        c = (u + v) >> 1;
        if (arr[result[c]] < arrI) {
          u = c + 1;
        } else {
          v = c;
        }
      }
      if (arrI < arr[result[u]]) {
        if (u > 0) {
          p[i] = result[u - 1];
        }
        result[u] = i;
      }
    }
  }
  u = result.length;
  v = result[u - 1];
  while (u-- > 0) {
    result[u] = v;
    v = p[v];
  }
  return result;
}


// 正式开始
// 定义新旧节点数据
const c1 = ['a', 'b', 'c', 'd', 'e', 'f', 'g'];
const c2 = ['a', 'b', 'e', 'd', 'h', 'f', 'g'];

// 设置初始数据
let i = 0;
const l2 = c2.length;
let e1 = c1.length - 1; // prev ending index
let e2 = l2 - 1; // next ending index

// 1. sync from start
while (i <= e1 && i <= e2) {
  const n1 = c1[i];
  const n2 = c2[i];
  if (isSameVNodeType(n1, n2)) {
    patch(n1, n2);
  } else {
    break;
  }
  i++;
}

// 2. sync from end
while (i <= e1 && i <= e2) {
  const n1 = c1[e1];
  const n2 = c2[e2];
  if (isSameVNodeType(n1, n2)) {
    patch(n1, n2);
  } else {
    break;
  }
  e1--;
  e2--;
}

// 3. common sequence + mount
if (i > e1) {
  if (i <= e2) {
    const nextPos = e2 + 1;
    while (i <= e2) {
      patch(null, c2[i]);
      i++;
    }
  }
}

// 4. common sequence + unmount
else if (i > e2) {
  while (i <= e1) {
    unmount(c1[i]);
    i++;
  }
}

// 5. unknown sequence
else {
  const s1 = i; // prev starting index
  const s2 = i; // next starting index

  // 5.1 build key:index map for newChildren
  const keyToNewIndexMap = new Map();
  for (i = s2;i <= e2;i++) {
    const nextChild = c2[i];
    if (nextChild != null) {
      keyToNewIndexMap.set(nextChild, i);
    }
  }

  // 5.2 loop through old children left to be patched and try to patch
  // matching nodes & remove nodes that are no longer present
  let j;
  let patched = 0;
  const toBePatched = e2 - s2 + 1;
  let moved = false;
  let maxNewIndexSoFar = 0;
  const newIndexToOldIndexMap = new Array(toBePatched);

  for (i = 0;i < toBePatched;i++) {
    newIndexToOldIndexMap[i] = 0;
  }

  for (i = s1;i <= e1;i++) {
    const prevChild = c1[i];
    if (patched >= toBePatched) {
      // all new children have been patched so this can only be a removal
      unmount(prevChild);
      continue;
    }

    let newIndex;
    if (prevChild != null) {
      newIndex = keyToNewIndexMap.get(prevChild);
    } else {
      // key-less node, try to locate a key-less node of the same type
      for (j = s2;j <= e2;j++) {
        if (
          newIndexToOldIndexMap[j - s2] === 0 &&
            isSameVNodeType(prevChild, c2[j])
        ) {
          newIndex = j;
          break;
        }
      }
    }

    if (newIndex === undefined) {
      unmount(prevChild);
    } else {
      newIndexToOldIndexMap[newIndex - s2] = i + 1;
      if (newIndex >= maxNewIndexSoFar) {
        maxNewIndexSoFar = newIndex;
      } else {
        moved = true;
      }
      patch(prevChild, c2[newIndex]);
      patched++;
    }
  }

  // 5.3 move and mount
  const increasingNewIndexSequence = moved ? getSequence(newIndexToOldIndexMap) : [];
  j = increasingNewIndexSequence.length - 1;
  for (i = toBePatched - 1;i >= 0;i--) {
    const nextIndex = s2 + i;
    const nextChild = c2[nextIndex];
    const anchor = nextIndex + 1 < l2 ? c2[nextIndex + 1] : null;
    if (newIndexToOldIndexMap[i] === 0) {
      // mount new
      patch(null, nextChild);
    } else if (moved) {
      if (j < 0 || i !== increasingNewIndexSequence[j]) {
        // move(nextChild, container, anchor, MoveType.REORDER)
        move(nextChild, anchor);
      } else {
        j--;
      }
    }
  }
}
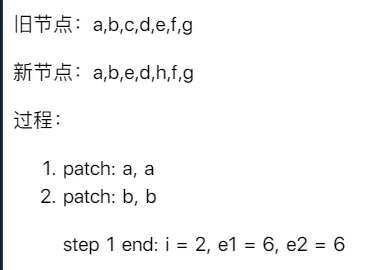
举例:
旧节点:['a', 'b', 'c', 'd', 'e', 'f', 'g']

新节点:['a', 'b', 'e', 'd', 'h', 'f', 'g']
经过的 diff 过程如下:

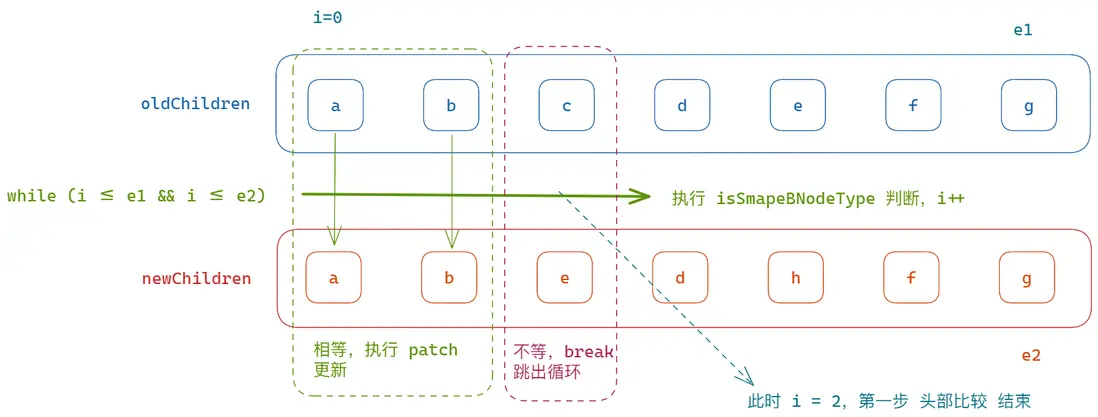
大致步骤:
- 从头开始、同位置比较,直到 遇到
key不一样的节点(也就是第三位c和e,此时i= 2) - 从尾开始、倒序同位置比较,直到 遇到
key不一样的节点或者第一步的停止位i(也就是遇到倒数第三位e和h,此时e1和e2都等于 4) - 经过前两步之后,剩下的节点虽然有相同节点,但是顺序已经改变,所以需要重新处理。这里与 Vue 2 中的 双端均不相同 的情况有些类似的过程,都会将一个节点数组转为
map形式然后遍历另一个数组进行匹配和更新。但是这里也一样有一些不同,我们在后面分析时进行详细说明。
这里可以发现 实际执行过程并没有完全匹配代码中的 5 种情况,这是因为 三和四这两种情况都是发生在前两步结束后已经有一个节点数组已经全部遍历完毕。
3、快速diff算法
根据《Vue.js 设计与实现》的说明:快速 Diff 算法包含预处理步骤,这其实是借鉴了纯文本 Diff 算法的思路。在纯文本 Diff 算法中,存在对两段文本进行预处理的过程。
在这个过程中,会 分别查找头部完全一致的内容与尾部完全一致的内容,将其排除后再比较剩余内容。

两段文本中只需要更新的仅仅只有中间部分,需要将 vue 改为 react。
接下来,我们以这个例子进行整个 diff 过程的解析~
1、从头查找最长相同 key 节点
假设现在有这样的内容:
它在第一步结束后,更新到了第二个节点;i 会停留在第一个不同的节点位置。
此时剩余内容为:
旧节点: ['c', 'd', 'e', 'f', 'g'];

新节点: ['e', 'd', 'h', 'f', 'g'];
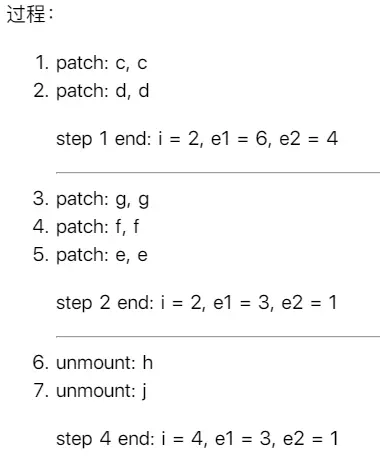
2、从尾部倒序查找最长相同 key 节点
在第二步结束之后,会进行这样的更新:
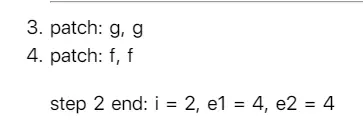
这一步不会处理 i 的位置,而是从两个数组的最末尾节点依次按顺序对比同位置节点:
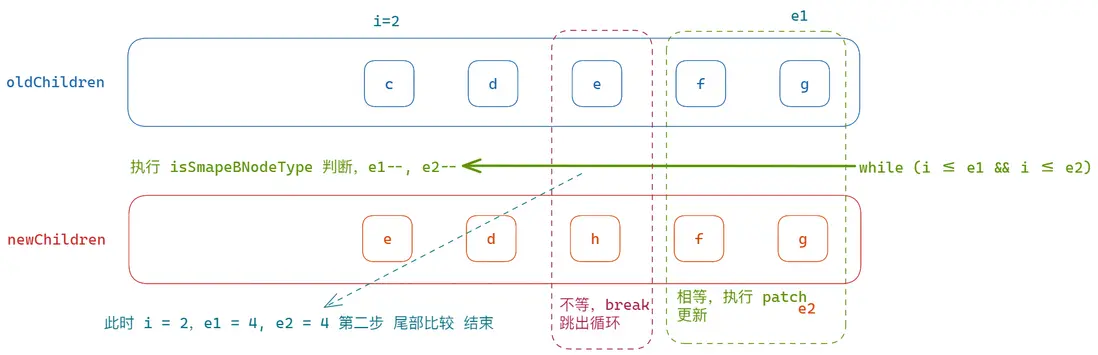
3、旧节点数组被遍历结束
因为最初的例子中没有触发代码中的第三、四步,所以这里的例子进行一下调整:
旧节点: ['c', 'd', 'e', 'f', 'g'];

新节点: ['c', 'd', 'h', 'j', 'e', 'f', 'g'];
此时过程如下:
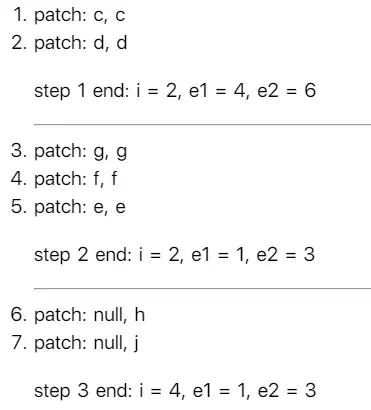
也就是对新节点数组剩余元素进行依次遍历和挂载
4、新节点数组被遍历结束
第 三、四、五 三个步骤属于 互斥情况,所以源码中采用的是
if判断
因为这三个情况不一样,所以这一步需要对前面的例子再进行修改,假设新示例如下:
旧节点: ['c', 'd', 'h', 'j', 'e', 'f', 'g'];

新节点: ['c', 'd', 'e', 'f', 'g'];
此时的步骤就刚好与第三步相反:
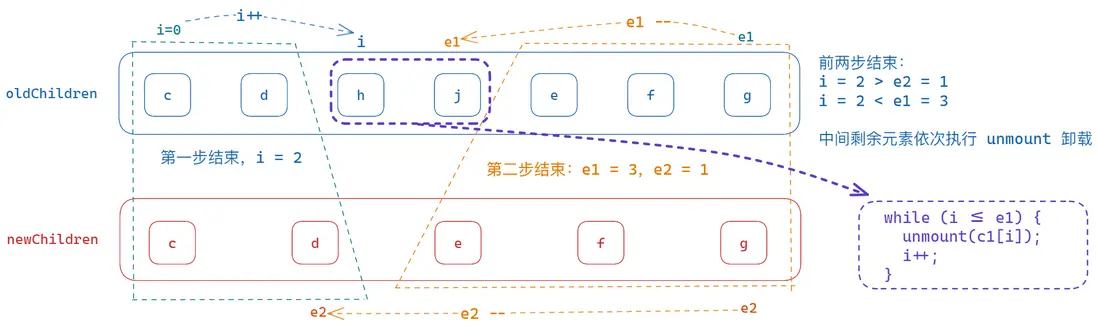
也就是对旧节点数组剩余元素进行依次遍历和卸载
5、剩余节点对比(移动、更新、卸载)
只有在这一步才用到了 最长递增子序列 算法。
在这一步开始之前,我们先了解一下什么是 最长递增子序列算法。
5.1、最长递增子序列
在一个给定的数值序列中,找到一个子序列,使得这个子序列元素的数值依次递增,并且这个子序列的长度尽可能地大。最长递增子序列中的元素在原序列中不一定是连续的
原始序列:
0, 8, 4, 12, 2, 10, 6, 14, 1, 9, 5, 13, 3, 11, 7, 15
最长递增子序列为:
值得注意的是,生成的递增子序列数组中的元素,在原数组中对应的元素下标不一定是连续的。

在 Vue 3 中,这个算法被提取成了一个工具方法 getSequence,位于 renderer.ts 文件的最底部。并且,Vue 3 中最这个方法进行了改造,最终生成的子序列 是以可生成 最长 子串数组的可用元素的 最大索引。
如果使用 Vue 3 中的 getSequence 方法来处理上面的这个原始序列,会得到这样的结果:
区别如下:

getSequence 方法的大致过程如下:
- 复制一份
arr数组,用于记录每个元素在递增子序列中的前驱元素。 - 初始化
result数组为[0],用于记录递增子序列的索引。 - 遍历
arr数组,如果当前元素不为 0,则在递增子序列result中查找比当前元素小的最大元素的索引j。 - 如果
arr[j] < arr[i],则将p[i]赋值为j,并将i添加到递增子序列result中。 - 否则,使用二分查找在递增子序列
result中查找比当前元素小的最大元素的索引u。 - 如果
arr[i]小于result[u],则将p[i]赋值为result[u-1]。 - 将
i添加到递增子序列result中。 - 通过
p数组回溯递增子序列,生成最终的递增新索引序列。
5.2、新节点剩余元素构建 Map
这一步就很简单了,直接循环 newChildren 的 i 到 e2 之间的剩余元素,组成一个 key => index 的 Map。
const s1 = (s2 = i);

const keyToNewIndexMap = new Map();
for (i = s2;i <= e2;i++) {
  const nextChild = c2[i];
  if (nextChild != null) {
    keyToNewIndexMap.set(nextChild, i);
  }
}
5.3、与旧节点的对比复用
在 newChildren 的对应关系 keyToNewIndexMap 创建好之后,就会遍历 oldChildren 对比 key 相同的 VNode 实例进行复用和更新。
而对于比较结束后依旧剩余的旧节点则直接进行 unmount 卸载(因为剩余的旧节点 key 都不能复用,所以直接视为废弃节点)。
简化代码如下:
let j;
let patched = 0; // 已更新节点数
const toBePatched = e2 - s2 + 1; // newChildren 剩余节点数(需要更新)
let moved = false; // 节点位置是否移动标识
let maxNewIndexSoFar = 0; // 当前元素在新节点数组最大索引
const newIndexToOldIndexMap = new Array(toBePatched); // 新旧节点索引对应关系

for (i = 0;i < toBePatched;i++) {
  newIndexToOldIndexMap[i] = 0;
}

// 遍历旧节点数组
for (i = s1;i <= e1;i++) {
  const prevChild = c1[i]; // 当前旧节点元素
  if (patched >= toBePatched) {
    // 如果以更新节点数大于等于需要更新节点数,
    // 说明新节点以全部更新,剩余旧节点直接移除,并跳出当次循环
    unmount(prevChild);
    continue;
  }

  // 判断当前节点是否有key,存在则在 map 中查找,
  // 不存在则遍历新节点剩余数组的相同节点并更新索引
  let newIndex;
  // 这里是判断 prevChild.key != null
  if (prevChild != null) {
    newIndex = keyToNewIndexMap.get(prevChild);
  } else {
    // key-less node, try to locate a key-less node of the same type
    for (j = s2;j <= e2;j++) {
      if (
        newIndexToOldIndexMap[j - s2] === 0 &&
          isSameVNodeType(prevChild, c2[j])
      ) {
        newIndex = j;
        break;
      }
    }
  }

  if (newIndex === undefined) {
    // 依然没有找到同key或者同 VNodeType的新节点,则卸载旧节点
    unmount(prevChild);
  } else {
    // 找到了对应新节点,对比索引位置设置 moved 标识,执行 patch 更新
    newIndexToOldIndexMap[newIndex - s2] = i + 1;
    if (newIndex >= maxNewIndexSoFar) {
      // 如果新节点的索引大于等于 maxNewIndexSoFar,
      // 则将 maxNewIndexSoFar 更新为新节点的索引
      maxNewIndexSoFar = newIndex;
    } else {
      // 说明向前移动了
      moved = true;
    }
    patch(prevChild, c2[newIndex]);
    patched++; // 已更新 +1
  }
}
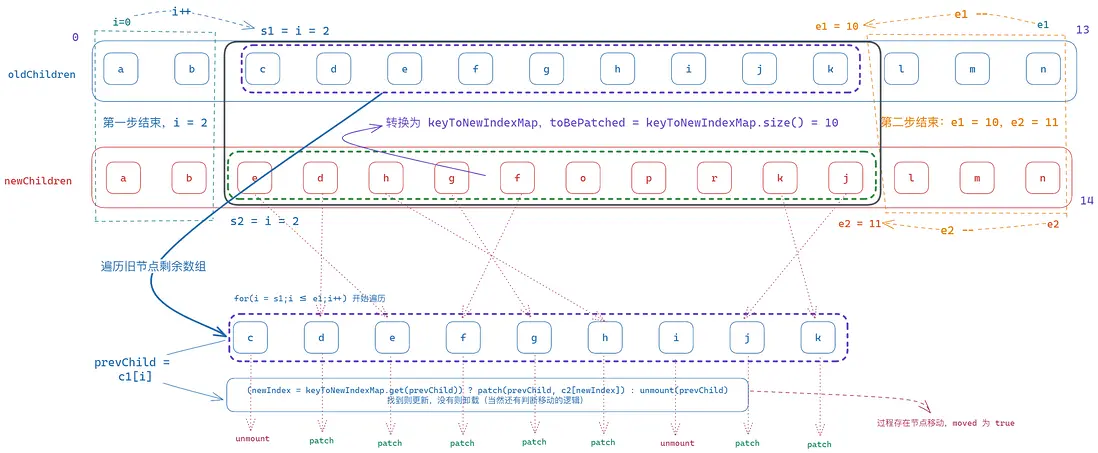
为了能更加体现整个过程中变化,我们将上面的例子进行一下扩充:
旧节点: ['a', 'b', 'c', 'd', 'e', 'f', 'g', 'h', 'i', 'j', 'k', 'l', 'm', 'n'];

新节点: ['a', 'b', 'e', 'd', 'h', 'g', 'f', 'o', 'p', 'r', 'k', 'j', 'l', 'm', 'n'];
其中包含了前两步的 头部相同节点,尾部相同节点,中间部分也包含了卸载、移动、更新三种情况,并且数据量已经比较大,可以看出整体过程。
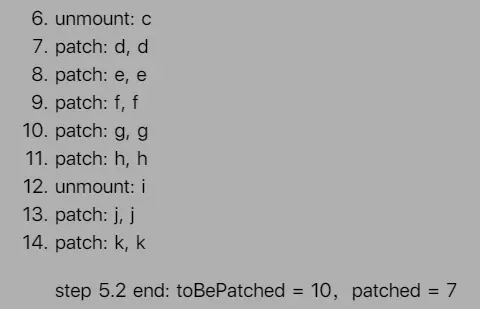
在第一步新节点数组索引 Map 对象构建结束之后,我们会的得到一个 size 为 10 的 keyToNewIndexMap,并且此时的 需要更新节点数标识 toBePatched 为 10(因为都有 key 属性,所以此时 toBePatched = keyToNewIndexMap.size())。
然后会遍历旧节点数组查找 key 相同的节点的下标 newIndex(如果找不到还会在 newChildren 新节点的剩余数组中查找 未被使用过 newIndexToOldIndexMap[j - s2] === 0 且同类型判断 isSameVNodeType 为 true 的节点,并将它的 index 下标作为 newIndex)。
这个过程结束后,如果 newIndex 依然是 undefined,则证明这个节点无法被复用,直接卸载;如果存在的话,则调用 patch 对比更新新旧节点元素。
大致过程如下:
此时新节点剩余数组中仍然还有剩余元素没有被挂载,而且节点顺序不对,就需要进行最后一步:新建节点与位置移动
5.4、新建节点与位置移动
在这一步的开始,会判断 5.2 结束后的 moved 标识,判断是否需要进行移动判定;如果需要的话,会通过 getSequence 查找位置更新的最长递增子串的 元素下标。
const increasingNewIndexSequence = moved ? getSequence(newIndexToOldIndexMap) : [];
j = increasingNewIndexSequence.length - 1;
这里的
newIndexToOldIndexMap记录了新节点剩余数组中,每个节点的在旧节点剩余数组中的位置下标,如果不存在记录则为 0。
此时数据如下:
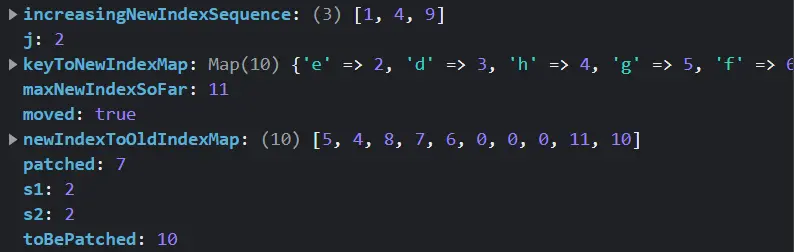
这里的最长递增子串下标数组就是
[1, 4, 9],对应的也就是newChildren[4], newChildren[6], newChildren[11],剩下的元素会根据这三个元素的位置进行插入。
然后,对比新旧节点的索引进行移动或者新增:
if (newIndexToOldIndexMap[i] === 0) {
  patch(null, nextChild);
} else if (moved) {
  if (j < 0 || i !== increasingNewIndexSequence[j]) {
    move(nextChild, anchor);
  } else {
    j--;
  }
}
整个过程大致为:
- 获取子节点在新
VNode中的位置nextIndex和子节点VNode对象nextChild。 - 获取子节点的后一个兄弟节点或父节点作为锚点
anchor。 - 如果新旧
VNode中该子节点对应的旧节点的索引为 0,则表示该子节点在旧VNode中不存在,需要新建该节点并挂载到容器中。 - 如果该子节点需要移动,则根据增序列和当前遍历的位置 i 的关系来判断是否需要移动,如果需要移动,则调用
move函数来移动该节点到正确的位置。

小结
到这里,Vue 3 的整个 渲染和更新 阶段的分析就基本上结束了。
整个过程可能与我们没有了解源码之前的理解有很大出入,比如我以前就以为 最长递增子串 是在更新阶段都会进行的算法,或者在 5.2、5.3 阶段的实际过程与 Vue 2 中的逻辑是类似的。
但是实际分析之后才会发现整个过程与我的以前的理解大相径庭。
在 Vue 3 中,对模板的编译和渲染做了大量的优化,在 编译阶段 通过 动态节点收集和静态节点提升,为 渲染阶段 的性能提升打下了坚实的基础,并且配合 快速 Diff 算法 与 最长递增子串,相比 Vue 2 在 patchChildren 子节点更新 做出了巨大提升。
完整流程: