

黑马程序员uni-app 小兔鲜儿 项目及bug记录(上)
文档食用指南
-
心很挣扎,是要复制官方文档然后再上面基础上进行修改来写这篇博客还是什么(这样从头到尾只要打开我这一个网页即可)想了想,还是算了,就对官方文档做个补充吧。 :scroll:
-
这篇博客能解决您写小兔线遇到的疑惑和bug,day1,我还记录了些代码,到了day2后,就是专注解决疑惑和bug与介绍项目这样些的好处:比如哑组件模式、Promise性能调优等。
-
一些没有放到官方文档的阶段性繁琐代码(比如写过很多遍的封装请求) 也加入了本文
-
:book:本文档与官方文档配合使用 小兔鲜儿小程序 | uniapp+vue3+ts (gitee.io)
-
这个老师课和备案比vue3小兔鲜好太多 :1st_place_medal:,不过还有一些没有总和 比如说 day四最后没有将最终代码放出来 对于已经知道实现的小伙伴不太友好,网上的其他文章也没有放,但我这里有放
-
使用本文档 帮助您快速开发uniapp :smile:
-
感觉不错就点赞关注吧 ::heart_eyes:
-
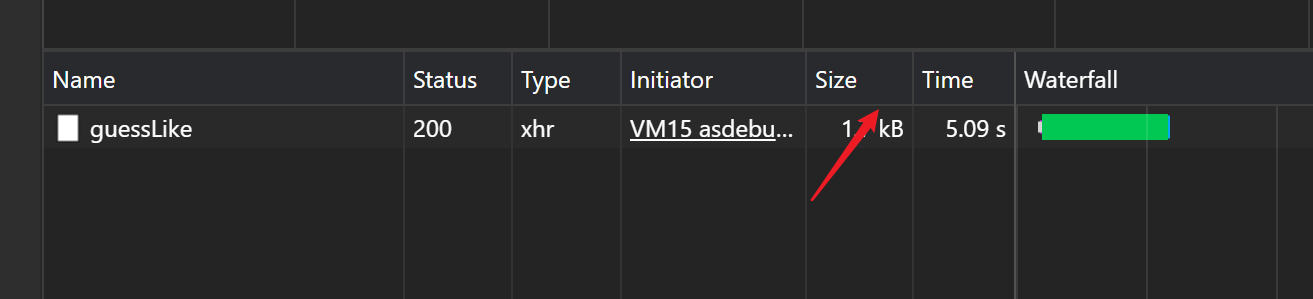
注意 有时候不是你的代码写的有问题 而是项目的后端有问题 看time 在day4里面我就遇到一个接口请求 一直10s 偶尔才返回数据 第二天零点几s就成功拿到数据了
-
估计是项目请求的后端访问量太大了
- 有时候 你会遇到一些莫名奇妙的报错 比如导入模板文件的时候报错了 这时候请重新打开编译器
Day 1
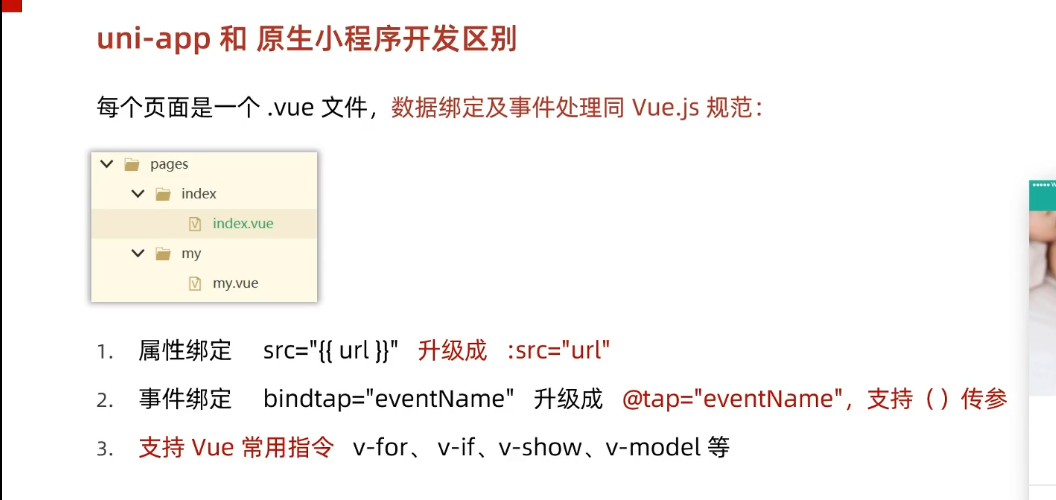
- 本项目建议使用vs开发 建议直接点击目录 通过命令行创建项目
语法
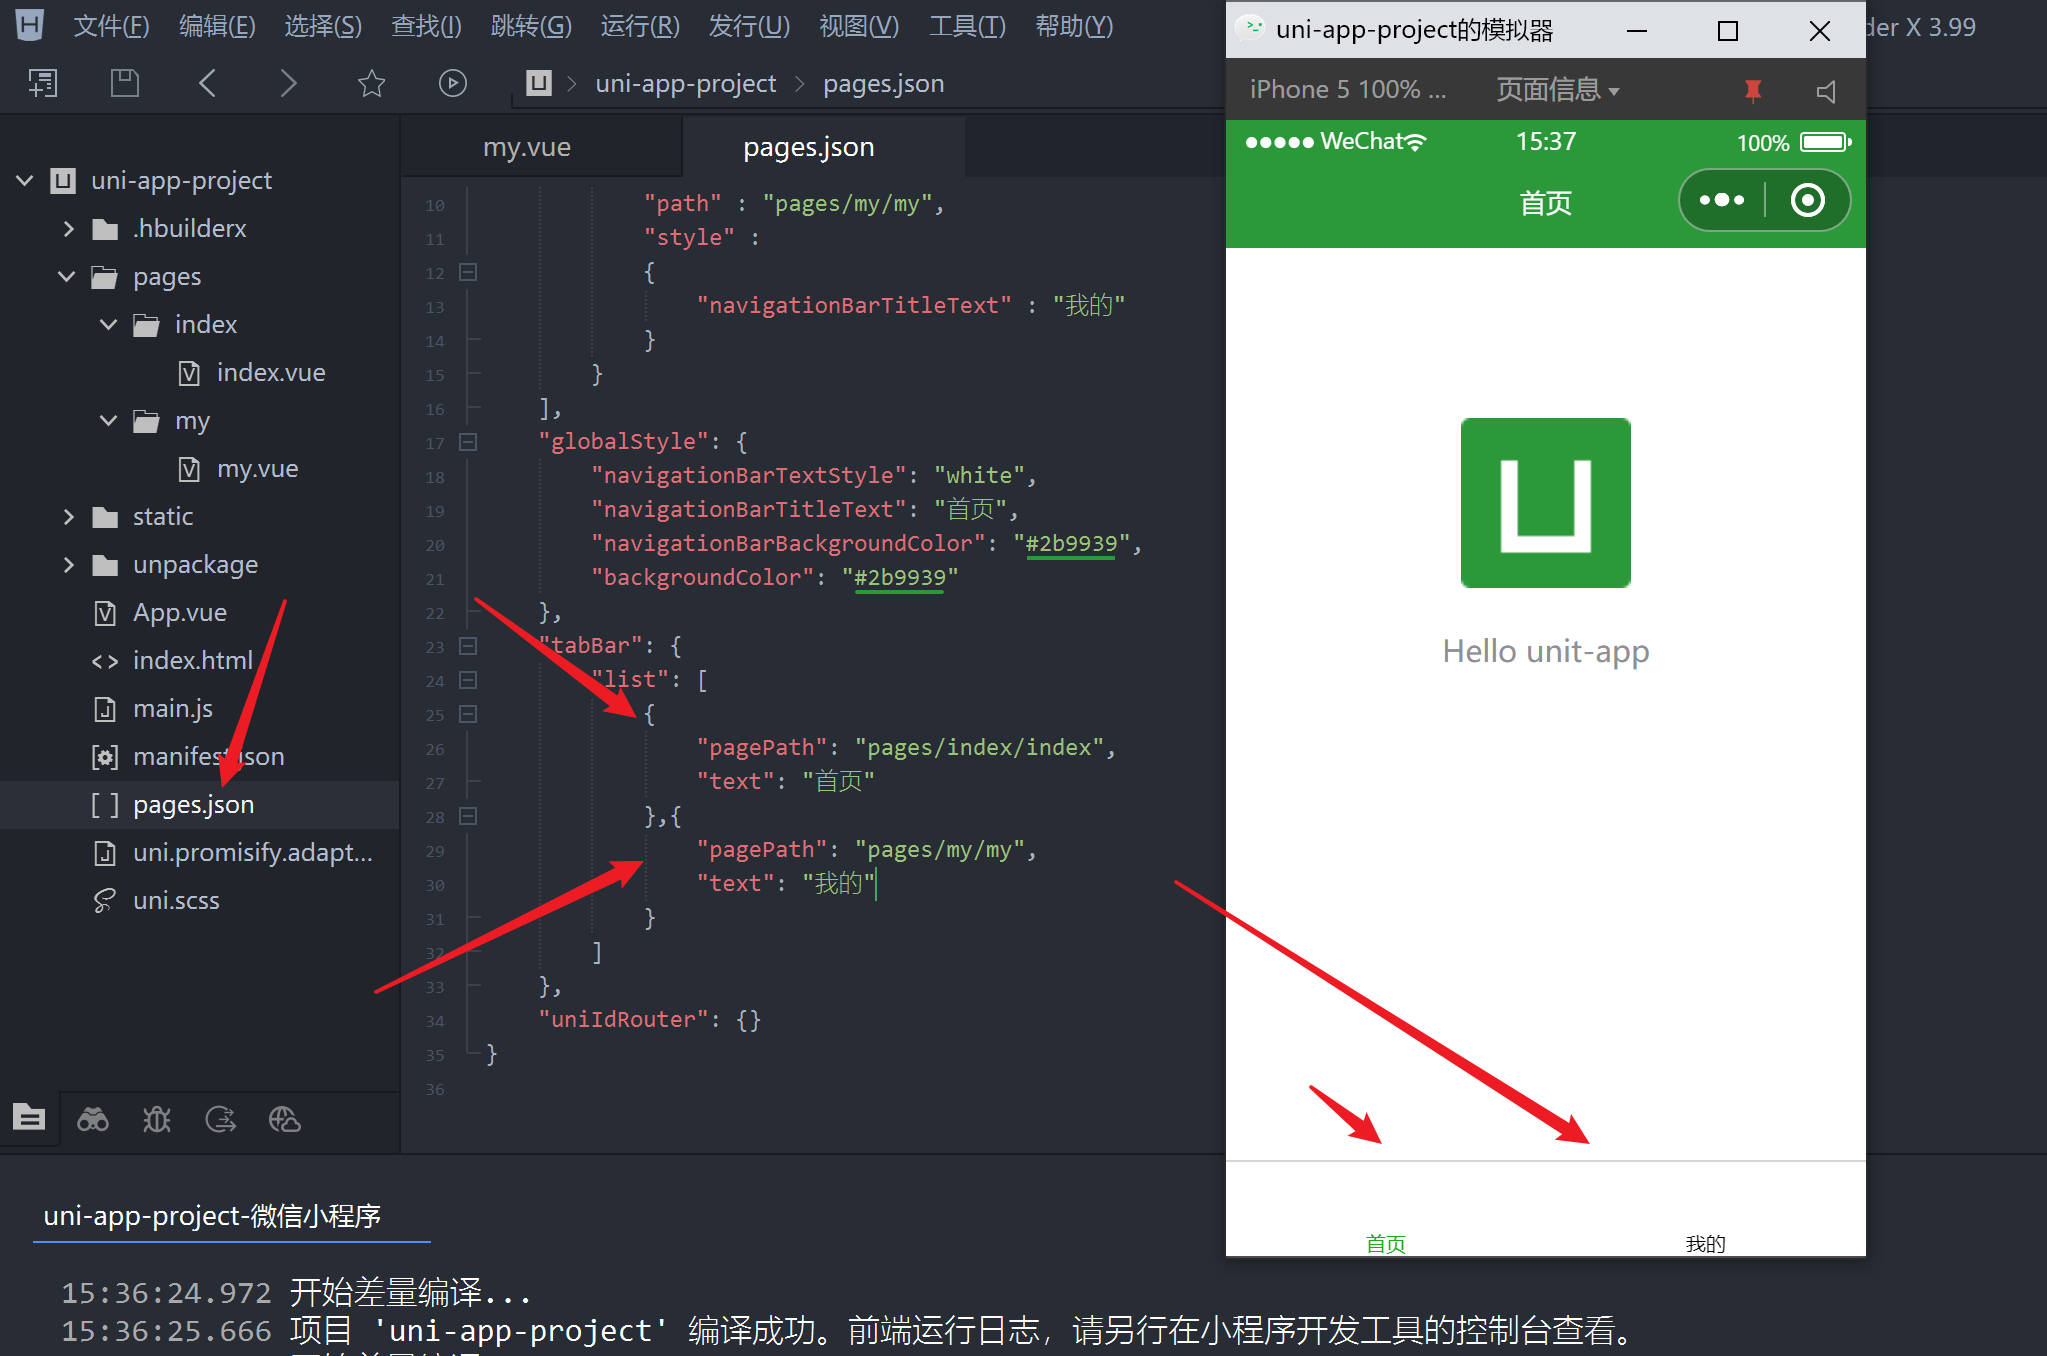
- 在pages.json中如此做,就可以实现
设置
模拟打开的时候,如果是灰的需要修改
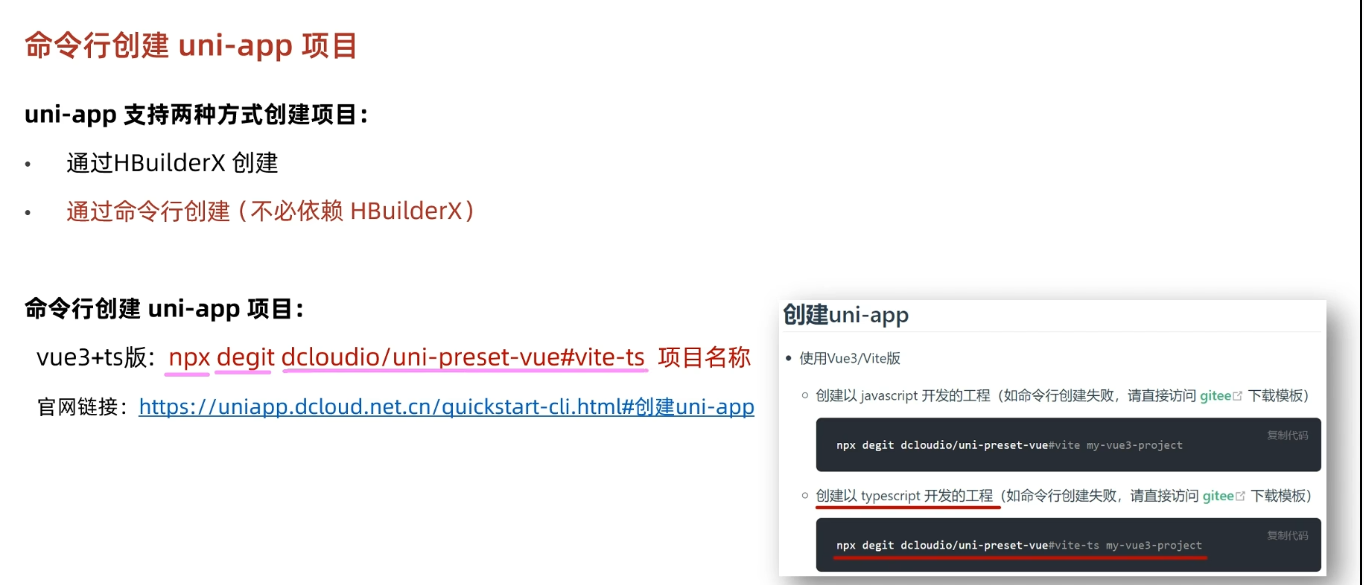
使用命令行创建项目
使用vscode开发
插件安装
unit-create-view
uni-helper
uniapp小程序扩展
1、创建unit文件可自动注册路由
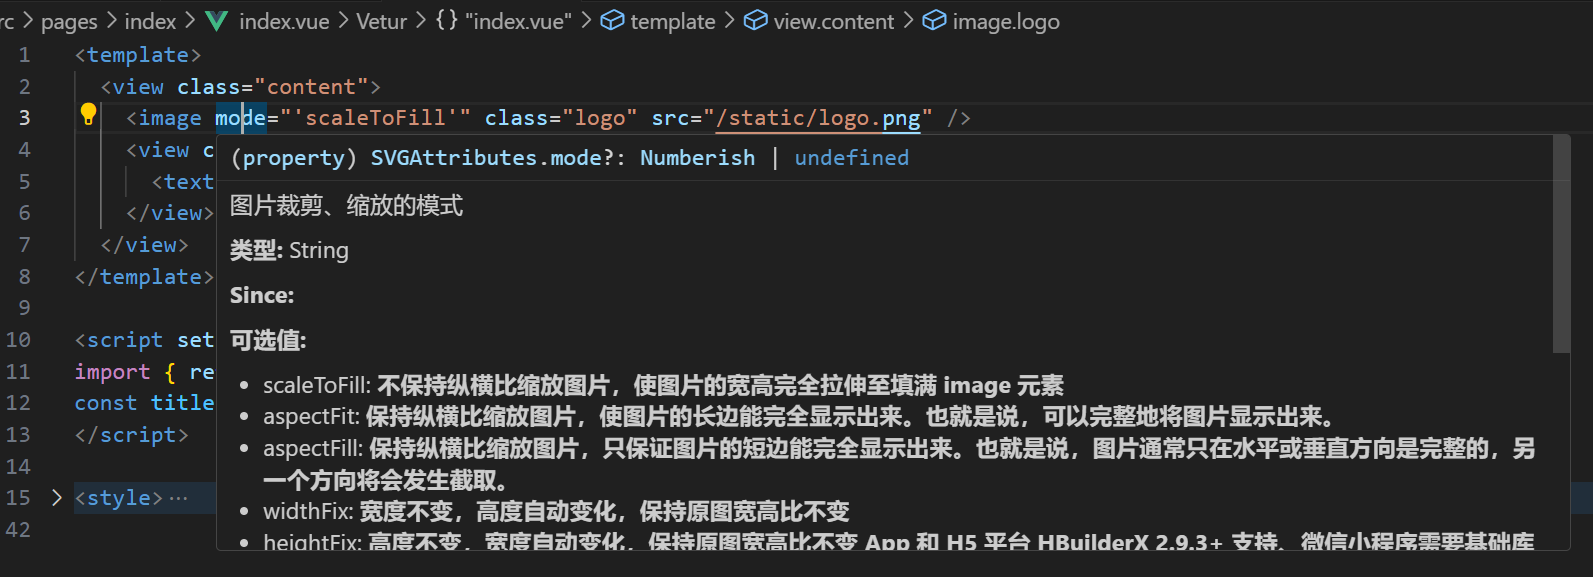
2、代码提示
3、鼠标悬停提示
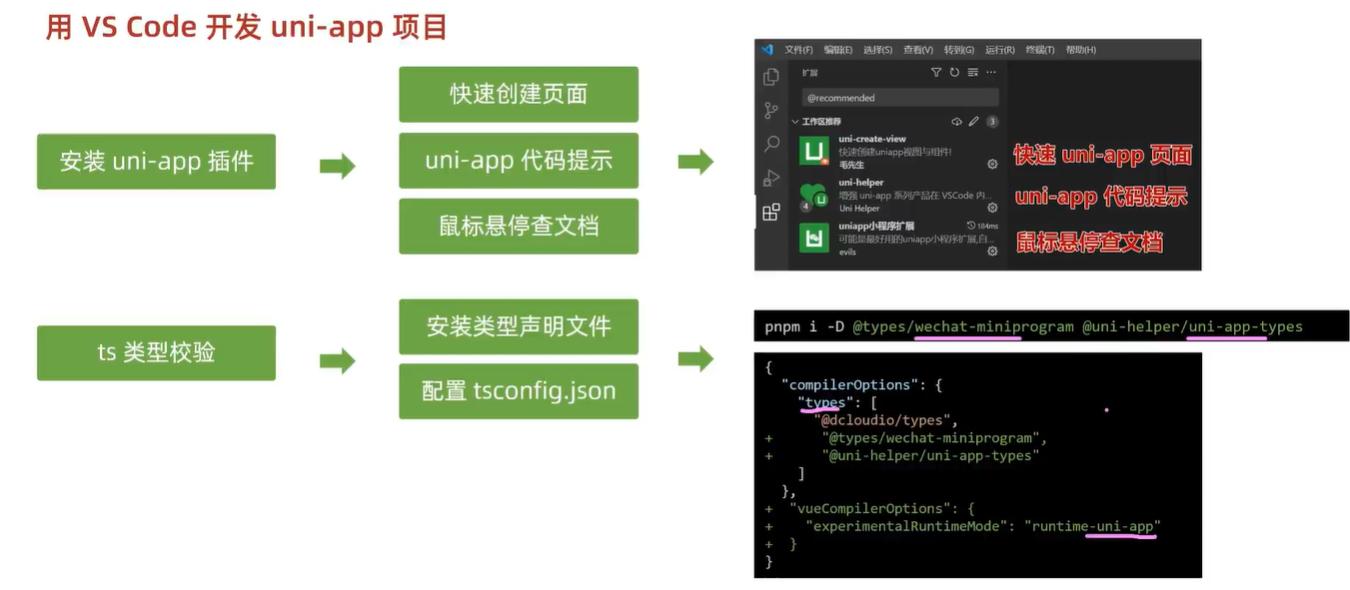
TS配置
npm i -D @types/wechat-miniprogram @uni-helper/uni-app-types
安装类型声明文件
- 如果你没有ts配置文件 那是因为你创建了一个js项目 你需要打开cmd创建一个ts项目
npx degit dcloudio/uni-preset-vue#vite-ts uni-app-Vue3-TS

{
  "extends": "@vue/tsconfig/tsconfig.json",
  "compilerOptions": {
    "sourceMap": true,
    "baseUrl": ".",
    "paths": {
      "@/*": [
        "./src/*"
      ]
    },
    "lib": [
      "esnext",
      "dom"
    ],
    "types": [
      "@dcloudio/types",
      "@types/wechat-miniprogram",
      "@uni-helper/uni-app-types"
    ],
    "ignoreDeprecations": "5.0" //TS废弃了之前的版本 所以使用这个
  },
  "include": [
    "src/**/*.ts",
    "src/**/*.d.ts",
    "src/**/*.tsx",
    "src/**/*.vue"
  ]
}
-
-
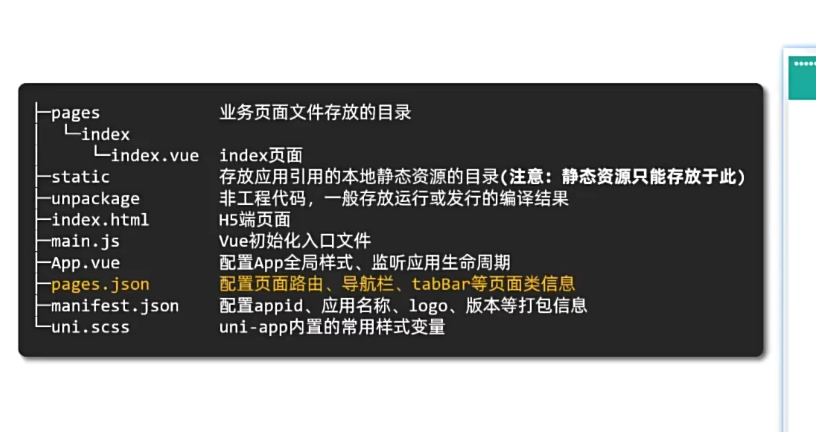
uni-app自带的东西
解决js注释问题
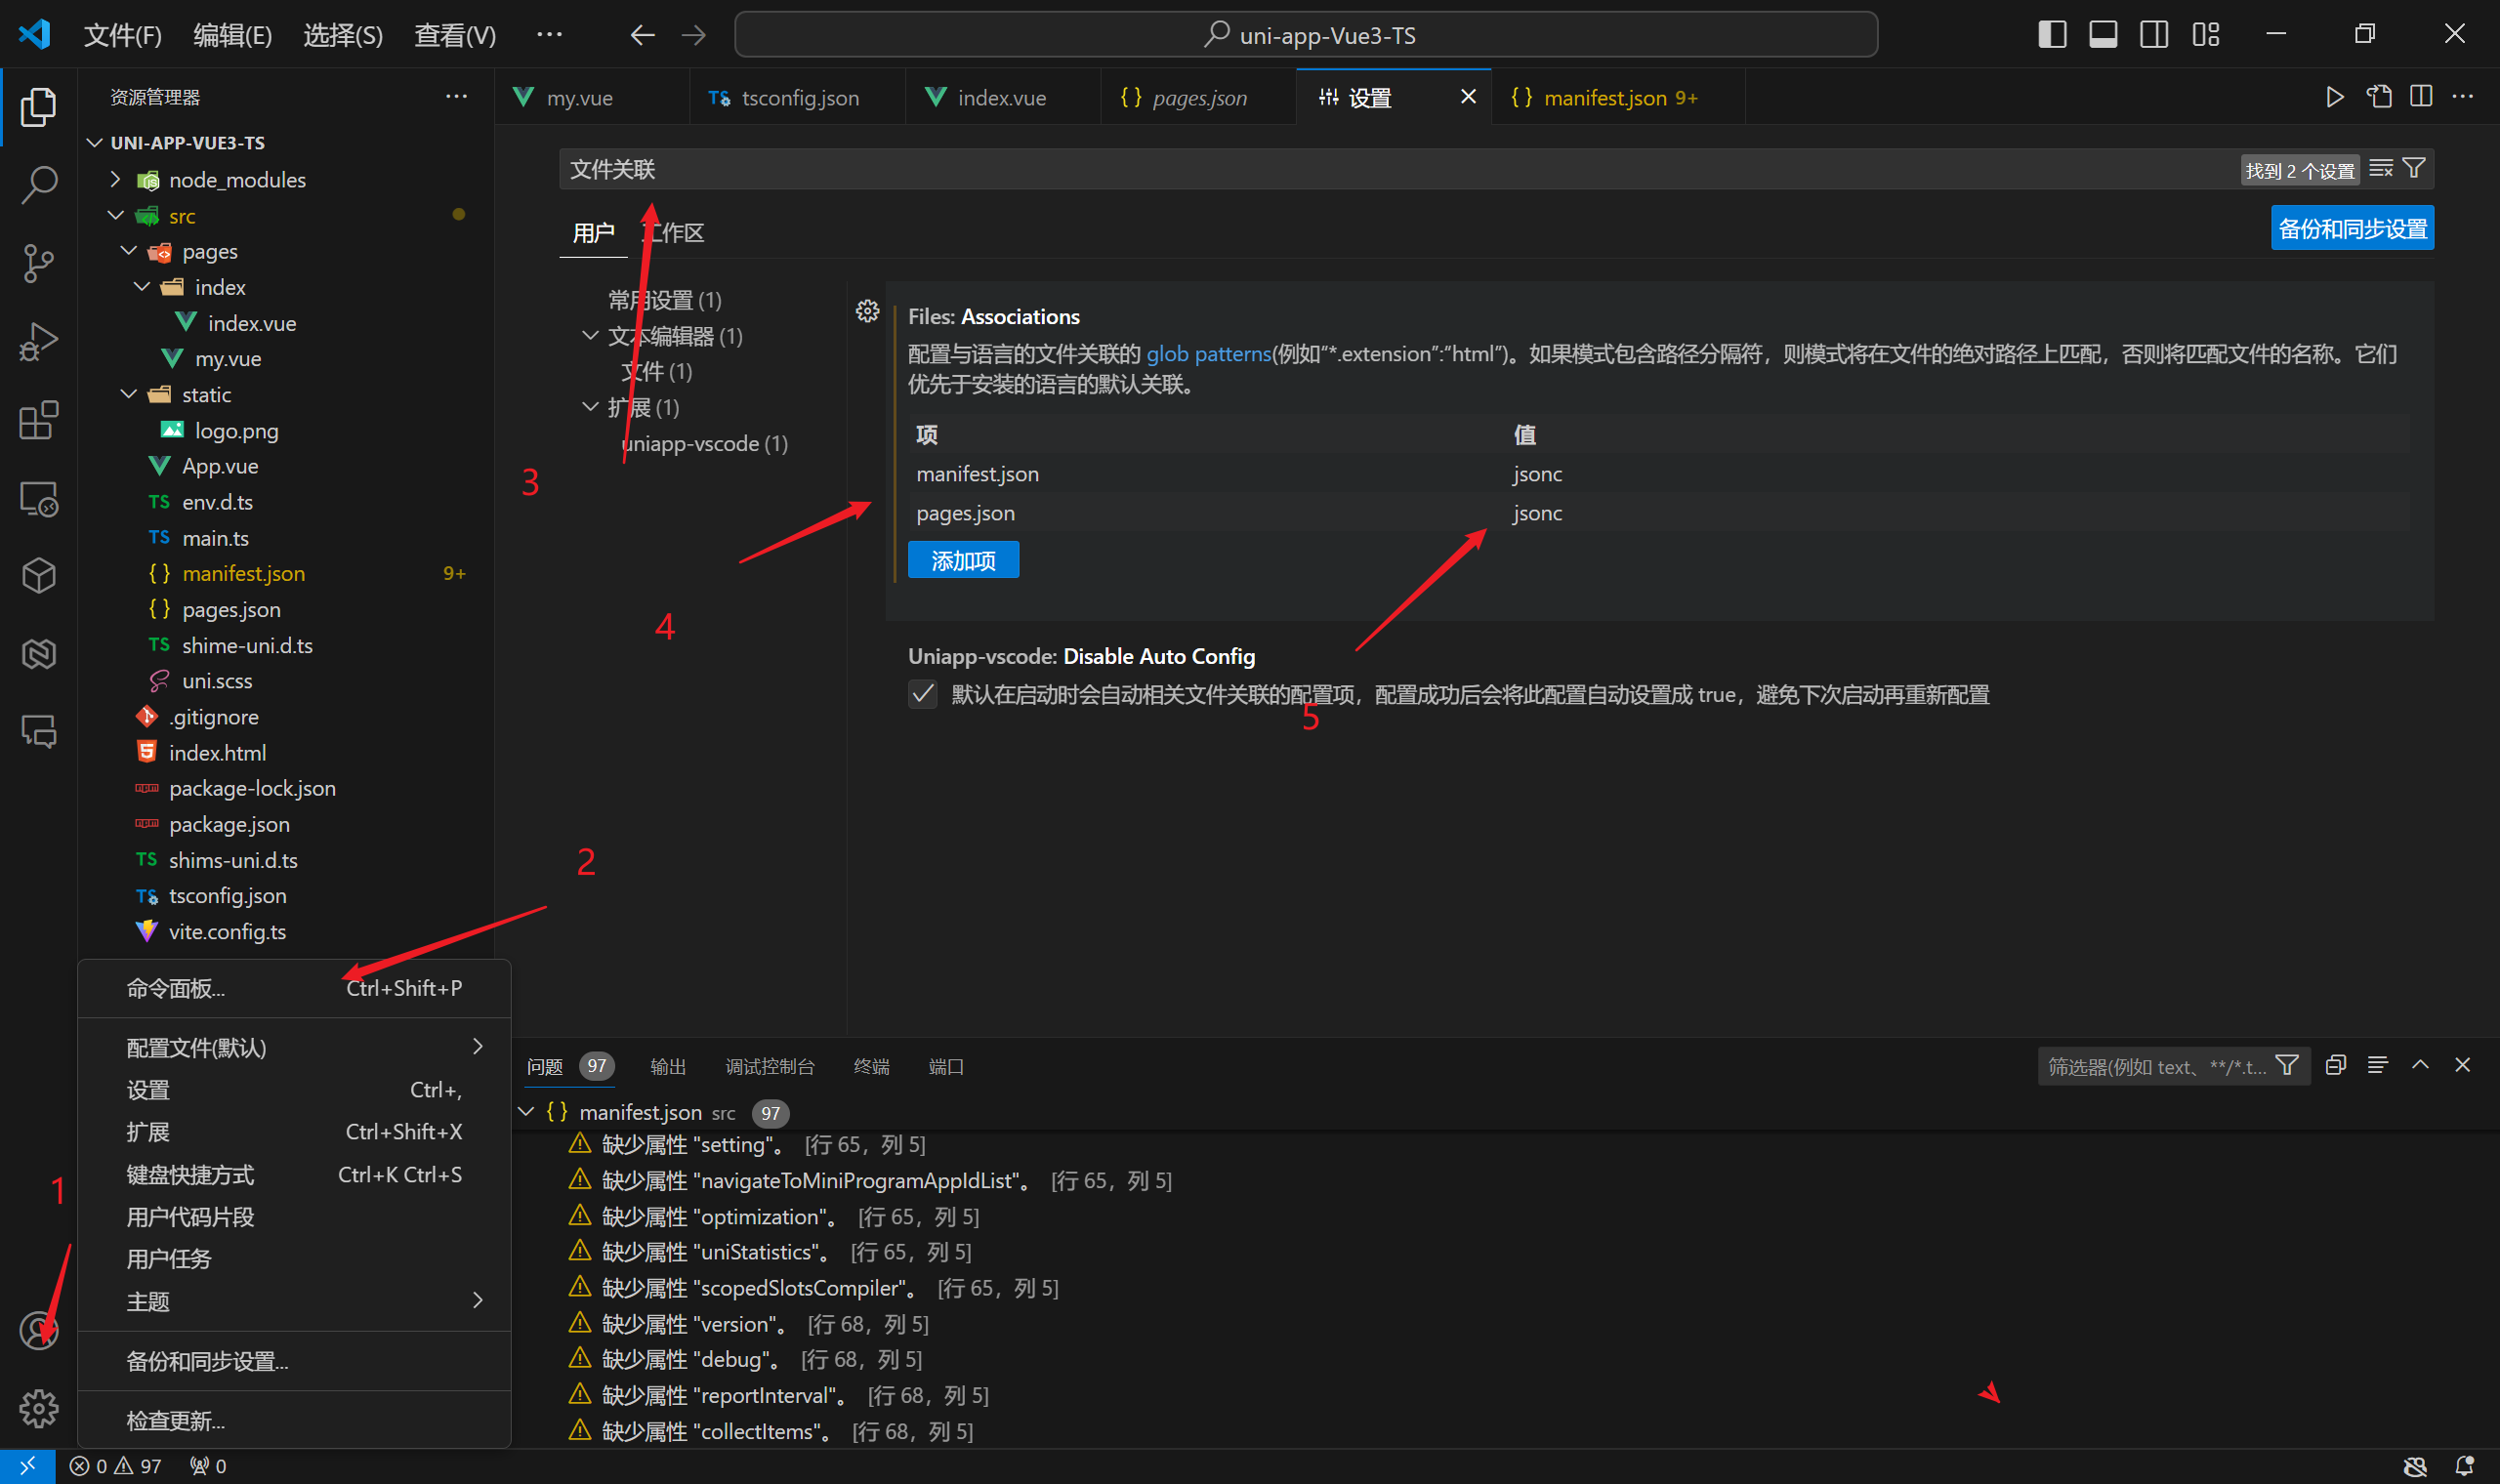
-
jsonc文件允许注释
-
uni-app只允许图中两个写注释
基础架构
拉取小兔线项目
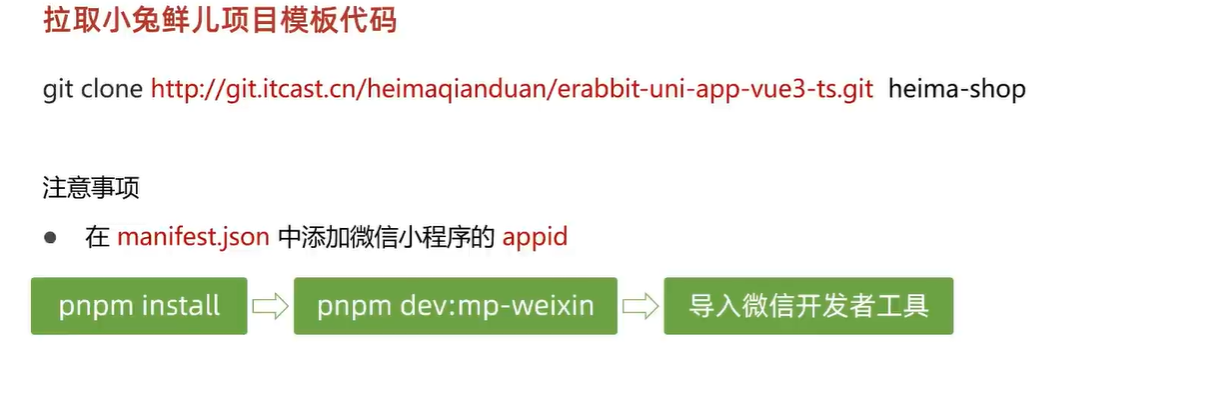
git clone http://git.itcast.cn/heimaqianduan/erabbit-uni-app-vue3-ts.git
heima-shop
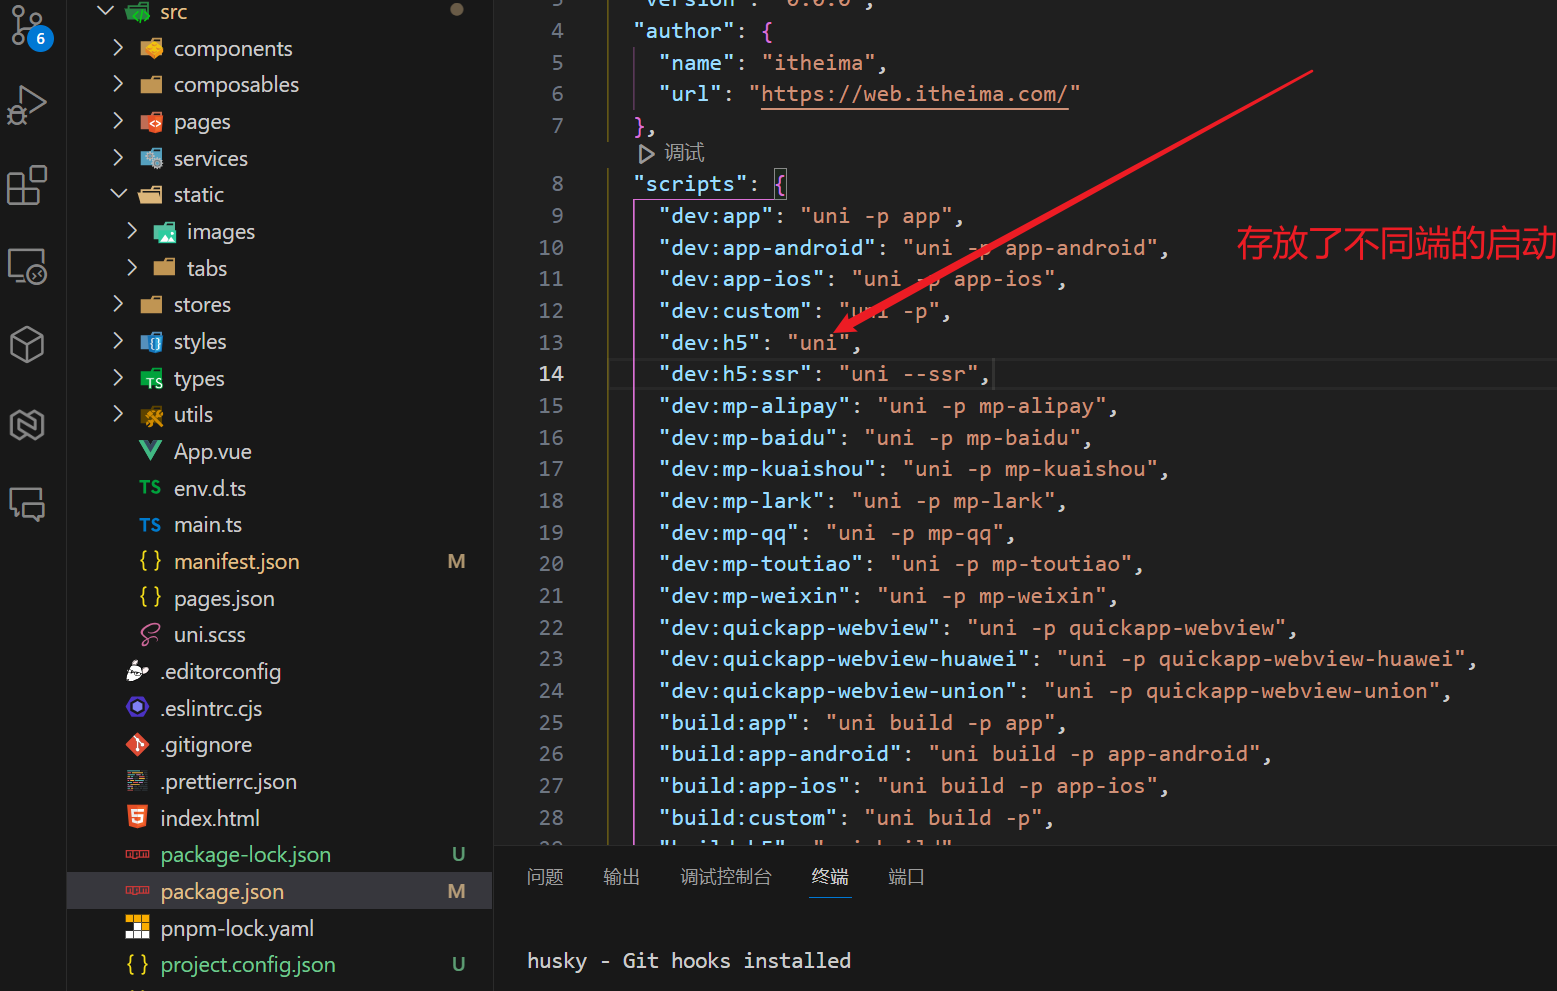
- 要使用pnpm来运行编译项目
npm install -g pnpm
pnpm set registry https://registry.npmmirror.com
使用管理员身份进入cmd 运行以上命令即可
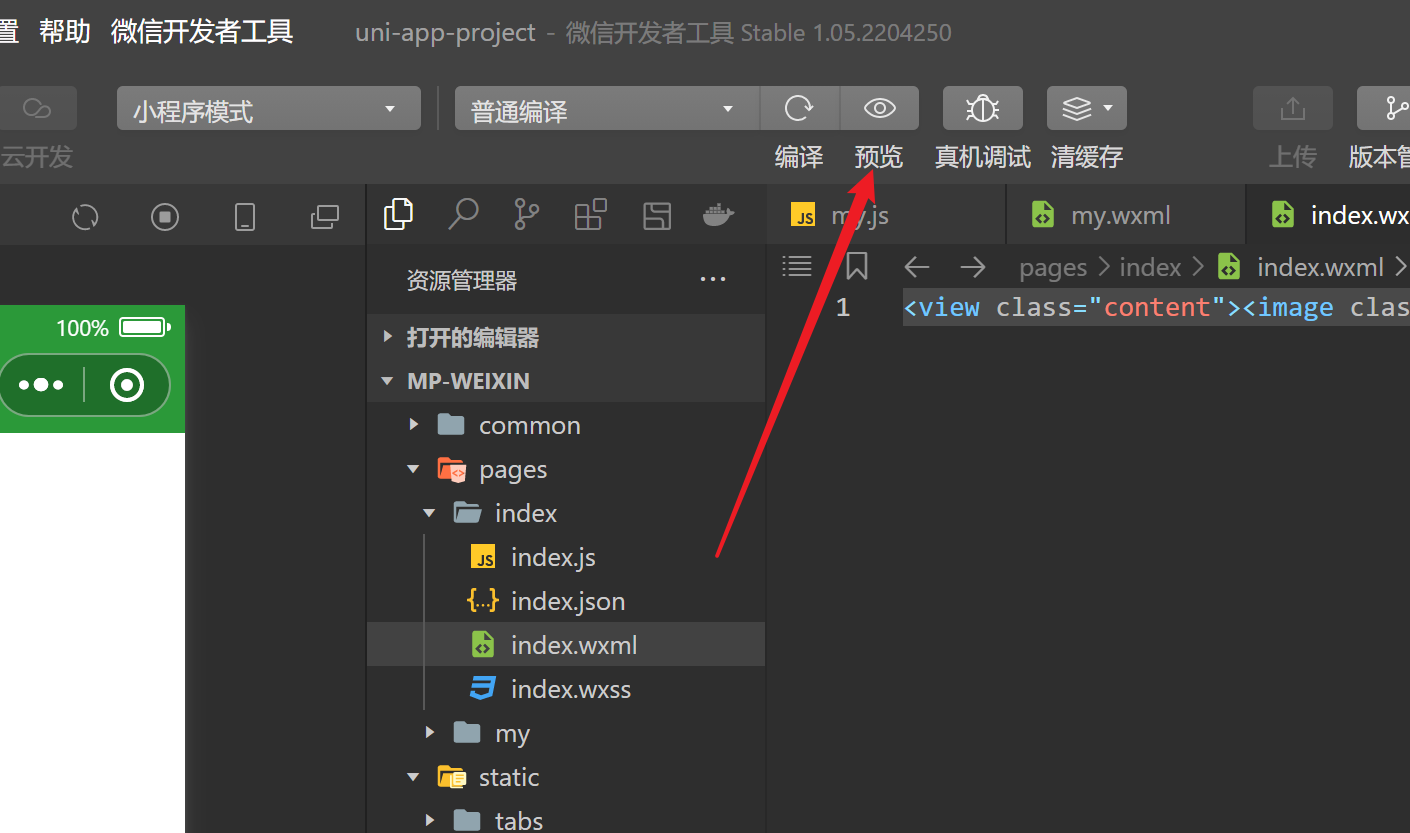
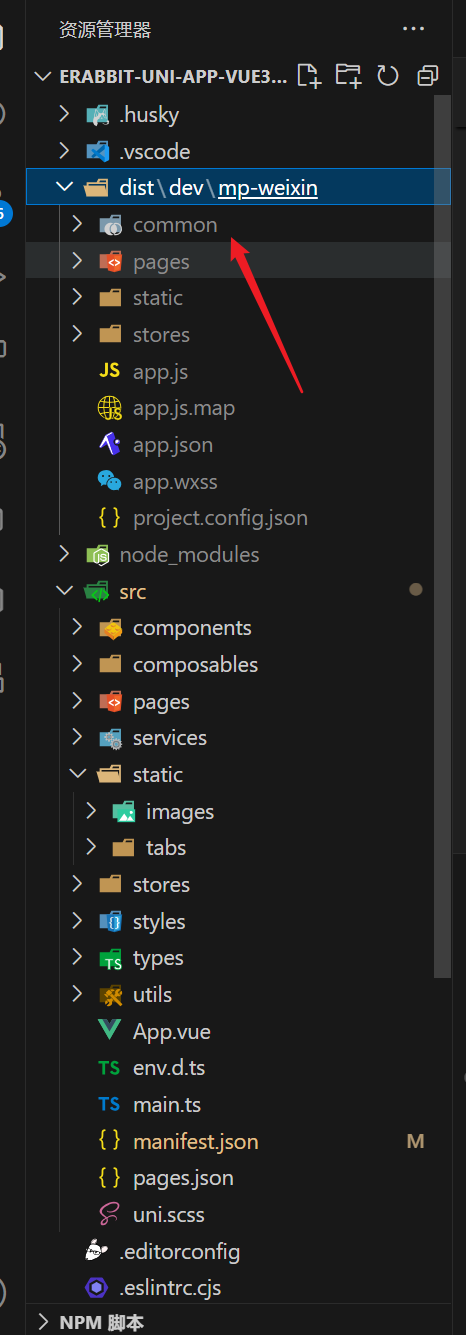
- 项目编译后会多出mp-weixin文件夹 这个才是才是微信小程序的本体 再微信小程序中打开这个而不是整个项目
安装uni-ui 配置easycom
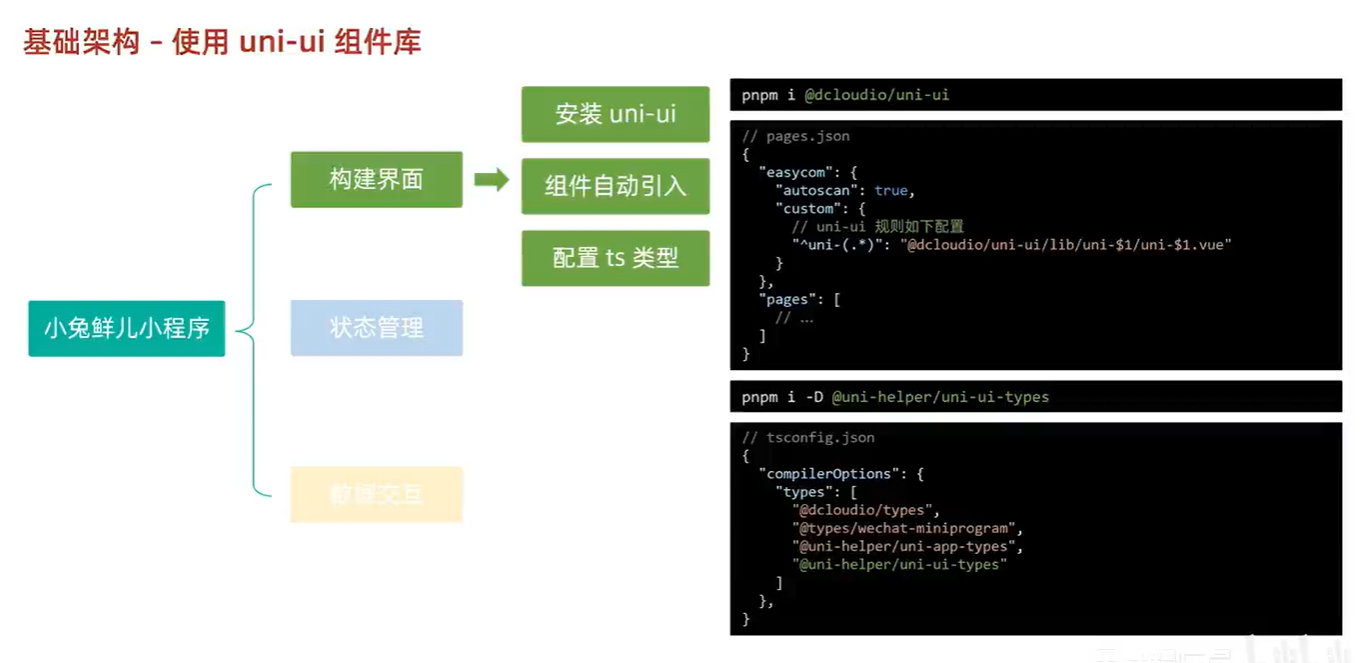
npm i @dcloudio/uni-ui
 // pages.json
  // 组件自动映入规则
	"easycom": {
    // 开始自动扫描
		"autoscan": true,
    // 正则方式匹配
		"custom": {
			// uni-ui 规则如下配置
			"^uni-(.*)": "@dcloudio/uni-ui/lib/uni-$1/uni-$1.vue"
		}
	},
安装提示
pnpm i -D @uni-helper/uni-ui-types
{
  "extends": "@vue/tsconfig/tsconfig.json",
  "compilerOptions": {
    "sourceMap": true,
    "baseUrl": ".",
    "paths": {
      "@/*": [
        "./src/*"
      ]
    },
    "lib": [
      "esnext",
      "dom"
    ],
    "types": [
      "@dcloudio/types",
      "@types/wechat-miniprogram",
      "@uni-helper/uni-app-types",
      "@uni-helper/uni-ui-types" // [!code 添加了ui ++]
    ],
    "ignoreDeprecations": "5.0" //TS废弃了之前的版本 所以使用这个
  },
  "include": [
    "src/**/*.ts",
    "src/**/*.d.ts",
    "src/**/*.tsx",
    "src/**/*.vue"
  ]
}
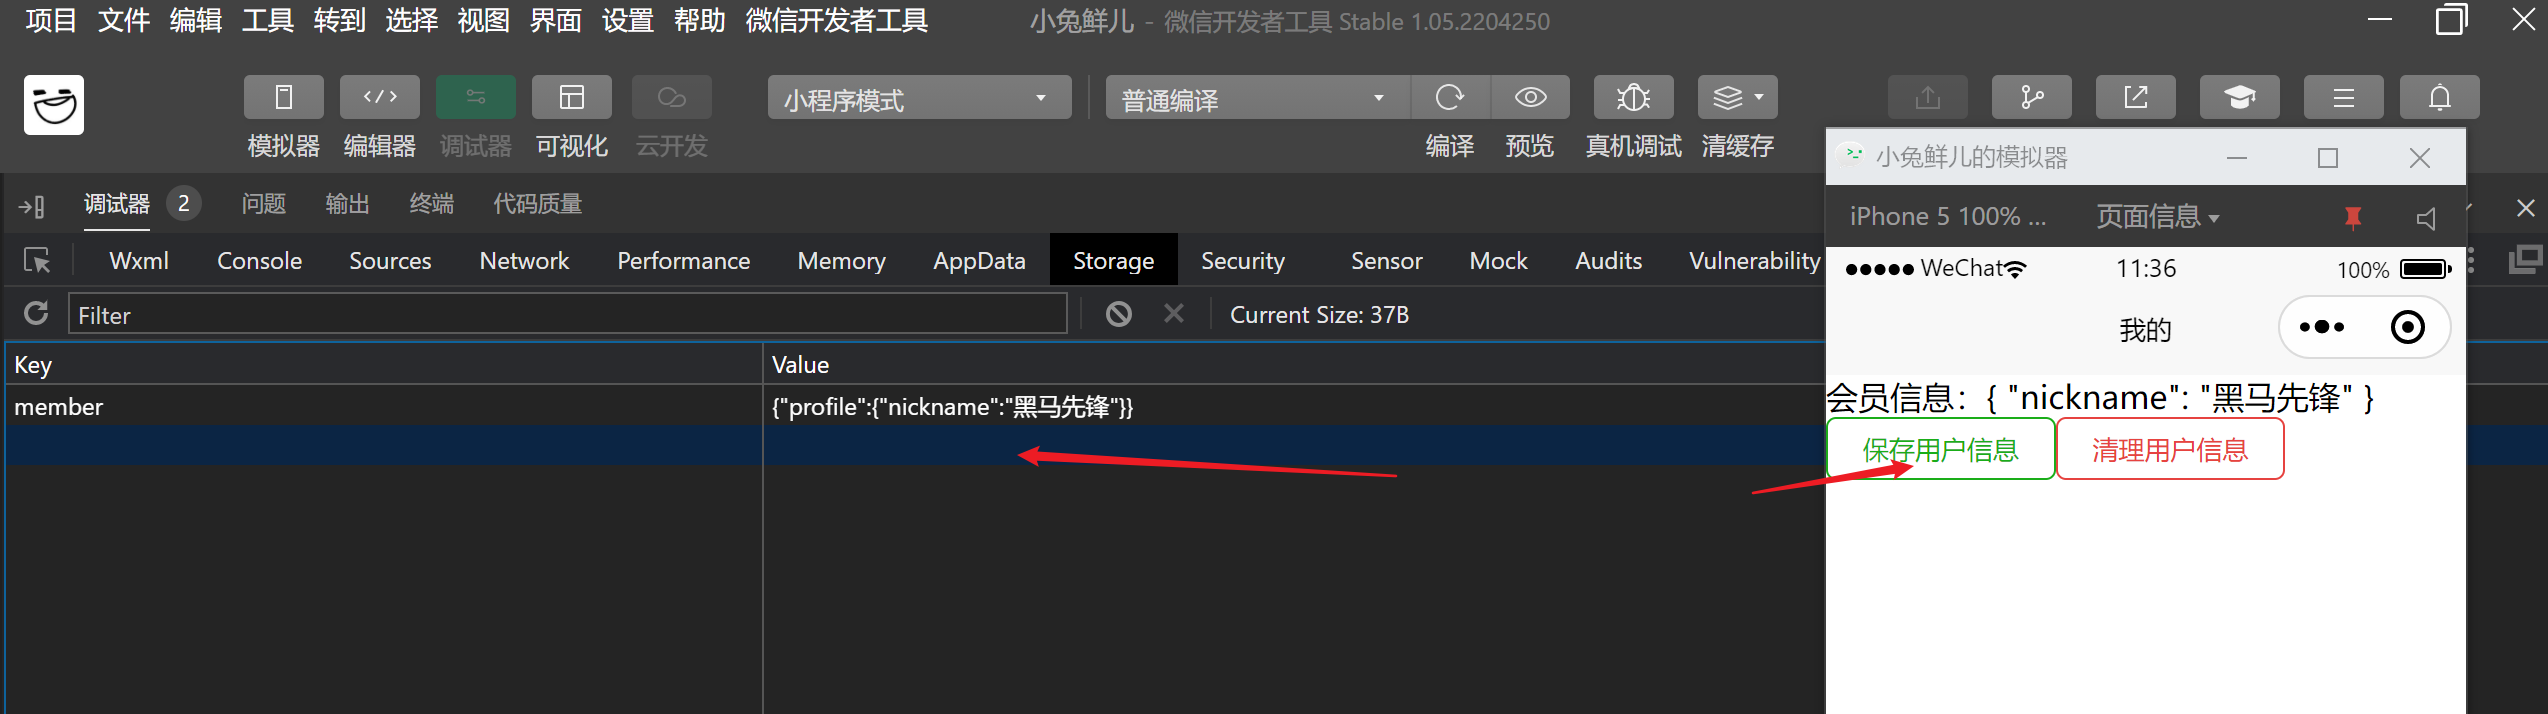
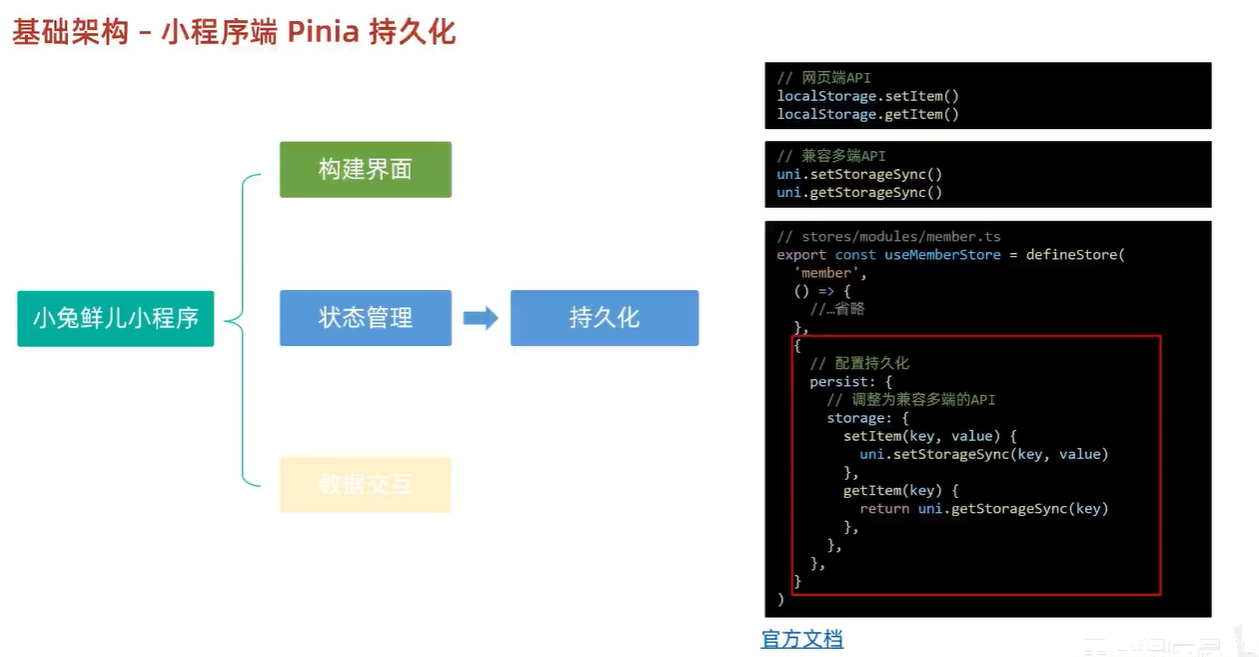
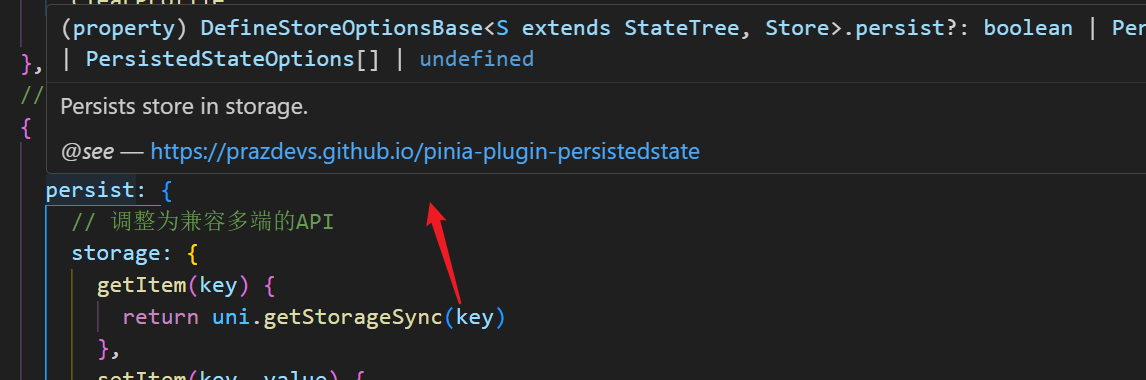
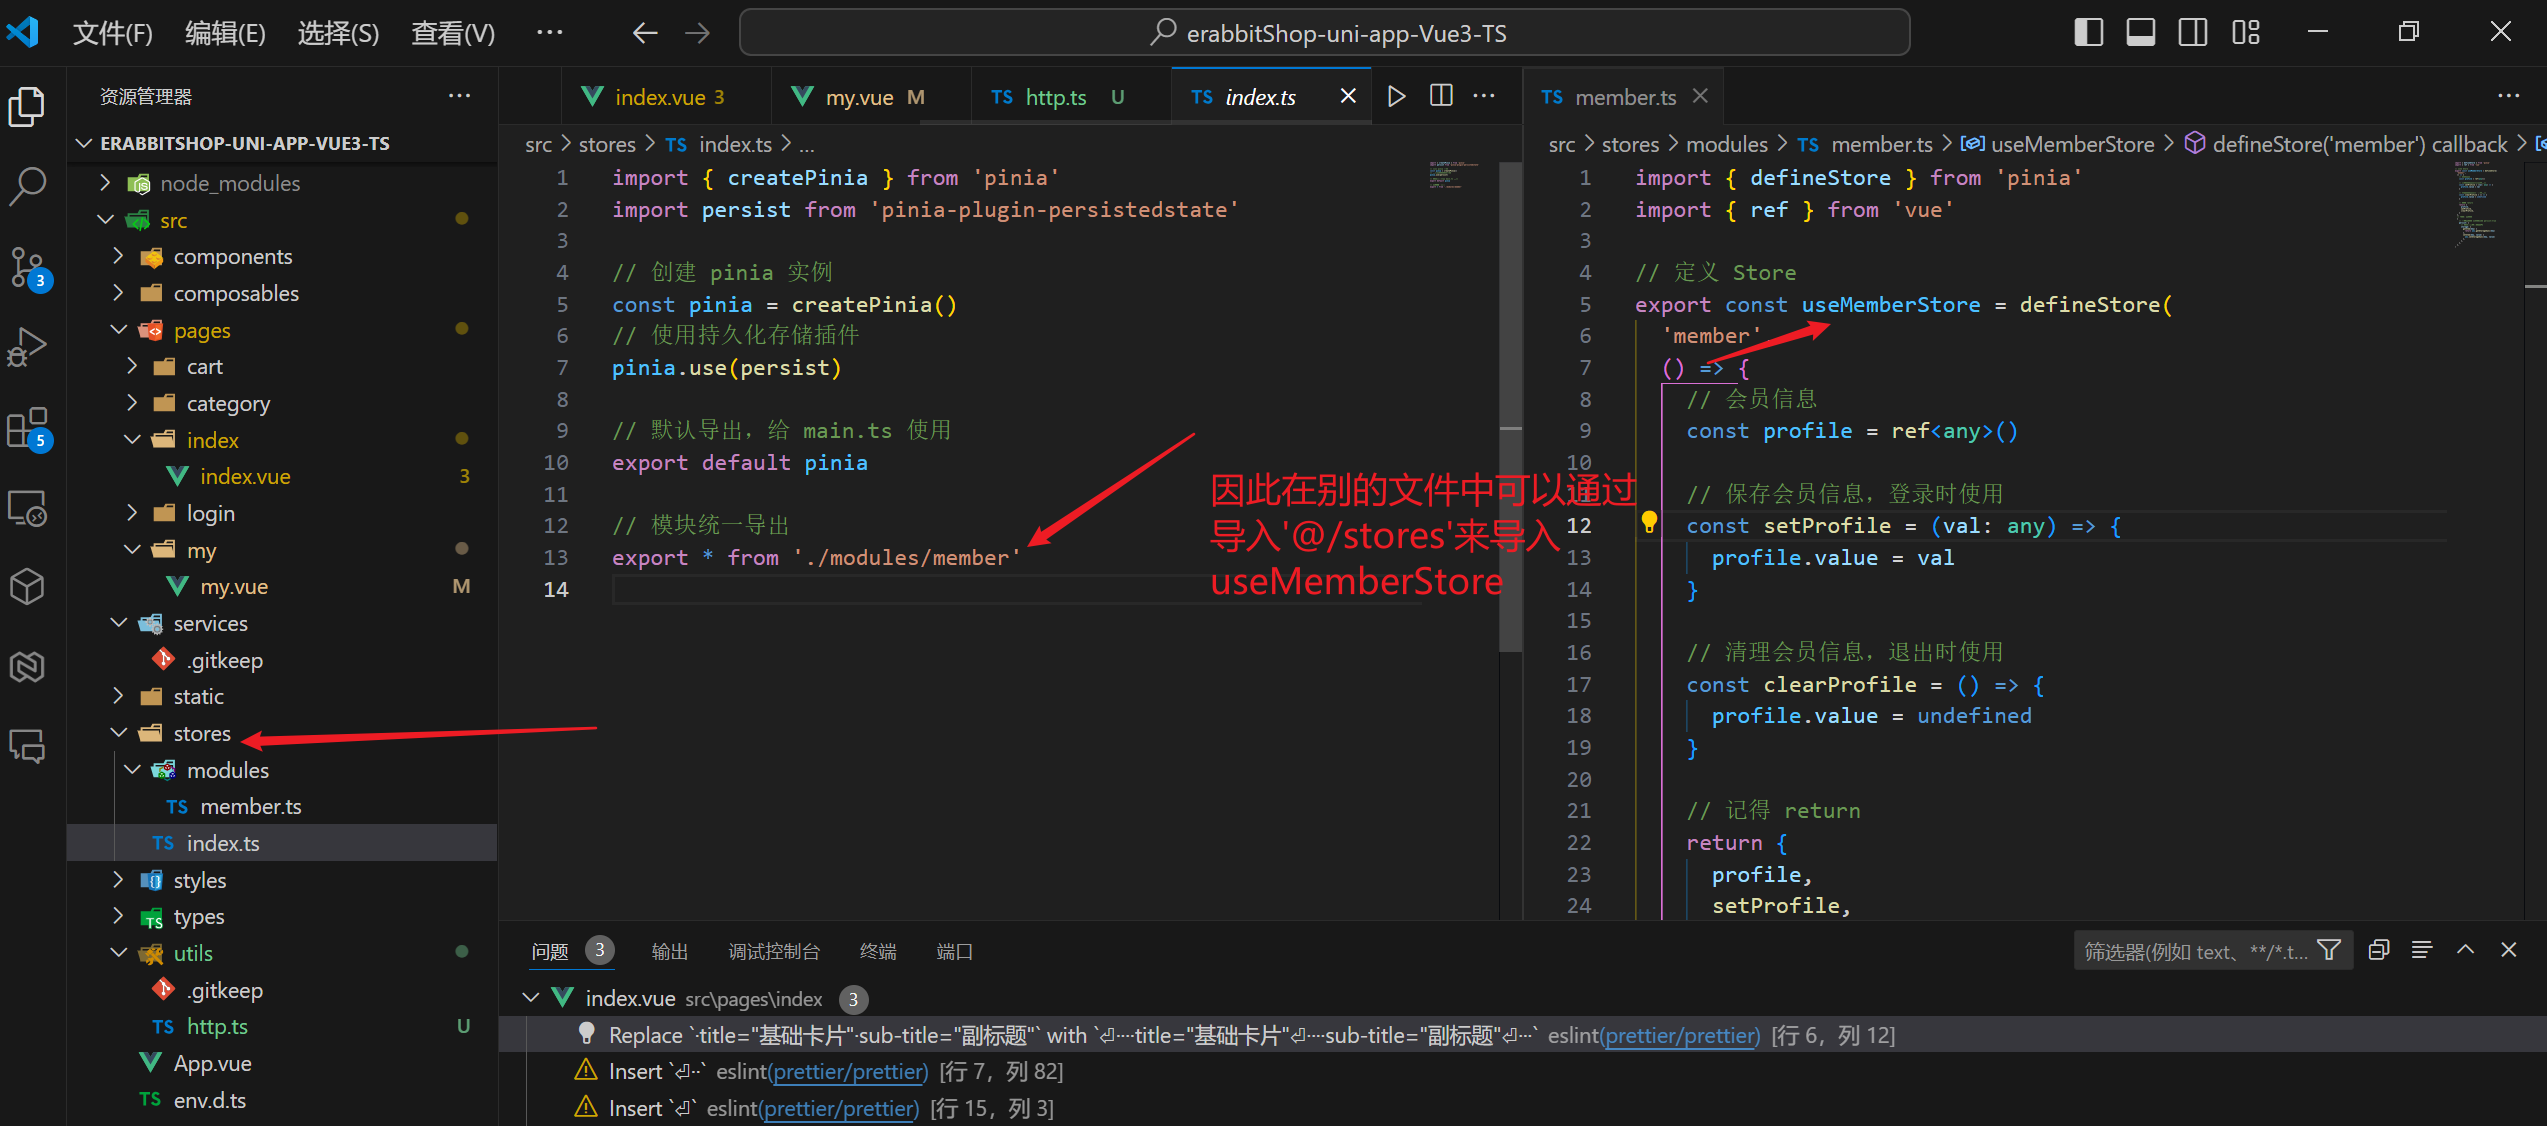
小程序端pinia持久化
- stores中进行如下配置
import { defineStore } from 'pinia'
import { ref } from 'vue'

// 定义 Store
export const useMemberStore = defineStore(
  'member',
  () => {
    // 会员信息
    const profile = ref<any>()

    // 保存会员信息,登录时使用
    const setProfile = (val: any) => {
      profile.value = val
    }

    // 清理会员信息,退出时使用
    const clearProfile = () => {
      profile.value = undefined
    }

    // 记得 return
    return {
      profile,
      setProfile,
      clearProfile,
    }
  },
  // TODO: 持久化
  {
    // 配置持久化 网页端只要 persist:true
    persist: {
      // 调整为兼容多端的API
      storage: {
        getItem(key) {
          return uni.getStorageSync(key)
        },
        setItem(key, value) {
          uni.setStorageSync(key, value)
        },
      },
    },
  },
)
- 如果没有出来可以尝试点击编译 就能刷出来了
如何解决项目中的问题
- 遇到问题直接访问官方文档 然后查看代码作者编写的项目文档即可
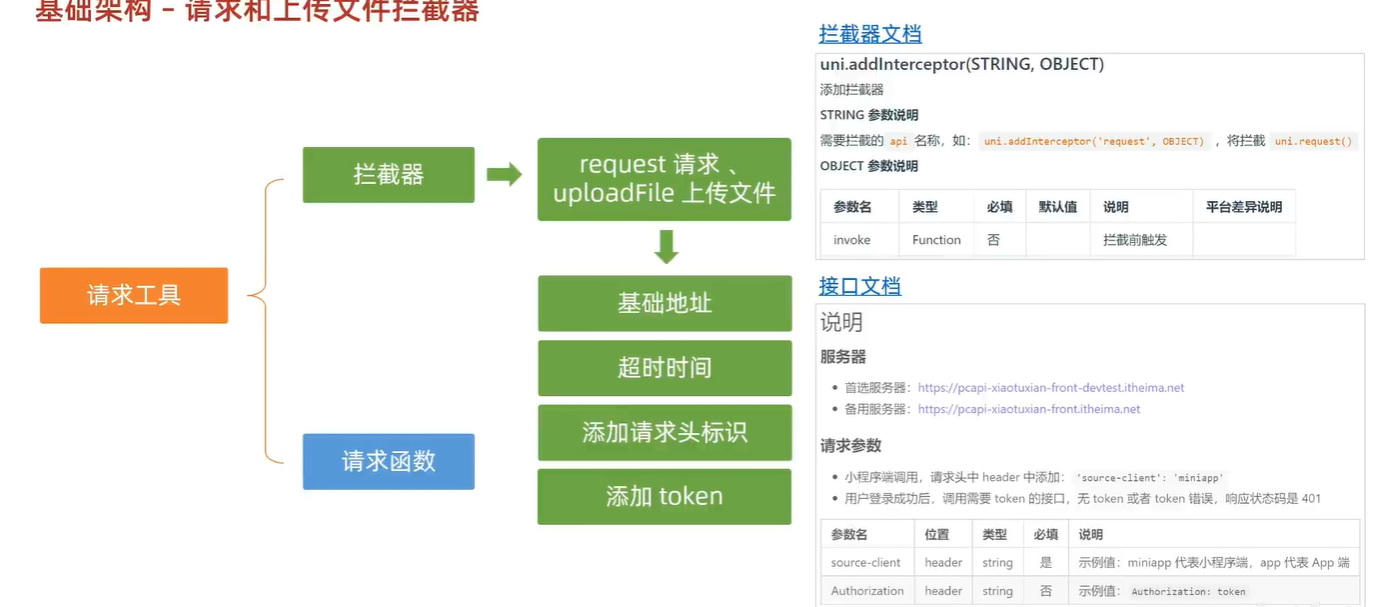
文件拦截器
请求和上传文件
// src/utils/http.ts

import { useMemberStore } from '@/stores'

// 请求基地址
const baseURL = 'https://pcapi-xiaotuxian-front-devtest.itheima.net'

// 拦截器配置
const httpInterceptor = {
  // 拦截前触发
  invoke(options: UniApp.RequestOptions) {
    // 1. 非 http 开头需拼接地址
    if (!options.url.startsWith('http')) {
      options.url = baseURL + options.url
    }
    // 2. 请求超时
    options.timeout = 10000
    // 3. 添加小程序端请求头标识
    options.header = {
      'source-client': 'miniapp',
      ...options.header,
    }
    // 4. 添加 token 请求头标识
    const memberStore = useMemberStore()
    const token = memberStore.profile?.token
    if (token) {
      options.header.Authorization = token
    }
  },
}

// 拦截 request 请求
uni.addInterceptor('request', httpInterceptor)
// 拦截 uploadFile 文件上传
uni.addInterceptor('uploadFile', httpInterceptor)
<script setup lang="ts">
import { useMemberStore } from '@/stores'
import '@/utils/http'
const memberStore = useMemberStore()

// 测试请求
const getDate = () => {
  uni.request({
    method: 'GET',
    url: '/home/banner',
  })
}
</script>

<template>
  <view class="my">
    <view>会员信息:{{ memberStore.profile }}</view>
    <button
      @tap="
        memberStore.setProfile({
          nickname: '黑马先锋',
        })
      "
      size="mini"
      plain
      type="primary"
    >
      保存用户信息
    </button>
    <button @tap="memberStore.clearProfile()" size="mini" plain type="warn">清理用户信息</button>
    <!-- @tap是uni-app框架的监听 其他是演示什么的 -->
    <button @tap="getDate" size="mini" plain type="primary">测试请求</button>
  </view>
</template>

<style lang="scss">
//
</style>
文件拦截器这一节出现的问题
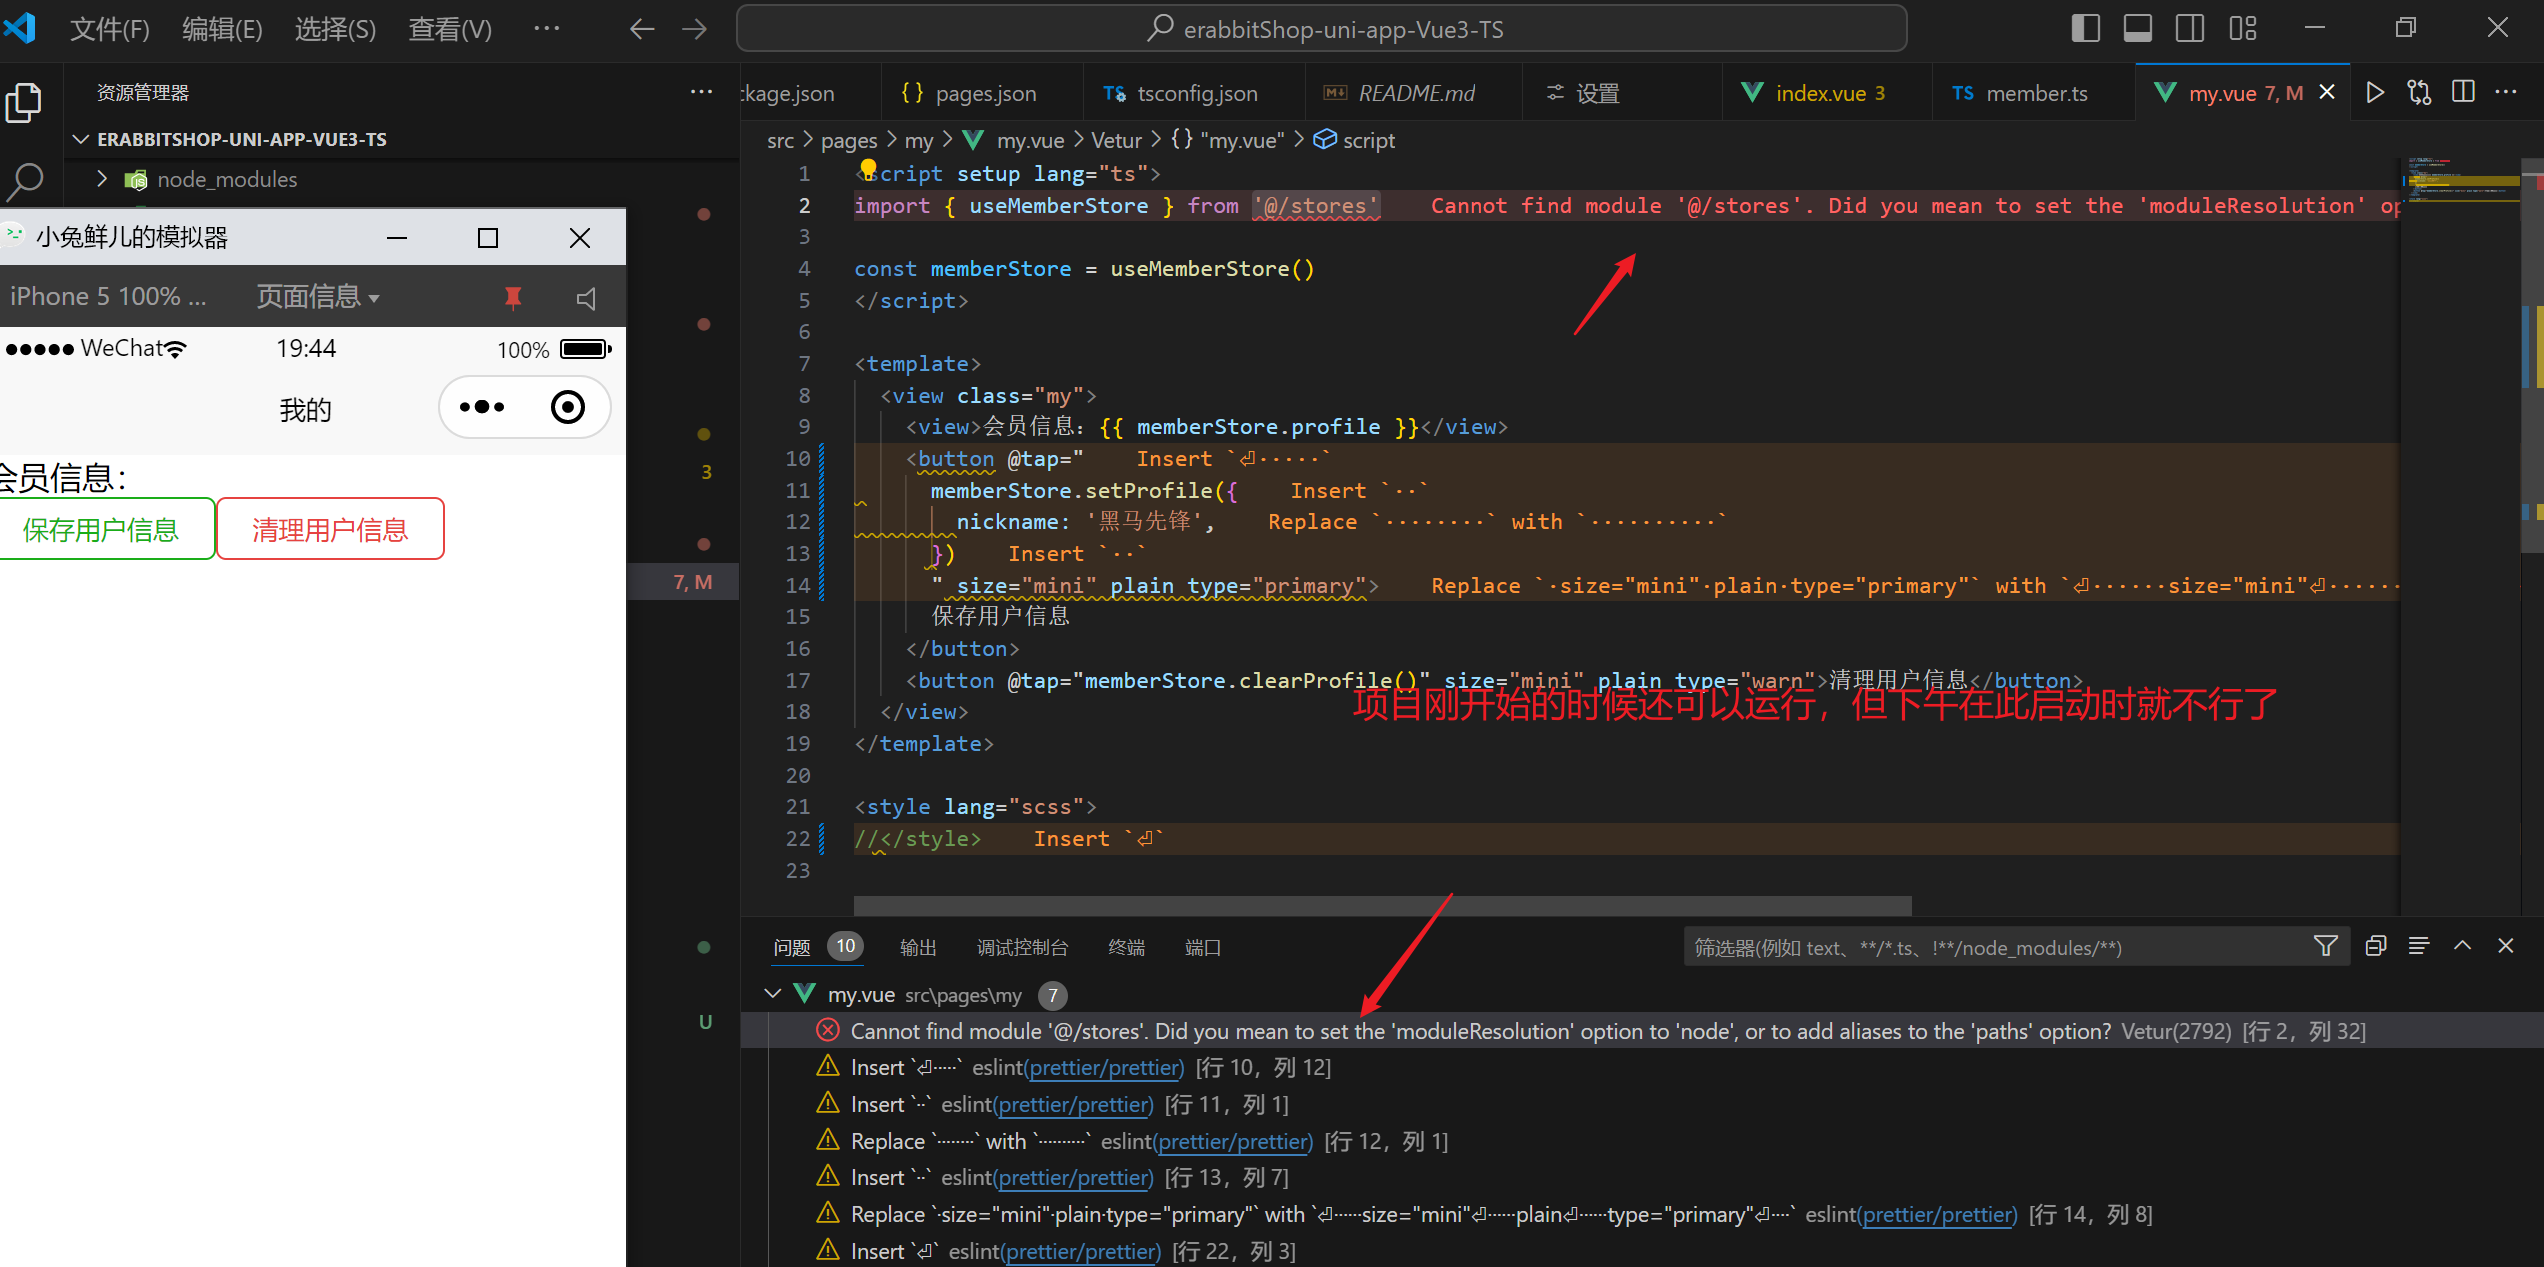
Cannot find module '@/stores'. Did you mean to set the 'moduleResolution' option to 'node', or to add aliases to the 'paths' option?
报错信息
解决方案
{
  "extends": "@vue/tsconfig/tsconfig.json",
  "compilerOptions": {
    "allowJs": true,
    "sourceMap": true,
    "moduleResolution": "node",
    "baseUrl": ".",
    "paths": {
      "@/*": ["./src/*"]
    },
    "lib": ["esnext", "dom"],
    "types": ["@dcloudio/types",
              "miniprogram-api-typings",
              "@uni-helper/uni-app-types",
              "@uni-helper/uni-ui-types" // uni-ui 组件类型

            ]
  },
  "vueCompilerOptions": {
    // experimentalRuntimeMode 已废弃,现调整为 nativeTags,请升级 Volar 插件至最新版本
    "nativeTags": ["block", "component", "template", "slot"]
  },
  "include": ["src/**/*.ts", "src/**/*.d.ts", "src/**/*.tsx", "src/**/*.vue"]
}
import { useMemberStore } from '@/stores' 是在导入什么
Promise请求函数封装
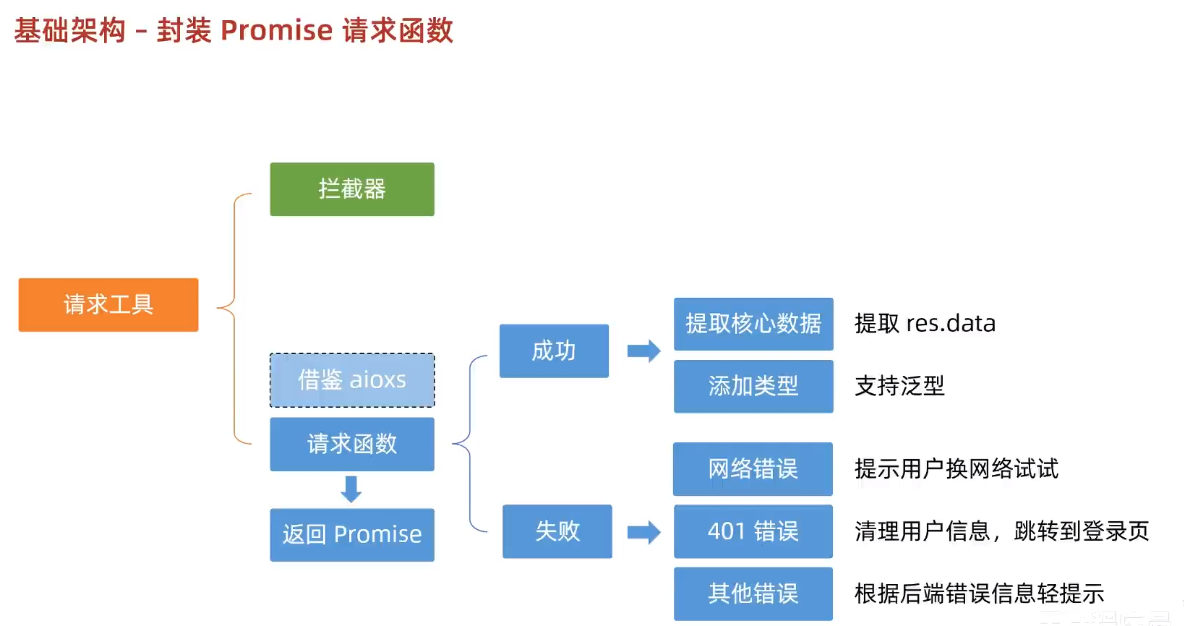
/**
* 请求函数
* @param UniApp.RequestOptions
* @returns Promise
* 1. 返回 Promise 对象,用于处理返回值类型
* 2. 获取数据成功
* 2.1 提取核心数据 res.data
* 2.2 添加类型,支持泛型
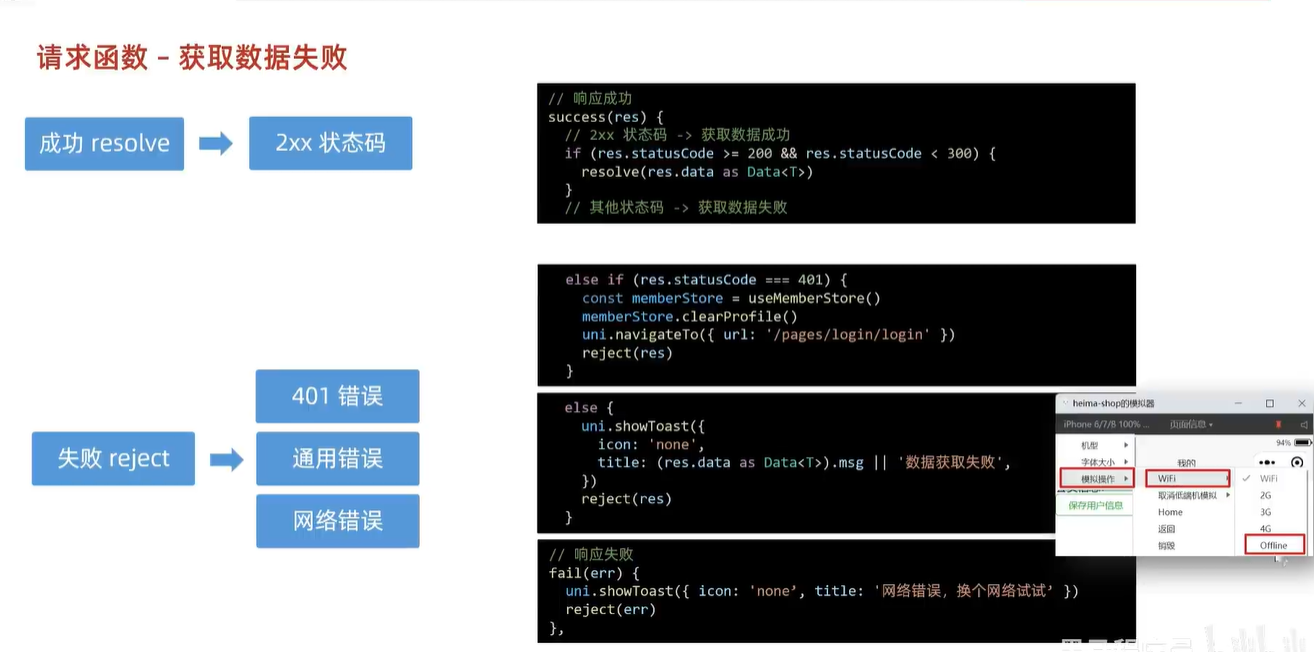
* 3. 获取数据失败
* 3.1 401错误 -> 清理用户信息,跳转到登录页
* 3.2 其他错误 -> 根据后端错误信息轻提示
* 3.3 网络错误 -> 提示用户换网络
*/
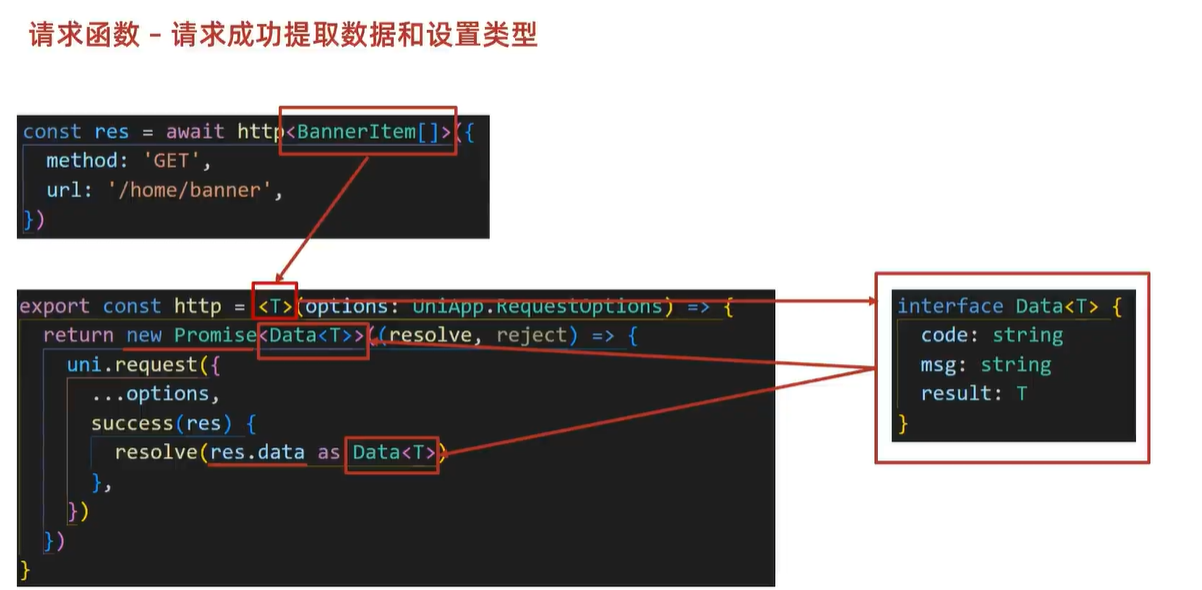
type Data<T> = {
code: string
msg: string
result: T
}
// 2.2 添加类型,支持泛型
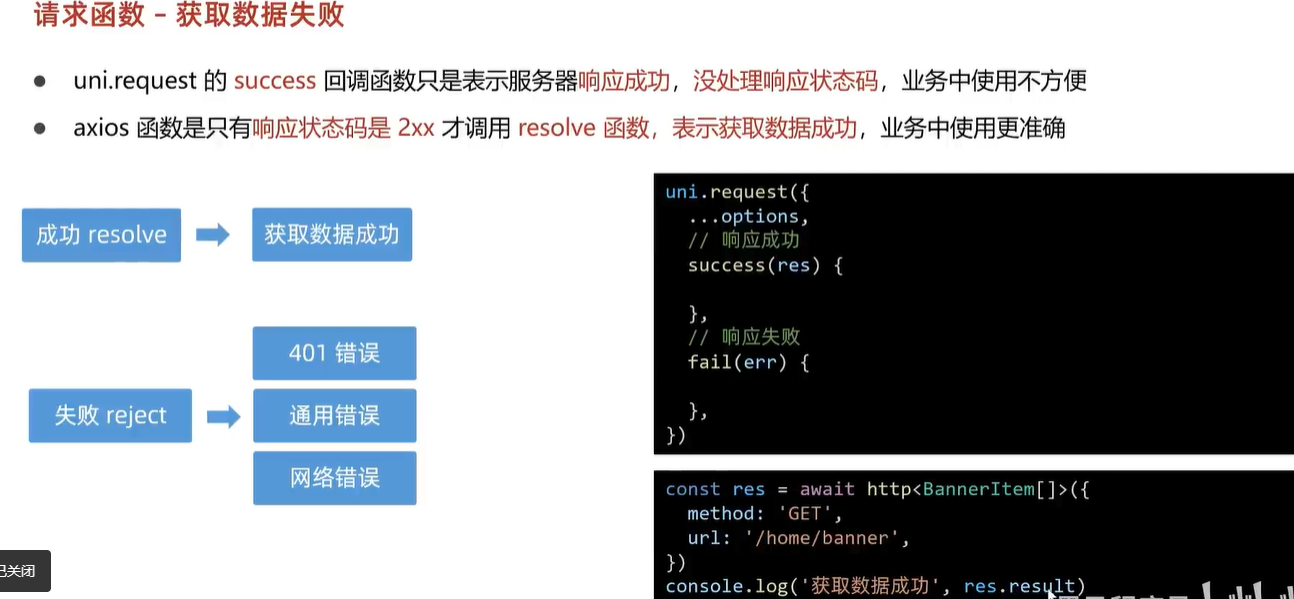
export const http = <T>(options: UniApp.RequestOptions) => {
// 1. 返回 Promise 对象 一个异步处理函数 可以处于进行中、已成功、已失败三种状态 用于解决回调地域和异步代码复杂性问题
// 其中 resolve是成功调用的函数 另一个是失败调用的函数
return new Promise<Data<T>>((resolve, reject) => {
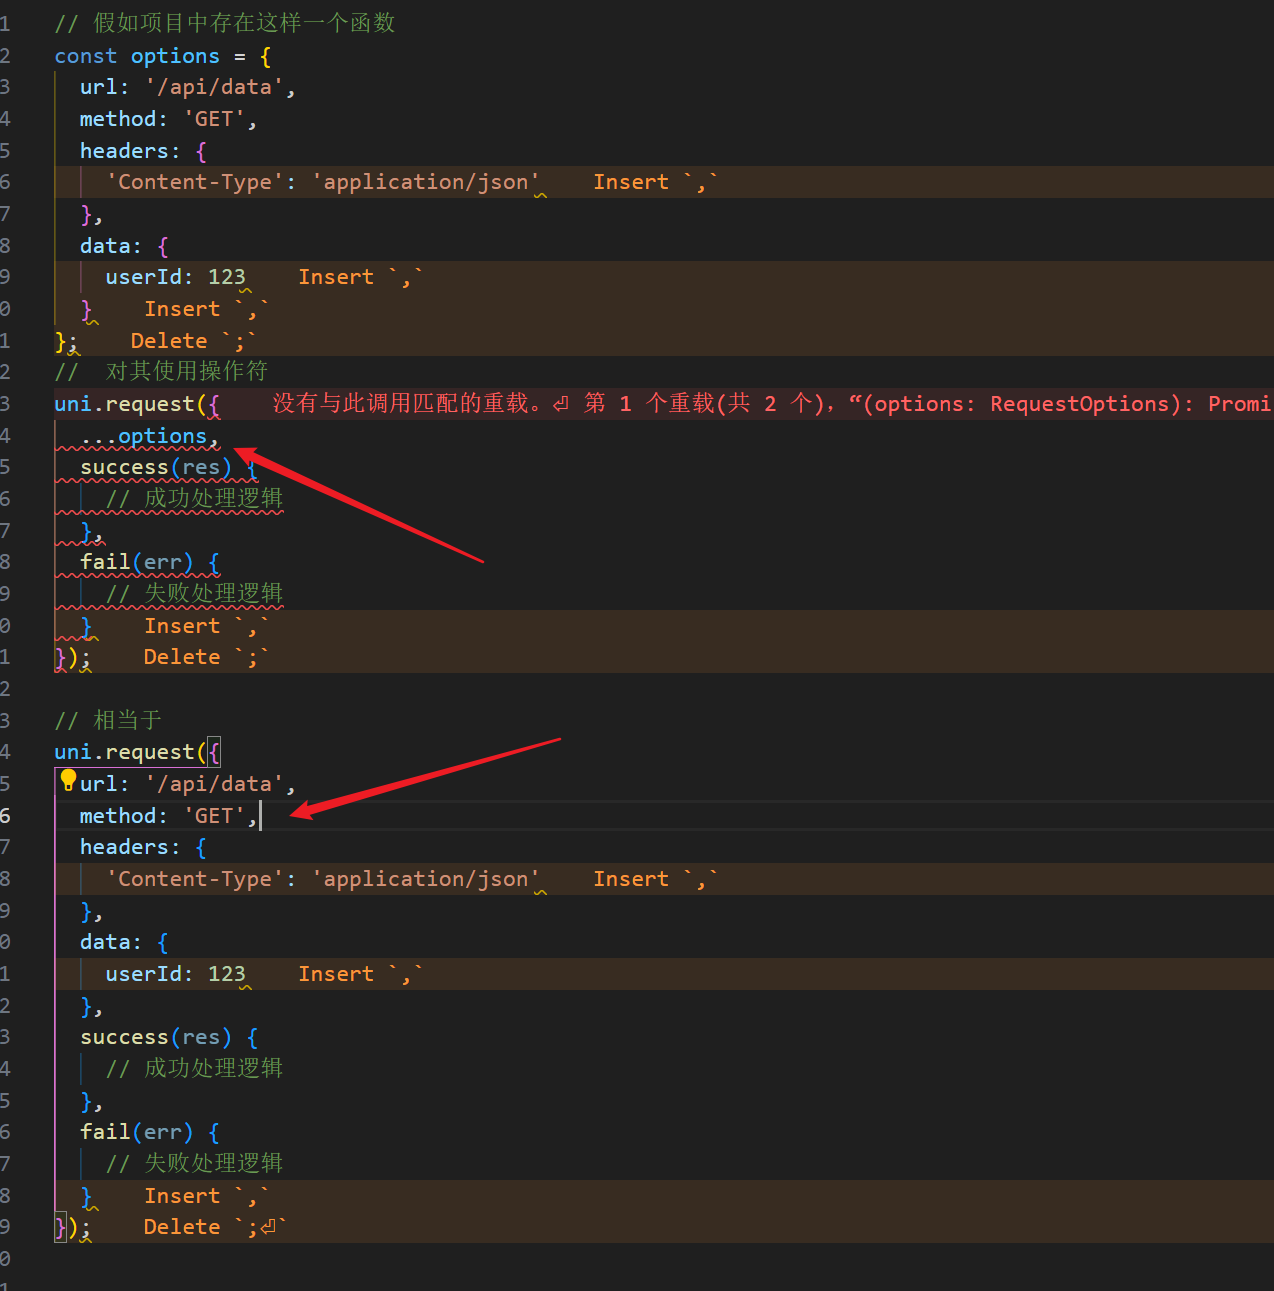
uni.request({
// 使用展开符 具体情况可以看我笔记的下面
...options,
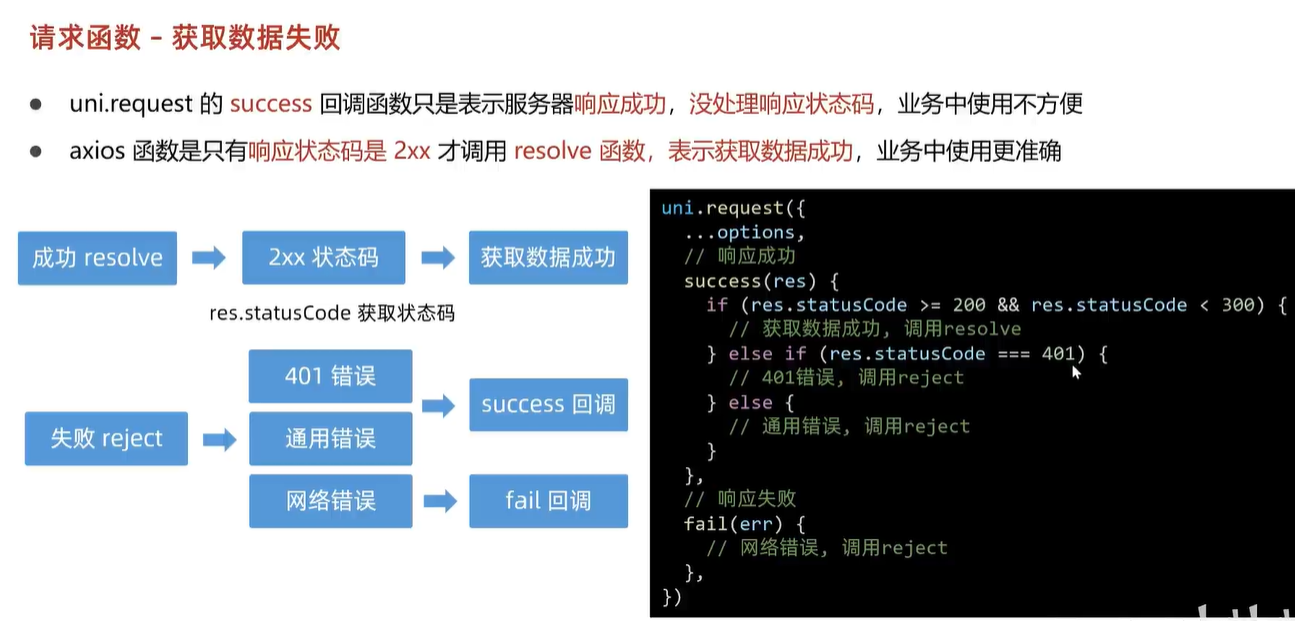
// 响应成功
success(res) {
// 状态码 2xx,参考 axios 的设计
if (res.statusCode >= 200 && res.statusCode < 300) {
// 2.1 提取核心数据 res.data as是强制转换
resolve(res.data as Data<T>)
} else if (res.statusCode === 401) {
// 401错误 -> 清理用户信息,跳转到登录页
const memberStore = useMemberStore()
memberStore.clearProfile()
uni.navigateTo({ url: '/pages/login/login' })
reject(res)
} else {
// 其他错误 -> 根据后端错误信息轻提示
uni.showToast({
// 指定不显示图标
icon: 'none',
// 如果请求数据中有msg则显示 否则标题为请求错误
title: (res.data as Data<T>).msg || '请求错误',
})
reject(res)
}
},
// 响应失败
fail(err) {
uni.showToast({
icon: 'none',
title: '网络错误,换个网络试试',
})
reject(err)
},
})
})
}
//my.vue 的测试请i去更新
// 测试请求
const getDate = async () => {
  const res = await http({
    method: 'GET',
    url: '/home/banner',
    header: {},
  })
  console.log('请求成功', res)
}
我无法看懂这个函数!
- 大部分东西已经解析的很清晰了 如果你没有看懂 请查看自己是否学过 vue 或者是否做过Vue小兔鲜项目,没有做过也不急 看我的另一篇笔记 Vue 3 黑马程序员小兔鲜开发-CSDN博客
…options
小结
自定义导航栏
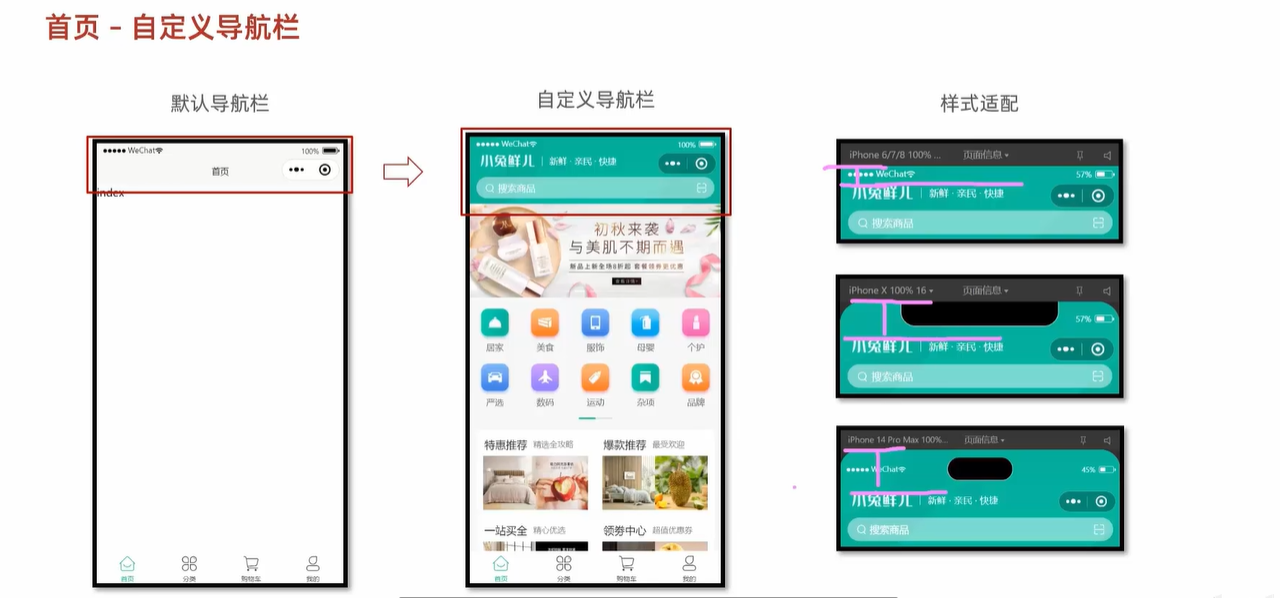
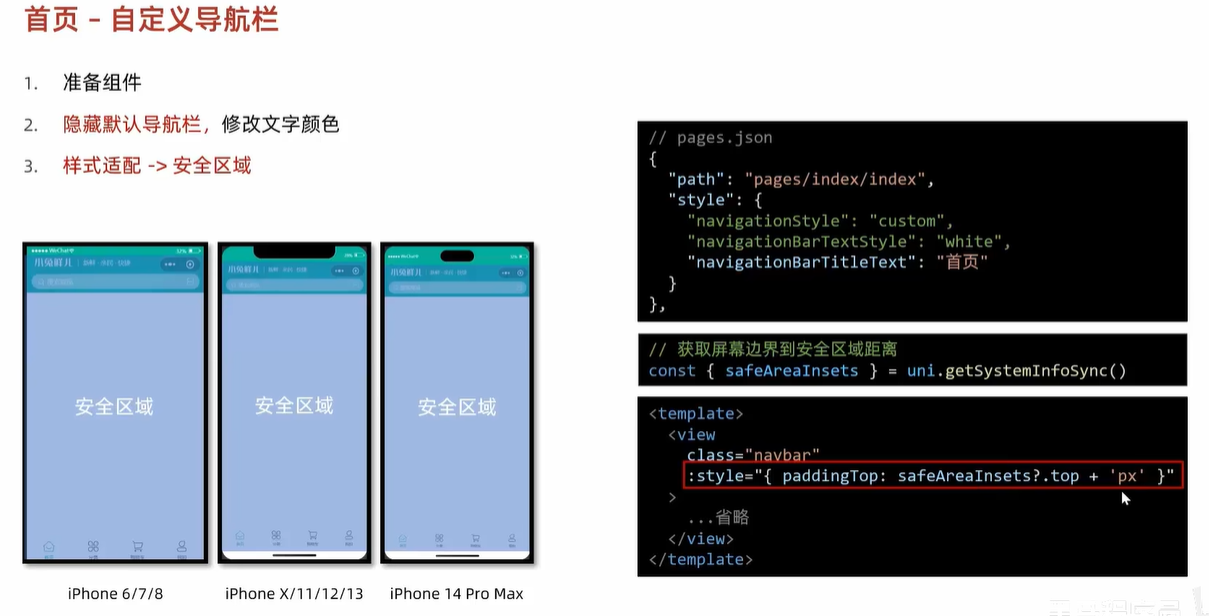
<!-- src/pages/index/componets/CustomNavbar.vue -->

<script setup lang="ts">
const { safeAreaInsets } = uni.getSystemInfoSync()
</script>

<template>
  <view class="navbar" :style="{ paddingTop: safeAreaInsets?.top + 'px' }">
    <!-- logo文字 -->
    <view class="logo">
      <image class="logo-image" src="@/static/images/logo.png"></image>
      <text class="logo-text">新鲜 · 亲民 · 快捷</text>
    </view>
    <!-- 搜索条 -->
    <view class="search">
      <text class="icon-search">搜索商品</text>
      <text class="icon-scan"></text>
    </view>
  </view>
</template>

<style lang="scss">
/* 自定义导航条 */
.navbar {
  background-image: url(@/static/images/navigator_bg.png);
  background-size: cover;
  position: relative;
  display: flex;
  flex-direction: column;
  padding-top: 20px;

  .logo {
    display: flex;
    align-items: center;
    height: 64rpx;
    padding-left: 30rpx;
    padding-top: 20rpx;

    .logo-image {
      width: 166rpx;
      height: 39rpx;
    }

    .logo-text {
      flex: 1;
      line-height: 28rpx;
      color: #fff;
      margin: 2rpx 0 0 20rpx;
      padding-left: 20rpx;
      border-left: 1rpx solid #fff;
      font-size: 26rpx;
    }
  }

  .search {
    display: flex;
    align-items: center;
    justify-content: space-between;
    padding: 0 10rpx 0 26rpx;
    height: 64rpx;
    margin: 16rpx 20rpx;
    color: #fff;
    font-size: 28rpx;
    border-radius: 32rpx;
    background-color: rgba(255, 255, 255, 0.5);
  }

  .icon-search {
    &::before {
      margin-right: 10rpx;
    }
  }

  .icon-scan {
    font-size: 30rpx;
    padding: 15rpx;
  }
}
</style>
// src/pages.json
{
  "path": "pages/index/index",
  "style": {
    "navigationStyle": "custom", // 隐藏默认导航
    "navigationBarTextStyle": "white",
    "navigationBarTitleText": "首页"
  }
}
报错 Module '"d:/Code/erabbitShop-uni-app-Vue3-TS/src/pages/index/components/CustomNavbar.vue"' has no default export.

- 因为你装的插件问题 Vetur
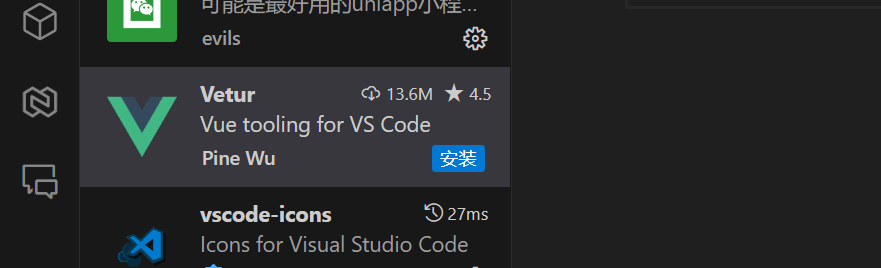
- 把这个插件删掉/禁用 使用 vola(不在维护)
没有显示导航栏目
- 查看项目有没有跑起来
Day2
轮播图
- 导入组件没有什么值得讲的,后面的是配置自动导入,项目约定都以Xtx开头
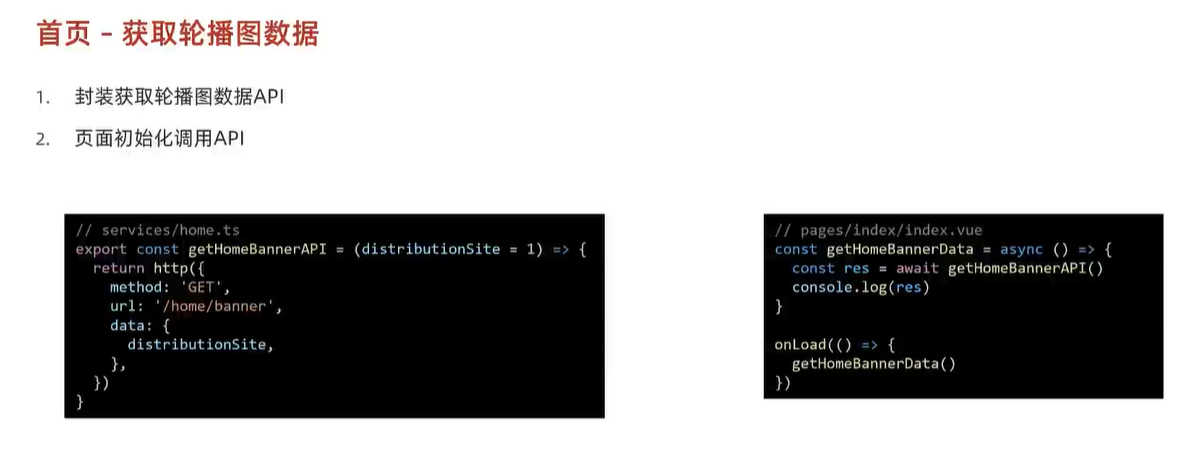
- 使用CTRL + i 实现自动导入
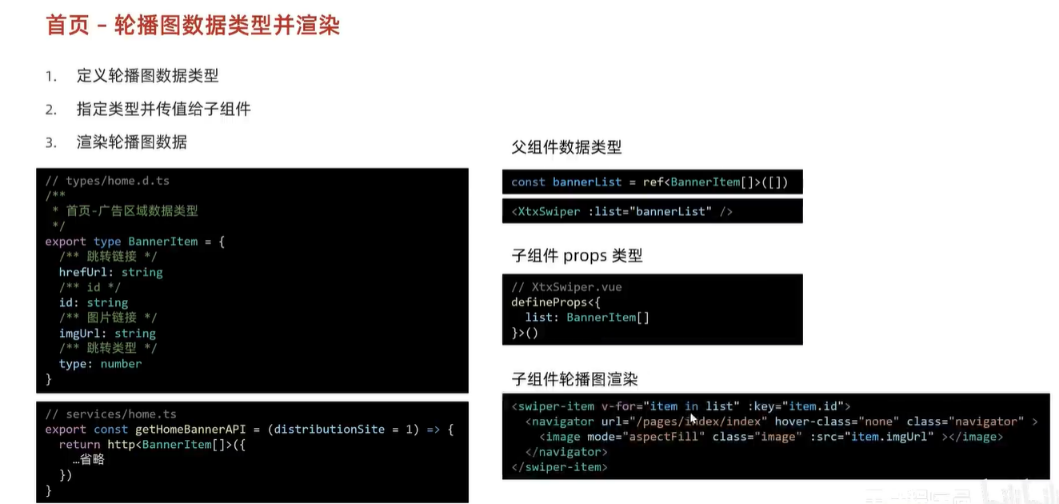
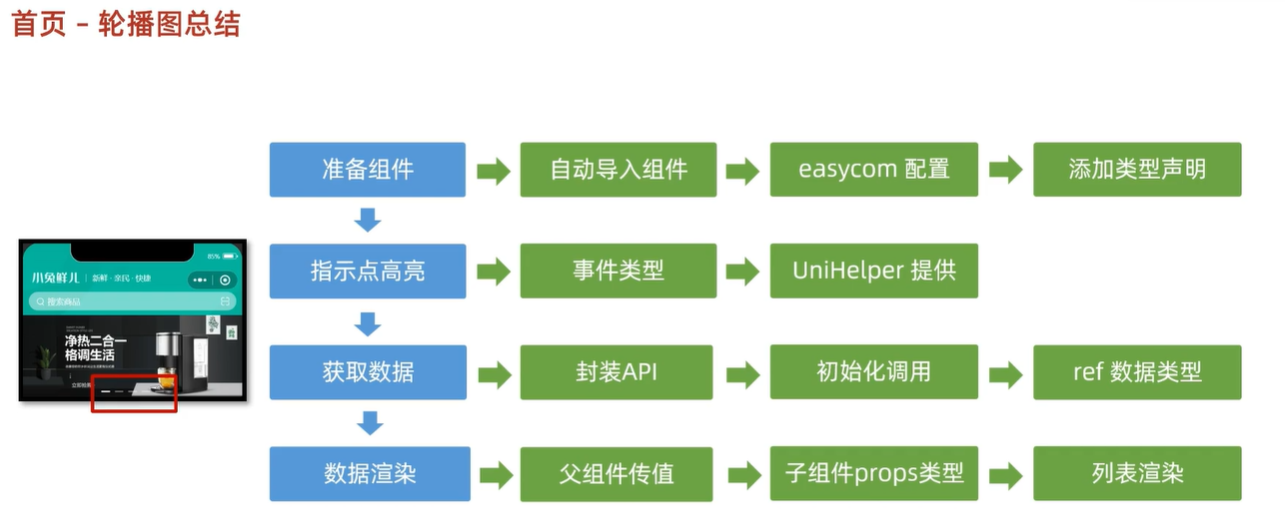
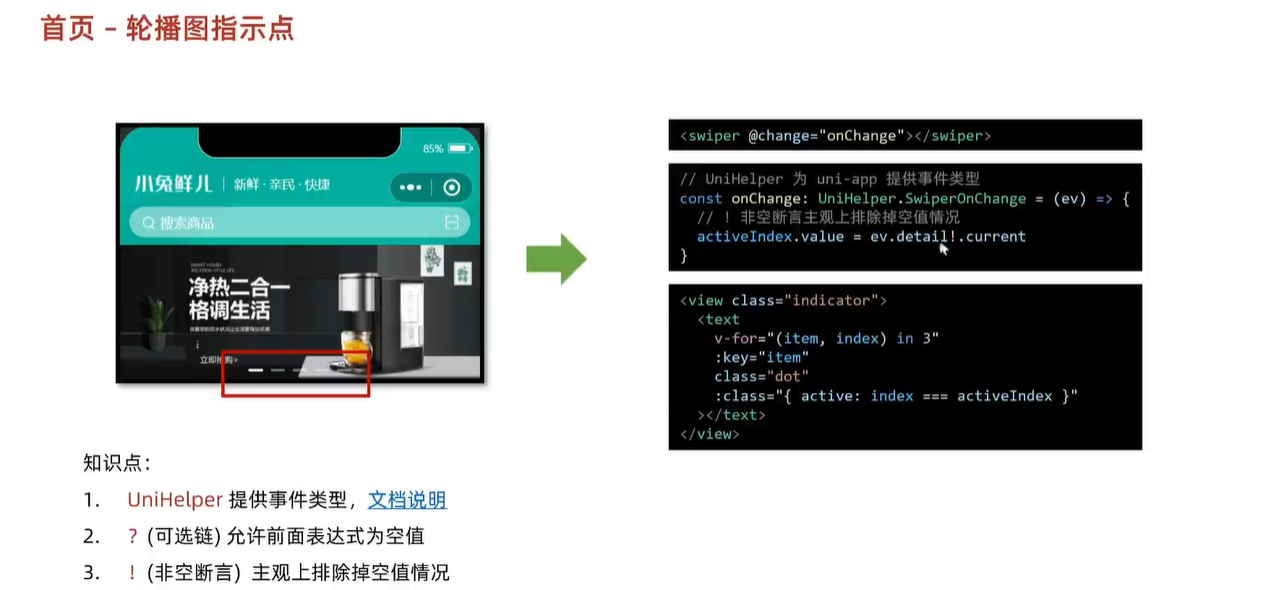
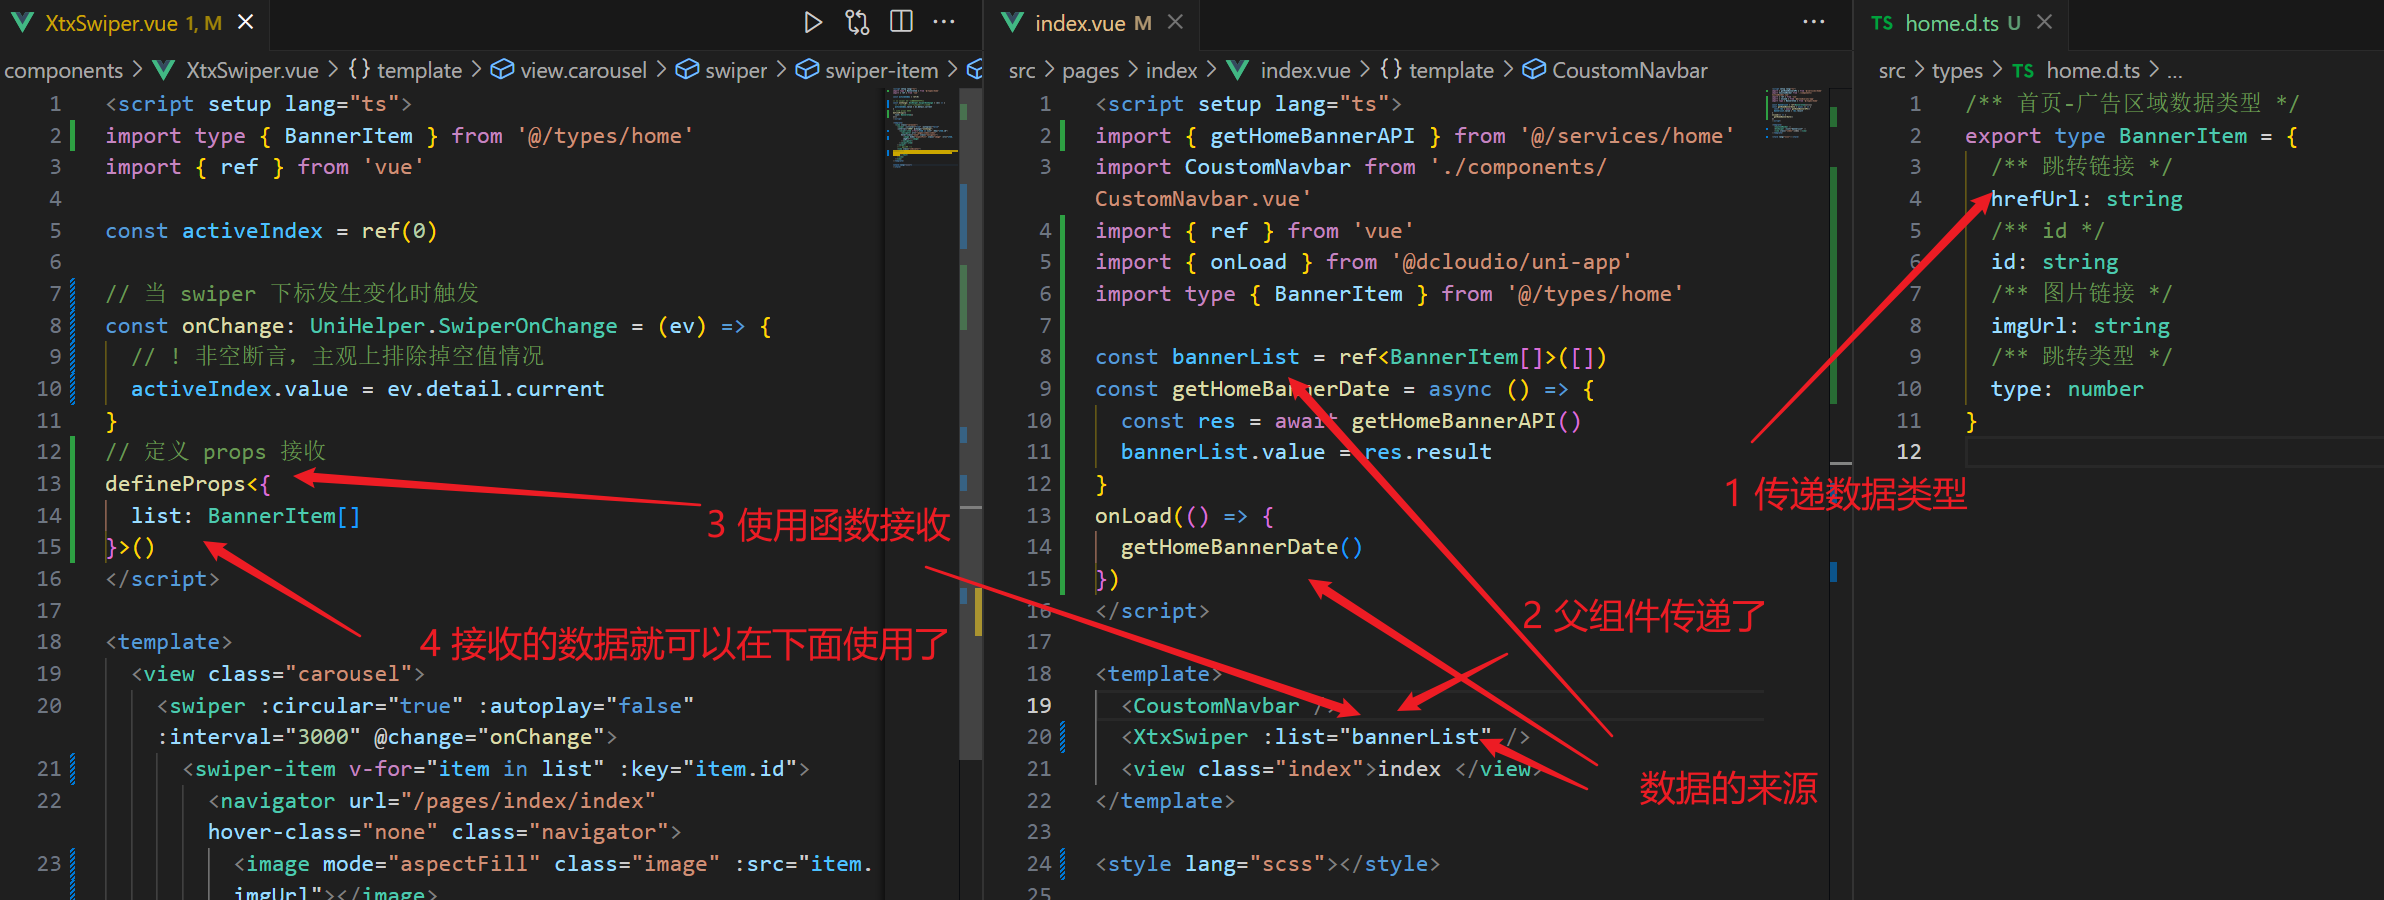
轮播图一图理清
Ts
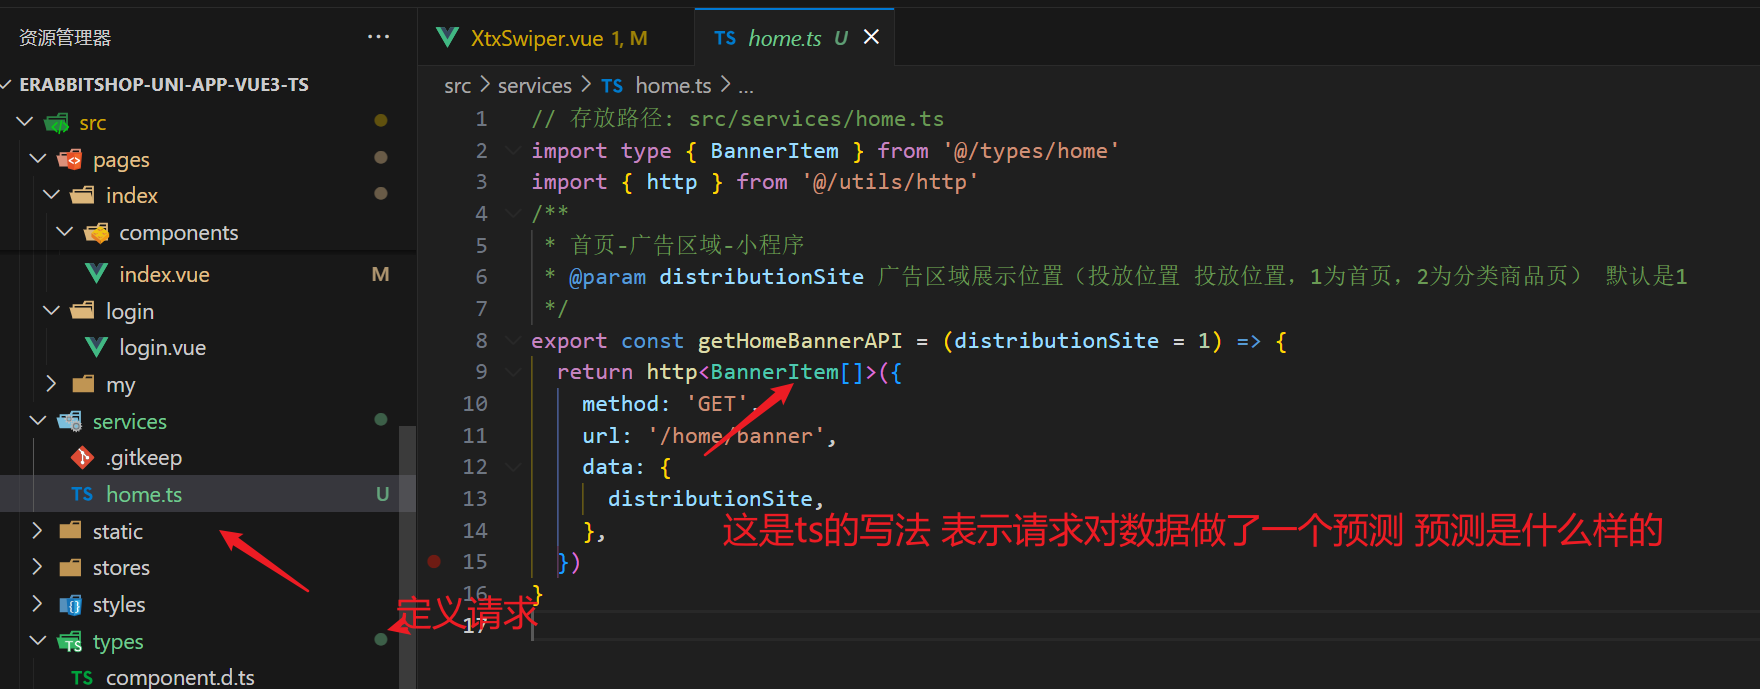
- 打错字了 应该是对返回数据做了一个预测
为什么要把子组件使用的数据在父组件发请求获取 而不是在子组件中获取?明明父组件不需要这些数据
这是一个常见的设计模式,称为"智能组件和哑组件"模式。
在这种模式中,父组件负责获取数据和处理业务逻辑,而子组件负责接收数据并展示。这种方式有几个优点:
- 数据流的可控性: 父组件可以更好地控制数据的获取和传递,从而使整个应用程序的数据流更加清晰可见。
- 复用性: 子组件可以更加通用,因为它们不需要关心数据的获取方式和业务逻辑,只需要关注数据的展示。
- 单一职责原则: 父组件负责数据获取和处理,符合单一职责原则,使得组件更加容易理解和维护。
另外,这种设计模式也有助于提高代码的可测试性和可维护性,因为业务逻辑更加集中,更容易进行单元测试和重构。
我甚至看不懂vue代码!要怎么办
- 去写个小兔鲜 vue3 项目
- 如果你是个后端开发人员 那么可以找下vue语法网站 花个几小时快速入门 吴悠讲编程的个人空间-吴悠讲编程个人主页-哔哩哔哩视频 (bilibili.com)
- 推荐看看他的视频
首页 前台分类组件
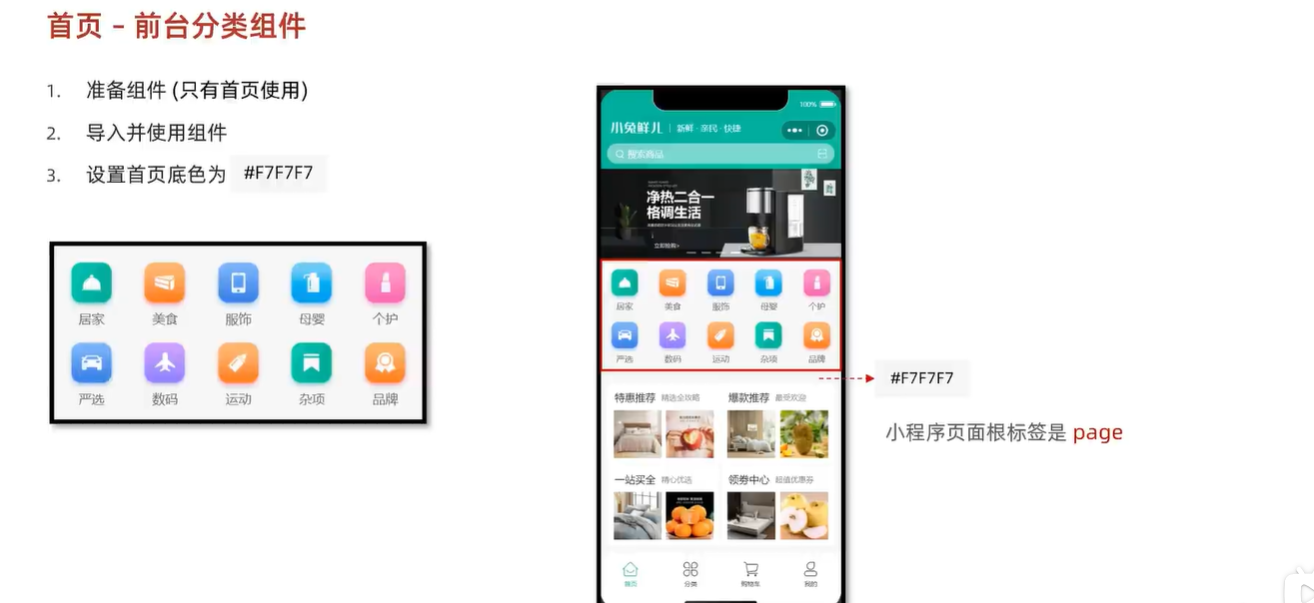
// 修改小程序的颜色 类似html5中为body指定颜色
page {
  background-color: #f7f7f7;
}
获取前台数据

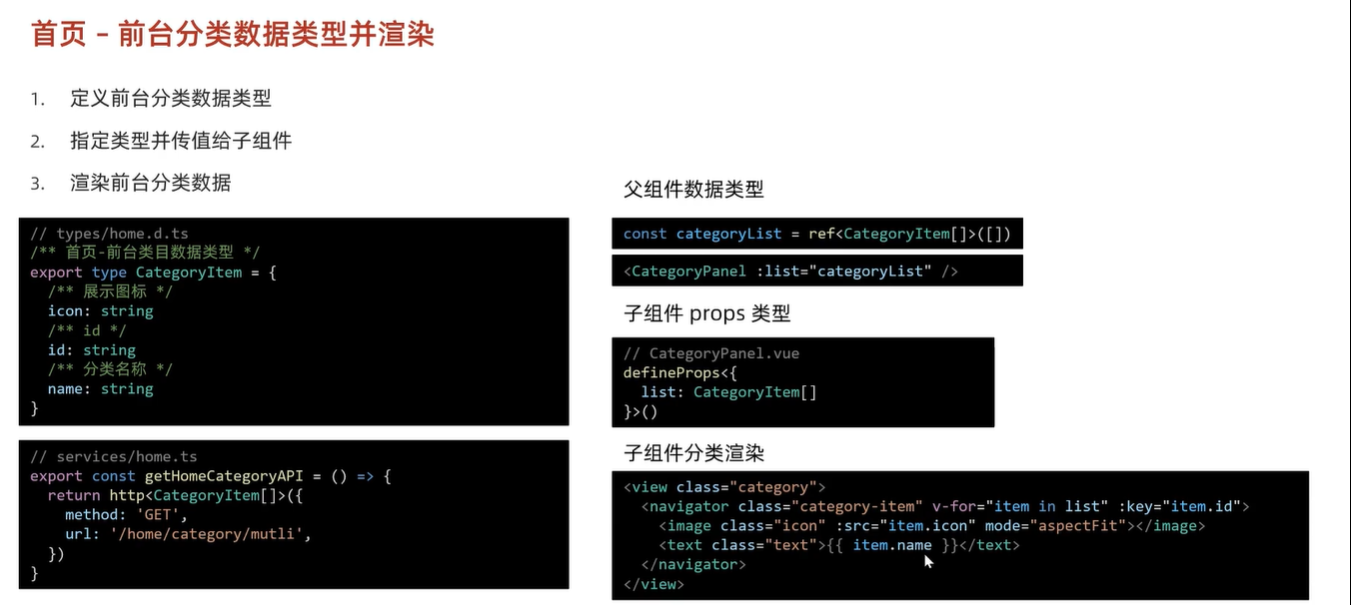
TS类型声明使用及编写
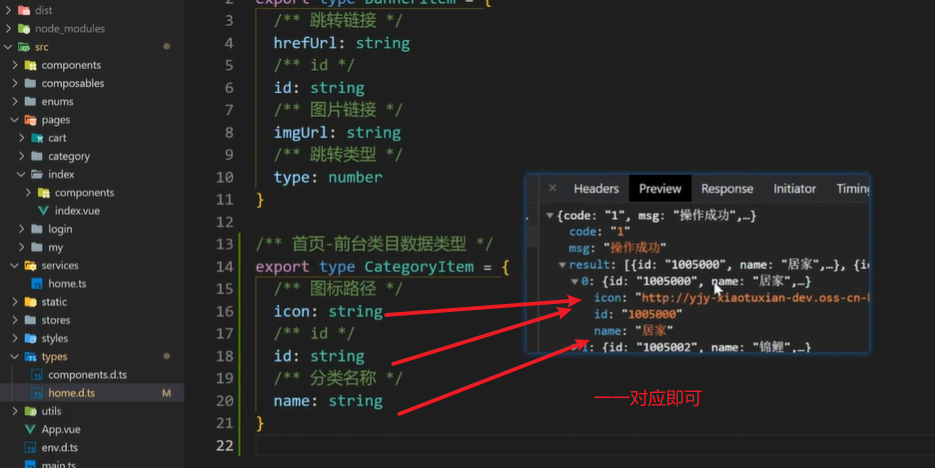
存储理念
- 一个组件是通用的存放在components中,不是则存放在page里的components中
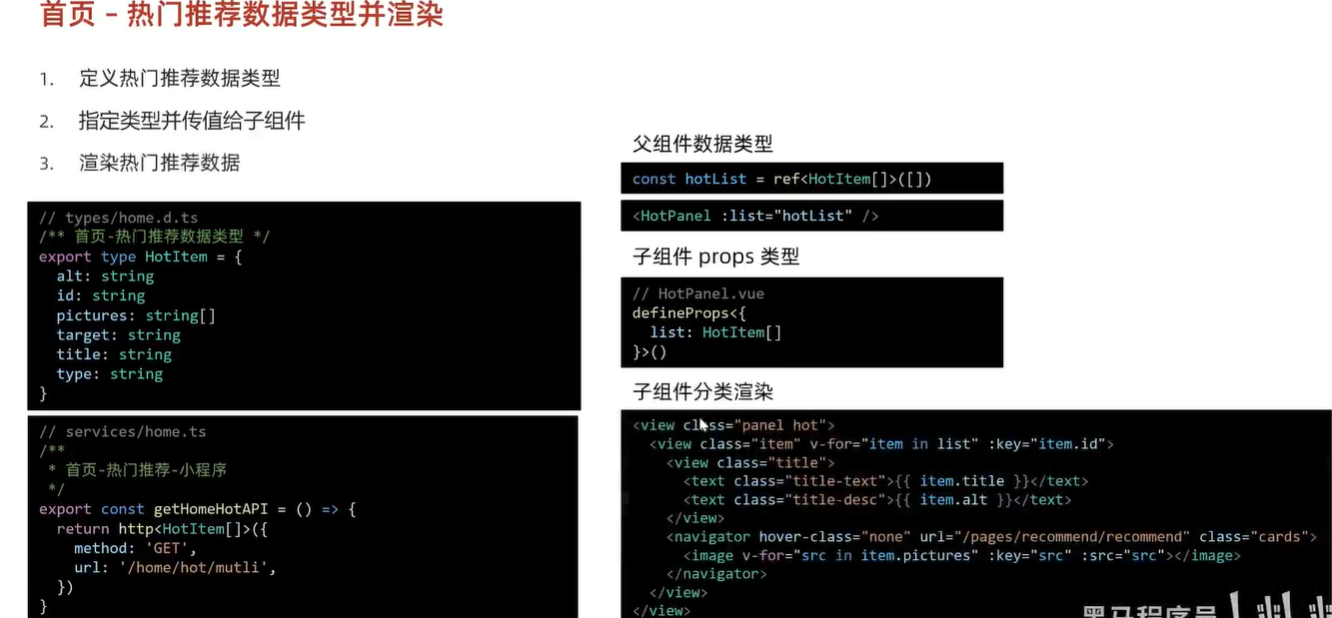
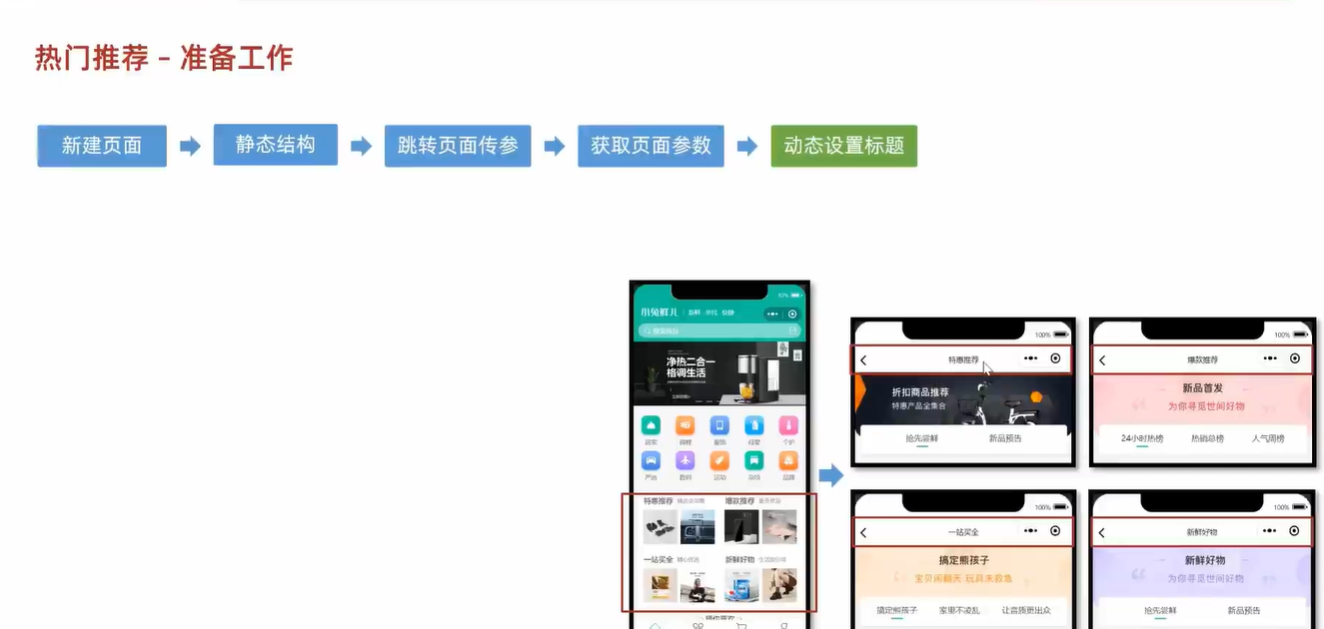
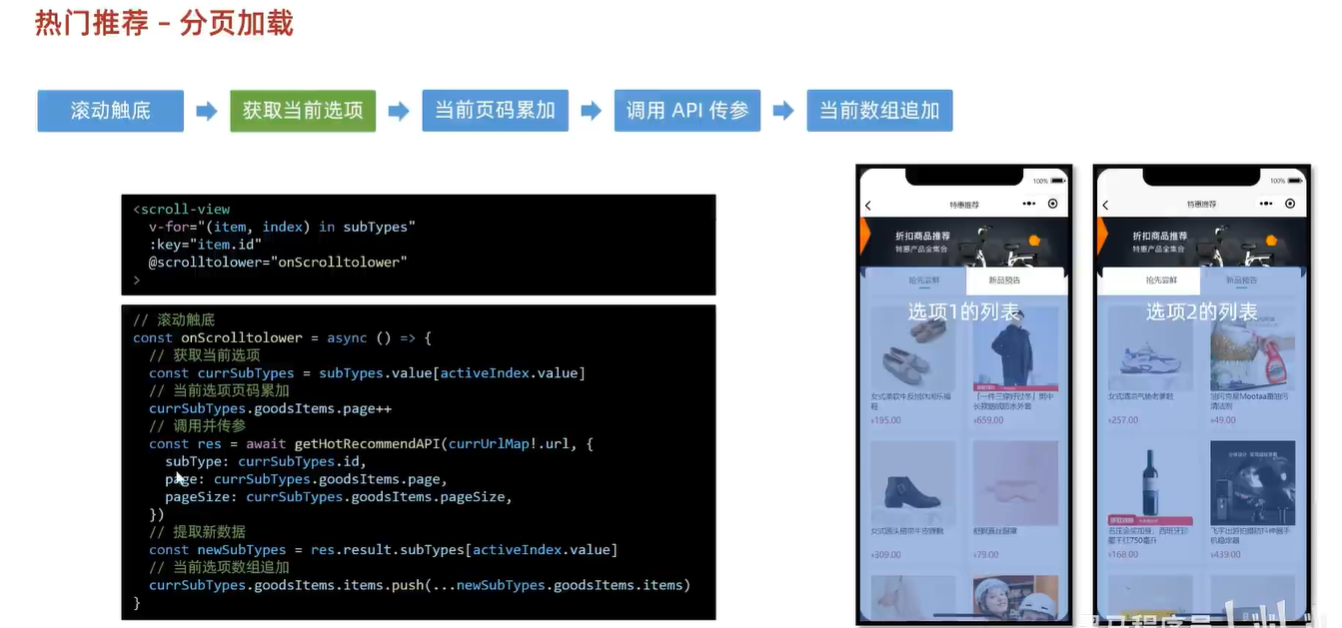
热门推荐
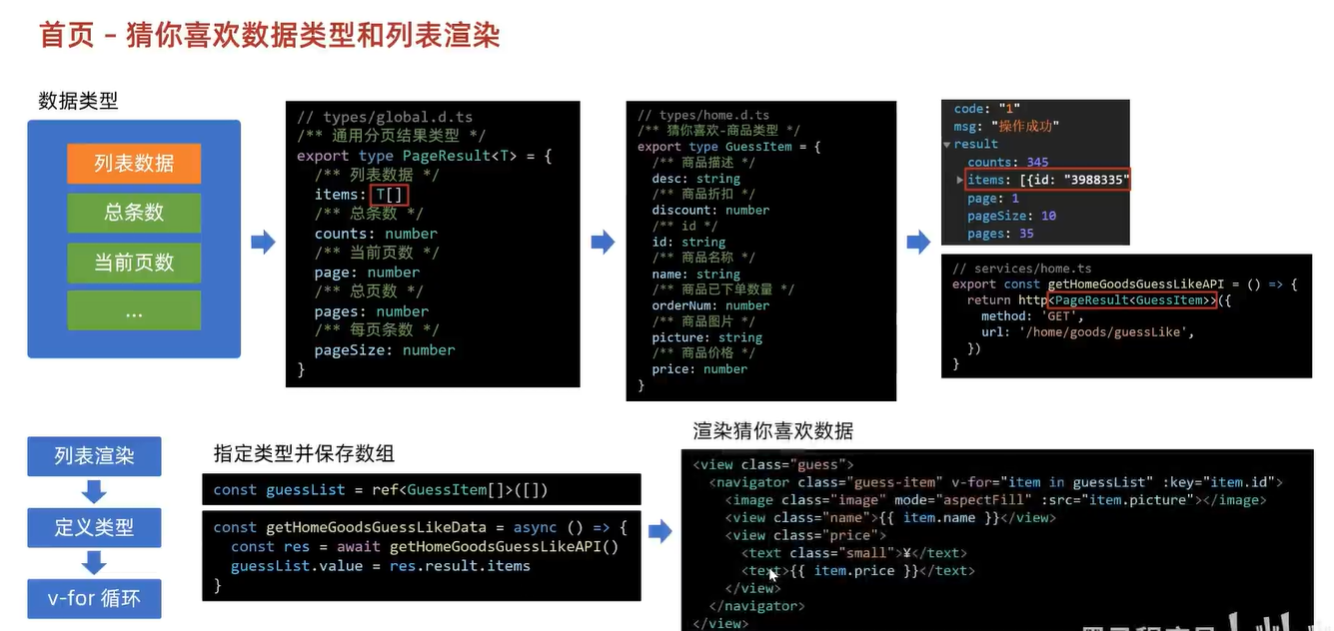
猜你喜欢
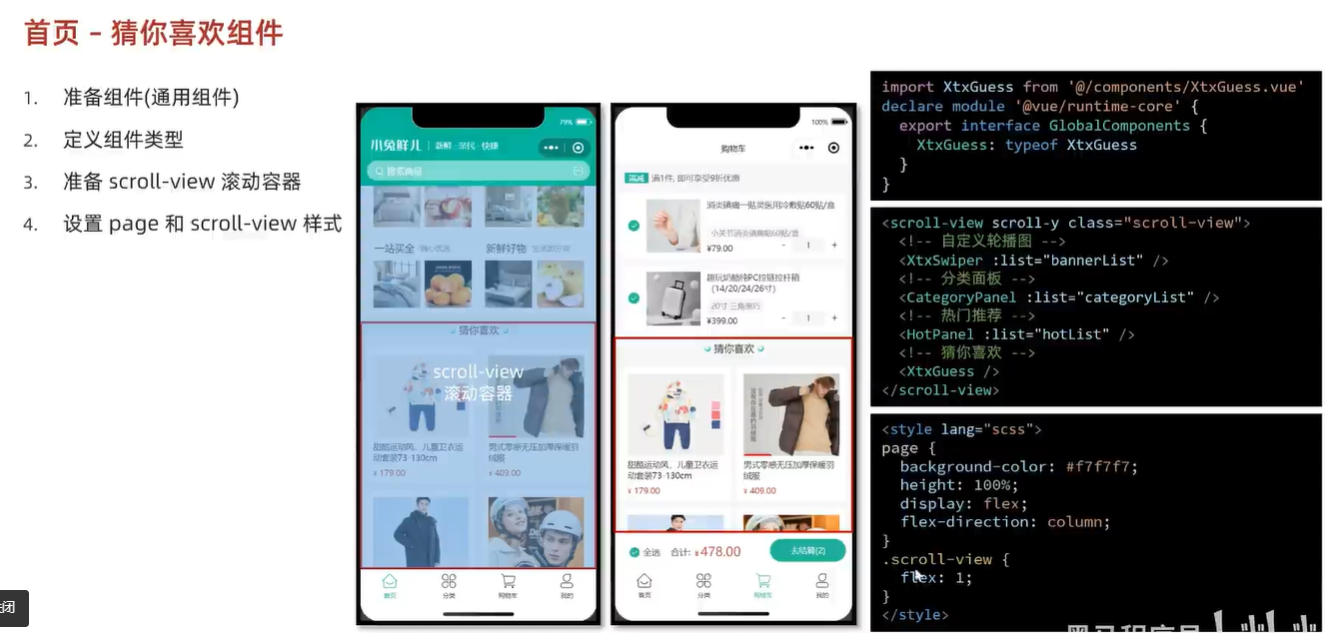
滚动实现
获取数据
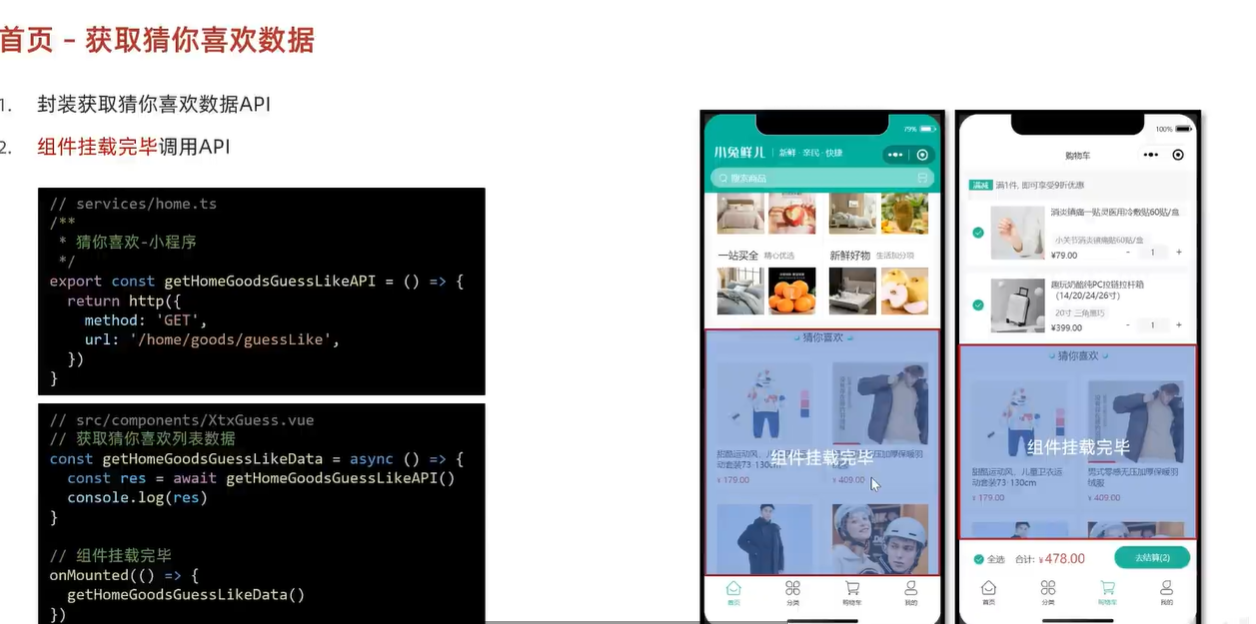
为什么要在子组件中获取数据而不是父组件中获取数据?
在子组件中获取数据而不在父组件中获取数据通常被称为"自包含组件"或"自管理组件"模式。在这种模式下,子组件负责管理自己的状态和数据获取逻辑,而不依赖于外部组件传递数据。
这种模式的优点包括:
- 组件独立性:子组件独立于父组件,可以更轻松地复用和维护。
- 封装性:子组件封装了自己的数据获取逻辑,使得代码更加清晰和易于理解。
- 可测试性:子组件的行为和状态更容易进行单元测试,因为其逻辑更加集中和独立。
然而,这种模式也存在一些局限性:
- 数据传递复杂性:如果子组件需要从多个父组件获取数据,可能需要在多个地方重复编写数据获取逻辑,增加了复杂性。
- 性能影响:如果同一个数据在多个子组件中重复获取,可能会导致冗余的数据请求,影响性能。
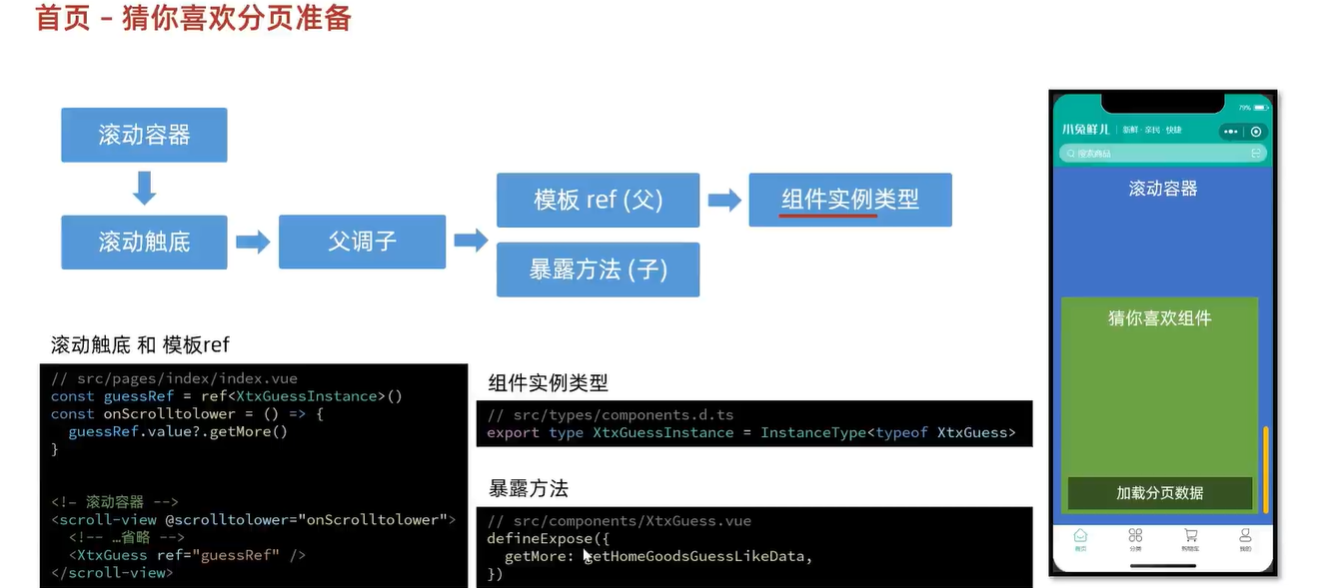
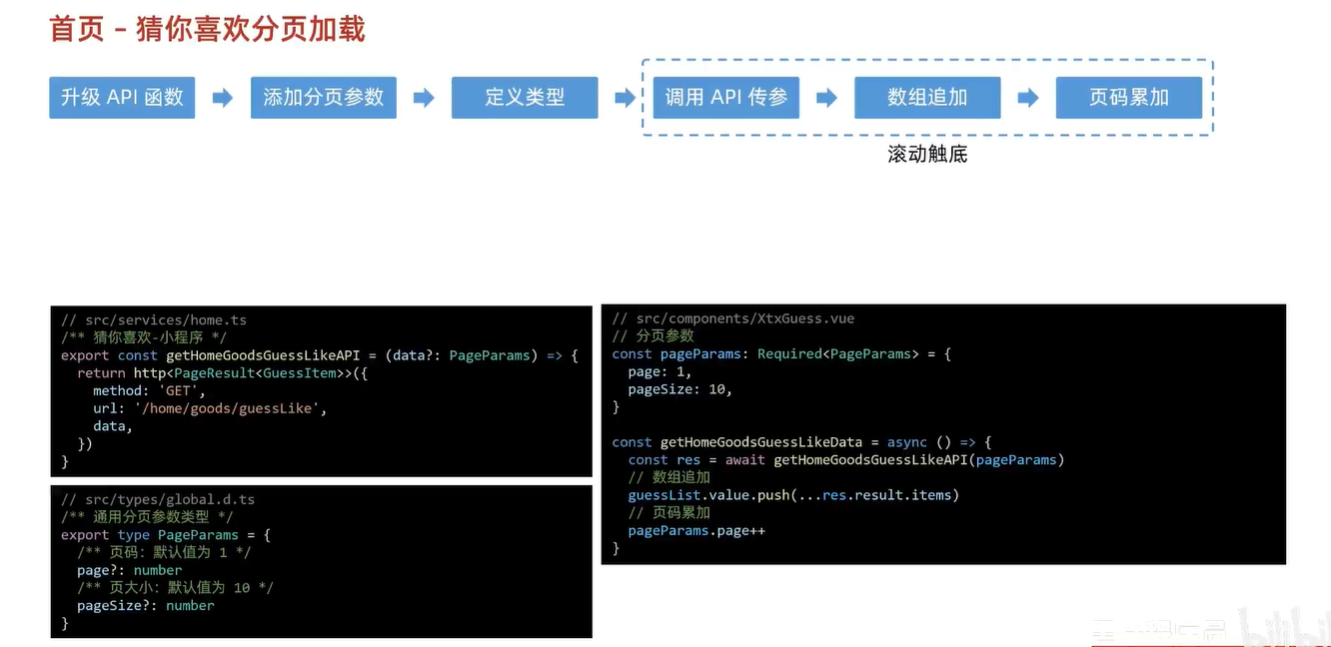
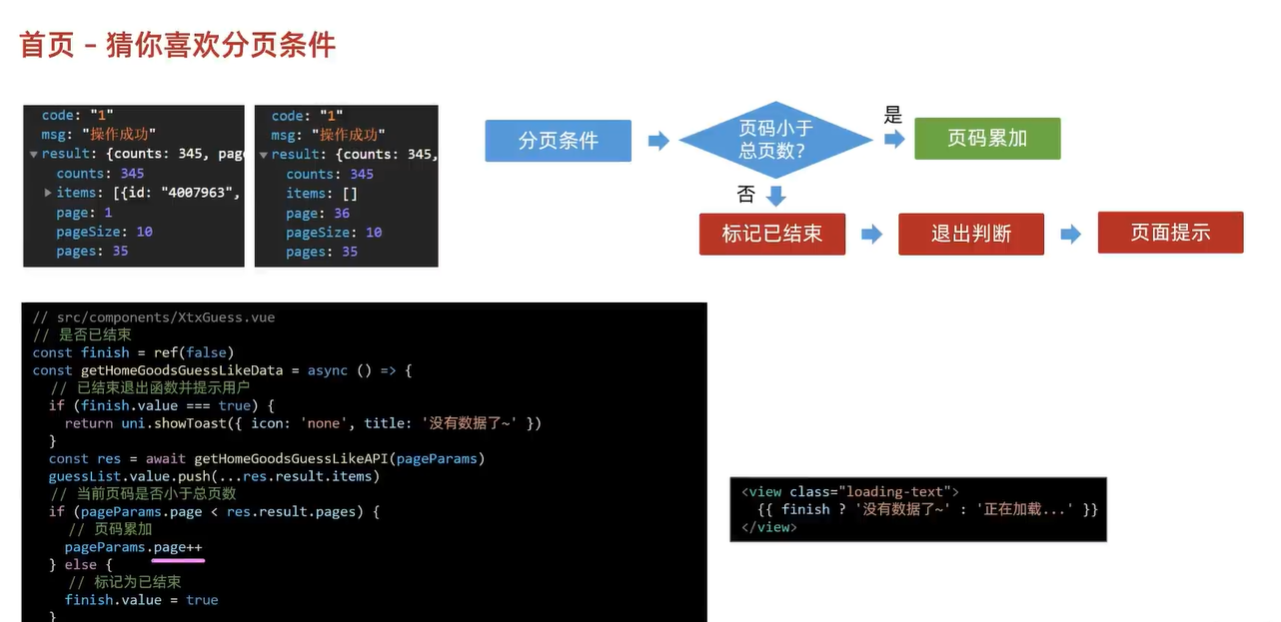
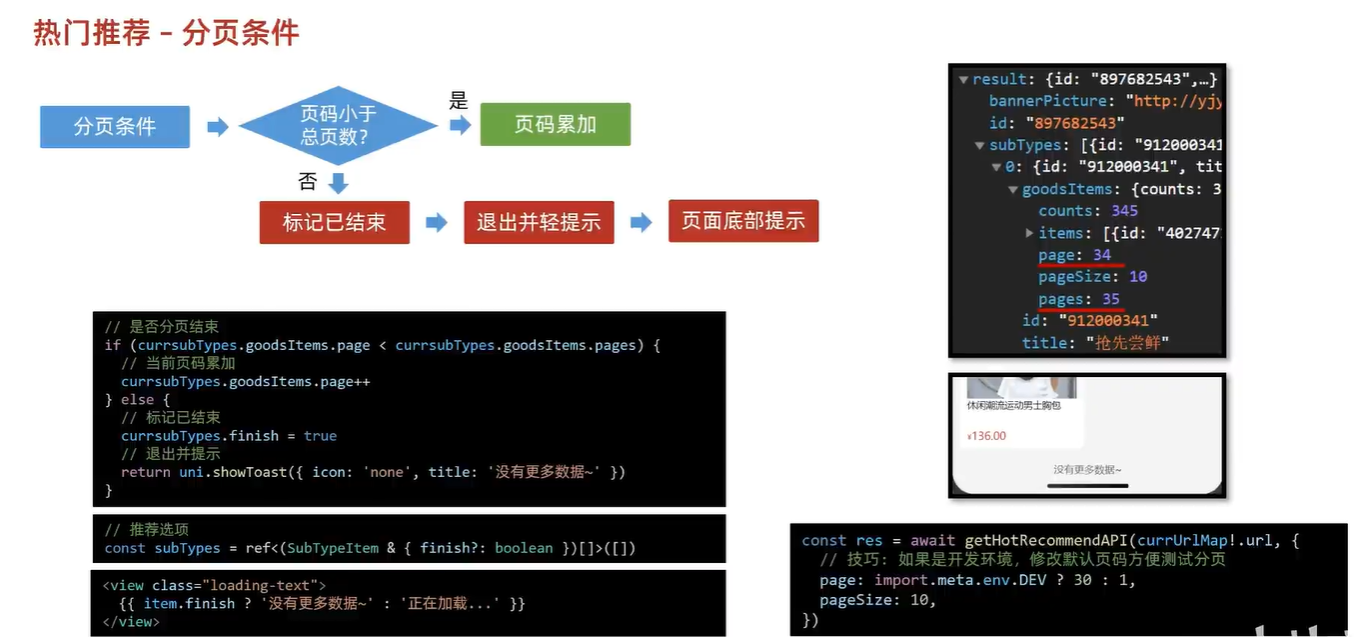
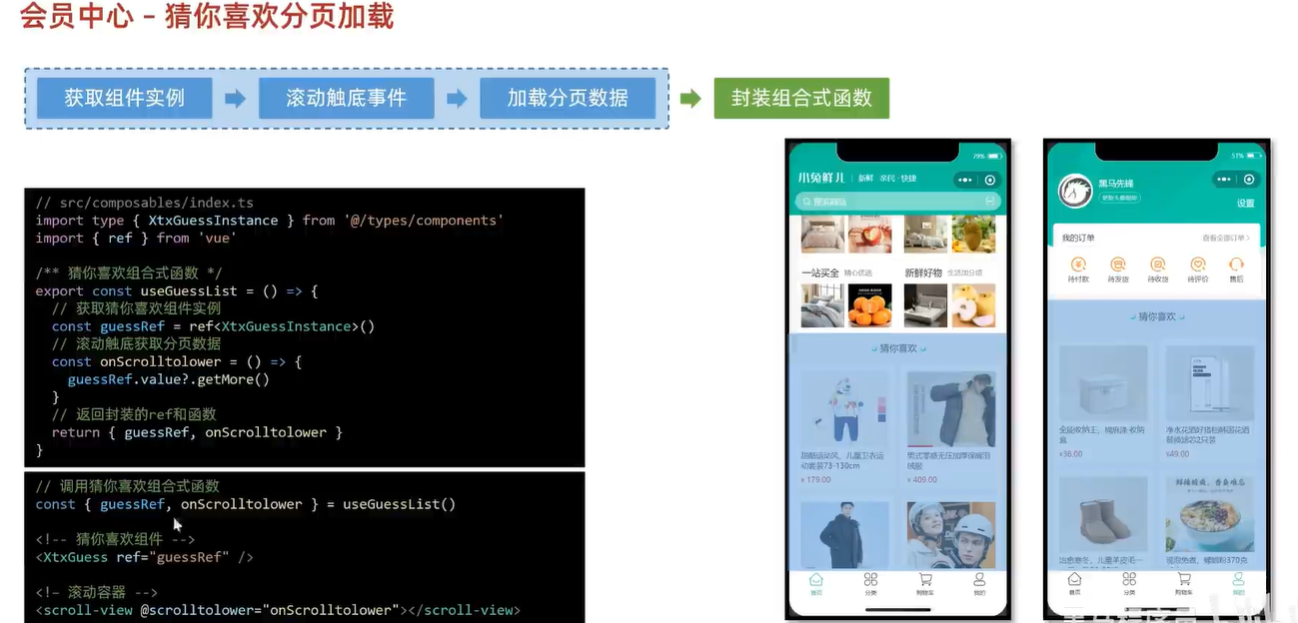
猜你喜欢分页准备
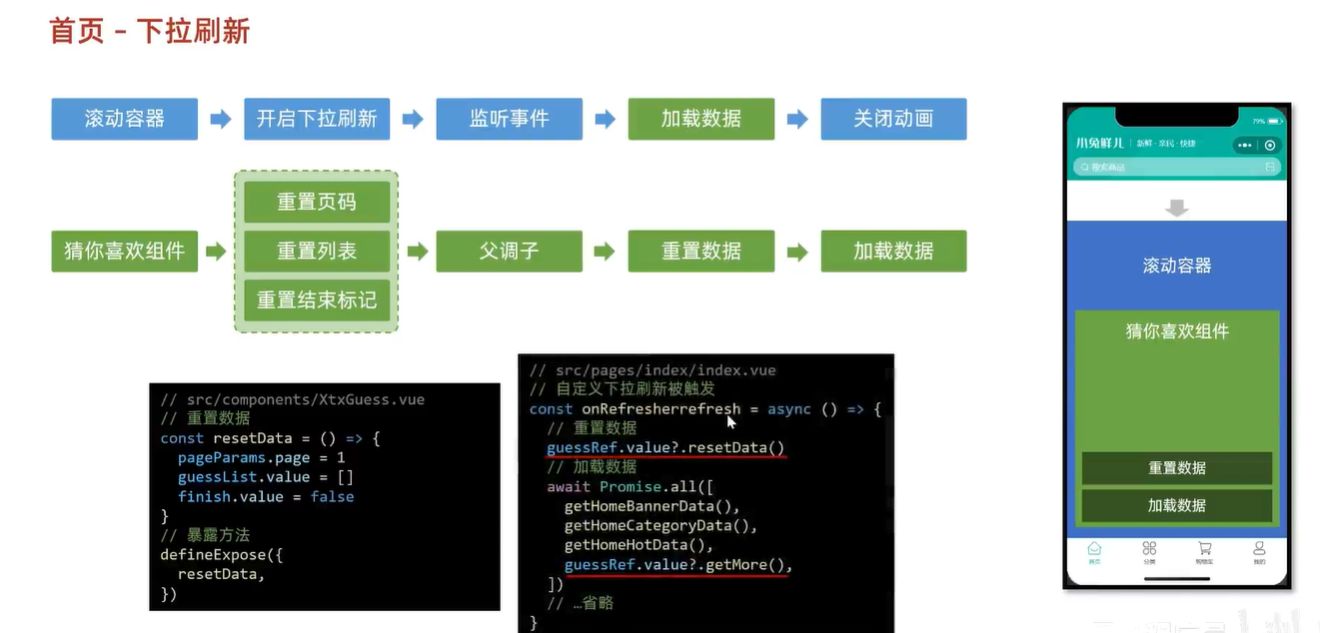
首页下拉刷新
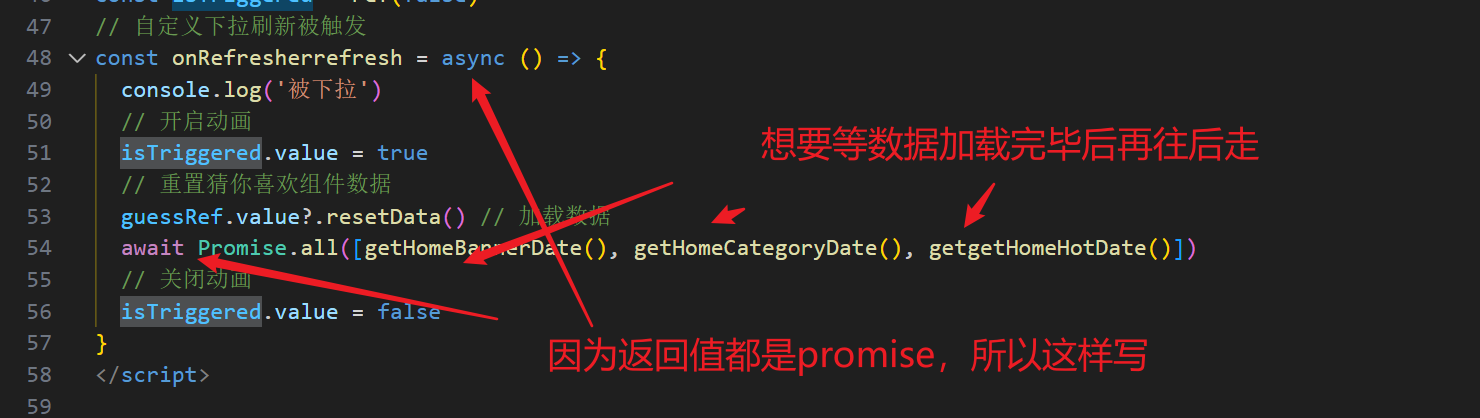
调优
这样就能实现全部一起开始请求

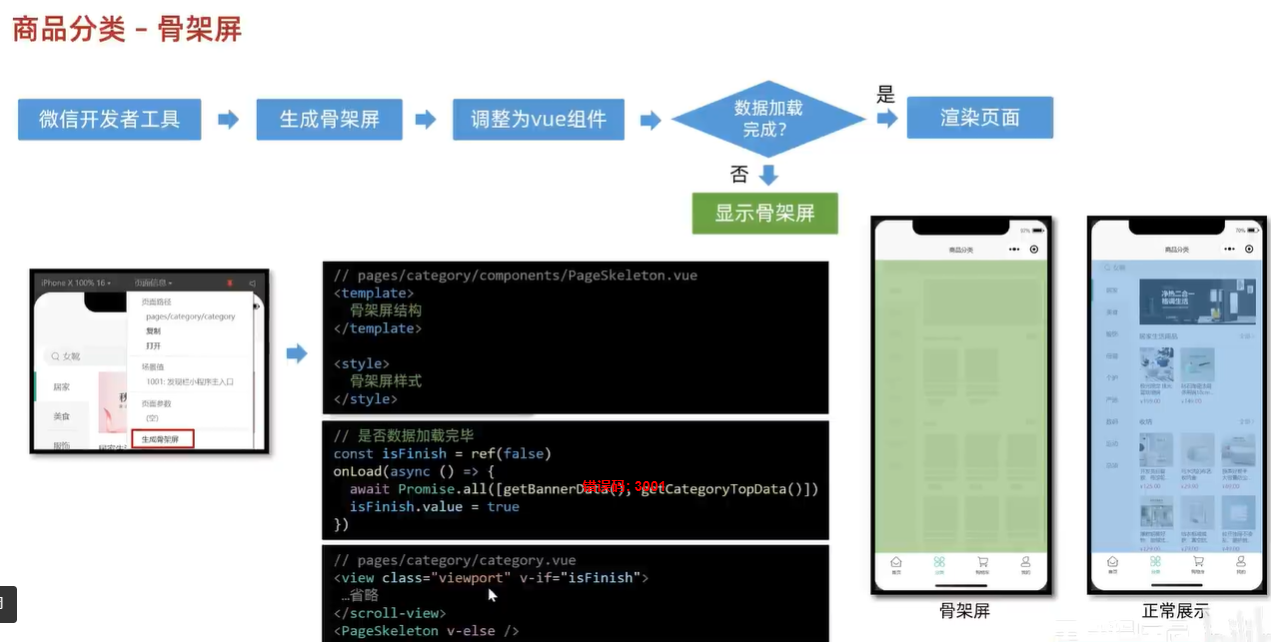
骨架屏

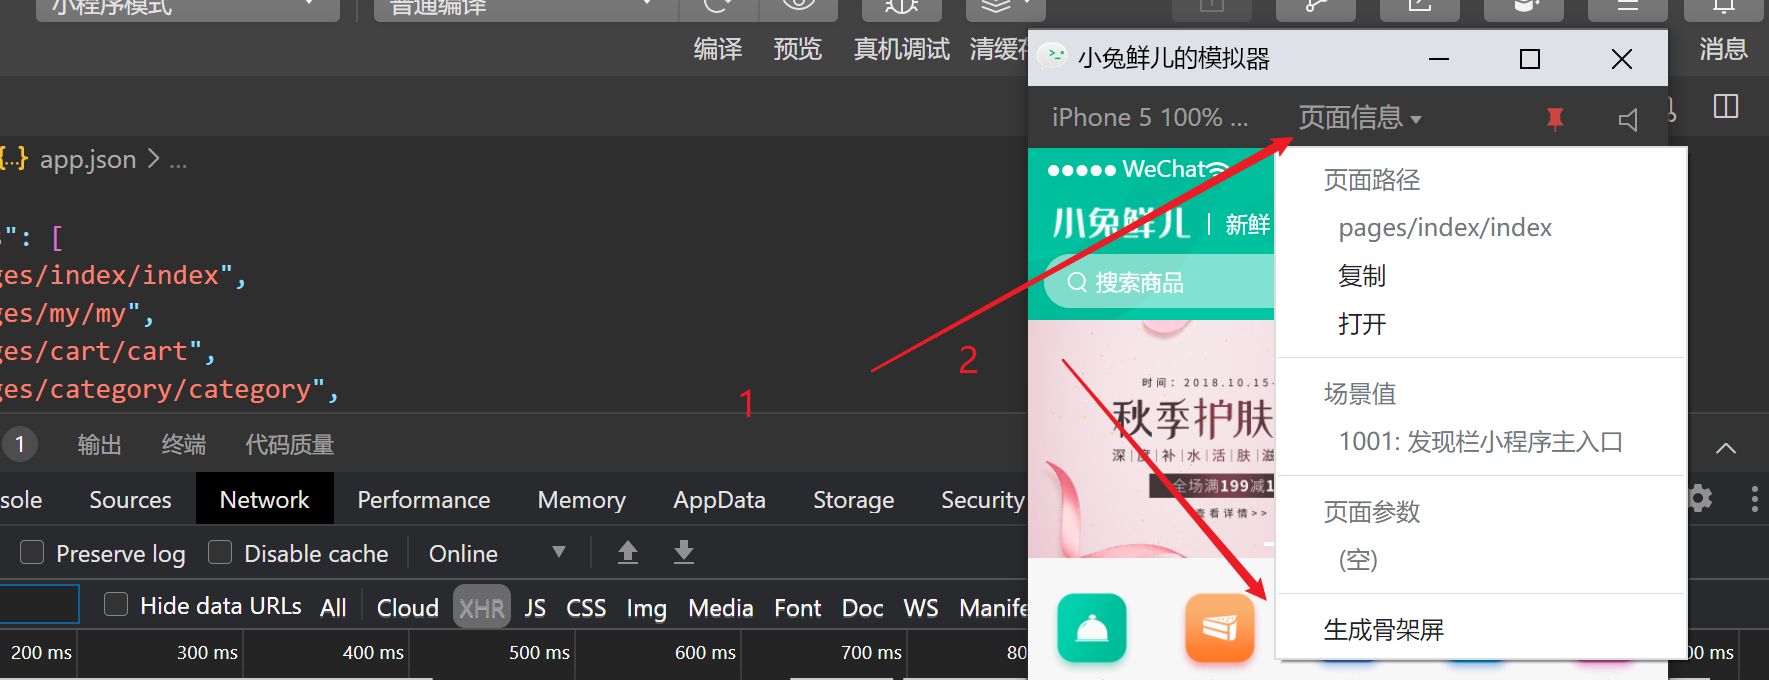
我没有生成出猜你喜欢/XtxGuess的骨架屏!!
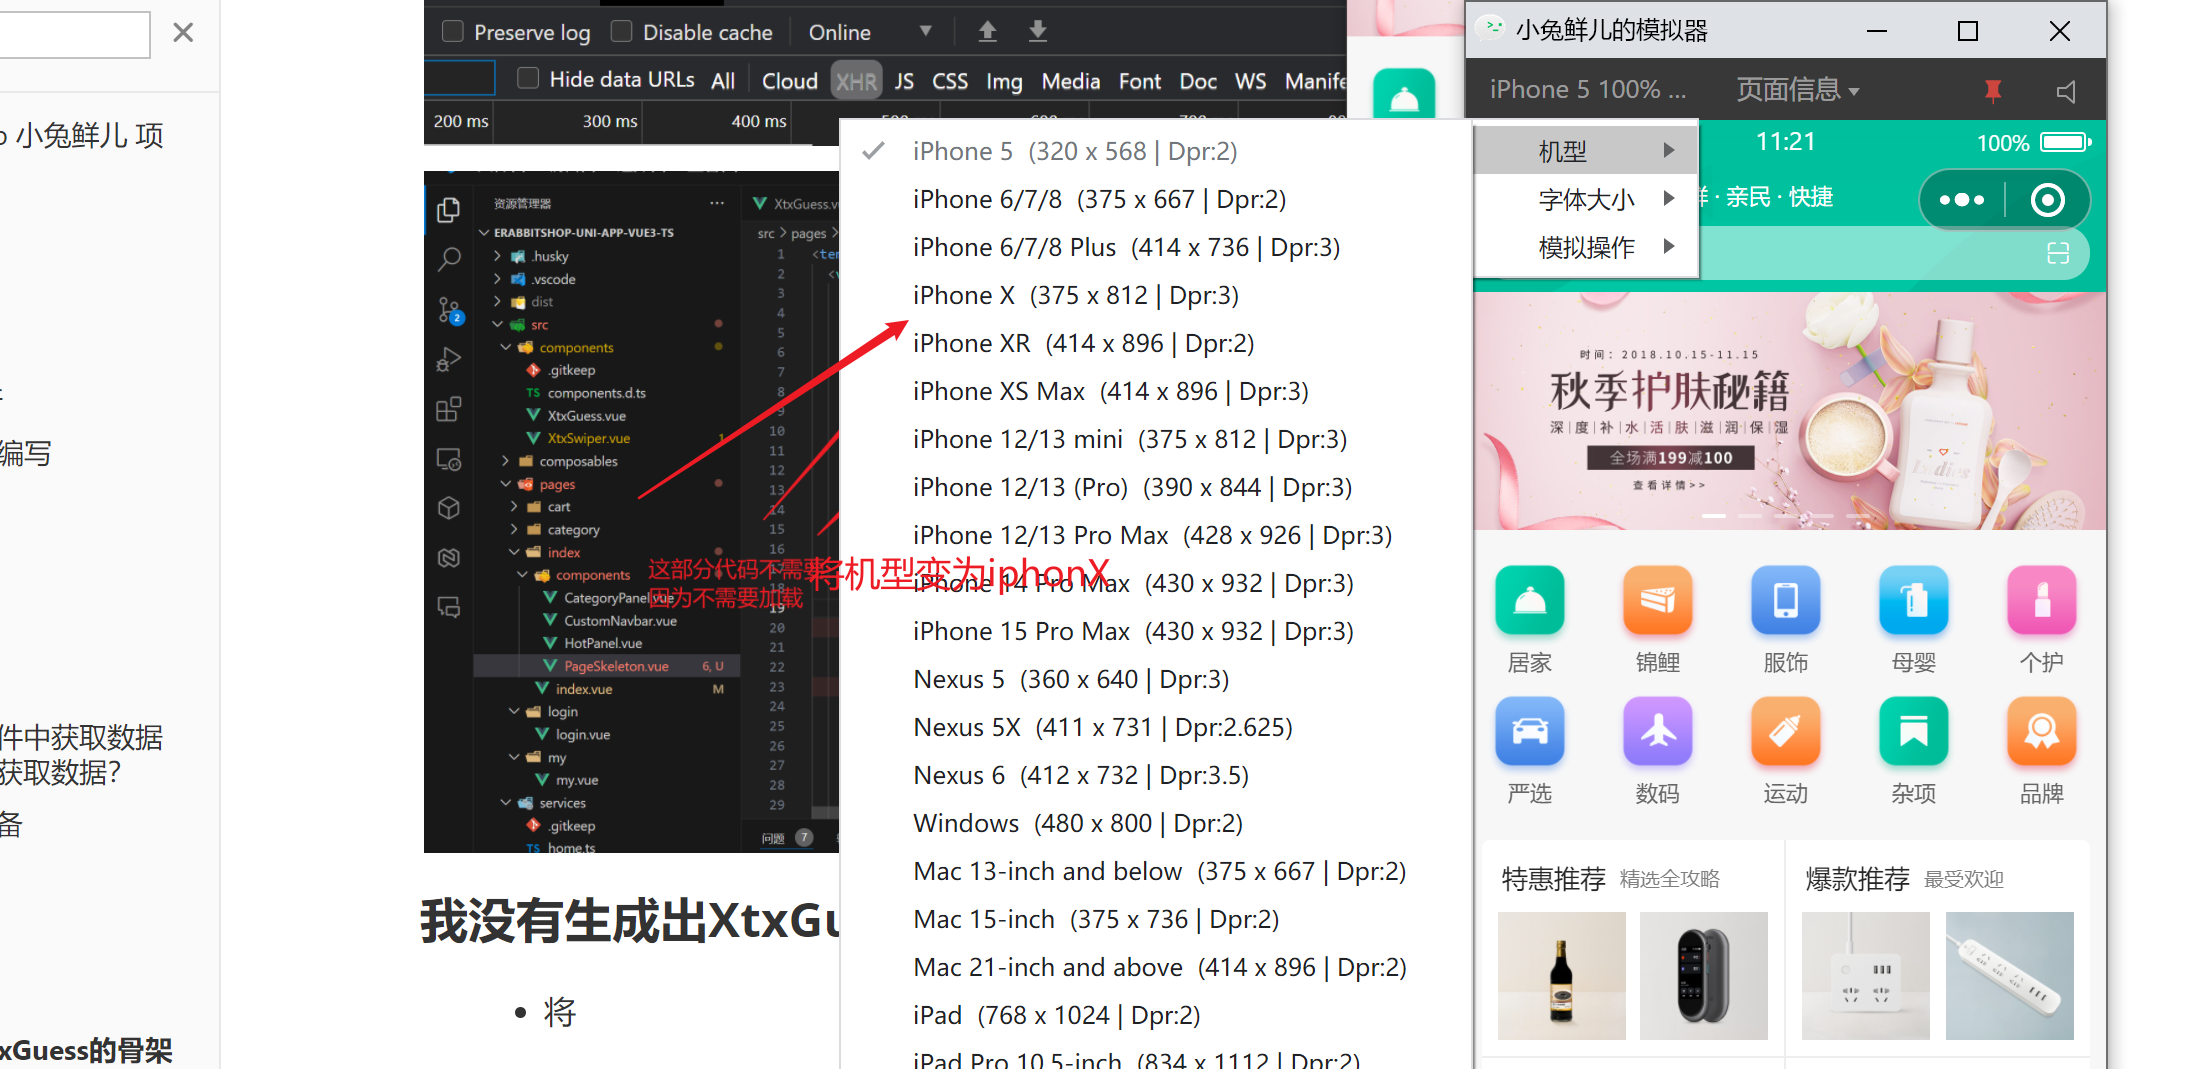
- 再生成一遍
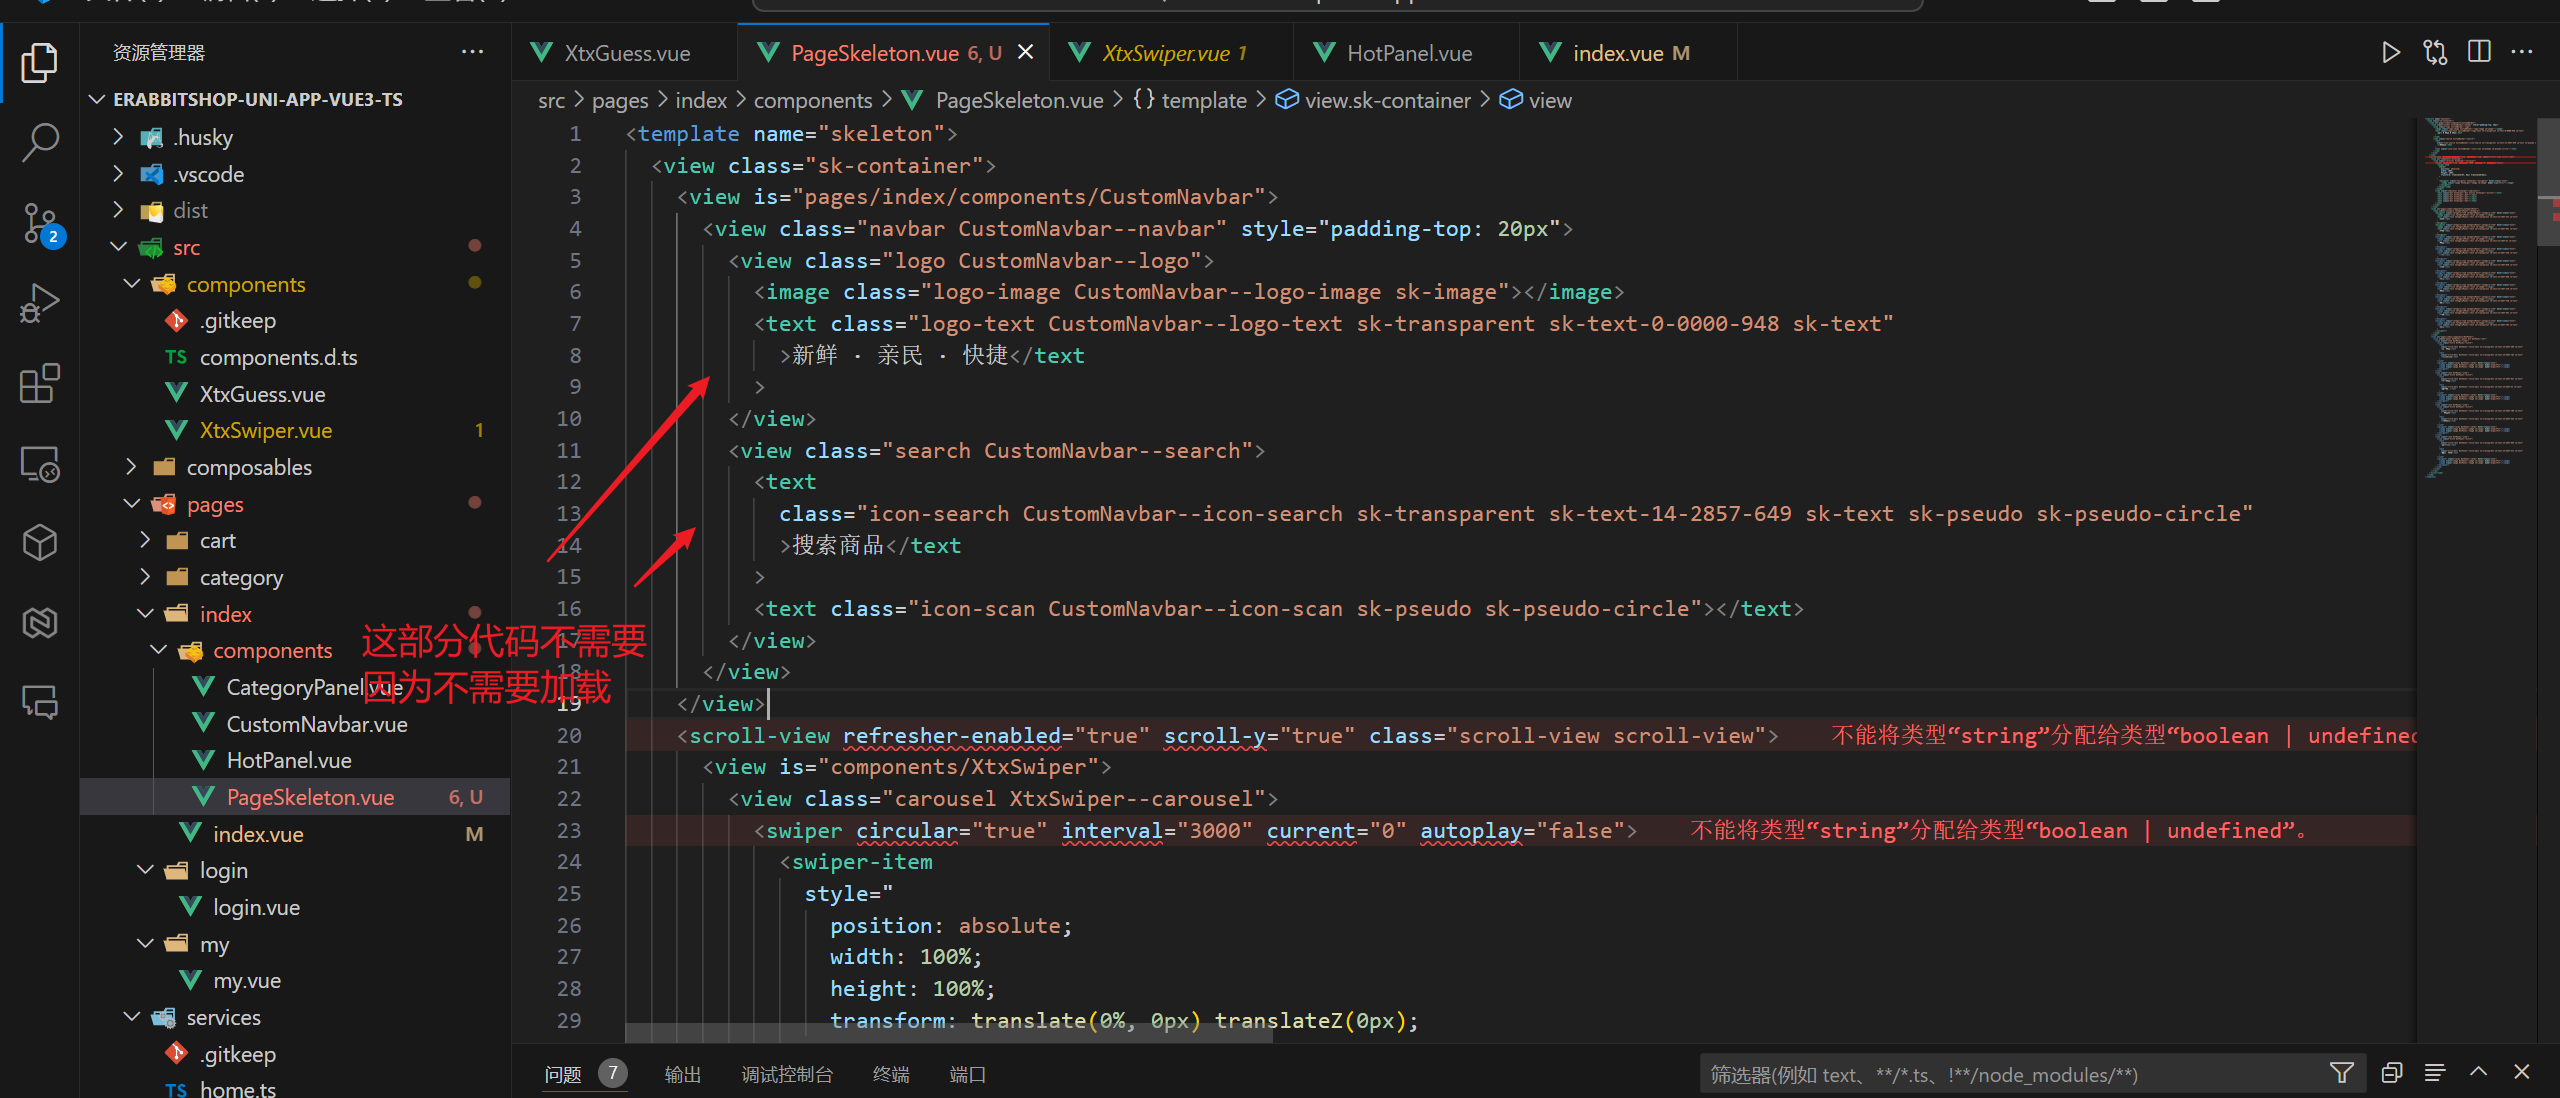
骨架屏显示逻辑代码
<script setup lang="ts">
import { getHomeBannerAPI, getHomeCategoryAPI, getHomeHotAPI } from '@/services/home'
import CoustomNavbar from './components/CustomNavbar.vue'
import { ref } from 'vue'
import { onLoad } from '@dcloudio/uni-app'
import type { BannerItem, CategoryItem, HotItem } from '@/types/home'
import CategoryPanel from './components/CategoryPanel.vue'
import HotPanel from './components/HotPanel.vue'
import type { XtxGuessInstance } from '@/types/component'
import PageSkeleton from './components/PageSkeleton.vue'
// 获取轮播图数据
const bannerList = ref<BannerItem[]>([])
const getHomeBannerDate = async () => {
const res = await getHomeBannerAPI()
bannerList.value = res.result
}
// 获取前台数据
const categoryList = ref<CategoryItem[]>([])
const getHomeCategoryDate = async () => {
const res = await getHomeCategoryAPI()
categoryList.value = res.result
}
const hotList = ref<HotItem[]>([])
// 获取热门推荐数据
const getgetHomeHotDate = async () => {
const res = await getHomeHotAPI()
hotList.value = res.result
}
// 获取猜你喜欢组件实例
const guessRef = ref<XtxGuessInstance>()
// 滚动触底事件
const onScrolltolower = () => {
guessRef.value?.getMore()
}
// 是否加载中标记
const isLoading = ref(false)
// 加载设置
onLoad(async () => {
isLoading.value = true
await Promise.all([getHomeBannerDate(), getHomeCategoryDate(), getgetHomeHotDate()])
isLoading.value = false
})
// 下拉刷新状态
const isTriggered = ref(false)
// 自定义下拉刷新被触发
const onRefresherrefresh = async () => {
console.log('被下拉')
// 开启动画
isTriggered.value = true
// 重置猜你喜欢组件数据
guessRef.value?.resetData() // 加载数据
await Promise.all([
getHomeBannerDate(),
getHomeCategoryDate(),
getgetHomeHotDate(),
guessRef.value?.getMore(),
])
// 关闭动画
isTriggered.value = false
}
</script>
<template>
<!-- 自定义导航栏 -->
<CoustomNavbar />
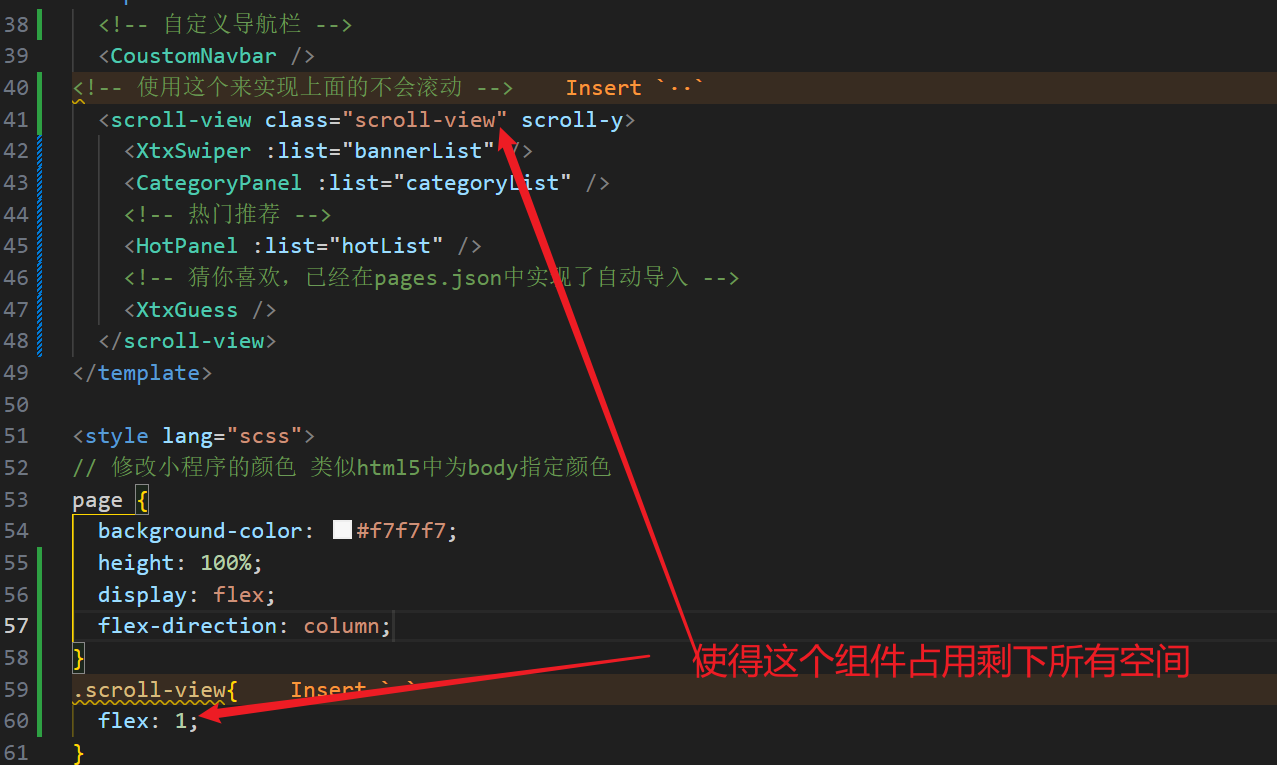
<!-- 使用这个来实现上面的不会滚动 -->
<!-- <scroll-view scroll-y @scrolltolower="onScrolltolower"> -->
<scroll-view
refresher-enabled
@refresherrefresh="onRefresherrefresh"
@scrolltolower="onScrolltolower"
:refresher-triggered="isTriggered"
class="scroll-view"
scroll-y
>
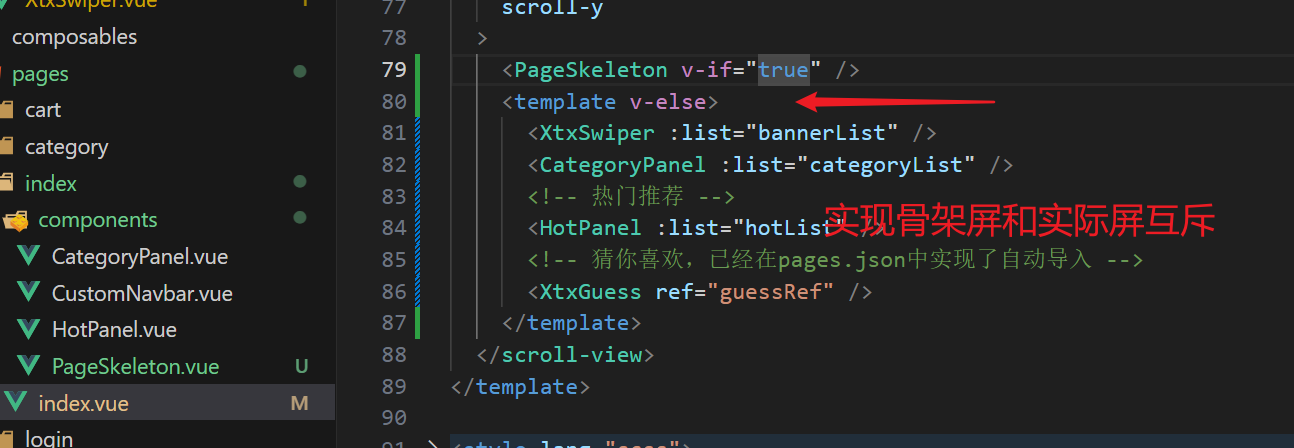
<PageSkeleton v-if="isLoading" />
<template v-else>
<XtxSwiper :list="bannerList" />
<CategoryPanel :list="categoryList" />
<!-- 热门推荐 -->
<HotPanel :list="hotList" />
<!-- 猜你喜欢,已经在pages.json中实现了自动导入 -->
<XtxGuess ref="guessRef" />
</template>
</scroll-view>
</template>
<style lang="scss">
// 修改小程序的颜色 类似html5中为body指定颜色
page {
background-color: #f7f7f7;
height: 100%;
display: flex;
flex-direction: column;
}
.scroll-view {
flex: 1;
}
</style>
Day 3
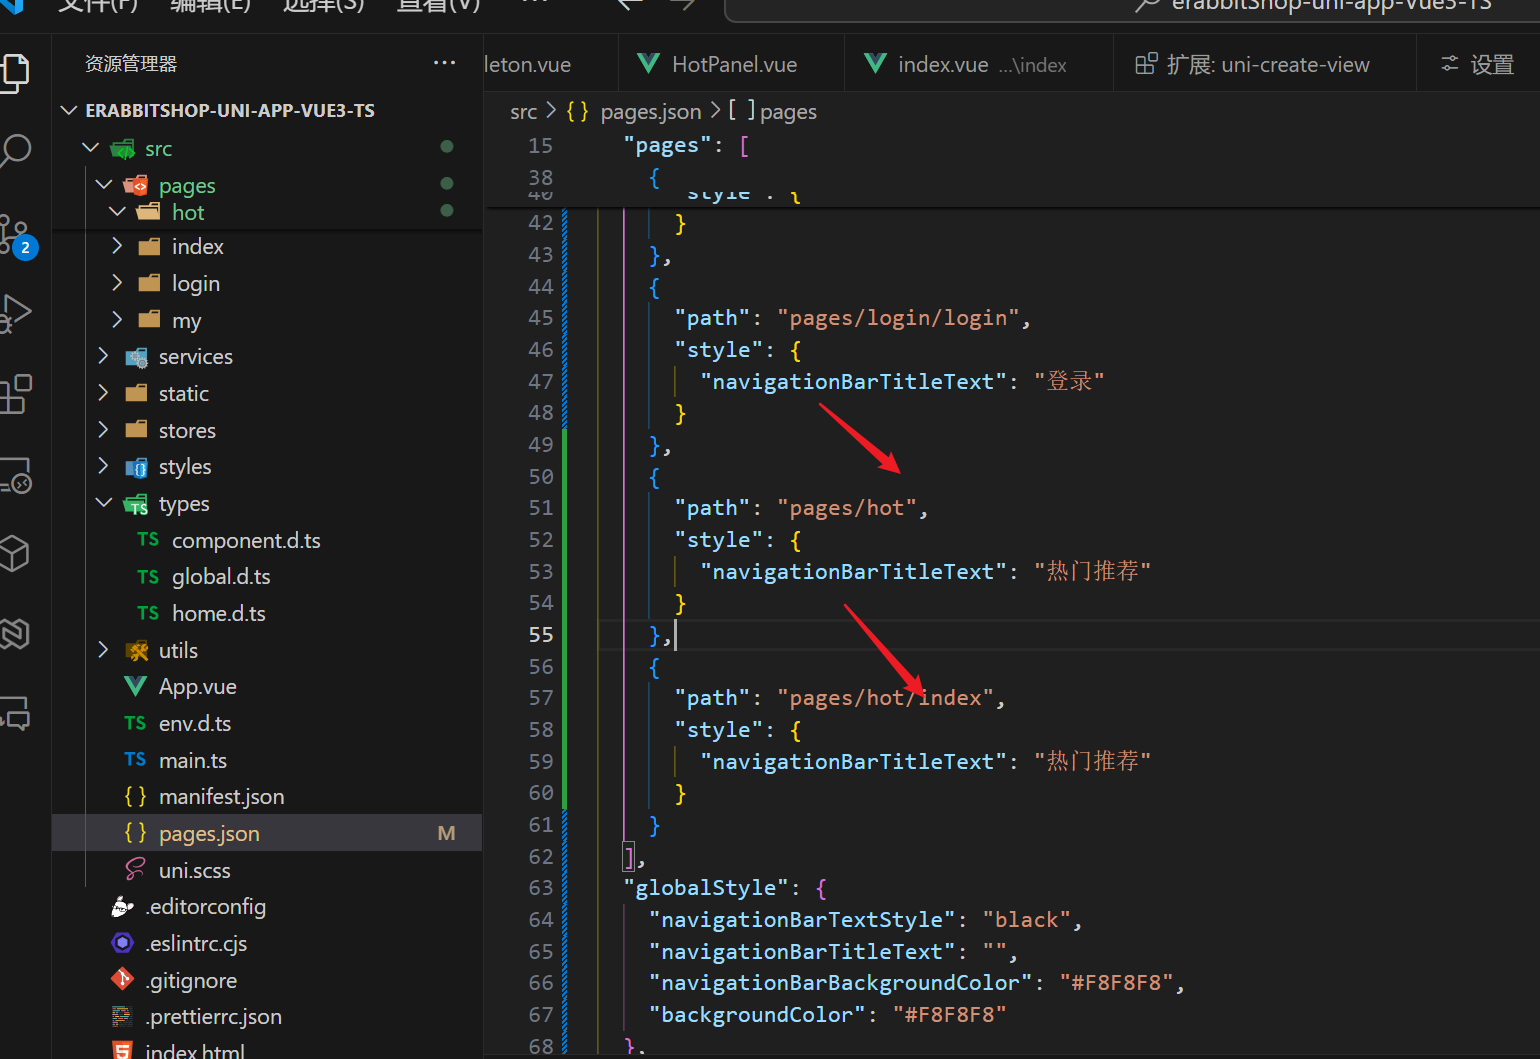
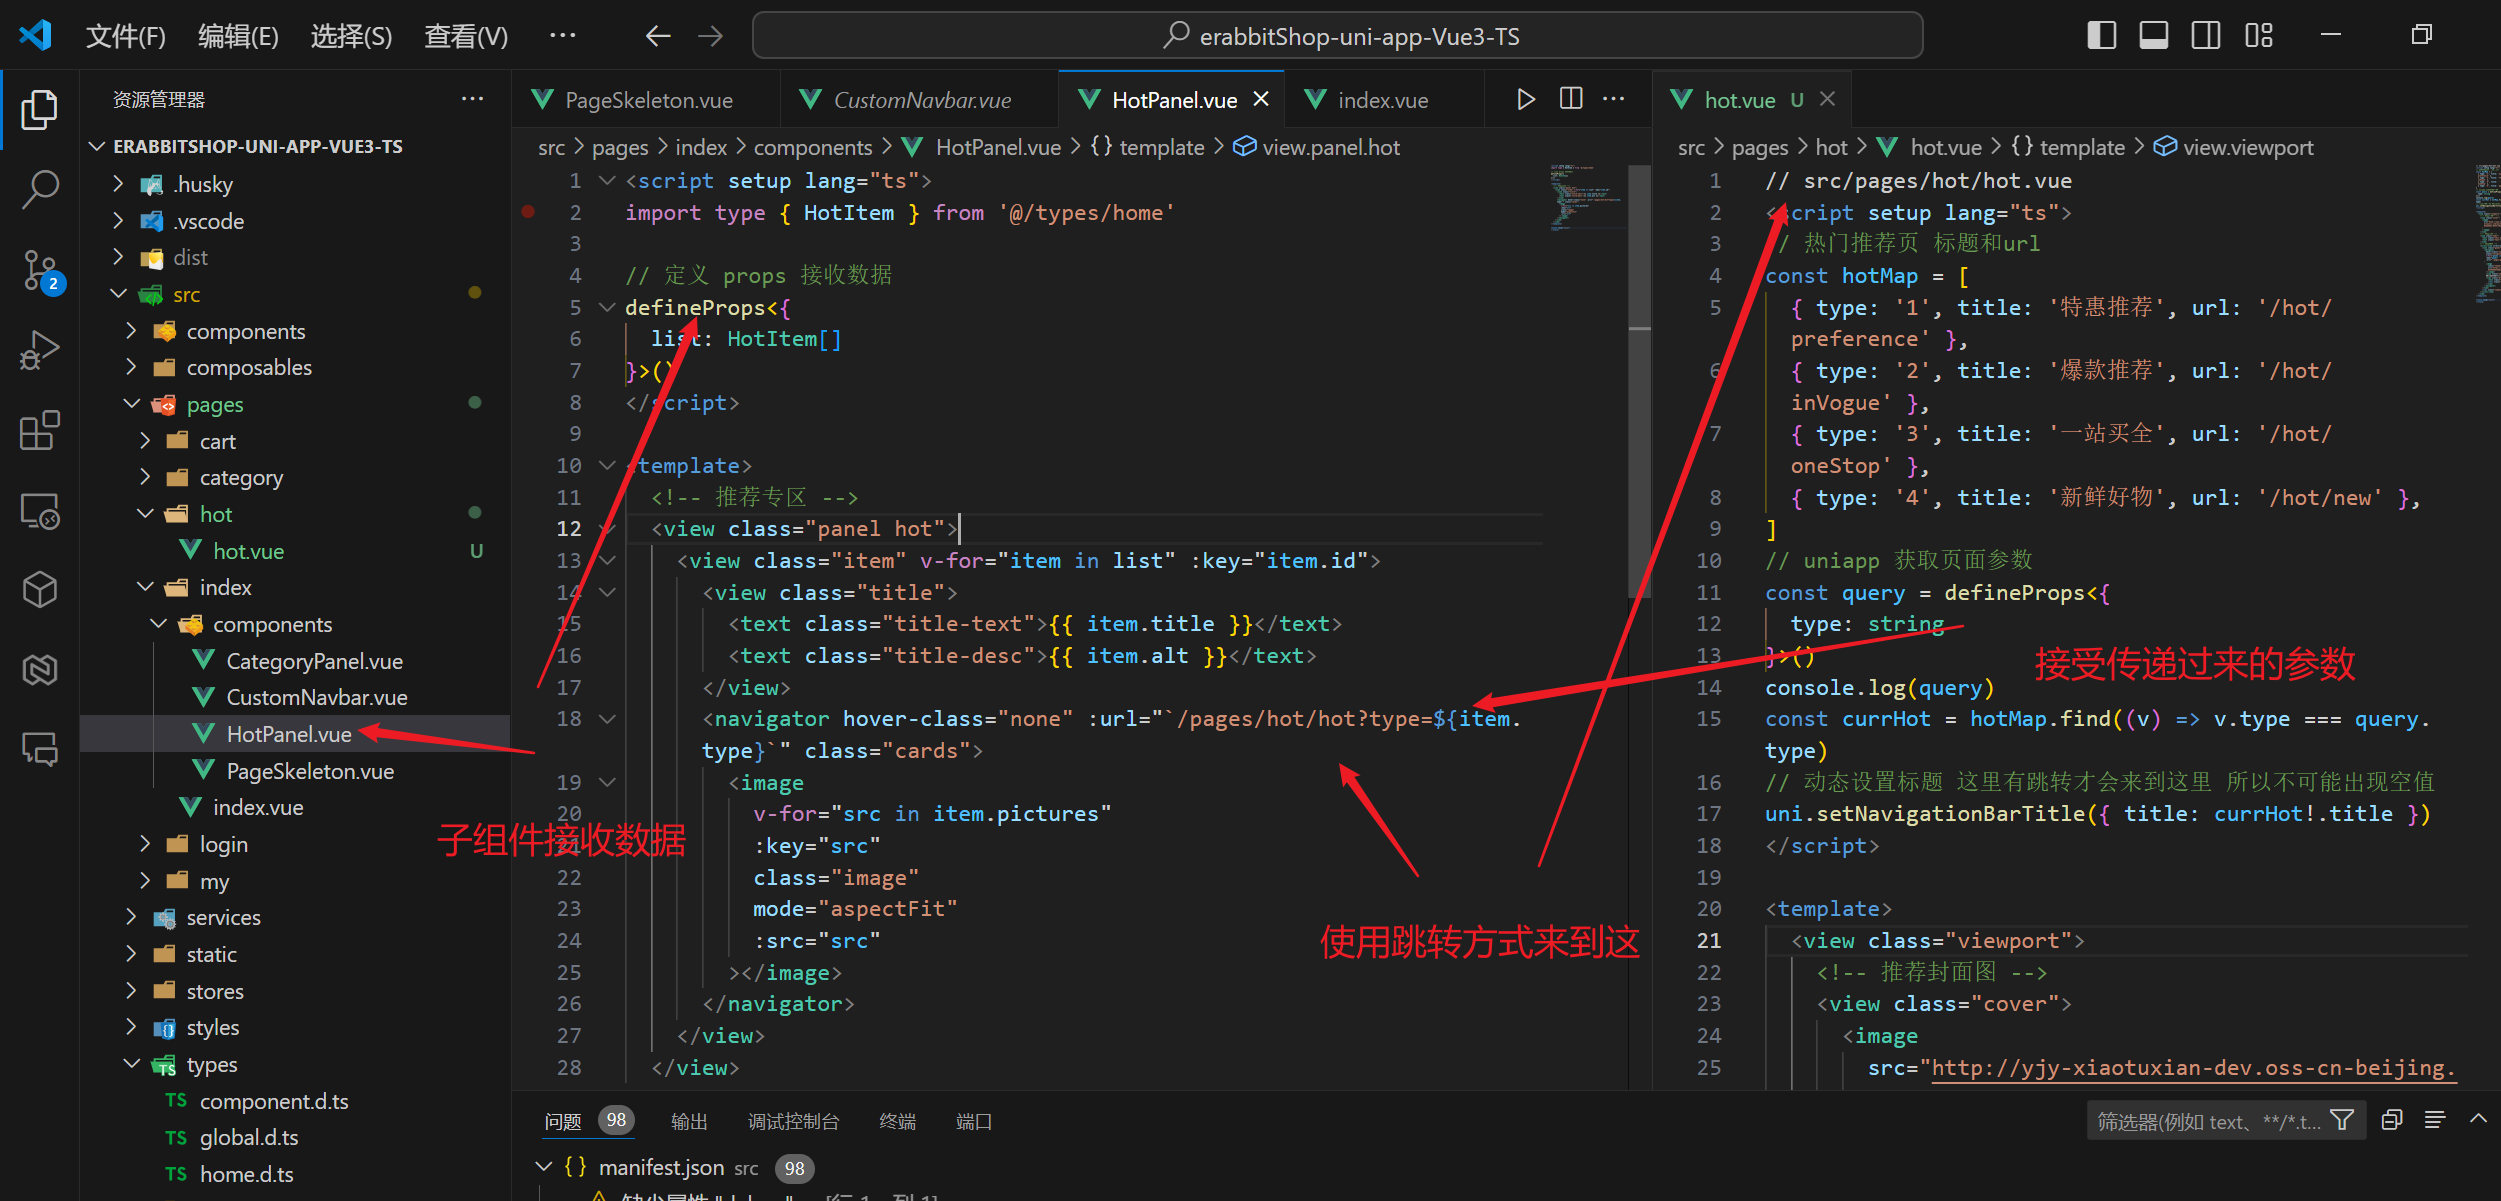
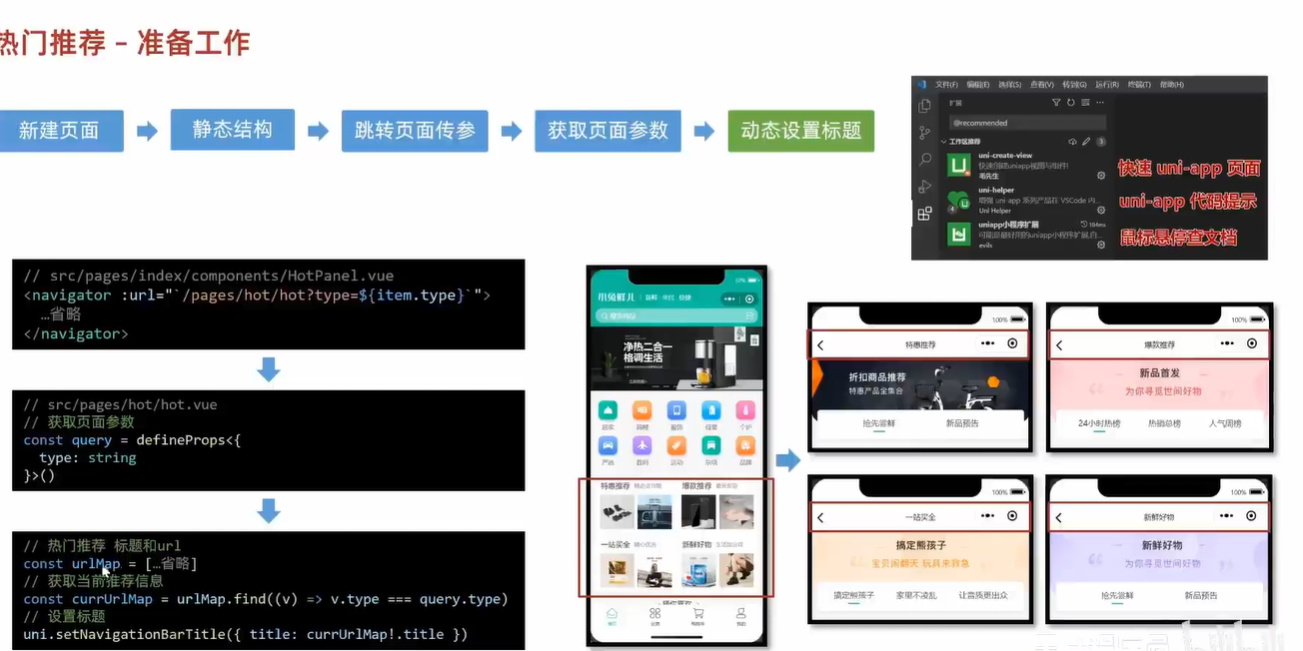
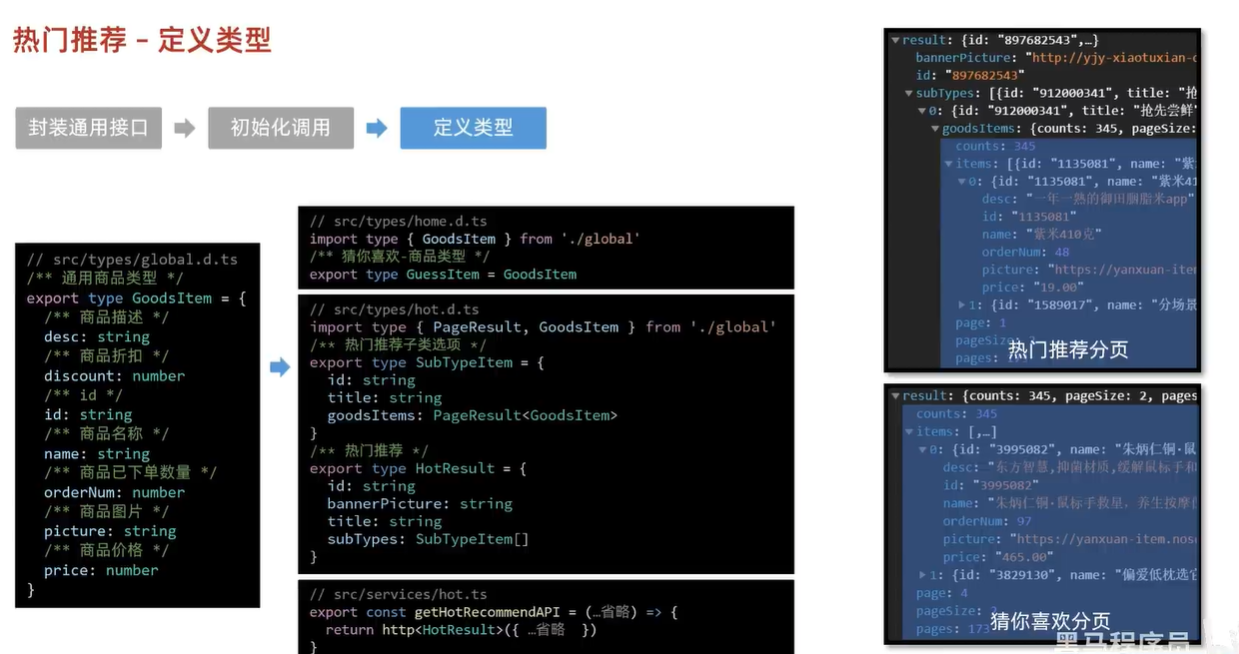
热门推荐
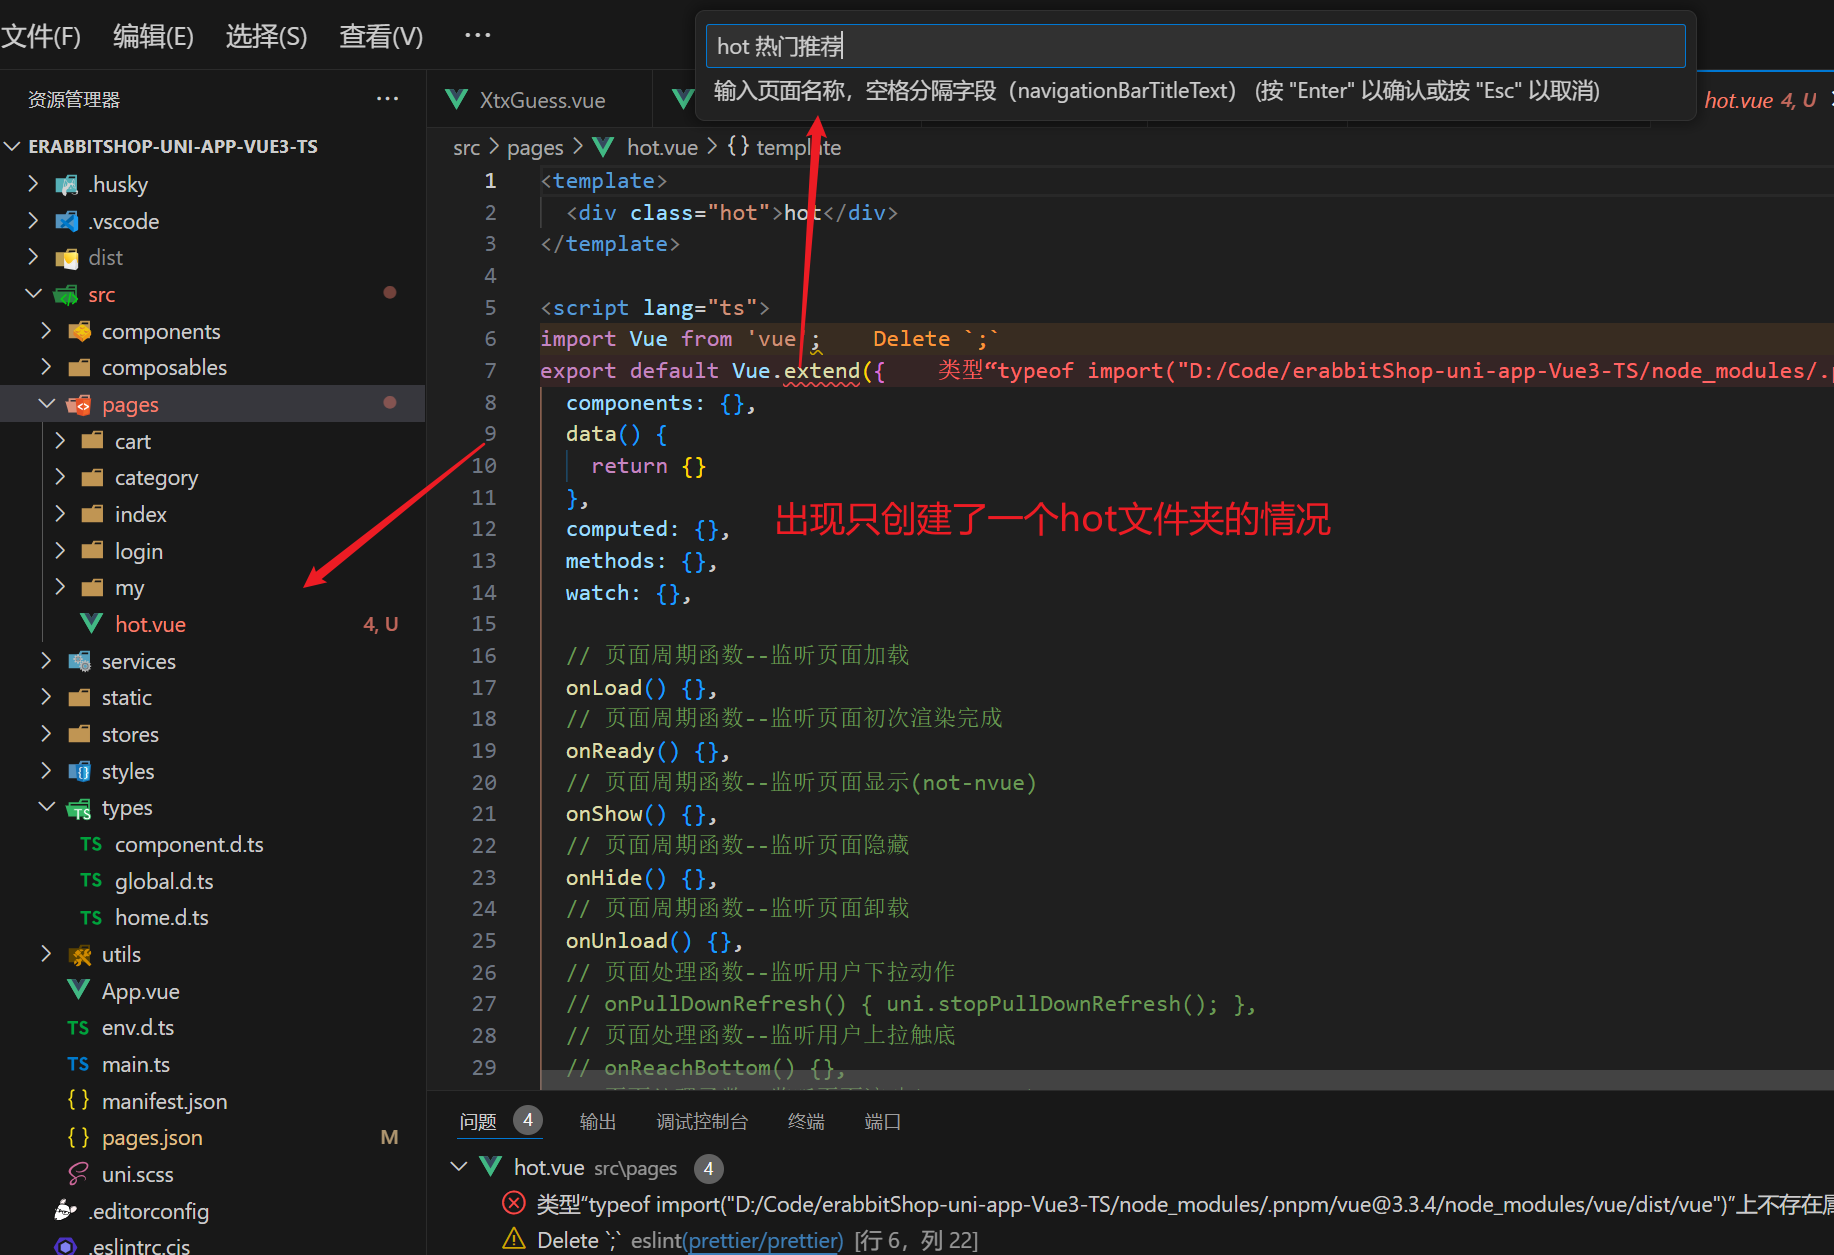
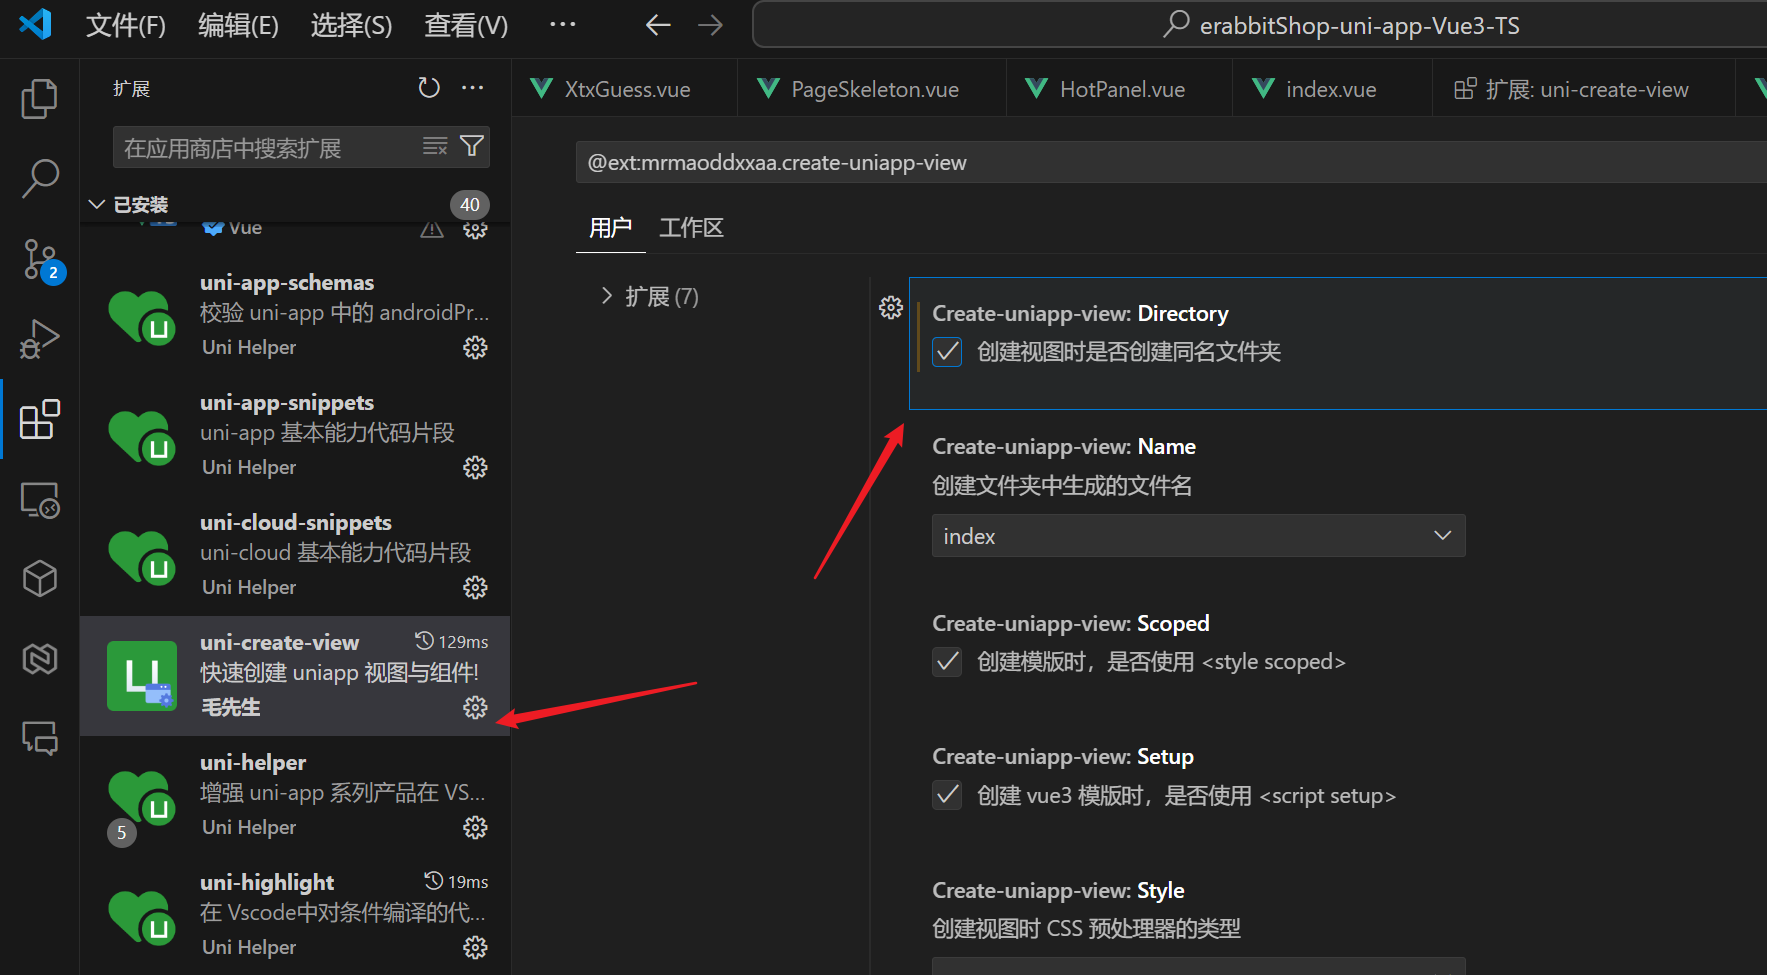
注意!! 删掉hot页面的时候不会减少
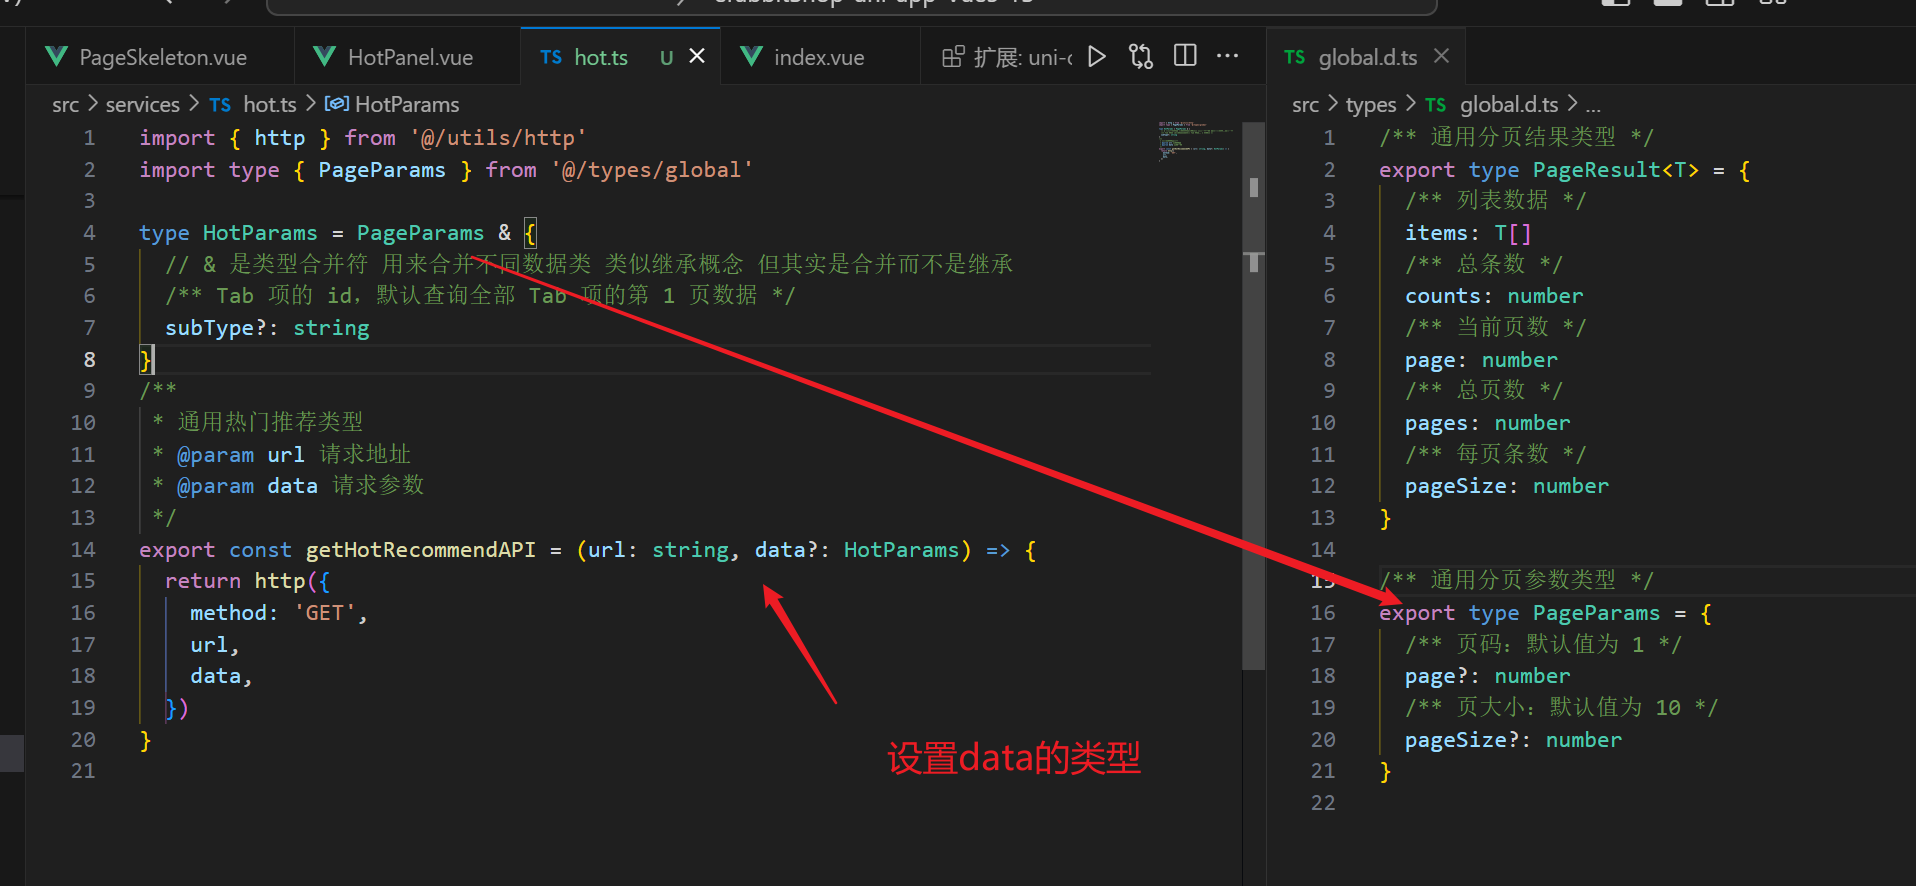
import { http } from '@/utils/http'
import type { PageParams } from '@/types/global'
type HotParams = PageParams & {
/** Tab 项的 id,默认查询全部 Tab 项的第 1 页数据 */
subType?: string
}
/**
* 通用热门推荐类型
* @param url 请求地址
* @param data 请求参数
*/
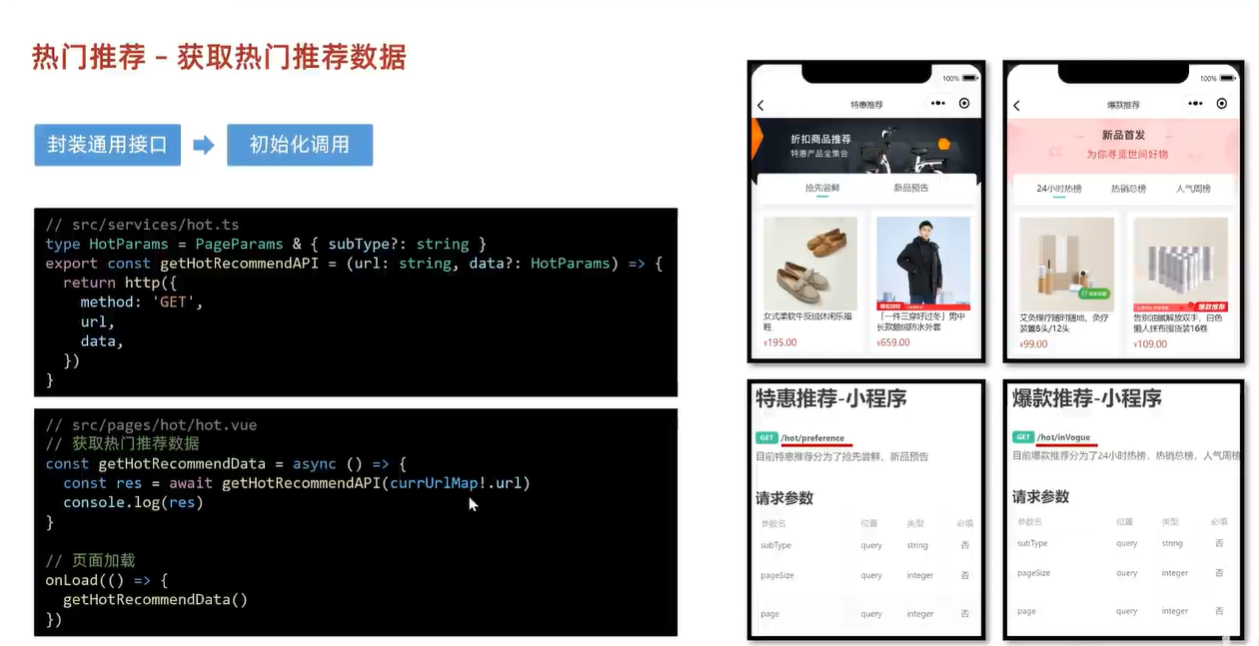
export const getHotRecommendAPI = (url: string, data?: HotParams ) => {
return http({
method: 'GET',
url,
data,
})
}
我看不懂上面这段带代码!
动态获取热门数据
热门推荐
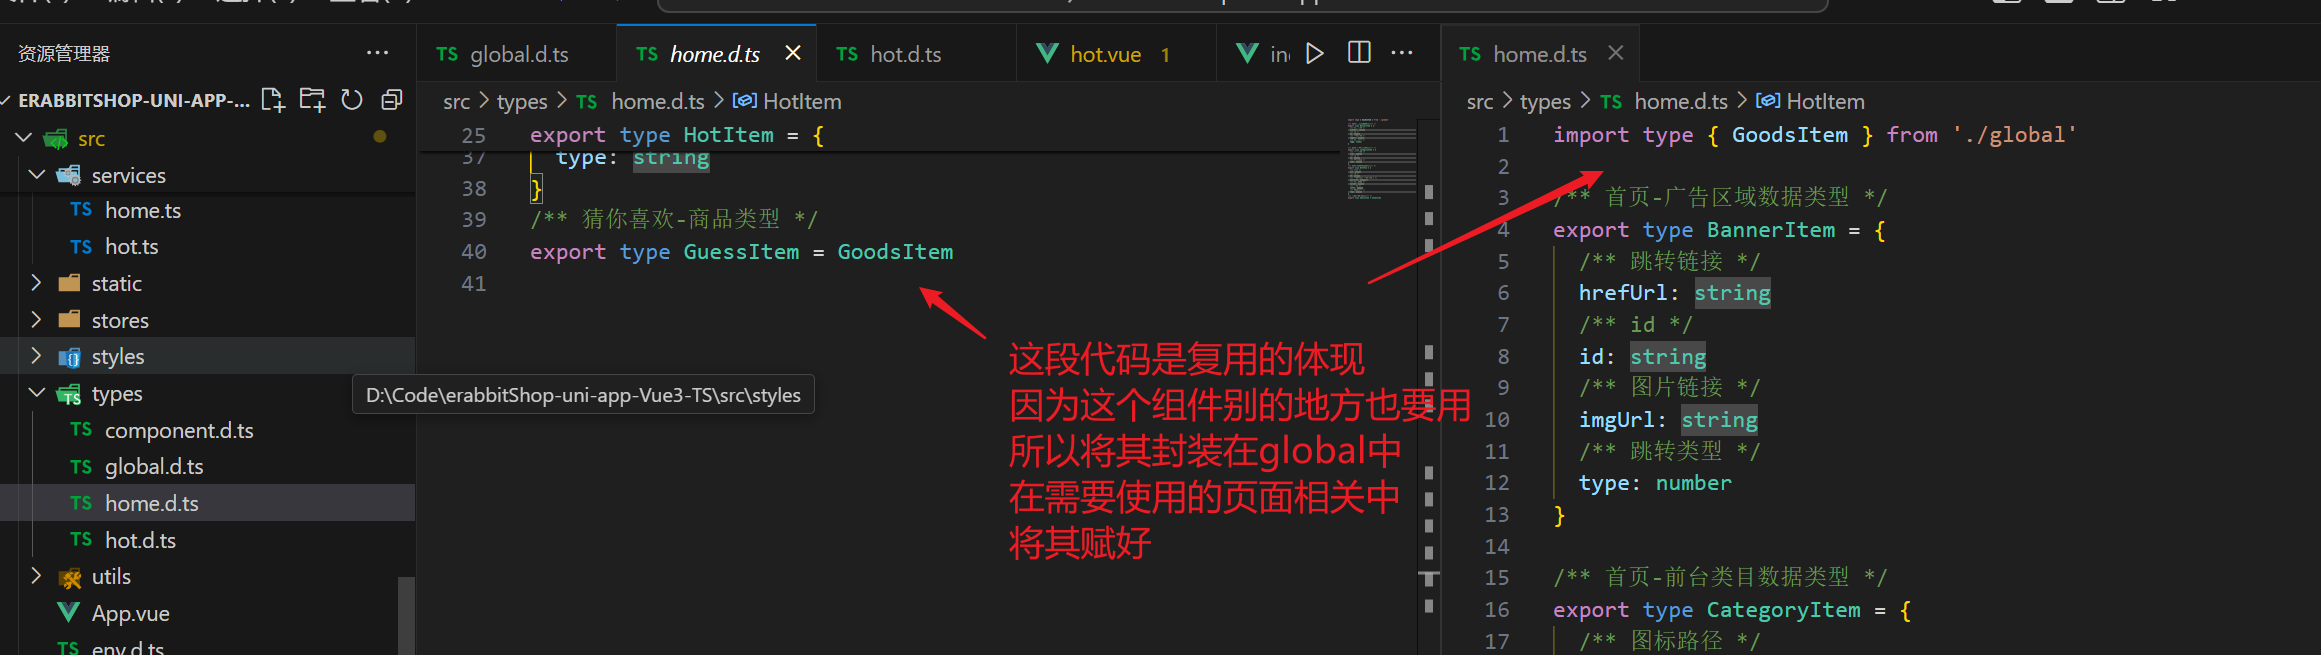
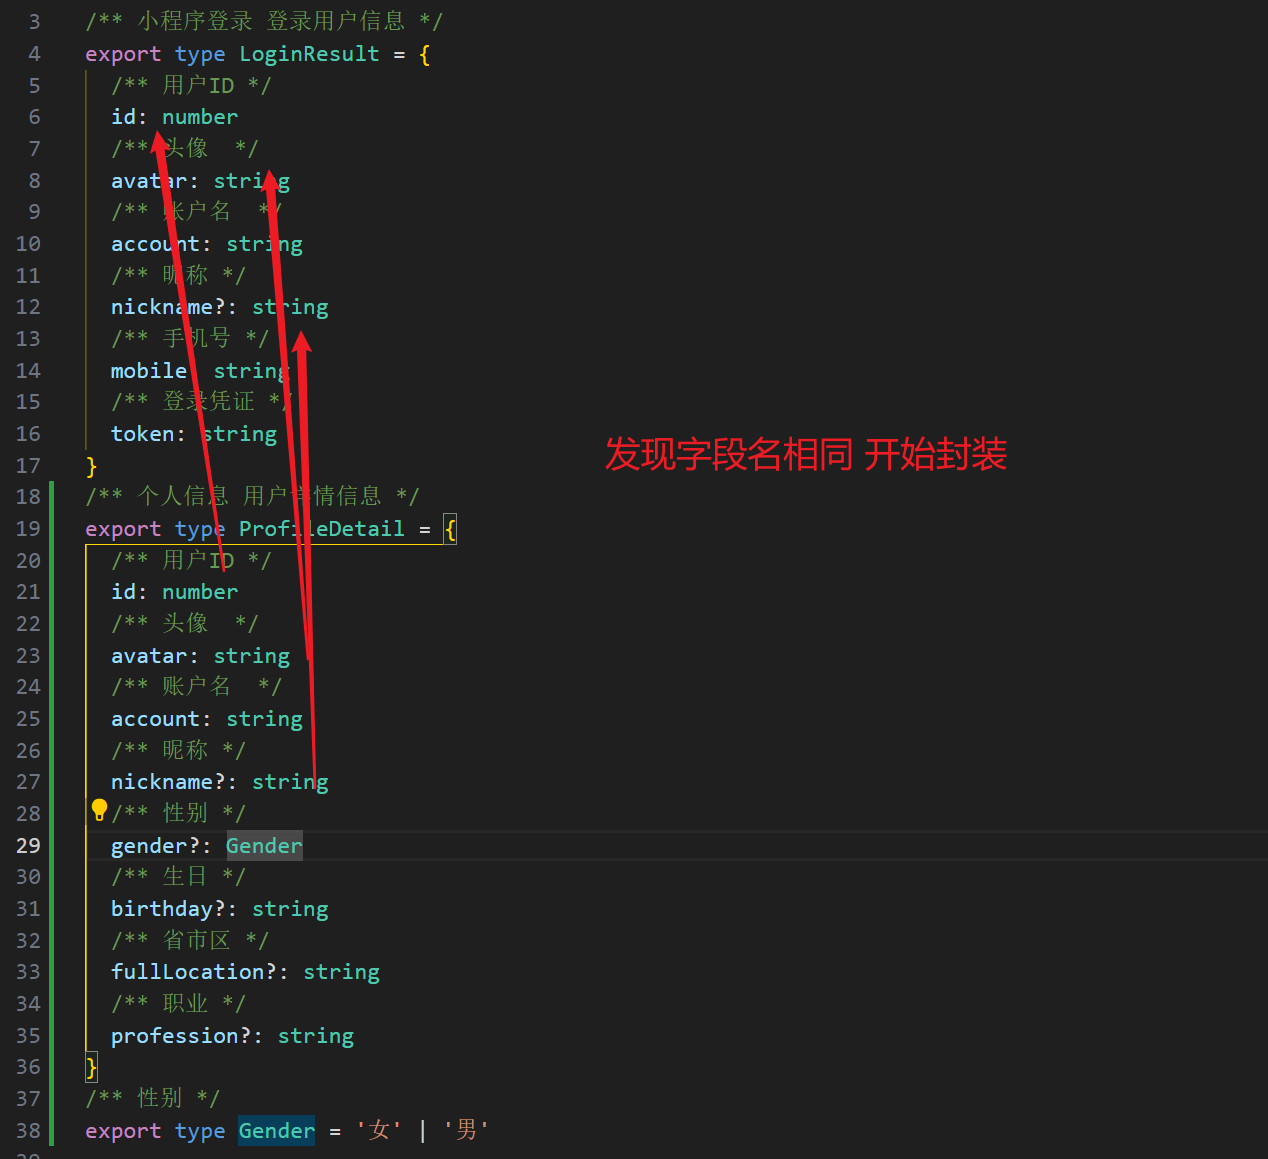
前端类型复用思想
热门推荐页面渲染和tab交互
为什么有这么多不同的ref
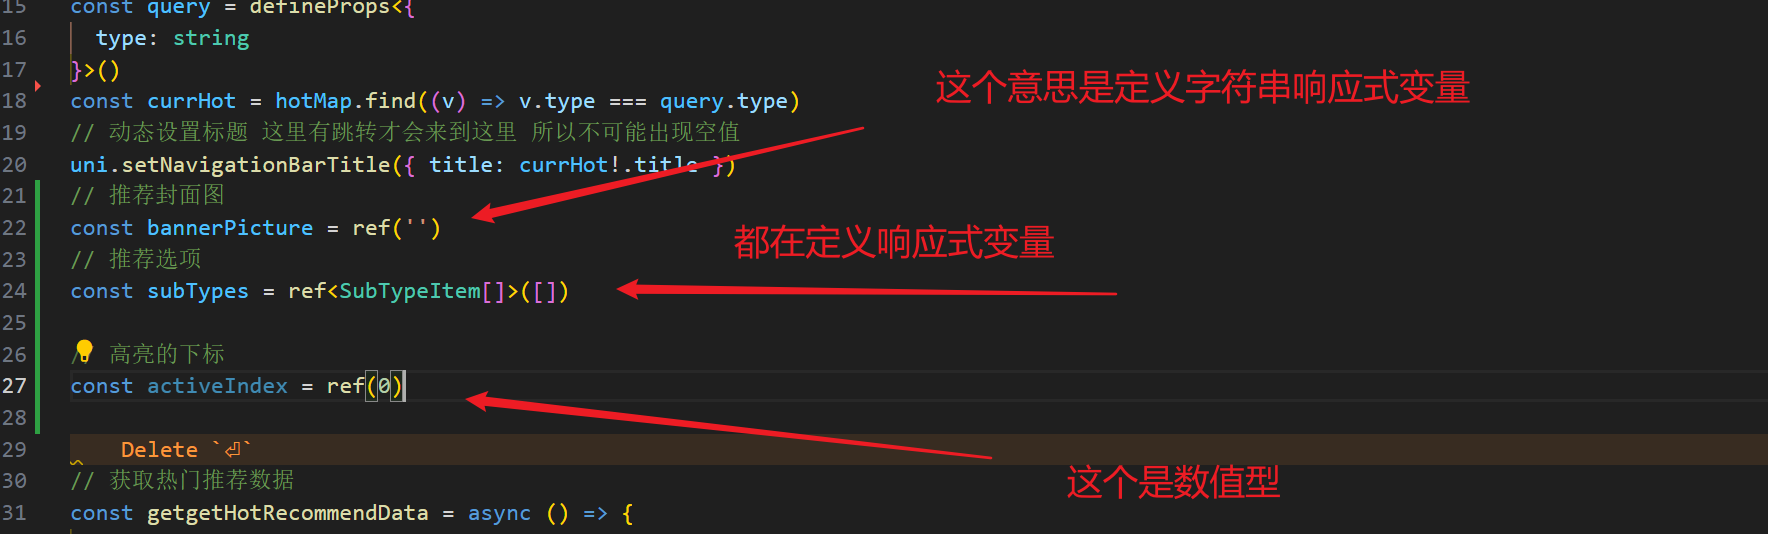
- 中间那个是组型
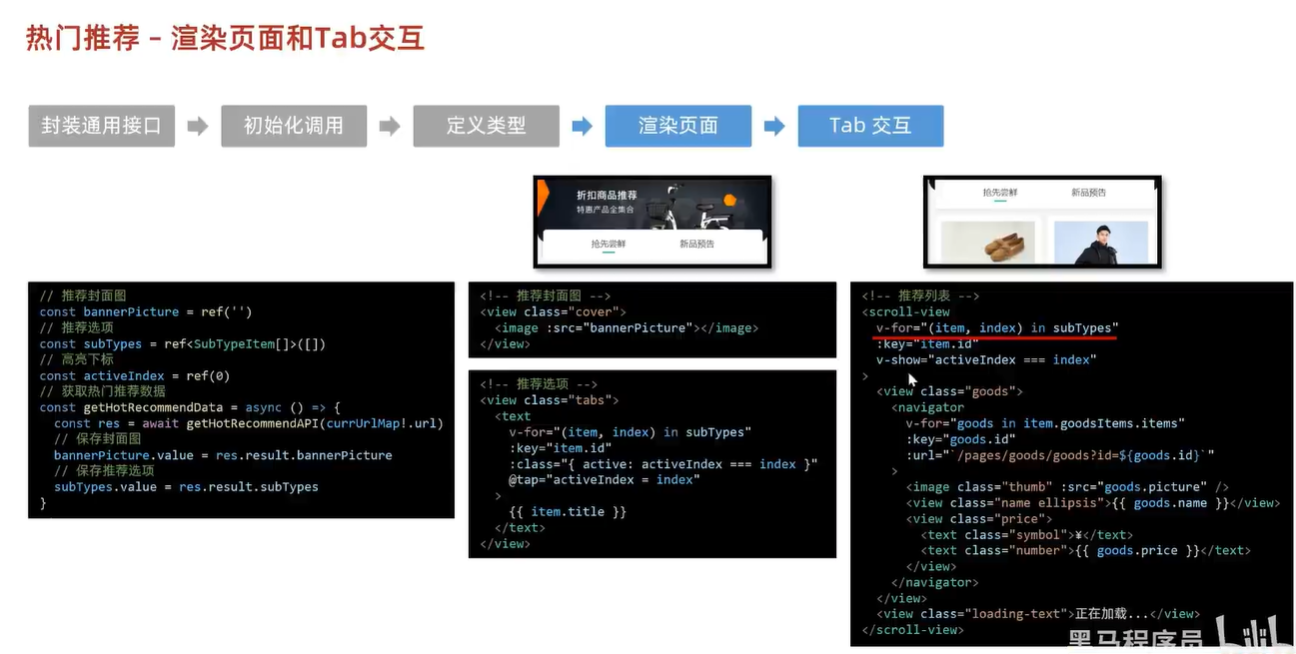
- 为什么使用v-show 因为v-if会反复销毁创建 而v-show只是切换 滚动记录也是会独立
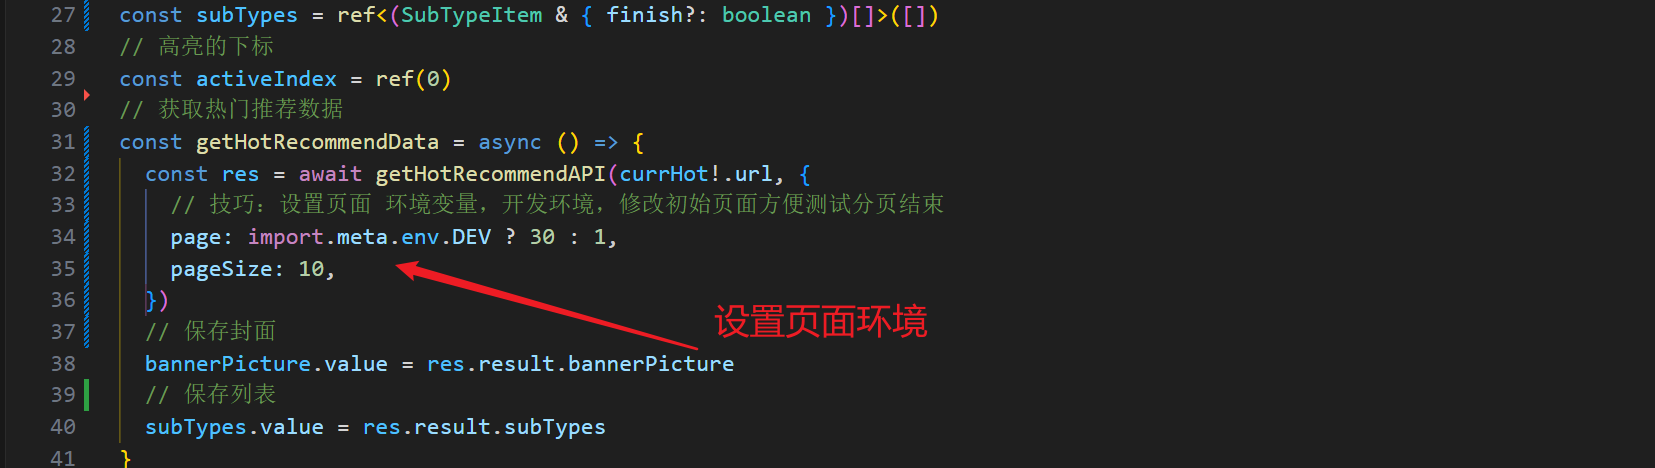
- 没有什么值得说的 就是基础的项目渲染啥的 唯一特殊的是介绍了一个配置开发环境
通用项目技巧
开发页面环境
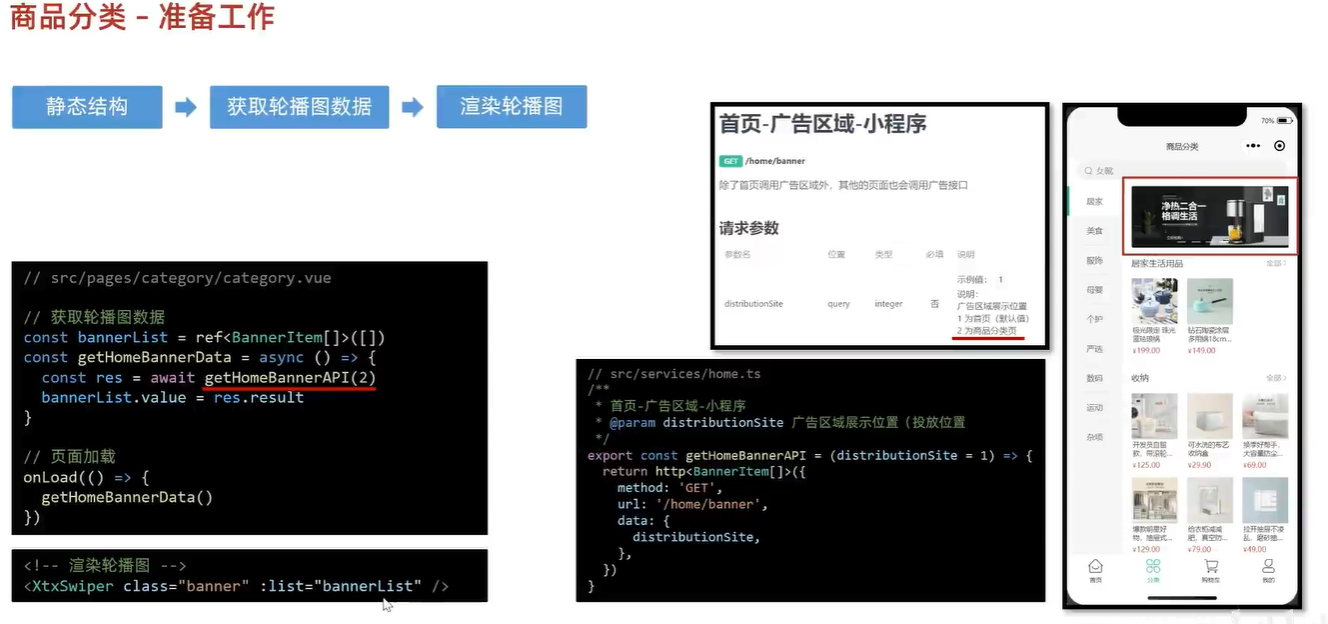
商品分类
编译模式
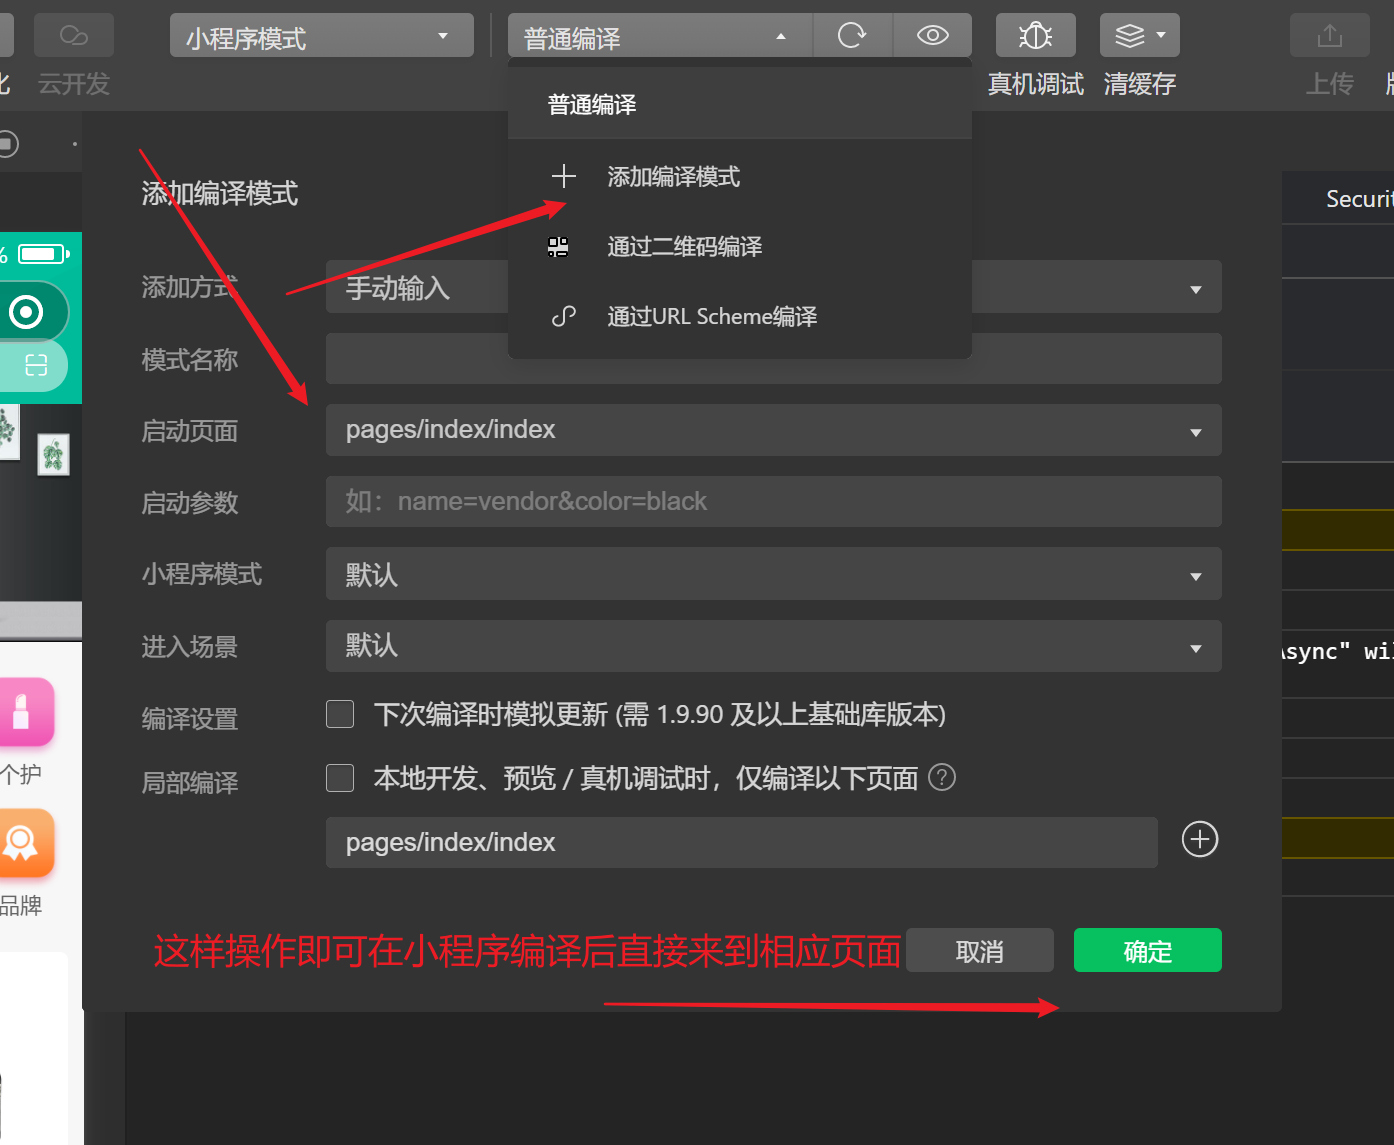
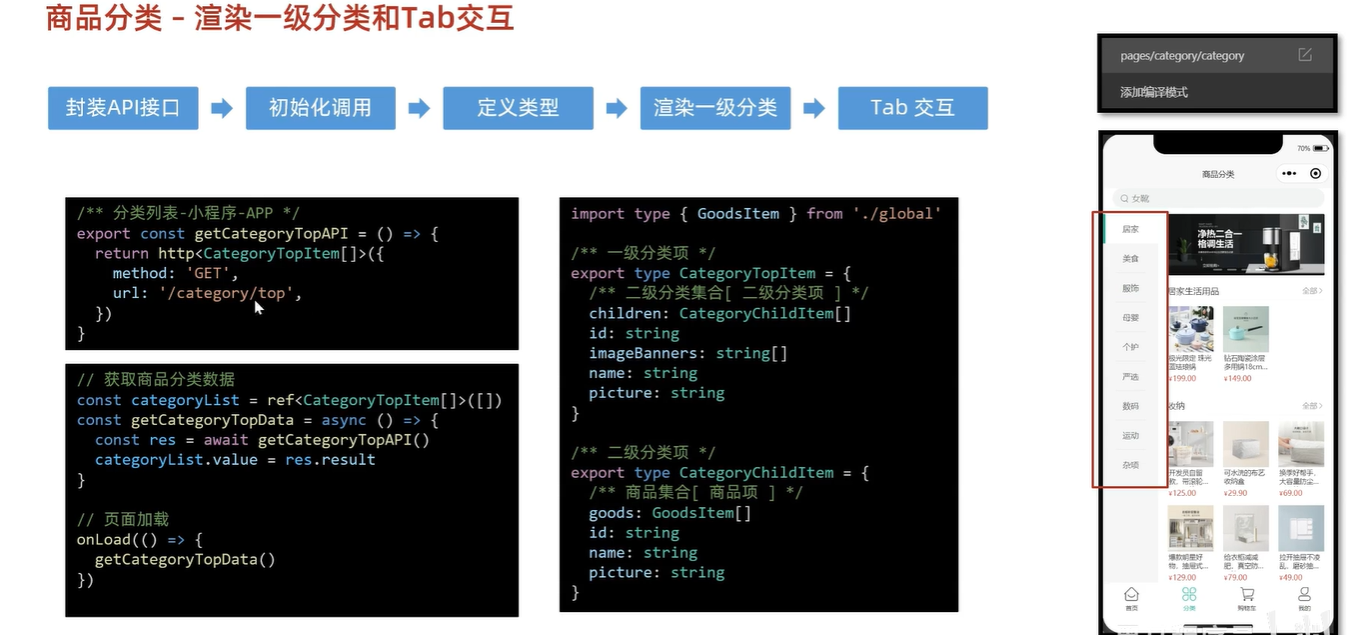
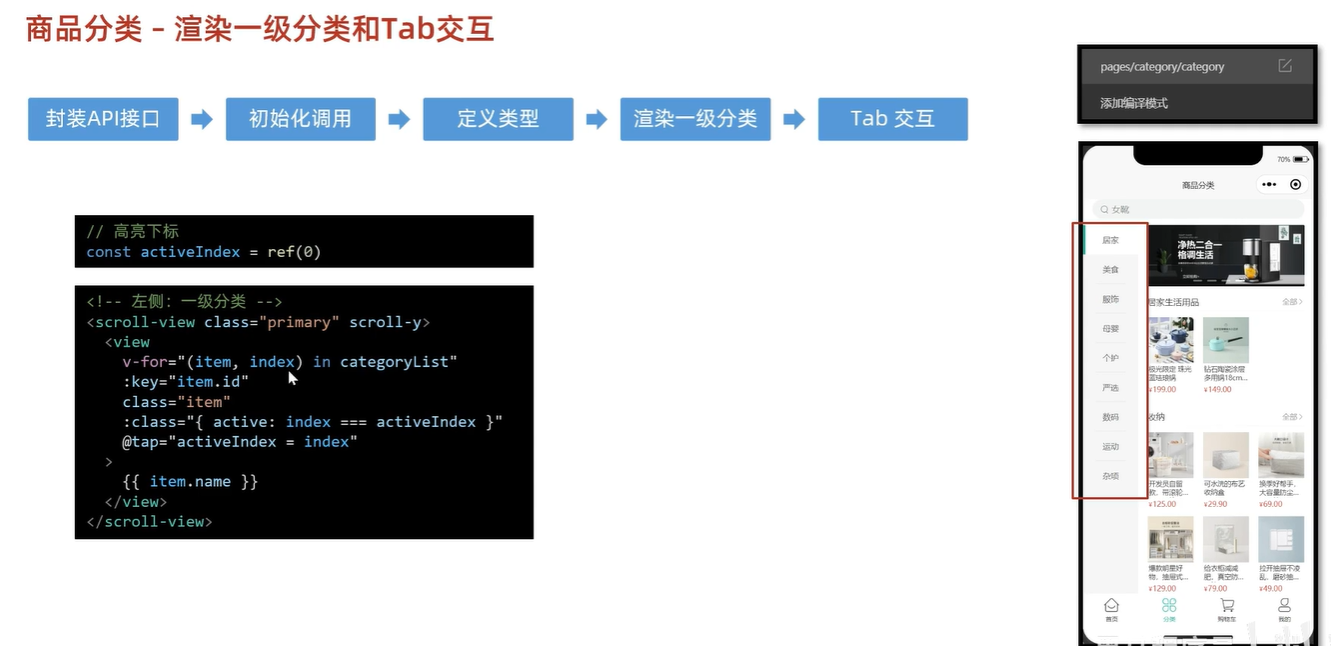
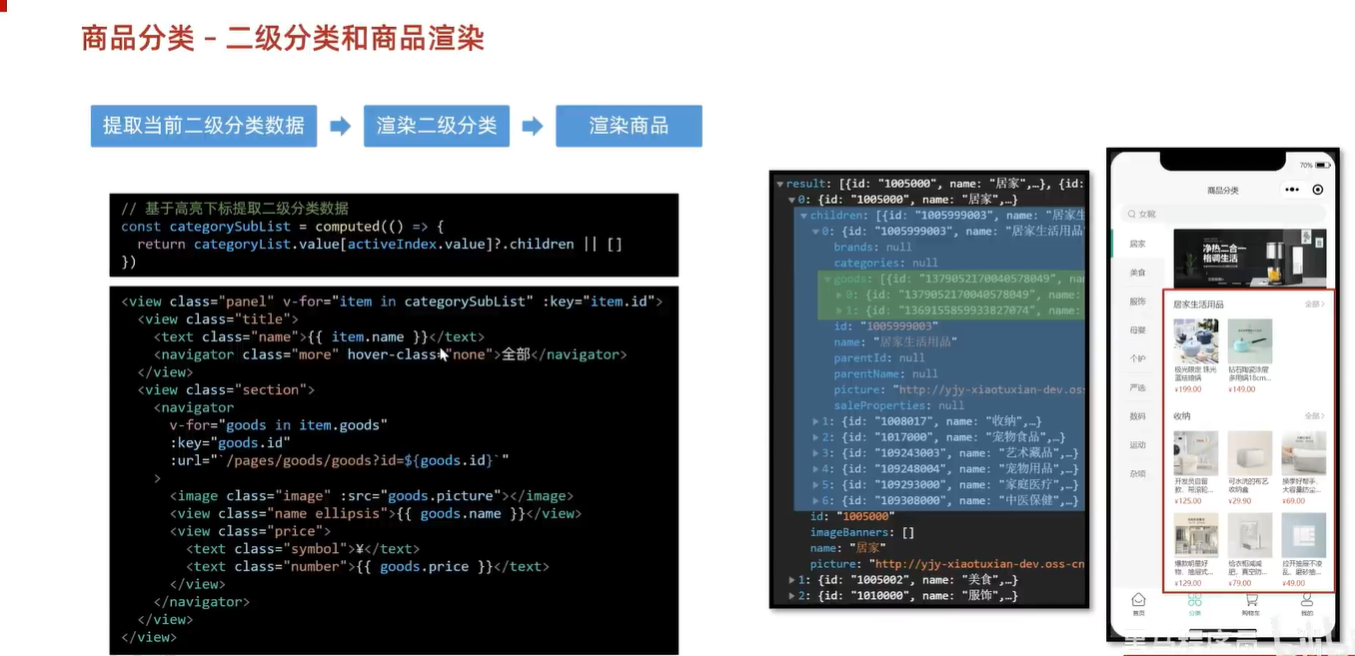
- 这里也没有什么好说的 内容很重复 建议自己独立写一遍
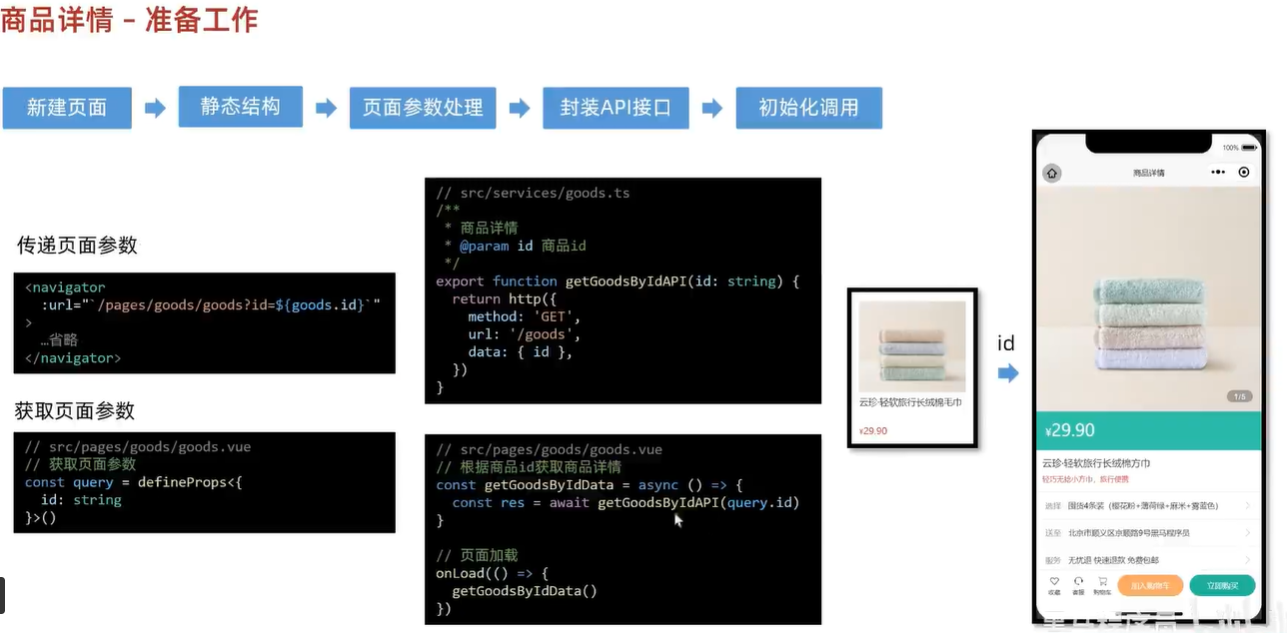
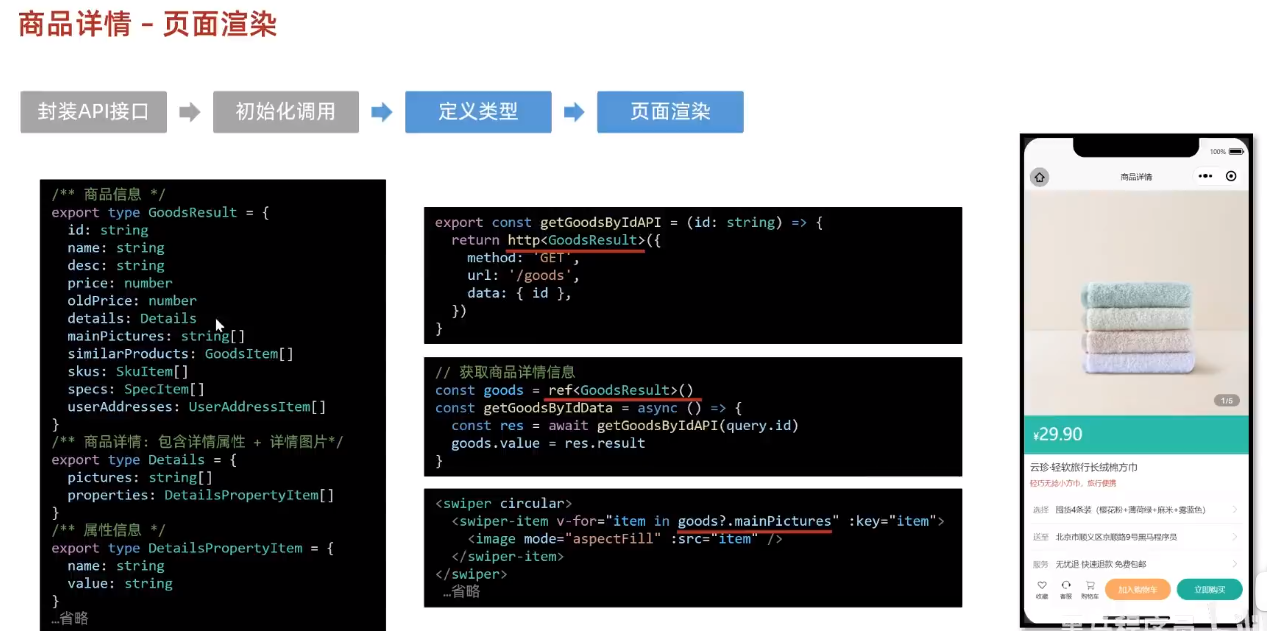
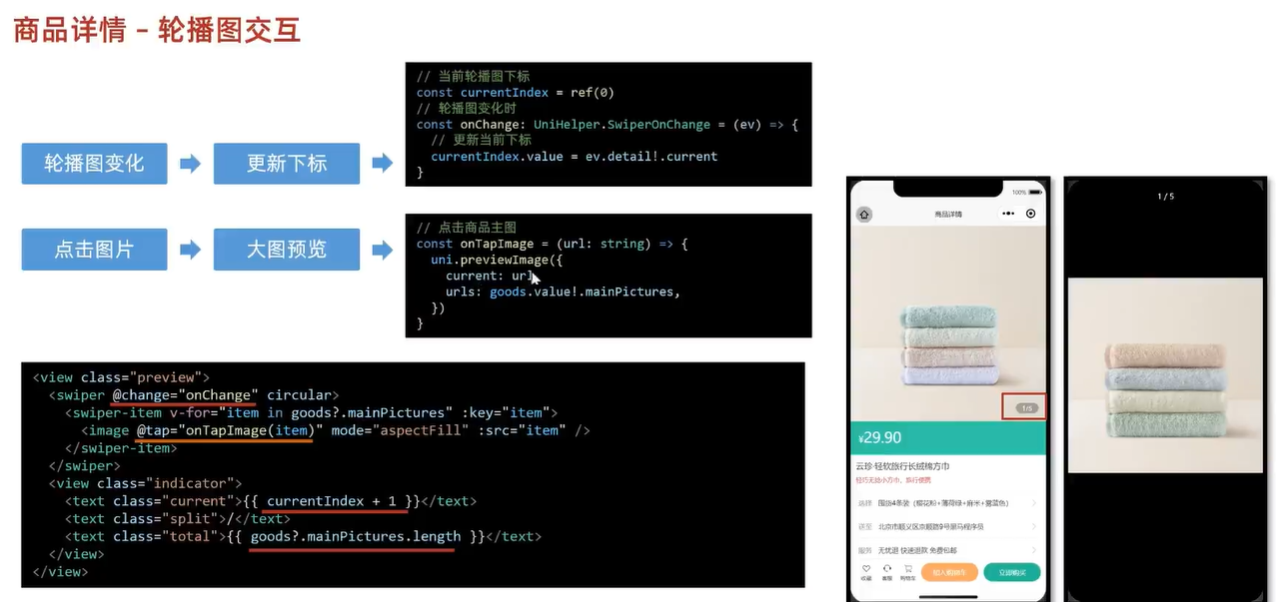
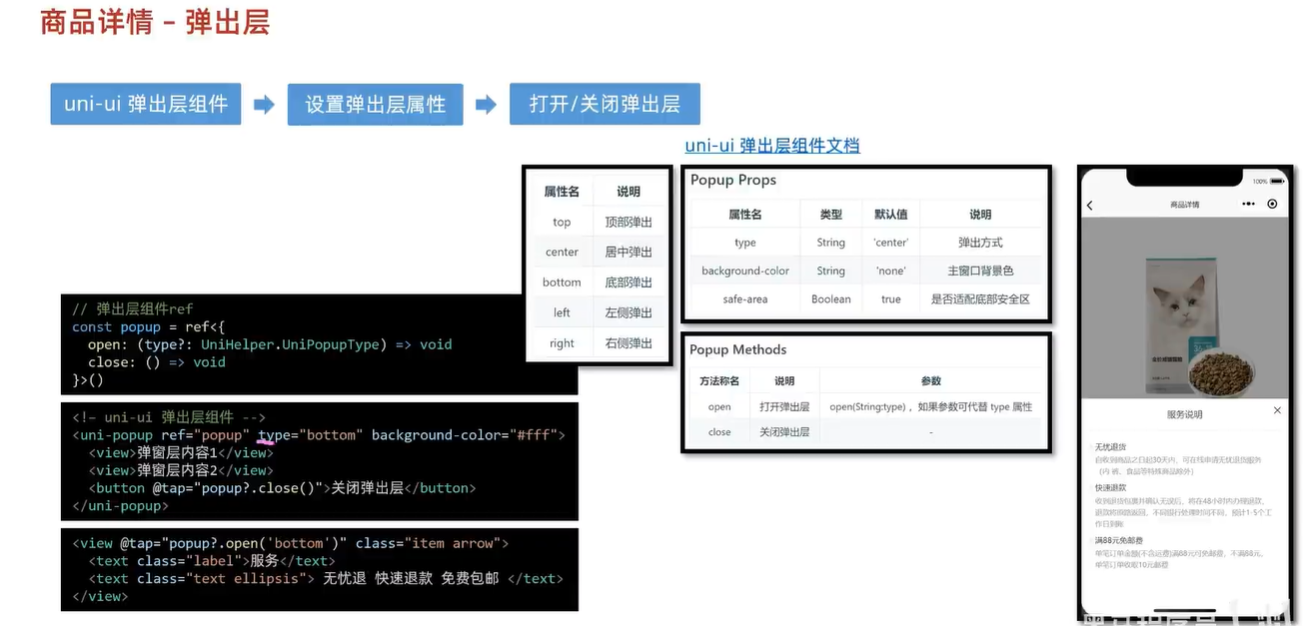
商品详情
Day 4
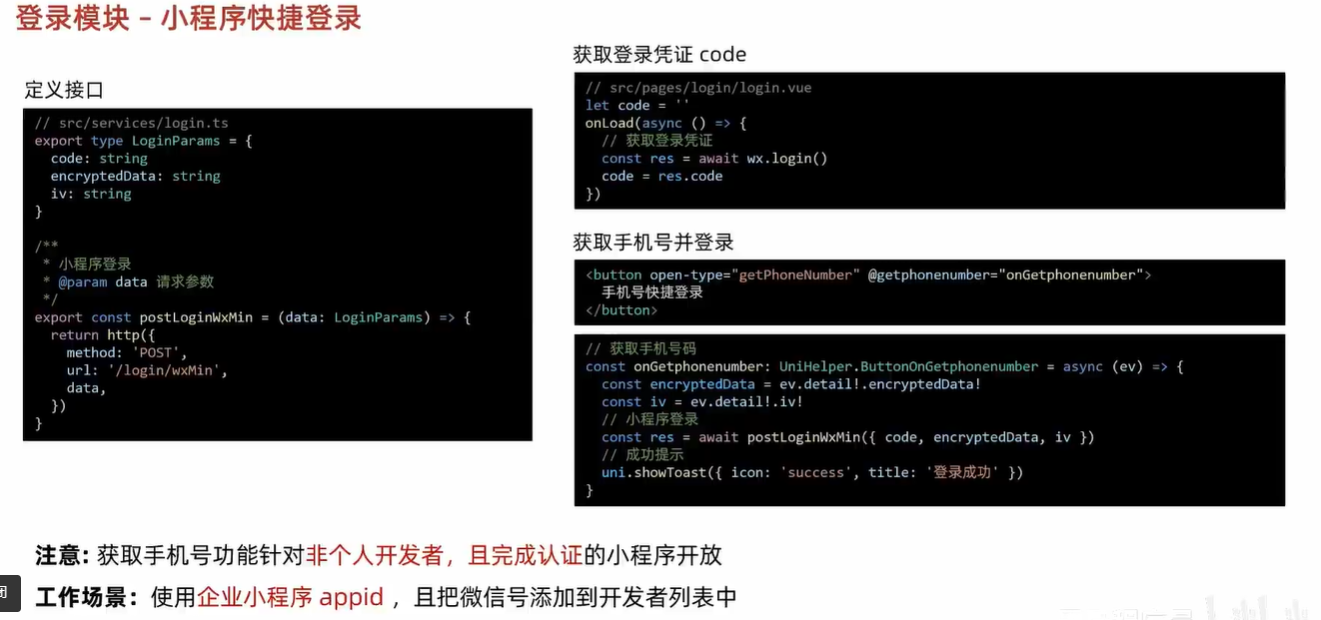
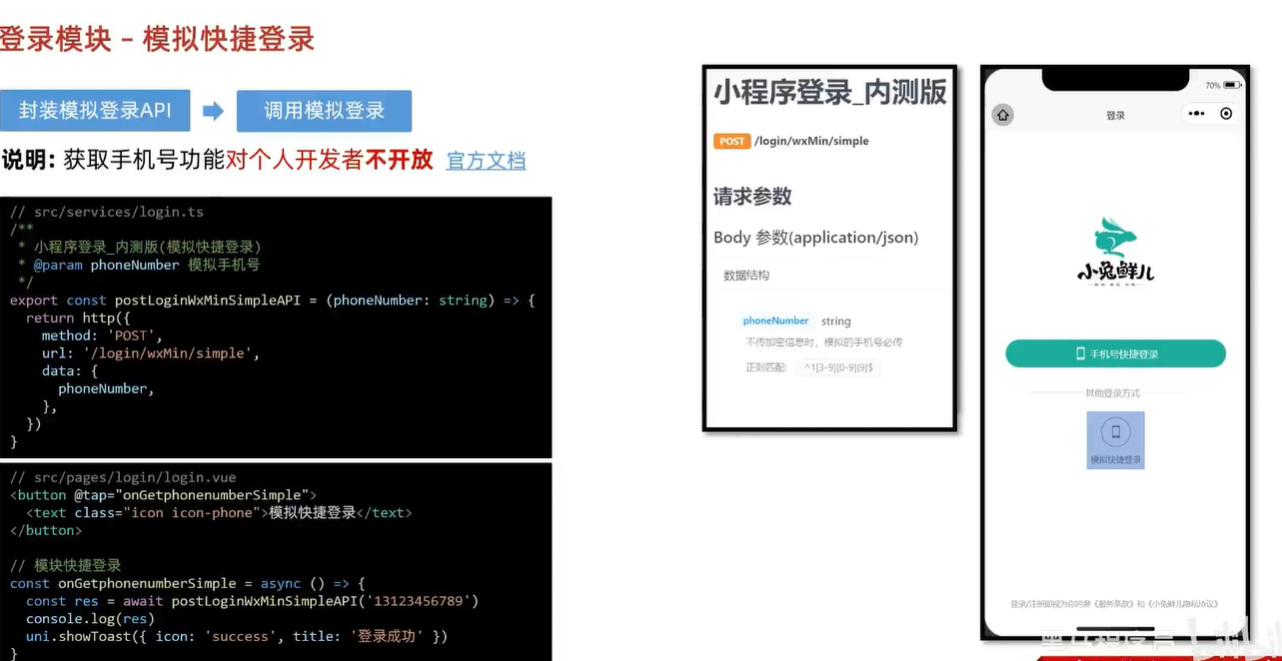
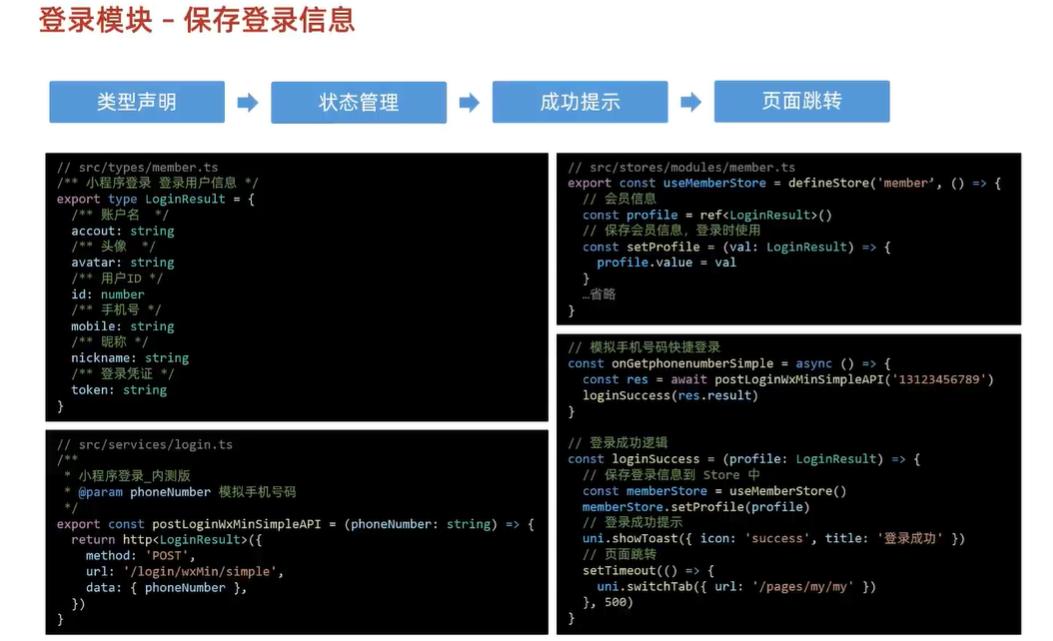
小程序快捷登录
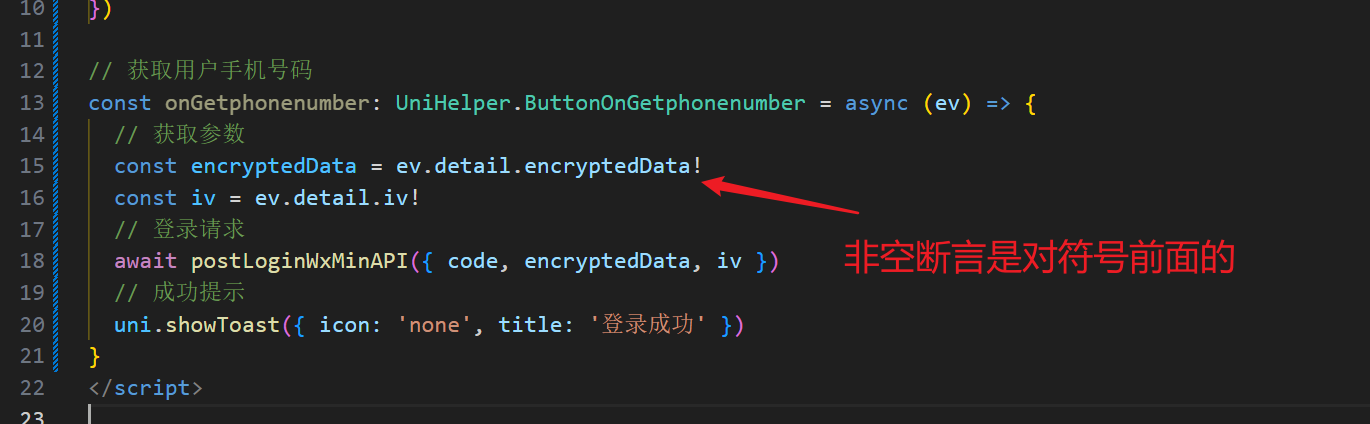
非空断言的正确认识
小程序页面跳转
小程序的页面跳转分为普通页面和tab页面
普通页面使用navigateTo tab页面使用switchTab
// 模拟手机号码快捷登录
const onGetphonenumberSimple = async () => {
  const res = await postLoginWxMinSimpleAPI('17338870680')
  const memberStore = useMemberStore()
  // pinia自带存储数据方法
  memberStore.setProfile(res.result)
  uni.showToast({ icon: 'none', title: '登录成功' })
  // 使用这段代码是因为 跳转tab页面会销毁掉之前的页面 所以会看不到提示
  setTimeout(() => {
    uni.switchTab({ url: '/pages/my/my ' })
  }, 500)
}
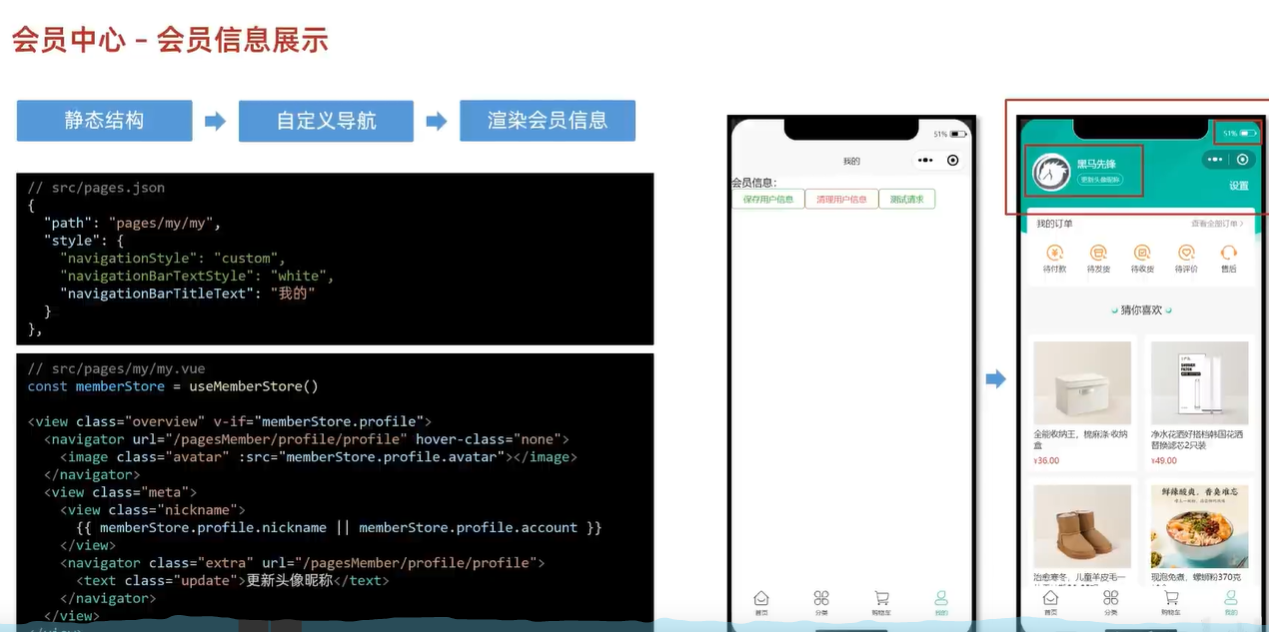
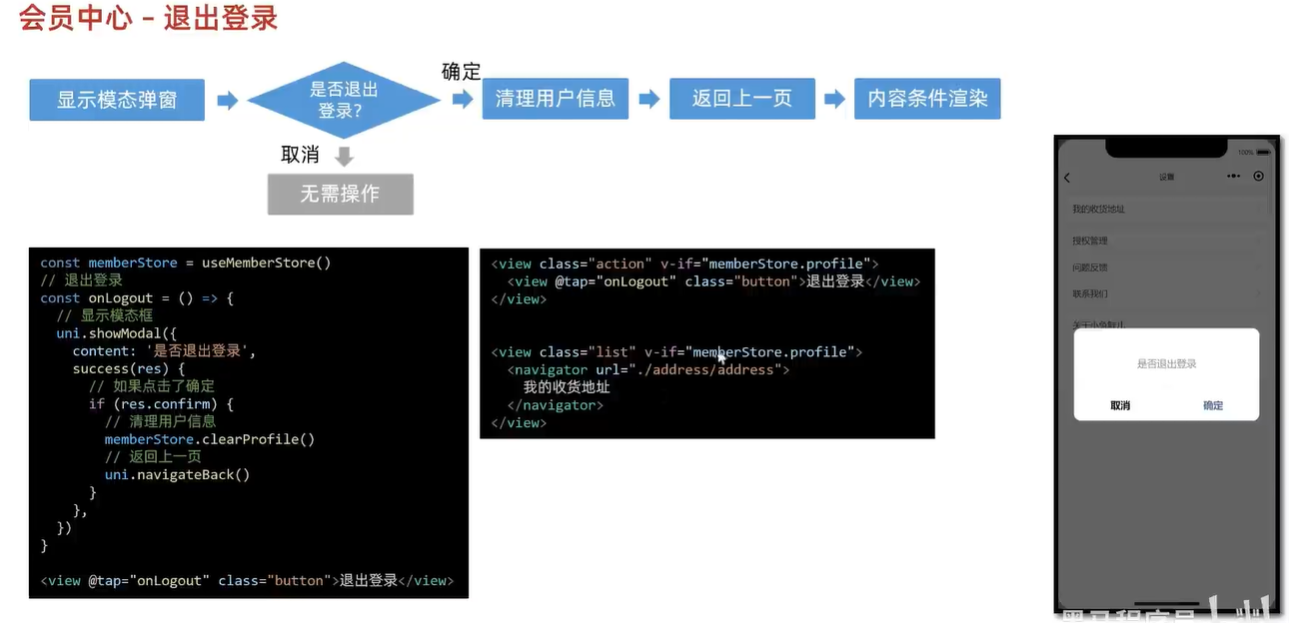
会员中心
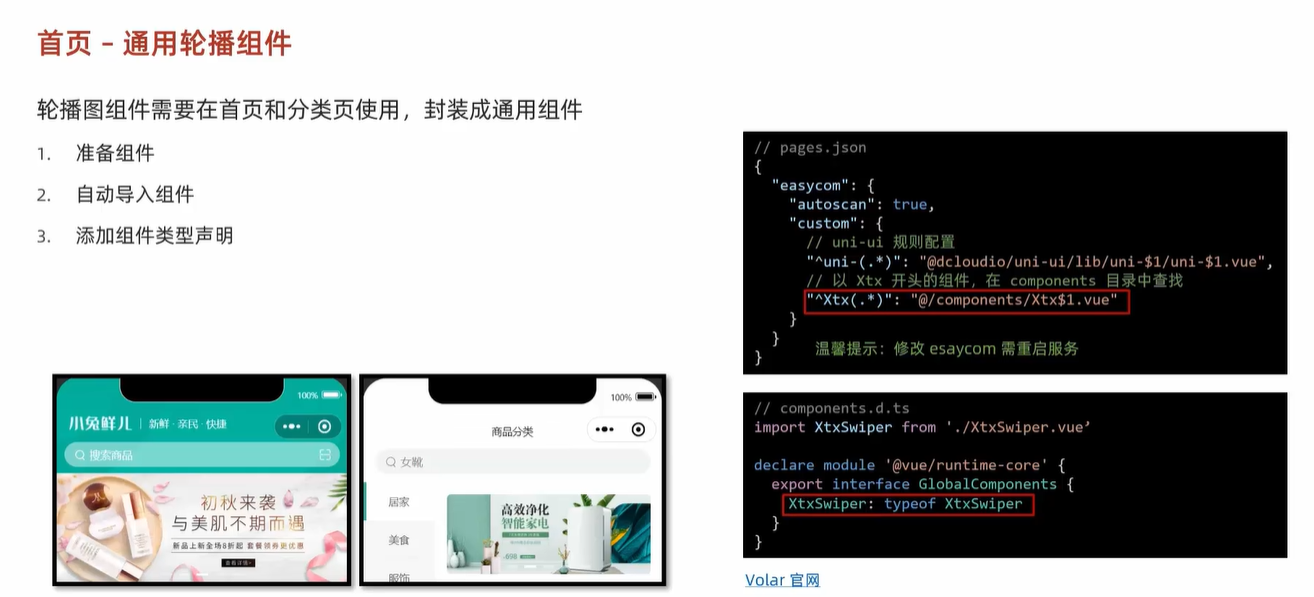
猜你喜欢组件封装
- 这里其实不止猜你喜欢可以封装 还有首页用到的轮播图也可以使用组件进行封装
轮播图组件封装
// 获取轮播图函数
export const useBannerList = () => {
  const bannerList = ref<BannerItem[]>([])
  const getBannerData = async () => {
    const res = await getHomeBannerAPI(2)
    bannerList.value = res.result
  }

  return { getBannerData, bannerList }
}
import { useBannerList } from '@/composables/index'

const { getBannerData, bannerList } = useBannerList()
//在index.vue中需要取个别名
import { useBannerList } from '@/composables/index'

const { getBannerData: getHomeBannerDate, bannerList } = useBannerList()
- 用到轮播图的地方就能使用
注意 有时候不是你的代码写的有问题 这里也会有开头提到的后端请求问题
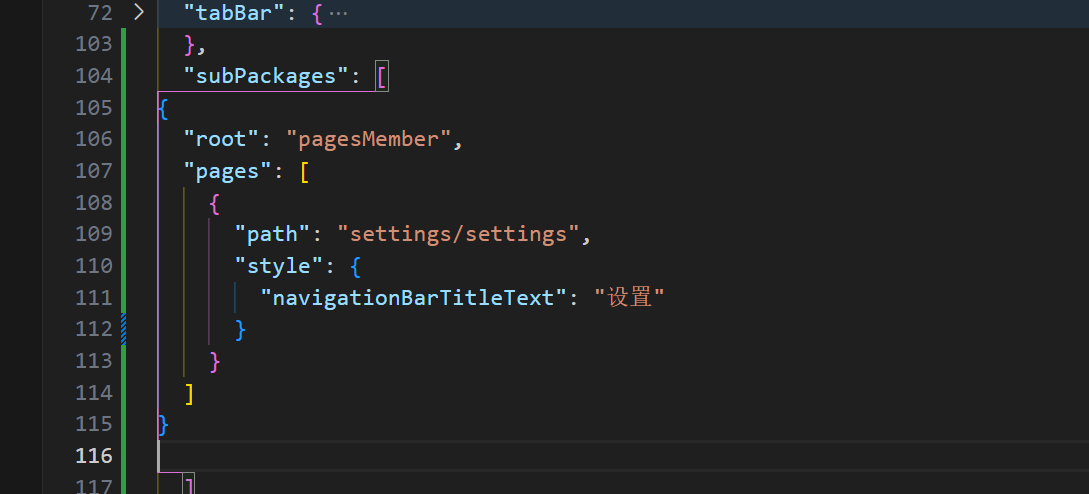
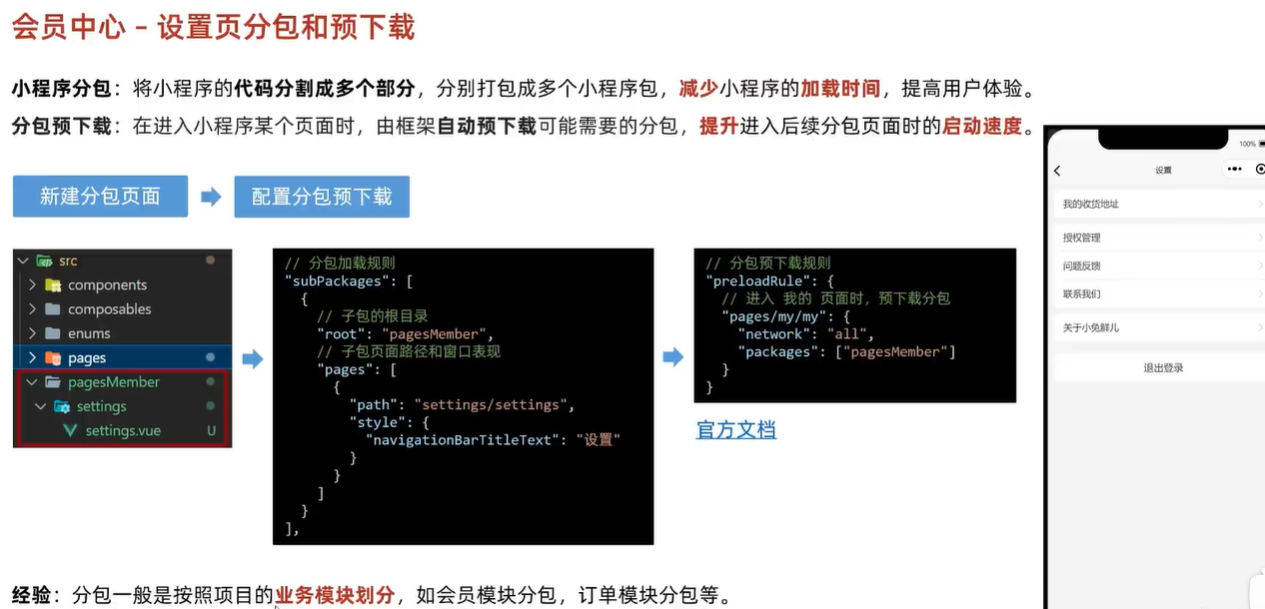
这里如果分包没有加载成功 请检查
- 正确的是 pagesMember
- settings
- 博主眼睛不太好 在这里看了半天都没发现自己写的代码有问题

{
	// pages.json
	// 组件自动映入规则
	"easycom": {
		// 开始自动扫描
		"autoscan": true,
		// 正则方式匹配
		"custom": {
			// uni-ui 规则如下配置
			"^uni-(.*)": "@dcloudio/uni-ui/lib/uni-$1/uni-$1.vue",
			// 以Xtx 开头的组件,在components文件中查找引入(需要重启服务器)
			"^Xtx(.*)": "@/components/Xtx$1.vue"
		}
	},
	"pages": [
		//pages数组中第一项表示应用启动页,参考:https://uniapp.dcloud.io/collocation/pages
		// src/pages.json
		{
			"path": "pages/index/index",
			"style": {
				"navigationStyle": "custom", // 隐藏默认导航
				"navigationBarTextStyle": "white",
				"navigationBarTitleText": "首页"
			}
		},
		{
			"path": "pages/my/my",
			"style": {
				"navigationBarTitleText": "我的"
			}
		},
		{
			"path": "pages/cart/cart",
			"style": {
				"navigationBarTitleText": "购物车"
			}
		},
		{
			"path": "pages/category/category",
			"style": {
				"navigationBarTitleText": "分类"
			}
		},
		{
			"path": "pages/login/login",
			"style": {
				"navigationStyle": "custom", // 隐藏默认导航
				"navigationBarTextStyle": "white",
				"navigationBarTitleText": "登录"
			}
		},
		{
			"path": "pages/hot/hot",
			"style": {
				"navigationBarTitleText": "热门推荐"
			}
		},
		{
			"path": "pages/goods/goods",
			"style": {
				"navigationBarTitleText": "商品详情"
			}
		}
	],
	"globalStyle": {
		"navigationBarTextStyle": "black",
		"navigationBarTitleText": "",
		"navigationBarBackgroundColor": "#F8F8F8",
		"backgroundColor": "#F8F8F8"
	},
	// 设置 TabBar
	"tabBar": {
		"color": "#333",
		"selectedColor": "#27ba9b",
		"backgroundColor": "#fff",
		"borderStyle": "white",
		"list": [
			{
				"text": "首页",
				"pagePath": "pages/index/index",
				"iconPath": "static/tabs/home_default.png",
				"selectedIconPath": "static/tabs/home_selected.png"
			},
			{
				"text": "分类",
				"pagePath": "pages/category/category",
				"iconPath": "static/tabs/category_default.png",
				"selectedIconPath": "static/tabs/category_selected.png"
			},
			{
				"text": "购物车",
				"pagePath": "pages/cart/cart",
				"iconPath": "static/tabs/cart_default.png",
				"selectedIconPath": "static/tabs/cart_selected.png"
			},
			{
				"text": "我的",
				"pagePath": "pages/my/my",
				"iconPath": "static/tabs/user_default.png",
				"selectedIconPath": "static/tabs/user_selected.png"
			}
		]
	},
	"subPackages": [
{
  "root": "pagesMember",
  "pages": [
    {
      "path": "settings/settings",
      "style": {
        "navigationBarTitleText": "设置"
      }
    }
  ]
}

	]
}
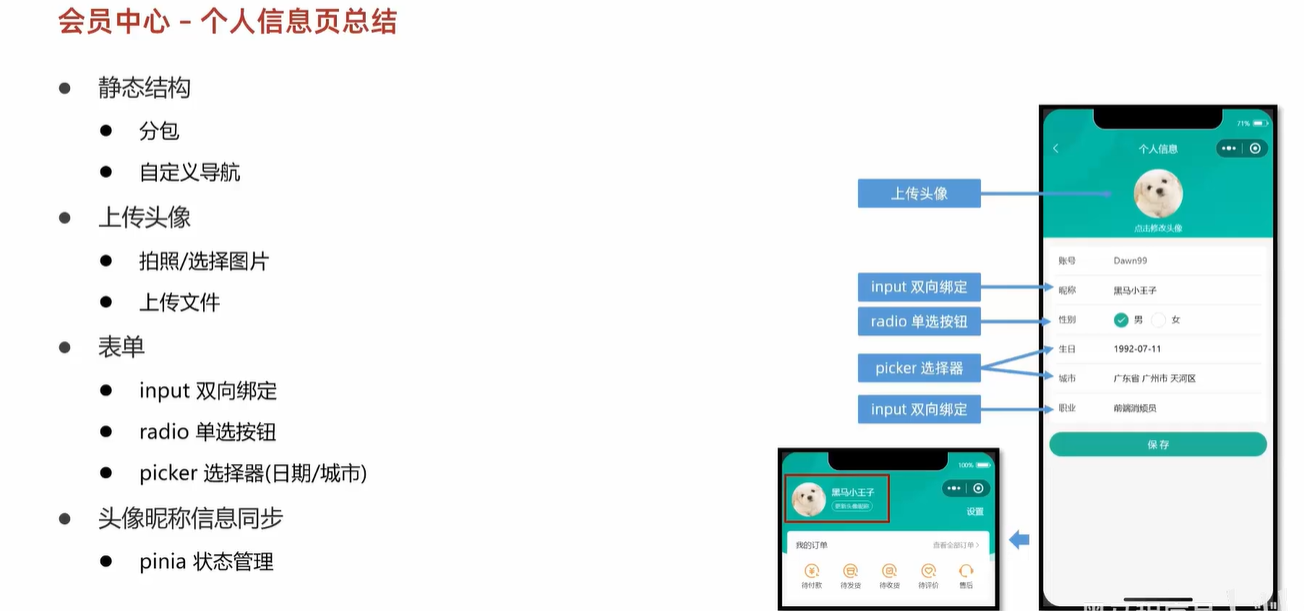
个人信息页
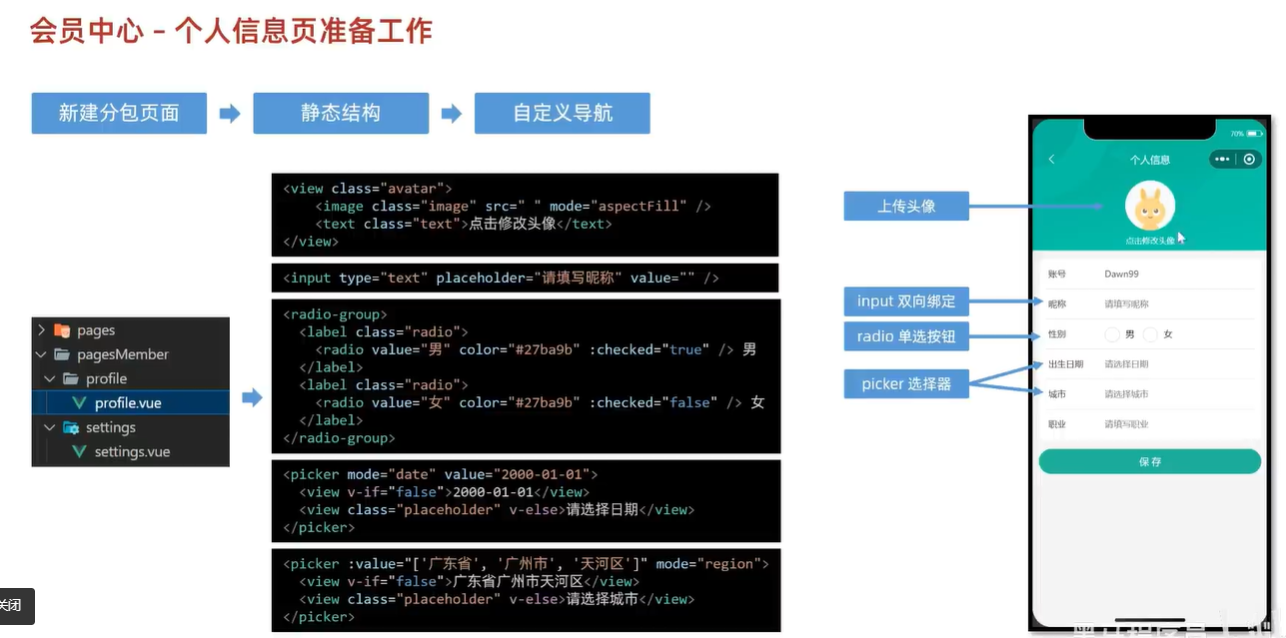
个人信息展示
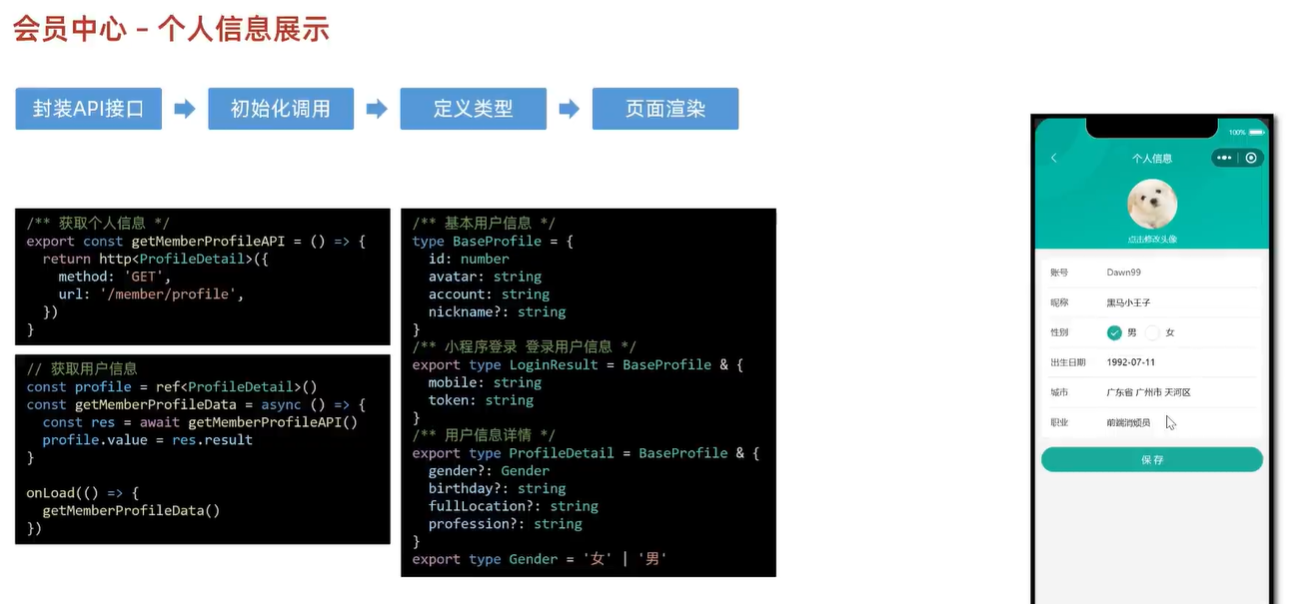
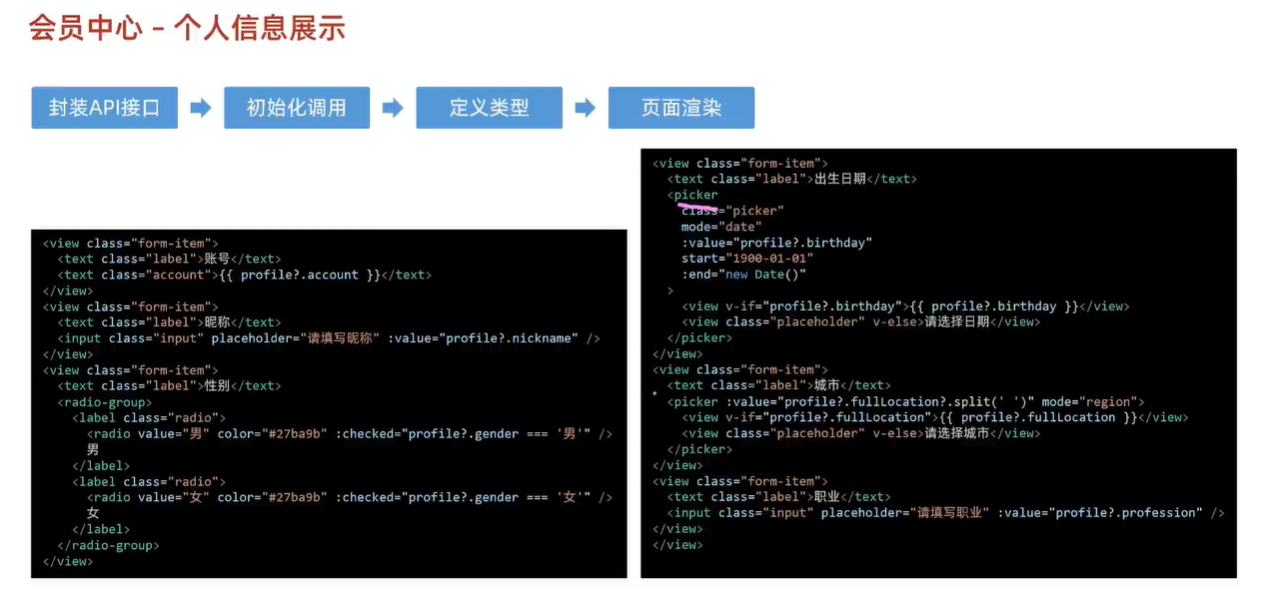
- 这里面有各种各样的数据渲染 不过不是很难
- 主要有判断类型、分割字符之类的
会员信息展示的琐屑代码
<script setup lang="ts">
import { getMemberProfileAPI } from '@/services/profile'
import type { ProfileDetail } from '@/types/member'
import { onLoad } from '@dcloudio/uni-app'
import { ref } from 'vue'

// 获取屏幕边界到安全区域距离
const { safeAreaInsets } = uni.getSystemInfoSync()

// 获取个人信息
const profile = ref<ProfileDetail>()
const getMemberProfileData = async () => {
  const res = await getMemberProfileAPI()
  profile.value = res.result
}

onLoad(() => {
  getMemberProfileData()
})
</script>

<template>
  <view class="viewport">
    <!-- 导航栏 -->
    <view class="navbar" :style="{ paddingTop: safeAreaInsets?.top + 'px' }">
      <navigator open-type="navigateBack" class="back icon-left" hover-class="none"></navigator>
      <view class="title">个人信息</view>
    </view>
    <!-- 头像 -->
    <view class="avatar">
      <view class="avatar-content">
        <image class="image" :src="profile?.avatar" mode="aspectFill" />
        <text class="text">点击修改头像</text>
      </view>
    </view>
    <!-- 表单 -->
    <view class="form">
      <!-- 表单内容 -->
      <view class="form-content">
        <view class="form-item">
          <text class="label">账号</text>
          <text class="account">{{ profile?.account }}</text>
        </view>
        <view class="form-item">
          <text class="label">昵称</text>
          <input class="input" type="text" placeholder="请填写昵称" :value="profile?.nickname" />
        </view>
        <view class="form-item">
          <text class="label">性别</text>
          <radio-group>
            <label class="radio">
              <radio value="男" color="#27ba9b" :checked="profile?.gender === '男'" />
              男
            </label>
            <label class="radio">
              <radio value="女" color="#27ba9b" :checked="profile?.gender === '女'" />
              女
            </label>
          </radio-group>
        </view>
        <view class="form-item">
          <text class="label">出生日期</text>
          <picker
            class="picker"
            mode="date"
            :value="profile?.birthday"
            start="1900-01-01"
            :end="new Date()"
          >
            <view v-if="profile?.birthday">{{ profile?.birthday }}</view>
            <view class="placeholder" v-else>请选择日期</view>
          </picker>
        </view>
        <view class="form-item">
          <text class="label">城市</text>
          <picker class="picker" :value="profile?.fullLocation?.split(' ')" mode="region">
            <view v-if="profile?.fullLocation">{{ profile.fullLocation }}</view>
            <view class="placeholder" v-else>请选择城市</view>
          </picker>
        </view>
        <view class="form-item">
          <text class="label">职业</text>
          <input class="input" type="text" placeholder="请填写职业" :value="profile?.profession" />
        </view>
      </view>
      <!-- 提交按钮 -->
      <button class="form-button">保 存</button>
    </view>
  </view>
</template>

<style lang="scss">
page {
  background-color: #f4f4f4;
}

.viewport {
  display: flex;
  flex-direction: column;
  height: 100%;
  background-image: url(https://pcapi-xiaotuxian-front-devtest.itheima.net/miniapp/images/order_bg.png);
  background-size: auto 420rpx;
  background-repeat: no-repeat;
}

// 导航栏
.navbar {
  position: relative;

  .title {
    height: 40px;
    display: flex;
    justify-content: center;
    align-items: center;
    font-size: 16px;
    font-weight: 500;
    color: #fff;
  }

  .back {
    position: absolute;
    height: 40px;
    width: 40px;
    left: 0;
    font-size: 20px;
    color: #fff;
    display: flex;
    justify-content: center;
    align-items: center;
  }
}

// 头像
.avatar {
  text-align: center;
  width: 100%;
  height: 260rpx;
  display: flex;
  flex-direction: column;
  justify-content: center;
  align-items: center;

  .image {
    width: 160rpx;
    height: 160rpx;
    border-radius: 50%;
    background-color: #eee;
  }

  .text {
    display: block;
    padding-top: 20rpx;
    line-height: 1;
    font-size: 26rpx;
    color: #fff;
  }
}

// 表单
.form {
  background-color: #f4f4f4;

  &-content {
    margin: 20rpx 20rpx 0;
    padding: 0 20rpx;
    border-radius: 10rpx;
    background-color: #fff;
  }

  &-item {
    display: flex;
    height: 96rpx;
    line-height: 46rpx;
    padding: 25rpx 10rpx;
    background-color: #fff;
    font-size: 28rpx;
    border-bottom: 1rpx solid #ddd;

    &:last-child {
      border: none;
    }

    .label {
      width: 180rpx;
      color: #333;
    }

    .account {
      color: #666;
    }

    .input {
      flex: 1;
      display: block;
      height: 46rpx;
    }

    .radio {
      margin-right: 20rpx;
    }

    .picker {
      flex: 1;
    }
    .placeholder {
      color: #808080;
    }
  }

  &-button {
    height: 80rpx;
    text-align: center;
    line-height: 80rpx;
    margin: 30rpx 20rpx;
    color: #fff;
    border-radius: 80rpx;
    font-size: 30rpx;
    background-color: #27ba9b;
  }
}
</style>
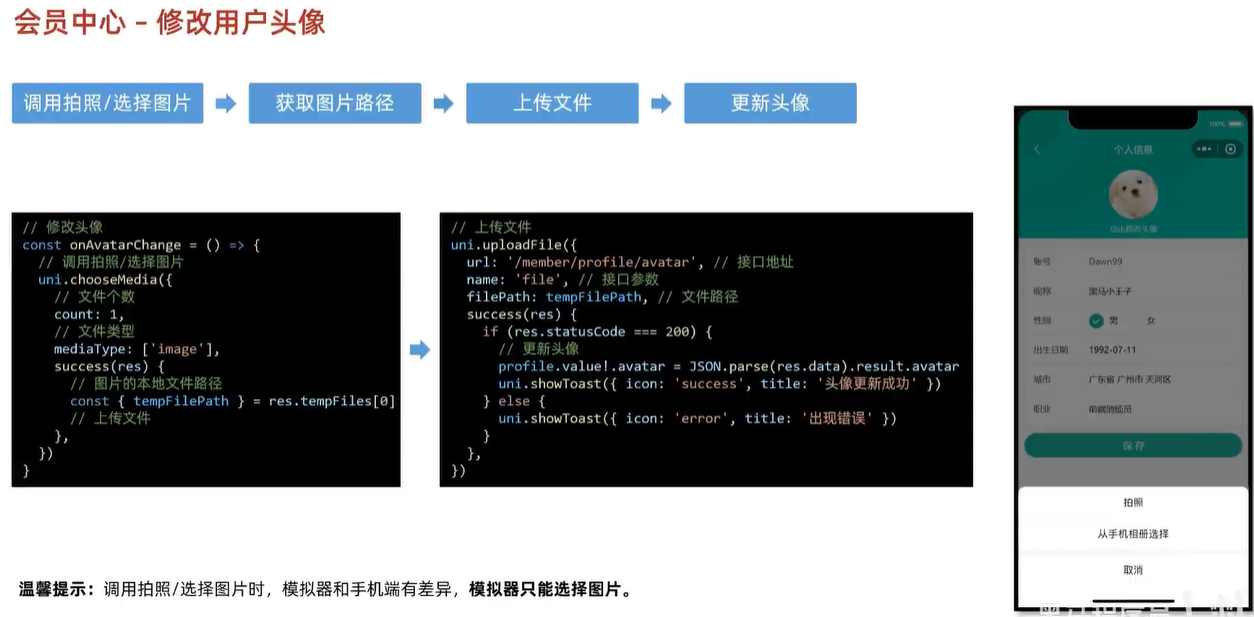
- 教程使用的是chooseMedia,只能在小程序中使用,多端需要考虑使用chooseimage
渲染与修改

- 这里需要对昵称数据进行即修改又使用
- v-model会对数据进行先读取再绑定 但这时候不能为空 所以读不到
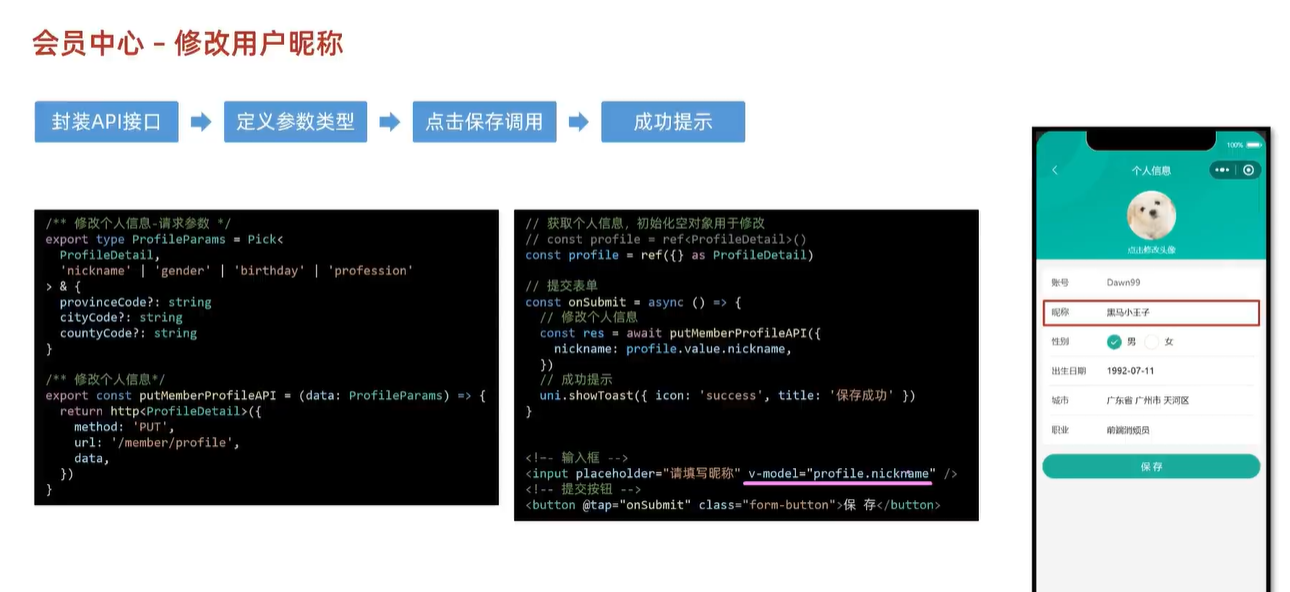
const onSubmit = async () => {
  console.log('123')
  const res = await putMemberProfileAPI({
    nickname: profile.value?.nickname,
  })
  uni.showToast({ icon: 'success', title: '保存成功' })
}
      <!-- 提交按钮 -->
      <button @tap="onSubmit" class="form-button">保 存</button>
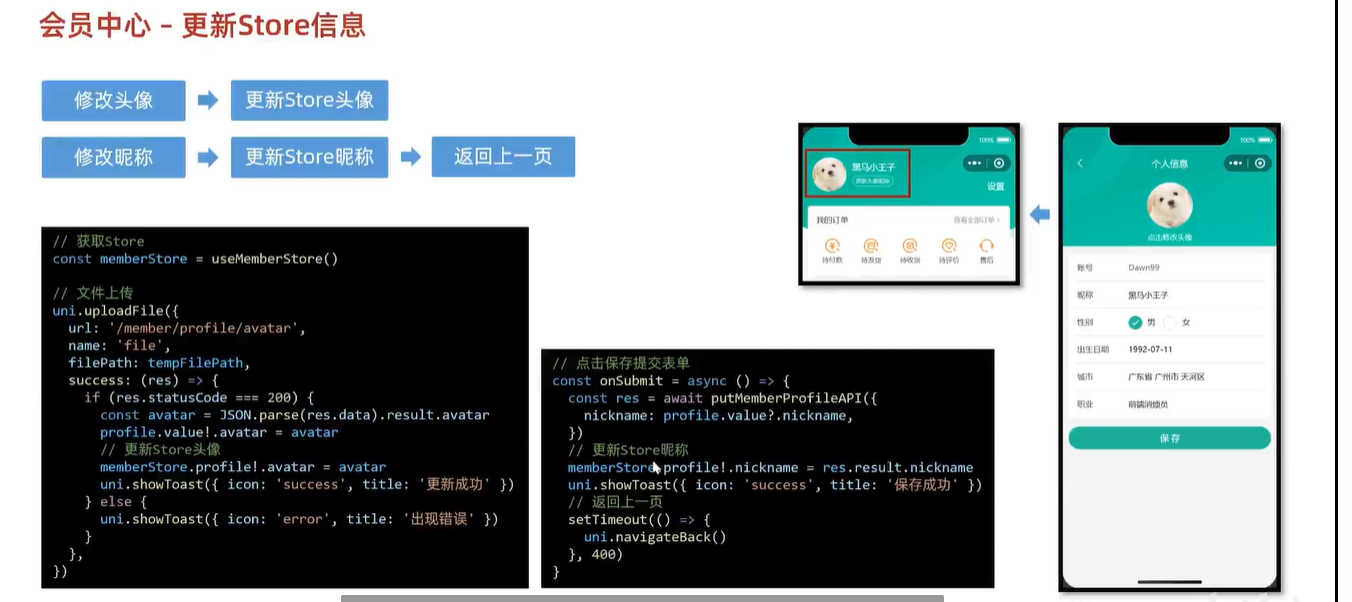
跟新store信息
// 这里将gender设置的类型不是string 所以需要使用as 指定为gender
const onGenderChange: UniHelper.RadioGroupOnChange = (ev) => {
  profile.value.gender = ev.detail.value as Gender
}
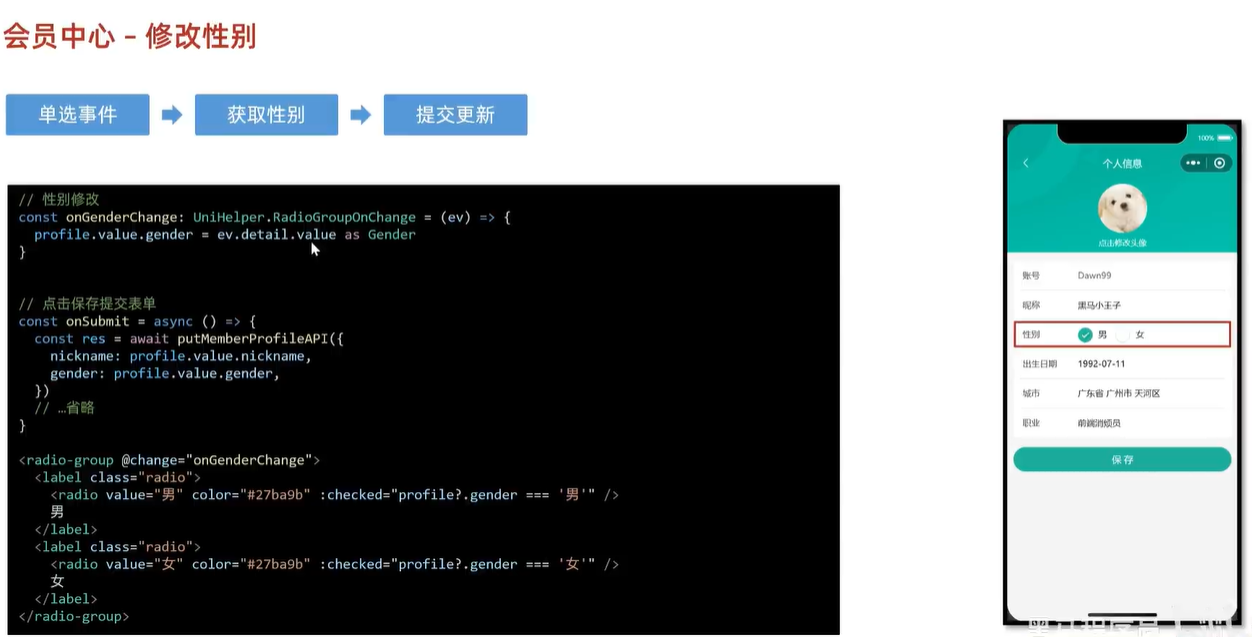
- 记得再submit中将参数传递给后端
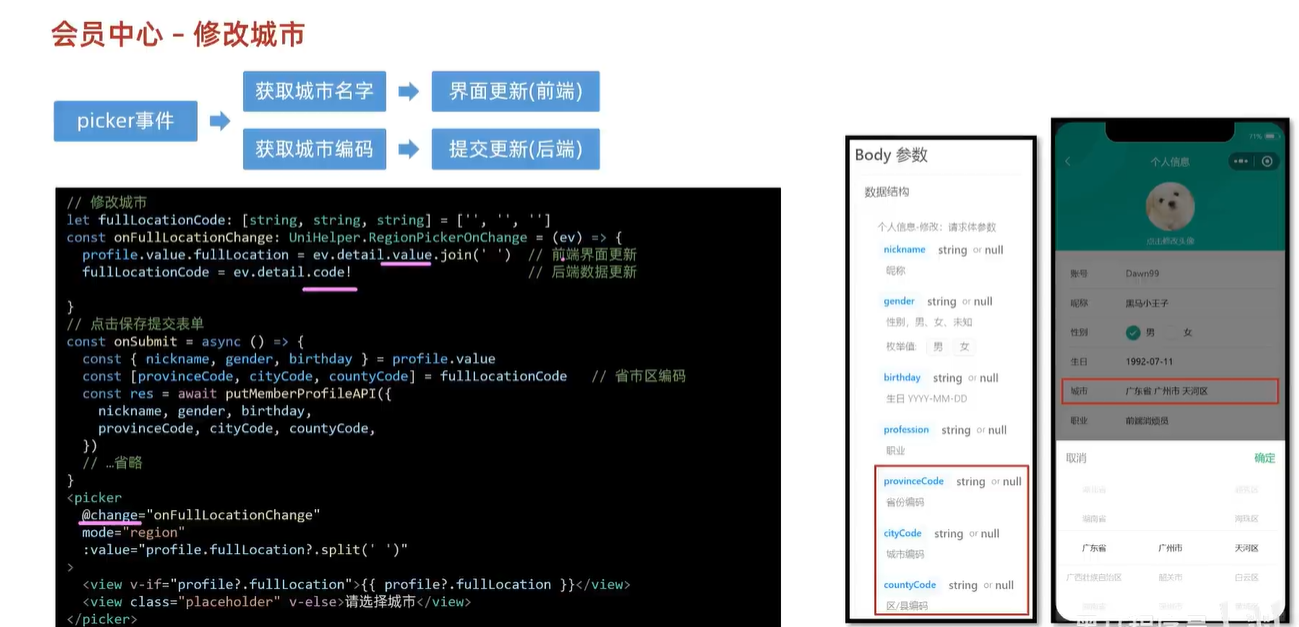
会员修改城市
最终代码
<script setup lang="ts">
import { getMemberProfileAPI, putMemberProfileAPI } from '@/services/profile'
import { useMemberStore } from '@/stores'
import type { Gender, ProfileDetail } from '@/types/member'
import { onLoad } from '@dcloudio/uni-app'
import { ref } from 'vue'
// 获取屏幕边界到安全区域距离
const { safeAreaInsets } = uni.getSystemInfoSync()
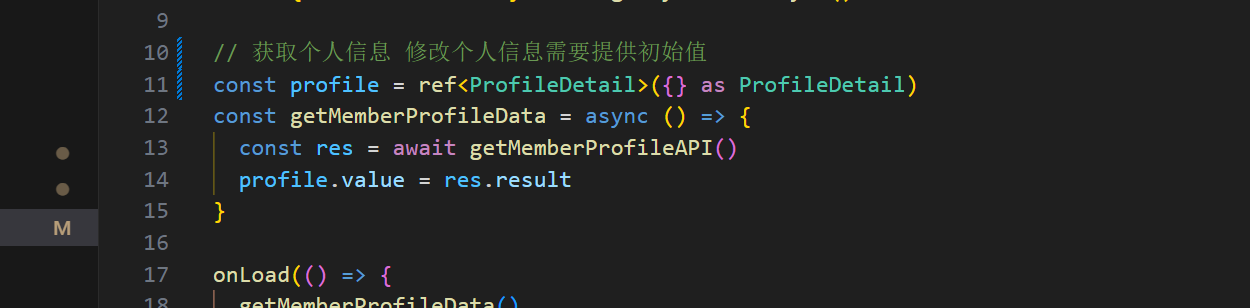
// 获取个人信息 修改个人信息所需初始值
const profile = ref({} as ProfileDetail)
const getMemberProfileData = async () => {
const res = await getMemberProfileAPI()
profile.value = res.result
}
onLoad(() => {
getMemberProfileData()
})
const memberStore = useMemberStore()
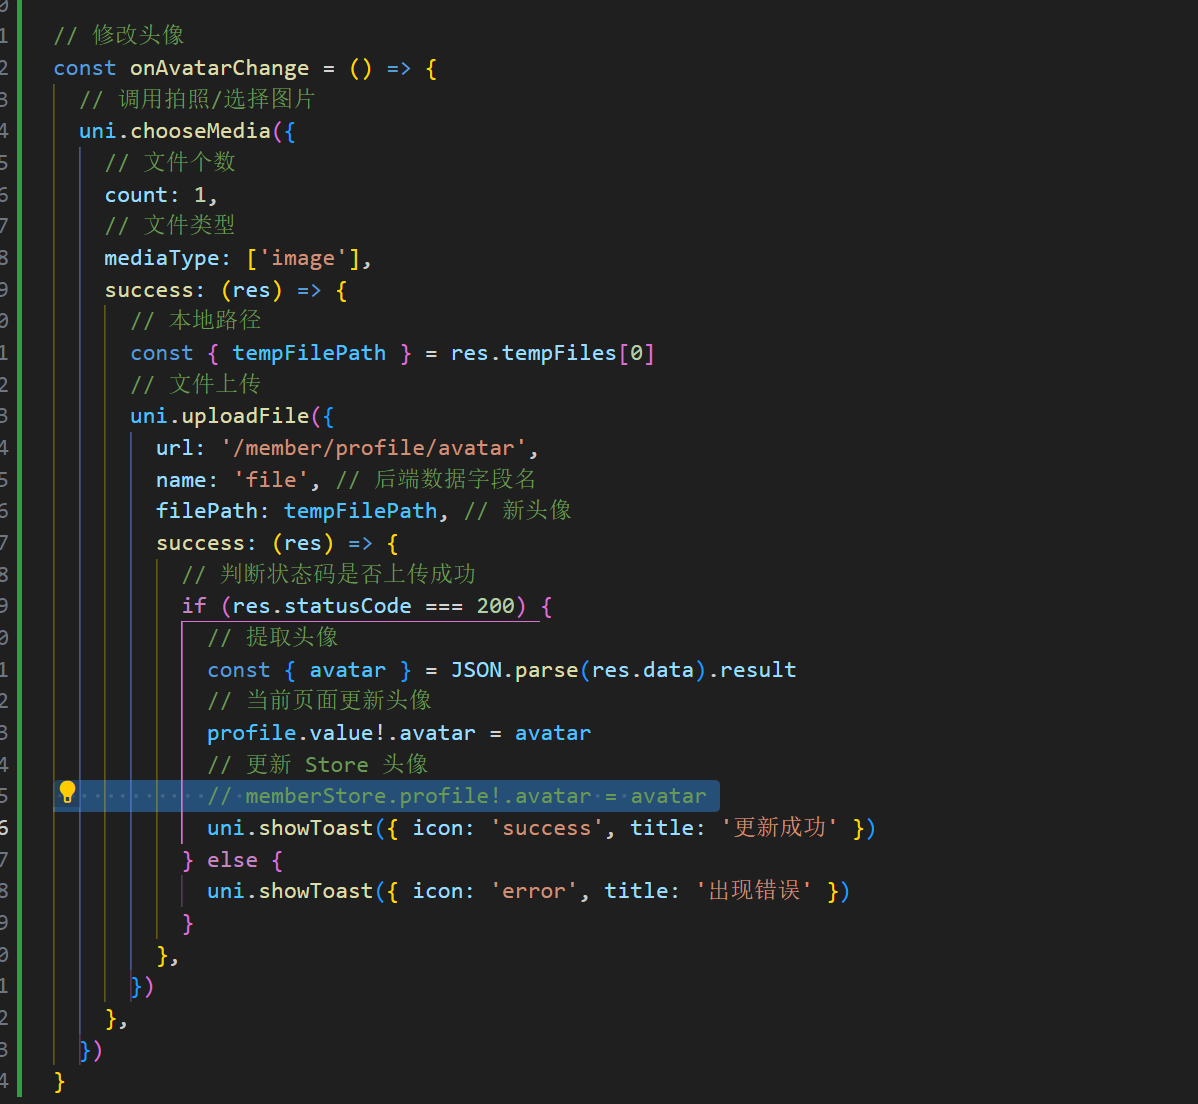
// 修改头像
const onAvatarChange = () => {
// 调用拍照/选择图片
uni.chooseMedia({
// 文件个数
count: 1,
// 文件类型
mediaType: ['image'],
success: (res) => {
// 本地路径
const { tempFilePath } = res.tempFiles[0]
// 文件上传
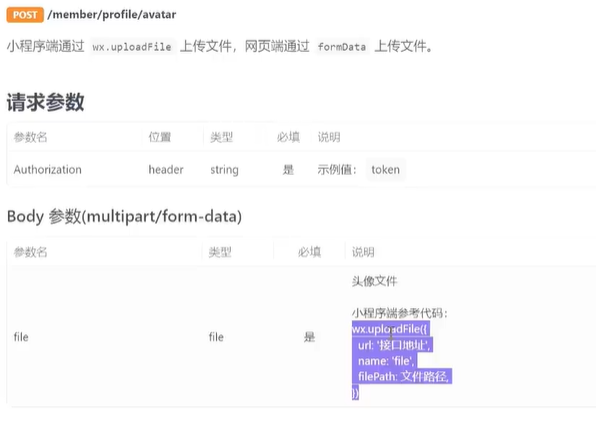
uni.uploadFile({
url: '/member/profile/avatar',
name: 'file', // 后端数据字段名
filePath: tempFilePath, // 新头像
success: (res) => {
// 判断状态码是否上传成功
if (res.statusCode === 200) {
// 提取头像
const { avatar } = JSON.parse(res.data).result
// 当前页面更新头像
profile.value!.avatar = avatar
// 更新 Store 头像
memberStore.profile!.avatar = avatar
uni.showToast({ icon: 'success', title: '更新成功' })
} else {
uni.showToast({ icon: 'error', title: '出现错误' })
}
},
})
},
})
}
// 这里将gender设置的类型不是string 所以需要使用as 指定为gender
const onGenderChange: UniHelper.RadioGroupOnChange = (ev) => {
profile.value.gender = ev.detail.value as Gender
}
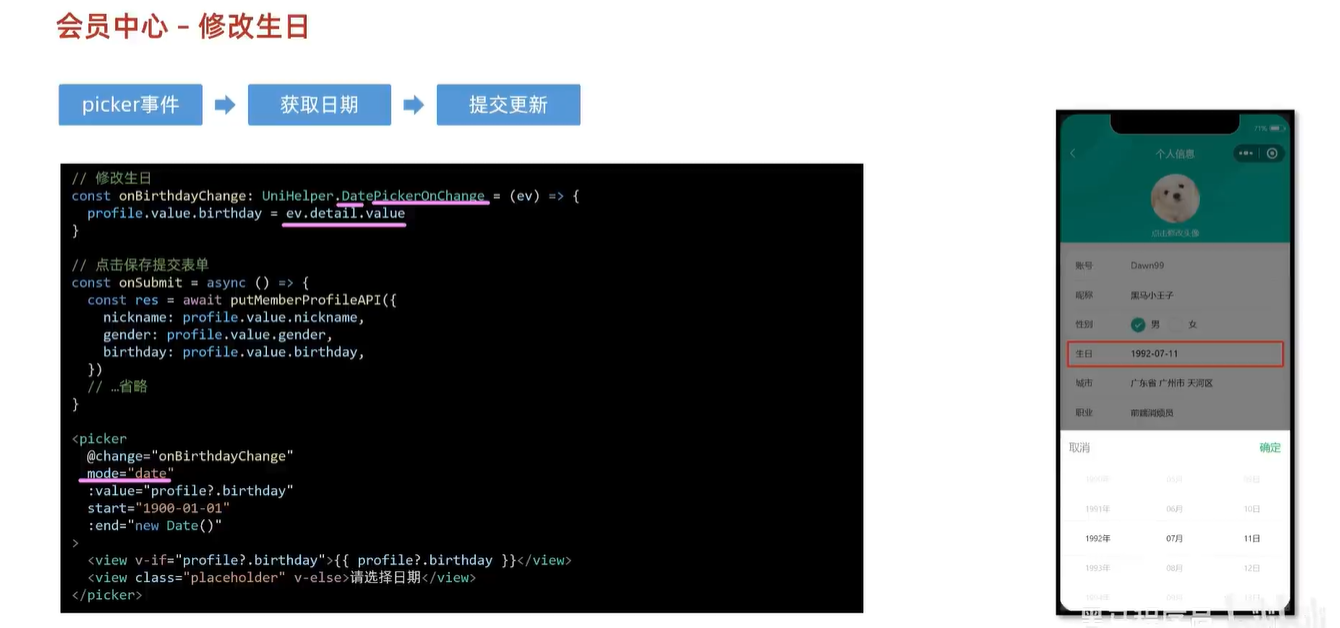
// 修改生日
const onBirthdayChange: UniHelper.DatePickerOnChange = (ev) => {
profile.value.birthday = ev.detail.value
}
// 修改城市
let fullLocationCode: [string, string, string] = ['', '', '']
const onFullLocationChange: UniHelper.RegionPickerOnChange = (ev) => {
// 修改前端界面
profile.value.fullLocation = ev.detail.value.join(' ')
// 提交后端更新
fullLocationCode = ev.detail.code!
}
const onSubmit = async () => {
const { nickname, gender, birthday, profession } = profile.value
const res = await putMemberProfileAPI({
nickname,
gender,
birthday,
profession,
provinceCode: fullLocationCode[0],
cityCode: fullLocationCode[1],
countyCode: fullLocationCode[2],
})
// 更新store昵称
memberStore.profile!.nickname = res.result.nickname
uni.showToast({ icon: 'success', title: '保存成功' })
setTimeout(() => {
uni.navigateBack()
}, 400)
}
</script>
<template>
<view class="viewport">
<!-- 导航栏 -->
<view class="navbar" :style="{ paddingTop: safeAreaInsets?.top + 'px' }">
<navigator open-type="navigateBack" class="back icon-left" hover-class="none"></navigator>
<view class="title">个人信息</view>
</view>
<!-- 头像 -->
<view class="avatar">
<view @tap="onAvatarChange" class="avatar-content">
<image class="image" :src="profile?.avatar" mode="aspectFill" />
<text class="text">点击修改头像</text>
</view>
</view>
<!-- 表单 -->
<view class="form">
<!-- 表单内容 -->
<view class="form-content">
<view class="form-item">
<text class="label">账号</text>
<text class="account">{{ profile?.account }}</text>
</view>
<view class="form-item">
<text class="label">昵称</text>
<input class="input" type="text" placeholder="请填写昵称" v-model="profile!.nickname" />
</view>
<view class="form-item">
<text class="label">性别</text>
<radio-group @change="onGenderChange">
<label class="radio">
<radio value="男" color="#27ba9b" :checked="profile?.gender === '男'" />
男
</label>
<label class="radio">
<radio value="女" color="#27ba9b" :checked="profile?.gender === '女'" />
女
</label>
</radio-group>
</view>
<view class="form-item">
<text class="label">生日</text>
<picker
class="picker"
mode="date"
start="1900-01-01"
:end="new Date()"
:value="profile.birthday"
@change="onBirthdayChange"
>
<view v-if="profile.birthday">{{ profile.birthday }}</view>
<view class="placeholder" v-else>请选择日期</view>
</picker>
</view>
<view class="form-item">
<text class="label">城市</text>
<picker
class="picker"
mode="region"
:value="profile.fullLocation?.split(' ')"
@change="onFullLocationChange"
>
<view v-if="profile.fullLocation">{{ profile.fullLocation }}</view>
<view class="placeholder" v-else>请选择城市</view>
</picker>
</view>
<view class="form-item">
<text class="label">职业</text>
<input class="input" type="text" placeholder="请填写职业" :value="profile?.profession" />
</view>
</view>
<!-- 提交按钮 -->
<button @tap="onSubmit" class="form-button">保 存</button>
</view>
</view>
</template>
<style lang="scss">
page {
background-color: #f4f4f4;
}
.viewport {
display: flex;
flex-direction: column;
height: 100%;
background-image: url(https://pcapi-xiaotuxian-front-devtest.itheima.net/miniapp/images/order_bg.png);
background-size: auto 420rpx;
background-repeat: no-repeat;
}
// 导航栏
.navbar {
position: relative;
.title {
height: 40px;
display: flex;
justify-content: center;
align-items: center;
font-size: 16px;
font-weight: 500;
color: #fff;
}
.back {
position: absolute;
height: 40px;
width: 40px;
left: 0;
font-size: 20px;
color: #fff;
display: flex;
justify-content: center;
align-items: center;
}
}
// 头像
.avatar {
text-align: center;
width: 100%;
height: 260rpx;
display: flex;
flex-direction: column;
justify-content: center;
align-items: center;
.image {
width: 160rpx;
height: 160rpx;
border-radius: 50%;
background-color: #eee;
}
.text {
display: block;
padding-top: 20rpx;
line-height: 1;
font-size: 26rpx;
color: #fff;
}
}
// 表单
.form {
background-color: #f4f4f4;
&-content {
margin: 20rpx 20rpx 0;
padding: 0 20rpx;
border-radius: 10rpx;
background-color: #fff;
}
&-item {
display: flex;
height: 96rpx;
line-height: 46rpx;
padding: 25rpx 10rpx;
background-color: #fff;
font-size: 28rpx;
border-bottom: 1rpx solid #ddd;
&:last-child {
border: none;
}
.label {
width: 180rpx;
color: #333;
}
.account {
color: #666;
}
.input {
flex: 1;
display: block;
height: 46rpx;
}
.radio {
margin-right: 20rpx;
}
.picker {
flex: 1;
}
.placeholder {
color: #808080;
}
}
&-button {
height: 80rpx;
text-align: center;
line-height: 80rpx;
margin: 30rpx 20rpx;
color: #fff;
border-radius: 80rpx;
font-size: 30rpx;
background-color: #27ba9b;
}
}
</style>
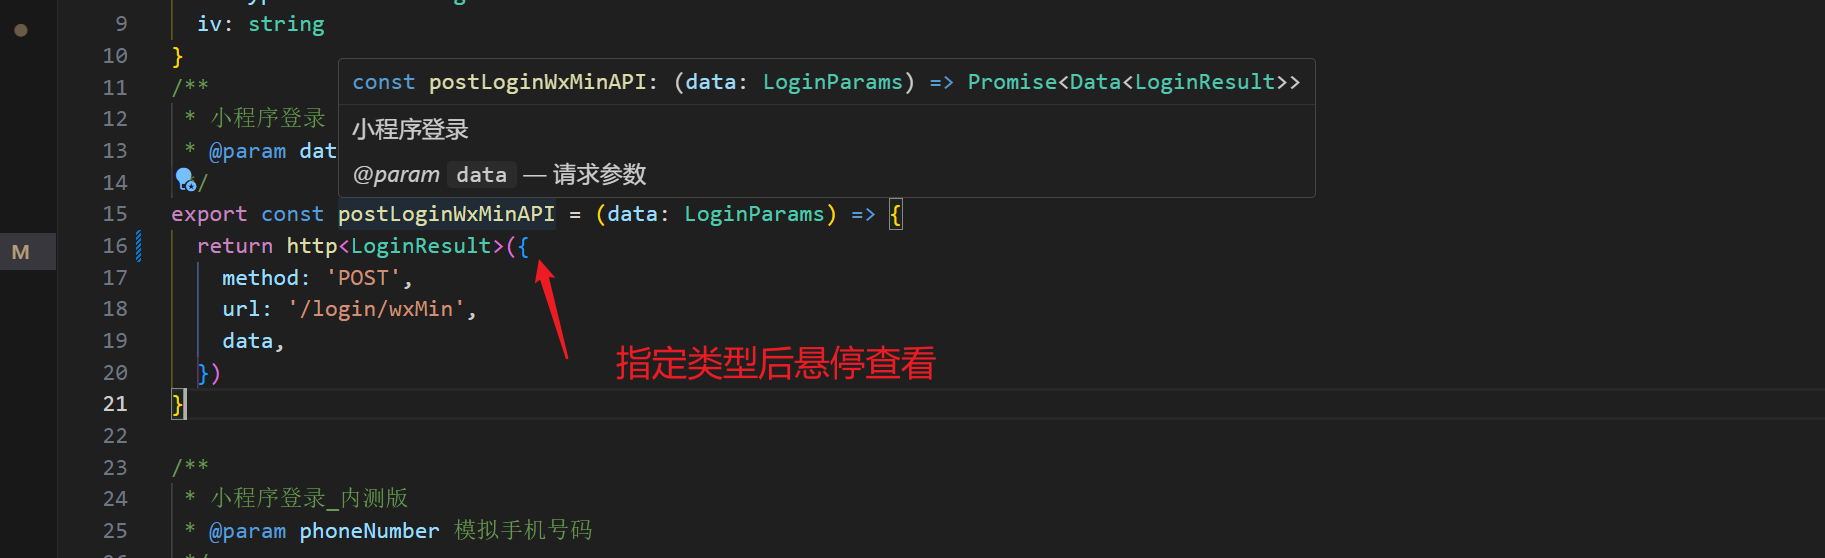
TS开发项目于JS开发项目的不同
- 不同之处就是指定类型
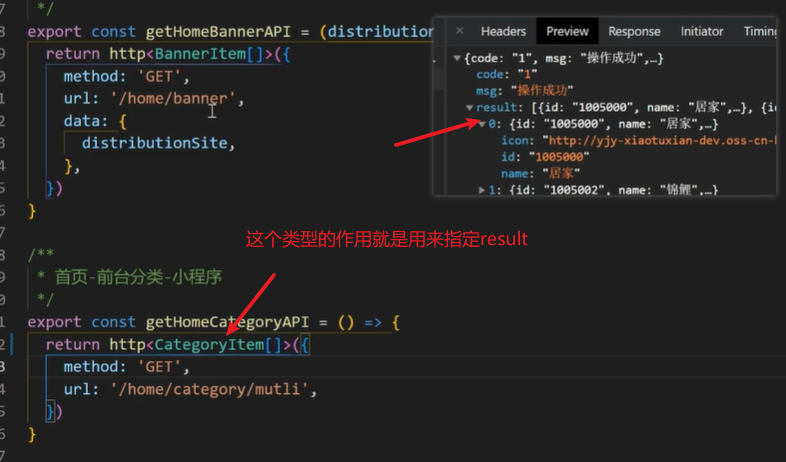
- 在编写发送请求的时候,js项目只要http{}然后开始写相关接口数据而Ts项目还要给http<>{}指定一个类型,用来判断请求返回值是否符合编写时的要求
- TS的类型有别于java类型,简单的number是对应int、long。但自定义的数据类型,如果要用java来理解的话,我认为TS类型像数据结构,像枚举。 TS定义的类型就是数据的组织形式,这个组织形式是根据返回的数据不同而不同
