

我们在开发安卓APP时,使用的Glide去加载图片,他会默认按照view的尺寸进行图片缓存。但是在Flutter中,默认缓存使用的是图片大小。这会导致图片加载过程中占用内存比较大。如果你在iOS设备上,加载一个图片列表,每张图片在2M左右时,应用会崩溃。
接下来我们通过自定义AutoResizeImage来解决这个问题
功能
支持各类 ImageProvider:包括NetworkImage,AssetImage,FileImage等,支持CachedNetworkImageProvider
无需图片尺寸,根据widget尺寸自动计算缓存图片大小,防止图片过载,加快加载速度
支持清晰度调整:设置ResizeMode支持三挡清晰度,设置scale支持手动调整清晰度
现象
在Flutter的开发过程中,我们很熟悉的使用各种类型的图片加载。当你加载一张尺寸比较大(9248x6944)的图片时,你会发现图片加载的很慢,即使它是本地图片。
Image.asset(
  Assets.imgBig,
  width: 200,
  height: 200,
),
这时打开debugInvertOversizedImages = true;这个配置,可以看到图片会颜色反转同时倒置,同时日志会提示图片过载。
======== Exception caught by painting library ======================================================
The following message was thrown while painting an image:
Image assets/img/big.jpg has a display size of 525×525 but a decode size of 6151×8192, which uses an additional 261007KB.

Consider resizing the asset ahead of time, supplying a cacheWidth parameter of 525, a cacheHeight parameter of 525, or using a ResizeImage.

====================================================================================================
原理
通过搜索debugInvertOversizedImages发现控制过载显示的信息在源码decoration_image.dart中,省略部分代码
可以看到只要满足sizeInfo.decodedSizeInBytes > sizeInfo.displaySizeInBytes + debugImageOverheadAllowance会显示过载提示
说人话就是图片解码的面积>widget的面积就会显示过载
void paintImage({
  ···
}) {
  ···
  if (!kReleaseMode) {
    ···
    assert(() {
      if (debugInvertOversizedImages &&
          sizeInfo.decodedSizeInBytes > sizeInfo.displaySizeInBytes + debugImageOverheadAllowance) {
        final int overheadInKilobytes = (sizeInfo.decodedSizeInBytes - sizeInfo.displaySizeInBytes) ~/ 1024;
        final int outputWidth = sizeInfo.displaySize.width.toInt();
        final int outputHeight = sizeInfo.displaySize.height.toInt();
        FlutterError.reportError(FlutterErrorDetails(
          exception: 'Image $debugImageLabel has a display size of '
            '$outputWidth×$outputHeight but a decode size of '
            '${image.width}×${image.height}, which uses an additional '
            '${overheadInKilobytes}KB.\n\n'
            'Consider resizing the asset ahead of time, supplying a cacheWidth '
            'parameter of $outputWidth, a cacheHeight parameter of '
            '$outputHeight, or using a ResizeImage.',
          library: 'painting library',
          context: ErrorDescription('while painting an image'),
        ));
        // Invert the colors of the canvas.
        canvas.saveLayer(
          destinationRect,
          Paint()..colorFilter = const ColorFilter.matrix(<double>[
            -1,  0,  0, 0, 255,
             0, -1,  0, 0, 255,
             0,  0, -1, 0, 255,
             0,  0,  0, 1,   0,
          ]),
        );
        // Flip the canvas vertically.
        final double dy = -(rect.top + rect.height / 2.0);
        canvas.translate(0.0, -dy);
        canvas.scale(1.0, -1.0);
        canvas.translate(0.0, dy);
        invertedCanvas = true;
      }
      return true;
    }());
    ···
}
/// The number of bytes needed to render the image without scaling it.
  int get displaySizeInBytes => _sizeToBytes(displaySize);

  /// The number of bytes used by the image in memory.
  int get decodedSizeInBytes => _sizeToBytes(imageSize);

  int _sizeToBytes(Size size) {
    // Assume 4 bytes per pixel and that mipmapping will be used, which adds
    // 4/3.
    return (size.width * size.height * 4 * (4/3)).toInt();
  }
使用ResizeImage
根据提示,我们使用cacheWidth, cacheHeight或ResizeImage
我们查看源码,当设置了cacheWidth或cacheHeight本质是使用ResizeImage包裹ImageProvider
  Image.asset(
    String name, {

  }) : image = ResizeImage.resizeIfNeeded(
         cacheWidth,
         cacheHeight,
         scale != null
           ? ExactAssetImage(name, bundle: bundle, scale: scale, package: package)
           : AssetImage(name, bundle: bundle, package: package),
       ),

static ImageProvider<Object> resizeIfNeeded(int? cacheWidth, int? cacheHeight, ImageProvider<Object> provider) {
  if (cacheWidth != null || cacheHeight != null) {
    return ResizeImage(provider, width: cacheWidth, height: cacheHeight);
  }
  return provider;
}
我们通过官方文档查看ReizeImage的使用,有一个新的参数ResizeImagePolicy
红色方框的尺寸是150x150,图片尺寸是300x200,通过单独和同时设置宽、高,以及设置ResizeImagePolicy的效果
| 代码 | 显示 | 清晰度 | 过载 |
|---|---|---|---|
| const ResizeImage( AssetImage('dragon_cake.jpg'), width: 150, height: 150, ) | 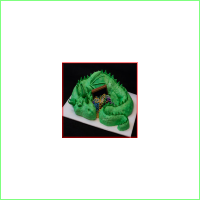 | 高,变形 | 否 |
| const ResizeImage( AssetImage('dragon_cake.jpg'), width: 150, ) |  | 低 | 否 |
| const ResizeImage( AssetImage('dragon_cake.jpg'), height: 150, ) | 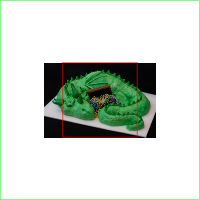 | 高 | 是 |
| const ResizeImage( AssetImage('dragon_cake.jpg'), policy: ResizeImagePolicy.fit, width: 150, ) | 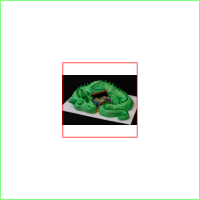 | 低 | 否 |
| const ResizeImage( AssetImage('dragon_cake.jpg'), policy: ResizeImagePolicy.fit, width: 150, ) |  | 低 | 否 |
| const ResizeImage( AssetImage('dragon_cake.jpg'), policy: ResizeImagePolicy.fit, height: 150, ) |  | 高 | 是 |
存在问题
可以看到,在不知道图片宽大于高还是高大于宽的前提下,没有办法单独设置宽或高。为了使图片不变形,并满足图片不过载,最优解是同时设置宽高和ResizeImagePolicy.fit
const ResizeImage(
  AssetImage('dragon_cake.jpg'),
  policy: ResizeImagePolicy.fit,
  width: 150,
  height: 150,
)
由此带来一个问题。当Image设置fit : BoxFit.cover时,图片会放大到红色方框大小,图片会不那么清楚。
ResizeImage存在的问题:
- 在不知道图片尺寸前提下,不能单独去设置width或height保证清晰度
- 不能动态调整清晰度
自定义ResizeImage
通过上面代码我们知道只要控件的面积小于图片面积即可避免图片过载提示。
定义ResizeMode满足不同情况,红框为控件尺寸,对应的图片解码尺寸
| ResizeMode | 图示 | 清晰度/内存占用 | Oversized |
|---|---|---|---|
| contain |  | 低 | 否 |
| balance |  | 中 | 否 |
| cover |  | 高 | 是 |
我们自定义一个AutoResizeImage去代替系统的ResizeImage,支持在图片不过载的前提下,满足图片的清晰度,同时支持清晰度调节。主要逻辑就是根据控件尺寸,调整图片解码尺寸。
@override
  ImageStreamCompleter loadBuffer(AutoResizeImageKey key, DecoderBufferCallback decode) {
    Future<Codec> decodeResize(ImmutableBuffer buffer, {int? cacheWidth, int? cacheHeight, bool? allowUpscaling}) async {
      assert(
        cacheWidth == null && cacheHeight == null && allowUpscaling == null,
        'ResizeImage cannot be composed with another ImageProvider that applies '
        'cacheWidth, cacheHeight, or allowUpscaling.',
      );
      final ImageDescriptor descriptor = await ImageDescriptor.encoded(buffer);
      Size resize = _resize(descriptor);
      return descriptor.instantiateCodec(
        targetWidth: resize.width.round(),
        targetHeight: resize.height.round(),
      );
    }

    final ImageStreamCompleter completer = imageProvider.loadBuffer(key._providerCacheKey, decodeResize);
    if (!kReleaseMode) {
      completer.debugLabel = '${completer.debugLabel} - Resized(${key._width}×${key._height})';
    }
    _configureErrorListener(completer, key);
    return completer;
  }


  Size _resize(ImageDescriptor descriptor) {
    var displayWidth = width * PaintingBinding.instance.window.devicePixelRatio;
    var displayHeight = height * PaintingBinding.instance.window.devicePixelRatio;
    var displayAspectRatio = displayWidth / displayHeight;

    int imageWidth = descriptor.width;
    int imageHeight = descriptor.height;
    double imageAspectRatio = imageWidth / imageHeight;

    if (displayHeight == double.infinity) {
      displayHeight = displayWidth / imageAspectRatio;
    }
    if (displayWidth == double.infinity) {
      displayWidth = displayHeight * imageAspectRatio;
    }

    double targetWidth;
    double targetHeight;

    if (imageWidth * imageHeight <= displayWidth * displayHeight) {
      targetWidth = imageWidth.toDouble();
      targetHeight = imageHeight.toDouble();
    } else {
      //need resize
      var mode = imageAspectRatio / displayAspectRatio > overRatio || (1 / imageAspectRatio) / (1 / displayAspectRatio) > overRatio
          ? ResizeMode.cover
          : resizeMode;
      switch (mode) {
        case ResizeMode.contain:
          if (imageAspectRatio > 1) {
            //wide
            targetWidth = displayWidth;
            targetHeight = displayWidth / imageAspectRatio;
          } else {
            //long
            targetWidth = displayHeight * imageAspectRatio;
            targetHeight = displayHeight;
          }
          break;
        case ResizeMode.cover:
          if (imageAspectRatio > 1) {
            //wide
            targetWidth = displayHeight * imageAspectRatio;
            targetHeight = displayHeight;
          } else {
            //long
            targetWidth = displayWidth;
            targetHeight = displayWidth / imageAspectRatio;
          }
          break;
        case ResizeMode.balance:
          double scale = sqrt((displayWidth * displayHeight) / (imageWidth * imageHeight));
          targetWidth = imageWidth * scale;
          targetHeight = imageHeight * scale;
          break;
      }
    }
    return Size(targetWidth * scale, targetHeight * scale);
  }
}
使用
基本使用
看这里example
| debugInvertOversizedImages = false | debugInvertOversizedImages = true |
|---|---|
 |  |
占位
CachedNetworkImage使用OctoImage实现占位,这里我们做一下调整
LayoutBuilder(builder: (context, constraints) {
        return OctoImage(
          image: AutoResizeImage(
            imageProvider: CachedNetworkImageProvider(url),
            width: constraints.maxWidth,
            height: constraints.maxHeight,
          ),
          placeholderBuilder: (_) => _buildPlaceHolder(),
          errorBuilder: (_, __, ___) => _buildError(),
        );
      })
