

If I have seen further, it is by standing on the shoulders of giants
如果我比别人看得更远,那是因为我站在巨人的肩膀上
如今回头看下Servlet不仅如此强大,还具有很强烈的参考意义,能在现如今流行的大部分框架中找到它的影子。下面文章不止与探索Servlet,可能在其中穿插其他的关联知识点,旨在能从此次的学习中获取更多的知识点参考资料总结,转化为自己的理解输出,在文中我尽量以截图+复制全限定类名的方式记录,以便感兴趣的再次查找。
Springboot与Servlet
在springboot中内嵌了Tomcat容器,而Tomcat又是Servlet的容器,Springboot就与Servlet产生了紧密的联系。 在分析各个类时,注意下每个类所在的包是如何在tomcat与boot之间跨越的~
生命周期
1、初始化
2、处理请求
3、销毁
应用上下文ServletContext
应用上下文即可看做:一次请求到达,到响应结束的过程中间的catlog,即阅读中结合上下文语境,是一个广义定义。 为什么说到上下文呢?来看下ServletContext的实现,第一个经典实现既是ApplicationContext我们不止在一次源码和应用中见到它,另外加载器目前有两种选择:ContextLoaderListener和ContextLoaderServlet。其功能是完全相同。会在下文进行介绍
/**
 * Standard implementation of <code>ServletContext</code> that represents
 * a web application's execution environment.  An instance of this class is
 * associated with each instance of <code>StandardContext</code>.
 * 代表web应用程序的执行环境。这个类的一个实例是
 *与StandardContext的每个实例关联。
 * @author Craig R. McClanahan
 * @author Remy Maucherat
 */
public class ApplicationContext implements ServletContext {

    protected static final boolean STRICT_SERVLET_COMPLIANCE;///翻译为是否严格遵守

    protected static final boolean GET_RESOURCE_REQUIRE_SLASH;//获取资源是否需要斜线。

    static {
        STRICT_SERVLET_COMPLIANCE = Globals.STRICT_SERVLET_COMPLIANCE;

        String requireSlash = System.getProperty("org.apache.catalina.core.ApplicationContext.GET_RESOURCE_REQUIRE_SLASH");
        if (requireSlash == null) {
            GET_RESOURCE_REQUIRE_SLASH = STRICT_SERVLET_COMPLIANCE;
        } else {
            GET_RESOURCE_REQUIRE_SLASH = Boolean.parseBoolean(requireSlash);
        }
    }
注:特别重要上述配置为tomcat中第一个开关配置,决定多个属性的值。来自于下面的Globals.STRICT_SERVLET_COMPLIANCE;默认为false 验证:
public static final boolean STRICT_SERVLET_COMPLIANCE =Boolean.parseBoolean(System.getProperty("org.apache.catalina.STRICT_SERVLET_COMPLIANCE", "false"));
和官网截图
问题:会因为tomcat的版本配置不同改变此值,在8.5.57当中会改变为true,当controller中配置多个映射路径会出现访问不到的问题
此处参考博文:blog.csdn.net/xing930408/…
Tomcat文档:tomcat.apache.org/tomcat-8.5-…
而GET_RESOURCE_REQUIRE_SLASH直接赋值为STRICT_SERVLET_COMPLIANCE
SpringBoot ApplicationContext
public interface ApplicationContext extends EnvironmentCapable, ListableBeanFactory, HierarchicalBeanFactory,MessageSource, ApplicationEventPublisher, ResourcePatternResolver
都在说ApplicationContext衍生了BeanFactory那么对此都扩展了那些功能?ApplicationContext定了高级容器的基本规范,其实他也不是直接继承BeanFactory基础容器,可以看到ApplicationContext的直接父接口对BeanFactory进行很多拓展其中就包括: 1.事件的注册和发布 2.消息解析 3.资源解析 4.Bean工厂层级管理 5.监听器 6.容器环境 通过以上拓展,我们基本可以知道高级IOC容器有哪些特点,这也是学习整个ApplicationContext容器重点了解的部分
再比较ApplicationContext和ConfigurableApplicationContext定义的方法以及下图层级关系,ConfigurableApplicationContext是ApplicationContext的子接口,也就包含了ApplicationContext。通过方法可以知道,ConfigurableApplicationContext重在对各种属性的配置,而ApplicationContext接口主要各种属性的get方法。
Spring这种将get和set分开到两个接口的设计增大了属性设置和获取的灵活性,将两者分开也更加清晰。在以后的解决方案设计中,可以参考,将配置信息和获取信息分开,两者互不干扰,在保证重要的基础属性不变的情况,可以按需进行拓展。其实Spring的框架设计中应用了大量的装饰者模式,这也是高拓展点的需要
该类提供了高级IOC规范 其中有几个注意点:
从ListableBeanFactory接口继承来的:用于访问应用组件的工厂方法 从ResourceLoader接口继承来的:用通用的方式加载文件资源 从ApplicationEventPublisher接口继承来的:注册和发布事件 从MessageSource接口继承来的:处理消息,支持国际化
从父应用上下文定义的在子上下文中将始终保持优先
www.javaguides.net/2019/10/how…
public interface ApplicationContext extends EnvironmentCapable, ListableBeanFactory, HierarchicalBeanFactory,
        MessageSource, ApplicationEventPublisher, ResourcePatternResolver {

    /**
     * 返回一个唯一的应用上下文id+
     * @return the unique id of the context, or {@code null} if none
     */
    @Nullable
    String getId();

    /**
     * 返回已经部署的该应用上下文的名称.
     * @return a name for the deployed application, or the empty String by default
     */
    String getApplicationName();

    /**
     * 返回此上下文友好的名称---这有什么用呢?
     * @return a display name for this context (never {@code null})
     */
    String getDisplayName();

    /**
     * 返回该上下文第一次被加载的时间戳
     * @return the timestamp (ms) when this context was first loaded
     */
    long getStartupDate();

    /**
     *返回父应用上下文, 如果没有父上下文,该上下文就是在上下文层次的根
     * @return the parent context, or {@code null} if there is no parent
     */
    @Nullable
    ApplicationContext getParent();


    AutowireCapableBeanFactory getAutowireCapableBeanFactory() throws IllegalStateException;

}
这其中对AutowireCapableBeanFactory getAutowireCapableBeanFactory()方法有疑惑,然后网上百度了一下。Spring提供了一种机制,能够为第三方框架赋能,让Spring去管理的Bean去装配和填充那些没有被SpringIOC管理的bean。也就是Spring提供了使用第三方框架的能力,能够做到无缝的将第三方框架整合到Spring中来进行使用,Junit与Quartz借用了这种机制为自己赋能。
———————————————— 版权声明:本文为CSDN博主「还你一梦」的原创文章,遵循CC 4.0 BY-SA版权协议,转载请附上原文出处链接及本声明。 原文链接:blog.csdn.net/ligel136738…
AutowireCapableBeanFactory
package org.springframework.beans.factory.config;

import java.util.Set;

import org.springframework.beans.BeansException;
import org.springframework.beans.TypeConverter;
import org.springframework.beans.factory.BeanFactory;
import org.springframework.beans.factory.NoSuchBeanDefinitionException;
import org.springframework.beans.factory.NoUniqueBeanDefinitionException;
import org.springframework.lang.Nullable;


public interface AutowireCapableBeanFactory extends BeanFactory {


    int AUTOWIRE_NO = 0;


    int AUTOWIRE_BY_NAME = 1;


    int AUTOWIRE_BY_TYPE = 2;


    int AUTOWIRE_CONSTRUCTOR = 3;


    @Deprecated
    int AUTOWIRE_AUTODETECT = 4;


    String ORIGINAL_INSTANCE_SUFFIX = ".ORIGINAL";


    <T> T createBean(Class<T> beanClass) throws BeansException;

    void autowireBean(Object existingBean) throws BeansException;


    Object configureBean(Object existingBean, String beanName) throws BeansException;


    Object createBean(Class<?> beanClass, int autowireMode, boolean dependencyCheck) throws BeansException;

    Object autowire(Class<?> beanClass, int autowireMode, boolean dependencyCheck) throws BeansException;


    void autowireBeanProperties(Object existingBean, int autowireMode, boolean dependencyCheck)
            throws BeansException;


    void applyBeanPropertyValues(Object existingBean, String beanName) throws BeansException;


    Object initializeBean(Object existingBean, String beanName) throws BeansException;


    Object applyBeanPostProcessorsBeforeInitialization(Object existingBean, String beanName)
            throws BeansException;

    Object applyBeanPostProcessorsAfterInitialization(Object existingBean, String beanName)
            throws BeansException;

    void destroyBean(Object existingBean);


    <T> NamedBeanHolder<T> resolveNamedBean(Class<T> requiredType) throws BeansException;


    @Nullable
    Object resolveDependency(DependencyDescriptor descriptor, @Nullable String requestingBeanName) throws BeansException;


    @Nullable
    Object resolveDependency(DependencyDescriptor descriptor, @Nullable String requestingBeanName,
            @Nullable Set<String> autowiredBeanNames, @Nullable TypeConverter typeConverter) throws BeansException;

}
在ApplacationContext中并没有实现此工厂接口,如上文可见,是在初始化Spring管理Bean之外的实例时直接调用getAutowireCapableBeanFactory方法 AutowireCapableBeanFactory定义了5种装配策略:
不自动注入:AUTOWIRE_NO 使用BeanName策略注入:AUTOWIRE_BY_NAME 使用类型装配策略:AUTOWIRE_BY_TYPE 使用构造器装配策略:AUTOWIRE_CONSTRUCTOR 自动装配策略:AUTOWIRE_AUTODETECT
以AbstractAutowireCapableBeanFactory为例,其实现如下
@@Override
    public void autowireBean(Object existingBean) {
        //使用非单例bean定义,以避免将bean注册为依赖bean
        // Use non-singleton bean definition, to avoid registering bean as dependent bean.
        RootBeanDefinition bd = new RootBeanDefinition(ClassUtils.getUserClass(existingBean));
        Bean的作用域
        bd.setScope(BeanDefinition.SCOPE_PROTOTYPE);
        检查给定类在给定上下文中是否是缓存安全的,
        即它是由给定类加载器加载还是由其父级加载。类加载器
        bd.allowCaching = ClassUtils.isCacheSafe(bd.getBeanClass(), getBeanClassLoader());
        BeanWrapper bw = new BeanWrapperImpl(existingBean);
        初始化BeanRapper并创建
        initBeanWrapper(bw);
        实际上该方法的逻辑主要是在populateBean中。这个方法是Spring中一个重要的方法。用于装配Bean。主要是通过反射获取到我们new出来的对象的属性及注解,若是注解时Autowired、Value、Inject时,进行Bean组装。此方法执行完毕,我们new出来的方法就可以通过注解注入的bean进行操作了
        作者:小胖学编程
        链接:https://www.jianshu.com/p/14dd69b5c516
        来源:简书
        著作权归作者所有。商业转载请联系作者获得授权,非商业转载请注明出处。
        populateBean(bd.getBeanClass().getName(), bd, bw);
    }
Spring容器内部工作机制AbstractApplicationContext
org.springframework.context.support.AbstractApplicationContext
package org.springframework.context.support;
/**
* 使用模板方法设计模式,需要具体的子类来实现抽象方法。
*/
public abstract class AbstractApplicationContext extends DefaultResourceLoader
implements ConfigurableApplicationContext {
/**
* 在此工厂中,国际化消息 MessageSource 的 bean的名称。
* 如果没有提供消息,消息解析将委托给父节点。
* @see MessageSource
*/
public static final String MESSAGE_SOURCE_BEAN_NAME = "messageSource";
/**
* 在此工厂中,SpringBean 的生命周期LifecycleProcessor 的 bean的名称
* 如果没有提供,则使用DefaultLifecycleProcessor。
* @see org.springframework.context.LifecycleProcessor
* @see org.springframework.context.support.DefaultLifecycleProcessor
*/
public static final String LIFECYCLE_PROCESSOR_BEAN_NAME = "lifecycleProcessor";
/**
* 在此工厂中,应用事件多路广播器 的 bean的名称。
* 如果没有提供,则使用默认的simpleapplicationeventmultiaster。
* @see org.springframework.context.event.ApplicationEventMulticaster
* @see org.springframework.context.event.SimpleApplicationEventMulticaster
*/
public static final String APPLICATION_EVENT_MULTICASTER_BEAN_NAME = "applicationEventMulticaster";
static {
ContextClosedEvent.class.getName();
}
/** 这个类使用的logger。可用于子类。 */
protected final Log logger = LogFactory.getLog(getClass());
/** 此上下文的唯一id(如果有的话)。 */
private String id = ObjectUtils.identityToString(this);
/** 显示名称 */
private String displayName = ObjectUtils.identityToString(this);
/** 父上下文。 */
@Nullable
private ApplicationContext parent;
/** 此上下文使用的环境。 */
@Nullable
private ConfigurableEnvironment environment;
/** 应用于刷新的 BeanFactoryPostProcessors */
private final List<BeanFactoryPostProcessor> beanFactoryPostProcessors = new ArrayList<>();
/** 此上下文启动时的系统时间(毫秒)。 */
private long startupDate;
/** 指示此上下文当前是否处于活动状态的标志。 */
private final AtomicBoolean active = new AtomicBoolean();
/** 指示此上下文是否已关闭的标志。 */
private final AtomicBoolean closed = new AtomicBoolean();
/** 用于"刷新" 和 "销毁" 时的同步监视器(浅显是说就是当做锁) */
private final Object startupShutdownMonitor = new Object();
/** 如果已注册,则引用JVM关闭链接。 */
@Nullable
private Thread shutdownHook;
/** 此上下文使用的 ResourcePatternResolver 资源模式解析器 */
private ResourcePatternResolver resourcePatternResolver;
/** LifecycleProcessor 生命周期处理器,用于在此上下文中管理bean的生命周期。 */
@Nullable
private LifecycleProcessor lifecycleProcessor;
/** 我们将这个接口的实现委托给 MessageSource */
@Nullable
private MessageSource messageSource;
/** 事件发布所使用的助手类。 */
@Nullable
private ApplicationEventMulticaster applicationEventMulticaster;
/** 静态的、指定的 listeners 监听器Set集合. */
private final Set<ApplicationListener<?>> applicationListeners = new LinkedHashSet<>();
/** 早期发布的 ApplicationEvents 应用事件Set集合. */
@Nullable
private Set<ApplicationEvent> earlyApplicationEvents;
/** 创建一个没有父元素的新的AbstractApplicationContext。 */
public AbstractApplicationContext() {
this.resourcePatternResolver = getResourcePatternResolver();
}
/** 使用给定的父上下文来创建一个新的AbstractApplicationContext。 */
public AbstractApplicationContext(@Nullable ApplicationContext parent) {
this();
setParent(parent);
}
//---------------------------------------------------------------------
// ApplicationContext接口的实现
//---------------------------------------------------------------------
/**
* 设置此应用程序上下文的惟一id。
* 默认值是上下文实例的对象id,或者上下文bean的名称(如果上下文本身定义为bean的话)。
* @param id 上下文的唯一id
*/
@Override
public void setId(String id) {
this.id = id;
}
/** 获取此应用程序上下文的id。 */
@Override
public String getId() {
return this.id;
}
@Override
public String getApplicationName() {
return "";
}
/**
* 为这个上下文设置一个(显示)名称。
* 通常在具体上下文实现的初始化过程中完成。
* 默认值是上下文实例的对象id。
*/
public void setDisplayName(String displayName) {
// 设置显示的上下文名称不能为空
Assert.hasLength(displayName, "Display name must not be empty");
this.displayName = displayName;
}
/**
* 获取并返回此应用上下文的展示名称
* @return 此应用上下文的展示名称(非null)
*/
@Override
public String getDisplayName() {
return this.displayName;
}
/**
* 返回父上下文,如果没有父上下文,则返回 null。
* (返回null意为着,此应用上下文是整个应用上下文体系的根上下文)。
*/
@Override
@Nullable
public ApplicationContext getParent() {
return this.parent;
}
/**
* 为这个应用程序上下文设置 Environment 环境
* 默认值由 createEnvironment()方法决定。
* 用这个方法替换默认值不是唯一选择,还可通过 getEnvironment() 方法进行配置。
* 但不管在哪一种情况下,这些修改都应该在 refresh() 方法前执行。
* @see org.springframework.context.support.AbstractApplicationContext#createEnvironment
*/
@Override
public void setEnvironment(ConfigurableEnvironment environment) {
this.environment = environment;
}
/**
* 获取并返回此应用上下文的环境,如果为null,则通过 createEnvironment() 方法进行创建并返回。
*/
@Override
public ConfigurableEnvironment getEnvironment() {
if (this.environment == null) {
this.environment = createEnvironment();
}
return this.environment;
}
/**
* 创建并返回新的StandardEnvironment 标准环境。
* 子类可以重写此方法,以便提供自定义 ConfigurableEnvironment 可配置环境的实现。
*/
protected ConfigurableEnvironment createEnvironment() {
return new StandardEnvironment();
}
/**
* 如果此应用上下文已经可用,则将此上下文的内部bean工厂返回为AutowireCapableBeanFactory。
* @see #getBeanFactory()
*/
@Override
public AutowireCapableBeanFactory getAutowireCapableBeanFactory() throws IllegalStateException {
return getBeanFactory();
}
/** 在首次加载此上下文时返回时间戳(ms)。 */
@Override
public long getStartupDate() {
return this.startupDate;
}
/**
* 将给定的事件发布给所有监听器。
* 注意:监听器在 MessageSource 之后初始化,以便能够在监听器实现中访问它。
* 因此,MessageSource 实现不能发布事件。要发布的事件(可能是特定于应用程序或标准框架事件)
*/
@Override
public void publishEvent(ApplicationEvent event) {
publishEvent(event, null);
}
/**
* 将给定的事件发布给所有监听器。
* 注意:监听器在 MessageSource 之后初始化,以便能够在监听器实现中访问它。
* 因此,MessageSource 实现不能发布事件。
* 要发布的事件(可能是 ApplicationEvent 或要转换为 PayloadApplicationEvent 的有效负载对象)
*/
@Override
public void publishEvent(Object event) {
publishEvent(event, null);
}
/**
* 将给定的事件发布给所有监听器。
* @param event 要发布的事件(可能是 ApplicationEvent 或要转换为 PayloadApplicationEvent 的有效负载对象)
* @param eventType 可解析的事件类型(如果已知)(前面的文章已经提到过)
* @since 4.2
*/
protected void publishEvent(Object event, @Nullable ResolvableType eventType) {
Assert.notNull(event, "Event must not be null");
// 必要时将事件装饰为 ApplicationEvent
ApplicationEvent applicationEvent;
if (event instanceof ApplicationEvent) {
applicationEvent = (ApplicationEvent) event;
}
else {
applicationEvent = new PayloadApplicationEvent<>(this, event);
if (eventType == null) {
eventType = ((PayloadApplicationEvent) applicationEvent).getResolvableType();
}
}
// 如果可能的话,现在就进行多播——或者在初始化多播器之后延迟
if (this.earlyApplicationEvents != null) {
this.earlyApplicationEvents.add(applicationEvent);
}
else {
getApplicationEventMulticaster().multicastEvent(applicationEvent, eventType);
}
// 通过父上下文发布事件…
if (this.parent != null) {
if (this.parent instanceof AbstractApplicationContext) {
((AbstractApplicationContext) this.parent).publishEvent(event, eventType);
}
else {
this.parent.publishEvent(event);
}
}
}
/**
* 返回上下文使用的内部 ApplicationEventMulticaster 应用事件多路广播器
* @return 上下文使用的内部 ApplicationEventMulticaster 应用事件多路广播器(从不为null)
* @throws IllegalStateException 如果上下文尚未初始化
*/
ApplicationEventMulticaster getApplicationEventMulticaster() throws IllegalStateException {
if (this.applicationEventMulticaster == null) {
throw new IllegalStateException("ApplicationEventMulticaster not initialized - " +
"call 'refresh' before multicasting events via the context: " + this);
}
return this.applicationEventMulticaster;
}
/**
* 返回上下文使用的内部生命周期处理器。
* @return 内部生命周期处理器。 (从不为null)
* @throws IllegalStateException 如果上下文尚未初始化
*/
LifecycleProcessor getLifecycleProcessor() throws IllegalStateException {
if (this.lifecycleProcessor == null) {
throw new IllegalStateException("LifecycleProcessor not initialized - " +
"call 'refresh' before invoking lifecycle methods via the context: " + this);
}
return this.lifecycleProcessor;
}
/**
* 返回此 ResourcePatternResolver资源模式解析器,
* 用于将多个资源的位置按照模式解析到资源实例中。
* 默认是org.springframework.core.io.support.PathMatchingResourcePatternResolver。
* 支持ant风格的位置模式。
* 可以在子类中重写,用于扩展解析策略,例如在web环境中。在需要解决位置模式时不要调用此函数。
* 相反,调用上下文的getResources方法,它将委托给ResourcePatternResolver。
* @return 此应用上下文的 ResourcePatternResolver 资源模式解析器
* @see #getResources
* @see org.springframework.core.io.support.PathMatchingResourcePatternResolver
*/
protected ResourcePatternResolver getResourcePatternResolver() {
return new PathMatchingResourcePatternResolver(this);
}
//---------------------------------------------------------------------
// ConfigurableApplicationContext接口的实现
//---------------------------------------------------------------------
/**
* 设置此应用程序上下文的父上下文。
* 父级ApplicationContext#getEnvironment()环境是
* ConfigurableEnvironment#merge(ConfigurableEnvironment),如果父级非null,
* 并且它的环境是ConfigurableEnvironment的实例,那么它就会与这个(子级)应用程序上下文环境合并
* @see ConfigurableEnvironment#merge(ConfigurableEnvironment)
*/
@Override
public void setParent(@Nullable ApplicationContext parent) {
this.parent = parent;
if (parent != null) {
Environment parentEnvironment = parent.getEnvironment();
if (parentEnvironment instanceof ConfigurableEnvironment) {
getEnvironment().merge((ConfigurableEnvironment) parentEnvironment);
}
}
}
/** 添加Bean工厂后置处理器 */
@Override
public void addBeanFactoryPostProcessor(BeanFactoryPostProcessor postProcessor) {
Assert.notNull(postProcessor, "BeanFactoryPostProcessor must not be null");
this.beanFactoryPostProcessors.add(postProcessor);
}
/**
* 返回将应用到内部BeanFactory的BeanFactoryPostProcessors列表。
*/
public List<BeanFactoryPostProcessor> getBeanFactoryPostProcessors() {
return this.beanFactoryPostProcessors;
}
/** 添加应用上下文监听器 */
@Override
public void addApplicationListener(ApplicationListener<?> listener) {
Assert.notNull(listener, "ApplicationListener must not be null");
if (this.applicationEventMulticaster != null) {
this.applicationEventMulticaster.addApplicationListener(listener);
}
this.applicationListeners.add(listener);
}
/**
* 返回静态指定的ApplicationListeners集合.
*/
public Collection<ApplicationListener<?>> getApplicationListeners() {
return this.applicationListeners;
}
/**
* 加载或刷新一个持久化的配置,可能是XML文件、属性文件或关系数据库模式。
* 由于这是一种启动方法,如果失败,应该销毁已经创建的单例,以避免悬空资源。
* 换句话说,在调用该方法之后,要么全部实例化,要么完全不实例化。
* @throws 如果bean工厂无法初始化,则抛出 BeansException 异常
* @throws 如果已经初始化且不支持多次刷新,则会抛出 IllegalStateException 异常
*/
@Override
public void refresh() throws BeansException, IllegalStateException {
// 加载或刷新配置前的同步处理
synchronized (this.startupShutdownMonitor) {
// 为刷新而准备此上下文
prepareRefresh();
// 告诉子类去刷新内部bean工厂。
ConfigurableListableBeanFactory beanFactory = obtainFreshBeanFactory();
// 准备好bean工厂,以便在此上下文中使用。
prepareBeanFactory(beanFactory);
try {
// 允许在上下文子类中对bean工厂进行后置处理。
postProcessBeanFactory(beanFactory);
// 调用在上下文中注册为bean的工厂处理器。
invokeBeanFactoryPostProcessors(beanFactory);
// 注册拦截bean创建的bean处理器。
registerBeanPostProcessors(beanFactory);
// 初始化此上下文的 message resource 消息资源。
initMessageSource();
// 为这个上下文初始化事件多路广播器。
initApplicationEventMulticaster();
// 初始化特定上下文子类中的其他特殊bean。
onRefresh();
// 注册监听器(检查监听器的bean并注册它们)。
registerListeners();
// 实例化所有剩余的(非 lazy-init 懒初始化的)单例。
finishBeanFactoryInitialization(beanFactory);
// 最后一步: 发布相应的事件。
finishRefresh();
}
catch (BeansException ex) {
if (logger.isWarnEnabled()) {
logger.warn("Exception encountered during context initialization - " +
"cancelling refresh attempt: " + ex);
}
// 销毁已经创建的单例,以避免悬空资源。
destroyBeans();
// 重置 'active' 表示.
cancelRefresh(ex);
// 将异常传播给调用者。
throw ex;
}
finally {
// 重置Spring内核中的共用的缓存,因为我们可能再也不需要单例bean的元数据了……
resetCommonCaches();
}
}
}
/**
* 准备这个上下文来刷新、设置它的启动日期和活动标志以及执行属性源的任何初始化。
*/
protected void prepareRefresh() {
this.startupDate = System.currentTimeMillis();
this.closed.set(false);
this.active.set(true);
if (logger.isDebugEnabled()) {
if (logger.isTraceEnabled()) {
logger.trace("Refreshing " + this);
}
else {
logger.debug("Refreshing " + getDisplayName());
}
}
// 在此上下文环境中,初始化任何占位符处的属性资源
initPropertySources();
// 验证标记为必需的所有属性是否可解析
// 请参考 ConfigurablePropertyResolver#setRequiredProperties
getEnvironment().validateRequiredProperties();
// 允许在多路广播器可用时,就会发布初期 ApplicationEvents 应用事件的集合
this.earlyApplicationEvents = new LinkedHashSet<>();
}
/**
* 用实际实例替换任何存根属性源。
* @see org.springframework.core.env.PropertySource.StubPropertySource
* @see org.springframework.web.context.support.WebApplicationContextUtils#initServletPropertySources
*/
protected void initPropertySources() {
// 对于子类:默认情况下不执行任何操作。
}
/**
* 通知此上下文的子类去加载或刷新其内在的bean工厂
* @return 新的bean工厂实例
* @see #refreshBeanFactory()
* @see #getBeanFactory()
*/
protected ConfigurableListableBeanFactory obtainFreshBeanFactory() {
refreshBeanFactory();
return getBeanFactory();
}
/**
* 配置工厂的标准上下文的特征属性,
* 例如上下文的ClassLoader类加载器和post-processors后置处理器。
* @param beanFactory 要配置的bean工厂
*/
protected void prepareBeanFactory(ConfigurableListableBeanFactory beanFactory) {
// 告诉内部bean工厂使用上下文的类加载器等。
beanFactory.setBeanClassLoader(getClassLoader());
beanFactory.setBeanExpressionResolver(new StandardBeanExpressionResolver(beanFactory.getBeanClassLoader()));
beanFactory.addPropertyEditorRegistrar(new ResourceEditorRegistrar(this, getEnvironment()));
// 使用上下文回调配置bean工厂。
beanFactory.addBeanPostProcessor(new ApplicationContextAwareProcessor(this));
beanFactory.ignoreDependencyInterface(EnvironmentAware.class);
beanFactory.ignoreDependencyInterface(EmbeddedValueResolverAware.class);
beanFactory.ignoreDependencyInterface(ResourceLoaderAware.class);
beanFactory.ignoreDependencyInterface(ApplicationEventPublisherAware.class);
beanFactory.ignoreDependencyInterface(MessageSourceAware.class);
beanFactory.ignoreDependencyInterface(ApplicationContextAware.class);
// 在简单的工厂中,BeanFactory接口没有注册为可解析的类型。
// MessageSource注册(并发现自动)为一个bean。
beanFactory.registerResolvableDependency(BeanFactory.class, beanFactory);
beanFactory.registerResolvableDependency(ResourceLoader.class, this);
beanFactory.registerResolvableDependency(ApplicationEventPublisher.class, this);
beanFactory.registerResolvableDependency(ApplicationContext.class, this);
// 注册早期后置处理器,用于检测内部bean作为应用程序监听器。
beanFactory.addBeanPostProcessor(new ApplicationListenerDetector(this));
// 如何找到一个LoadTimeWeaver,那么就准备将后置处理器“织入”bean工厂
if (beanFactory.containsBean(LOAD_TIME_WEAVER_BEAN_NAME)) {
beanFactory.addBeanPostProcessor(new LoadTimeWeaverAwareProcessor(beanFactory));
// 为类型匹配设置临时类加载器。
beanFactory.setTempClassLoader(new ContextTypeMatchClassLoader(beanFactory.getBeanClassLoader()));
}
// 注册默认environment环境bean。
if (!beanFactory.containsLocalBean(ENVIRONMENT_BEAN_NAME)) {
beanFactory.registerSingleton(ENVIRONMENT_BEAN_NAME, getEnvironment());
}
if (!beanFactory.containsLocalBean(SYSTEM_PROPERTIES_BEAN_NAME)) {
beanFactory.registerSingleton(SYSTEM_PROPERTIES_BEAN_NAME, getEnvironment().getSystemProperties());
}
if (!beanFactory.containsLocalBean(SYSTEM_ENVIRONMENT_BEAN_NAME)) {
beanFactory.registerSingleton(SYSTEM_ENVIRONMENT_BEAN_NAME, getEnvironment().getSystemEnvironment());
}
}
/**
* 在标准初始化后修改应用程序上下文的内部bean工厂。
* 所有bean定义都将被加载,但是没有bean会被实例化。
* 这允许在某些应用上下文实现中注册特殊的BeanPostProcessors等。
* @param beanFactory 应用环境下的Bean工厂
*/
protected void postProcessBeanFactory(ConfigurableListableBeanFactory beanFactory) {
}
/**
* 实例化并调用所有已注册的BeanFactoryPostProcessor 的 bean,如果已给出顺序,请按照顺序。
* 必须在单实例实例化之前调用。
*/
protected void invokeBeanFactoryPostProcessors(ConfigurableListableBeanFactory beanFactory) {
PostProcessorRegistrationDelegate.invokeBeanFactoryPostProcessors(beanFactory, getBeanFactoryPostProcessors());
// 如何找到一个LoadTimeWeaver,那么就准备将后置处理器“织入”bean工厂
// (例如,一个 @Bean 方法通过ConfigurationClassPostProcessor来注册)
if (beanFactory.getTempClassLoader() == null && beanFactory.containsBean(LOAD_TIME_WEAVER_BEAN_NAME)) {
beanFactory.addBeanPostProcessor(new LoadTimeWeaverAwareProcessor(beanFactory));
beanFactory.setTempClassLoader(new ContextTypeMatchClassLoader(beanFactory.getBeanClassLoader()));
}
}
/**
* BeanPostProcessor 的 bean,如果给出显式顺序,请按照顺序。
* 必须在应用程序bean的任何实例化之前调用。
*/
protected void registerBeanPostProcessors(ConfigurableListableBeanFactory beanFactory) {
PostProcessorRegistrationDelegate.registerBeanPostProcessors(beanFactory, this);
}
/**
* 初始化MessageSource。
* 如果在此上下文中未定义国际化资源,则使用父上下文的国际化资源。
*/
protected void initMessageSource() {
ConfigurableListableBeanFactory beanFactory = getBeanFactory();
if (beanFactory.containsLocalBean(MESSAGE_SOURCE_BEAN_NAME)) {
this.messageSource = beanFactory.getBean(MESSAGE_SOURCE_BEAN_NAME, MessageSource.class);
// 使用此上下文的 MessageSource 知道父上下文的 MessageSource.
if (this.parent != null && this.messageSource instanceof HierarchicalMessageSource) {
HierarchicalMessageSource hms = (HierarchicalMessageSource) this.messageSource;
if (hms.getParentMessageSource() == null) {
// 如果没有已注册的父MessageSource,则只将父上下文设置为父MessageSource
// registered already.
hms.setParentMessageSource(getInternalParentMessageSource());
}
}
if (logger.isTraceEnabled()) {
logger.trace("Using MessageSource [" + this.messageSource + "]");
}
}
else {
// 使用空MessageSource可以接受getMessage方法的调用。
DelegatingMessageSource dms = new DelegatingMessageSource();
dms.setParentMessageSource(getInternalParentMessageSource());
this.messageSource = dms;
beanFactory.registerSingleton(MESSAGE_SOURCE_BEAN_NAME, this.messageSource);
if (logger.isTraceEnabled()) {
logger.trace("No '" + MESSAGE_SOURCE_BEAN_NAME + "' bean, using [" + this.messageSource + "]");
}
}
}
/**
* 初始化ApplicationEventMulticaster。
* 如果在上下文中没有定义,则使用SimpleApplicationEventMulticaster。
* @see org.springframework.context.event.SimpleApplicationEventMulticaster
*/
protected void initApplicationEventMulticaster() {
ConfigurableListableBeanFactory beanFactory = getBeanFactory();
if (beanFactory.containsLocalBean(APPLICATION_EVENT_MULTICASTER_BEAN_NAME)) {
this.applicationEventMulticaster =
beanFactory.getBean(APPLICATION_EVENT_MULTICASTER_BEAN_NAME, ApplicationEventMulticaster.class);
if (logger.isTraceEnabled()) {
logger.trace("Using ApplicationEventMulticaster [" + this.applicationEventMulticaster + "]");
}
}
else {
this.applicationEventMulticaster = new SimpleApplicationEventMulticaster(beanFactory);
beanFactory.registerSingleton(APPLICATION_EVENT_MULTICASTER_BEAN_NAME, this.applicationEventMulticaster);
if (logger.isTraceEnabled()) {
logger.trace("No '" + APPLICATION_EVENT_MULTICASTER_BEAN_NAME + "' bean, using " +
"[" + this.applicationEventMulticaster.getClass().getSimpleName() + "]");
}
}
}
/**
* 初始化LifecycleProcessor.
* 如果在当前上下文中没有定义,则使用 DefaultLifecycleProcessor
* @see org.springframework.context.support.DefaultLifecycleProcessor
*/
protected void initLifecycleProcessor() {
ConfigurableListableBeanFactory beanFactory = getBeanFactory();
if (beanFactory.containsLocalBean(LIFECYCLE_PROCESSOR_BEAN_NAME)) {
this.lifecycleProcessor =
beanFactory.getBean(LIFECYCLE_PROCESSOR_BEAN_NAME, LifecycleProcessor.class);
if (logger.isTraceEnabled()) {
logger.trace("Using LifecycleProcessor [" + this.lifecycleProcessor + "]");
}
}
else {
DefaultLifecycleProcessor defaultProcessor = new DefaultLifecycleProcessor();
defaultProcessor.setBeanFactory(beanFactory);
this.lifecycleProcessor = defaultProcessor;
beanFactory.registerSingleton(LIFECYCLE_PROCESSOR_BEAN_NAME, this.lifecycleProcessor);
if (logger.isTraceEnabled()) {
logger.trace("No '" + LIFECYCLE_PROCESSOR_BEAN_NAME + "' bean, using " +
"[" + this.lifecycleProcessor.getClass().getSimpleName() + "]");
}
}
}
/**
* 模板方法,可以重写以添加特定于上下文的刷新工作。
* 在特殊实例实例化之前调用特殊bean的初始化。
* 此实现为空。
* @throws BeansException in case of errors
* @see #refresh()
*/
protected void onRefresh() throws BeansException {
// 对于子类:默认情况下不做任何事情。
}
/**
* 添加应用程序监听器作为监听器的bean。
* 不影响其他监听器,可以在没有bean的情况下添加。
*/
protected void registerListeners() {
// 首先注册静态的指定的监听器。
for (ApplicationListener<?> listener : getApplicationListeners()) {
getApplicationEventMulticaster().addApplicationListener(listener);
}
// 不要在这里初始化factorybean:我们需要保留所有未初始化的常规bean,让后处理器应用到它们!
String[] listenerBeanNames = getBeanNamesForType(ApplicationListener.class, true, false);
for (String listenerBeanName : listenerBeanNames) {
getApplicationEventMulticaster().addApplicationListenerBean(listenerBeanName);
}
// 现在我们最终拥有一个多路广播器来发布早期的应用程序事件......
Set<ApplicationEvent> earlyEventsToProcess = this.earlyApplicationEvents;
this.earlyApplicationEvents = null;
if (earlyEventsToProcess != null) {
for (ApplicationEvent earlyEvent : earlyEventsToProcess) {
getApplicationEventMulticaster().multicastEvent(earlyEvent);
}
}
}
/** 完成此上下文的bean工厂的初始化,初始化所有剩余的单例bean。 */
protected void finishBeanFactoryInitialization(ConfigurableListableBeanFactory beanFactory) {
// 初始化此上下文的转换服务conversion service。
if (beanFactory.containsBean(CONVERSION_SERVICE_BEAN_NAME) &&
beanFactory.isTypeMatch(CONVERSION_SERVICE_BEAN_NAME, ConversionService.class)) {
beanFactory.setConversionService(
beanFactory.getBean(CONVERSION_SERVICE_BEAN_NAME, ConversionService.class));
}
// 如果没有bean后置处理器post-processor,则注册默认嵌入式值解析器
// (例如像一个 PropertyPlaceholderConfigurer bean) 以前任何注册过:
// 此时,主要用于注释属性值的解析。
if (!beanFactory.hasEmbeddedValueResolver()) {
beanFactory.addEmbeddedValueResolver(strVal -> getEnvironment().resolvePlaceholders(strVal));
}
// 尽早初始化LoadTimeWeaverAware bean,以便尽早注册它们的transformers。
String[] weaverAwareNames = beanFactory.getBeanNamesForType(LoadTimeWeaverAware.class, false, false);
for (String weaverAwareName : weaverAwareNames) {
getBean(weaverAwareName);
}
// 停止使用临时类加载器进行类型匹配。
beanFactory.setTempClassLoader(null);
// 允许缓存所有bean定义元数据,不希望有进一步的更改。
beanFactory.freezeConfiguration();
// 实例化所有剩余的(non-lazy-init非延时加载的)单例。
beanFactory.preInstantiateSingletons();
}
/**
* 完成此上下文的刷新,调用LifecycleProcessor的onRefresh()方法
* 并发布org.springframework.context.event.ContextRefreshedEvent 事件.
*/
protected void finishRefresh() {
// 清除上下文级别的资源缓存(如扫描的ASM元数据)。
clearResourceCaches();
// 为这个上下文初始化生命周期处理器。
initLifecycleProcessor();
// 首先将刷新传播到生命周期处理器。
getLifecycleProcessor().onRefresh();
// 发布最终事件。
publishEvent(new ContextRefreshedEvent(this));
// 如何处于激活状态,将参与到 LiveBeansView MBean 中
LiveBeansView.registerApplicationContext(this);
}
/**
* 取消此上下文的刷新尝试,在抛出异常后重置 active 标志。
* @param ex 导致取消的异常
*/
protected void cancelRefresh(BeansException ex) {
this.active.set(false);
}
/**
* 重置Spring的共同的反射元数据缓存,
* 特别是 ReflectionUtils, AnnotationUtils, ResolvableType
* 和 CachedIntrospectionResults 缓存
* @since 4.2
* @see ReflectionUtils#clearCache()
* @see AnnotationUtils#clearCache()
* @see ResolvableType#clearCache()
* @see CachedIntrospectionResults#clearClassLoader(ClassLoader)
*/
protected void resetCommonCaches() {
ReflectionUtils.clearCache();
AnnotationUtils.clearCache();
ResolvableType.clearCache();
CachedIntrospectionResults.clearClassLoader(getClassLoader());
}
/**
* 向JVM运行时注册一个关闭链接,在JVM关闭时关闭这个上下文,除非此时它已经关闭。
* 委托给 doClose() 方法去关闭,用于实际的关闭过程。
* @see Runtime#addShutdownHook
* @see #close()
* @see #doClose()
*/
@Override
public void registerShutdownHook() {
if (this.shutdownHook == null) {
// 尚未注册关机链接
this.shutdownHook = new Thread() {
@Override
public void run() {
synchronized (startupShutdownMonitor) {
doClose();
}
}
};
Runtime.getRuntime().addShutdownHook(this.shutdownHook);
}
}
/**
* 用于销毁此实例的回调,最初附加到 DisposableBean 的实现(spring 5.0中不再存在)。
* close() 方法是关闭 ApplicationContext 本应用上下文的方法,
* 该destroy()方法只是委托给close()方法。
* @deprecated 从Spring Framework 5.0开始,本方法被标记为过时,而支持 close()方法
*/
@Deprecated
public void destroy() {
close();
}
/**
* 关闭此应用程序上下文,销毁其bean工厂中的所有bean。
* 实际关闭过程是委派 doClose()方法。
* 同时,如果已在JVM注册了关闭链接,也删除其关闭链接,因为它不再需要了。
* @see #doClose()
* @see #registerShutdownHook()
*/
@Override
public void close() {
synchronized (this.startupShutdownMonitor) {
doClose();
// 如果已在JVM注册了关闭链接,现在我们不再需要它了:
// 我们已经明确地关闭了上下文。
if (this.shutdownHook != null) {
try {
Runtime.getRuntime().removeShutdownHook(this.shutdownHook);
}
catch (IllegalStateException ex) {
// 忽略已经关闭的VM
}
}
}
}
/**
* 实际上执行上下文关闭:
* 发布ContextClosedEvent山下文关闭事件,并销毁此应用程序上下文的bean工厂中的单例对象。
* 如果有的话,则调用 close() 方法和一个JVM关闭链接。
* @see #destroyBeans()
* @see #close()
* @see #registerShutdownHook()
*/
protected void doClose() {
if (this.active.get() && this.closed.compareAndSet(false, true)) {
if (logger.isDebugEnabled()) {
logger.debug("Closing " + this);
}
LiveBeansView.unregisterApplicationContext(this);
try {
// 发布上下文关闭事件
publishEvent(new ContextClosedEvent(this));
}
catch (Throwable ex) {
logger.warn("Exception thrown from ApplicationListener handling ContextClosedEvent", ex);
}
// 停止所有 Lifecycle bean,以避免单个地销毁期间而产生延迟。
if (this.lifecycleProcessor != null) {
try {
this.lifecycleProcessor.onClose();
}
catch (Throwable ex) {
logger.warn("Exception thrown from LifecycleProcessor on context close", ex);
}
}
// 销毁上下文的bean工厂中所有缓存的单例对象。
destroyBeans();
// 关闭该上下文本身的状态。
closeBeanFactory();
// 让子类做一些最后的清理…
onClose();
// 设置此应用上下文为非活跃状态
this.active.set(false);
}
}
/**
* 模板方法,用于销毁该上下文管理的所有bean。
* 调用 DisposableBean.destroy() 或 指定的“destroy-method”销毁方法,
* 默认销毁将此实现的上下文中所有缓存的单例对象。
* 可以重写,以在标准单例销毁之前或之后添加上下文特定的bean销毁步骤,
* 同时上下文的BeanFactory仍然处于活动状态。
* @see #getBeanFactory()
* @see org.springframework.beans.factory.config.ConfigurableBeanFactory#destroySingletons()
*/
protected void destroyBeans() {
getBeanFactory().destroySingletons();
}
/**
* 可以重写以添加特定于上下文的关闭工作的模板方法。
* 默认实现为空。
* 在此上下文的BeanFactory已被关闭后,调用 doClose() 方法做最后的关闭过程.
* 如果在BeanFactory仍然激活状态时,需要执行自定义关闭逻辑,
* 则重重写 destroyBeans() 方法
*/
protected void onClose() {
// 对于子类:默认不做任何事情。
}
@Override
public boolean isActive() {
return this.active.get();
}
/**
* 声明此上下文的BeanFactory当前是活动的,如果不是,则抛出 IllegalStateException。
* 由所有依赖于活动上下文的 BeanFactory 委托方法调用,特别是所有bean访问方法。
* 默认实现检查 isActive() 这个上下文的“active”状态。
* 可能被覆盖用于更具体的检查,或用于如果 getBeanFactory() 本身在这种情况下抛出异常。
*/
protected void assertBeanFactoryActive() {
if (!this.active.get()) {
if (this.closed.get()) {
throw new IllegalStateException(getDisplayName() + " has been closed already");
}
else {
throw new IllegalStateException(getDisplayName() + " has not been refreshed yet");
}
}
}
//---------------------------------------------------------------------
// BeanFactory 接口的实现
//---------------------------------------------------------------------
@Override
public Object getBean(String name) throws BeansException {
assertBeanFactoryActive();
return getBeanFactory().getBean(name);
}
@Override
public <T> T getBean(String name, Class<T> requiredType) throws BeansException {
assertBeanFactoryActive();
return getBeanFactory().getBean(name, requiredType);
}
@Override
public Object getBean(String name, Object... args) throws BeansException {
assertBeanFactoryActive();
return getBeanFactory().getBean(name, args);
}
@Override
public <T> T getBean(Class<T> requiredType) throws BeansException {
assertBeanFactoryActive();
return getBeanFactory().getBean(requiredType);
}
@Override
public <T> T getBean(Class<T> requiredType, Object... args) throws BeansException {
assertBeanFactoryActive();
return getBeanFactory().getBean(requiredType, args);
}
@Override
public <T> ObjectProvider<T> getBeanProvider(Class<T> requiredType) {
assertBeanFactoryActive();
return getBeanFactory().getBeanProvider(requiredType);
}
@Override
public <T> ObjectProvider<T> getBeanProvider(ResolvableType requiredType) {
assertBeanFactoryActive();
return getBeanFactory().getBeanProvider(requiredType);
}
@Override
public boolean containsBean(String name) {
return getBeanFactory().containsBean(name);
}
@Override
public boolean isSingleton(String name) throws NoSuchBeanDefinitionException {
assertBeanFactoryActive();
return getBeanFactory().isSingleton(name);
}
@Override
public boolean isPrototype(String name) throws NoSuchBeanDefinitionException {
assertBeanFactoryActive();
return getBeanFactory().isPrototype(name);
}
@Override
public boolean isTypeMatch(String name, ResolvableType typeToMatch) throws NoSuchBeanDefinitionException {
assertBeanFactoryActive();
return getBeanFactory().isTypeMatch(name, typeToMatch);
}
@Override
public boolean isTypeMatch(String name, Class<?> typeToMatch) throws NoSuchBeanDefinitionException {
assertBeanFactoryActive();
return getBeanFactory().isTypeMatch(name, typeToMatch);
}
@Override
@Nullable
public Class<?> getType(String name) throws NoSuchBeanDefinitionException {
assertBeanFactoryActive();
return getBeanFactory().getType(name);
}
@Override
public String[] getAliases(String name) {
return getBeanFactory().getAliases(name);
}
//---------------------------------------------------------------------
// ListableBeanFactory 接口的实现
//---------------------------------------------------------------------
@Override
public boolean containsBeanDefinition(String beanName) {
return getBeanFactory().containsBeanDefinition(beanName);
}
@Override
public int getBeanDefinitionCount() {
return getBeanFactory().getBeanDefinitionCount();
}
@Override
public String[] getBeanDefinitionNames() {
return getBeanFactory().getBeanDefinitionNames();
}
@Override
public String[] getBeanNamesForType(ResolvableType type) {
assertBeanFactoryActive();
return getBeanFactory().getBeanNamesForType(type);
}
@Override
public String[] getBeanNamesForType(@Nullable Class<?> type) {
assertBeanFactoryActive();
return getBeanFactory().getBeanNamesForType(type);
}
@Override
public String[] getBeanNamesForType(@Nullable Class<?> type, boolean includeNonSingletons, boolean allowEagerInit) {
assertBeanFactoryActive();
return getBeanFactory().getBeanNamesForType(type, includeNonSingletons, allowEagerInit);
}
@Override
public <T> Map<String, T> getBeansOfType(@Nullable Class<T> type) throws BeansException {
assertBeanFactoryActive();
return getBeanFactory().getBeansOfType(type);
}
@Override
public <T> Map<String, T> getBeansOfType(@Nullable Class<T> type, boolean includeNonSingletons, boolean allowEagerInit)
throws BeansException {
assertBeanFactoryActive();
return getBeanFactory().getBeansOfType(type, includeNonSingletons, allowEagerInit);
}
@Override
public String[] getBeanNamesForAnnotation(Class<? extends Annotation> annotationType) {
assertBeanFactoryActive();
return getBeanFactory().getBeanNamesForAnnotation(annotationType);
}
@Override
public Map<String, Object> getBeansWithAnnotation(Class<? extends Annotation> annotationType)
throws BeansException {
assertBeanFactoryActive();
return getBeanFactory().getBeansWithAnnotation(annotationType);
}
@Override
@Nullable
public <A extends Annotation> A findAnnotationOnBean(String beanName, Class<A> annotationType)
throws NoSuchBeanDefinitionException{
assertBeanFactoryActive();
return getBeanFactory().findAnnotationOnBean(beanName, annotationType);
}
//---------------------------------------------------------------------
// HierarchicalBeanFactory 接口的实现
//---------------------------------------------------------------------
@Override
@Nullable
public BeanFactory getParentBeanFactory() {
return getParent();
}
@Override
public boolean containsLocalBean(String name) {
return getBeanFactory().containsLocalBean(name);
}
/**
* 如果父上下文实现了ConfigurableApplicationContext接口,
* 则返回父上下文的内部bean工厂;否则,返回父上下文本身。
* @see org.springframework.context.ConfigurableApplicationContext#getBeanFactory
*/
@Nullable
protected BeanFactory getInternalParentBeanFactory() {
return (getParent() instanceof ConfigurableApplicationContext ?
((ConfigurableApplicationContext) getParent()).getBeanFactory() : getParent());
}
//---------------------------------------------------------------------
// MessageSource 接口的实现
//---------------------------------------------------------------------
@Override
public String getMessage(String code, @Nullable Object[] args, @Nullable String defaultMessage, Locale locale) {
return getMessageSource().getMessage(code, args, defaultMessage, locale);
}
@Override
public String getMessage(String code, @Nullable Object[] args, Locale locale) throws NoSuchMessageException {
return getMessageSource().getMessage(code, args, locale);
}
@Override
public String getMessage(MessageSourceResolvable resolvable, Locale locale) throws NoSuchMessageException {
return getMessageSource().getMessage(resolvable, locale);
}
/**
* 返回上下文使用的内部 MessageSource。
* @return 此上下文内部的 MessageSource (非 null})
* @throws IllegalStateException 如果上下文尚未初始化
*/
private MessageSource getMessageSource() throws IllegalStateException {
if (this.messageSource == null) {
throw new IllegalStateException("MessageSource not initialized - " +
"call 'refresh' before accessing messages via the context: " + this);
}
return this.messageSource;
}
/**
* 如果父上下文也是AbstractApplicationContext抽象类,则返回父上下文的内部 MessageSource;
* 否则,返回父上下文本身。
*/
@Nullable
protected MessageSource getInternalParentMessageSource() {
return (getParent() instanceof AbstractApplicationContext ?
((AbstractApplicationContext) getParent()).messageSource : getParent());
}
//---------------------------------------------------------------------
// ResourcePatternResolver 接口的实现
//---------------------------------------------------------------------
@Override
public Resource[] getResources(String locationPattern) throws IOException {
return this.resourcePatternResolver.getResources(locationPattern);
}
//---------------------------------------------------------------------
// Lifecycle 接口的实现
//---------------------------------------------------------------------
@Override
public void start() {
getLifecycleProcessor().start();
publishEvent(new ContextStartedEvent(this));
}
@Override
public void stop() {
getLifecycleProcessor().stop();
publishEvent(new ContextStoppedEvent(this));
}
@Override
public boolean isRunning() {
return (this.lifecycleProcessor != null && this.lifecycleProcessor.isRunning());
}
//---------------------------------------------------------------------
// 必须由子类实现的抽象方法
//---------------------------------------------------------------------
/**
* 子类必须实现此方法来执行实际配置的加载。
* 在任何其他初始化工作之前,可通过 refresh() 调用此方法。
* 子类要么创建一个新的bean工厂并持有对它的引用,
* 要么返回一个它持有的BeanFactory实例。
* 在后一种情况下,如果多次刷新上下文,它通常会抛出一个IllegalStateException。
* @throws BeansException 如果bean工厂的初始化失败
* @throws IllegalStateException 如果已经初始化并且不支持多次刷新尝试
*/
protected abstract void refreshBeanFactory() throws BeansException, IllegalStateException;
/**
* 子类必须实现此方法来释放它们内部bean工厂。
* 在所有其他关闭工作之后, close() 将调用此方法。
* 永远不要抛出异常,而是日志关闭失败。
*/
protected abstract void closeBeanFactory();
/**
* 子类必须在这里返回其内部bean工厂。
* 它们应该有效地实现查找,这样就可以重复调用查找,而不会影响性能。
* 注意:在返回内部bean工厂之前,子类应该检查上下文是否仍然是活动的。
* 一旦上下文关闭,内部工厂通常被认为不可用。
* @return 此应用上下文的内部bean工厂(非null)
* @throws IllegalStateException 如果上下文还没有包含内部bean工厂(通常是 refresh()}从未被调用),或者上下文已经被关闭
* @see #refreshBeanFactory()
* @see #closeBeanFactory()
*/
@Override
public abstract ConfigurableListableBeanFactory getBeanFactory() throws IllegalStateException;
/** 返回关于此上下文的信息。 */
@Override
public String toString() {
StringBuilder sb = new StringBuilder(getDisplayName());
sb.append(", started on ").append(new Date(getStartupDate()));
ApplicationContext parent = getParent();
if (parent != null) {
sb.append(", parent: ").append(parent.getDisplayName());
}
return sb.toString();
}
getBeansWithAnnotation方法实例:
XXLJOB实际使用注解使用@JobHandler标识是一个job handler,当XXLJOB在执行AOP方法时,扫描注解执行handle方法
@Around("pointcut()")
    public Object handle(ProceedingJoinPoint joinPoint) throws Throwable {
        MDC.put(RequestUtil.REQUEST_TRACEID, RequestUtil.getRequestId());
        Object result= joinPoint.proceed();
        MDC.clear();
        return result;
    }
再执行Executor加载jobhandler时执行IJobHandler newJobHandler = XxlJobExecutor.loadJobHandler(triggerParam.getExecutorHandler());调佣start方法初始化
 @Override
    public void start() throws Exception {

        // init JobHandler Repository
        initJobHandlerRepository(applicationContext);

        // refresh GlueFactory
        GlueFactory.refreshInstance(1);


        // super start
        super.start();
    }

private void initJobHandlerRepository(ApplicationContext applicationContext){
        if (applicationContext == null) {
            return;
        }

        // init job handler action
        Map<String, Object> serviceBeanMap = applicationContext.getBeansWithAnnotation(JobHandler.class);

        if (serviceBeanMap!=null && serviceBeanMap.size()>0) {
            for (Object serviceBean : serviceBeanMap.values()) {
                if (serviceBean instanceof IJobHandler){
                    String name = serviceBean.getClass().getAnnotation(JobHandler.class).value();
                    IJobHandler handler = (IJobHandler) serviceBean;
                    if (loadJobHandler(name) != null) {
                        throw new RuntimeException("xxl-job jobhandler naming conflicts.");
                    }
                    registJobHandler(name, handler);
                }
            }
        }
    }

初始化动作
 // init job handler action
Map<String, Object> serviceBeanMap = applicationContext.getBeansWithAnnotation(JobHandler.class);
AnnotationConfigWebApplicationContext
AnnotationConfigWebApplicationContext-->WebApplicationContext-->ApplicationContext
核心方法:loadBeanDefinitions
    @Override
    protected void loadBeanDefinitions(DefaultListableBeanFactory beanFactory) {
        //加载Bean
        AnnotatedBeanDefinitionReader reader = getAnnotatedBeanDefinitionReader(beanFactory);
        //扫描注解
        ClassPathBeanDefinitionScanner scanner = getClassPathBeanDefinitionScanner(beanFactory);
        //装配Bean
        BeanNameGenerator beanNameGenerator = getBeanNameGenerator();
        if (beanNameGenerator != null) {
            reader.setBeanNameGenerator(beanNameGenerator);
            scanner.setBeanNameGenerator(beanNameGenerator);
            //注册Bean
            beanFactory.registerSingleton(AnnotationConfigUtils.CONFIGURATION_BEAN_NAME_GENERATOR, beanNameGenerator);
        }

        ScopeMetadataResolver scopeMetadataResolver = getScopeMetadataResolver();
        if (scopeMetadataResolver != null) {
            reader.setScopeMetadataResolver(scopeMetadataResolver);
            scanner.setScopeMetadataResolver(scopeMetadataResolver);
        }

        if (!this.annotatedClasses.isEmpty()) {
            if (logger.isDebugEnabled()) {
                logger.debug("Registering annotated classes: [" +
                        StringUtils.collectionToCommaDelimitedString(this.annotatedClasses) + "]");
            }
            //注册Bean
            reader.register(ClassUtils.toClassArray(this.annotatedClasses));
        }

        if (!this.basePackages.isEmpty()) {
            if (logger.isDebugEnabled()) {
                logger.debug("Scanning base packages: [" +
                        StringUtils.collectionToCommaDelimitedString(this.basePackages) + "]");
            }
            //扫描指定基包
            scanner.scan(StringUtils.toStringArray(this.basePackages));
        }

        String[] configLocations = getConfigLocations();
        if (configLocations != null) {
            for (String configLocation : configLocations) {
                try {
                    Class<?> clazz = ClassUtils.forName(configLocation, getClassLoader());
                    if (logger.isTraceEnabled()) {
                        logger.trace("Registering [" + configLocation + "]");
                    }
                    reader.register(clazz);
                }
                catch (ClassNotFoundException ex) {
                    if (logger.isTraceEnabled()) {
                        logger.trace("Could not load class for config location [" + configLocation +
                                "] - trying package scan. " + ex);
                    }
                    int count = scanner.scan(configLocation);
                    if (count == 0 && logger.isDebugEnabled()) {
                        logger.debug("No annotated classes found for specified class/package [" + configLocation + "]");
                    }
                }
            }
        }
    }
BeanPostProcessor(后置处理器)
public interface BeanPostProcessor {

    @Nullable
    default Object postProcessBeforeInitialization(Object bean, String beanName) throws BeansException {
        return bean;
    }

    @Nullable
    default Object postProcessAfterInitialization(Object bean, String beanName) throws BeansException {
        return bean;
    }

}
在上面的context中随处可见对BeanPostProcessor的方法调用,用于检查标记接口或用代理封装,在Bean对象在实例化和依赖注入完毕后调用,第三方扩展功能均会实现此接口,在Bean的初始化时,通过InitializingBean来调用afterPropertiesSet方法。
ApplicationContextAware
在某些特殊的情况下,Bean需要实现某个功能,但该功能必须借助于Spring容器才能实现,此时就必须让该Bean先获取Spring容器,然后借助于Spring容器实现该功能。为了让Bean获取它所在的Spring容器,可以让该Bean实现ApplicationContextAware接口。ApplicationContextAware 通过它Spring容器会自动把上下文环境对象调用ApplicationContextAware接口中的setApplicationContext方法。在ApplicationContextAware的实现类中,就可以通过这个上下文环境对象得到Spring容器中的Bean。看到—Aware就知道是干什么的了,就是属性注入的,但是这个ApplicationContextAware的不同地方在于,实现了这个接口的bean,当spring容器初始化的时候,会自动的将ApplicationContext注入进来。
public interface ApplicationContextAware extends Aware {
    /*
        设置此对象在其中运行的ApplicationContext。通常,此调用将用于初始化对象。
    */
    void setApplicationContext(ApplicationContext applicationContext) throws BeansException;
}

@Component
public class SpringContextUtil implements ApplicationContextAware {
    private static ApplicationContext applicationContext;

    @Override
    public void setApplicationContext(ApplicationContext context) throws BeansException {
        //setContext
        applicationContext = context;
    }

    public static ApplicationContext getApplicationContext() {
        return applicationContext;
    }
    //获取Bean
    public static <T> T getBean(Class<T> requiredType){
        return getApplicationContext().getBean(requiredType);
    }
    public static <T> T getBean(String name){
        return (T) getApplicationContext().getBean(name);
    }
}
ResourceLoaderAware
ResourceLoaderAware是特殊的标记接口,它希望拥有一个ResourceLoader 引用的对象。
public interface ResourceLoaderAware {
   void setResourceLoader(ResourceLoader resourceLoader);
}
当实现了 ResourceLoaderAware接口的类部署到application context(比如受Spring管理的bean)中时,它会被application context识别为 ResourceLoaderAware。 接着application context会调用setResourceLoader(ResourceLoader)方法,并把自身作为参数传入该方法(记住,所有Spring里的application context都实现了ResourceLoader接口)。
既然 ApplicationContext 就是ResourceLoader,那么该bean就可以实现 ApplicationContextAware接口并直接使用所提供的application context来载入资源,但是通常更适合使用特定的满足所有需要的 ResourceLoader实现。 这样一来,代码只需要依赖于可以看作辅助接口的资源载入接口,而不用依赖于整个Spring ApplicationContext 接口。
从Spring 2.5开始, 你可以使用ResourceLoader 的自动装配来代替实现 ResourceLoaderAware 接口。“传统的” constructor及 byType的自动装配模式 (第 3.3.5 节 “自动装配(autowire)协作者”已有论述)现在可以分别为构造方法参数及setter方法参数提供 ResourceLoader 类型的依赖。请使用新式的基于注解的自动装配特性以提供更大的灵活性(包括装配属性及多个方法参数的能力)。在这种情况下,只要属性、构造方法或者方法被 @Autowired注解修饰,ResourceLoader 就会被装配到需要ResourceLoader类型的属性、构造方法参数或者方法参数中
Servlet与HttpServlet
类图标明很是明显,在这个图中展示了servlet,tomcat,Springboot的关系,完美解释了那句Springboot是内嵌了tomcat的嵌入式引擎,嵌入式容器的说法~
而HttpServlet即是大部分请求的处理对象,嵌入式引擎---->嵌入式容器---->webfilter---->weblistener
javax.servlet.ServletContext#addServlet(java.lang.String, java.lang.Class<? extends javax.servlet.Servlet>)返回一个ServletRegistration对象,可用于进一步
配置已注册的servlet
javax.servlet.ServletRegistration
public interface ServletRegistration extends Registration {

    /**
     * TODO
     * @param urlPatterns The URL patterns that this Servlet should be mapped to
     * @return TODO
     * @throws IllegalArgumentException if urlPattern is null or empty
     * @throws IllegalStateException if the associated ServletContext has
     *                                  already been initialised
     */URL必须映射
    public Set<String> addMapping(String... urlPatterns);

    public Collection<String> getMappings();

    public String getRunAsRole();

    public static interface Dynamic
    extends ServletRegistration, Registration.Dynamic {
        public void setLoadOnStartup(int loadOnStartup);
        public Set<String> setServletSecurity(ServletSecurityElement constraint);
        public void setMultipartConfig(MultipartConfigElement multipartConfig);
        public void setRunAsRole(String roleName);
    }
}
思考:为什么Applacationcontext会有那么多重载方法?
 @Override
    public ServletRegistration.Dynamic addServlet(String servletName, String className) {
        return addServlet(servletName, className, null, null);
    }


    @Override
    public ServletRegistration.Dynamic addServlet(String servletName, Servlet servlet) {
        return addServlet(servletName, null, servlet, null);
    }


    @Override
    public ServletRegistration.Dynamic addServlet(String servletName,
            Class<? extends Servlet> servletClass) {
        return addServlet(servletName, servletClass.getName(), null, null);
    }
--用在不同场景下解决同一类问题
而在HttpServlet中的关键方法service可看到平时请求接口的所有方法
    private static final String METHOD_DELETE = "DELETE";
    private static final String METHOD_HEAD = "HEAD";
    private static final String METHOD_GET = "GET";
    private static final String METHOD_OPTIONS = "OPTIONS";
    private static final String METHOD_POST = "POST";
    private static final String METHOD_PUT = "PUT";
    private static final String METHOD_TRACE = "TRACE";

 protected void service(HttpServletRequest req, HttpServletResponse resp)
        throws ServletException, IOException
    {
        String method = req.getMethod();
        //GET
        if (method.equals(METHOD_GET)) {
            long lastModified = getLastModified(req);
            if (lastModified == -1) {
                // servlet doesn't support if-modified-since, no reason
                // to go through further expensive logic
                doGet(req, resp);
            } else {
                long ifModifiedSince = req.getDateHeader(HEADER_IFMODSINCE);
                if (ifModifiedSince < lastModified) {
                    // If the servlet mod time is later, call doGet()
                    // Round down to the nearest second for a proper compare
                    // A ifModifiedSince of -1 will always be less
                    maybeSetLastModified(resp, lastModified);
                    doGet(req, resp);
                } else {
                    resp.setStatus(HttpServletResponse.SC_NOT_MODIFIED);
                }
            }

        } else if (method.equals(METHOD_HEAD)) {
            long lastModified = getLastModified(req);
            maybeSetLastModified(resp, lastModified);
            doHead(req, resp);

        } else if (method.equals(METHOD_POST)) {
            doPost(req, resp);

        } else if (method.equals(METHOD_PUT)) {
            doPut(req, resp);

        } else if (method.equals(METHOD_DELETE)) {
            doDelete(req, resp);

        } else if (method.equals(METHOD_OPTIONS)) {
            doOptions(req,resp);

        } else if (method.equals(METHOD_TRACE)) {
            doTrace(req,resp);
            //There's no need to override this method. 没有必要~
        } else {
            //
            // Note that this means NO servlet supports whatever
            // method was requested, anywhere on this server.
            //

            String errMsg = lStrings.getString("http.method_not_implemented");
            Object[] errArgs = new Object[1];
            errArgs[0] = method;
            errMsg = MessageFormat.format(errMsg, errArgs);

            resp.sendError(HttpServletResponse.SC_NOT_IMPLEMENTED, errMsg);
        }
    }


    protected void doPost(HttpServletRequest req, HttpServletResponse resp)
    throws ServletException, IOException {

    String protocol = req.getProtocol();
    String msg = lStrings.getString("http.method_post_not_supported");
    if (protocol.endsWith("1.1")) {
        resp.sendError(HttpServletResponse.SC_METHOD_NOT_ALLOWED, msg);
    } else {
        resp.sendError(HttpServletResponse.SC_BAD_REQUEST, msg);
    }
}
注:在javaHttpServlet中,与Tomcat中的dopost方法如出一辙
真正的调用链(妥妥的责任链模式)是
Tomcat与SpringMVC的结合点:
(1)所有配置了路由信息的处理方法最终都是通过反射的方式进行调用的;
(2)在Java8中,反射方法调用最终落脚于NativeMethodAccessorImpl类的native方法:
private static native Object invoke0(Method var0, Object var1, Object[] var2);
在此处与JVM底层交互,实现跨代码衔接执行;
(3)观察到的比较重要的设计模式:职责链模式(ApplicationFilterChain)、委派模式(DelegatingFilterProxy)、
工厂模式、策略模式、代理模式(FilterChainProxy)、外观模式、适配器模式(HandlerAdapter);
(4)Tomcat与SpringMVC的结合点:ApplicationFilterChain与DispatcherServlet(继承于FrameworkServlet);
(5)在集成了Tomcat的SpringBoot项目中,先启动的不是Tomcat,而是Spring,Spring的工厂(默认DefaultListableBeanFactory)
读取注解完成各类Bean(WebApplicationContext、securityFilterChainRegistration、dispatcherServletRegistration、各类FilterInitializer与Filter)
的初始化,放入IoC容器,然后做路由Mapping,创建FilterChain,开启JMX等;
(6)Servlet、Filter是单实例多线程的,成员变量线程不安全,方法内局部变量线程安全;SingleThreadModel采用同步/实例池的方式来确保不会有两个线程同时执行servlet的service方法,但已被弃用,需自行确保成员变量线程安全;
————————————————
版权声明:本文为CSDN博主「wanxu12345678910」的原创文章,遵循CC 4.0 BY-SA版权协议,转载请附上原文出处链接及本声明。
原文链接:https://blog.csdn.net/wanxu12345678910/article/details/83352371
ContextLoaderServlet与下文中的ContextLoaderListener功能完全相同
<servlet>
         <servlet-name>context</servlet-name>
         <servlet-class>
           org.springframework.web.context.ContextLoaderServlet
         </servlet-class>
         <load-on-startup>1</load-on-startup>
</servlet>
HttpServletResponse响应码
监听器: 实现接口、标记
比如MQ,观察者模式,所有的时间监听都会继承 extend java.util.EventListener接口,但里面什么都没有 ,称之为mark接口,经典实现:ContextLoaderListener、RequestContextListener(重要)
/**
 * A tagging interface that all event listener interfaces must extend.
 * @since 1.1
 */
public interface EventListener {
}
/**
 * Bootstrap listener to start up and shut down Spring's root {@link WebApplicationContext}.
 * Simply delegates to {@link ContextLoader} as well as to {@link ContextCleanupListener}.
 *
 * <p>As of Spring 3.1, {@code ContextLoaderListener} supports injecting the root web
 * application context via the {@link #ContextLoaderListener(WebApplicationContext)}
 * constructor, allowing for programmatic configuration in Servlet 3.0+ environments.
 * See {@link org.springframework.web.WebApplicationInitializer} for usage examples.
 *
 * @author Juergen Hoeller
 * @author Chris Beams
 * @since 17.02.2003
 * @see #setContextInitializers
 * @see org.springframework.web.WebApplicationInitializer
 */
public class ContextLoaderListener extends ContextLoader implements ServletContextListener {


}
见名知意既然包含contextLoader必然跟上线文息息相关,在初始化容器时加载配置~
@Override
    public void requestInitialized(ServletRequestEvent requestEvent) {
        if (!(requestEvent.getServletRequest() instanceof HttpServletRequest)) {
            throw new IllegalArgumentException(
                    "Request is not an HttpServletRequest: " + requestEvent.getServletRequest());
        }
        HttpServletRequest request = (HttpServletRequest) requestEvent.getServletRequest();
        ServletRequestAttributes attributes = new ServletRequestAttributes(request);
        request.setAttribute(REQUEST_ATTRIBUTES_ATTRIBUTE, attributes);
        //将请求对象放入ThreadLocal中
        LocaleContextHolder.setLocale(request.getLocale());
        RequestContextHolder.setRequestAttributes(attributes);
    }
重要:Servlet在同一个线程中,当初始化时放到对象里,当请求销毁时,自动将Threadlocal对象销毁,防止了内存泄漏的问题
当有请求到达时,会从线程池中取出一个线程来执行任务,执行完毕后再将线程回收至线程池,这样当前请求不可能拿到上一个请求保存在ThreadLocal对象里的值
@Override
    public void requestDestroyed(ServletRequestEvent requestEvent) {
        ServletRequestAttributes attributes = null;
        Object reqAttr = requestEvent.getServletRequest().getAttribute(REQUEST_ATTRIBUTES_ATTRIBUTE);
        if (reqAttr instanceof ServletRequestAttributes) {
            attributes = (ServletRequestAttributes) reqAttr;
        }
        RequestAttributes threadAttributes = RequestContextHolder.getRequestAttributes();
        if (threadAttributes != null) {
            // We're assumably within the original request thread...
            LocaleContextHolder.resetLocaleContext();
            RequestContextHolder.resetRequestAttributes();
            if (attributes == null && threadAttributes instanceof ServletRequestAttributes) {
                attributes = (ServletRequestAttributes) threadAttributes;
            }
        }
        if (attributes != null) {
            attributes.requestCompleted();
        }
    }
/**
 * Bootstrap listener to start up and shut down Spring's root {@link WebApplicationContext}.
 * Simply delegates to {@link ContextLoader} as well as to {@link ContextCleanupListener}.
 *
 * <p>As of Spring 3.1, {@code ContextLoaderListener} supports injecting the root web
 * application context via the {@link #ContextLoaderListener(WebApplicationContext)}
 * constructor, allowing for programmatic configuration in Servlet 3.0+ environments.
 * See {@link org.springframework.web.WebApplicationInitializer} for usage examples.
 *
 * @author Juergen Hoeller
 * @author Chris Beams
 * @since 17.02.2003
 * @see #setContextInitializers
 * @see org.springframework.web.WebApplicationInitializer
 */
public class ContextLoaderListener extends ContextLoader implements ServletContextListener {

}
插播一句:在书写过程中发现某URL响应变慢,在分析SQL时,用到了in查询,执行分析计划用到了索引
Servlet on Springboot
组件扫描:ServletComponentScan
熟悉波~ 是不是应用跟Springboot的@ComponentScan如出一辙
@Target(ElementType.TYPE)
@Retention(RetentionPolicy.RUNTIME)
@Documented
@Import(ServletComponentScanRegistrar.class)
public @interface ServletComponentScan {

    /**
     * Alias for the {@link #basePackages()} attribute. Allows for more concise annotation
     * declarations e.g.: {@code @ServletComponentScan("org.my.pkg")} instead of
     * {@code @ServletComponentScan(basePackages="org.my.pkg")}.
     * @return the base packages to scan
     */
    @AliasFor("basePackages")
    String[] value() default {};

    /**
     * Base packages to scan for annotated servlet components. {@link #value()} is an
     * alias for (and mutually exclusive with) this attribute.
     * <p>
     * Use {@link #basePackageClasses()} for a type-safe alternative to String-based
     * package names.
     * @return the base packages to scan
     */
    @AliasFor("value")
    String[] basePackages() default {};

    /**
     * Type-safe alternative to {@link #basePackages()} for specifying the packages to
     * scan for annotated servlet components. The package of each class specified will be
     * scanned.
     * @return classes from the base packages to scan
     */
    Class<?>[] basePackageClasses() default {};

}
配置声明:@interface 暴露SpringBean @Bean 事件:Event
filter:
webFilter OncePerRequestFilter:只调用一次且是线程安全的 而其子类得ApplicationContextHeaderFilter调用的dofilter方法就是我们上面提到的真正在请求中执行的filter
激活Springbootweb
文无第一,武无第二,没有最好的技术框架或体系,只有最适合当下业务的框架或体系 谈谈你对技术的理解:天上飞的理念,必定有落地的实现
组装SpringApplicationBuilder
你看看这名字就知道他以后干啥的,并且它包含了太多太多的东西, SpringApplication和ApplicationContext实例的生成器,基本包含了所有的SpringbootApplacation特性
    private final SpringApplication application;

    private ConfigurableApplicationContext context;

    private SpringApplicationBuilder parent;
    AtomicBoolean是不是的看看
    private final AtomicBoolean running = new AtomicBoolean(false);

    private final Set<Class<?>> sources = new LinkedHashSet<>();

    private final Map<String, Object> defaultProperties = new LinkedHashMap<>();

    private ConfigurableEnvironment environment;

    private Set<String> additionalProfiles = new LinkedHashSet<>();

    private boolean registerShutdownHookApplied;

    private boolean configuredAsChild = false;
@SpringBootApplication
public class TestProfiles {

    public static void main(String[] args) {
        ConfigurableApplicationContext context = new SpringApplicationBuilder(TestProfiles.class)
                .properties("spring.config.location=classpath:/test-profiles.yml")
                .properties("spring.profiles.active=oracle")
                .run(args);
        // 输出变量
        System.out.println(context.getEnvironment().getProperty("jdbc.driver"));

        // 启动第二个Spring容器,指定端口为8848
        ConfigurableApplicationContext context2 = new SpringApplicationBuilder(TestProfiles.class)
                .properties("spring.config.location=classpath:/test-profiles.yml")
                .properties("spring.profiles.active=mysql")
                .properties("server.port=8848")
                .run(args);
        // 输出变量
        System.out.println(context2.getEnvironment().getProperty("jdbc.driver"));
    }
}
Springboot自动装配 /META-INF/spring.factories XXXAotuConfigration NIO不是异步IO而是非阻塞IO java9推崇模块化
ClassLoader
public static void main(String[] args) {
    ClassLoader contextClassLoader = Thread.currentThread().getContextClassLoader();
    while (true) {

        System.out.println(contextClassLoader.getClass().getName());
        ClassLoader parent = contextClassLoader.getParent();
        if (parent == null) {
            break;
        }

    }

    ClassLoader systemClassLoader = ClassLoader.getSystemClassLoader();
    System.out.println(systemClassLoader.getClass().getName());
}
update_time =2022年2月14日13:48:19
传统的Servlet容器 Apache Tomcat
这里只记录了部分重要场景 包含核心组件 静态资源处理 类加载 连接器 JDBC数据源
HttpServletResponse
javax.servlet.http.HttpServletResponse
public static void main(String[] args) {
    ClassLoader contextClassLoader = Thread.currentThread().getContextClassLoader();
    while (true) {

        System.out.println(contextClassLoader.getClass().getName());
        ClassLoader parent = contextClassLoader.getParent();
        if (parent == null) {
            break;
        }

    }

    ClassLoader systemClassLoader = ClassLoader.getSystemClassLoader();
    System.out.println(systemClassLoader.getClass().getName());
}
除了其中的状态码之外,结合最近的测试其中的实现可具体参考 addHeader方法,getHeader方法等等 BootStrap--system---common---webapp
静态资源处理类org.apache.catalina.servlets.DefaultServlet
注意下包名
大多数情况下我们关注的更多是server.xml中Tomcat的配置,而在web.xml中除了路径映射等配置外
 <!-- The mapping for the default servlet -->
    <servlet-mapping>
        <servlet-name>default</servlet-name>
        <url-pattern>/</url-pattern>
    </servlet-mapping>

    <!-- The mappings for the JSP servlet -->
    <servlet-mapping>
        <servlet-name>jsp</servlet-name>
        <url-pattern>*.jsp</url-pattern>
        <url-pattern>*.jspx</url-pattern>
    </servlet-mapping>
关于是否是开发模式
 <!--   development         Is Jasper used in development mode? If true,   -->
  <!--                       the frequency at which JSPs are checked for    -->
  <!--                       modification may be specified via the          -->
  <!--                       modificationTestInterval parameter. [true]     -->
由于DefaultServlet是HttpServlet的子类,所以在此不展开讨论 而在server.xml中标签与后台接口是一一绑定的
<Connector port="8080" protocol="HTTP/1.1" connectionTimeout="20000" redirectPort="8443" />
而在JDBC中的大多数类中也遵循此规则,那么就上面这段分析标签Connector则对应 org.apache.catalina.connector.Connector,验证一下标签中对应protocol,connectionTimeout,redirectPort 其中标签对应部分
 /**
     * Defaults to using HTTP/1.1 NIO implementation.
     */
    public Connector() {
        this("org.apache.coyote.http11.Http11NioProtocol");
    }
而在tomcat8.0+中getProtocol对应protocol redirectPort对应属性默认值
/**
     * The redirect port for non-SSL to SSL redirects.
     */
    protected int redirectPort = 443;
关于标签中connector中这个Http11NioProtocol则在tomcat官方文档中可见其中一句话
When using HTTP connectors (based on APR or NIO/NIO2), Tomcat supports using sendfile to send large static files. These writes, as soon as the system load increases, will be performed asynchronously in the most efficient way. Instead of sending a large response using blocking writes, it is possible to write content to a static file, and write it using a sendfile code. A caching valve could take advantage of this to cache the response data in a file rather than store it in memory. Sendfile support is available if the request attribute org.apache.tomcat.sendfile.support is set to Boolean.TRUE
也可在server.xml中搜索
<!-- Define an AJP 1.3 Connector on port 8009 -->
    <!--
    <Connector protocol="AJP/1.3"
               address="::1"
               port="8009"
               redirectPort="8443" />
    -->
server.port在文件中的位置
重点来了 ServerProperties包含了tomcat,Jetty,Undertow,而在Springboot2.2.6中则存在Netty
那么理所当然,在tomcat中的一些配置也存在于此
/**
 * Maximum amount of worker threads.
 */
private int maxThreads = 200;

/**
 * Minimum amount of worker threads.
 */
private int minSpareThreads = 10;
那么为什么Tomcat被称之为嵌入式容器呢?
在启动时无需自启动容器,在Bootstrap中调用tomcat,另外tomcat中TomcatEmbeddedContext,Embedded即直译为嵌入式
这里记忆有些混乱了,有点找不过来哪里是入口了,但先从TomcatServletWebServerFactoryCustomizer的customize()方法调用找,
private Stream<Wrapper> getLoadOnStartupWrappers(Container[] children) {
        Map<Integer, List<Wrapper>> grouped = new TreeMap<>();
        for (Container child : children) {
            Wrapper wrapper = (Wrapper) child;
            int order = wrapper.getLoadOnStartup();
            if (order >= 0) {
                grouped.computeIfAbsent(order, ArrayList::new);
                grouped.get(order).add(wrapper);
            }
        }
        return grouped.values().stream().flatMap(List::stream);
    }
因为要看下Netty,所以还是重新看下server.properties 我将Spring Boot AutoConfigure升级到了2.6.2,内置的Tomcat就升级到9.0了 为了方便查看才升级的,之前的2.1.x就不截图了 server.properties的位置在configuration的下面的json文件 spring-configuration-metadata.json
{
      "name": "server",
      "type": "org.springframework.boot.autoconfigure.web.ServerProperties",
      "sourceType": "org.springframework.boot.autoconfigure.web.ServerProperties"
}
那既然为了看Netty在这个json文件中同样存在
{
      "name": "server.netty",
      "type": "org.springframework.boot.autoconfigure.web.ServerProperties$Netty",
      "sourceType": "org.springframework.boot.autoconfigure.web.ServerProperties",
      "sourceMethod": "getNetty()"
}
既然在json中存在getNetty等方法,猜测那么对应的ServerProperties也存在对应的方法, 因为存在实例么,tomcat搭配server.xml和web.xml简单看了一下,当然Tomcat还是主要和Servlet的关联关系更为重要, 本身tomcat知识点也最够庞大的,包含类加载器,双拼委派,打破双亲委派、jvm调优等等,可以顺带看下这里的专题
当一次请求发起都发生了什么?
用户通过浏览器进行了一个操作,这个操作可以是输入url地址并回车,或者是点击超链接,或者是在搜索框中输入关键字进行搜索,接着浏览器就捕获到了这个事件 由于 HTTP 协议底层具体的数据传输使用的是 TCP/IP 协议,因此浏览器需要向服务端发出 TCP 连接请求 服务器接受浏览器的连接请求,并经过 TCP 三次握手建立连接 浏览器将请求数据打包成一个 HTTP 协议格式的数据包 浏览器将打包好的数据包推入网络,经过网络传输最终到达服务器指定程序 服务端程序拿到数据包后,根据 HTTP 协议格式进行解包,获取到客户端的意图 得知客户端意图后进行处理,比如提供静态文件或者调用服务端程序获得动态结果 服务器将响应结果按照 HTTP 协议格式打包 服务器将响应数据包推入网络,数据包经过网络传输最终达到到浏览器 浏览器拿到数据包后,按照 HTTP 协议的格式解包,然后对数据进行解析 浏览器将解析后的静态数据(如html、图片)展示给用户
Tomcat 作为一个 HTTP 服务器,主要需要完成的功能是接受连接、解析请求数据、处理请求和发送响应这几个步骤。 作者:若兮缘 链接:www.jianshu.com/p/7c9401b85… 来源:简书 著作权归作者所有。商业转载请联系作者获得授权,非商业转载请注明出处。 关于tomcat的架构就取自这篇文章,图文都很喜欢~
导入过程Running With JRE 7 Or Later
启动tomcat所需环境
 else
    eval $_NOHUP "\"$_RUNJAVA\"" "\"$CATALINA_LOGGING_CONFIG\"" $LOGGING_MANAGER "$JAVA_OPTS" "$CATALINA_OPTS" \
      -D$ENDORSED_PROP="\"$JAVA_ENDORSED_DIRS\"" \
      -classpath "\"$CLASSPATH\"" \
      -Dcatalina.base="\"$CATALINA_BASE\"" \
      -Dcatalina.home="\"$CATALINA_HOME\"" \
      -Djava.io.tmpdir="\"$CATALINA_TMPDIR\"" \
      org.apache.catalina.startup.Bootstrap "$@" start \
后续不在赘述。重点在Server.properties中版本区别是否包含Netty的这个类, 本来我是想跟着dei一下bug的,实际是我没起来,版本又不兼容,中间穿插了需求,就不dei了skr~
一方库、二方库、三方库说明
有些二方库为apache所需类库,当然定义也尽相同,以统一标准为准吧~就像嵌入式这个单词, 如果学习的时候根据服务的命名,猜测其作用,然后再去证实的话,可能我早就认识这个单词了
一方库:本工程中的各模块的相互依赖 二方库:公司内部的依赖库,一般指公司内部的其他项目发布的jar包 三方库:公司之外的开源库, 比如apache、ibm、google等发布的依赖 为什么写这句话就是因为javax是指扩展我的java,因为原生的二方库是不允许被覆盖的。提到的
private Stream<Wrapper> getLoadOnStartupWrappers(Container[] children) {
        Map<Integer, List<Wrapper>> grouped = new TreeMap<>();
        for (Container child : children) {
            Wrapper wrapper = (Wrapper) child;
            int order = wrapper.getLoadOnStartup();
            if (order >= 0) {
                grouped.computeIfAbsent(order, ArrayList::new);
                grouped.get(order).add(wrapper);
            }
        }
        return grouped.values().stream().flatMap(List::stream);
    }
再比如这里面的grouped.computeIfAbsent(order, ArrayList::new);其中Absent译为缺席,入参是key=order,以及函数方法,在key!=null的情况下赋值为newAraayList并返回去。 and this flatMap VS map,其他人举的例子很明朗,我就不摘抄了,www.cnblogs.com/yucy/p/1026…
JDBC中的servlet
数据库三大范式: 1.第一范式(确保每列保持原子性) 2.第二范式(确保表中的每列都和主键相关) 3.第三范式(确保每列都和主键列直接相关,而不是间接相关) 1、DML:Data Manipulation Language 操作语句 2、DDL:data define Language、 3、存储过程执行后 4、查询中也是有事务的:select查询后结果集关闭后 事务并发可能的影响: 1、脏读(读取未提交数据) A事务读取B事务尚未提交的数据,此时如果B事务发生错误并执行回滚操作,那么A事务读取到的数据就是脏数据。 就好像原本的数据比较干净、纯粹,此时由于B事务更改了它,这个数据变得不再纯粹。这个时候A事务立即读取了这个脏数据, 但事务B良心发现,又用回滚把数据恢复成原来干净、纯粹的样子,而事务A却什么都不知道,最终结果就是事务A读取了此次的脏数据,称为脏读。 2、不可重复读(前后多次读取,数据内容不一致) 事务A在执行读取操作,由整个事务A比较大,前后读取同一条数据需要经历很长的时间 。而在事务A第一次读取数据, 比如此时读取了小明的年龄为20岁,事务B执行更改操作,将小明的年龄更改为30岁,此时事务A第二次读取到小明的年龄时, 发现其年龄是30岁,和之前的数据不一样了,也就是数据不重复了,系统不可以读取到重复的数据,成为不可重复读 3、幻读(前后多次读取,数据总量不一致) 事务A在执行读取操作,需要两次统计数据的总量,前一次查询数据总量后,此时事务B执行了新增数据的操作并提交后, 这个时候事务A读取的数据总量和之前统计的不一样,就像产生了幻觉一样,平白无故的多了几条数据,成为幻读 幻读产生的根本原因是采用的行级锁,所以只针对脏读和重复读有用
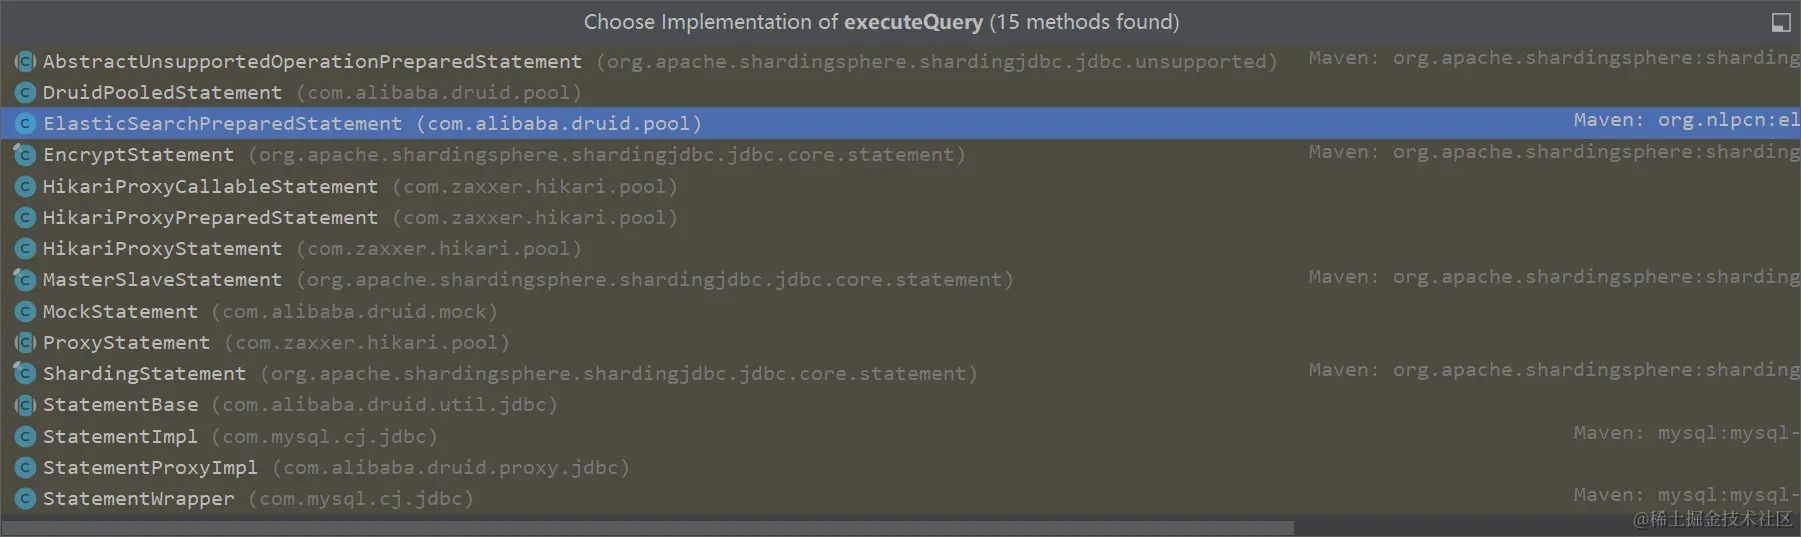
Drivermanager-->getconnection--->connection-->createStatement-->ResultSet executeQuery(String sql) throws SQLException;
代码实现登陆:
    public class PayController {
        private Logger logger = LoggerFactory.getLogger(PayController.class);

        public boolean doPay(String uId, String tradeId, BigDecimal amount,
                             int channelType, int modeType) {
            // 微信⽀付
            if (1 == channelType) {
                logger.info("模拟微信渠道⽀付划账开始。uId:{} tradeId:{} amount:
                {
                }
                ", uId, tradeId, amount);
                if (1 == modeType) {
                    logger.info("密码⽀付,⻛控校验环境安全");
                } else if (2 == modeType) {
                    logger.info("⼈脸⽀付,⻛控校验脸部识别");
                } else if (3 == modeType) {
                    logger.info("指纹⽀付,⻛控校验指纹信息");

                    上⾯的类提供了⼀个⽀付服务功能,通过提供的必要字段; ⽤户ID 、交易ID 、 ⾦额 、渠道 、模 式 ,来控制⽀付⽅式。
                    以上的 ifelse 应该是最差的⼀种写法,即使写 ifelse 也是可以优化的⽅式去写的。
                    3. 测试验证
                    3.1 编写测试类
                    以上分别测试了两种不同的⽀付类型和⽀付模式;微信⼈脸⽀付、⽀付宝指纹⽀付
                    3.2 测试结果
                }
            }
            // ⽀付宝⽀付
            else if (2 == channelType) {
                logger.info("模拟⽀付宝渠道⽀付划账开始。uId:{} tradeId:{}
                        amount: {
                }
                ", uId, tradeId, amount);
                if (1 == modeType) {
                    logger.info("密码⽀付,⻛控校验环境安全");
                } else if (2 == modeType) {
                    logger.info("⼈脸⽀付,⻛控校验脸部识别");
                } else if (3 == modeType) {
                    logger.info("指纹⽀付,⻛控校验指纹信息");
                }
            }
            return true;
        }
    }
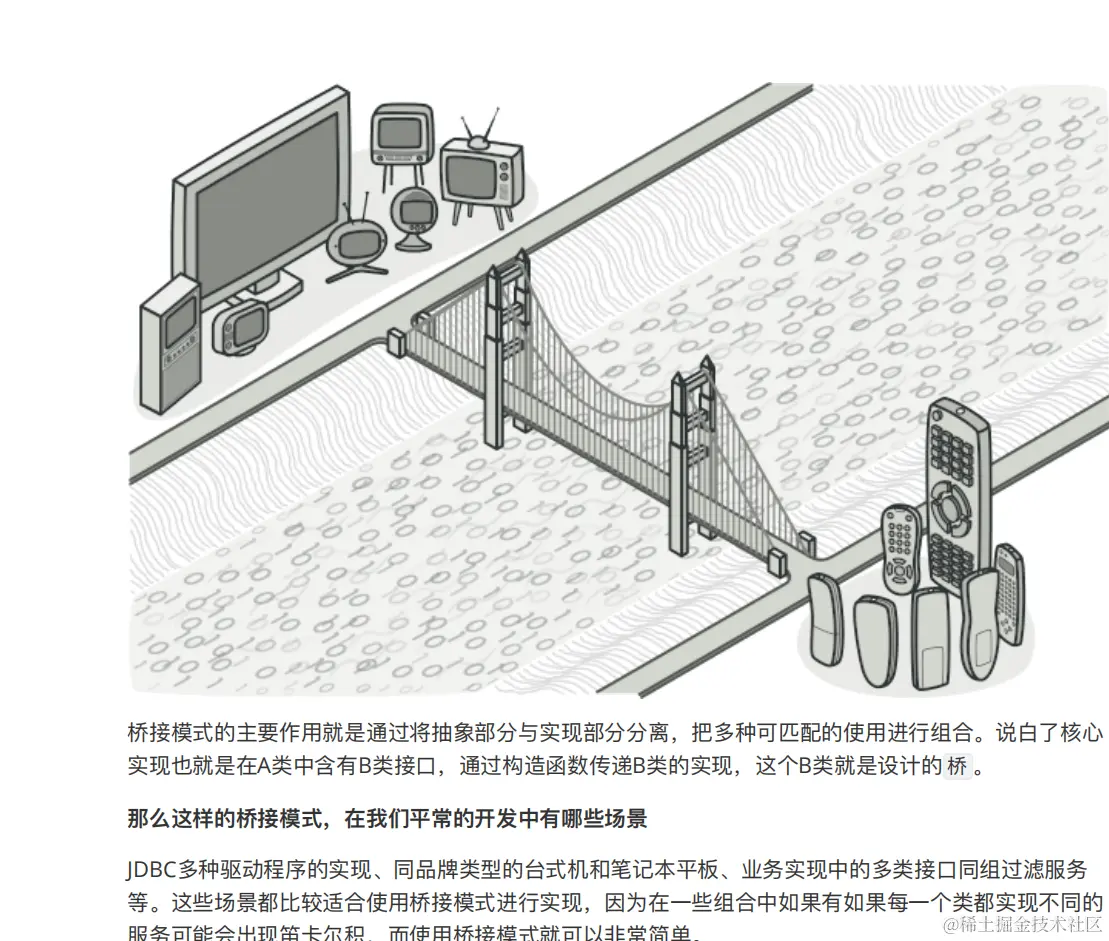
其实面对这种情况一般我是看到大多数是应用策略+模板的,桥接真的很少听
public abstract class Pay {
 protected Logger logger = LoggerFactory.getLogger(Pay.class);
 protected IPayMode payMode;
 public Pay(IPayMode payMode) {
 this.payMode = payMode;
 }
 public abstract String transfer(String uId, String tradeId, BigDecimal
amount);
}
在这个类中定义了⽀付⽅式的需要实现的划账接⼝: transfer ,以及桥接接⼝; IPayMode ,并 在构造函数中⽤户⽅⾃⾏选择⽀付⽅式。 如果没有接触过此类实现,可以᯿点关注 IPayMode payMode ,这部分是桥接的核⼼
public class WxPay extends Pay {
 public WxPay(IPayMode payMode) {
 super(payMode);
 }
 public String transfer(String uId, String tradeId, BigDecimal amount) {
 logger.info("模拟微信渠道⽀付划账开始。uId:{} tradeId:{} amount:{}",
uId, tradeId, amount);
 boolean security = payMode.security(uId);
 logger.info("模拟微信渠道⽀付⻛控校验。uId:{} tradeId:{} security:
{}", uId, tradeId, security);
 if (!security) {
 logger.info("模拟微信渠道⽀付划账拦截。uId:{} tradeId:{} amount:
{}", uId, tradeId, amount);
 return "0001";
 }
 logger.info("模拟微信渠道⽀付划账成功。uId:{} tradeId:{} amount:{}",
uId, tradeId, amount);
 return "0000";
 }
}
支付宝支付
public class ZfbPay extends Pay {
 public ZfbPay(IPayMode payMode) {
 super(payMode);
 }
 public String transfer(String uId, String tradeId, BigDecimal amount) {
 logger.info("模拟⽀付宝渠道⽀付划账开始。uId:{} tradeId:{} amount:
{}", uId, tradeId, amount);
 boolean security = payMode.security(uId);
 logger.info("模拟⽀付宝渠道⽀付⻛控校验。uId:{} tradeId:{} security:
{}", uId, tradeId, security);
 if (!security) {
 logger.info("模拟⽀付宝渠道⽀付划账拦截。uId:{} tradeId:{}
amount:{}", uId, tradeId, amount);
 return "0001";
 }
 logger.info("模拟⽀付宝渠道⽀付划账成功。uId:{} tradeId:{} amount:
{}", uId, tradeId, amount);
 return "0000";
 }
}
桥接模式接口
public interface IPayMode {
 boolean security(String uId);
}
刷脸
public class PayFaceMode implements IPayMode{
 protected Logger logger = LoggerFactory.getLogger(PayCypher.class);
 public boolean security(String uId) {
 logger.info("⼈脸⽀付,⻛控校验脸部识别");
 return true;
 }
}
其他同上
测试类编写
@Test
public void test_pay() {
 System.out.println("\r\n模拟测试场景;微信⽀付、⼈脸⽅式。");
 Pay wxPay = new WxPay(new PayFaceMode());
 wxPay.transfer("weixin_1092033111", "100000109893", new
BigDecimal(100));
 System.out.println("\r\n模拟测试场景;⽀付宝⽀付、指纹⽅式。");
 Pay zfbPay = new ZfbPay(new PayFingerprintMode());
 zfbPay.transfer("jlu19dlxo111","100000109894",new BigDecimal(100));
}
ResultSet executeQuery(String sql) throws SQLException;
<dependency>
  <groupId>commons-dbcp</groupId>
  <artifactId>commons-dbcp</artifactId>
</dependency>
org.springframework.transaction.interceptor.TransactionInterceptor
@Nullable
public Object invoke(MethodInvocation invocation) throws Throwable {
    Class<?> targetClass = invocation.getThis() != null ? AopUtils.getTargetClass(invocation.getThis()) : null;
    Method var10001 = invocation.getMethod();
    invocation.getClass();
    return this.invokeWithinTransaction(var10001, targetClass, invocation::proceed);
}
org.springframework.transaction.TransactionDefinition
其实这里看不出来跟servlet的关联性有多么高,如果实在要说其中的关联性, 还不如将jdbc的整合过程与Mybatis进行比较,或者分析jdbc代码分析封装硬编码的过程, 就连其包下的大部分类名都不与之相关,当然你要说再Servlet与jdbc集成开发的时代,他也是有一定时代和代表性的。
    @CallerSensitive
    public static Connection getConnection(String url,
        java.util.Properties info) throws SQLException {

        return (getConnection(url, info, Reflection.getCallerClass()));
    }
CallerSensitive是什么鬼?
CallerSensitive老规矩,猜测下Caller=调用,Sensitive=敏感的,那么标识在方法上则是当调用方法时的一些控制。 其中特指Reflection.getCallerClass()能够追踪到调用者的第一人。项目中用是用不到。
学习方法就是学习大佬的学习方法
这里JDBC就先到此为止,我先不得不先记录下我在javacache中遇到的小问题思考。
为什么有ConcurrentHashMap还要加入synchronized
在org.springframework.cache.support.AbstractCacheManager中有一段关于初始化缓存静态配置的代码。
/**
     * Initialize the static configuration of caches.
     * <p>Triggered on startup through {@link #afterPropertiesSet()};
     * can also be called to re-initialize at runtime.
     * @since 4.2.2
     * @see #loadCaches()
     */
public void initializeCaches() {
        Collection<? extends Cache> caches = loadCaches();

        synchronized (this.cacheMap) {
            this.cacheNames = Collections.emptySet();
            this.cacheMap.clear();
            Set<String> cacheNames = new LinkedHashSet<>(caches.size());
            for (Cache cache : caches) {
                String name = cache.getName();
                this.cacheMap.put(name, decorateCache(cache));
                cacheNames.add(name);
            }
            this.cacheNames = Collections.unmodifiableSet(cacheNames);
        }
    }
Triggered:触发 原因:本身put和add的线程安全是由ConcurrentHashMap保证的,但是此时获取的值ConcurrentHashMap并不能保证其他线程对共享变量的值操作时还是原来的值。 怎么说呢,这么看来可能失去了map的本来特性,但其实还是不理解,是不理解这个原因准不准确。
谁提出谁解决:concurrentHashMap只能保证一次操作的原子性,一系列操作的时候就需要加锁了,不能保证第N+1个线程进来的时候获取到的状态是未clear的
Collections.emptySet():如果你想 new 一个空的 List ,而这个 List 以后也不会再添加元素,那么就用 Collections.emptyList() 好了。 new ArrayList() 或者 new LinkedList() 在创建的时候有会有初始大小,多少会占用一内存。 每次使用都new 一个空的list集合,浪费就积少成多,浪费就严重啦,就不好啦。
还有一个
@Override
    @Nullable
    public Cache getCache(String name) {
        Cache cache = this.cacheMap.get(name);
        if (cache != null) {
            return cache;
        }
        else {
            // Fully synchronize now for missing cache creation...
            synchronized (this.cacheMap) {
                cache = this.cacheMap.get(name);
                if (cache == null) {
                    cache = getMissingCache(name);
                    if (cache != null) {
                        cache = decorateCache(cache);
                        this.cacheMap.put(name, cache);
                        updateCacheNames(name);
                    }
                }
                return cache;
            }
        }
    }

其中的getMissingCache方法
@Nullable
    protected Cache getMissingCache(String name) {
        return null;
    }
无论如何都要返回null,那么他还要进行判空意义又何在?

源码注释是这样写的
Return a missing cache with the specified name, or null if such a cache does not exist or could not be created on demand.
Caches may be lazily created at runtime if the native provider supports it. If a lookup by name does not yield any result, an AbstractCacheManager subclass gets a chance to register such a cache at runtime. The returned cache will be automatically added to this cache manager.
返回指定名称的缺失缓存,如果此类缓存不存在或无法按需创建,则返回null。
如果本机提供程序支持,可以在运行时延迟创建缓存,就是其扩展实际是在子类中来复写的,
注意:在spring-data-redis的1.7.2中是没有复写此方法的
在官网中查询https://spring.io/projects/spring-data-redis#support
接入了
 <dependency>
      <groupId>org.springframework.data</groupId>
      <artifactId>spring-data-redis</artifactId>
      <version>2.1.9.RELEASE</version>
</dependency>
低版本可是没有的呢,具体变化是在2.X前后的区别
protected RedisCache getMissingCache(String name) {
        return allowInFlightCacheCreation ? createRedisCache(name, defaultCacheConfig) : null;
}
第二次见到identityHashMap
实际应用 mp.weixin.qq.com/s?__biz=Mzg…
public static void main(String[] args) {
    var var1 = new Integer(1);
    var var2 = new Integer(1);
    System.out.println(var1.equals(var2));

    System.out.println(var1.hashCode());
    System.out.println(var2.hashCode());


    System.out.println(System.identityHashCode(var1));
    System.out.println(System.identityHashCode(var2));
}

控制台输出
true
1
1
1524960486
117009527
org.springframework.cache.Cache对于缓存是应用接口, Hashmap是否是在并发写的情况下,如果是则不是线程安全的 Consistency(一致性) getinclude 想要看到源文档时,搜索:JSR107规范即可 推荐文章:www.jianshu.com/p/f6a1eae
接着来看缓存类CacheManager
从名字就能看出是管理缓存的类,CacheManager有两种,一种是Spring的,一种是javax的,就是上面所说的扩展类,但实现确实大体一致,
就接口实现入手,先从最简单的看起,从名字看就是SimpleCacheManager,提供最基本的set方法,load方法。
SimpleCacheManager在spring-context包下,5.1.4版本,rediscachemanager在spring-data-redis包下
CachingProvider:创建、配置、获取、管理和控制多个CacheManager CacheManager:创建、配置、获取、管理和控制多个唯一命名的Cache。(一个CacheManager仅被一个CachingProvider所拥有) Cache:一个类似Map的数据结构。(一个Cache仅被一个CacheManager所拥有) Entry:一个存储在Cache中的key-value对 Expiry:每一个存储在Cache中的条目有一个定义的有效期,过期后不可访问、更新、删除。缓存有效期可以通过ExpiryPolicy设置 cloud.tencent.com/developer/a… 缓存么,除了快之外,还要满足有过期时间,但是除了在redis中并没有提供响应的方法,为什么呢?我觉得既然你启动或者加载就将bean放入cache管理了 就不可能伴随过期,应该会有响应的destroy方法在实例结束运行时清理,要不不可能实例还没运行完就进行清理吧。
@Override
    protected Collection<RedisCache> loadCaches() {

        List<RedisCache> caches = new LinkedList<>();

        for (Map.Entry<String, RedisCacheConfiguration> entry : initialCacheConfiguration.entrySet()) {
            caches.add(createRedisCache(entry.getKey(), entry.getValue()));
        }

        return caches;
    }
读取缓存的配置时间,一级缓存60s,二级缓存30s 在spring-autoconfigure-metadata.properties中的org.springframework.data.redis.cache.RedisCacheConfiguration配置此参数
org.springframework.boot.autoconfigure.cache.CacheAutoConfiguration.AutoConfigureAfter=
org.springframework.boot.autoconfigure.couchbase.CouchbaseAutoConfiguration,
org.springframework.boot.autoconfigure.hazelcast.HazelcastAutoConfiguration,
org.springframework.boot.autoconfigure.data.redis.RedisAutoConfiguration
启动时
c.y.c.b.redis.config.RedisConfiguration  : [BSF][Redis]已启动,addressList:
2022-02-18 15:04:45.674  INFO 2604 --- [           main] c.y.c.b.e.c.EurekaClientConfiguration    : [BSF][Eureka-Client]已启动!!! eureka.client.serviceUrl.defaultZone=http://10.:8080/eureka/
2022-02-18 15:04:47.846  WARN 2604 --- [           main] c.n.c.sources.URLConfigurationSource     : No URLs will be polled as dynamic configuration sources.
2022-02-18 15:04:47.847  INFO 2604 --- [           main] c.n.c.sources.URLConfigurationSource     : To enable URLs as dynamic configuration sources, define System property archaius.configurationSource.additionalUrls or make config.properties available on classpath.
2022-02-18 15:04:47.943  INFO 2604 --- [           main] c.netflix.config.DynamicPropertyFactory  : DynamicPropertyFactory is initialized with configuration sources: com.netflix.config.ConcurrentCompositeConfiguration@4bf9f44b
2022-02-18 15:04:54.662  INFO 2604 --- [           main] c.y.c.b.s.ShardingJdbcConfiguration      : [BSF][Sharding-jdbc]已启动!!!
2022-02-18 15:04:57.232  INFO 2604 --- [           main] com.alibaba.druid.pool.DruidDataSource   : {dataSource-1} inited
2022-02-18 15:04:58.661  INFO 2604 --- [           main] com.alibaba.druid.pool.DruidDataSource   : {dataSource-2} inited
2022-02-18 15:05:02.531 ERROR 2604 --- [           main] c.b.mybatisplus.MybatisConfiguration
或者在redisconfig中配置
@Configuration
public class RedisCacheConfig {

    @Bean
    public KeyGenerator simpleKeyGenerator() {
        return (o, method, objects) -> {
            StringBuilder stringBuilder = new StringBuilder();
            stringBuilder.append(o.getClass().getSimpleName());
            stringBuilder.append(".");
            stringBuilder.append(method.getName());
            stringBuilder.append("[");
            for (Object obj : objects) {
                stringBuilder.append(obj.toString());
            }
            stringBuilder.append("]");

            return stringBuilder.toString();
        };
    }

    @Bean
    public CacheManager cacheManager(RedisConnectionFactory redisConnectionFactory) {
        return new RedisCacheManager(
            RedisCacheWriter.nonLockingRedisCacheWriter(redisConnectionFactory),
            this.getRedisCacheConfigurationWithTtl(600), // 默认策略,未配置的 key 会使用这个
            this.getRedisCacheConfigurationMap() // 指定 key 策略
        );
    }

    private Map<String, RedisCacheConfiguration> getRedisCacheConfigurationMap() {
        Map<String, RedisCacheConfiguration> redisCacheConfigurationMap = new HashMap<>();
        redisCacheConfigurationMap.put("UserInfoList", this.getRedisCacheConfigurationWithTtl(3000));
        redisCacheConfigurationMap.put("UserInfoListAnother", this.getRedisCacheConfigurationWithTtl(18000));

        return redisCacheConfigurationMap;
    }

    private RedisCacheConfiguration getRedisCacheConfigurationWithTtl(Integer seconds) {
        Jackson2JsonRedisSerializer<Object> jackson2JsonRedisSerializer = new Jackson2JsonRedisSerializer<>(Object.class);
        ObjectMapper om = new ObjectMapper();
        om.setVisibility(PropertyAccessor.ALL, JsonAutoDetect.Visibility.ANY);
        om.enableDefaultTyping(ObjectMapper.DefaultTyping.NON_FINAL);
        jackson2JsonRedisSerializer.setObjectMapper(om);

        RedisCacheConfiguration redisCacheConfiguration = RedisCacheConfiguration.defaultCacheConfig();
        redisCacheConfiguration = redisCacheConfiguration.serializeValuesWith(
            RedisSerializationContext
                .SerializationPair
                .fromSerializer(jackson2JsonRedisSerializer)
        ).entryTtl(Duration.ofSeconds(seconds));

        return redisCacheConfiguration;
    }
}
过期时间
    @Cacheable(value = "UserInfoList", keyGenerator = "simpleKeyGenerator") // 3000秒
    @Cacheable(value = "UserInfoListAnother", keyGenerator = "simpleKeyGenerator") // 18000秒
    @Cacheable(value = "DefaultKeyTest", keyGenerator = "simpleKeyGenerator") // 600秒,未指定的key,使用默认策略
在spring2.0前后差异 构造器差异 before
RedisCacheManager cacheManager = new RedisCacheManager(RedisTemplate redisTemplate);
after
RedisCacheManager cacheManager = new RedisCacheManager(RedisCacheWriter redisCacheWriter,RedisCacheConfiguration redisCacheConfiguration);
创建RedisCacheWriter分为有锁和无锁
static RedisCacheWriter nonLockingRedisCacheWriter(RedisConnectionFactory connectionFactory) {

        Assert.notNull(connectionFactory, "ConnectionFactory must not be null!");

        return new DefaultRedisCacheWriter(connectionFactory);
    }
    JedisConnectionFactory
    /**
     * Create new {@link RedisCacheWriter} with locking behavior.
     *
     * @param connectionFactory must not be {@literal null}.
     * @return new instance of {@link DefaultRedisCacheWriter}.
     */
    static RedisCacheWriter lockingRedisCacheWriter(RedisConnectionFactory connectionFactory) {

        Assert.notNull(connectionFactory, "ConnectionFactory must not be null!");

        return new DefaultRedisCacheWriter(connectionFactory, Duration.ofMillis(50));
    }
即使是同一个缓存CacheManager管理的缓存实例,配置有可能不一样。
指定redis数据序列化
.serializeKeysWith(RedisSerializationContext.SerializationPair.fromSerializer(keySerializer()))
                .serializeValuesWith(RedisSerializationContext.SerializationPair.fromSerializer(valueSerializer()))
JAVA序列化方式 序列化方式一实现:Serializable接口 序列化方式二:Externalizable显式序列化 序列化方式三:实现Serializable接口+添加writeObject()和readObject()方法。(显+隐序列化) 对了,想要使用cache记得开启缓存注解,@EnableCaching 转过头来看下CacheOperation,这里面是缓存相关注解的父类,在SpringCacheAnnotationParser中管理了子类相关
static {
        CACHE_OPERATION_ANNOTATIONS.add(Cacheable.class);
        CACHE_OPERATION_ANNOTATIONS.add(CacheEvict.class);
        CACHE_OPERATION_ANNOTATIONS.add(CachePut.class);
        CACHE_OPERATION_ANNOTATIONS.add(Caching.class);
    }
解析注解的时候他们的入参,实现一模一样,只有返回值不一样,但是一模一样的代码写了三遍,为什么不判断类型动态返回呢~
@Nullable
    private Collection<CacheOperation> parseCacheAnnotations(
            DefaultCacheConfig cachingConfig, AnnotatedElement ae, boolean localOnly) {

        Collection<? extends Annotation> anns = (localOnly ?
                AnnotatedElementUtils.getAllMergedAnnotations(ae, CACHE_OPERATION_ANNOTATIONS) :
                AnnotatedElementUtils.findAllMergedAnnotations(ae, CACHE_OPERATION_ANNOTATIONS));
        if (anns.isEmpty()) {
            return null;
        }

        final Collection<CacheOperation> ops = new ArrayList<>(1);
        anns.stream().filter(ann -> ann instanceof Cacheable).forEach(
                ann -> ops.add(parseCacheableAnnotation(ae, cachingConfig, (Cacheable) ann)));
        anns.stream().filter(ann -> ann instanceof CacheEvict).forEach(
                ann -> ops.add(parseEvictAnnotation(ae, cachingConfig, (CacheEvict) ann)));
        anns.stream().filter(ann -> ann instanceof CachePut).forEach(
                ann -> ops.add(parsePutAnnotation(ae, cachingConfig, (CachePut) ann)));
        anns.stream().filter(ann -> ann instanceof Caching).forEach(
                ann -> parseCachingAnnotation(ae, cachingConfig, (Caching) ann, ops));
        return ops;
    }

    private CacheableOperation parseCacheableAnnotation(
            AnnotatedElement ae, DefaultCacheConfig defaultConfig, Cacheable cacheable) {

        CacheableOperation.Builder builder = new CacheableOperation.Builder();

        builder.setName(ae.toString());
        builder.setCacheNames(cacheable.cacheNames());
        builder.setCondition(cacheable.condition());
        builder.setUnless(cacheable.unless());
        builder.setKey(cacheable.key());
        builder.setKeyGenerator(cacheable.keyGenerator());
        builder.setCacheManager(cacheable.cacheManager());
        builder.setCacheResolver(cacheable.cacheResolver());
        builder.setSync(cacheable.sync());

        defaultConfig.applyDefault(builder);
        CacheableOperation op = builder.build();
        validateCacheOperation(ae, op);

        return op;
    }

    private CacheEvictOperation parseEvictAnnotation(
            AnnotatedElement ae, DefaultCacheConfig defaultConfig, CacheEvict cacheEvict) {

        CacheEvictOperation.Builder builder = new CacheEvictOperation.Builder();

        builder.setName(ae.toString());
        builder.setCacheNames(cacheEvict.cacheNames());
        builder.setCondition(cacheEvict.condition());
        builder.setKey(cacheEvict.key());
        builder.setKeyGenerator(cacheEvict.keyGenerator());
        builder.setCacheManager(cacheEvict.cacheManager());
        builder.setCacheResolver(cacheEvict.cacheResolver());
        builder.setCacheWide(cacheEvict.allEntries());
        builder.setBeforeInvocation(cacheEvict.beforeInvocation());

        defaultConfig.applyDefault(builder);
        CacheEvictOperation op = builder.build();
        validateCacheOperation(ae, op);

        return op;
    }

    private CacheOperation parsePutAnnotation(
            AnnotatedElement ae, DefaultCacheConfig defaultConfig, CachePut cachePut) {

        CachePutOperation.Builder builder = new CachePutOperation.Builder();

        builder.setName(ae.toString());
        builder.setCacheNames(cachePut.cacheNames());
        builder.setCondition(cachePut.condition());
        builder.setUnless(cachePut.unless());
        builder.setKey(cachePut.key());
        builder.setKeyGenerator(cachePut.keyGenerator());
        builder.setCacheManager(cachePut.cacheManager());
        builder.setCacheResolver(cachePut.cacheResolver());

        defaultConfig.applyDefault(builder);
        CachePutOperation op = builder.build();
        validateCacheOperation(ae, op);

        return op;
    }

    private void parseCachingAnnotation(
            AnnotatedElement ae, DefaultCacheConfig defaultConfig, Caching caching, Collection<CacheOperation> ops) {

        Cacheable[] cacheables = caching.cacheable();
        for (Cacheable cacheable : cacheables) {
            ops.add(parseCacheableAnnotation(ae, defaultConfig, cacheable));
        }
        CacheEvict[] cacheEvicts = caching.evict();
        for (CacheEvict cacheEvict : cacheEvicts) {
            ops.add(parseEvictAnnotation(ae, defaultConfig, cacheEvict));
        }
        CachePut[] cachePuts = caching.put();
        for (CachePut cachePut : cachePuts) {
            ops.add(parsePutAnnotation(ae, defaultConfig, cachePut));
        }
    }
JSR(JCP Java Community Process)文档查询地址,例如JSR107规范,servlet规范等等,
https://www.docs4dev.com/docs/zh/spring-framework/5.1.3.RELEASE/reference/web.html
以及各类中文版在线开发文档
https://www.docs4dev.com/docs
对了本次的主题虽然是Servlet,但不全是Servlet,都是用servlet带出来的,比如现在
 public DynamicThreadPoolExecutor(int corePoolSize,
                                     int maximumPoolSize,
                                     long keepAliveTime,
                                     TimeUnit unit,
                                     boolean waitForTasksToCompleteOnShutdown,
                                     long awaitTerminationMillis,
                                     @NonNull BlockingQueue<Runnable> workQueue,
                                     @NonNull String threadPoolId,
                                     @NonNull ThreadFactory threadFactory,
                                     @NonNull RejectedExecutionHandler handler) {
        super(corePoolSize, maximumPoolSize, keepAliveTime, unit, waitForTasksToCompleteOnShutdown, awaitTerminationMillis, workQueue, threadPoolId, threadFactory, handler);
        this.threadPoolId = threadPoolId;

        RejectedExecutionHandler rejectedProxy = (RejectedExecutionHandler) Proxy
                .newProxyInstance(
                        handler.getClass().getClassLoader(),
                        new Class[]{RejectedExecutionHandler.class},
                        new RejectedProxyInvocationHandler(handler, rejectCount));
        setRejectedExecutionHandler(rejectedProxy);
    }
mybatis动态代理
protected T newInstance(MapperProxy<T> mapperProxy) {
    //这里使用JDK动态代理,通过Proxy.newProxyInstance生成动态代理类
    // newProxyInstance的参数:类加载器、接口类、InvocationHandler接口实现类
    // 动态代理可以将所有接口的调用重定向到调用处理器InvocationHandler,调用它的invoke方法
    return (T) Proxy.newProxyInstance(mapperInterface.getClassLoader(), new Class[] { mapperInterface }, mapperProxy);
  }

  public T newInstance(SqlSession sqlSession) {
    final MapperProxy<T> mapperProxy = new MapperProxy<>(sqlSession, mapperInterface, methodCache);
    return newInstance(mapperProxy);
  }
问题: 一个接口方法,返回值相同,方法相同,参数为Person,现在有子类PersonMan和PersonWoman,如何对接口进行适配?
public class Person {

    private  String name;


    private  Integer age;

}
public class PersonMan extends  Person{

    private String character;
}

public class PersonWoman  extends Person{

    private String constellation;
}
在泛型类型中支持class等,以及省去参数转换的上界通配符<? extends E>:上界通配符,表明参数化类型可能是所指定的类型,或者此类型的子类;
public enum ElementType {
    /** Class, interface (including annotation type), or enum declaration */
    TYPE,

    /** Field declaration (includes enum constants) */
    FIELD,

    /** Method declaration */
    METHOD,

    /** Formal parameter declaration */
    PARAMETER,

    /** Constructor declaration */
    CONSTRUCTOR,

    /** Local variable declaration */
    LOCAL_VARIABLE,

    /** Annotation type declaration */
    ANNOTATION_TYPE,

    /** Package declaration */
    PACKAGE,

    /**
     * Type parameter declaration
     *
     * @since 1.8
     */
    TYPE_PARAMETER,

    /**
     * Use of a type
     *
     * @since 1.8
     */
    TYPE_USE
}
如下
public interface PersonService {

    public void  queryPerson(List<? extends Person> list);

}


@Service
public class PersonServiceImpl implements PersonService{


    @Override
    public void queryPerson(List<? extends Person> list) {
        System.out.println(JSONObject.toJSONString(list));
    }
}

List<Person> list = new ArrayList<>();


//List<PersonMan> list = new ArrayList<>();


//List<PersonWoman> list = new ArrayList<>();


personService.queryPerson(list);
那么如果参数类型为注解呢?
@Override
    public void queryPerson(List<? extends Person> list,Class<? extends Annotation> t) {
        System.out.println(JSONObject.toJSONString(list));

        System.out.println(cast.annotationType());
    }
那么为什么上面的parsePutAnnotation不用呢? NONONO,其实是用了的,只不过方法不同
private static final Set<Class<? extends Annotation>> CACHE_OPERATION_ANNOTATIONS = new LinkedHashSet<>(8);

    static {
        CACHE_OPERATION_ANNOTATIONS.add(Cacheable.class);
        CACHE_OPERATION_ANNOTATIONS.add(CacheEvict.class);
        CACHE_OPERATION_ANNOTATIONS.add(CachePut.class);
        CACHE_OPERATION_ANNOTATIONS.add(Caching.class);
    }
其实我就是看他的写的emoj,而且在caching这个注解里他包含了4种注解,然后统一进行管理的。
插播:Dbeaver中普通操作都会,安利一个类似idea的快捷键功能,Template--->SQL编辑器中可设置常用SQL,快捷键加Tab唤出.
国际化包含文本的国际化和时区的国际化
@Repository VS @NoRepositoryBean
回到cache相关中,在开启缓存时提示错误需要加入@Enablecahing注解,而在验证缓存注解时,在接口加了NoRepositoryBean,那么NoRepositoryBean又是什么?跟@Repository有何不同? NoRepositoryBean:见名知意就是不需要创建的bean,在Springboot jpa中标识,雷同与不需要序列化的字段标识transient; NoRepositoryBean用做标记当前接口或者类(抽象)不应该作为RepositoryBean被注册到Spring上下文,Springdata提供了自动代理的机制
JMS(java message service)JSR-914
1.JMS:用于应用程序之间,或在分布式系统中发送消息。而一些生产者,消费者,消息等不是消息队列的特指,而是JMS的所有特性。
2.AMQP:(Advanced Message Queuing Protocol)
消息队列协议,中文规范,消息代理(message brokers) 从发布者(publisher)亦称作生产者(producers)接受消息,根据
不同的路由规则(Routing Rule)把接受到的消息发送给处理消息的消费者(consumers);
3.kafka? 零拷贝? 哎嗨,重点来了
官网:kafka.apache.org/
Kafka是一个分布式的基于发布/订阅模式的消息队列(Message Queue),主要应用于大数据实时处理领域。
其实大多数的消息队列的实时性只能保持在秒级,而在银行是能够在纳秒之间的,kafka2.8.x之前是基于zookeeper的,
架构图
默认分区内存大小32M,每个批次大小是16K 1.批次数据满了才会发送,16K 2.linger.ms批次数据未满时,延迟发送时间 Sender数据拉取 同步vs异步发送
1.配置
2.连接集群
3.指定序列化类型
4.创建生产者
5.发送数据
6.关闭资源
分区自定义,合理使用资源,负载均衡 可配置类都要放到统一类管理 1.指定分区的情况 2.没有指定分区,带key,key的hash值与topic的分区值取模 3.没有指定分区,不带key,粘性分区,随机选择一个分区,尽可能一直使用该分区 自定义分区器:实现分区器接口 一般会说那个表名作为key 自定义分区器: 恰好达到批次大小就进行发送 导致数据延迟: 生产环境配置5-100ms之间 压缩类型snappy 提供生产者吞吐量 应答ack 0 1 -1 动态ISR replica.lag.time.max.ms默认30s,超出则踢出 数据完全可靠条件: ACK级别设置为1 +分区副本大于等于2 +ISR应答最小副本数量大于等于2 要求可靠性 要求速度 默认值为int最大值 ack和重试数据 幂等性和事务:保证单分区单回话内不会重复 开启事务,必须开启幂等性 指定事务id 数据有序 单分区有序: 多分区有序: 数据乱序 kafka1.x前后差别: 是否开启幂等性区别: 其中一个出现异常则先缓存,后落盘 zookeeper中存放的信息 工具:prettyzoo
1、brokerid 2、主题 3.消费者信息
AR:是kafka中你那个所有分区副本的总称 ISR:leader和follower之间正常通讯的节点 除了基础知识点之外我最想看的就是kafka的零拷贝跟netty的关系。
DMA 在介绍零拷贝之前,我们先来看一个技术名词DMA(Direct Memory Access 直接内存访问)。它是现代电脑的重要特征之一,允许不同速度的硬件之间直接交互,而不需要占用CPU的中断负载。DMA传输将一个地址空间复制到另一个地址空间,当CPU 初始化这个传输之后,实际的数据传输是有DMA设备之间完成,这样可以大大的减少CPU的消耗。我们常见的硬件设备都支持DMA
零拷贝有两种方式:mmap/sendfile,而直接内存的方式跟Netty也是如出一辙。
关于压缩类型snappy,他是Java提供的实现,在maven以来中可在kafka中看到
源码阅读
org.apache.kafka.clients.producer.ProducerRecord
    可指定主题
    private final String topic;
    分区
    private final Integer partition;
    头信息
    private final Headers headers;
    key
    private final K key;
    value
    private final V value;
    linger.ms
    private final Long timestamp;
构造器有几种,对于发送消息就有几种类型,consumerRecord同理,key和value需要指定序列化类。 所有的配置项存放在ProducerConfig中,本来想看几个代表性参数就可以了,但是后续的调优参数有很多配置是用的到的,还是要仔细看看。 比如每个batchsize批次内存大小默认是
.define(BATCH_SIZE_CONFIG, Type.INT, 16384, atLeast(0), Importance.MEDIUM, BATCH_SIZE_DOC)
16384/1024=16k 比如linger.ms默认为0ms
.define(LINGER_MS_CONFIG, Type.LONG, 0, atLeast(0), Importance.MEDIUM, LINGER_MS_DOC)
key指定的序列化类为
Serializer class for key that implements the <code>org.apache.kafka.common.serialization.Serializer</code> interface.
如果在配置文件中指定则需要全限定类名
zookeeper中存放的信息
broker启动后在zookeeper中注册 controller将节点信息记录到zookeeper中,推荐使用工具链接prettyzoo,存放brokerid,topic,消费者信息等。
Linux新增知识点
kafka 搭配 xcall jps ,查看集群下机器节点
kafka服务器挂了怎么办?
1.先尝试重启,重启成功直接解决 2.增加内存,CPU,宽带 3.如果副本数大于等于2,可以按照服役新节点方法执行,并配置负载均衡
Broker中的重要参数
| 参数名称 | Description |
|---|---|
| replica.lag.time.max.ms | ISR 中,如果 Follower 长时间未向 Leader 发送通信请求或同步数据,则该 Follower 将被踢出 ISR。该时间阈值,默认30s 。 |
| auto.leader.rebalance.enable | 默认是 true。 自动 Leader Partition 平衡。 |
| leader.imbalance.per.broker.percentage | 默认是 10%。每个 broker 允许的不平衡的 leader的比率。如果每个 broker 超过了这个值,控制器会触发 leader 的平衡。 |
| leader.imbalance.check.interval.seconds | 认值 300 秒 。检查 leader 负载是否平衡的间隔时间。 |
| log.segment.bytes | Kafka 中 log 日志是分成一块块存储的,此配置是指 log 日志划分 成块的大小,默认值 1G。 |
| log.index.interval.bytes | 默认 4kb,kafka 里面每当写入了 4kb 大小的日志(.log),然后就往 index 文件里面记录一个索引 |
| log.retention.hours | Kafka 中数据保存的时间,默认7天。 |
| log.retention.minutes | Kafka 中数据保存的时间,分钟级别,默认关闭。 |
文件清理策略
Kafka 中默认的日志保存时间为7天。 日志删除策略
