


🎼 前言
新起一个前端项目,除了决定项目架构,第一件事情,你会做什么?接手现成的项目,你又会做哪些重要的事情?
我新起一个项目的时候,第一件事情,就是把 husky + 各种 linter 都安排上。
接手现成的项目,第一看本地运行,第二看依赖更新,第三就是看 husky + 各种 linter 有没有安排上。
TL;DR
关爱洁癖程序员,寻求项目可持续发展,请把二哈 husky 和它的朋友们(commitlint、lint-staged、eslint、stylelint、markdownlint、npm-package-json-lint)都安排上。
主要内容

适合读者
- 前端开发
- 代码洁癖患者
你将获得
- 自主配置 husky、commitlint、lint-staged(eslint、stylelint、markdownlint、npm-package-json-lint)的能力
- 开发 linter 们的可共享 config 包的基础知识
编辑历史
| 日期 | 版本说明 |
|---|---|
| 2024/04/22 | V2,Husky 8 → 9 |
| 2023/09/16 | V1 |
💋 Why
自诩「肉眼 Linter」的我,原本是甚不喜欢在提交代码之前被拦一道的,直到我的项目开始需要有别人参与进来...
从此,Git log 看到一水儿的「update」,无数次因为明显的 Eslint 格式问题导致的 CR 往复...终于忍无可忍,只好给项目加上了二哈。
结果就是,不得不说「真香」。
一来上述的往复问题明显少了;二来,即使编码习惯强如「肉眼 Linter」的我,也会有偶尔迷糊的时候;三来,大家的代码习惯都有了不同程度的提升。
从此以后,我会故意在临时代码中放几个错误,以免误提交。
一个个都安排上
相关 devDependencies:
{
  "devDependencies": {
    "@alicloud/eslint-config": "^1.13.3",
    "@commitlint/cli": "^17.7.1",
    "@commitlint/config-conventional": "^17.7.0",
    "eslint": "^8.49.0",
    "husky": "^9.0.11",
    "lint-staged": "^14.0.1",
    "markdownlint-cli2": "^0.10.0",
    "npm-check-updates": "^16.14.4",
    "npm-package-json-lint": "^7.0.0",
    "postcss-less": "^6.0.0",
    "stylelint": "^15.10.3",
    "stylelint-config-standard": "^34.0.0"
  }
}
husky
一切的核心就是这个二哈 husky 了,可以参考 Get started。
V8 推荐它的自动脚本 npx husky-init && npm install,V9 做了很多的简化 npm i -D husky && npx husky init。
主要步骤
- 安装依赖
- 初始化
安装 husky
安装 husky:
# Step 1 - 安装依赖
npm i -D husky

# 或
pnpm add -D husky # 非 Workspace
pnpm add -w -D husky # Workspace
初始化
npx husky init

# 或
pnpx husky init
以上命令做了两个事情:
- 设置
scripts.prepare - 新建
.husky目录(pre-commit+_)
.husky 目录长这样:
| V9 | V8 |
|---|---|
 |  |
相较于 V8,V9 在 _ 下新增了所有的钩子,便于新手快速上手;且钩子文件(.huksy 下直属文件)的内容也作了简化,以下是 V8 的 pre-commit 代码:
#!/usr/bin/env sh
. "$(dirname -- "$0")/_/husky.sh"

npm test
V9 已经不需要前面的两行代码,变成这样:
npm test
该钩子表示在执行 git commit 前将先运行 npm test,只有 npm test 成功,才会真正执行 git commit,这样,问题代码就会被拦截在 commit 之外。
验证 husky
现在,我们需要验证的是,敲命令 git commit,会不会如预期先运行 npm test:
# Step 3 - 有新加文件
git add .

# Step 4 - 提交,报错
git commit -am 'husky setup'
报错了,因为 npm init 生的 "test": "echo \"Error: no test specified\" && exit 1" 会抛错,改:
# Step 5 - 让 test 不抛错
npm pkg set scripts.test="echo 'test nothing 😈'"

# Step 6 - 再次提交,成功
git commit -am 'husky setup'  # 8
过程图解
以上 Step 1-6 如下图所示:

commitlint
在用 commitlint 之前,我的 commit message 长这样:

其实,这样也没有任何问题,该有的都有,这种「不成文的约定」,在只有一个人写代码的时候,毫无问题。一旦超过一个人,问题就来了。
每次我在 Git 上回顾别人代码的时候,看到一水的「update」,完全不清楚他到底干了什么。我没法要求,或者没法一直督促他们该怎样写,于是 commitlint 出场的时候到了。
同时我自己的风格也是「被教育」好了:

主要步骤
更详细的说明可以看官方文档 Guide: Local setup。
- 安装依赖
- .commitlintrc
- .husky/commit-msg
安装 commitlint
安装 @commitlint/cli + @commitlint/config-conventional:
# Step 1 - 安装依赖
npm i -D @commitlint/{cli,config-conventional}

# 或
pnpm add -D @commitlint/{cli,config-conventional} # 非 Workspace
pnpm add -w -D @commitlint/{cli,config-conventional} # Workspace
设置 commitlint
.commitlintrc
# Step 2 - 新建 .commitlintrc
echo "{\n  \"extends\": [\n    \"@commitlint/config-conventional\"\n  ]\n}" > .commitlintrc
.husky/commit-msg
# Step 3 - 加 commit-msg 钩子
echo "npx --no -- commitlint --edit \${1}" > .husky/commit-msg

如上图,现在 .husky 下多了一个 commit-msg,内容为:
npx --no -- commitlint --edit ${1}
验证 commitlint
# Step 4 - 有新加文件
git add .

# Step 5 - 不合规 message,提交失败
git commit -m 'this commit shall fail..'

# Step 6 - 合规 message,提交成功
git commit -m 'chore: commitlint setup'
过程图解
以上 Step 1-6 如下图所示:

lint-staged
接下来是「不良代码」的拦截了,它的核心是 lint-staged。
主要步骤
更详细的说明可以看官方文档 README: Installation and setup。
- 安装依赖
- .husky/pre-commit
- .lintstagedrc
安装 lint-staged
安装 lint-staged:
# Step 1 - 安装依赖
npm i -D lint-staged

# 或
pnpm add -D lint-staged # 非 Workspace
pnpm add -w -D lint-staged # Workspace
设置 lint-staged
.husky/pre-commit
# Step 2 - 新增 pre-commit 下的命令
echo "npx lint-staged" > .husky/pre-commit
也可以直接修改 .husky/pre-commit:
  npm test
+ npx lint-staged
.lintstagedrc
参考 Configuration。
Step 3 - 配置文件
echo "{\n  \"###\": \"do nothing\"\n}" > .lintstagedrc
以上只是为了告诉 lint-staged 已配置完毕,但不会有任何文件命中规则。如果没有这一段,或者这一段是 {},就会报错「husky - pre-commit hook exited with code 1 (error)」。
验证 lint-staged
# Step 4 - 有新加文件
git add .

# Step 5 - 提交,没有文件命中,所以直接通过
git commit -m 'chore: lint-staged setup'
过程图解
以上 Step 1-5 如下图所示:

lint-staged » eslint
让 lint-staged 真正有用,我们把能安排上的 linter 都安排是,先 eslint。
主要步骤
- 安装依赖
- 设置
安装 eslint
接下来,增加 eslint 让 lint-staged 能够真正地工作。
安装 eslint + @alicloud/eslint-config:
# Step 1 - 安装依赖
npm i -D eslint @alicloud/eslint-config

# 或
pnpm add -D eslint @alicloud/eslint-config # 非 Workspace
pnpm add -w -D eslint @alicloud/eslint-config # Workspace
注意如果安装其他
eslint-config,可能其peerDependencies要求你自行安装部分依赖,@alicloud/eslint-config是我写的,基于 eslint-config-ali 但更严格,已经内置了必要的依赖。
设置 eslint
.eslintrc
# Step 2 - 新建 .eslintrc
echo "{\n  \"extends\": \"@alicloud/eslint-config/tsx\"\n}" > .eslintrc
.lintstagedrc
{
-  "###": "do nothing"
+  "*.{js,ts,tsx}": "eslint"
}
这告诉 lint-staged:执行 git commit 之前,对后缀为 .js、.ts、.tsx 的文件执行 eslint。
验证 eslint
我们随便新建一个 TS 文件,故意安排一些问题:
export default function   helloWOrld(): string {
  if (true) {

    console.info('whatever'); //eslint-disable-line no-console
  }
  return 'hello world'


}
注意:对 TS 文件,eslint 必须有 tsconfig.json 才能正常工作。
WebStorm 下的报错:

尝试提交,如期被拦:
# Step 3 - 有新加文件
git add .

# Step 4 - 提交,失败
git commit -m 'chore: eslint setup and test'

修正所有的 Error,但留有一个 Warning:
export default function helloWorld(): string {
  if (true) {
    console.info('whatever'); // eslint-disable-line no-console
  }

  return 'hello world';
}
# Step 5 - 再次提交,成功
git commit -am 'chore: eslint setup and test'
过程图解
以上 Step 1-5 如下图所示:

lint-staged » stylelint
再来搞第二重要的 stylelint。
主要步骤
- 安装依赖
- .stylelintrc
- .lintstagedrc
安装 stylelint
安装 stylelint + stylelint-config-standard:
# # Step 1 - 安装依赖
npm i -D stylelint stylelint-config-standard

# 或
pnpm add -D stylelint stylelint-config-standard # 非 Workspace
pnpm add -w -D stylelint stylelint-config-standard # Workspace
设置 stylelint
.stylelintrc
# Step 2 - 新建 .stylelintrc
echo "{\n  \"extends\": \"stylelint-config-standard\"\n}" > .stylelintrc
.lintstagedrc
{
-  "*.{js,ts,tsx}": "eslint"
+  "*.{js,ts,tsx}": "eslint",
+  "*.{css}": "stylelint"
}
验证 stylelint
新建一个 CSS 文件,故意安排一些问题:
.empty {

}
.prop-dup {
  color: red;
  color: red;
}

// illegal comment and color shall be simple
.illegal-comment {
  background-color: #FF00CC;
}
WebStorm 下的报错:

尝试提交,如期被拦:
# Step 3 - 有新加文件
git add .

# Step 4 - 提交,失败
git commit -m 'chore: stylelint setup and test'
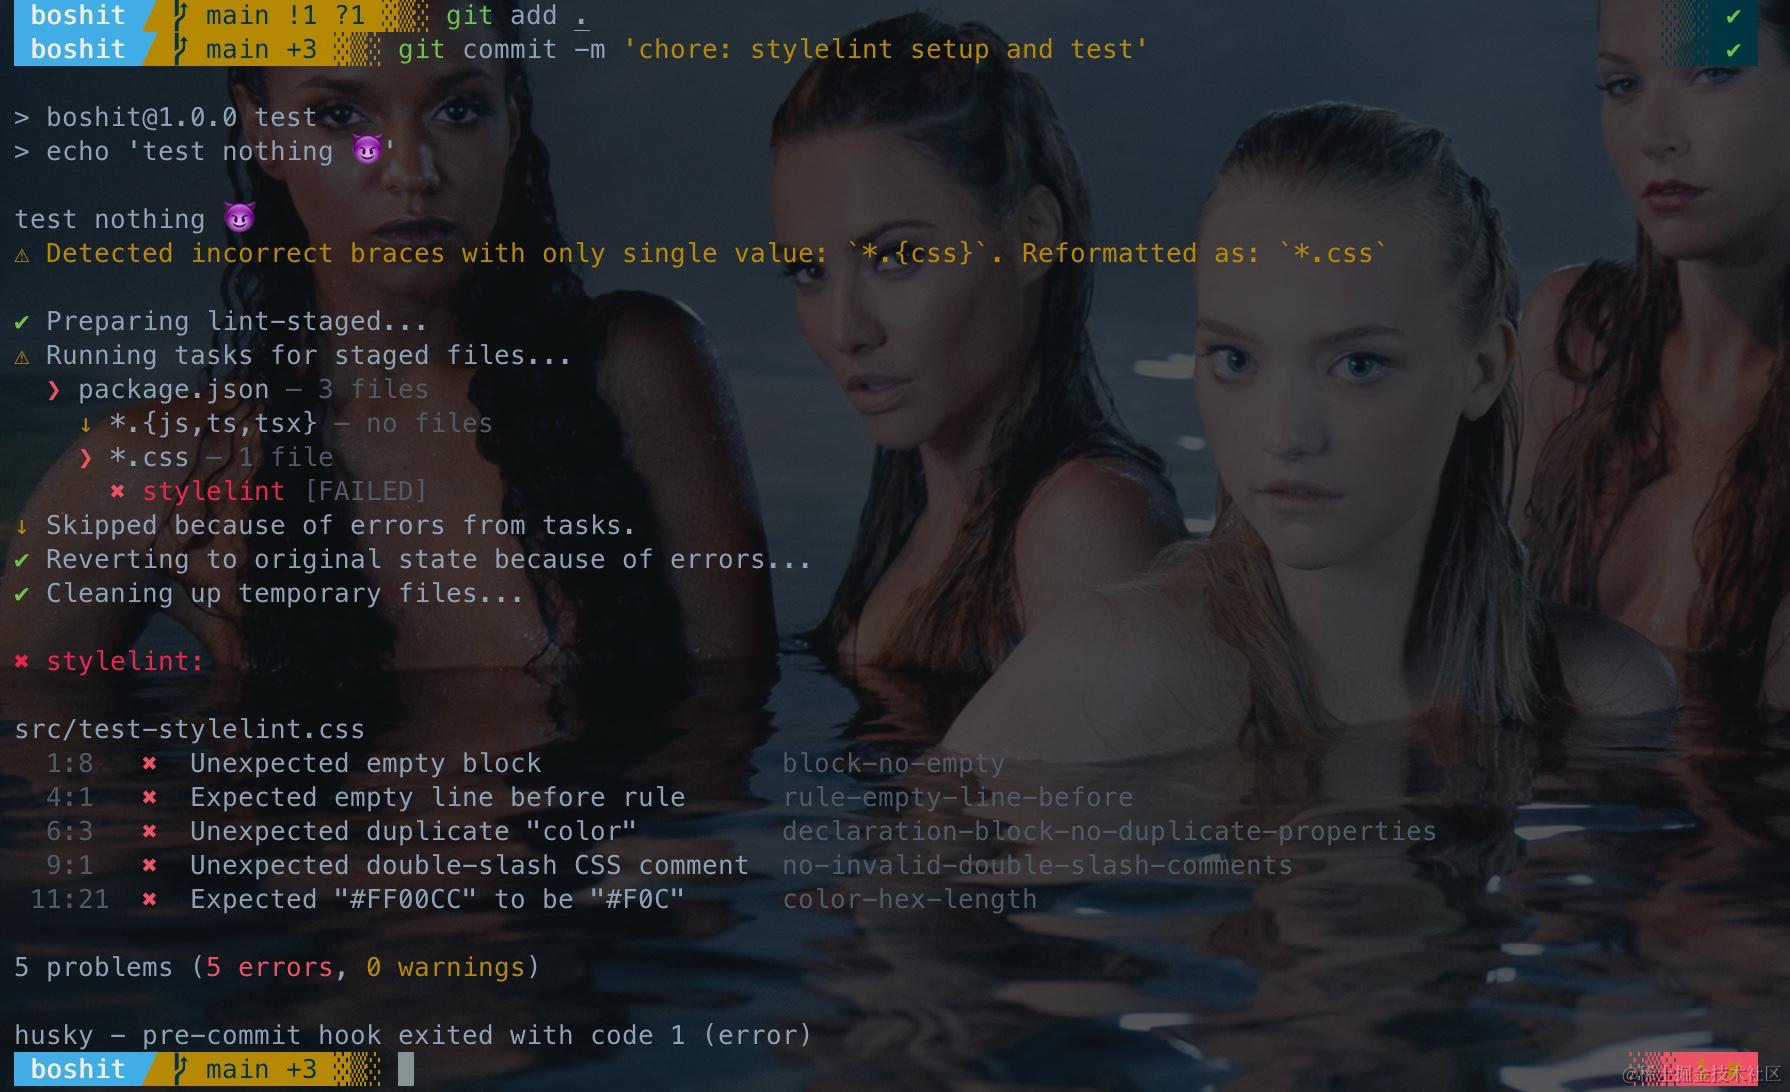
修正所有的 Error:
.prop-dup {
  color: red;
}

/* this is css comment */
.illegal-comment {
  background-color: #f0c;
}
# Step 5 - 再次提交,成功
git commit -am 'chore: stylelint setup and test'
过程图解
以上 Step 1-5 如下图所示:

lint-staged » stylelint » less 和其他
这年头,还有谁直接写 CSS 呢 🙈?Awesome Stylelint 列举了很棒的预设配置、插件和集成方案,非常值得学习研究。
项目中常用的有:
| CSS 变体 | 所需依赖 |
|---|---|
| Less | postcss-less |
| Sass | postcss-sass |
| Scss | postcss-scss |
| Styled-components | postcss-styled-syntax 或 postcss-styled-components |
这里我们以 less 为例进行说明。
主要步骤
- 安装依赖
- .stylelintrc
- .lintstagedrc
安装 postcss-less
安装 postcss-less:
# Step 1 - 安装依赖
npm i -D postcss-less

# 或
pnpm add -D postcss-less # 非 Workspace
pnpm add -w -D postcss-less # Workspace
设置 postcss-less
.stylelintrc
手改文件:
 {
-  "extends": "stylelint-config-standard"
+  "extends": "stylelint-config-standard",
+  "overrides": [{
+    "files": ["*.less"],
+    "customSyntax": "postcss-less"
+  }]
 }
.lintstagedrc
{
  "*.{js,ts,tsx}": "eslint",
-  "*.{css}": "stylelint"
+  "*.{css,less}": "stylelint"
}
验证 postcss-less
新建一个 LESS 文件,故意安排一些问题:
.article {
  p {
    margin: 1em 0em;
  }

  em {
    font-style: normal;
    color: #f70;
  }
  button {

  }

  // a warning message
  .WarningMessage {
    padding: 12px;
    padding: 14px;
    background-color: #ffc;
    transition: all ease 200ms;
  }
}
WebStorm 下的报错:

尝试提交,如期被拦:
# Step 2 - 有新加文件
git add .

# Step 3 - 提交,失败
git commit -am 'chore: stylelint for less test'

修正所有的 Error:
.article {
  p {
    margin: 1em 0;
  }

  em {
    font-style: normal;
    color: #f70;
  }

  // a warning message
  .warning-message {
    padding: 12px;
    background-color: #ffc;
    transition: all ease 200ms;
  }
}
# Step 4 - 再次提交,成功:
git commit -am 'chore: stylelint for less test'
过程图解
以上 Step 1-4 如下图所示:

lint-staged » markdownlint
Markdown,程序员都喜欢,但不是每个人写出来的都让人看着舒服。
主要步骤
- 安装依赖
- .markdownlint.yml(可选,但推荐)
- .lintstagedrc
安装 markdownlint-cli2
有两个包可以用:markdownlint-cli 或 markdownlint-cli2,两个不是升级或竞争关系,两个作者相互间还比较熟。两个包用起来效果接近,但 2 的效率会好一些(感觉不大出来)。
你可以随便用哪个,我用 2。
# Step 1 - 安装依赖
npm i -D markdownlint-cli2

# 或
pnpm add -D markdownlint-cli2 # 非 Workspace
pnpm add -w -D markdownlint-cli2 # Workspace
设置 markdownlint-cli2
.markdownlint.yml
# Step 2 - 新建 .markdownlint.yml
touch .markdownlint.yml
Markdownlint 有 默认的规则,即使没有 .markdownlint.yml 也能正常工作,只是默认设置可能不是你或者你的团队希望的写法。
可以在 .markdownlint.yml 对默认规则进行覆盖,更可以把你自己的规则发布成包,然后在你所有项目下继承。
补充 .markdownlint.yml 内容:
# refer to https://github.com/DavidAnson/markdownlint/blob/main/doc/Rules.md
# https://github.com/DavidAnson/markdownlint/blob/main/schema/.markdownlint.yaml

# MD004/ul-style - Unordered list style
MD004:
  style: "sublist"

# MD013/line-length - Line length
MD013:
  line_length: 200
  heading_line_length: 128
  code_block_line_length: 200

# MD024/no-duplicate-heading/no-duplicate-header - Multiple headings with the same content
MD024:
  allow_different_nesting: true

# MD047/single-trailing-newline
MD047: false
当然,你可以将自己的预设发布成包,然后在需要的地方继承它:
extends: "..."
.lintstagedrc
{
+  "*.md": "markdownlint-cli2",
  "*.{js,ts,tsx}": "eslint",
  "*.{css,less}": "stylelint"
}
验证 markdownlint-cli2
新建或者修改 Markdown 文件,故意安排一些问题:
# README

# 1. Title 1

## title shall start with capital letter

[an empty link]()

* list 1
* list 2
+ list prefix shall not mix

# 2. Title 2

This is blah blah.

## Hello

Blah blah blah.

## Hello

The heading above is a duplicate
VSCode 下报错(需装插件,WebStorm 没有此福利):

# Step 3 - 有新加文件
git add .

# Step 4 - 提交,失败
git commit -m 'chore: markdownlint test'

修正所有的 Error:
# README

## 1. Title 1

### title shall start with capital letter

[an empty link](http://www.google.com/)

* list 1
* list 2
  + sub list item 1

## 2. Title 2

This is blah blah.

## Hello

Blah blah blah.

## Hello 2

The heading above is a duplicate
# Step 5 - 再次提交,成功
git commit -am 'chore: markdownlint test'
过程图解
以上 Step 1-5 如下图所示:

lint-staged » npm-package-json-lint
「什么?package.json 都要 lint?」
如果你需要写 package,采用 Monorepo 的方式管理,这就很有必要了。
主要步骤
- 安装依赖
- .npmpackagejsonlintrc.json
- .lintstagedrc
安装 npm-package-json-lint
安装 npm-package-json-lint + npm-package-json-lint-config-default:
# Step 1 - 安装依赖
npm i -D npm-package-json-{lint,lint-config-default}

# 或
pnpm add -D npm-package-json-{lint,lint-config-default} # 非 Workspace
pnpm add -w -D npm-package-json-{lint,lint-config-default} # Workspace
设置 npm-package-json-lint
.npmpackagejsonlintrc.js
# Step2 - 新建配置文件
touch .npmpackagejsonlintrc.js
填充内容如下:
module.exports = {
  extends: 'npm-package-json-lint-config-default',
  rules: { // rules ref: https://npmpackagejsonlint.org/docs/rules
    // required stuff
    'require-description': 'error',
    'require-keywords': 'error',
    'require-license': 'error',
    'require-author': 'error',
    'require-bugs': 'error',
    'require-repository': 'error',
    'require-homepage': 'error',
    // format
    'name-format': 'error',
    'version-format': 'error',
    'description-format': ['error', {
      requireCapitalFirstLetter: true,
      requireEndingPeriod: true
    }],
    // no- / prefer-
    'no-repeated-dependencies': 'error',
    'no-duplicate-properties': 'error',
    'prefer-alphabetical-peerDependencies': 'error',
    'prefer-alphabetical-dependencies': 'error',
    'prefer-alphabetical-devDependencies': 'error',
    'prefer-alphabetical-optionalDependencies': 'error',
    'prefer-alphabetical-bundledDependencies': 'error',
    'prefer-property-order': ['error', [
      // basic info
      'name',
      'version',
      'description',
      'keywords',
      'license',
      // output
      'private',
      'sideEffects',
      'files',
      'exports',
      'main',
      'module',
      'umd',
      'browser',
      'types',
      'directories',
      'bin',
      'man',
      // repo info
      'author',
      'authors',
      'contributors',
      'homepage',
      'repository',
      'publishConfig',
      'bugs',
      'funding',
      'workspaces',
      // env
      'engines',
      'os',
      'cpu',
      // dep
      'packageManager',
      'peerDependencies',
      'peerDependenciesMeta',
      'devDependencies',
      'dependencies',
      'bundleDependencies',
      'optionalDependencies',
      'overrides',
      // config
      'pre-commit',
      'lint-staged',
      'eslintConfig',
      'stylelint',
      'npmpackagejsonlint',
      'babel',
      'browserify',
      // npm run
      'config',
      'scripts'
    ]]
  }
};
.lintstagedrc
{
+  "package.json": "npmPkgJsonLint",
  "*.md": "markdownlint-cli2",
  "*.{js,ts,tsx}": "eslint",
  "*.{css,less}": "stylelint"
}
验证 npm-package-json-lint
现成的 package.json 已经被改了,会触发检查,有些问题:
#  Step 3 - 有新加文件
git add .

# Step 4 - 提交,失败
git commit -m 'chore: npm-package-json-lint setup and test'

改至没有问题:
# Step 5 - 再次提交,成功
git commit -am 'chore: npm-package-json-lint setup and test'
过程图解
以上 Step 1-5 如下图所示:

约束提交用户信息和分支规范
操作到现在,你打开 .husky 可以看到有 commit-msg 和 pre-commit 两个文件,熟悉 Git 的话,你应该知道 Git Hooks,而且是「Client-side Hook」。
是的,这两个就是 Git Hooks,和原生的不一样,Husky 让他们得以提交到仓库,从而在所有人的机器上保持一致。
如果我没记错的话,早期的 Husky 在 prepare 阶段会把这些 Hook 拷贝到
.git/hooks下。
Husky 支持所有的 Git Hooks,前提是文件需要有执行权限,如果报错说没有执行权限,可以用 chmod +x <hook-file> 修复。
言归正传。对于公司的项目来说,通常会要求使用公司邮箱,还有可能会对分支命名有规范。做的好的,会在 Git 服务器上限制非公司邮箱不可提交(这会导致提交者不得不逐条修复提交记录),会通过工具链要求分支名必须符合一定的规范。
我最近就做了一件事情,因为发现提交记录中有不少的非公司邮箱,而且每个人的 user.name 风格都不一样,同时分支名称居然有人用中文,也没有一个版本的概念。
Git Hooks 是 Shell 写的,因此我们需要一些 Shell 的基础知识,可以在 Learn Shell 上入个门。
pre-commit 约束提交用户
Commit 之前,验证用户信息是否合法,并且避免直接在主分支上(也可以限制别的分支)直接提交代码。
实际写脚本的时候,应合理使用颜色将信息展示的更友好,并给出相应的修复方案,这里精简了。
- 限制提交用户名格式为全小写英文或拼音,名与姓之间用点号,如
boshi.wang,至于名在前姓在后就只能全靠自觉了 - 限制提交用户邮箱为公司邮箱(有一个 npm 包 husky-check-email,这里选择手写)
以下是两个无参方法,放在 pre-commit 中:
# 检查 Git 用户名,统一为小写的 `名.姓`
check_user_name() {
  userName="$(git config user.name)" # Git 要求一定有 user.name,这里一定有值

  if [[ ! "$userName" =~ ^[a-z]+\.[a-z]+$ ]]; then
    echo "Git user.name \"$userName\" not in \"name.surname\" format"
    exit 1
  fi
}

# 检查 Git 用户邮箱,仅允许公司邮箱
check_user_email() {
  userEmail="$(git config user.email)"

  if [ -z "$userEmail" ] || [[ ! "$userEmail" =~ @mycompay?\.com$ ]]; then
    echo "Git user.email not a company email"
    exit 1
  fi
}

# 不允许直接在主分支上提交代码
check_branch() {
  branch="$(git rev-parse --abbrev-ref HEAD)"

  if [ "$branch" = "master" ] || [ "$branch" = "main" ]; then
    echo "Do NOT commit on \"$branch\""
    exit 1
  fi
}
最后在 npx lint-staged 前调用这两个方法即可:
check_user_name
check_user_email
check_branch
npx lint-staged
pre-push 约束分支名
echo "todo" > .husky/pre-push 新建 pre-push 钩子。
规定分支命名有相应的规范,只有符合规范的分支可以被 push 到远程。
pre-push 内容如下:
# 仅允许 push 合法命名分支
check_branch() {
  # https://mirrors.edge.kernel.org/pub/software/scm/git/docs/githooks.html
  while read -r localRef localHash remoteRef remoteHash; do
    LOCAL_REF="$localRef"
    REMOTE_REF=${remoteRef}
    REMOTE_BRANCH=${remoteRef#refs/heads/}
  done

  # 不检查的情况
  # - 没有需要推送的变更 - $REMOTE_REF 为空
  # - 删除分支 - $LOCAL_REF 为 `(delete)`
  # - 提交 Tag - $REMOTE_REF 为 `refs/tags/*`
  if [[ ! "$REMOTE_REF" ]] || [[ "$LOCAL_REF" = "(delete)" ]] || [[ "$REMOTE_REF" =~ ^refs/tags/ ]]; then
    exit 0
  fi

  branch="$(git rev-parse --abbrev-ref HEAD)" # TODO 需要感知 origin 才行

  if [[ ! "$REMOTE_BRANCH" =~ ^(feature|fix|chore|docs|test|perf|refactor)/[0-9]+\.[0-9]+\.[0-9]+(-[a-z0-9\-]+)?$ ]]; then
    echo "Branch name \"$REMOTE_BRANCH\" is not allowed to push

Valid branch name examples:

  - feature/1.1.0-some-new-stuff
  - fix/1.0.1-fix-bug-xxx
  - chore/1.2.0-setup-dev-stuff
  - docs/1.0.2-update-readme
  - test/1.0.3-unit-test-for-xx
  - perf/1.3.0-improve-performance
  - refactor/2.0.0-refactor-xx

How to Fix

  1. git branch -m <good_branch_name>
  2. git push -u origin <good_branch_name>"

    exit 1
  fi
}

check_branch
🤔 以上脚本有一个问题,就是无法处理本地分支和远程分支名称不同的情况,我暂时不知道怎么解,望不吝赐教。
总结
以上,我们以 husky 为中心,为项目搭建了基本质量保障体系:
- husky
- commitlint - git message 质量
- lint-staged - 新提交代码质量
- eslint - JS、TS 代码质量
- stylelint - 样式代码书写规范
- markdownlint - Markdown 书写规范
- npm-package-json-lint - package.json 书写规范
- pre-commit 约束提交用户信息,并阻止在主分支直接提交代码
- pre-push 约束提交到远程的分支名规范
🍡 Shareable config
- 凡是支持
extends的,都可以将配置发布成包进行复用 - 凡是支持
plugins,都支持自定义扩展
所有的 Config 都可以,也都应该有可复用的 config 包,这里不十分具体地做介绍,唯一要强调的是依赖问题,个人的建议是:
xxlint-config将xxlint放在peerDependencies- 各种插件作为包的
dependencies,不要让 config 包的使用者安装 - 记得常升级
以下是相关的文档:
- Eslint - Shareable Config
- Eslint - Rules
- Stylint - Customizing
- Stylint - Rules
- Markdownlint 支持
extends - Markdownlint - Rules
- Package.json Lint - Shareable Config
- Package.json Lint - Rules
🙋 FAQ
❓ 如何解决 lint-staged「xx failed without output (ENOENT)」抛错?
一般是命令写错了,比如 markdownlint-cli 生成的命令是 markdownlint,如果你写成 markdownlint-cli,就会报这个错。
可以在 node_modules/.bin 下看命令的正确书写格式:

❓ 如何不进行 git commit 调试相关 linter 命令?
可以用 npx,比如:
npx eslint <file>npx stylelint <file>npx markdownlint-cli2 <file>npx markdownlint <file>使用markdownlint-cli时npx npmPkgJsonLint <file>
📌 Links
- husky
- commitlint
- lint-staged
- eslint
- stylelint
- markdownlint
- markdownlint-cli
- markdownlint-cli2
- npm-package-json-lint
- GitHub Collection - Clean code linters
🪭 写在最后
还有别的 linter 么?
