

一、前言
Zeroc ICE在简中互联网的资料十分匮乏,以至于大家线上使用时可能会有所顾虑。其实大家尽可放心,ZerocICE是一款性能和稳定性都非常优秀的RPC组件,这也是我当时选择ZerocICE作为XL-LightHouse的RPC组件的唯一原因。为便于大家快速了解ZerocICE,本文以v3.7版本为例介绍其部署和使用方式。
二、特性
-
跨语言通信
-
高性能RPC
-
安全通信
-
实时压缩
-
注册中心支持主从备份
-
节点负载均衡,可动态调整
-
支持同步调用和异步调用
三、名词解释
1、Slice语义
ZerocICE目前支持的开发语言有:C++、Java、C#、JavaScript、Python、Ruby、Swift、Objective-C、PHP。通过Slice语义,不同语言开发的客户端和服务端可以完全互通。Slice语义可以理解成一种描述接口构成(接口名称、接口参数类型、返回值类型)的标准。ZerocICE提供了Slice转化工具,可以在各种系统平台将Slice语义转化成对应的接口的代码。比如相同的Slice文件,在X86平台可以通过Slice2Java转化成相应的Java接口代码,在ARM平台通过Slice2C++可以转化成对应的C++接口代码。
2、Ice.Object
Ice.Object是RPC接口的抽象,ICE中一个Object对象可以包含多个接口,每一个接口对应一个响应客户端请求的Object实体。ICE使用(Object Identity)来区分不同的Object对象,identity在集群中必须全局唯一。
3、Proxy
Ice.Object是相对于ICE服务端来说的,而Proxy则是相对于ICE客户端来说的.客户端要想调用某个接口,必须持有该对象的代理,Proxy就是Object对象在客户端的代理者。
4、Adapter
Adapter是对象适配器,用于把客户端请求映射到某个Object对象的特定方法上。
5、IceBox
IceBox是应用容器,每个IceBox实例叫做一个Server,对应一个独立的进程,系统为每个server分配一个独立的server id,ICE通过对管理IceBox进程来实现负载均衡等操作。
6、IceNode
IceBox对应的独立进程,而IceNode则对应的独立服务器节点,一个服务器节点可以启动多个IceBox进程实例。
7、IceGrid
ICE可以同时管理多个IceGrid,每个IceGrid可以理解成是一套服务的整体拓扑结构,Locator是用于定位IceGrid的寻址信息。
8、Registry
服务的注册中心,客户端在调用接口时,需要指定主从注册中心的地址,接口处理时首先请求注册中心,注册中心为其分配处理当前请求的adapter,adapter再将请求定位到具体的指定server进程中的特定object对象处理。
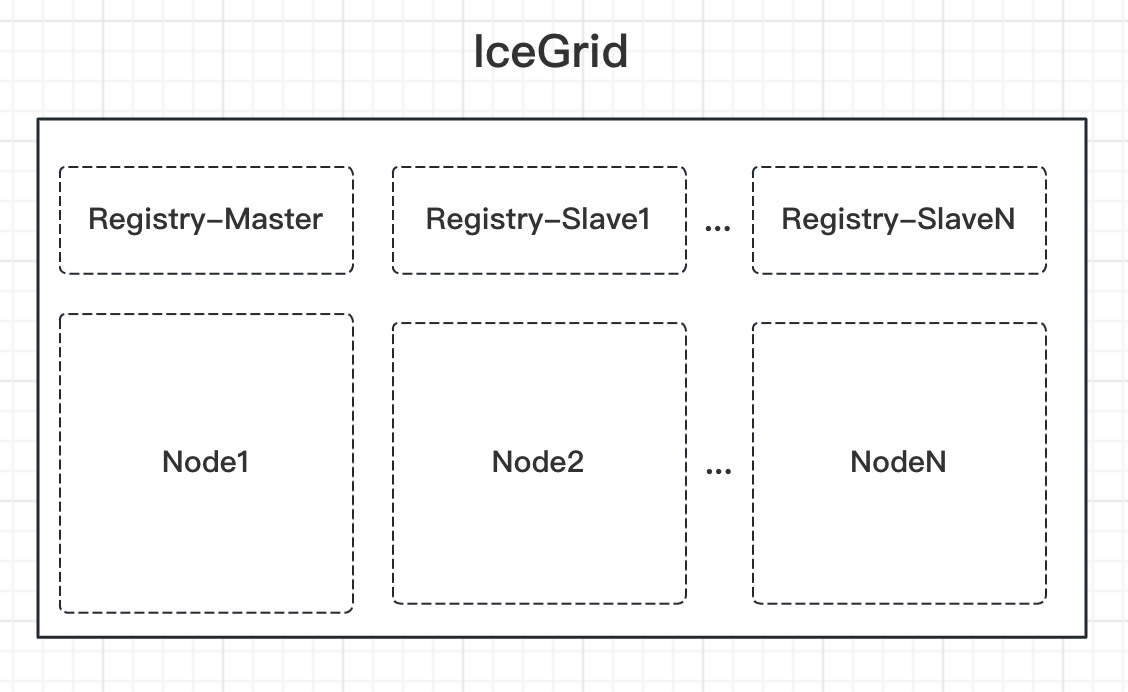
9、部署及运行结构
很多朋友觉得ICE复杂,可能是因为ICE提出了很多新的概念,而不清每个概念的包含关系,以至于不能理解它的运行方式,再加上资料匮乏所以难以上手。我觉得只要从两个角度去看这个问题可能会比较清晰,一个是物理结构(服务器节点),另一个是软件结构(服务运行结构)。
- 从物理节点的角度
一个IceGrid集群,包括至少一个注册中心节点(建议线上使用主从注册中心节点),并且一个IceGrid集群管理多个Node节点。
- 从服务运行的角度
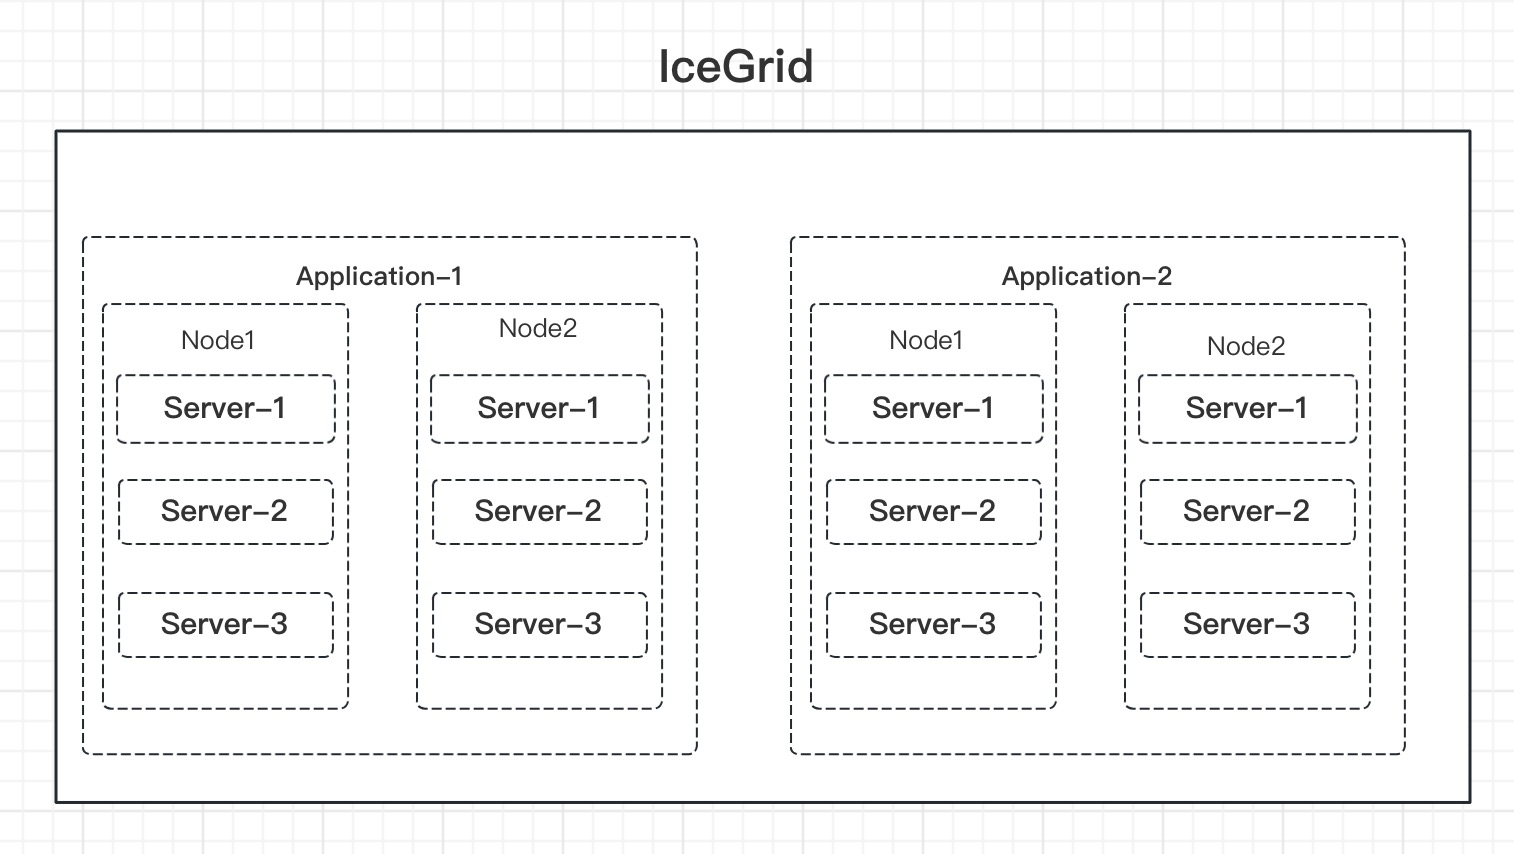
IceGrid集群可以启动一个或多个应用(Application),每个应用可以占用当前IceGrid集群中的一个或多个节点,这里的Application概念你可以理解成是我们常说的微服务。
Application启动时其配置文件指定了当前应用运行所可以占用的节点信息,以及每个节点可以启动的Server实例,这个Server实例就是IceBox进程。注意:application启动时默认不会同时启动server实例,server实例是根据客户端请求并发量自动启动的,当然也可以手动启动。
为什么IceGrid部署时明明已经启动了对应的Node节点,但application的配置文件还需要加Node配置?
其实这个问题很好理解,Grid可以管理多个节点,所以部署时被其管理的每个节点都要启动一个icegridnode进程。而Grid也可以包含多个application,每个application可以根据需要占用Grid所有节点中的一个或多个。
service和adapter区别?
ICE中的service对应的是接口,一个server中可以包含多个接口。
adapter是特定对象上的接口,用来将客户端请求分配到特定server上去处理。可能有些拗口,不过我拿XL-LightHouse的进程举一个例子就很明白了。
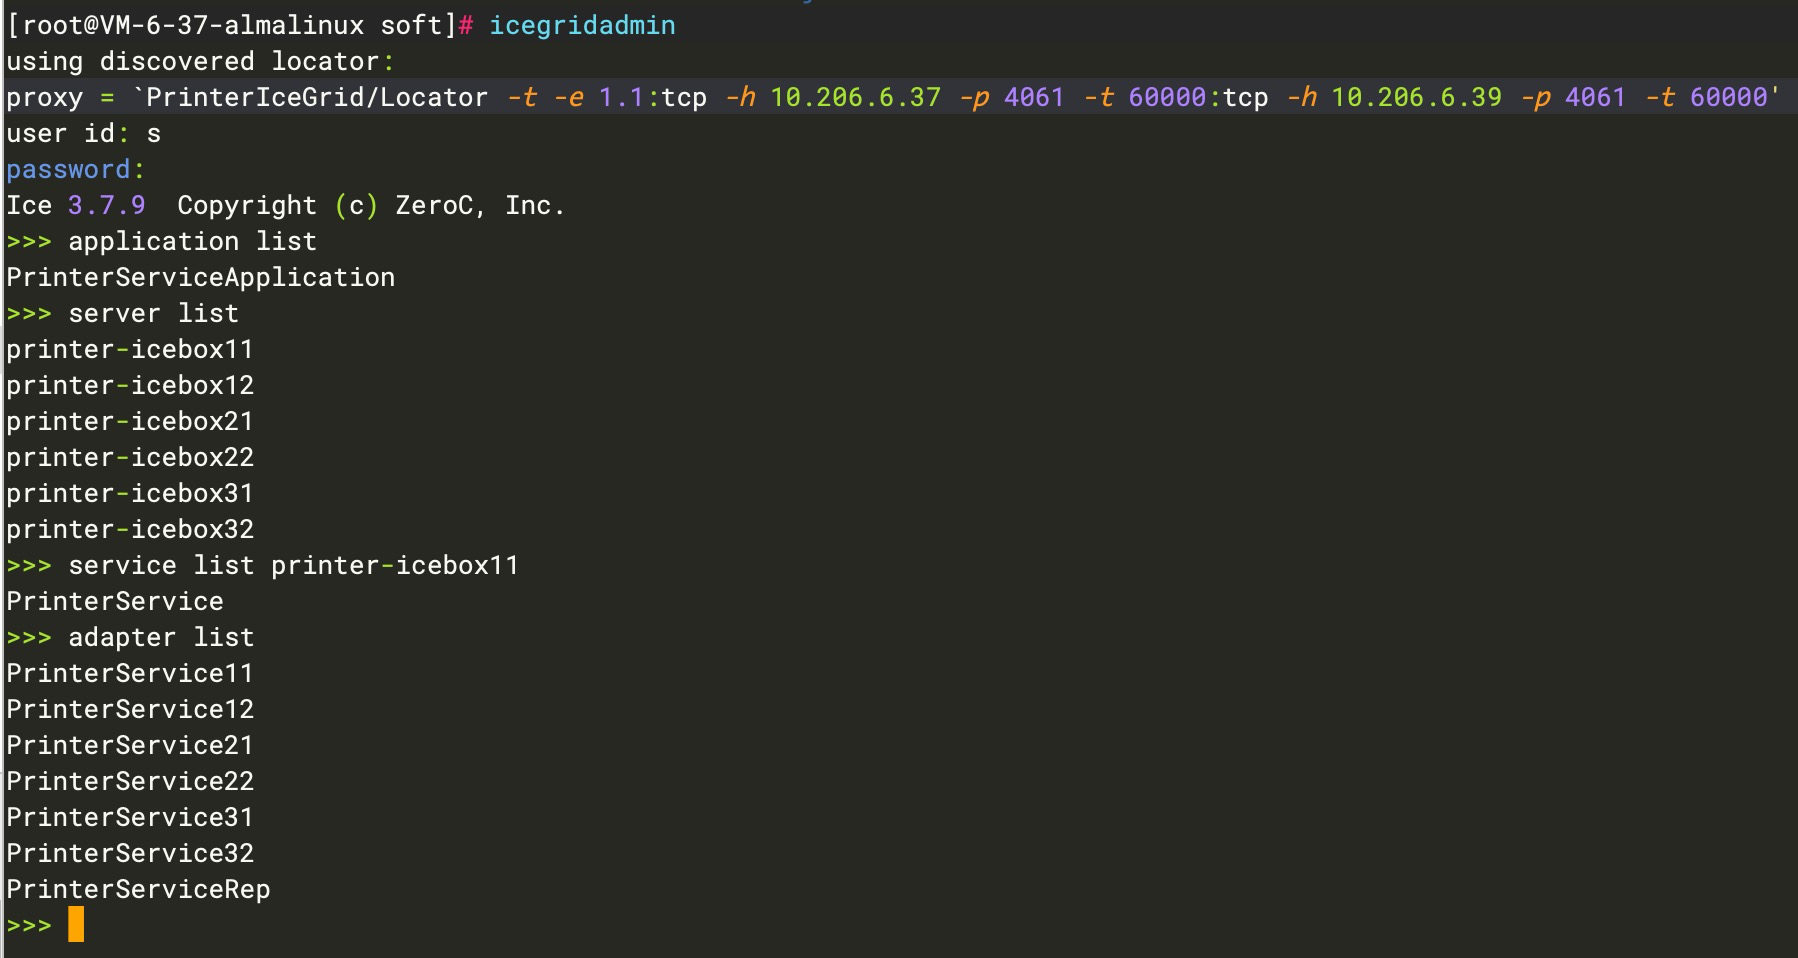
如上图:
server list,将集群所有IceBox进程罗列出来。
service list,serverID将当前server中的接口名称罗列出来。
adapter list,ICE将所有server中的每个接口实例都分配了一个adapter句柄并将其罗列出来。
四、Ice安装
部署前请确保系统已安装JDK、GCC等依赖包!
不同发行版的安装方式略有不同,以下命令只适合RHEL、CentOS、Rocky和Almalinux,如果您是其他的Linux发行版,请按照官网描述的方式安装(也可以参考XL-LightHouse源码中的/bin/install/install_ice.sh文件)。
官网安装参考:doc.zeroc.com/ice/3.7/rel…
下面以AlmaLinux安装为例:
#注意:rpm安装需要根据系统版本指定el版本,使用uname命令可以查看系统el版本,不能配错

[root@VM-6-22-rockylinux ~]# uname -a

Linux VM-6-22-rockylinux 5.14.0-162.6.1.el9_1.x86_64 #1 SMP PREEMPT_DYNAMIC Fri Nov 18 02:06:38 UTC 2022 x86_64 x86_64 x86_64 GNU/Linux

我用的Alma9.1部署时需要指定el9,安装命令即为:

sudo yum install https://zeroc.com/download/ice/3.7/el9/ice-repo-3.7.el9.noarch.rpm

sudo yum install ice-all-runtime ice-all-devel
安装成功后,可以查看到相关的命令:
[root@VM-6-37-almalinux soft]# ice

icebox iceboxadmin icegridadmin icegridgui icegridregistry icepatch2client icestormadmin

icebox++11 icebridge icegriddb icegridnode icepatch2calc icepatch2server icestormdb
五、Slice文件生成
完整代码请查阅:https://github.com/xl-xueling/ZerocICEDemo.git
(1)、创建slice文件printer.ice
[["java:package:com.dtstep.test.ice"]]

module PrinterServer {

interface Printer{

void printStr(string str);

};

};
(2)、生成接口代码
#进入到Linux环境,执行以下命令

slice2java printer.ice

以上命令会在当前目录生成接口代码,因为我这里的部署客户端和服务端都是使用的Java语言,所以该接口代码客户端和服务端都需要用,如果客户端和服务端是跨语言的需要用相应的命令生成不同的接口代码。
(3)、创建工程并引入依赖包
<dependencies>

<dependency>

<groupId>com.zeroc</groupId>

<artifactId>ice</artifactId>

<version>3.7.9</version>

</dependency>

<dependency>

<groupId>com.zeroc</groupId>

<artifactId>icebox</artifactId>

<version>3.7.9</version>

</dependency>

<dependency>

<groupId>com.zeroc</groupId>

<artifactId>icegrid</artifactId>

<version>3.7.9</version>

</dependency>

<dependency>

<groupId>com.zeroc</groupId>

<artifactId>ice-compat</artifactId>

<version>3.7.9</version>

<scope>runtime</scope>

</dependency>

<dependency>

<groupId>com.zeroc</groupId>

<artifactId>glacier2</artifactId>

<version>3.7.9</version>

</dependency>

</dependencies>
(4)、将上面生成的接口代码拷贝到工程中。
六、本地运行模式
完整代码请查阅:https://github.com/xl-xueling/ZerocICEDemo.git
(1)、创建服务端实现类
public class PrinterServer {

public static void main(String[] args) {

Communicator ic = null;

try {

ic = Util.initialize();

ObjectAdapter adapter = ic.

createObjectAdapterWithEndpoints("PrinterServiceAdapter", "default -p 10000");

LocalPrinterServiceImpl servant = new LocalPrinterServiceImpl();

adapter.add(servant, Util.stringToIdentity("PrinterService"));

adapter.activate();

System.out.println("The server starts listening ...");

ic.waitForShutdown();

} catch (Exception e) {

e.printStackTrace();

} finally {

if (ic != null) {

ic.destroy();

}

}

}

}
(2)、创建客户端端实现类
public class PrinterClient {

public static void main(String[] args) {

Communicator ic = null;

try {

ic = Util.initialize();

ObjectPrx base = ic.stringToProxy("PrinterService:default -p 10000");

PrinterPrx proxy = PrinterPrx.checkedCast(base);

for(int i=0;i<500;i++){

String msg = "Hello World_" + i;

proxy.printStr(msg);

System.out.println("client send message,msg:" + msg);

Thread.sleep(1000);

}

} catch (Exception e) {

e.printStackTrace();

} finally {

if (ic != null) {

ic.destroy();

}

}

}

}
(3)、同时本地运行客户端和服务端可以正常发送和接收消息
七、集群模式配置
注意:

1、以下操作不要在root账号下执行,如果在root账号下启动icegridnode,ice启动服务为了安全起见使用的是nobody用户,而该用户没有目录访问权限,所以启动会报错!

2、完整代码请查阅:https://github.com/xl-xueling/ZerocICEDemo.git

3、以下内容我直接基于【XL-LightHouse开源通用型流式数据统计项目】的结构进行修改,XL-LightHouse是对程序员日常开发很有帮助的辅助工具,欢迎GitHub搜索了解。
(1)、集群规划
以下操作我在三台AlmaLinux节点上部署该集群,IP分别为:
10.206.6.37 #作为注册中心主节点和Node运算节点

10.206.6.39 #作为注册中心从节点和Node运算节点

10.206.6.25 #作为Node运算节点
(2)、创建工程所需目录
在三台服务器上依次创建以下目录结构。
#该路径用于存储相关配置文件

mkdir -p /opt/soft/PrinterProject/conf

#该路径用于存储注册中心的数据文件及日志信息

mkdir -p /opt/soft/PrinterProject/data/registdata

#该路径用于存储Node节点的运行数据文件

mkdir -p /opt/soft/PrinterProject/data/nodedata

#该路径用于存储Node节点的输出日志信息

mkdir -p /opt/soft/PrinterProject/data/nodeoutput

#创建依赖包路径,包含工程jar包和ICE依赖包

mkdir -p /opt/soft/PrinterProject/lib

#赋予目录读写权限

chmod -R 755 /opt/soft/PrinterProject
(3)、创建注册中心主节点配置文件 master_registry.cfg
IceGrid.InstanceName=PrinterIceGrid

IceGrid.Registry.Client.Endpoints=tcp -p 4061

IceGrid.Registry.Server.Endpoints=tcp

IceGrid.Registry.Internal.Endpoints=tcp

IceGrid.Registry.PermissionsVerifier=PrinterIceGrid/NullPermissionsVerifier

IceGrid.Registry.AdminPermissionsVerifier=PrinterIceGrid/NullPermissionsVerifier

IceGrid.Registry.LMDB.Path=/opt/soft/PrinterProject/data/registdata

IceGrid.Registry.DynamicRegistration=1

Ice.Admin.InstanceName=AdminInstance

Ice.LogFile=/opt/soft/PrinterProject/data/registdata/ice-regist.log
(4)、创建注册中心从节点配置文件 slave_registry.cfg
Ice.Default.Locator=PrinterIceGrid/Locator:tcp -h 10.206.6.37 -p 4061

IceGrid.Registry.Client.Endpoints=tcp -p 4061

IceGrid.Registry.Server.Endpoints=tcp

IceGrid.Registry.Internal.Endpoints=tcp

IceGrid.Registry.PermissionsVerifier=PrinterIceGrid/NullPermissionsVerifier

IceGrid.Registry.AdminPermissionsVerifier=PrinterIceGrid/NullPermissionsVerifier

IceGrid.Registry.LMDB.Path=/opt/soft/PrinterProject/data/registdata

IceGrid.Registry.DynamicRegistration=1

IceGrid.Registry.ReplicaName=Replica1

Ice.LogFile=/opt/soft/PrinterProject/data/registdata/ice-regist.log
(5)、创建每台节点对应的node.cfg文件
注意:每个节点的Node.Name不可相同,而且需要与application.xml文件中的节点名称一致。
Ice.Default.Locator=PrinterIceGrid/Locator:tcp -h 10.206.6.37 -p 4061:tcp -h 10.206.6.39 -p 4061

IceGrid.Node.Name=node1

IceGrid.Node.Endpoints=tcp

#配置文件中的路径必须首先创建出来,并且目录需要有写入数据的权限

IceGrid.Node.Data=/opt/soft/PrinterProject/data/nodedata

IceGrid.Node.Output=/opt/soft/PrinterProject/data/nodeoutput

IceGrid.Node.CollocateRegistry=0

Ice.StdErr=/opt/soft/PrinterProject/data/nodeoutput/ice_stderr.log
(6)、创建应用配置文件application.xml
<icegrid>

<application name="PrinterServiceApplication">

<properties id="MultiThreaded">

<property name="Ice.PrintStackTraces" value="1"/>

<property name="IceSSL.Trace.Security" value="2"/>

<property name="Ice.ThreadPool.Client.Size" value="50"/>

<property name="Ice.ThreadPool.Client.SizeMax" value="500"/>

<property name="Ice.ThreadPool.Server.Size" value="50"/>

<property name="Ice.ThreadPool.Serxver.SizeMax" value="500"/>

<property name="IceBox.InheritProperties" value="1"/>

<property name="Ice.Override.ConnectTimeout" value="2000"/>

<property name="Ice.Override.Timeout" value="2000" />

<property name="IceBox.Trace.ServiceObserver" value="1"/>

<property name="Ice.Default.Timeout" value="2000"/>

<property name="Ice.Default.LocatorCacheTimeout" value="1200" />

<property name="Ice.BackgroundLocatorCacheUpdates" value="1"/>

</properties>

<server-template id="PrinterBoxTemplate">

<parameter name="index" default="0"/>

<icebox id="printer-icebox${index}" exe="java" activation="on-demand" >

<properties>

<properties refid="MultiThreaded" />

</properties>

<option>-Xmx4000M</option>

<option>-Xms4000m</option>

<option>-XX:+UseCompressedOops</option>

<option>-XX:+HeapDumpOnOutOfMemoryError</option>

<option>-XX:+UseG1GC</option>

<option>-XX:-UseBiasedLocking</option>

<option>-XX:G1HeapRegionSize=4M</option>

<option>com.zeroc.IceBox.Server</option>

<env>CLASSPATH=.:/opt/soft/PrinterProject/lib/*</env>

<!--该处配置server端的接口类地址-->

<service name="PrinterService" entry="com.dtstep.test.ice.PrinterServer.cluster.server.PrinterService">

<adapter name="PrinterService" id="PrinterService${index}" endpoints="default" replica-group="PrinterServiceRep" />

</service>

</icebox>

</server-template>

<replica-group id="PrinterServiceRep">

<load-balancing type="adaptive" n-replicas="0" />

<!--该处的type配置slice文件的module名称和interface名称-->

<object identity="PrinterServiceIdentity" type="::PrinterServer::Printer"/>

</replica-group>

<!--node名称,必须与node.cfg中的名称对应-->

<node name="node1">

<!--注意template名称需要与上面的server-template保持一致 -->

<server-instance template="PrinterBoxTemplate" index="11"/>

<server-instance template="PrinterBoxTemplate" index="12"/>

</node>

<node name="node2">

<server-instance template="PrinterBoxTemplate" index="21"/>

<server-instance template="PrinterBoxTemplate" index="22"/>

</node>

<node name="node3">

<server-instance template="PrinterBoxTemplate" index="31"/>

<server-instance template="PrinterBoxTemplate" index="32"/>

</node>

</application>

</icegrid>
(7)、创建集群Server端实现
public class PrinterService implements Service {

@Override

public void start(String s, Communicator communicator, String[] strings) {

ObjectAdapter adapter = communicator.createObjectAdapter(s);

communicator.getProperties().setProperty("Ice.MessageSizeMax", "1409600");

ClusterPrinterServiceImpl servant = new ClusterPrinterServiceImpl();

adapter.add(servant, Util.stringToIdentity("PrinterServiceIdentity"));

adapter.activate();

System.out.println("printer server start success!");

}

@Override

public void stop() {

}

}
(8)、创建集群Client端实现
public class ClientTest {

public static void main(String[] args) {

Communicator ic = null;

try {

String initParams = "--Ice.Default.Locator=PrinterIceGrid/Locator:tcp -h 10.206.6.39 -p 4061:tcp -h 10.206.6.37 -p 4061 -z";

String [] params = new String[]{initParams};

ic = Util.initialize(params);

//注意该处配置与接口对应的replica-group的identity名称保持一致

ObjectPrx objectPrx = ic.stringToProxy("PrinterServiceIdentity").ice_connectionId(UUID.randomUUID().toString()).ice_locatorCacheTimeout(1200);

PrinterPrx proxy = PrinterPrx.checkedCast(objectPrx);

for(int i=0;i<500;i++){

String msg = "Hello World_" + i;

proxy.printStr(msg);

System.out.println("client send message,msg:" + msg);

Thread.sleep(1000);

}

} catch (Exception e) {

e.printStackTrace();

} finally {

if (ic != null) {

ic.destroy();

}

}

}

}
(9)、将上述配置文件上传到conf目录。
(10)、将工程打包和maven依赖包上传到lib目录下
(11)、工程的完整文件及路径信息如下
[root@VM-6-37-almalinux PrinterProject]# pwd

/opt/soft/PrinterProject

[root@VM-6-37-almalinux PrinterProject]# tree -a ./

./

├── conf

│   ├── application.xml

│   ├── master_registry.cfg

│   ├── node1.cfg

│   ├── node2.cfg

│   ├── node3.cfg

│   ├── printer.ice

│   └── slave_registry.cfg

├── data

│   ├── nodedata

│   ├── nodeoutput

│   └── registdata

└── lib

├── glacier2-3.7.9.jar

├── ice-3.7.9.jar

├── icebox-3.7.9.jar

├── ice-compat-3.7.9.jar

├── icegrid-3.7.9.jar

└── TestICE-1.0-SNAPSHOT.jar

5 directories, 13 files
(12)、将以上工程文件夹同步到集群各个节点。
七、集群模式启动
(1)、在第一台服务器上启动注册中心主节点
#注意:如果执行重启操作,请检查一下icegridregistry进程是否仍存在,如果存在先kill掉,然后务必删除registdata目录下的文件后再重启。

icegridregistry --Ice.Config=/opt/soft/PrinterProject/conf/master_registry.cfg &

执行完后,查看/opt/soft/PrinterProject/data/registdata/ice-regist.log是否有异常。
(2)、在第二台服务器上启动注册中心主节点,注意与主节点配置文件不同
#注意:如果重启请检查一下icegridregistry进程是否仍存在,如果存在kill掉,然后务必删除registdata目录下的文件后再重启。

icegridregistry --Ice.Config=/opt/soft/PrinterProject/conf/slave_registry.cfg &

执行完后,查看/opt/soft/PrinterProject/data/registdata/ice-regist.log是否有异常。
(3)、在三台服务器依次启动节点,注意配置文件各不相同
#注意:如果重启请检查一下icegridnode进程是否仍存在,如果存在kill掉,并同时将nodedata目录下文件删除后再重启。

icegridnode --Ice.Config=/opt/soft/PrinterProject/conf/node1.cfg &

icegridnode --Ice.Config=/opt/soft/PrinterProject/conf/node2.cfg &

icegridnode --Ice.Config=/opt/soft/PrinterProject/conf/node3.cfg &
(4)、进程检查
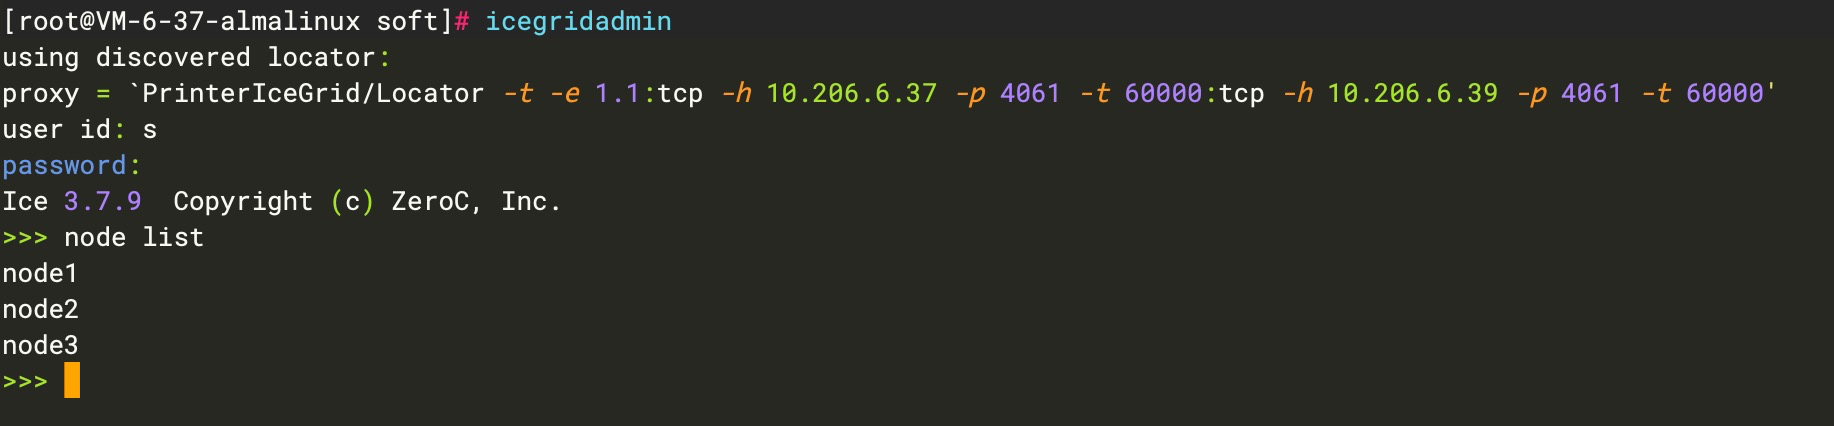
执行完以上操作后,在注册中心主节点执行
icegridadmin命令,user id和password随便输入进入到ICE控制台。
执行help命令,可查看所有组件,执行 node help,service help ...可查看每个组件的帮助信息。
执行node list命令,查看当前节点是否启动正常,如果正常进行下一步。
八、启动应用Application
执行icegridamin命令进入ICE控制台。
# 启动应用

>> application add /opt/soft/PrinterProject/conf/application.xml

# 启动应用后,默认不会立即启动server,当有客户端请求时会自动启动server

# 查看server 列表

>> server list

# 手动启动server,进入nodeout目录查看日志是否正常。

>> server start printer-icebox11

# 查看应用列表

>> application list

# 移除应用

>> application remove PrinterServiceApplication
执行cluster目录内的ClientTest.java发送消息到服务端,服务端的nodeoutput目录可以正常输出日志信息(注意:由于集群在三台服务器上启动了6个进程,所以需要具体看下请求被分发到了哪个进程,输出的日志文件是不同的,线上使用的时候可以配置log4j让节点内的多个进程都输出到一个日志文件)。
[work@VM-6-25-almalinux nodeoutput]$ tail -f printer-icebox32.out

server receive message,msg:Hello World_25

server receive message,msg:Hello World_26

server receive message,msg:Hello World_27

server receive message,msg:Hello World_28

server receive message,msg:Hello World_29

server receive message,msg:Hello World_30

server receive message,msg:Hello World_31

server receive message,msg:Hello World_32

server receive message,msg:Hello World_33

server receive message,msg:Hello World_34

server receive message,msg:Hello World_35
完整代码及配置信息请查阅:github.com/xl-xueling/…
九、解锁新技能
上述内容向大家介绍了一款超高性能的RPC服务框架ZerocICE的集群部署方式和初步使用。接下来向大家推荐一款更具有实用价值的开发好帮手XL-LightHouse。XL-LightHouse是一款通用型流式大数据统计工具。
1、一键部署,一行代码接入,轻松实现各类实时统计,比如常见的PV,UV,接口调用量、耗时情况等场景,比自己使用Flink、ClickHouse或基于Redis实现更加方便;
2、对各种工种的程序员都具有很大的实用价值;
建议您花一两分钟的时间GitHub搜索XL-LightHouse或访问dtstep.com了解更多!
