

什么是代码块
代码块是 Xcode 提供的一种快速创建代码的一种方式,当你敲出某个代码时,Xcode 会根据提示自动联想你想要输入的一段样板代码,便于快速创建。
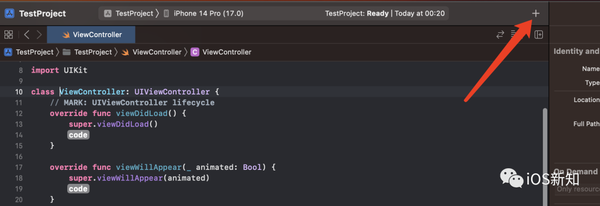
代码块的打开方式
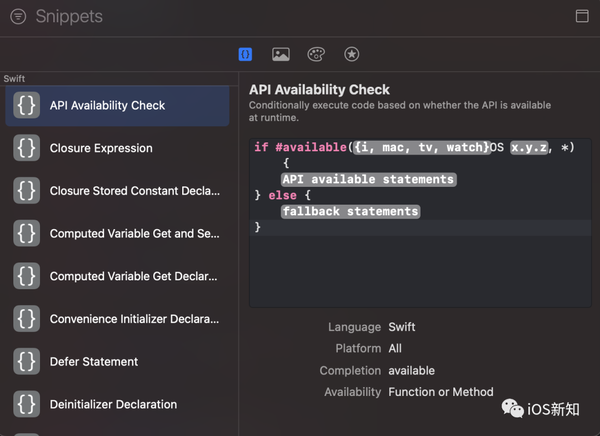
可以通过 Xcode 顶部菜单栏中的加号(+)唤起代码块的菜单栏,菜单栏中会展示所有的代码片段。
或者使用 Xcode 顶部导航菜单 View -> Show Library
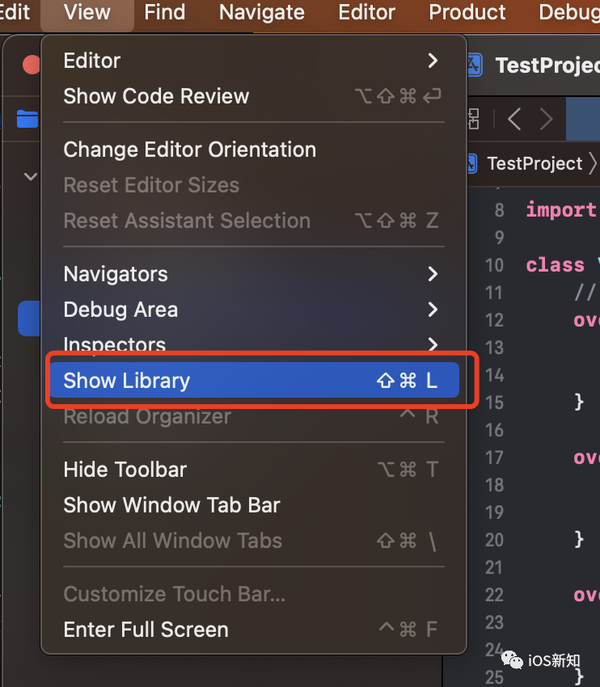
也可以使用快捷键 command + shift + L
如何创建自定义的代码块
我们平时使用的代码块大都是 Xcode 自带的,也可以自己来自定义一些比较有用的代码块。
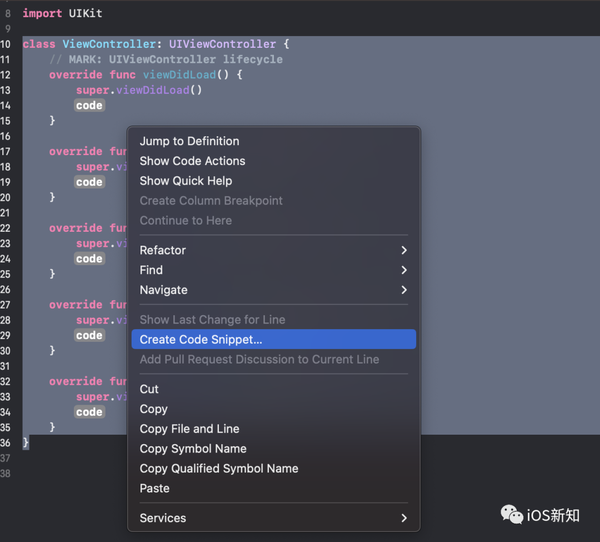
1、在 Xcode 任意文件中写入你要创建的代码
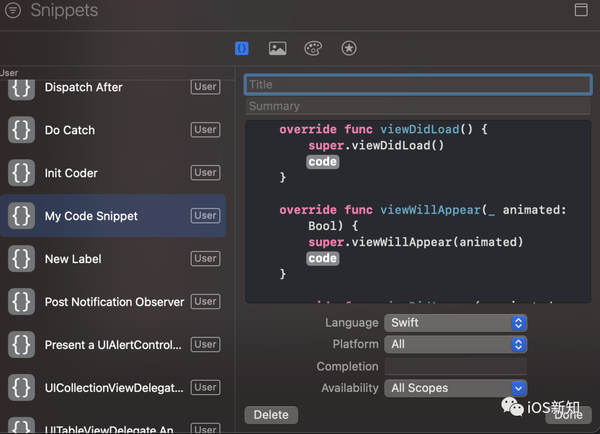
2、选中这些代码,单击鼠标右键,然后选择 Create Code Snippet
3、在弹出的编辑器中依次填入代码块的名称(title)、其功能的简短描述(Summary)和快捷方式(Completion)用来触发自动完成的。
完成以上三步之后就可以在代码中输入 Completion 来使用代码块了。
今天给大家分享 10 个我在日常开发中常用的代码块:
1、添加通知监听
Title: Add Notification Observer
Summary: 添加通知监听
Completion: addNotiObserver
NotificationCenter.default.addObserver(<#observer#>, selector: <#Selector#>, name: <#NSNotification.Name#>, object: <#Any?#>)
2、发送通知
Title: Post Notification Observer
Summary: 发送通知
Completion: postNotiObserver
NotificationCenter.default.post(name: <#NSNotification.Name#>, object: <#Any?#>, userInfo: <#[AnyHashable : Any]?#>)
3、弹出一个 UIAlertController
Title: Present a UIAlertController
Summary: 弹出一个 UIAlertController
Completion: presentAlert
let alert = UIAlertController(title: <#title#>, message: <#message#>, preferredStyle: .alert)
let action = UIAlertAction(title: <#title#>, style: <#UIAlertAction.Style#>, handler: { (action) in
    alert.dismiss(animated: <#Bool#>, completion: {
        <#code#>
    })
})
alert.addAction(action)
presentViewController(alert, animated: true, completion: nil)
4、添加 UITableView 代理和数据源方法
Title: UITableViewDelegate And UITableViewDataSource
Summary: 添加 UITableView 代理和数据源
Completion: tableViewDelegateAndDataSource
// MARK: UITableViewDelegate && UITableViewDataSource

extension <#UIViewController#>: UITableViewDelegate, UITableViewDataSource {
    func numberOfSections(in tableView: UITableView) -> Int {
        <#numberOfSections#>
    }

    func tableView(_ tableView: UITableView, numberOfRowsInSection section: Int) -> Int {
        <#numberOfRowsInSection#>
    }

    func tableView(_ tableView: UITableView, cellForRowAt indexPath: IndexPath) -> UITableViewCell {
        let cell = tableView.dequeueReusableCell(withIdentifier: <#T##String#>)
        return cell
    }

    func tableView(_ tableView: UITableView, didSelectRowAt indexPath: IndexPath) {
        <#code#>
    }
}
5、添加 UICollectionView 代理和数据源
Title: UICollectionViewDelegate And UICollectionViewDataSource
Summary: 添加 UICollectionView 代理和数据源
Completion: collectionViewDelegateAndDataSource
// MARK: UICollectionViewDelegate && UICollectionViewDataSourceextension <#UIViewController#>: UICollectionViewDelegate, UICollectionViewDataSource {    func numberOfSections(in collectionView: UICollectionView) -> Int {        <#numberOfSections#>    }
    func collectionView(_ collectionView: UICollectionView, numberOfItemsInSection section: Int) -> Int {        <#numberOfItems#>    }    func collectionView(_ collectionView: UICollectionView, cellForItemAt indexPath: IndexPath) -> UICollectionViewCell {        let cell = collectionView.dequeueReusableCell(withReuseIdentifier: <#identifier#>, for: indexPath)        return cell    }        func collectionView(_ collectionView: UICollectionView, didSelectItemAt indexPath: IndexPath) {        <#code#>    }}
6、延迟执行
Title: Dispatch After
Summary: 延迟执行
Completion: dispatchAfter
DispatchQueue.main.asyncAfter(deadline: .now() + <#seconds#>) {
    <#code#>
}
7、Decoder 初始化方法
Title: Init Coder
Summary: Decoder 初始化方法
Completion: initCoder
@available(*, unavailable)
required init?(coder aDecoder: NSCoder) {
    fatalError("init(coder:) has not been implemented")
}
8、Custom UIView
Title: Custom UIView
Summary: 自定义一个 UIView
Completion: customView
class <#CustomView#>: UIView {
    override init(frame: CGRect) {
        super.init(frame: frame)

        configUI()
    }

    private func configUI() {
        <#code#>
    }

    @available(*, unavailable)
    required init?(coder aDecoder: NSCoder) {
        fatalError("init(coder:) has not been implemented")
    }
}
9、创建一个 UILabel
Title: New Label
Summary: 创建一个 UILabel
Completion: newLabel
let label = UILabel()
label.text = <#text#>
label.font = <#font#>
label.textColor = <#textColor#>
label.textAlignment = .left
10、自定义 UIViewController
Title: Custom UIViewController
Summary: 自定义 UIViewController
Completion: customController
class <#YourViewController#>: UIViewController {
    // MARK: UIViewController lifecycle
    override func viewDidLoad() {
        super.viewDidLoad()
        <#code#>
    }

    override func viewWillAppear(_ animated: Bool) {
        super.viewWillAppear(animated)
        <#code#>
    }

    override func viewDidAppear(_ animated: Bool) {
        super.viewDidAppear(animated)
        <#code#>
    }

    override func viewWillDisappear(_ animated: Bool) {
        super.viewWillDisappear(animated)
        <#code#>
    }

    override func viewDidDisappear(_ animated: Bool) {
        super.viewDidDisappear(animated)
        <#code#>
    }
}
点击下方公众号卡片,关注我,每天分享一个关于 iOS 的新知识
本文同步自微信公众号 “iOS新知”,每天准时分享一个新知识,这里只是同步,想要及时学到就来关注我吧!
