

Xcode 14 之前
在 Xcode 14 之前,即使开启了推送权限,在模拟器上运行时,也无法拿到推送所使用的 Device Token。因此我们只能使用 .apns 文件和 simctl push 命令在本地模拟通知。
这在之前的文章里讲到过,感兴趣可以去看一下之前关于模拟器推送的文章。
Xcode 14 及以后的版本
从 Xcode 14 开始,当模拟器在配备 Apple 芯片或 T2 处理器的 Mac 电脑上运行 macOS 13 时,支持 iOS 16 中的远程通知。模拟器支持 Apple 沙箱环境远程推送通知服务。这在 Xcode 14 的更新日志中有提到:
Simulator now supports remote notifications in iOS 16 when running in macOS 13 on Mac computers with Apple silicon or T2 processors. Simulator supports the Apple Push Notification Service Sandbox environment. Your server can send a remote notification to your app running in that simulator by connecting to the APNS Sandbox (api.sandbox.push.apple.com). Each simulator generates registration tokens unique to the combination of that simulator and the Mac hardware it’s running on. See User Notifications for more information.
通过以下配置开启远程推送权限之后,可以拿到一个模拟器的 Device Token
首先选择项目的 Target > Signing & Capabilities,然后点击 + Capability
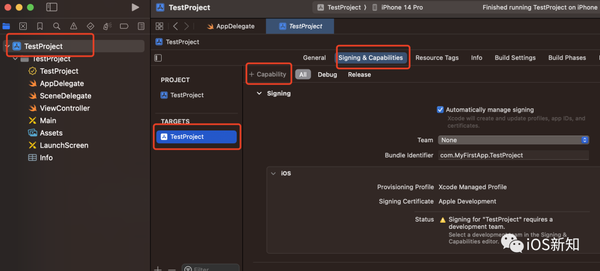
然后添加推送能力:
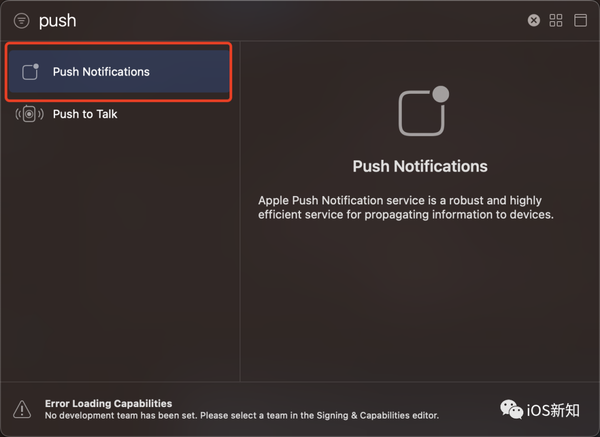
最后添加相应代码即可:
func application(_ application: UIApplication, didFinishLaunchingWithOptions launchOptions: [UIApplication.LaunchOptionsKey: Any]?) -> Bool {
    UNUserNotificationCenter.current().requestAuthorization(options: [.badge, .sound, .alert]) { isSuccess, error in
        print("isSuccess: \(isSuccess), error: \(error)")
        if isSuccess {
            DispatchQueue.main.async {
                UIApplication.shared.registerForRemoteNotifications()
            }
        }
    }
    return true
}

func application(_ application: UIApplication, didFailToRegisterForRemoteNotificationsWithError error: Error) {
    print("register remote notification failed: \(error)")
}

func application(_ application: UIApplication, didRegisterForRemoteNotificationsWithDeviceToken deviceToken: Data) {
    let tokenString = deviceToken.reduce(into: "") { $0 += String(format: "%02X", $1) }
    print("device token is: \(tokenString)")
}
运行在模拟器上之后会看到推送的申请弹窗,点击允许后将会在控制台看到对应的 device token:

远程推送测试
如果你是接入的友盟或者极光 SDK,或者其他厂家的 SDK,他们都有提供对应的后台面板,可以直接输入上一步拿到的 Device Token 来推送。
如果你没有接入第三方 SDK,也可以使用 curl 命令直接调用 Apple 的 API 进行推送,大概的格式如下:
curl -v --header 'apns-topic: {bundle ID}' \
--header apns-push-type: alert \
--cert {PEM} \
--key-type PEM \
--data '{"aps":{"alert":"测试一下","body":"测试 Body~"}}' \
--http2 https://api.development.push.apple.com/3/device/{DeviceToken}
有几个变量需要替换一下:
-
{bundle ID} 替换成你的 Bundle ID
-
{PEM} 替换成你的远程推送证书本地路径,.pem 格式
-
{DeviceToken} 替换成上边获取到的模拟器的 Device Token
一个完整的示例大概是这样:
curl -v --header 'apns-topic: {bundle ID}' \
--header apns-push-type: alert \
--cert /Users/xxx/Desktop/mypush.pem \
--key-type PEM \
--data '{"aps":{"alert":"测试一下","body":"测试 Body~"}}' \
--http2  https://api.development.push.apple.com/3/device/8079EF8269982CA7D9A4A33170C1CDBF95A782B3088E6D2F25BC4624BB4191224230ADCC2D4D9A96FAF188B7FE7D183B0D2173ED9A0903DE6915B89CF7DA7E2A508CAEB7A3B5EFE4AA1E35FD371D63BD
data 是一个 json 格式的数据模型,所有的参数可以参考苹果的文档。

参考资料
[1]
苹果的推送文档: developer.apple.com/documentati…
本文同步自微信公众号 “iOS新知”,每天准时分享一个新知识,这里只是同步,想要及时学到就来关注我吧!
