

完整原文地址见简书www.jianshu.com/p/8fa37a3c8…
createApp()、mount()、MVVM、根组件实例
-【createApp()】
Vue.createApp(),创建Vue应用实例,开始使用Vue;
-【mount()】
.mount()指定在哪个组件上使用Vue
(这个在《Vue3 | 基本特性概念 与语法的 应用与案例》中已经讲过了);
-传入createApp()的参数,描述了这个Vue应用实例的展示内容,包括数据、UI、各种事件等;
-【MVVM】
我们说Vue架构使用了MVVM的设计思想,其中data()是M层,template是V层,
VM层视图数据连接层,由Vue组件帮我们完成;
-【Vue应用实例的根组件实例】
以下代码中,const vm = heheApp.mount('#root_div');这里,
vm接收的组件实例,就是这个Vue应用实例的根组件;
我们可以使用这个根组件实例访问到组件内相关的 数据(data)等字段(详见下面案例):
<!DOCTYPE html>
<html lang="en">
<head>
    <meta charset="UTF-8">
    <meta name="viewport" content="width=device-width, initial-scale=1.0">
    <title>Hello World! heheheheheheda</title>
    <script src="https://unpkg.com/vue@next"></script>
</head>
<body>
    <div id="root_div"></div>
</body>

<script>
    const heheApp = Vue.createApp({
        data(){
            return{
                divText:'hehehedadada'
            }
        },
        template:`
        <div>{{divText}}</div>
        `
    });

    const vm = heheApp.mount('#root_div');
</script>
</html>
运行效果:
可以打开控制台进行终端操作:
输入刚刚案例代码中的Vue实例(
heheApp),查看实例内容:查看
根组件实例vm及其内容:查看vm的字段:
查看vm的data字段:
对data中的
数据字段赋值, 触发Vue的ViewModel层效果,UI数据双向绑定, 使得绑定这个数据字段的对应的UI发生改变:再尝试:
生命周期
先贴上案例代码:
<!DOCTYPE html>
<html lang="en">
<head>
    <meta charset="UTF-8">
    <meta name="viewport" content="width=device-width, initial-scale=1.0">
    <title>Hello World! heheheheheheda</title>
    <script src="https://unpkg.com/vue@next"></script>
</head>
<body>
    <div id="heheApp">
      <h1>{{heheString + ' ———— string in outer HTML'}}</h1>
    </div>
</body>
  <script>
    var vm = Vue.createApp({
      el:'#heheApp',
      data() {
        return{
            heheString: 'Vue的生命周期'
        }
      },
      beforeCreate: function() {
        console.group('------beforeCreate创建前状态------');
        console.log("%c%s", "color:red" , "el     : " + this.$el); //undefined
        console.log("%c%s", "color:red","data   : " + this.$data); //undefined
        console.log("%c%s", "color:red","heheString: " + this.heheString)
      },
      created: function() {
        console.group('------created创建完毕状态------');
        console.log("%c%s", "color:red","el     : " + this.$el); //undefined
        console.log("%c%s", "color:red","data   : " + this.$data); //已被初始化
        console.log("%c%s", "color:red","heheString: " + this.heheString); //已被初始化
      },
      beforeMount: function() {
        console.group('------beforeMount挂载前状态------');
        console.log("%c%s", "color:red","el     : " + (this.$el)); //已被初始化
        console.log(this.$el);
        console.log("%c%s", "color:red","data   : " + this.$data); //已被初始化
        console.log("%c%s", "color:red","heheString: " + this.heheString); //已被初始化
        console.log("%c%s", "color:red",
            document.getElementById('heheApp').innerHTML, " ———— beforeMount");
      },
      mounted: function() {
        console.group('------mounted 挂载结束状态------');
        console.log("%c%s", "color:red","el     : " + this.$el); //已被初始化
        console.log(this.$el);
        console.log("%c%s", "color:red","data   : " + this.$data); //已被初始化
        console.log("%c%s", "color:red","heheString: " + this.heheString); //已被初始化
        console.log("%c%s", "color:red",
            document.getElementById('heheApp').innerHTML, " ———— mounted");
      },
      beforeUpdate: function () {
        console.group('beforeUpdate 更新前状态===============》');
        console.log("%c%s", "color:red","el     : " + this.$el);
        console.log(this.$el);
        console.log("%c%s", "color:red","data   : " + this.$data);
        console.log("%c%s", "color:red","heheString: " + this.heheString);
        console.log("%c%s", "color:red",
            document.getElementById('heheApp').innerHTML, " ———— beforeUpdate");
      },
      updated: function () {
        console.group('updated 更新完成状态===============》');
        console.log("%c%s", "color:red","el     : " + this.$el);
        console.log(this.$el);
        console.log("%c%s", "color:red","data   : " + this.$data);
        console.log("%c%s", "color:red","heheString: " + this.heheString);
        console.log("%c%s", "color:red",
            document.getElementById('heheApp').innerHTML, " ———— updated");
      },
      beforeUnmount: function () {
        console.group('beforeDestroy 销毁前状态===============》');
        console.log("%c%s", "color:red","el     : " + this.$el);
        console.log(this.$el);
        console.log("%c%s", "color:red","data   : " + this.$data);
        console.log("%c%s", "color:red","heheString: " + this.heheString);
        console.log("%c%s", "color:red",
            document.getElementById('heheApp').innerHTML, " ———— beforeUnmount");
      },
      unmounted: function () {
        console.group('destroyed 销毁完成状态===============》');
        console.log("%c%s", "color:red","el     : " + this.$el);
        console.log(this.$el);
        console.log("%c%s", "color:red","data   : " + this.$data);
        console.log("%c%s", "color:red","heheString: " + this.heheString);
        console.log("%c%s", "color:red",
            document.getElementById('heheApp').innerHTML, " ———— unmounted");
      },
      template: "<h1>{{this.heheString +' ———— string in template'}}</h1>"
    })
    const vmR = vm.mount('#heheApp');
  </script>
</html>
运行结果:
关注重点:
回调的时机,对应周期时刻挂载元素字段$el以及 数据对象$data的状态!
- Vue的生命周期流程如下图所示, 接下来我们将按照这个
流程图来一步一步探索:首先,第一个节点,即
app = Vue.createApp(options)和app.mount(el);
接着就是Init Events & Lifecycle节点, 在这个时机节点中,Vue会去做一个初步的代码逻辑分析—— 检查我们的Vue实例代码中, 是否编写了事件的绑定(如v-on等)、是否编写了生命周期函数等;
接着会执行 -【生命周期函数1 —— beforeCreate(Vue实例创建前)】 此时是在 实例完全被创建出来 之前, 数据对象data有值, 但是vue 实例的挂载元素$el和数据对象data中的字段 都没有被初始化好。
接着是 -【Init injection & reactivity】节点, 初始化数据和模板间绑定的相关内容;
接着会执行 -【生命周期函数2 —— created(Vue实例创建后)】 数据对象 data 及其 内容字段 都 初始化完毕, 可以调用 methods 中的方法,操作 data 中的数据, 但 dom 未生成,挂载目的元素$el仍然为null。-接着是
created()和beforeMount()间的工作:首先会判断是否有
template参数选项【即上图的橙色菱形判断框——“Has “template” option?”】
-a. 如果vue实例对象中有template参数选项, 则将其作为模板编译成render函数【render函数与数据相结合方才完成UI渲染】。 如上文首的案例,代码中 我们把// template: "<h1>{{this.heheString +' ———— string in template'}}</h1>"注释掉了, 所以页面走的是No的分支, 即把外部的HTML加载到页面上:如果解开注释, 那现在Vue实例就有自己的
template option了, Vue也会优先加载template中的内容:
-b. 如果没有template选项, 则将(Vue所在<script>标签)外部HTML(即<body>中的HTML)作为模板编译。
-c. 综上可见template中的内容模板优先级要高于outer HTML的内容;
-【生命周期函数3 —— beforeMount(挂载前) (要显示的UI代码——即模板template或者outer HTML完成 编译成render函数的时刻, 组件内容即将但未 渲染到页面 的时刻 )】 vue 实例的$data及其 内容字段都已初始化,挂载之前为虚拟的 dom节点,模板已经在内存中编辑完成了, 但是尚未把模板内容(outer HTML或者Vue实例的template)渲染到页面中, 则挂载目的元素$el有值了但 仍然为null;
-【生命周期函数4 —— mounted(挂载后)内存中的Vue实例的UI内容,完成 替换虚拟的 dom节点, 组件内容渲染到页面的时刻】 vue 实例的$el、$data及其 内容字段都已有值, vue 实例挂载完成,data数据成功渲染; 内存中的模板,已经真实地挂载到了页面中,用户可以看到渲染好的页面。实例创建期间的最后一个生命周期函数; 当执行完mounted就表示,实例已经被完全创建好了;DOM 渲染在 mounted 中就已经完成了; 可以看到打印出来的$el的值 为其对应的DOM标签;
加上测试代码,再次调试 验证生命周期特性:可见
beforeMount没有把UI内容打印出来,而mounted则打印出来了; 再次验证前者未渲染UI,后者完成渲染的特性:-【
生命周期函数5 —— beforeUpdate(当数据发生变化时,页面更新渲染前)】 当 data 变化时,会触发beforeUpdate方法 。 data 数据尚未和最新的数据保持同步。 -【生命周期函数6 —— updated(当数据发生变化时,页面更新渲染后)】 当 data 变化时,会触发 updated 方法。 页面和 data 数据已经保持同步了。
如图,在浏览器中断编写vmR.$data.heheString = '不是吧';, 触发数据发生变化:效果如下,
beforeUpdate打印的页面HTML中,还是改变前的模样,updated打印的内容,就是渲染之后的内容了: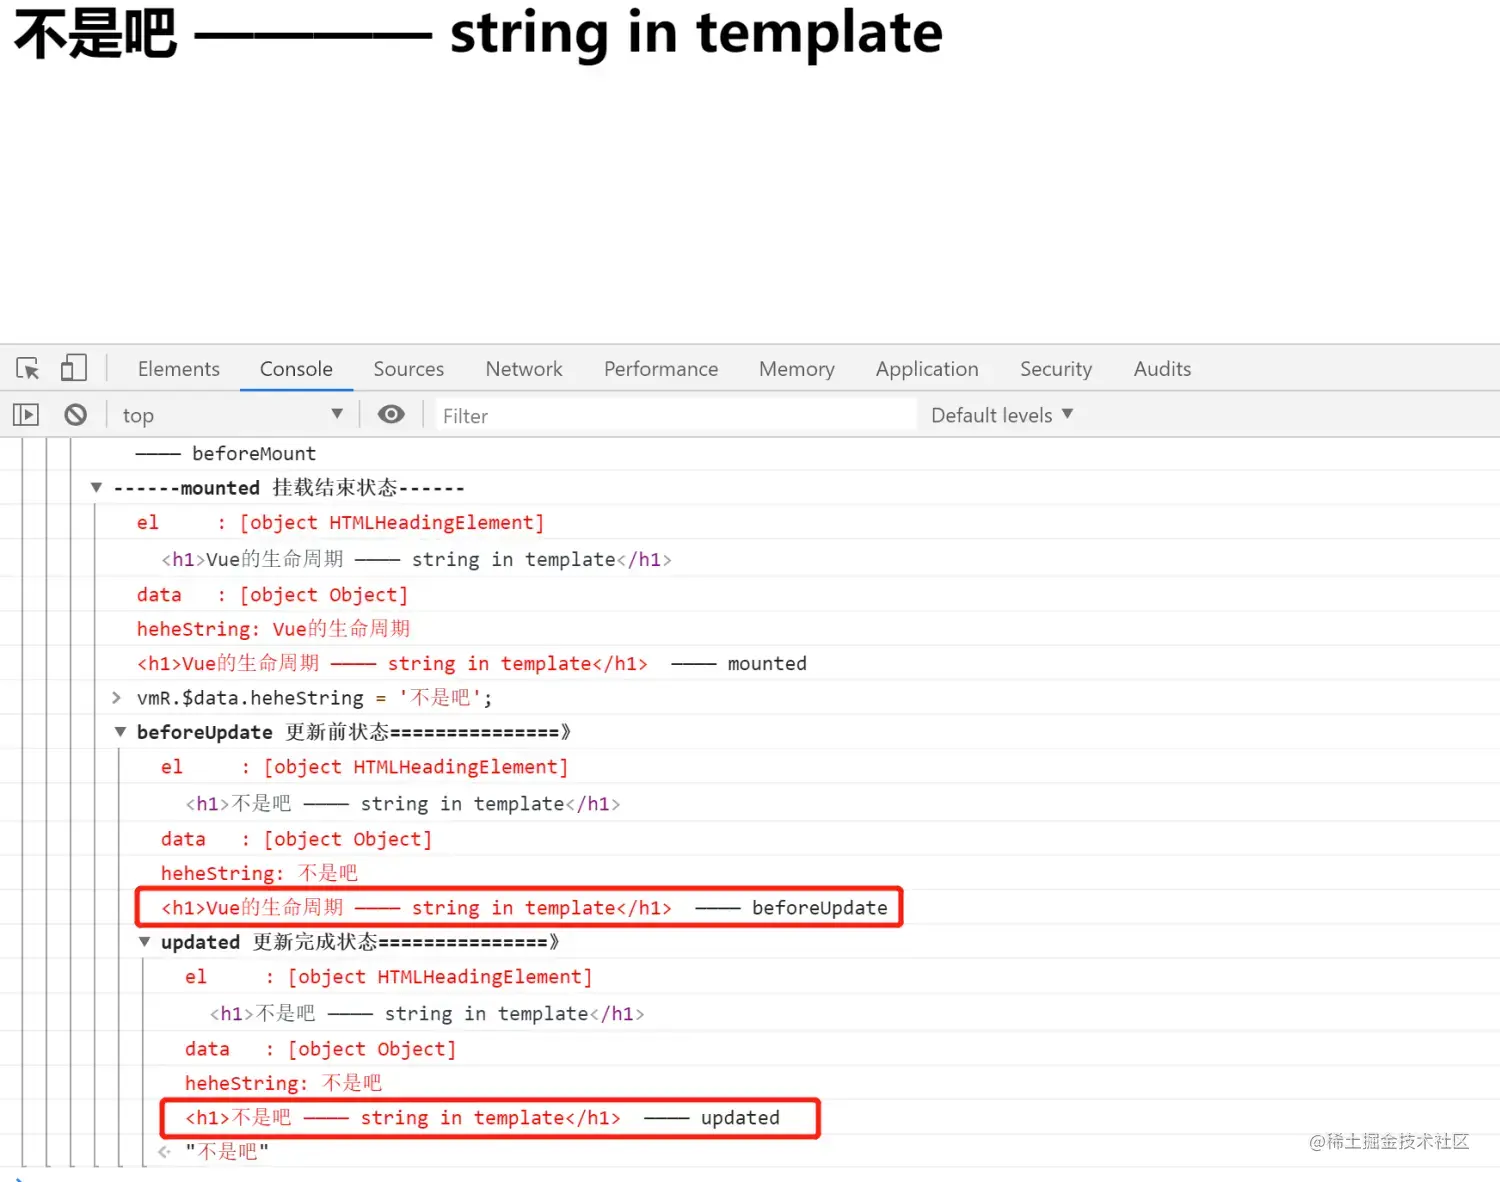
浏览器终端或者js脚本中,调用
Vue实例.unmount(), 使得Vue实例不再接管DOM节点,使Vue实例失效, 断连Vue实例与DOM节点的挂载;
-【生命周期函数7 —— beforeUnmount( 调用Vue实例.unmount()使得Vue失效,Vue实例与DOM节点挂载关系完全销毁前)】 组件销毁之前调用 ,在这一步,实例仍然完全可用。
-【生命周期函数8 —— unmounted( 调用Vue实例.unmount()使得Vue失效,Vue实例与DOM节点挂载关系完全销毁后)】 组件销毁之后调用,对 data 的改变不会再触发周期函数, vue 实例已解除事件监听和 dom绑定,但 dom 结构依然存在。 调用后,Vue 实例指示的所有东西都会解绑定, 所有的事件监听器会被移除,所有的子实例也会被销毁。
参考博客 -vue.js官方文档 —— 生命周期图示
-如何使用vue3搭建项目框架并运行
-vue.js 三种方式安装(vue-cli)
-Vue 3.x 中文api文档
-vue2生命周期(图 + 概括)
-详解vue2 生命周期(详细 + 案例!!!)
