- 部分描述见注释 项目源码:点击前往
#三个自定义构造函数的调用时机
public class TextView extends View {

    //这个构造函数 会在代码里面 new的时候 调用
    //TextView textView = new TextView(this);
    public TextView(Context context) {
        super(context);
    }

    //这个构造函数 在布局layout中使用时候 调用
//    <com.lwp.customviewtest.CustomViews.TextView
//    android:layout_width="wrap_content"
//    android:layout_height="wrap_content" />
    public TextView(Context context, AttributeSet attrs) {
        super(context, attrs);
    }

    //这个构造函数 在布局layout中使用 并且有style的时候 调用
    // 【Refactor -- Extract -- style】
//    <com.lwp.customviewtest.CustomViews.TextView
//    android:text="6666666666666666666"
//    style="@style/cstyle" />
//   style可以提取重复的属性
    public TextView(Context context, AttributeSet attrs, int defStyleAttr) {
        super(context, attrs, defStyleAttr);
    }
}
- style.xml
<resources>

    <!-- Base application theme. -->
    <style name="AppTheme" parent="Theme.AppCompat.Light.DarkActionBar">
...
    </style>

    <style name="cstyle">
        <item name="android:layout_width">wrap_content</item>
        <item name="android:layout_height">wrap_content</item>
        <item name="android:textColor">@color/colorPrimaryDark</item>
    </style>

</resources>
#onMeasure()简述 #####测量模式 - UNSPECIFIED :任意大,尽可能大,一般开发中少用 如ListView,RecyclerView,ScrollView测量子View的时候 给的就是UNSPECIFIED;
- EXACTLY :一个确定的值,
比如在布局中写的
layout_width="666dp","match_parent","fill_parent"; - AT_MOST:包裹内容,比如在布局中写的
layout_width="wrap_content"。 - 获取:
MeasureSpec.getMode()
@Override
    protected void onMeasure(int widthMeasureSpec, int heightMeasureSpec) {
        super.onMeasure(widthMeasureSpec, heightMeasureSpec);

        //获取宽高的模式 widthMeasureSpec的前两位
        int widthMode = MeasureSpec.getMode(widthMeasureSpec);
        int heightMode = MeasureSpec.getMode(heightMeasureSpec);

        //获取宽高的值 widthMeasureSpec的后30位
        int widthSize = MeasureSpec.getSize(widthMeasureSpec);
        int heightSize = MeasureSpec.getSize(heightMeasureSpec);
    }
-
widthMeasureSpec、heightMeasureSpec 是32位的值, 前面2位是模式, 后面30位是值;
-
源码:
        /**
         * Measure specification mode: The parent has not imposed any constraint
         * on the child. It can be whatever size it wants.
         */
        public static final int UNSPECIFIED = 0 << MODE_SHIFT;

        /**
         * Measure specification mode: The parent has determined an exact size
         * for the child. The child is going to be given those bounds regardless
         * of how big it wants to be.
         */
        public static final int EXACTLY     = 1 << MODE_SHIFT;

        /**
         * Measure specification mode: The child can be as large as it wants up
         * to the specified size.
         */
        public static final int AT_MOST     = 2 << MODE_SHIFT;
#onDraw()简述 主要用来绘制效果,利用参数canvas就可以画各式各样的效果; ``` @Override protected void onDraw(Canvas canvas) { // 画圆 canvas.drawCircle(); // 画bitmap canvas.drawBitmap(); // 画文本 canvas.drawText(); // ...... } ```
#onTouch()方法简述 用来处理触摸事件与用户进行交互; ``` @Override public boolean onTouchEvent(MotionEvent event) { switch (event.getAction()) { case MotionEvent.ACTION_DOWN: Log.e(TAG,"ACTION_DOWN"); break; case MotionEvent.ACTION_MOVE: Log.e(TAG,"ACTION_MOVE"); break; case MotionEvent.ACTION_UP: Log.e(TAG,"ACTION_UP"); break; } return super.onTouchEvent(event); } ```
#自定义属性 - `android:layout_width=""`等,是系统的`自定义属性`;
- 在
res下的values目录下新建一个attrs.xml文件: 【系统已经定义的属性,不能重新自定义(注意自定义属性的命名)】
<?xml version="1.0" encoding="utf-8"?>
<resources>
    <!--name 最好是自定义View的名字 TextView-->
    <declare-styleable name="TextView">
        <!--name 是名称,format是格式  color(颜色),string(文本),
        dimension(sp,dp)【宽高、字体大小】 integer 数字
        reference 资源(Drawable)-->
        <attr name="lwpTextColor" format="color"/>
        <attr name="lwpText" format="string"/>
        <attr name="lwpTextSize" format="dimension"/>
        <attr name="lwpMaxLength" format="integer"/>

        <!--Background由View控制-->
        <!--<attr name="lwpBackground" format="reference|color"/>-->

        <!--枚举 外部写入的值是 number、text等 枚举量,
        自定义View逻辑收到的是 1、2等实际的值-->
        <attr name="lwpInputType">
            <enum name="number" value="1"/>
            <enum name="text" value="2"/>
            <enum name="password" value="3"/>
        </attr>
    </declare-styleable>
</resources>
- 在布局文件中使用:
首先需要写入命名空间
xmlns:app="http://schemas.android.com/apk/res-auto"
<LinearLayout xmlns:android="http://schemas.android.com/apk/res/android"
    xmlns:app="http://schemas.android.com/apk/res-auto"
    android:id="@+id/ll_nextParent"
    xmlns:tools="http://schemas.android.com/tools"
    android:orientation="vertical"
    android:layout_width="match_parent"
    android:layout_height="match_parent"
    tools:context=".MainActivity">

    <com.lwp.customviewtest.CustomViews.TextView
        // app: 自定义属性
        app:lwpText="自定义文本"
        app:lwpTextColor="@color/colorAccent"
        app:lwpTextSize="18sp"
        // android: 系统自带的属性
        android:text="6666666666666666666"
        android:layout_width="wrap_content"
        android:layout_height="wrap_content" />
    <!--<com.lwp.customviewtest.CustomViews.TextView-->
        <!--android:text="6666666666666666666"-->
        <!--style="@style/cstyle" />-->
    <!--<com.lwp.customviewtest.CustomViews.TextView-->
        <!--android:text="6666666666666666666"-->
        <!--style="@style/cstyle" />-->

</LinearLayout>
- 在Java逻辑中,编写自定义View的逻辑:
【注意三个构造函数的调用技巧, 把前两个改成
this,使得始终调用第三个构造函数】
【有时候可能会找不到我们自定义的属性 如TextView_lwpMaxLength, 这个时候Rebuild一下,或者重启AS即可】
    private String mText;
    private int mTextSize = 15;
    private int mTextColor = Color.BLACK;

    //这个构造函数 会在代码里面 new的时候 调用
    //TextView textView = new TextView(this);
    public TextView(Context context) {
        this(context,null);
    }

    //这个构造函数 在布局layout中使用时候 调用
//    <com.lwp.customviewtest.CustomViews.TextView
//    android:layout_width="wrap_content"
//    android:layout_height="wrap_content" />
    public TextView(Context context, AttributeSet attrs) {
        this(context, attrs, 0);
    }

    public TextView(Context context, AttributeSet attrs, int defStyleAttr) {
        super(context, attrs, defStyleAttr);

        // 获取自定义属性列表 TypedArray
        TypedArray typedArray = context.obtainStyledAttributes(attrs,R.styleable.TextView);
        // 获取文本
        mText = (String) typedArray.getText(R.styleable.TextView_lwpText);
        // 获取文字颜色
        mTextColor = typedArray.getColor(R.styleable.TextView_lwpTextColor, mTextColor);
        // 获取文字大小
        mTextSize = typedArray.getDimensionPixelSize(R.styleable.TextView_lwpTextSize, mTextSize);

        // 回收
        typedArray.recycle();
    }
其中的TextSize要选用get方法的时候:我们可以通过读
TextView 的原生源码而知:
#完善onMeasure() ``` /** * 自定义View的测量方法 * @param widthMeasureSpec * @param heightMeasureSpec */ @Override protected void onMeasure(int widthMeasureSpec, int heightMeasureSpec) { super.onMeasure(widthMeasureSpec, heightMeasureSpec); //布局的 宽高 都是由这个方法指定 //指定控件的宽高 需要测量
    //获取宽高的模式 widthMeasureSpec的前两位
    int widthMode = MeasureSpec.getMode(widthMeasureSpec);
    int heightMode = MeasureSpec.getMode(heightMeasureSpec);

    //1.确定的值,这个时候 不需要计算,给的多少就是多少
    //获取宽高的值 widthMeasureSpec的后30位
    int widthSize = MeasureSpec.getSize(widthMeasureSpec);
    int heightSize = MeasureSpec.getSize(heightMeasureSpec);


    //2.给的是wrap_content,需要计算
    if (widthMode == MeasureSpec.AT_MOST) {
        //计算的宽度 与 字体的长度、大小 有关  用画笔来测量
        Rect bounds = new Rect();
        //获取文本的 Rect
        mPaint.getTextBounds(mText, 0, mText.length(), bounds);
        //拿到文本的宽度
        widthSize = bounds.width() + getPaddingLeft() + getPaddingRight();
    }
    if (heightMode == MeasureSpec.AT_MOST) {

        int x = getPaddingLeft();
        //计算的宽度 与 字体的长度、大小 有关  用画笔来测量
        Rect bounds = new Rect();
        //获取文本的 Rect
        mPaint.getTextBounds(mText, x, mText.length(), bounds);
        //拿到文本的高度
        heightSize = bounds.height() + getPaddingTop() + getPaddingBottom();
    }

    //设置控件的宽高
    setMeasuredDimension(widthSize, heightSize);
}
<br>
#完善onDraw()
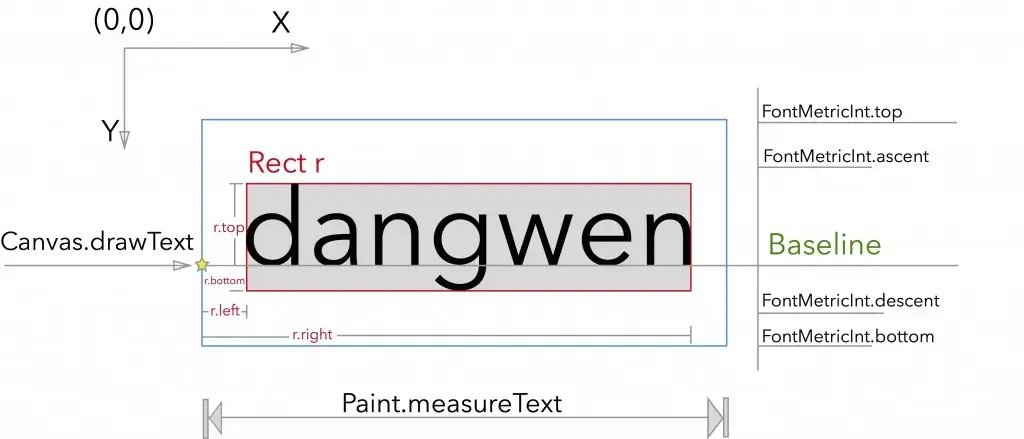
#####计算文字基线
>- **Baseline到字体的下边缘线为`descent`;
Baseline到字体的上边缘线为`ascent`**
>- f.bottom = bottom - baseline(文字底部到基线的距离,正值)
>f.top = top - baseline(文字顶部到基线的距离,负值)
>f.bottom - f.top = bottom - baseline - (top-baseline)= bottom - top
>
>(f.bottom - f.top)/ 2 = `View的一半高度`(文字底部到View中线的`距离`)
getHeight()是`View的一半高度`的`位置`的`y坐标`;<br>
>`dy = (f.bottom - f.top)/ 2 - f.bottom (基线与View中线间的距离)`
>
>- 基线`位置`的`y坐标``baseline = getHeight() / 2 + dy;`
- [Baseline的定义(以及关于一个TextView的所有属性)](https://www.jianshu.com/p/6e4b3eebbba0)
    //***********************************计算基线************************************
    //画文字 四个参数:text内容  x  y  paint画笔
    //x 开始的位置 0   y 基线
    //dy 代表的是:高度的一半到 baseline的距离
    Paint.FontMetricsInt fontMetricsInt = mPaint.getFontMetricsInt();
    int dy = (fontMetricsInt.bottom - fontMetricsInt.top) / 2 - fontMetricsInt.bottom;
    int baseline = getHeight() / 2 + dy;
    //*******************************************************************************
@Override
protected void onDraw(Canvas canvas) {
    super.onDraw(canvas);

    //***********************************计算基线************************************
    //画文字 四个参数:text内容  x  y  paint画笔
    //x 开始的位置 0   y 基线
    //dy 代表的是:高度的一半到 baseline的距离
    Paint.FontMetricsInt fontMetricsInt = mPaint.getFontMetricsInt();
    int dy = (fontMetricsInt.bottom - fontMetricsInt.top) / 2 - fontMetricsInt.bottom;
    int baseline = getHeight() / 2 + dy;
    //*******************************************************************************
// canvas.drawText(mText, 0, getHeight() / 2, mPaint); canvas.drawText(mText, 0, baseline, mPaint); }
<br><br>
##一个问题——ViewGroup默认不会触发onDraw()方法
- background不是用onDraw()画的
- View的draw()源码:
这里边有6个Step,可以去具体看一下,这里就大体点一下: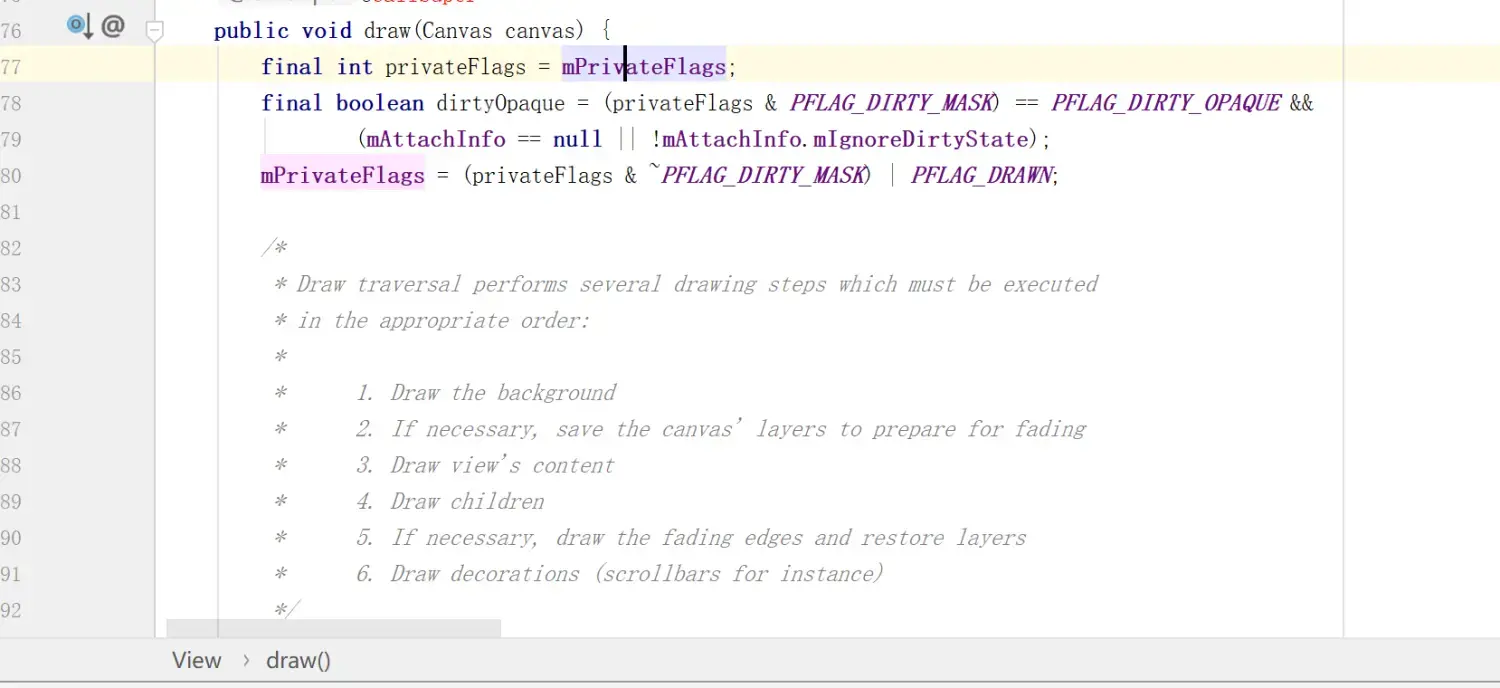
public void draw(Canvas canvas) { .... // Step 1, draw the background, if needed int saveCount;
    if (!dirtyOpaque) {
        drawBackground(canvas);
    }
... // Step 3, draw the content if (!dirtyOpaque) onDraw(canvas);
    // Step 4, draw the children
    dispatchDraw(canvas);
... // Step 6, draw decorations (foreground, scrollbars) onDrawForeground(canvas); ... }
###应该是说——ViewGroup默认没有`设置背景时`不会画出来(调用onDraw()),下面究其原因
>**我们`自定义TextView`的时候是`extends View`去做的,
如果`extends LinearLayout`等`ViewGroup`、
且`没有`设置自定义TextView的`background`的话,【有background还是可以绘制】
自定义TextView就`无法正常绘制`【不会调用onDraw()方法】;**
- 由下面源码,
`// Step 3, draw the content`
` if (!dirtyOpaque) onDraw(canvas);`
可知`dirtyOpaque`需为false,才会调用`onDraw()`;
- 而`final boolean dirtyOpaque = (privateFlags & PFLAG_DIRTY_MASK) == PFLAG_DIRTY_OPAQUE && (mAttachInfo == null || !mAttachInfo.mIgnoreDirtyState);`
`dirtyOpaque`又
由`privateFlags `、`PFLAG_DIRTY_MASK`、`PFLAG_DIRTY_OPAQUE `、`mAttachInfo `、`mAttachInfo.mIgnoreDirtyState`等决定;
- 首先,`privateFlags `;
源码中:`final int privateFlags = mPrivateFlags;`
找到源码中View的构造方法: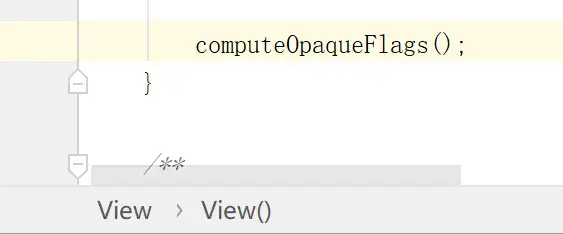
`View`的构造方法中,最后一行调用了`computeOpaqueFlags()`:
/**
 * @hide
 */
protected void computeOpaqueFlags() {
    // Opaque if:
    //   - Has a background
    //   - Background is opaque  Background 不透明
    //   - Doesn't have scrollbars or scrollbars overlay

    if (mBackground != null && mBackground.getOpacity() == PixelFormat.OPAQUE) {
        mPrivateFlags |= PFLAG_OPAQUE_BACKGROUND;
    } else {
        mPrivateFlags &= ~PFLAG_OPAQUE_BACKGROUND;
    }

    final int flags = mViewFlags;
    if (((flags & SCROLLBARS_VERTICAL) == 0 && (flags & SCROLLBARS_HORIZONTAL) == 0) ||
            (flags & SCROLLBARS_STYLE_MASK) == SCROLLBARS_INSIDE_OVERLAY ||
            (flags & SCROLLBARS_STYLE_MASK) == SCROLLBARS_OUTSIDE_OVERLAY) {
        mPrivateFlags |= PFLAG_OPAQUE_SCROLLBARS;
    } else {
        mPrivateFlags &= ~PFLAG_OPAQUE_SCROLLBARS;
    }
}
注意,` if (mBackground != null...)`,
是否有Background直接影响到`ViewGroup`能不能显示;
- `ViewGroup`源码中,
构造方法调用了` initViewGroup()`,` initViewGroup()`调用了`setFlags()`:
public ViewGroup(Context context, AttributeSet attrs, int defStyleAttr, int defStyleRes) {
    super(context, attrs, defStyleAttr, defStyleRes);

    initViewGroup();
    initFromAttributes(context, attrs, defStyleAttr, defStyleRes);
}

private void initViewGroup() {
    // ViewGroup doesn't draw by default
    if (!debugDraw()) {
        setFlags(WILL_NOT_DRAW, DRAW_MASK);
    }
... }
>**`setFlags(WILL_NOT_DRAW, DRAW_MASK);`会对`mPrivateFlags`根据情况重新计算并赋值,
`WILL_NOT_DRAW`,默认什么都不画了!!!!!!
最后连锁反应不会调用到`onDraw()`;**
- 但是如果`background`有,不为空的时候,
则会调用到`View`的`setBackgroundDrawable()`方法: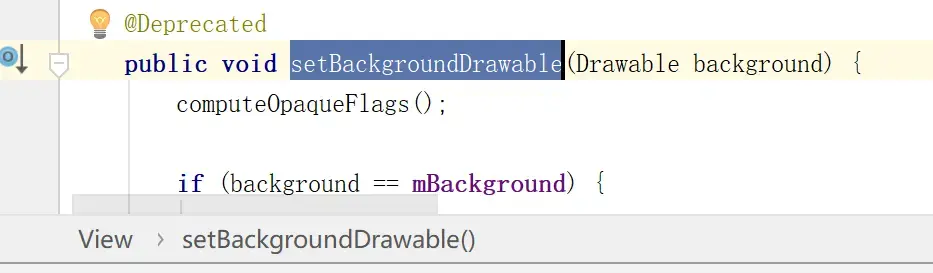
@Deprecated public void setBackgroundDrawable(Drawable background) { computeOpaqueFlags();
...
        if ((mPrivateFlags & PFLAG_SKIP_DRAW) != 0) {
            mPrivateFlags &= ~PFLAG_SKIP_DRAW;
           ...
        }
    } else {
       ...
        if ((mViewFlags & WILL_NOT_DRAW) != 0
                && (mDefaultFocusHighlight == null)
                && (mForegroundInfo == null || mForegroundInfo.mDrawable == null)) {
            mPrivateFlags |= PFLAG_SKIP_DRAW;
        }
...
computeOpaqueFlags();
...
    mBackgroundSizeChanged = true;
    invalidate(true);
    invalidateOutline();
}
>**其中调用了两次`computeOpaqueFlags()`;
重新计算了相关的Flags;
并调用`invalidate(true);`重绘;
使得`ViewGroup`得以显示;**

##解决问题——使得`ViewGroup`没有`设置背景`也能正常画出来
- **思路1 —— 绕过条件:
把自定义TextView的`onDraw()`改成`dispatchDraw()`
【由View的draw()源码,
可知`drawBackground(canvas);`、`onDraw(canvas);`是否会执行,
是受if条件`(!dirtyOpaque) `控制的;
而`dispatchDraw(canvas);`、`onDrawForeground(canvas);`不受if条件制约!】**
public class TextView extends LinearLayout {
... @Override protected void onMeasure(int widthMeasureSpec, int heightMeasureSpec) { super.onMeasure(widthMeasureSpec, heightMeasureSpec); ... }
 ...
}
...
@Override
protected void dispatchDraw(Canvas canvas) {
    super.dispatchDraw(canvas);
   ...
}
... }
- **思路2 —— 默认置位:
在自定义View的构造函数、或者其他方法中,
通过`setBackgroundColor(Color.TRANSPARENT);`
指定一个`透明的背景`或者其他`默认的背景色`即可;**

- **思路3 —— 从根源解决:
调用View的`setWillNotDraw()`,
即调用`setWillNotDraw(false);`,亦可解决;<br>
因为`setWillNotDraw()`调用了`setFlags()`,
而`setFlags()`可以根据形参变动`mPrivateFlags`;【上面提到过】**
public void setWillNotDraw(boolean willNotDraw) { setFlags(willNotDraw ? WILL_NOT_DRAW : 0, DRAW_MASK); }
**【ViewGroup源码中的`initViewGroup`中,
默认设置为`setFlags(WILL_NOT_DRAW, DRAW_MASK);`即不绘制,
所以这里只要调用一下`setFlags(0, DRAW_MASK);`即可】**


<br><br>
<br><br>
---

####最终自定义TextView代码
public class TextView extends View {
private String mText;
private int mTextSize = 15;
private int mTextColor = Color.BLACK;

//写字用的画笔
private Paint mPaint;

//这个构造函数 会在代码里面 new的时候 调用
//TextView textView = new TextView(this);
public TextView(Context context) {
    this(context,null);
}

//这个构造函数 在布局layout中使用时候 调用
// <com.lwp.customviewtest.CustomViews.TextView // android:layout_width="wrap_content" // android:layout_height="wrap_content" /> public TextView(Context context, AttributeSet attrs) { this(context, attrs, 0); }
//这个构造函数 在布局layout中使用 并且有style的时候 调用
// 【Refactor -- Extract -- style】
// <com.lwp.customviewtest.CustomViews.TextView // android:text="6666666666666666666" // style="@style/cstyle" /> // style可以提取重复的属性 public TextView(Context context, AttributeSet attrs, int defStyleAttr) { super(context, attrs, defStyleAttr);
    // 获取自定义属性列表 TypedArray
    TypedArray typedArray = context.obtainStyledAttributes(attrs,R.styleable.TextView);
    // 获取文本 有时候可能会找不到我们自定义的属性 如TextView_lwpMaxLength,这个时候Rebuild一下,或者重启AS即可
    mText = (String) typedArray.getText(R.styleable.TextView_lwpText);
    // 获取文字颜色
    mTextColor = typedArray.getColor(R.styleable.TextView_lwpTextColor, mTextColor);
    // 获取文字大小
    mTextSize = typedArray.getDimensionPixelSize(R.styleable.TextView_lwpTextSize, sp2px(mTextSize));

    // 回收
    typedArray.recycle();

    mPaint = new Paint();
    //抗锯齿 画的时候不会那么模糊
    mPaint.setAntiAlias(true);
    //设置 字体的大小和颜色!!
    mPaint.setTextSize(mTextSize);
    mPaint.setColor(mTextColor);
}

/**
 * 自定义View的测量方法
 * @param widthMeasureSpec
 * @param heightMeasureSpec
 */
@Override
protected void onMeasure(int widthMeasureSpec, int heightMeasureSpec) {
    super.onMeasure(widthMeasureSpec, heightMeasureSpec);
    //布局的 宽高 都是由这个方法指定
    //指定控件的宽高 需要测量

    //获取宽高的模式 widthMeasureSpec的前两位
    int widthMode = MeasureSpec.getMode(widthMeasureSpec);
    int heightMode = MeasureSpec.getMode(heightMeasureSpec);

    Paint.FontMetricsInt fontMetricsInt = mPaint.getFontMetricsInt();

    //1.确定的值,这个时候 不需要计算,给的多少就是多少
    //获取宽高的值 widthMeasureSpec的后30位
    int widthSize = MeasureSpec.getSize(widthMeasureSpec);
    int heightSize = MeasureSpec.getSize(heightMeasureSpec);


    //2.给的是wrap_content,需要计算
    if (widthMode == MeasureSpec.AT_MOST) {
        //计算的宽度 与 字体的长度、大小 有关  用画笔来测量
        Rect bounds = new Rect();
        //获取文本的 Rect
        mPaint.getTextBounds(mText, 0, mText.length(), bounds);
        //拿到文本的宽度
        widthSize = bounds.width() + getPaddingLeft() + getPaddingRight();
    }
    if (heightMode == MeasureSpec.AT_MOST) {

        int x = getPaddingLeft();
        //计算的宽度 与 字体的长度、大小 有关  用画笔来测量
        Rect bounds = new Rect();
        //获取文本的 Rect
        mPaint.getTextBounds(mText, x, mText.length(), bounds);
        //拿到文本的高度
        heightSize = bounds.height() + getPaddingTop() + getPaddingBottom() -
                fontMetricsInt.ascent + fontMetricsInt.descent;
    }

    //设置控件的宽高
    setMeasuredDimension(widthSize, heightSize);
}

@Override
protected void onDraw(Canvas canvas) {
    super.onDraw(canvas);

    //***********************************计算基线************************************
    //画文字 四个参数:text内容  x  y  paint画笔
    //x 开始的位置 0   y 基线
    //dy 代表的是:高度的一半到 baseline的距离
    Paint.FontMetricsInt fontMetricsInt = mPaint.getFontMetricsInt();
    int dy = (fontMetricsInt.bottom - fontMetricsInt.top) / 2 - fontMetricsInt.bottom;
    int baseline = getHeight() / 2 + dy;
    //*******************************************************************************
// canvas.drawText(mText, 0, getHeight() / 2, mPaint); canvas.drawText(mText, 0, baseline, mPaint); }
//sp转px
private int sp2px(int sp) {
    return (int) TypedValue.applyDimension(TypedValue.COMPLEX_UNIT_SP, sp, getResources().getDisplayMetrics());
}
}
<br><br><br><br>
---
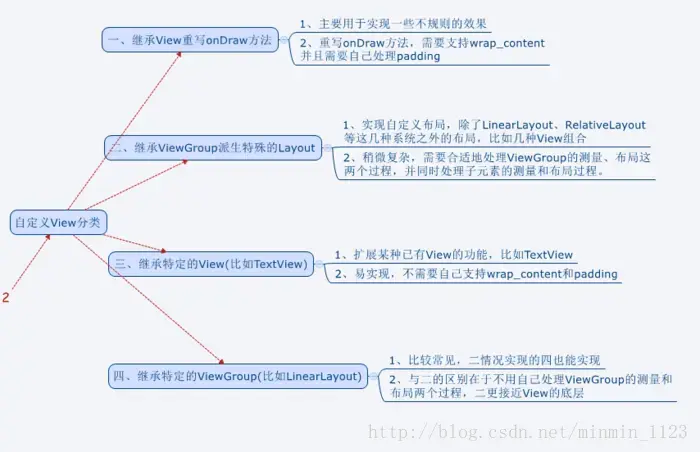
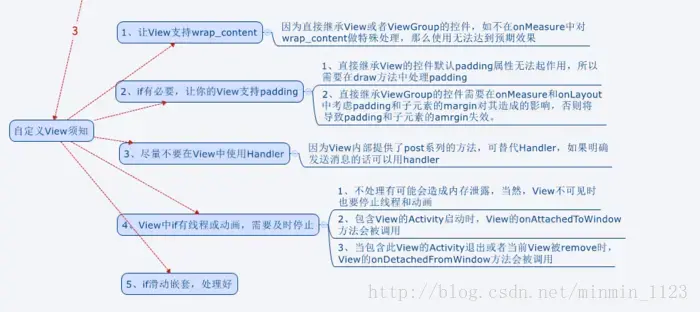
#自定义View分类、注意事项
>- 参考自**[要点提炼|开发艺术之View](https://www.jianshu.com/p/06ff0dfeed39)**
>
>