

###1.Canvas的变换方法
-
Canvas.save() 这个方法从字面上可以理解为保存画布, 调用时,将当前的画布(canvas)保存到Canvas栈。
-
Canvas.restore() Canvas栈弹栈,取出栈顶的canvas作为当前的canvas形状。
-
Canvas.restoreToCount(int saveCount) 不断弹栈,直到弹出索引是saveCount的栈顶canvas;
save()、restore()、restoreToCount()是对应着有一个画布栈的, 调用save()时候将当前的画布(canvas)入Canvas栈, 同时返回一个入栈后在栈中的索引; restore()出栈;
#####这里关于Canvas的保存和恢复的三个方法,笔者写了一个demo,由于篇幅有限,放在另外一篇博客里面Canvas的保存和恢复的demo,欢迎各位小伙伴前往惠读指教~
- **Canvas.translate()** **Android默认绘图坐标零点位于屏幕左上角,那么在调用translate()之后,则将零点(0,0)移动到了(x,y)。之后所有绘图操作都将以(x,y)为原点执行。**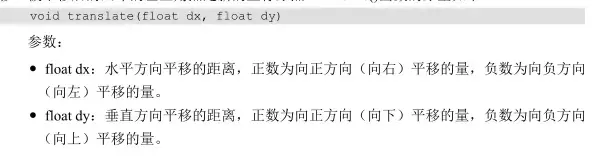
-
Canvas.rotate() 与translate()同理,旋转坐标系一个一定的角度。
-
Canvas.scale()
-
Canvas.skew()
-
canvas.clip() clip函数根据传入的Rect、Path、Region来获得最新的画布形状;
###2.Demo:仪表盘
####2.1.画外圆
####2.2.画刻度和刻度值
####2.3.画指针
####2.4.全代码和运行结果 Clock.java:
package com.yishengxu.myapplication;

import android.content.Context;
import android.graphics.Canvas;
import android.graphics.Paint;
import android.util.AttributeSet;
import android.view.View;

public class Clock extends View {

    private int mHeight, mWidth;

    public Clock(Context context) {
        super(context);
    }

    public Clock(Context context, AttributeSet attrs) {
        super(context, attrs);
    }

    public Clock(Context context, AttributeSet attrs, int defStyleAttr) {
        super(context, attrs, defStyleAttr);
    }

    @Override
    protected void onDraw(Canvas canvas) {
        // 获取宽高参数
        mWidth = getMeasuredWidth();
        mHeight = getMeasuredHeight();
        // 画外圆
        Paint paintCircle = new Paint();
        paintCircle.setStyle(Paint.Style.STROKE);
        paintCircle.setAntiAlias(true);
        paintCircle.setStrokeWidth(5);
        canvas.drawCircle(mWidth / 2,
                mHeight / 2, mWidth / 2, paintCircle);
        // 画刻度
        Paint painDegree = new Paint();
        paintCircle.setStrokeWidth(3);
        for (int i = 0; i < 24; i++) {
            // 区分整点与非整点
            if (i == 0 || i == 6 || i == 12 || i == 18) {
                painDegree.setStrokeWidth(5);
                painDegree.setTextSize(30);
                canvas.drawLine(mWidth / 2, mHeight / 2 - mWidth / 2,//基线起点x
                        mWidth / 2, mHeight / 2 - mWidth / 2 + 60,//基线起点y
                        painDegree);
                String degree = String.valueOf(i);//Integer.toString(i)
                canvas.drawText(degree,
                        mWidth / 2 - painDegree.measureText(degree) / 2,//measureText()在画布上输出文本之前,检查字体的宽度:
                        mHeight / 2 - mWidth / 2 + 90,
                        painDegree);
            } else {
                painDegree.setStrokeWidth(3);
                painDegree.setTextSize(15);
                canvas.drawLine(mWidth / 2, mHeight / 2 - mWidth / 2,
                        mWidth / 2, mHeight / 2 - mWidth / 2 + 30,
                        painDegree);
                String degree = String.valueOf(i);
                canvas.drawText(degree,
                        mWidth / 2 - painDegree.measureText(degree) / 2,
                        mHeight / 2 - mWidth / 2 + 60,
                        painDegree);
            }
            // 通过旋转画布简化坐标运算
            canvas.rotate(15, mWidth / 2, mHeight / 2);//二三参数为枢轴点的xy,枢轴点即旋转中心
        }
        // 画圆心
        Paint paintPointer = new Paint();
        paintPointer.setStrokeWidth(30);
        canvas.drawPoint(mWidth / 2, mHeight / 2, paintPointer);
        // 画指针
        Paint paintHour = new Paint();
        paintHour.setStrokeWidth(20);
        Paint paintMinute = new Paint();
        paintMinute.setStrokeWidth(10);
        canvas.save();//只是保存“缓冲区”绘制的内容
        canvas.translate(mWidth / 2, mHeight / 2);
        canvas.drawLine(0, 0, 100, 100, paintHour);
        canvas.drawLine(0, 0, 100, 200, paintMinute);
        canvas.restore();//将“缓冲区”绘制的内容和已经save()的内容一同合并并保存起来,这里跟上边的save注意区分开来
    }
}
MainActivity.java:
package com.yishengxu.myapplication;

import android.app.Activity;
import android.os.Bundle;


public class MainActivity extends Activity {

    @Override
    protected void onCreate(Bundle savedInstanceState) {
        super.onCreate(savedInstanceState);
        setContentView(new Clock(this));
    }
}
效果图:
###3.Layer图层 创建一个新的Layer到“栈”中,可以使用saveLayer(), savaLayerAlpha(), 从“栈”中推出一个Layer,可以使用restore(),restoreToCount()。但Layer入栈时,后续的DrawXXX操作都发生在这个Layer上,而Layer退栈时,就会把本层绘制的图像“绘制”到上层或是Canvas上,在复制Layer到Canvas上时,可以指定Layer的透明度
- 透明度:
- 127,半透明
- 255,完全不透明
- 0,完全透明 实例如Demo下图:
####上Demo:
package com.imooc.myapplication;

import android.app.Activity;
import android.content.Context;
import android.graphics.Canvas;
import android.graphics.Color;
import android.graphics.Paint;
import android.os.Bundle;
import android.view.View;


public class MainActivity extends Activity {

    @Override
    protected void onCreate(Bundle savedInstanceState) {
        super.onCreate(savedInstanceState);
        setContentView(new MyLayer(this));
    }

    public class MyLayer extends View {

        private Paint mPaint;
        private static final int LAYER_FLAGS =
                        Canvas.MATRIX_SAVE_FLAG |
                        Canvas.CLIP_SAVE_FLAG |
                        Canvas.HAS_ALPHA_LAYER_SAVE_FLAG |
                        Canvas.FULL_COLOR_LAYER_SAVE_FLAG |
                        Canvas.CLIP_TO_LAYER_SAVE_FLAG;//此乃API定义的常量,ctrl+E 进入文档查看便知晓其含义

        public MyLayer(Context context) {
            super(context);
            mPaint = new Paint(Paint.ANTI_ALIAS_FLAG);
        }

        @Override
        protected void onDraw(Canvas canvas) {
            canvas.drawColor(Color.WHITE);//背景
            mPaint.setColor(Color.BLUE);
            canvas.drawCircle(150, 150, 100, mPaint);//“零图层”

            canvas.saveLayerAlpha(0, 0, 400, 400, 127, LAYER_FLAGS);
            mPaint.setColor(Color.RED);
            canvas.drawCircle(200, 200, 100, mPaint);
            canvas.restore();
        }
    }
}
半透明:
完全不透明: canvas.saveLayerAlpha(0, 0, 400, 400, 255, LAYER_FLAGS);
完全透明: canvas.saveLayerAlpha(0, 0, 400, 400, 0, LAYER_FLAGS);
#自定义View——圆形头像 **思路: 获取一张图片的bitmap对象, 根据图片大小构造一条适宜图片大小的圆形路径, 绘图时, `保存画布,把画布裁剪成圆形,画上位图,回复画布,即可`;** - 其中注意, 为了避免选择的图片太大, 这里使用到了图片压缩技术; ###上代码 ``` public class CustomCircleView extends View {
private Bitmap mBmp;
private Paint mPaint;
private Path mPath;

public CustomCircleView(Context context) {
    super(context);
    init();
}

public CustomCircleView(Context context, AttributeSet attrs) {
    super(context, attrs);
    init();
}


private void init() {
    setLayerType(LAYER_TYPE_SOFTWARE, null);

    mBmp = decodeSampledBitmapFromResource(getResources(), R.drawable.testtheview, 100, 100);
    mPaint = new Paint();
    mPath = new Path();

    int width = mBmp.getWidth();
    int height = mBmp.getHeight();

    float r = (width / 2) > (height / 2) ? (height / 2) : (width / 2);

    mPath.addCircle(width / 2, height / 2, r, Path.Direction.CCW);
}

@Override
protected void onDraw(Canvas canvas) {
    super.onDraw(canvas);

    canvas.save();
    canvas.clipPath(mPath);
    canvas.drawBitmap(mBmp, 0, 0, mPaint);
    canvas.restore();
}


//下面两个方法用于进行图片压缩
public static int calculateInSampleSize(BitmapFactory.Options options,
                                        int reqWidth, int reqHeight) {
    // 源图片的高度和宽度
    final int height = options.outHeight;
    final int width = options.outWidth;
    int inSampleSize = 1;
    if (height > reqHeight || width > reqWidth) {
        // 计算出实际宽高和目标宽高的比率
        final int heightRatio = Math.round((float) height / (float) reqHeight);
        final int widthRatio = Math.round((float) width / (float) reqWidth);
        // 选择宽和高中最小的比率作为inSampleSize的值,这样可以保证最终图片的宽和高
        // 一定都会大于等于目标的宽和高。
        inSampleSize = heightRatio < widthRatio ? heightRatio : widthRatio;
    }
    return inSampleSize;
}

public static Bitmap decodeSampledBitmapFromResource(Resources res, int resId,
                                                     int reqWidth, int reqHeight) {
    // 第一次解析将inJustDecodeBounds设置为true,来获取图片大小
    final BitmapFactory.Options options = new BitmapFactory.Options();
    options.inJustDecodeBounds = true;
    BitmapFactory.decodeResource(res, resId, options);
    // 调用上面定义的方法计算inSampleSize值
    options.inSampleSize = calculateInSampleSize(options, reqWidth, reqHeight);
    // 使用获取到的inSampleSize值再次解析图片
    options.inJustDecodeBounds = false;
    return BitmapFactory.decodeResource(res, resId, options);
}
}
**MainActivity:**
public class MainActivity extends AppCompatActivity {
private LinearLayout ll_nextParent;
private LinearLayout.LayoutParams layoutParams;

private CanvasTestView canvasTestView;
private int canvasDrawId;

@Override
protected void onCreate(Bundle savedInstanceState) {
    super.onCreate(savedInstanceState);
    setContentView(R.layout.activity_main);

    //初始化控件和点击事件
    initViews();

    //为了方便调试,定义此方法,输入不同的id,显示不同的自定义View
    configCustomViews(2);
}

private void initViews() {

    canvasDrawId = 0;

    ll_nextParent = findViewById(R.id.ll_nextParent);

    layoutParams = new LinearLayout.LayoutParams(
            LinearLayout.LayoutParams.WRAP_CONTENT,
            LinearLayout.LayoutParams.WRAP_CONTENT);


}


private void configCustomViews(int drawId) {
    switch (drawId) {
        case 0:
            //SpiderView...
            break;

        case 1:
            //canvasTestView...
            break;

        case 2:
            CustomCircleView customCircleView = new CustomCircleView(this);
            ll_nextParent.addView(customCircleView,layoutParams);
            break;

        default:
    }
}
}
- **通过在MainActivity.java 中设置,
或者在activity_main.xml中添加位置属性之类等等,
便可以设定这个圆形头像的位置;**
- **[所用图片,来自百度图片](http://image.baidu.com/search/detail?ct=503316480&z=0&ipn=false&word=%E5%A4%B4%E5%83%8F&step_word=&hs=0&pn=123&spn=0&di=99990&pi=0&rn=1&tn=baiduimagedetail&is=0%2C0&istype=2&ie=utf-8&oe=utf-8&in=&cl=2&lm=-1&st=-1&cs=3902611835%2C2873646536&os=4293607150%2C445348382&simid=4153226538%2C702828979&adpicid=0&lpn=0&ln=3434&fr=&fmq=1390280702008_R&fm=&ic=0&s=undefined&hd=undefined&latest=undefined©right=undefined&se=&sme=&tab=0&width=&height=&face=undefined&ist=&jit=&cg=head&bdtype=0&oriquery=%E5%A4%B4%E5%83%8F&objurl=http%3A%2F%2Fb-ssl.duitang.com%2Fuploads%2Fitem%2F201601%2F06%2F20160106133730_tm2f8.jpeg&fromurl=ippr_z2C%24qAzdH3FAzdH3Fooo_z%26e3B17tpwg2_z%26e3Bv54AzdH3Fks52AzdH3F%3Ft1%3Dcal8d9nnn&gsm=5a&rpstart=0&rpnum=0&islist=&querylist=&force=undefined)**
- 效果图: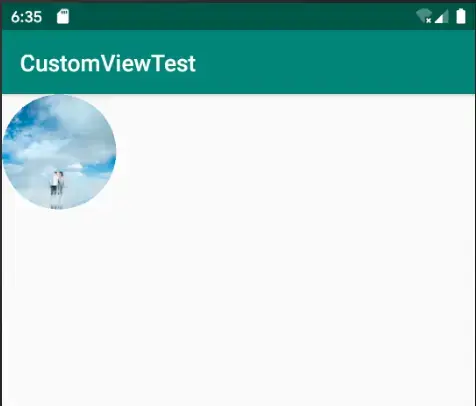
<br>
#裁剪动画
- **`Region`并不是用来画图的,它的主要作用就是裁剪画布;**
- **原理:
短时间内不断改变一个宽度值`clipwidth`,
每次改变时将`裁剪区域(传给clip方法当做参数的区域Region)`变大,
在裁剪区域内的图像显示出来,
而裁剪区域之外的图像不会显示;**
- **问题关键在于计算裁剪区域:**
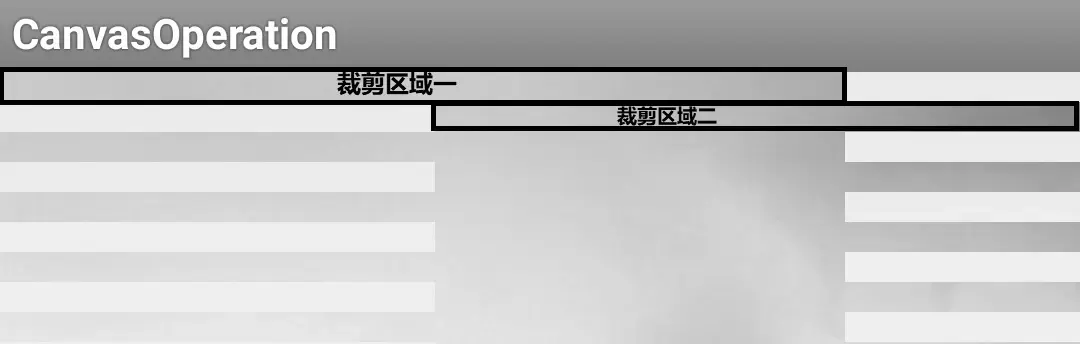**裁剪区域主要是由两类矩形不断交叠而成,
一类从左到右变大(裁剪区域一),
另一类从右到左变大(裁剪区域二)**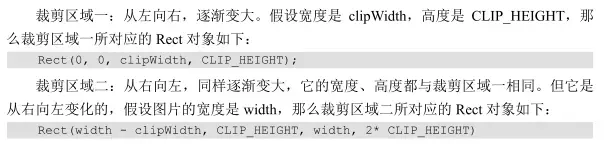
- **每次重绘,
在`while (i * CLIP_HEIGHT <= bitmapHeight)`中把整个`Bitmap`画完,
同时每次,矩形便向对应方向变大(变长)一点;**
#话不多说,上代码
MainActivity.java
public class MainActivity extends AppCompatActivity {
private LinearLayout ll_nextParent;
private LinearLayout.LayoutParams layoutParams;

private CanvasTestView canvasTestView;
private int canvasDrawId;

@Override
protected void onCreate(Bundle savedInstanceState) {
    super.onCreate(savedInstanceState);
    setContentView(R.layout.activity_main);

    //初始化控件和点击事件
    initViews();

    //为了方便调试,定义此方法,输入不同的id,显示不同的自定义View
    configCustomViews(3);
}

private void initViews() {

    canvasDrawId = 0;

    ll_nextParent = findViewById(R.id.ll_nextParent);

    layoutParams = new LinearLayout.LayoutParams(
            LinearLayout.LayoutParams.WRAP_CONTENT,
            LinearLayout.LayoutParams.WRAP_CONTENT);


}


private void configCustomViews(int drawId) {
    switch (drawId) {
        case 0:
            SpiderView spiderViewOri = new SpiderView(this);
            ll_nextParent.addView(spiderViewOri, layoutParams);
            break;

        case 1:
            canvasTestView = new CanvasTestView(this);
            ll_nextParent.addView(canvasTestView, layoutParams);
            break;

        case 2:
            CustomCircleView customCircleView = new CustomCircleView(this);
            ll_nextParent.addView(customCircleView,layoutParams);
            break;

        case 3:
            DisplayMetrics outMetrics = new DisplayMetrics();
            getWindowManager().getDefaultDisplay().getMetrics(outMetrics);
            int widthPixels = outMetrics.widthPixels;
            int heightPixels = outMetrics.heightPixels;

            final ClipRgnView clipRgnView = new ClipRgnView(this);
            clipRgnView.setDecodeSize(300,400);

            clipRgnView.setOnClickListener(new View.OnClickListener() {
                @Override
                public void onClick(View v) {
                    clipRgnView.clipWidth = 0;
                    clipRgnView.reDraw();
                }
            });

            ll_nextParent.addView(clipRgnView,layoutParams);
            break;

        default:
    }
}
自定义View——ClipRgnView:
public class ClipRgnView extends View {
private Bitmap mBitmap;
public int clipWidth = 0;
private int bitmapWidth;
private int bitmapHeight;
private static final int CLIP_HEIGHT = 30;
//    private Region mRgn;
private Path mPath;

public ClipRgnView(Context context) {
    super(context);
    init();
}

public ClipRgnView(Context context, AttributeSet attrs) {
    super(context, attrs);
    init();
}

private void init() {
    setLayerType(LAYER_TYPE_SOFTWARE, null);
// mRgn = new Region(); mPath = new Path(); }
public void setDecodeSize(int bmpWidth, int bmpHeight) {
    mBitmap = decodeSampledBitmapFromResource(getResources(),R.drawable.testtheview,bmpWidth,bmpHeight);
    bitmapWidth = mBitmap.getWidth();
    bitmapHeight = mBitmap.getHeight();
}

public void reDraw() {
    postInvalidate();
}

@Override
protected void onDraw(Canvas canvas) {
    super.onDraw(canvas);
// mRgn.setEmpty(); mPath.reset();
    int i = 0;//花了多少个矩形区域

    while (i * CLIP_HEIGHT <= bitmapHeight) {
        if (i % 2 == 0) {
// mRgn.union(new Rect(0, i * CLIP_HEIGHT, clipWidth, (i + 1) * CLIP_HEIGHT)); mPath.addRect(new RectF(0, i * CLIP_HEIGHT, clipWidth, (i + 1) * CLIP_HEIGHT), Path.Direction.CCW);
} else {
// mRgn.union(new Rect(bitmapWidth - clipWidth, i * CLIP_HEIGHT, bitmapWidth, (i + 1) * CLIP_HEIGHT)); mPath.addRect(new RectF(bitmapWidth - clipWidth, i * CLIP_HEIGHT, bitmapWidth, (i + 1) * CLIP_HEIGHT), Path.Direction.CCW); } i++; }
    canvas.clipPath(mPath);
    canvas.drawBitmap(mBitmap, 0, 0, new Paint());

    if (clipWidth > bitmapWidth) {
        return;
    }

    clipWidth += 5;

    postInvalidate();
}


//下面两个方法用于进行图片压缩
public static int calculateInSampleSize(BitmapFactory.Options options,
                                        int reqWidth, int reqHeight) {
    // 源图片的高度和宽度
    final int height = options.outHeight;
    final int width = options.outWidth;
    int inSampleSize = 1;
    if (height > reqHeight || width > reqWidth) {
        // 计算出实际宽高和目标宽高的比率
        final int heightRatio = Math.round((float) height / (float) reqHeight);
        final int widthRatio = Math.round((float) width / (float) reqWidth);
        // 选择宽和高中最小的比率作为inSampleSize的值,这样可以保证最终图片的宽和高
        // 一定都会大于等于目标的宽和高。
        inSampleSize = heightRatio < widthRatio ? heightRatio : widthRatio;
    }
    return inSampleSize;
}

public static Bitmap decodeSampledBitmapFromResource(Resources res, int resId,
                                                     int reqWidth, int reqHeight) {
    // 第一次解析将inJustDecodeBounds设置为true,来获取图片大小
    final BitmapFactory.Options options = new BitmapFactory.Options();
    options.inJustDecodeBounds = true;
    BitmapFactory.decodeResource(res, resId, options);
    // 调用上面定义的方法计算inSampleSize值
    options.inSampleSize = calculateInSampleSize(options, reqWidth, reqHeight);
    // 使用获取到的inSampleSize值再次解析图片
    options.inJustDecodeBounds = false;
    return BitmapFactory.decodeResource(res, resId, options);
}
}
