

[TOC]
多线程基础
一、实现多线程的方法(2种)
实现Runnable接口的run方法,传给Thread
public class TestRunnable implements Runnable{
    @Override
    public void run() {
        System.out.println("测试runnable接口");
    }

    public static void main(String[] args) {
        TestRunnable runnable = new TestRunnable();
        Thread thread = new Thread(runnable);
        thread.start();
    }
}
继承Thread类,重写run方法
public class TestThread extends Thread{
    @Override
    public void run() {
        System.out.println("测试thread run方法");
    }

    public static void main(String[] args) {
        TestThread thread = new TestThread();
        thread.start();
    }
}
说明:
- 两种实现的本质:都是实现了Thread类的run方法,一个是调用,一个是重写
- 线程池、callable、future、定时器timer本质上都是通过这两种方式创建线程
面试问题:两种实现方式对比?实现runnable接口更好
- 代码架构:线程执行的任务应该与线程本身的创建、运行机制解耦
- 资源利用:利用线程池可以减少创建销毁线程带来的性能损耗
- 扩展性:继承thread类后无法继承别的类
二、启动线程的正确姿势
案例:打印当前线程名称
public class TestRunnable implements Runnable{
    @Override
    public void run() {
        System.out.println(Thread.currentThread().getName());
    }

    public static void main(String[] args) {
        TestRunnable runnable = new TestRunnable();
        Thread thread = new Thread(runnable);
        // 执行run方法
        thread.run();
        // 执行start方法
        thread.start();
        // 执行两次start方法
        thread.start();
    }
}
说明:
run方法打印了main线程的名称
start方法启动了新线程,本质是执行了虚拟机的native方法start0
第二次执行会报线程状态异常
面试问题:执行两次start方法会怎么样?
会抛出线程状态异常
三、如何正确停止线程
原理:使用interrupt通知,而不是强制
1、普通情况下停止线程
public class TestInterruptThread implements Runnable{

    @Override
    public void run() {
        int num = 0;
        // 执行条件中判断当前线程是否被打断
        while (!Thread.currentThread().isInterrupted() && num <= Integer.MAX_VALUE / 2) {
            if (num % 10000 == 0) {
                System.out.println(num + "是10000的倍数");
            }
            num ++;
        }
        System.out.println("执行结束");
    }

    public static void main(String[] args) throws InterruptedException {
        TestInterruptThread runnable = new TestInterruptThread();
        Thread thread = new Thread(runnable);
        // 启动线程
        thread.start();
        Thread.sleep(500);
        // 线程通知打断
        thread.interrupt();
    }
}
说明:主线程发出interrupt指令后,线程任务中有interrupt状态的判断,所以任务被终止
2、阻塞的情况下停止线程
public class TestInterruptThread implements Runnable {

    @Override
    public void run()  {
        int num = 0;
        // 这里很快执行完
        while (!Thread.currentThread().isInterrupted() && num <= 300) {
            if (num % 100 == 0) {
                System.out.println(num + "是100的倍数");
            }
            num ++;
        }
        // 这里进入阻塞
        try {
            Thread.sleep(5000);
        } catch (InterruptedException e) {
            e.printStackTrace();
        }
        System.out.println("执行结束");
    }

    public static void main(String[] args) throws InterruptedException {
        TestInterruptThread runnable = new TestInterruptThread();
        Thread thread = new Thread(runnable);
        thread.start();
        // 主线程sleep 1s让新线程把逻辑跑完
        Thread.sleep(1000);
        // 主线程通知打断
        thread.interrupt();
    }
}
说明:线程在sleep状态下被interrupt,会抛出InterruptedException异常
3、迭代阻塞的情况下停止线程
public class TestInterruptThread implements Runnable {

    @Override
    public void run()  {
        int num = 0;
        // 执行条件中判断当前线程是否被打断
        while (!Thread.currentThread().isInterrupted() && num <= Integer.MAX_VALUE / 2) {
            if (num % 10 == 0) {
                System.out.println(num + "是100的倍数");
            }
            num ++;
            try {
                Thread.sleep(10);
            } catch (InterruptedException e) {
                e.printStackTrace();
            }
        }
		System.out.println("执行结束");
    }

    public static void main(String[] args) throws InterruptedException {
        TestInterruptThread runnable = new TestInterruptThread();
        Thread thread = new Thread(runnable);
        // 启动线程
        thread.start();
        Thread.sleep(500);
        // 线程通知打断
        thread.interrupt();
    }
}
说明:在while循环中对阻塞(sleep)进行异常捕获,并且在while条件中加入当前线程的isInterrupted的判断是不会终止循环的,原因是:
阻塞(sleep)状态下被interrupt会抛出异常并将当前线程的interrupt标记清除掉,所以需要在catch中显式的添加interrupt标记
try {
    Thread.sleep(10);
} catch (InterruptedException e) {
    e.printStackTrace();
    // 显式终止线程
    Thread.currentThread().interrupt();
}
3、停止线程的错误方式
①弃用的stop、suspend、resume方法
②用volatile设置Boolean标记位
public class TestInterruptThread implements Runnable {

    /** 为什么可以用volatile,因为volatile声明的变量是线程可见的,线程实时更新的 */
    private volatile boolean cancel = false;

    @Override
    public void run()  {
        int num = 0;
        try {
            // 执行条件中判断当前线程是否被打断
            while (!cancel && num <= Integer.MAX_VALUE / 2) {
                if (num % 10 == 0) {
                    System.out.println(num + "是100的倍数");
                }
                num ++;
                Thread.sleep(10);
            }
        } catch (InterruptedException e) {
            e.printStackTrace();
            Thread.currentThread().interrupt();
        }
        System.out.println("执行结束");
    }

    public static void main(String[] args) throws InterruptedException {
        TestInterruptThread runnable = new TestInterruptThread();
        Thread thread = new Thread(runnable);
        // 启动线程
        thread.start();
        Thread.sleep(500);
        // 线程通知打断
        runnable.cancel = true;
    }
}
说明:volatile关键字声明的变量在线程中是可见的,因此可以作为线程间通信的标志位
为什么这样做是有问题的?
在上述场景下,使用volatile关键字完美实现了interrupt的功能,但是在长时间阻塞的情况下,无法进行中断操作
以生产者、消费者模式说明:
/** 生产者 */
class Producer implements Runnable{

    /** 中断标记 */
    public volatile boolean cancel = false;

    private BlockingQueue<Integer> queue;

    public Producer(BlockingQueue<Integer> queue) {
        this.queue = queue;
    }

    @Override
    public void run() {
        int num = 0;
        // 执行条件中判断当前线程是否被打断
        try {
            while (!cancel && num <= Integer.MAX_VALUE / 2) {
                if (num % 10 == 0) {
                    queue.put(num);
                    System.out.println("仓库生产出:" + num);
                }
                num ++;
                Thread.sleep(10);
            }
        } catch (InterruptedException e) {
            e.printStackTrace();
        } finally {
            System.out.println("仓库已满");
        }
    }
}

/** 消费者 */
class Consumer implements Runnable{

    private BlockingQueue<Integer> queue;

    public Consumer(BlockingQueue<Integer> queue) {
        this.queue = queue;
    }

    @Override
    public void run() {
        try {
            while (Math.random() > 0.15) {
                System.out.println(queue.take() + "被消费");
                Thread.sleep(100);
            }
        } catch (InterruptedException e) {
            e.printStackTrace();
        } finally {
            System.out.println("消费者已不再需要数据");
        }
    }
}


public static void main(String[] args) throws InterruptedException {
        BlockingQueue<Integer> queue = new ArrayBlockingQueue<>(10);
        Producer pd = new Producer(queue);
        new Thread(pd).start();
        Thread.sleep(1000);
        Consumer cn = new Consumer(queue);
        new Thread(cn).start();
        Thread.sleep(5000);
        pd.cancel = true;
    	System.out.println(pd.cancel);
    }
说明:上述生产者消费者案例中,生产者的生产速度明显快于消费者的消费速度,当前消费者执行完毕时,生产者处于满队列状态,生产者线程此时进入阻塞状态。
此时将volatile的中断标记设为true,但生产者线程并没有被中断
4、interrupt()、isInterrupted()、Thread.interrupted()方法对比
| 方法 | 作用 | 作用域 |
|---|---|---|
| thread.interrupt() | 设置中断标记 | 对象 |
| thread.isInterrupted() | 获取中断标记,不清除 | 对象 |
| Thread.interrupted() | 获取中断标记,并清除 | 类 |
面试问题:如何正确的停止线程?
- 原理:使用interrupt来请求
- 停止线程,需要请求方、被停止方相互配合
- volatile关键字无法处理长时间阻塞的情况
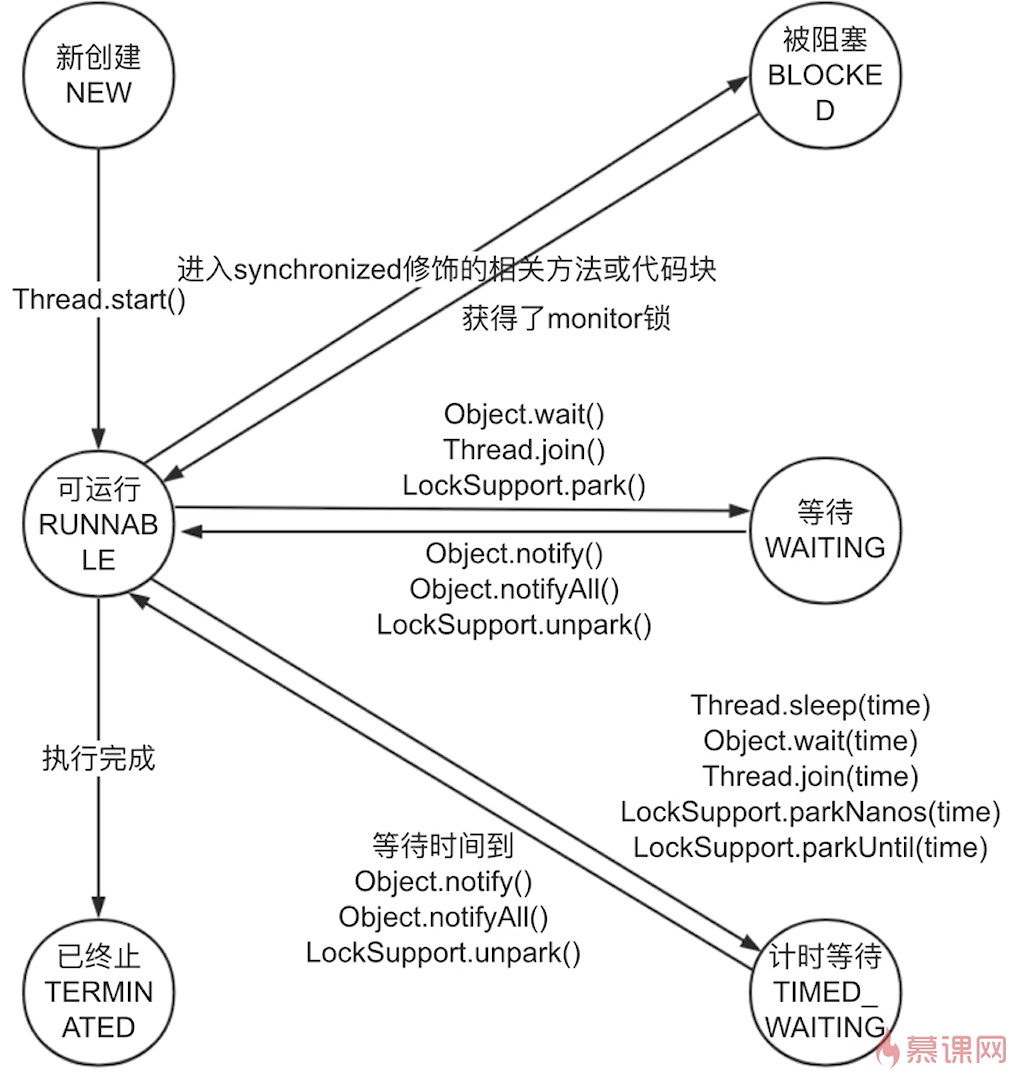
四、线程的生命周期
1、线程的6中状态
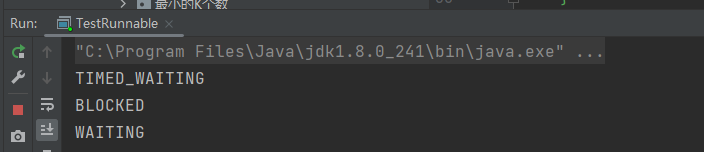
public class TestRunnable implements Runnable{
    @Override
    public void run() {
        try {
            Thread.sleep(1000);
        } catch (InterruptedException e) {
            e.printStackTrace();
        }
    }

    public static void main(String[] args) throws InterruptedException {
        TestRunnable runnable = new TestRunnable();
        Thread thread = new Thread(runnable);
        System.out.println(thread.getState());
        thread.start();
        System.out.println(thread.getState());
        Thread.sleep(2000);
        System.out.println(thread.getState());
    }
}
public class TestRunnable implements Runnable{

    @Override
    public void run() {
        toDo();
    }

    private synchronized void toDo() {
        try {
            Thread.sleep(10000);
            wait();
        } catch (InterruptedException e) {
            e.printStackTrace();
        }
    }

    public static void main(String[] args) throws InterruptedException {
        TestRunnable runnable = new TestRunnable();
        Thread thread1 = new Thread(runnable);
        thread1.start();
        Thread.sleep(2000);
        Thread thread2 = new Thread(runnable);
        thread2.start();
        System.out.println(thread1.getState());
        System.out.println(thread2.getState());
        Thread.sleep(11000);
        System.out.println(thread1.getState());

    }
}
面试问题:线程有哪几种状态?生命周期是什么?
上图解释
五、Thread、Object线程相关方法
1、wait、notify、notifyAll作用、用法
public class TestRunnable{

    /** 锁对象 */
    private static final Object object = new Object();

    public static void main(String[] args) throws InterruptedException {
        Thread thread1 = new Thread1();
        thread1.start();
        // 保证线程1进入wait
        Thread.sleep(200);
        Thread thread2 = new Thread2();
        thread2.start();
    }

    static class Thread1 extends Thread {
        @Override
        public void run() {
            synchronized (object) {
                System.out.println("进入thread1方法");
                try {
                    object.wait();
                } catch (InterruptedException e) {
                    e.printStackTrace();
                }
            }
            System.out.println("thread1重新获得锁继续执行直到结束");
        }
    }

    static class Thread2 extends Thread {
        @Override
        public void run() {
            synchronized (object) {
                System.out.println("进入thread2方法");
                object.notify();
            }
            System.out.println("thread2继续执行直到结束");
        }
    }
}
说明:
- wait()方法会释放锁,所以Thread2会进入同步代码块,notify后Thread1重新获得锁,得以继续执行
- thread1启动后主线程sleep是为了保证thread1进入wait,代码的start顺序并不代表线程的启动顺序
public class TestRunnable implements Runnable{

    /** 锁对象 */
    private static final Object object = new Object();

    @Override
    public void run() {
        synchronized (object) {
            System.out.println(Thread.currentThread().getName() + "获得锁开始执行");
            try {
                object.wait();
            } catch (InterruptedException e) {
                e.printStackTrace();
            }
            System.out.println(Thread.currentThread().getName() + "被唤醒,并重新获得锁继续执行");
        }
    }


    public static void main(String[] args) throws InterruptedException {
        TestRunnable runnable = new TestRunnable();
        Thread thread1 = new Thread(runnable);
        Thread thread2 = new Thread(runnable);
        thread1.start();
        thread2.start();
        Thread.sleep(200);
        new Thread(() -> {
            synchronized (object) {
                System.out.println(Thread.currentThread().getName() + "开始唤醒阻塞线程");
                object.notifyAll();
                System.out.println(Thread.currentThread().getName() + "唤醒完毕");
            }
        }).start();
    }
}
说明:notifyAll唤醒了所有阻塞线程
public class TestRunnable implements Runnable{

    private static final Object lock1 = new Object();
    private static final Object lock2 = new Object();

    @Override
    public void run() {
        synchronized (lock1) {
            System.out.println(Thread.currentThread().getName() + "获得锁1开始执行");
            synchronized (lock2) {
                System.out.println(Thread.currentThread().getName() + "获得锁2开始执行");
                try {
                    lock1.wait();
                } catch (InterruptedException e) {
                    e.printStackTrace();
                }
                System.out.println(Thread.currentThread().getName() + "锁2被释放继续执行");
            }
            System.out.println(Thread.currentThread().getName() + "锁2被释放继续执行");
        }
    }


    public static void main(String[] args) throws InterruptedException {
        TestRunnable runnable = new TestRunnable();
        Thread thread1 = new Thread(runnable);
        Thread thread2 = new Thread(runnable);
        thread1.start();
        thread2.start();
    }
}
说明:wait()只会释放当前锁
总结:
- wait、notify、notifyAll操作必须先拥有monitor锁(synchronized)
- notify会随机唤醒一个wait的线程
- 一个线程拥有多把锁的情况下,wait只会释放一个锁
- 由于只有拥有同一个锁的线程可以进行notify,所以唤醒后,当前线程还未释放该锁,所以刚被唤醒的线程此时并不能到runnable状态,而是回到了锁等待的状态,即blocked
- wait状态期间发生异常会直接进入terminated状态
2、wait、notify实现生产者消费者模型
import java.util.LinkedList;

public class ProducerConsumerModel{

    static class Producer implements Runnable{

        private Storage storage;

        public Producer(Storage storage) {
            this.storage = storage;
        }

        @Override
        public void run() {
            for (int i = 0; i < 1000; i++) {
                storage.put();
            }
        }
    }

    static class Consumer implements Runnable{

        private Storage storage;

        public Consumer(Storage storage) {
            this.storage = storage;
        }

        @Override
        public void run() {
            for (int i = 0; i < 1000; i++) {
                storage.take();
            }
        }
    }

    static class Storage {

        private int maxSize;
        private LinkedList<String> store;

        public Storage() {
            this.maxSize = 10;
            this.store = new LinkedList<>();
        }

        public synchronized void put() {
            while (store.size() == maxSize) {
                System.out.println("仓库已满");
                try {
                    wait();
                } catch (InterruptedException e) {
                    e.printStackTrace();
                }
            }
            store.add("new stuff");
            System.out.println(Thread.currentThread().getName() + "仓库已生产" + store.size() + "个货物");
            notifyAll();
        }

        public synchronized void take() {
            while (store.isEmpty()) {
                System.out.println("仓库已空");
                try {
                    wait();
                } catch (InterruptedException e) {
                    e.printStackTrace();
                }
            }
            System.out.println(Thread.currentThread().getName() + "消费者已消费" + (maxSize - store.size() + 1) + "个货物");
            store.poll();
            notifyAll();
        }
    }

    public static void main(String[] args) {
        Storage storage = new Storage();
        Producer pd = new Producer(storage);
        Consumer cs = new Consumer(storage);
        new Thread(pd).start();
        new Thread(cs).start();
    }
}
说明:
- 仓库类实现生产(put)、消费(take)两个同步方法
- 生产者、消费者分别在构造函数中传入同一个仓库对象作为锁
- run方法中分别实现循环生产和消费
3、用wait、notify实现交替打印0-任意数字
public class OddEvenNum{

    static class OddNum implements Runnable{

        private Num num;

        public OddNum(Num num) {
            this.num = num;
        }

        @Override
        public void run() {
            num.readOdd();
        }
    }

    static class EvenNum implements Runnable{

        private Num num;

        public EvenNum(Num num) {
            this.num = num;
        }

        @Override
        public void run() {
            num.readEven();
        }
    }

    static class Num {

        private final int maxNum;
        private int initNum = 1;

        public Num(int maxNum) {
            this.maxNum = maxNum;
        }

        public synchronized void readOdd() {
            while (initNum < maxNum) {
                if (initNum % 2 == 0) {
                    try {
                        wait();
                    } catch (InterruptedException e) {
                        e.printStackTrace();
                    }
                }
                System.out.println(Thread.currentThread().getName() + "打印数字: " + initNum++);
                notify();
            }
        }

        public synchronized void readEven() {
            while (initNum < maxNum) {
                if (initNum % 2 != 0) {
                    try {
                        wait();
                    } catch (InterruptedException e) {
                        e.printStackTrace();
                    }
                }
                System.out.println(Thread.currentThread().getName() + "打印数字: " + initNum++);
                notify();
            }
        }
    }

    public static void main(String[] args) {
        Num num = new Num(100);
        OddNum oddNum = new OddNum(num);
        EvenNum evenNum = new EvenNum(num);
        new Thread(oddNum).start();
        new Thread(evenNum).start();
    }
}
说明:仿照生产者消费者模型写了交替打印0-100数字
面试问题:
为什么wait需要在同步代码块内使用,而sleep不需要?
如果不在同步代码块中,可能会出现在wait之前上下文切换到另一个线程执行了notify方法,导致wait不会被唤醒(lost-wake up问题),因为无法保证代码的同步执行,而wait设计的初衷就是为了让notify可以将其唤醒
为什么线程通信方法wait、notify、notifyAll被定义在Object里,而sleep被定义在Thread里?、
- wait、notify、notifyAll都是锁级别的方法,在java中,任意对象都可以作为锁,所以定义在所有对象的父类object是最合理的
- 一个线程可以拥有多个锁,如果wait、notify、notifyAll方法被定义在Thread类中,则该线程无法知道具体要释放那个锁,唤醒哪个锁阻塞的线程
4、join方法解释
说明:
- thread.join()是指子线程TestThread加入主线程main,main线程会进入wait状态,等待子线程运行结束后,继续执行main线程
- 根据join原理,thread.join()可用synchronized代码块代替
public static void main(String[] args) throws InterruptedException {
        TestThread thread = new TestThread();
        thread.start();
        // TestThread加入main线程
        System.out.println("等待test线程执行完");
//        thread.join();
        synchronized (thread) {
            thread.wait();
        }
        System.out.println("test线程执行完毕");
    }
六、线程各属性
面试问题:
什么时候使用守护线程?
通常情况下不需要设置,JVM已经有足够的守护线程,例如垃圾回收
应该如何应用线程优先级来帮助程序运行?有哪些禁忌
通常情况下不使用线程优先级,因为本质还是操作系统的调度,java程序层面只是建议,并不能起到决定性作用
七、如何处理子线程的异常
import java.util.logging.Level;
import java.util.logging.Logger;

public class MyUncaughtExceptionHandler implements Thread.UncaughtExceptionHandler {

    @Override
    public void uncaughtException(Thread t, Throwable e) {
        Logger logger = Logger.getAnonymousLogger();
        logger.log(Level.WARNING, String.format("%s线程异常终止,并被UncaughtExceptionHandler捕获", t.getName()), e);
    }
}
public class TestThread extends Thread{
    @Override
    public void run() {
        try {
            Thread.sleep(1000);
        } catch (InterruptedException e) {
            e.printStackTrace();
        }
        System.out.println("执行子子线程的run方法");
        throw new IllegalArgumentException("出错啦~");
    }

    public static void main(String[] args) throws InterruptedException {
        Thread.setDefaultUncaughtExceptionHandler(new MyUncaughtExceptionHandler());
        TestThread thread = new TestThread();
        thread.start();
    }
}
说明:设置全局异常捕获器,处理线程异常
八、线程是把双刃剑
1、各种需要考虑线程安全的情况
- 访问共享的变量或资源,有并发风险
- 所有依赖时序的操作,即使每一步都是安全的,还是存在并发问题
- 通常没有声明是线程安全的类,是存在线程安全问题的
2、为什么多线程会带来性能问题?
①、调度:
-
上下文切换:操作系统内核在CPU上对于进程(线程)进行一些活动
- 挂起一个进程,在CPU某处存储该进程的状态
- 在内存中检索下一个进程的上下文并将其在CPU的寄存器中恢复
- 跳转到程序计数器所指向的位置(跳转到进程被中断时所在的代码行),以恢复该进程
-
缓存失效:CPU重新缓存,CPU在该进程执行过程中的缓存被清除
-
导致密集的上下文切换场景:频繁的竞争锁、由于IO等读写操作导致频繁的阻塞
②、协作:内存同步
为了数据正确性,同步手段会禁止编译器优化(指令重排)、使CPU的缓存失效
九、Java内存模型
1、JVM内存结构、Java内存模型、Java对象模型
JVM内存结构:虚拟机的运行时区域,主要是线程共享的堆、方法栈,线程独有的虚拟机栈、本地方法栈、程序计数器
Java内存模型:和并发编程有关
Java对象模型:指Java对象在虚拟机中的表现形式有关
2、JMM是什么
- 是一组规范,保证了不同虚拟机在处理多线程并发场景的统一机制
- 是工具类和关键字的原理:volatile、synchronized、Lock
- 包含三点内容:重排序、可见性、原子性
3、重排序
三种情况:
- 编译器优化
- CPU指令重排
- 内存的”重排序“
好处:提高处理速度
4、可见性
概念:当一个线程修改了共享变量的值,其他线程能够立即得知这个修改
5、JMM抽象
计算机CPU与内存的工作模式
Java内存模型
Java 作为高级语言,屏蔽了这些底层细节,用JMM 定义了一套读写内存数据的规范,我们不再需要关心一级缓存和二级缓存的问题,JMM抽象了主内存和本地内存的概念。这里说的本地内存并不是真的是一块给每个线程分配的内存,而是JMM的一个抽象,是对于寄存器、一级缓存、二级缓存等的抽象。
为什么会导致可见性的问题?
所有的共享变量存在于主内存中,每个线程有自己的本地内存,会存有主内存的共享变量的拷贝,线程读写共享数据都是通过本地内存交换的,所以存在可见性问题。
6、happens-before(先行发生原则)
概念:两个操作A、B满足happens-before原则的前提下,如果操作A先行发生于操作B,那么操作A产生的结果对于操作B是可见的。
- 单线程操作:在一个线程内,程序按照代码书写顺序执行
- 锁操作(synchronized、Lock):一个线程的锁住的代码一定先行发生于另一个线程同一个锁的代码
- volatile变量:volatile变量的写操作先行发生于后面对这个变量的读操作
- 线程启动:Thread的start方法先行发生于此线程的所有动作
- 线程join:线程执行的run方法一定先行发生于join后的操作
- 线程中断:interrupt方法一定先行发生于检测中断的方法前,意思是可以用interrupt检测是否有中断发生
- 传递性:操作A先行发生与操作B,操作B先行发生于操作C,那么操作A一定先行发生于操作C
十、volatile关键字
1、特性:
- 保证此变量对所有线程的可见性
- 禁止指令重排优化
2、适用场景
- Boolean flag,如果一个变量自始至终都只被各个线程赋值,没有其他操作,那么就可用volatile修饰,由于赋值是原子操作,所以保证了线程安全
import java.util.concurrent.atomic.AtomicInteger;

public class TestRunnable implements Runnable{

    private volatile Boolean done = false;
    private final AtomicInteger real = new AtomicInteger();

    @Override
    public void run() {
        for (int i = 0; i < 10000; i++) {
            flipDone();
            real.incrementAndGet();
        }
    }

    private void flipDone() {
        // 只是赋值操作,原子操作
        done = true;
        // 依赖于变量本身的当前值,不是原子操作
        // done = !done;
    }

    public static void main(String[] args) throws InterruptedException {
        TestRunnable runnable = new TestRunnable();
        Thread thread1 = new Thread(runnable);
        Thread thread2 = new Thread(runnable);
        thread1.start();
        thread2.start();
        thread1.join();
        thread2.join();
        System.out.println(runnable.done);
        System.out.println(runnable.real);
    }
}
- 作为刷新之前变量的触发器
这个原理是说:线程A将volatile变量赋值为true,由于可见性原理,线程B的判断条件保证了volatile变量赋值操作前的操作一定是可见的,且不存在指令重排
3、不适用场景
凡是该变量的赋值操作依赖于当前变量,都会导致同步失效的可能
我理解本质还是因为凡是涉及计算的都不是原子操作,所以会存在同步失败的情况
import java.util.concurrent.atomic.AtomicInteger;

public class TestRunnable implements Runnable{

    private volatile int count;
    // 保证了自增的原子操作,用来对比同步情况下的计算结果
    private final AtomicInteger real = new AtomicInteger();

    @Override
    public void run() {
        for (int i = 0; i < 10000; i++) {
            count ++;
            real.incrementAndGet();
        }
    }

    public static void main(String[] args) throws InterruptedException {
        TestRunnable runnable = new TestRunnable();
        Thread thread1 = new Thread(runnable);
        Thread thread2 = new Thread(runnable);
        thread1.start();
        thread2.start();
        thread1.join();
        thread2.join();
        System.out.println(runnable.count);
        System.out.println(runnable.real);
    }
}
4、原子性的说明
Java中,原子性的操作有以下几种:
- 除long、double以外的基本类型的赋值操作
- 引用的赋值操作
- java.concurrent.Atomic.*包中所有类的操作
5、总结
保证并发同步安全需要三个条件:
- 操作的原子性
- 线程的可见性
- 禁止指令重排序
volatile关键字只保证了可见性和禁止重排序,所以只要对volatile修饰的变量的操作是原子的,那么volatile就是并发安全的。
十一、单例模式
1、适用场景
- 无状态的工具类:比如日志工具类,不需要在实例上存储任何状态,只需要一个实例即可
- 全局信息类:比如在一个类中记录网站的访问次数,希望不管访问任何页面都会被记录到,可以使用一个实例即可
2、八种单例写法
饿汉式(静态变量)
public class Singleton1 {

    private static final Singleton1 INSTANCE = new Singleton1();

    private Singleton1() {
    }

    public static Singleton1 getInstance() {
        return INSTANCE;
    }
}
饿汉式(静态代码块)
public class Singleton2 {

    private static final Singleton2 INSTANCE;

    static {
        INSTANCE = new Singleton2();
    }

    private Singleton2() {
    }

    public static Singleton2 getInstance() {
        return INSTANCE;
    }
}
饿汉式弊端:无论是否用到,都会首先实例化该对象,浪费内存
懒汉式(线程不安全)
public class Singleton3 {

    private static Singleton3 instance;

    private Singleton3() {
    }

    public static Singleton3 getInstance() {
        if (instance == null) {
            instance = new Singleton3();
        }
        return instance;
    }
}
懒汉式(线程安全)(不推荐)
public class Singleton4 {

    private static Singleton4 instance;

    private Singleton4() {
    }

    public static synchronized Singleton4 getInstance() {
        if (instance == null) {
            instance = new Singleton4();
        }
        return instance;
    }
}
懒汉式(同步代码块)(不可用)
public class Singleton5 {

    private static Singleton5 instance;

    private Singleton5() {
    }

    public static Singleton5 getInstance() {
        if (instance == null) {
            synchronized (Singleton5.class) {
                instance = new Singleton5();
            }
        }
        return instance;
    }
}
懒汉式优点:
- 延迟加载,需要用到才会实例化,优化内存使用
缺点:
- 写法相对复杂
- 处理不好存在线程安全问题
- 线程安全的懒汉式的方式效率太低,针对不需要实例化的操作也被加上了锁
双重检查(面试推荐写法)
public class Singleton6 {

    private static volatile Singleton6 instance;

    private Singleton6() {
    }

    public static Singleton6 getInstance() {
        if (instance == null) {
            synchronized (Singleton6.class) {
                if (instance == null) {
                    instance = new Singleton6();
                }
            }
        }
        return instance;
    }
}
原理解读:
在getInstance方法中,首先判断instance是否为空,只有为空时才需要进行实例化,而为了避免并发问题,使用synchronized将实例化的逻辑锁起来:
public static Singleton6 getInstance() {
        if (instance == null) {
            synchronized (Singleton6.class) {
                instance = new Singleton6();
            }
        }
        return instance;
    }
但是此时是有问题的,如果线程A、B同时进入为空的判断逻辑中,由于锁的原因,线程A进行了实例化,当A退出锁时,B进入实例化的逻辑,就会又进行实例化,从而破坏了单例。针对这个问题,需要再一次进行为空的判断:
public static Singleton6 getInstance() {
        if (instance == null) {
            synchronized (Singleton6.class) {
                // 线程B进来时由于instance已经不为空了,所以不会进行实例化
                if (instance == null) {
                    instance = new Singleton6();
                }
            }
        }
        return instance;
    }
为什么需要加volatile关键字?
实例化一个对象有三个步骤:
1、创建一个空对象
2、执行该类的构造方法
3、将空对象赋值给引用
volatile关键字禁止指令重排序,防止了CPU将空对象赋值给引用的操作提前而导致空指针
匿名内部类(推荐,但复杂度高)
public class Singleton7 {

    private Singleton7() {
    }

    private static class SingletonInstance{
        private static final Singleton7 SINGLETON_INSTANCE = new Singleton7();
    }

    public static Singleton7 getInstance() {
        return SingletonInstance.SINGLETON_INSTANCE;
    }
}
枚举(最佳实践)
public enum Singleton8 {

    INSTANCE;

    public void doSomething() {

    }
}
枚举写法的优势:
- 写法简单
- 线程安全有保障
- 同时也是懒加载
- 避免反序列化破坏单例
十二、死锁
1、案例
代码案例:
public class TestRunnable implements Runnable{

    private boolean flag;

    // 这两个锁是static的,类层级的锁,所以两个runnable对象可以共享
    static final Object o1 = new Object();
    static final Object o2 = new Object();

    public TestRunnable(boolean flag) {
        this.flag = flag;
    }

    @Override
    public void run() {
        System.out.println("flag:" + flag);
        if (flag) {
            synchronized (o1) {
                System.out.println(Thread.currentThread().getName() + "获得锁1");
                try {
                    Thread.sleep(2000);
                } catch (InterruptedException e) {
                    e.printStackTrace();
                }
                synchronized (o2) {
                    System.out.println(Thread.currentThread().getName() + "获得锁2");
                }
            }
        }
        if (!flag) {
            synchronized (o2) {
                System.out.println(Thread.currentThread().getName() + "获得锁2");
                try {
                    Thread.sleep(2000);
                } catch (InterruptedException e) {
                    e.printStackTrace();
                }
                synchronized (o1) {
                    System.out.println(Thread.currentThread().getName() + "获得锁1");
                }
            }
        }
    }

    public static void main(String[] args) throws InterruptedException {
        TestRunnable runnable1 = new TestRunnable(true);
        TestRunnable runnable2 = new TestRunnable(false);
        Thread thread1 = new Thread(runnable1);
        Thread thread2 = new Thread(runnable2);
        thread1.start();
        thread2.start();
    }
}
说明:thread1获得锁1后,执行sleep期间thread2获得了锁2,thread2需要等thread1释放锁1,thread1需要thread2释放锁2,造成死锁
2、必要条件
- 互斥条件:资源不能被共享,只能由一个进程使用。
- 请求与保持条件:进程已获得了一些资源,但因请求其它资源被阻塞时,对已获得的资源保持不放。
- 不剥夺条件:有些系统资源是不可抢占的,当某个进程已获得这种资源后,系统不能强行收回,只能由进程使用完时自己释放。
- 循环等待:若干个进程形成环形链,每个都占用对方申请的下一个资源。
3、定位死锁
jstack工具
使用ThreadMxBean
public static void main(String[] args) throws InterruptedException {
        TestRunnable runnable1 = new TestRunnable(true);
        TestRunnable runnable2 = new TestRunnable(false);
        Thread thread1 = new Thread(runnable1);
        Thread thread2 = new Thread(runnable2);
        thread1.start();
        thread2.start();
        Thread.sleep(5000);
        ThreadMXBean mxBean = ManagementFactory.getThreadMXBean();
        long[] deadlockedThreads = mxBean.findDeadlockedThreads();
        if (deadlockedThreads != null && deadlockedThreads.length > 0) {
            for (int i = 0; i < deadlockedThreads.length; i++) {
                ThreadInfo threadInfo = mxBean.getThreadInfo(deadlockedThreads[i]);
                System.out.println("发现死锁线程:" + threadInfo.getThreadName());
            }
        }
    }
4、修复死锁的策略
避免策略
- 服务员检查:在哲学家去拿筷子的时候, 由服务员去判断是否会造成五个人都拿着左边筷子的情况, 如果会, 那么服务员就让某个哲学家等一会再拿左边的筷子, 避免了死锁的情况
- 改变一个哲学家拿筷子的顺序:此策略没有额外的服务员 . 而是 某一个哲学家不是从左边拿筷子, 是从右边拿筷子, 这样就避免了死锁的环路
- 餐票:餐票方案是指, 如果有五个哲学家 , 那么只给出四个餐票, 总会有一个哲学家是吃不上饭的, 这样也就避免了死锁. 当某个哲学家吃完饭后, 再把餐票还回去
检测与恢复策略
- 领导调节:领导调节策略指的是, 有领导定期的巡视, 如果发现出现了死锁, 那么就会剥夺某一个哲学家手中的筷子 , 释放锁资源, 破坏死锁的四个条件中的不剥夺条件
