云函数访问的是本地的
通过绑定其他项目的服务空间
- 解决云函数冲突的问题
- 关联云服务或者项目,选择绑定其他项目的云服务空间
尝试在管理员端添加用户
uni-cloud admin扩展插件
以banner表为例子,演示uni-admin的自动生成
- 找到opendb-banner.schema.json,右键schema-to-code
- 然后添加菜单,复制路径pages/opendb-banner/list
- 填写相关信息,就生成成功了
- 然后随便编辑删除,到unistarter测试一下看看能否生效,发现生效了
- 如果二次开发之后,还需要再一次schematocode,需要进行合并操作
留言板功能实战开发
- 基于uni-starter开发,新建项目guestbook
- database新建guestbook.schema.jsons
{
"bsonType": "object",
"required": [],
"permission": {
"read": false,
"create": false,
"update": false,
"delete": false
},
"properties": {
"_id": {
"description": "ID,系统自动生成"
},
"text": {
"bsonType": "string"
},
"state": {
"bsonType": "bool"
},
"user_id": {
"bsonType": "string"
}
}
}
简单编辑一下留言板页面
<template>
	<view>
		guest
	</view>
	<button @click="add">添加</button>
</template>

<script>
	export default {
		data() {
			return {

			}
		},
		methods: {
			add() {
				// cdb 拿到数据表的操作对象
				const db = uniCloud.database();
				// 指定操作的是哪一张表
				const guestbookTable = db.collection('guestbook')
				// 添加一条数据
				guestbookTable.add({
					"text": "这是第一条数据",
					"state": true,
					"user_id": "123456"
				})
			}
		}
	}
</script>

<style>

</style>
{
"bsonType": "object",
"required": [],
"permission": {
"read": false,
"create": "auth.uid != null",
"update": false,
"delete": false
},
"properties": {
"_id": {
"description": "ID,系统自动生成"
},
"text": {
"bsonType": "string"
},
"state": {
"bsonType": "bool"
},
"user_id": {
"bsonType": "string"
}
}
}
- 然后点击就有一条数据,但是这样子的数据完全没有约束
强制默认值为false
"state": {
"bsonType": "bool",
"forceDefaultValue": false
},
- 此时提交state为true就不行
- 类似用户id也必须要用forceDefaultValue,原理是通过token来获取id
"user_id": {
			"bsonType": "string",
			"forceDefaultValue": {
				"$env": "uid"
			}
		}s
methods: {
add() {
const db = uniCloud.database();
const guestbookTable = db.collection('guestbook')
guestbookTable.add({
"text": "这是第一条数据",
})
}
}
美化页面
<template>
	<view>
  // 这里必须加上查询条件
		<unicloud-db where="state == true" v-slot:default="{data, loading, error, options}" collection="guestbook">
			<view v-if="error">{{error.message}}</view>
			<view v-else>
				{{data}}
			</view>
		</unicloud-db>
		<button @click="add">添加</button>
	</view>
</template>
修改一下schema中查询的条件
"permission": {
		"read": "doc.state==trues",
		"create": "auth.uid != null",
		"update": false,
		"delete": false
	},
通过关联查询查询到用户的头像和昵称
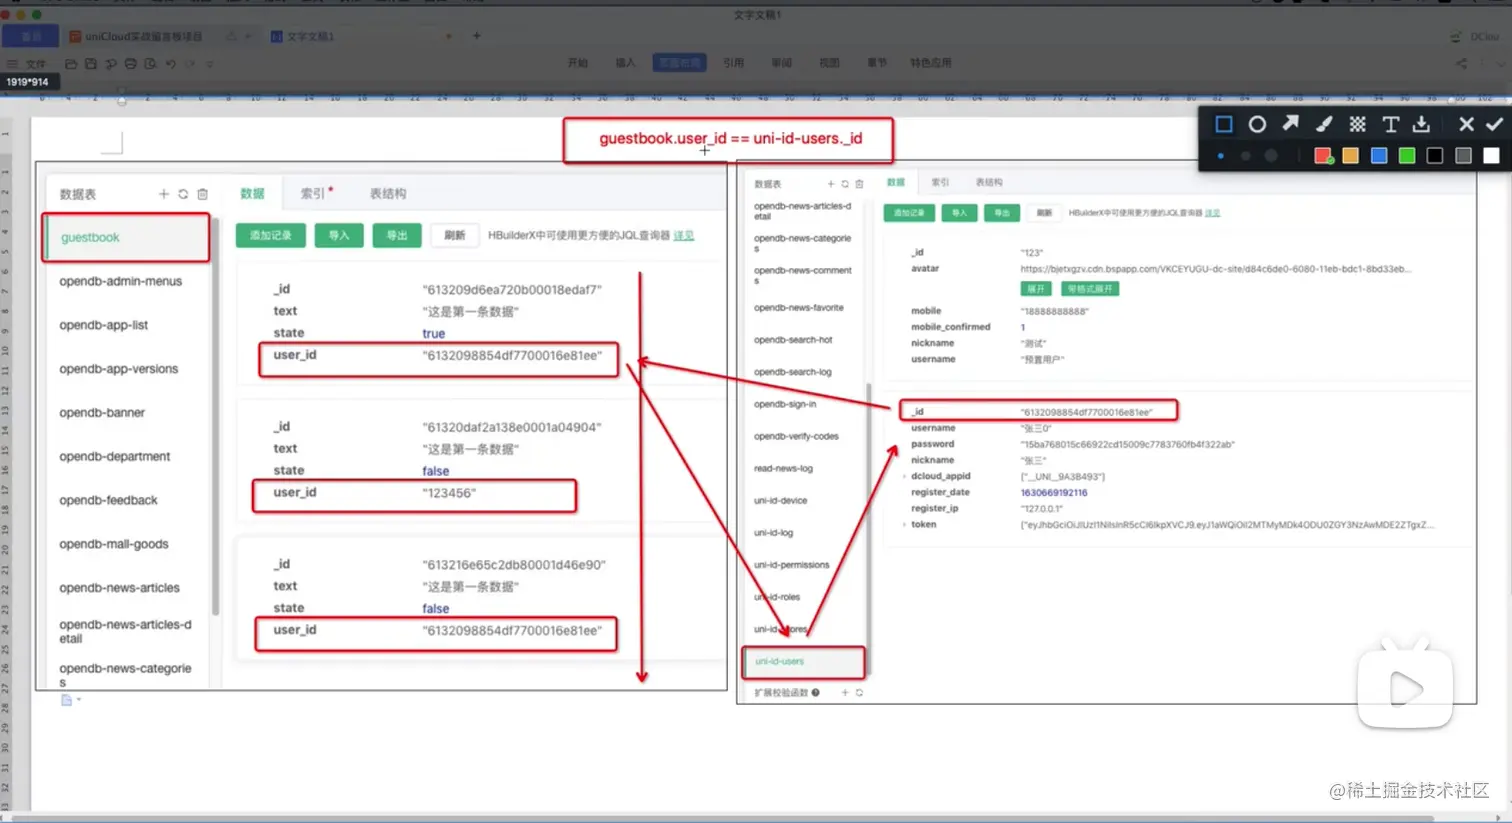
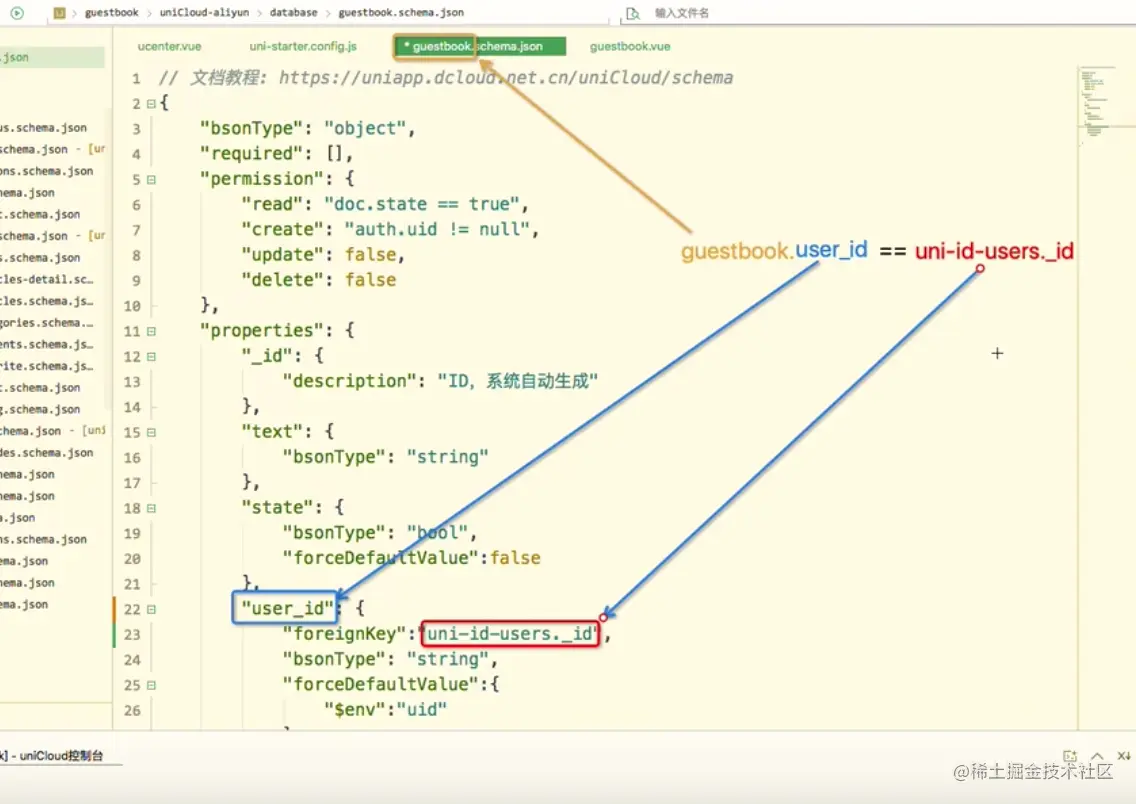
"user_id": {
			"foreignKey": "uni-id-users._id",
			"bsonType": "string",
			"forceDefaultValue": {
				"$env": "uid"
			}
		}
实现发表者可见留言
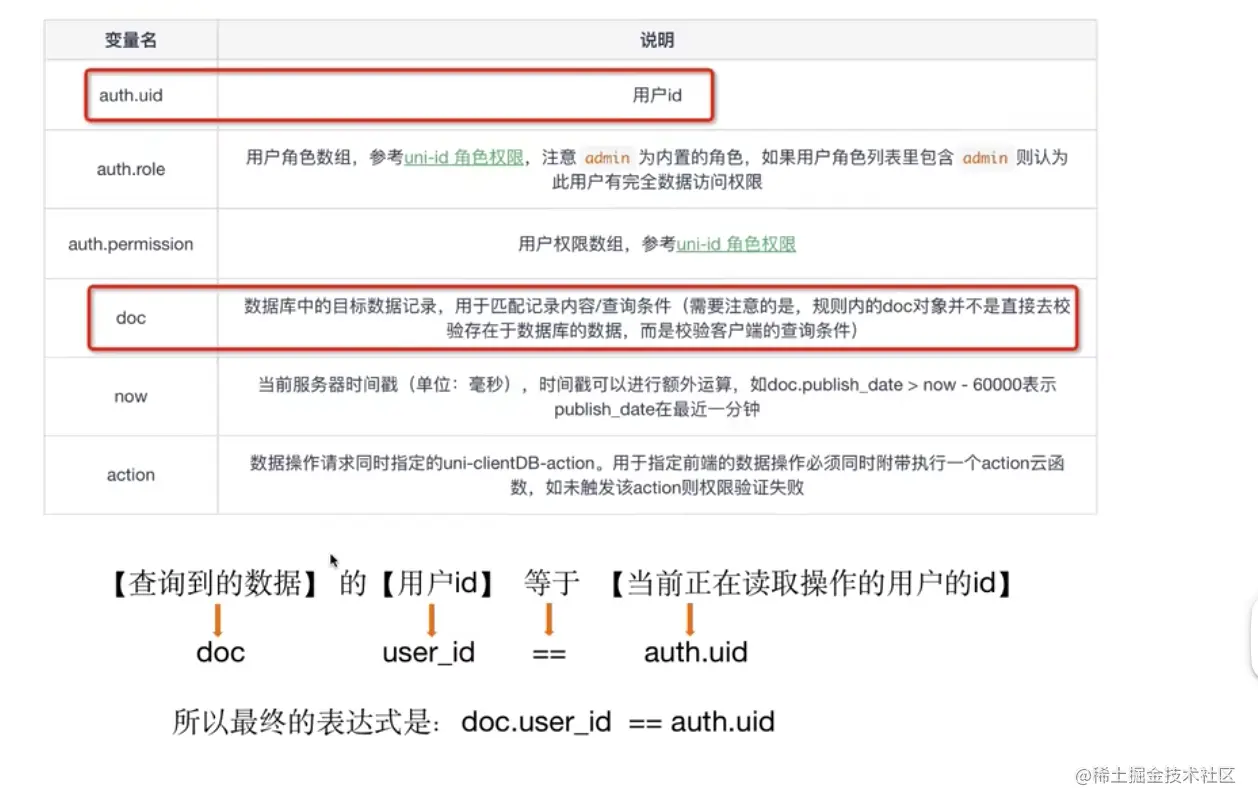
	"permission": {
		"read": "doc.state==true || doc.user_id == auth.uid",
	},
// $cloudEnv_uid 表示当前用户的id
		<unicloud-db where="state == true || user_id == $cloudEnv_uid" v-slot:default="{data, loading, error, options}" collection="guestbook,uni-id-users" field="_id,text,state,user_id.nickname,user_id.avatar_file,user_id._id">
使用unicloud-admin创建角色时审核员的用户,实现审核留言的功能
- 后台创建一个新的角色叫做审核员
- 然后用户管理创建新的一个账户,他的角色是审核员
- 添加应用,然后让角色勾选留言板
在留言板项目登录刚才创建好的审核员账号
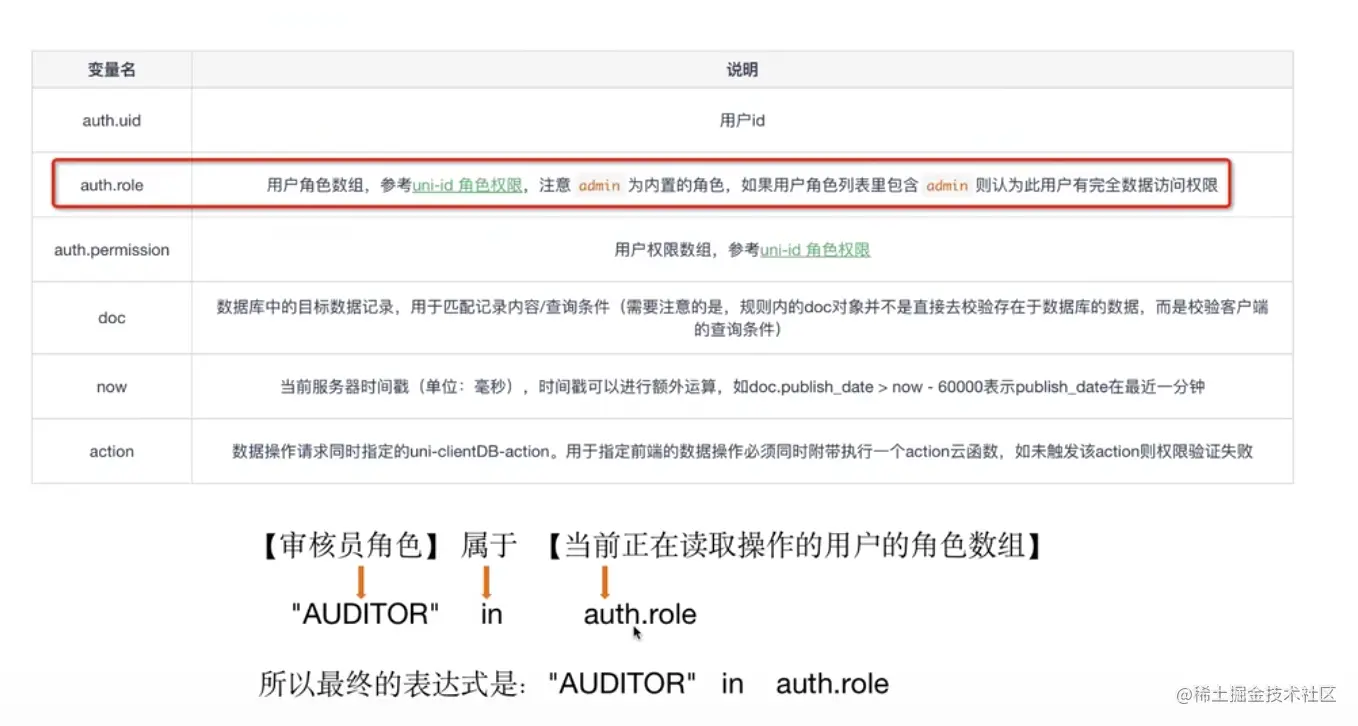
"read": "doc.state==true || doc.user_id == auth.uid || 'AUDITOR' in auth.role",
<unicloud-db :where="where"
		v-slot:default="{data, loading, error, options}" collection="guestbook,uni-id-users" field="_id,text,state,user_id.nickname,user_id.avatar_file,user_id._id">


computed: {
			where() {
				if(this.uniIDHasRole('ADUITOR')) {
					return ''
				} else {
					return "state == true || user_id._id == $cloudEnv_uid"
				}
			}
		},
通过button切换审核状态
"permission": {
"read": "doc.state==true || doc.user_id == auth.uid || 'AUDITOR' in auth.role",
"create": "auth.uid != null",
"update": "'AUDITOR' in auth.role",
"delete": false
},
<view>
		<unicloud-db :where="where"
		ref="udb"
		v-slot:default="{data, loading, error, options}" collection="guestbook,uni-id-users" field="_id,text,state,user_id.nickname,user_id.avatar_file,user_id._id">
			<view v-if="error">{{error.message}}</view>
			<view v-else>
				<view v-for="(item, index) in data" :key="index" class="item">
					<view class="main">
						<view class="nickname">{{item.user_id[0].nickname}}</view>
						<text>{{item.text}}</text>
					</view>
					<!-- <text>{{item.state?'审核通过':'审核中'}}</text> -->
					<button @click="changeType">
						{{item.state?'审核通过':'审核中'}}
					</button>
				</view>

			</view>
		</unicloud-db>
		<button @click="add">添加</button>
	</view>

changeType() {
				this.$refs.udb.update(item._id, {state: item.state}, {
					complete: e=>{
						console.log(e)
						this.$refs.udb.refresh()
					}
				})
			}


