

在很久以前就想自己搭建一个邮件服务器,正好现在一些服务需要邮件通知,所以这个需求迫在眉睫,于是我决定就开始搭建了。花了很多时间在GitHub上面找相关的项目,最终采用 maddy 搭建邮件系统,listmonk 搭建邮件订阅发送平台,Mailspring 作为邮件客户端,这已经可以满足绝大部分的需求了
🛠 准备工作
- 可信度高的顶级域名,通常是价格稍微高一点,或者不是免费能得到的域名,例如 com,cn 等
- 域名提供商能解析 mx,txt 等记录
- 一台未被封禁 25 端口的服务器
📌 前提说明
为了文章简洁,以下参数值在本教程中用作示例,无论在哪里看到,都需要将它们替换成你的实际值:
- 域名:example.com
- MX 域:mx1.example.com
- IPv4 地址:1.2.3.4
- 用户名:stellarisw
- 用户密码:stellariswpass
✈ 部署
maddy
一个GO语言开发的ALL-IN-ONE邮件系统,主要功能是通过SMTP发送和接收邮件,通过IMAP,客户端可以实现访问,也支持DKIM、SPF、DMARC、DANE、MTA-STS等邮件相关的安全和反垃圾协议。对比配置传统软件,即使是像MailCow、Mail-in-a-Box等基于docker的现成方案,安装、配置也足够简单、开箱即用,可以说是懒人必备。
1. 获取域名证书
设置你的DNS提供商的API Key 环境变量, 具体参考: How to use DNS API
执行 cd 命令到你想要安装 maddy 的目录,然后执行以下命令:
curl https://get.acme.sh | sh
alias acme.sh ~/.acme.sh/acme.sh
acme.sh --set-default-ca --server letsencrypt
acme.sh --issue --dns dns_dp -d mx1.example.com
mkdir data/tls
acme.sh --force --install-cert -d example.com \
--cert-file $(pwd)/data/tls/cert.pem \
--key-file $(pwd)/data/tls/key.pem \
--fullchain-file $(pwd)/data/tls/fullchain.pem
2. 修改 maddy 配置文件
vim ./data/maddy.conf
## Maddy Mail Server - default configuration file (2022-06-18)
## This is the copy of maddy.conf with changes necessary to run it in Docker.
# Suitable for small-scale deployments. Uses its own format for local users DB,
# should be managed via maddyctl utility.
#
# See tutorials at https://maddy.email for guidance on typical
# configuration changes.

# ----------------------------------------------------------------------------
# Base variables

$(hostname) = example.com
$(primary_domain) = example.com
$(local_domains) = $(primary_domain) # 如果你还想创建多个服务器,可以设置其他邮件服务器的域名

tls file /data/tls/fullchain.pem /data/tls/key.pem

# ----------------------------------------------------------------------------
# Local storage & authentication

# pass_table provides local hashed passwords storage for authentication of
# users. It can be configured to use any "table" module, in default
# configuration a table in SQLite DB is used.
# Table can be replaced to use e.g. a file for passwords. Or pass_table module
# can be replaced altogether to use some external source of credentials (e.g.
# PAM, /etc/shadow file).
#
# If table module supports it (sql_table does) - credentials can be managed
# using 'maddyctl creds' command.

auth.pass_table local_authdb {
    table sql_table {
        driver sqlite3
        dsn credentials.db
        table_name passwords
    }
}

# imapsql module stores all indexes and metadata necessary for IMAP using a
# relational database. It is used by IMAP endpoint for mailbox access and
# also by SMTP & Submission endpoints for delivery of local messages.
#
# IMAP accounts, mailboxes and all message metadata can be inspected using
# imap-* subcommands of maddyctl utility.

storage.imapsql local_mailboxes {
    driver sqlite3
    dsn imapsql.db
}

# ----------------------------------------------------------------------------
# SMTP endpoints + message routing

hostname $(hostname)

table.chain local_rewrites {
    optional_step regexp "(.+)+(.+)@(.+)" "$1@$3"
    optional_step static {
        entry postmaster postmaster@$(primary_domain)
    }
    optional_step file /etc/maddy/aliases
}

msgpipeline local_routing {
    # Insert handling for special-purpose local domains here.
    # e.g.
    # destination lists.example.org {
    #     deliver_to lmtp tcp://127.0.0.1:8024
    # }

    destination postmaster $(local_domains) {
        modify {
            replace_rcpt &local_rewrites
        }

        deliver_to &local_mailboxes
    }

    default_destination {
        reject 550 5.1.1 "User doesn't exist"
    }
}

smtp tcp://0.0.0.0:25 {
    limits {
        # Up to 20 msgs/sec across max. 10 SMTP connections.
        all rate 20 1s
        all concurrency 10
    }

    dmarc yes
    check {
        require_mx_record
        dkim
        spf
    }

    source $(local_domains) {
        reject 501 5.1.8 "Use Submission for outgoing SMTP"
    }
    default_source {
        destination postmaster $(local_domains) {
            deliver_to &local_routing
        }
        default_destination {
            reject 550 5.1.1 "User doesn't exist"
        }
    }
}

submission tls://0.0.0.0:465 tcp://0.0.0.0:587 {
    limits {
        # Up to 50 msgs/sec across any amount of SMTP connections.
        all rate 50 1s
    }

    auth &local_authdb

    source $(local_domains) {
        check {
            authorize_sender {
                prepare_email &local_rewrites
                user_to_email identity
            }
        }

        destination postmaster $(local_domains) {
            deliver_to &local_routing
        }
        default_destination {
            modify {
                dkim $(primary_domain) $(local_domains) default
            }
            deliver_to &remote_queue
        }
    }
    default_source {
        reject 501 5.1.8 "Non-local sender domain"
    }
}

target.remote outbound_delivery {
    limits {
        # Up to 20 msgs/sec across max. 10 SMTP connections
        # for each recipient domain.
        destination rate 20 1s
        destination concurrency 10
    }
    mx_auth {
        dane
        mtasts {
            cache fs
            fs_dir mtasts_cache/
        }
        local_policy {
            min_tls_level encrypted
            min_mx_level none
        }
    }
}

target.queue remote_queue {
    target &outbound_delivery

    autogenerated_msg_domain $(primary_domain)
    bounce {
        destination postmaster $(local_domains) {
            deliver_to &local_routing
        }
        default_destination {
            reject 550 5.0.0 "Refusing to send DSNs to non-local addresses"
        }
    }
}

# ----------------------------------------------------------------------------
# IMAP endpoints

imap tls://0.0.0.0:993 tcp://0.0.0.0:143 {
    auth &local_authdb
    storage &local_mailboxes
}
3. 创建邮箱账户
docker run --rm -it \
-v $(pwd)/data:/data \
--entrypoint /bin/maddyctl \
foxcpp/maddy:latest \
creds create stellarisw@example.com
docker run --rm -it \
-v $(pwd)/data:/data \
--entrypoint /bin/maddyctl \
foxcpp/maddy:latest \
imap-acct create stellarisw@example.com
4. 运行镜像
docker run \
--name maddy \
-d \
-v $(pwd)/data:/data \
-p 25:25 \
-p 143:143 \
-p 465:465 \
-p 587:587 \
-p 993:993 \
-e MADDY_HOSTNAME=example.com \
-e MADDY_DOMAIN=example.com \
foxcpp/maddy:latest
5. 开放端口
25:smtp inbound 端口
465:smtp ssl 加密端口
587:smtp-msa 端口
143:imap 非加密端口
993:imap ssl 加密端口
详细参考:常用邮件端口说明
6. 设置 DNS 解析
-
主域名解析
example.com. A 1.2.3.4
-
MX 记录
example.com. MX 10 mx1.example.com.
-
MX 域 解析
mx1.example.com A 1.2.3.4
-
SPF 记录
example.com TXT v=spf1 mx ~all
mx1.example.com TXT v=spf1 mx ~all
-
DMARC 记录
_dmarc TXT v=DMARC1; p=quarantine; ruf=mailto:report@example.com
-
DKIM 签名
cat ./data/dkim_keys/example.com_default.dnsdefault._domainkey TXT .... (这里填刚刚命令所输出的内容)
想设置更高级的配置,请看:maddy-setting-up
关于记录类型的说明,请看:Maddy打造个人邮箱服务
listmonk
一个独立的,自托管的通讯和邮件列表管理器,有美观的仪表板,速度快,功能丰富,简单来说就是能给你的订阅者们群发邮件更方便更有效率。
1. 修改 listmonk 配置文件
执行 cd 命令到你想要安装 listmonk 的目录,然后执行以下命令:
mkdir config
vim ./config/config.toml
[app]
address = "0.0.0.0:9000"
admin_username = "stellarisw"
admin_password = "password" # 你的仪表盘界面的登入密码

# Database.
[db]
host = "listmonk_db"
port = 5432
user = "listmonk"
password = "password" # 数据库密码
database = "listmonk"
ssl_mode = "disable"
max_open = 25
max_idle = 25
max_lifetime = "300s"
上述密码最好使用 openssl rand -base64 16 随机生成一个字符串然后存入,记住保存
2. 创建 docker-compose.yml
vim ./docker-compose.yml
# NOTE: This docker-compose.yml is meant to be just an example guideline
# on how you can achieve the same. It is not intented to run out of the box
# and you must edit the below configurations to suit your needs.

version: "3.7"

x-app-defaults:
  restart: always
  image: listmonk/listmonk:latest
  container_name: listmonk_app
  depends_on:
    - db
  volumes:
    - ./config/config.toml:/listmonk/config.toml
  ports:
    - "9000:9000"
  networks:
    - listmonk
  environment:
    - TZ=Asia/Shanghai

x-db-defaults:
  image: postgres:13
  container_name: listmonk_db
  volumes:
    - ./data:/var/lib/postgresql/data
  ports:
    - "5432:5432"
  networks:
    - listmonk
  environment:
    - POSTGRES_PASSWORD=password # 这里填刚刚的数据库密码
    - POSTGRES_USER=listmonk
    - POSTGRES_DB=listmonk
  restart: always
  healthcheck:
    test: ["CMD-SHELL", "pg_isready -U listmonk"]
    interval: 10s
    timeout: 5s
    retries: 6

networks:
  listmonk:
docker-compose up -d
Mailspring
一个开源的邮件客户端,支持 Mac、Linux 和 Windows,主要是看起来美观才选这个
-
下载 Mailspring
进入 官网 下载合适的版本
-
点击
IMAP / SMTP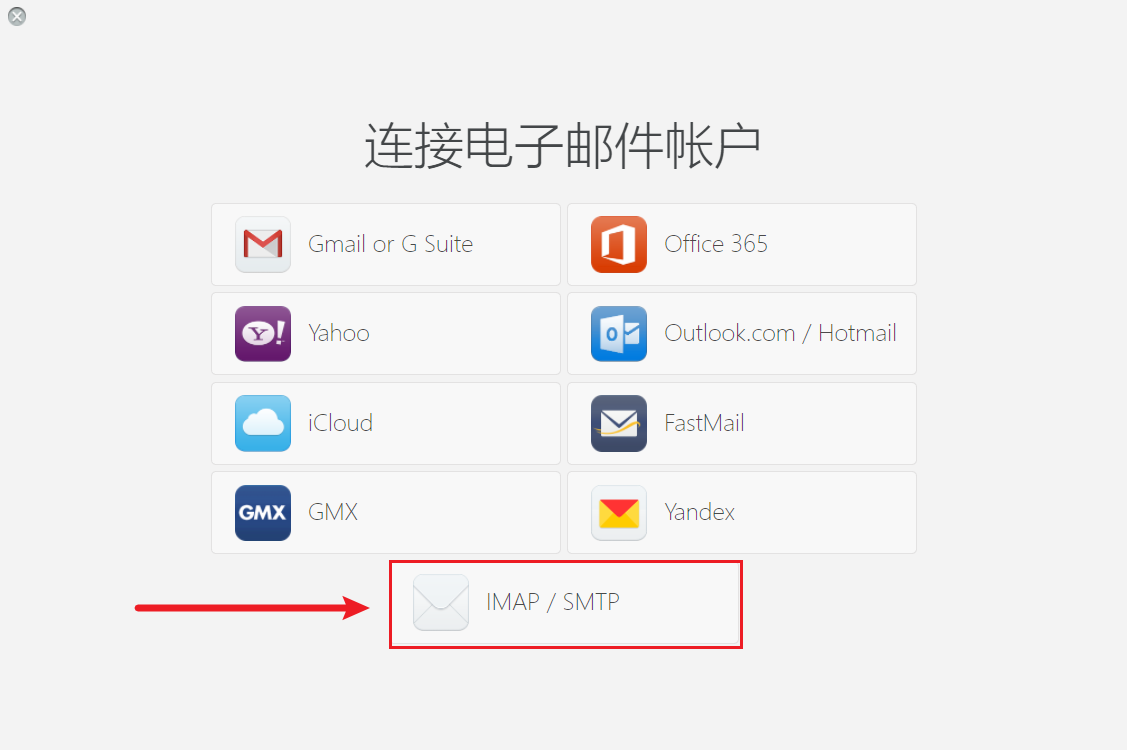
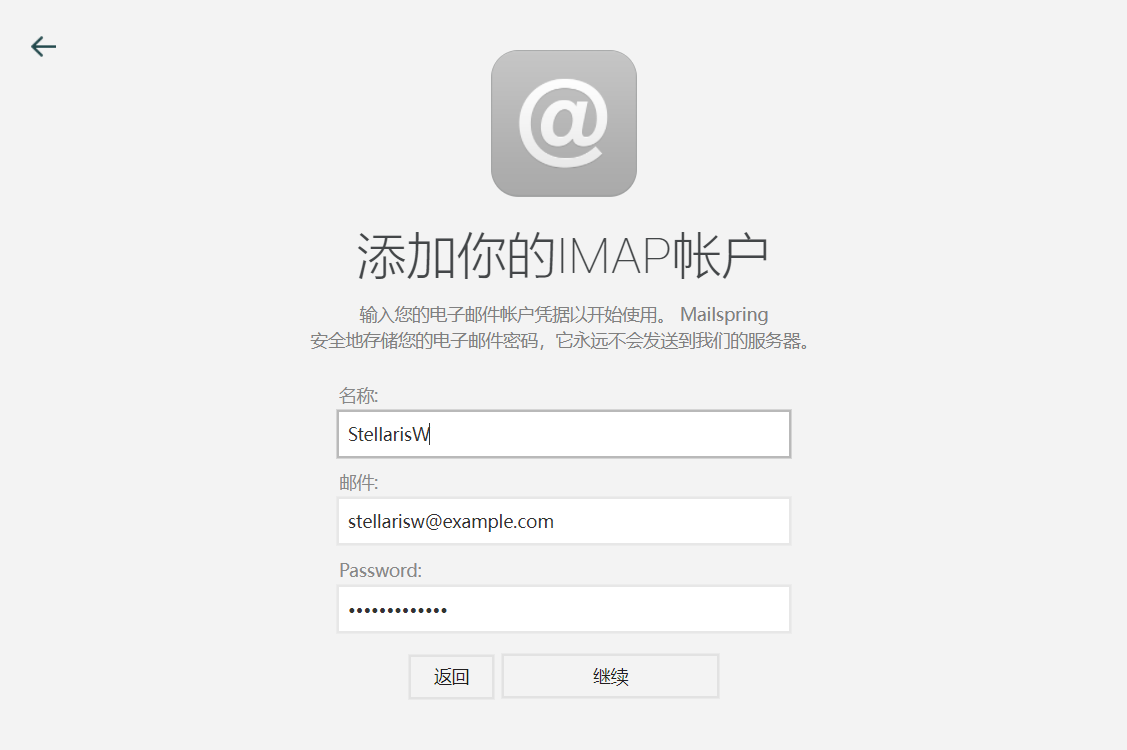
-
填写邮箱账号密码
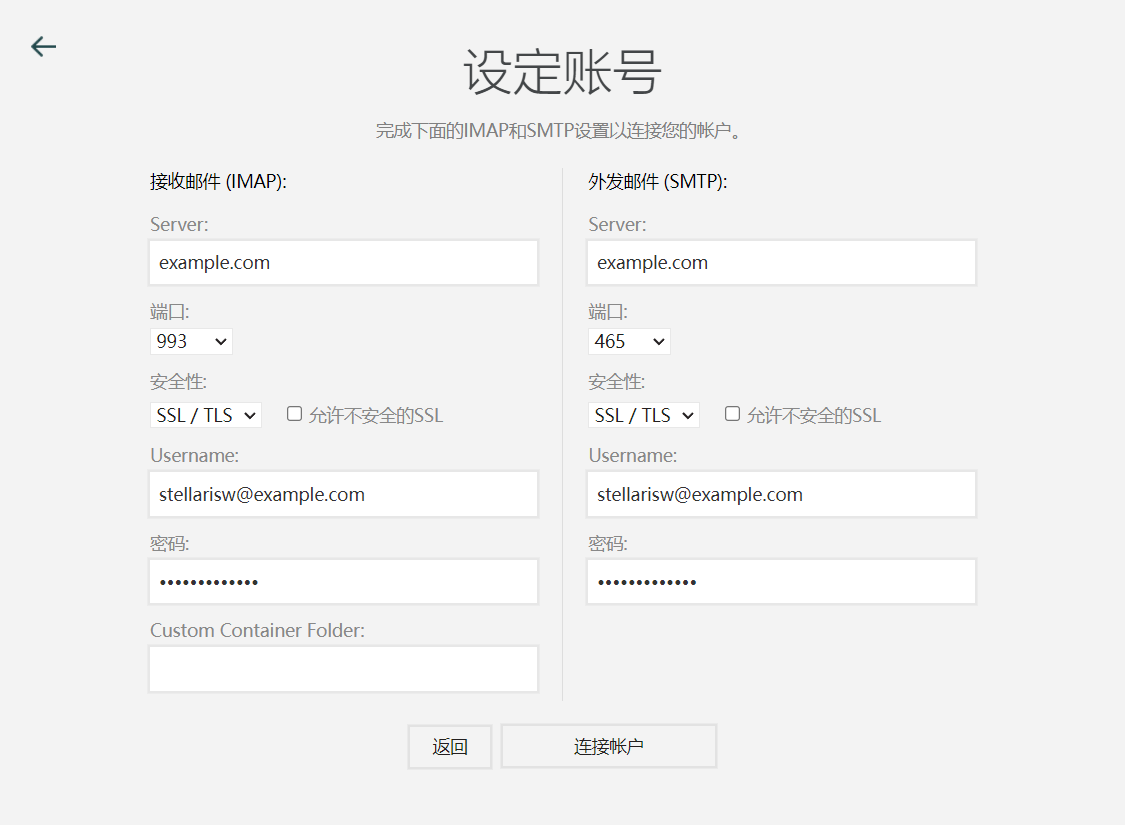
-
填写服务器信息
📝 参考链接
