一、认识应用状态管理
1. 什么是状态管理
- 在开发中,我们会的应用程序需要处理各种各样的数据,这些数据需要保存在我们应用程序中的某一个位置,对于这些数据的管理我们就称之为状态管理
2. 如何管理状态
- 在Vue开发中,我们使用组件化的开发方式
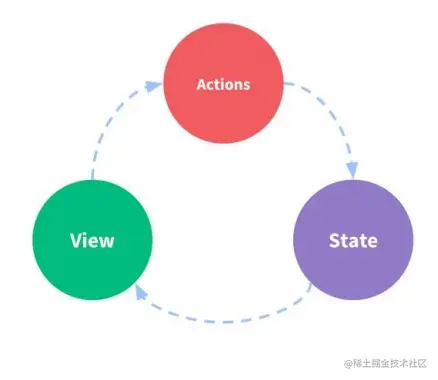
- 而在组件中我们定义data或者在setup中返回使用的数据,这些数据我们称之为state
- 在模块template中我们可以使用这些数据,模块最终会被渲染成DOM,我们称之为View
- 在模块中我们会产生一些行为事件,处理这些行为事件时,有可能会修改state,这些行为事件我们称之为actions
3. Vuex的状态管理

二、Vuex的基本使用
1. 创建Store
- 每一个Vuex应用的核心就是store(仓库)。store本质上是一个容器,它包含着你的应用中大部分的状态(state)
- Vuex和单纯的全局对象的区别:Vuex的状态存储是响应式的;不能直接改变store的状态,改变的唯一途径就是提交(commit)mutation
2. 组件中使用Store
- 在模板中使用
- 在options api中使用,比如computed
- 在setup中使用
<template>
    <div class="home>
        <h2>Home当前计数:{{ this.$store.state.counter }}</h2>
        <h2>Home当前计数:{{ storeCounter }}</h2>
        <h2>Home当前计数:{{ counter }}</h2>
    </div>
</template>
<sciprt>
    export default {
        computed: {
            storeCounter() {
                return this.$store.state.counter
            }
        }
    }
</script>
<sciprt setup>
    import { toRefs } from "vue"
    import { useStore } from "vuex"

    const store = useStore()
    const { counter } = toRefs(store.state)
</script>
3. 单一状态树
- Vuex使用单一状态树,用一个对象就包含了全部的应用层级的状态
- 每个应用将仅仅包含一个store实例
三、核心概念State
import { createStore } from "vuex"
const store = createStore({
    state: () => ({
        counter: 100,
        level: 100,
        avatarURL: "http://baidu.com"
    })
})
- 获取状态state的方法
- 组件获取状态
- 计算属性获取状态
- setup获取状态
- mapState辅助函数获取状态
- 在setup中使用mapState
<template>
<div class="home">
<h2>{{ $store.state.name }}</h2>
<h2>{{ $store.state.level }}</h2>
<h2>{{ $store.state.avatarURL }}</h2>
<h2>{{ name }}</h2>
<h2>{{ sName }}</h2>
<h2>{{ name }}</h2>
<h2>{{ cName }}</h2>
</div>
</template>
<script>
import { mapState } from "vuex"
export default {
computed: {
...mapState(["name, "level", "avatarURL"]),
...mapState({
sName: state => state.name,
sLevel: state => state.level
})
}
}
</script>
<script setup>
import { toRefs, computed } from "vue"
import { useStore, mapState } from "vuex"
const { name, level } = mapState(["name", "level"])
const store = useStore()
const cName = computed(name.bind({ $store: store })
const cLevel = computed(level.bind({ $store: store })
</script>
四、核心概念Getters
const { createStore } from "vuex"
const store = createStore({
state: () => ({
counter: 100,
level: 100,
friends: [
{ id: 111, name: "why", age: 20 },
{ id: 222, name: "messi", age: 30 },
{ id: 333, name: "kobe", age: 35 }
]
}),
getters: {
doubleCounter(state) {
return state.counter * 2
},
message(state, getters) {
return `name-${state.name}; level-${state.level}; doubleCounter-${getters.doubleCounter}`
},
getFriendById(state) {
return function(id) {
return state.friends.find(item => item.id === id)
}
}
}
})
export default store
<template>
<div class="home">
<h2>doubleCounter:{{ $store.getters.doubleCounter }}</h2>
<h2>id-111:{{ $store.getters.getFriendById(111) }}</h2>
<h2>doubleCounter:{{ doubleCounter }}</h2>
<h2>id-111:{{ getFriendById(111) }}</h2>
<h2>message:{{ message }}</h2>
</div>
</template>
<script>
import { mapGetters } from "vuex"
export default {
computed: {
...mapGetters(["doubleCounter"]),
...mapGetters(["getFriendById"])
}
}
</script>
<script setup>
import { toRefs, computed } from "vue"
import { useStore, mapState } from "vuex"
const { message: messageFns } = mapGetters(["message"])
const message = computed(messageFns.bind({ $store: store })
</script>
五、核心概念Mutations
- Mutation基本使用
- Mutation携带数据
- mapMutations辅助函数
import { createStore } from "vuex"
const store = createStore({
state: () => ({
counter: 100,
level: 100
}),
mutations: {
increment(state) {
state.counter++
},
changeName(state, payload) {
state.name = payload
}
}
})
export default store
<template>
    <div class="home">
        <h2>name:{{ $store.state.name }}</h2>
        <h2>level:{{ $store.state.level }}</h2>
        <button @click="increment">increment</button>
        <button @click="changeName('哈哈哈')">changeName</button>
    </div>
</template>
<script>
    import { mapMutations } from "vuex"
    export default {
        methods: {
            increment() {
                this.$store.commit("increment")
            },
            ...mapMutations(["changeName"])
        }
    }
</script>
<script setup>
    import { mapMutations, useStore } from "vuex"
    const store = useStore()
    const mutations = mapMutations(["increment", "changeName"])
    const newMutations = {}
    Object.keys(mutations).forEach(key => {
        newMutations[key] = mutations[key].bind({ $store: store })
    })
    const { increment, changeName } = newMutations
</script>
六、核心概念Actions
- actions基本使用
- Action提交的是mutation,而不是直接变更状态
- Action可以包含任何异步操作
- Action的一个参数context:context是一个和store实例均有相同方法和属性的context对象,所以我们可以从其中获取到commit方法来提交一个mutation
- actions的分发操作
- actions辅助函数mapActions
- actions的异步操作
- 我们可以通过让action返回Promise,在Promise的then中处理后续的操作
import { createStore } from "vuex"
const store = createStore({
    state: () => ({
        counter: 100,
        level: 100
    }),
    mutations: {
        increment(state) {
            state.counter++
        },
        changeName(state, payload) {
            state.name = payload
        }
    },
    actions: {
        incrementAction(context) {
            context.commit("increment")
        },
        changeNameAction(context, payload) {
            context.commit("changeName", payload)
        },
        fetchAction(context) {
            return Promise(async (resolve, reject) => {
                const res = await fetch(url)
                const data = awati res.json()

                context.commit("changeName", data)
                resolve("aaa")
            })
        }
    }
})
export default store
<template>
<div class="home">
<h2>name:{{ $store.state.name }}</h2>
<h2>level:{{ $store.state.level }}</h2>
<button @click="incrementAction">incrementAction</button>
<button @click="changeNameAction('哈哈哈')">changeNameAction</button>
</div>
</template>
<script>
import { mapActions } from "vuex"
export default {
methods: {
counterBtnClick() {
this.$store.dispatch("incrementAction")
},
nameBtnClick() {
this.$store.dispatch("changeNameAction")
},
...mapActions(["incrementAction", "changeNameAction"])
}
}
</script>
<script setup>
import { mapActions, useStore } from "vuex"
const store = useStore()
const actions = mapActions(["incrementAction", "changeNameAction"])
const newActions = {}
Object.keys(actions).forEach(key => {
newActions[key] = actions[key].bind({ $store: store })
})
const { incrementAction, changeNameAction } = newActions
</script>
七、核心概念Modules
1. moudule的基本使用
- 由于使用单一状态树,应用的所有状态会集中到一个比较大的对象,当应用变得非常复杂时,store对象就有可能变得相当臃肿
- 为了解决以上问题,Vuex允许我们将store分割成模块(module)
- 每个模块拥有自己的state、mutation、action、getter、甚至是嵌套子模块
2. module的命名空间
- 如果我们希望模块具有更高的封装度和复用性,可以添加 namespaced: true 的方式使其成为带命名空间的模块


