

现在的网站经常为各种用例实现弹出式窗口、警报或模式对话框的使用,如接受cookies、询问权限、输入数据、警告警报等。尽管有一些有效的用例,但不必要的弹出窗口可能看起来很烦人,需要加以处理。
你一定在日常的网络互动中遇到过这样的情况,比如亚马逊或沃尔玛在第一次访问时提示注册,在各种食品网站如McD、Swiggy提供位置,或在支付网关模式下完成支付。
随着使用量的增加,现在人们对自动化测试人员的期望是他们能够意识到通过自动化处理。主要原因是这些弹出窗口,有时是多个,出现在被测网站的主页上,需要处理/关闭,直到父页面可以访问互动,实际测试流程可以开始。
因此,如果你到目前为止还没有机会处理这些问题或使其自动化,那么这篇博客就是你的最佳选择。在这篇博客中,我们将通过实际例子学习如何在Selenium WebDriverJava中处理模态对话框。
这篇博客将涵盖处理Bootstrap对话框、弹出窗口/标签和警报。我将从弹出式窗口的基础知识开始,之后我将演示如何在Selenium WebDriver Java中处理模态对话框。所以让我们开始吧。
如何在Selenium WebDriver Java中处理模态对话框?
在这个Selenium Java教程中,我们将学习什么是模态对话框,并演示如何在Selenium Java中处理模态对话框。
什么是模态对话框?
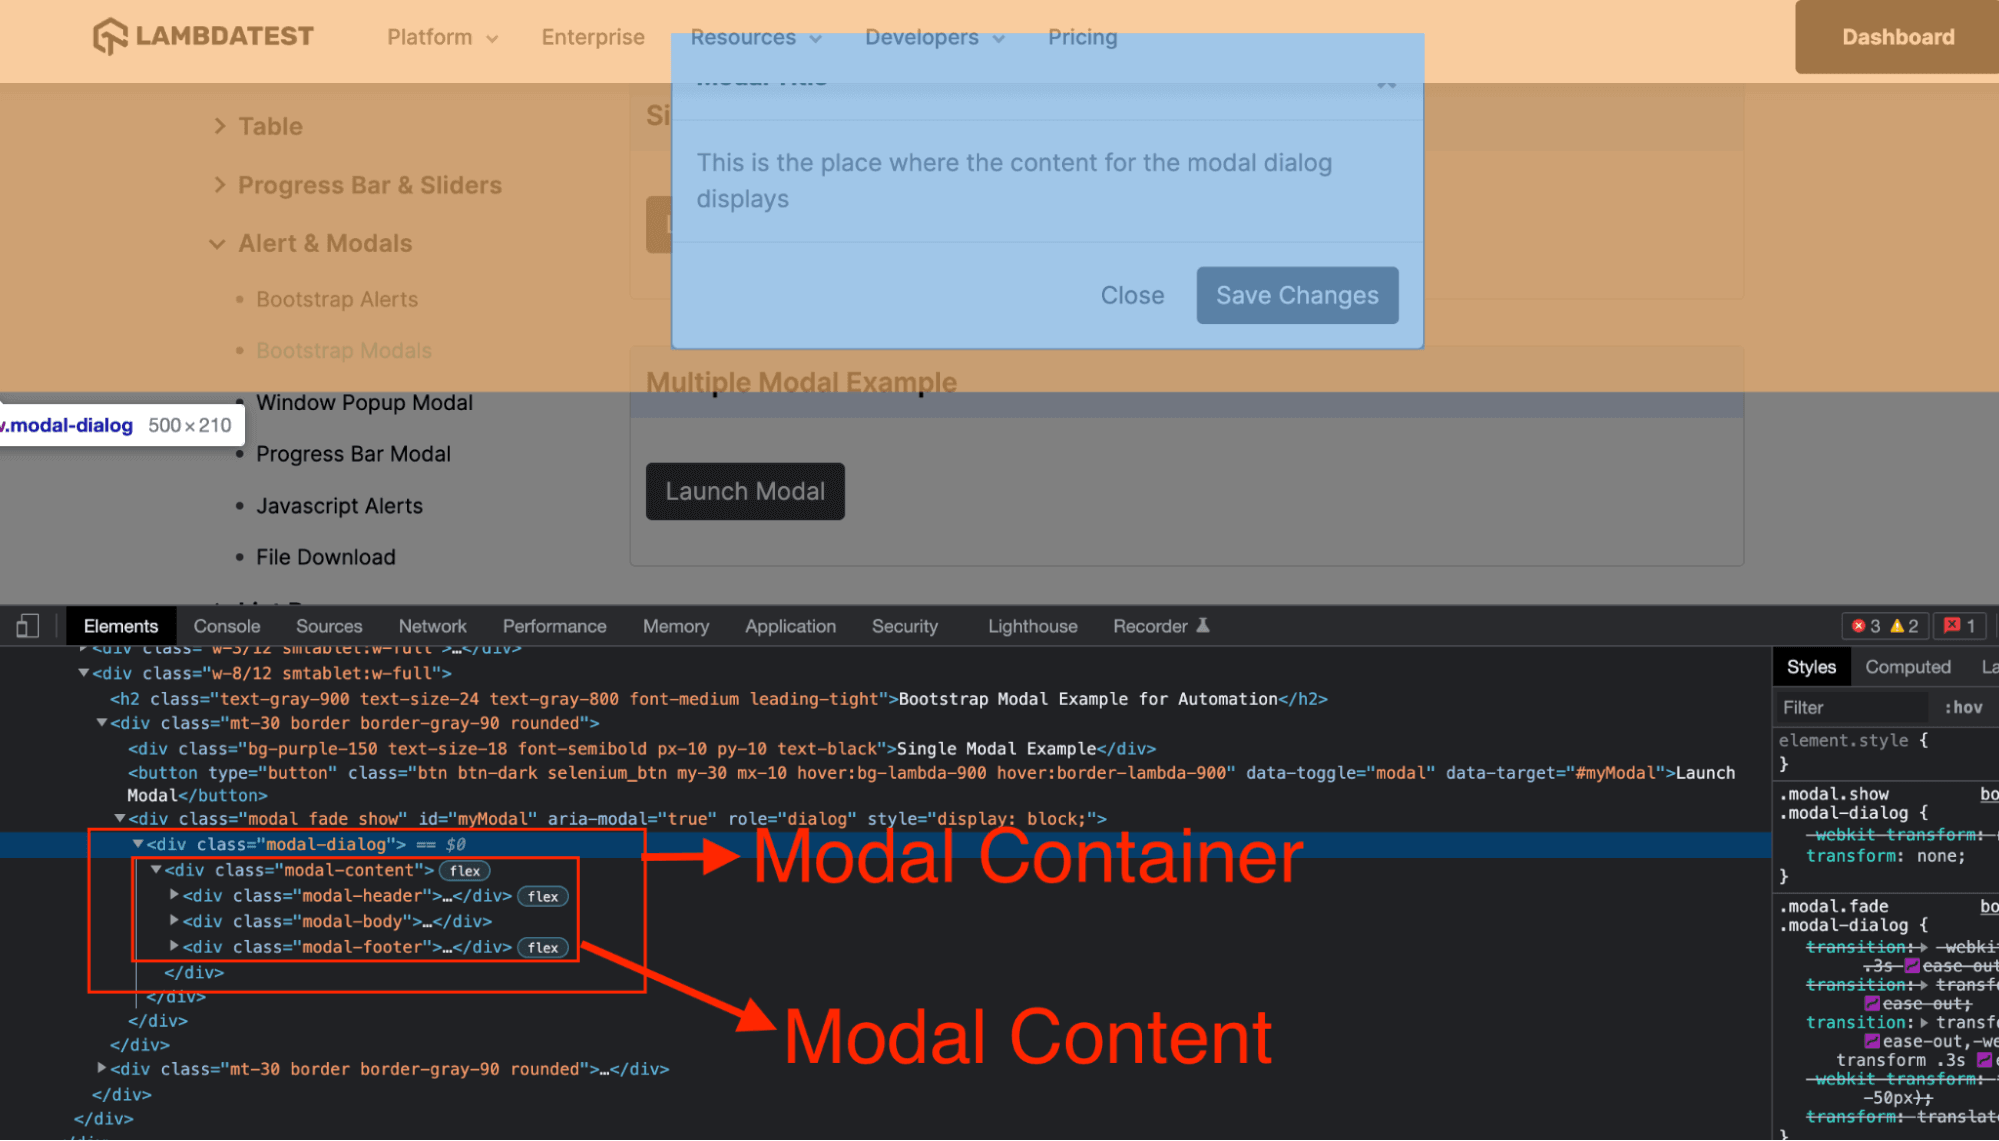
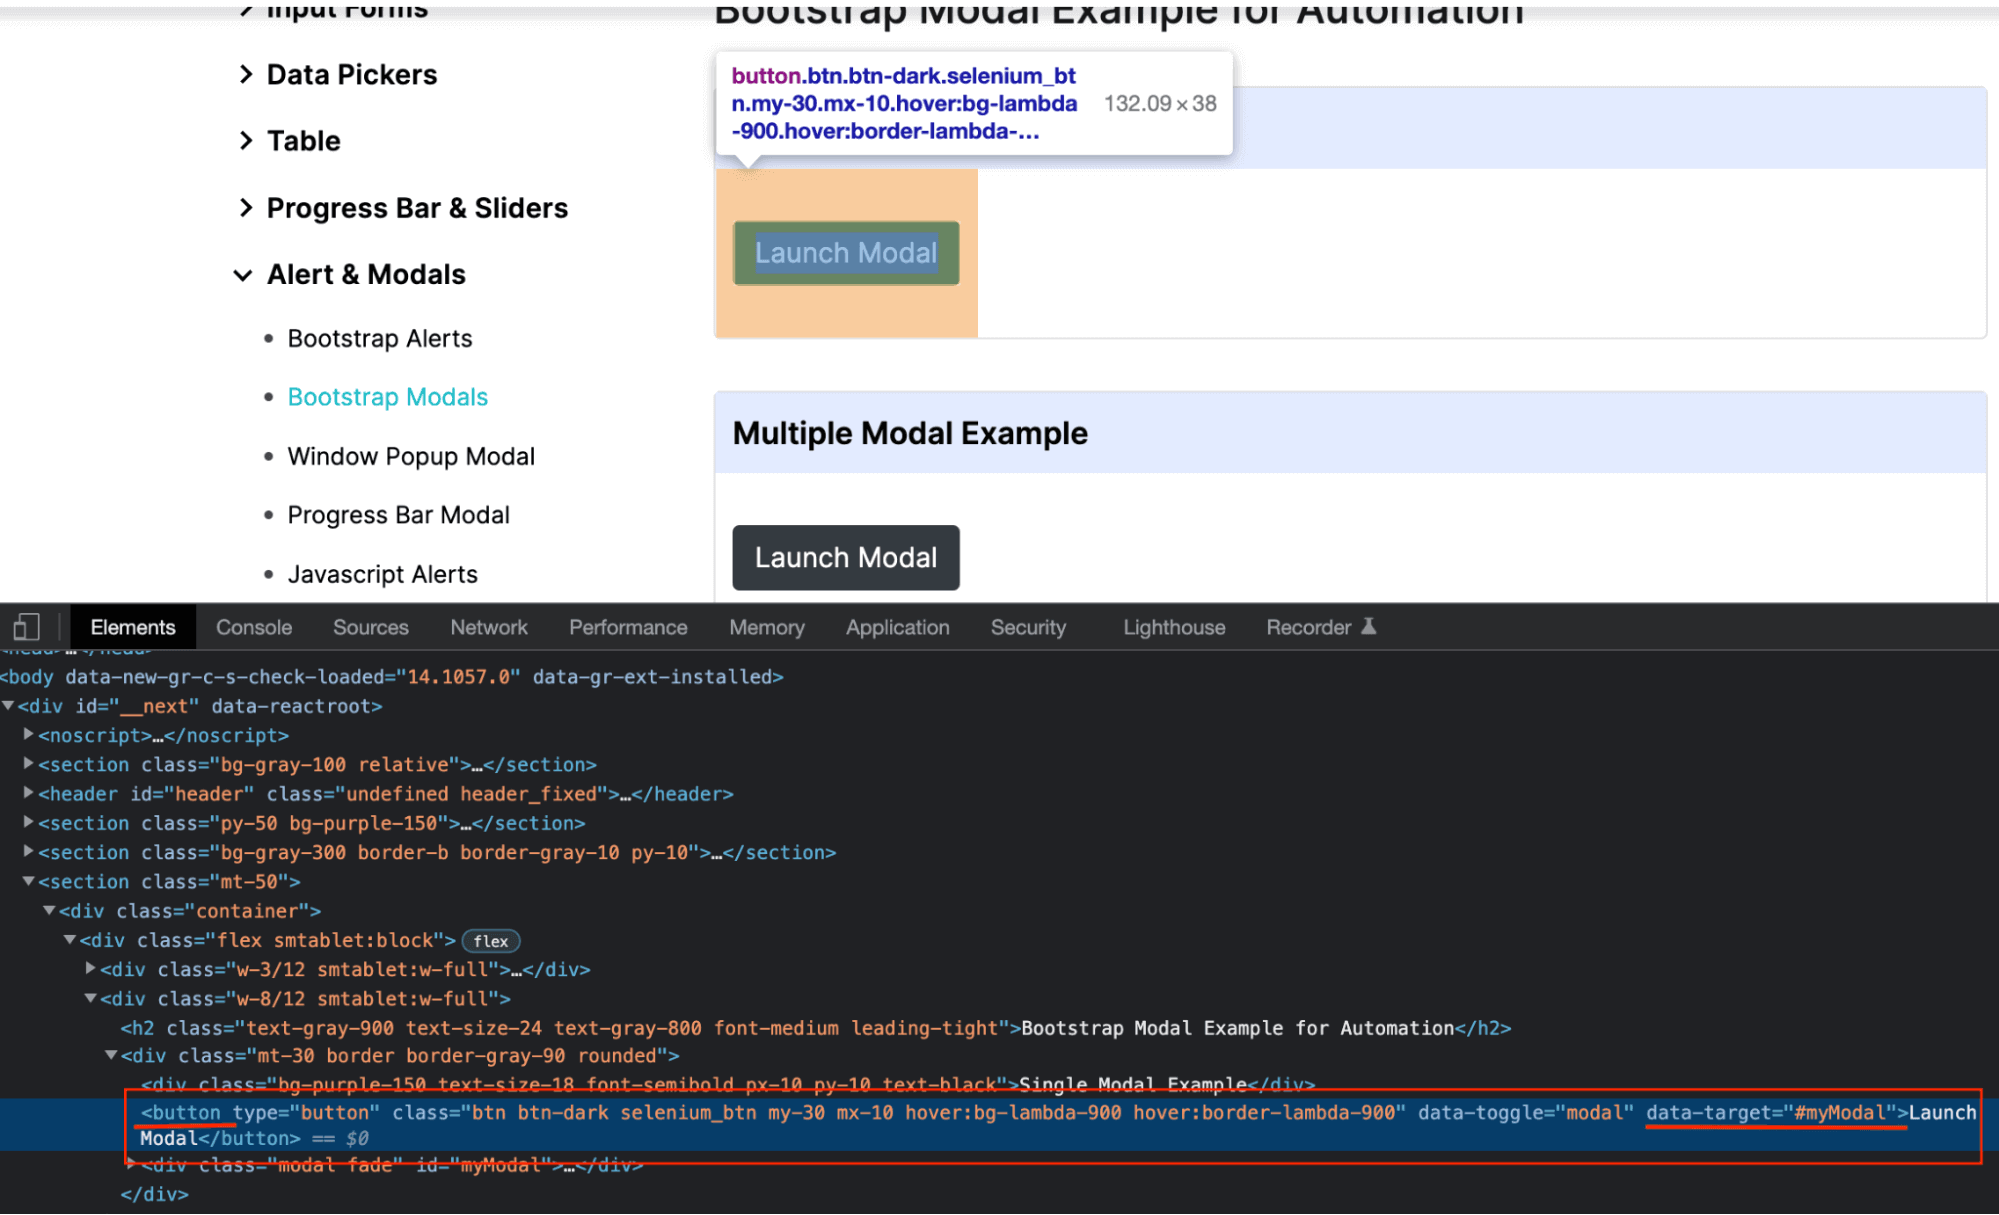
模态对话框(也被称为Bootstrap模态窗口)是在Bootstrap框架中建立的,因此它被显示在你当前页面的顶部。由于这个原因,模态对话框需要在移动到当前网页之前先进行互动。
对于初学者来说,Bootstrap框架是一个非常流行的、免费的、开源的CSS框架,在网页开发中被高度使用,特别是在响应式和移动优先的网页上。它包含HTML、CSS和JavaScript。要了解更多关于Bootstrap框架的信息,你可以深入了解CSS Grid与Bootstrap的比较。
用Bootstrap编写的模态对话框是由三个关键组件组成的,即。
- 触发元素,触发模态窗口在网页上显示。它可以是网页上的任何链接或任何按钮,等等。
- 模态,它就像一个实际模态窗口代码的保存区,当触发元素被交互时,它就会出现。
- 模态内容,是实际的代码和内容,窗口是根据执行情况形成和显示的。
因此,当自动化任何模态窗口时,我们首先使用我们的网络驱动程序获取模态,然后识别其中的模态内容来执行操作。
示范 在Selenium WebDriver Java中处理模态对话框
在对模态对话框有了基本的了解后,现在是时候实现它,看看它是如何实时工作的。
请注意,在本博客中的所有例子中,我们将使用相同的项目设置,并随着我们的进展不断添加更多的测试类文件。因此,为了实现的目的,请在你的机器上仔细进行设置。
第1步。选择你要进行设置的IDE。在这篇博客中,我们使用了Eclipse IDE。如果你选择了其他IDE,也可以按照同样的步骤进行。如果你使用的是IntelliJ,你可以阅读关于构建和执行Selenium项目的文章。
第2步。在Eclipse中创建一个Maven项目,将其命名为Dialog_Boxes_With_Selenium_Java。
第3步。更新pom.xml文件,加入Selenium (因为它将是一个使用Selenium WebDriver的网络自动化项目)和TestNG(使用注释创建测试流程并执行测试用例)依赖项。
文件名:pom.xml
<project xmlns="http://maven.apache.org/POM/4.0.0" xmlns:xsi="http://www.w3.org/2001/XMLSchema-instance" xsi:schemaLocation="http://maven.apache.org/POM/4.0.0 https://maven.apache.org/xsd/maven-4.0.0.xsd">
  <modelVersion>4.0.0</modelVersion>
  <groupId>Dialog_Boxes_With_Selenium_Java</groupId>
  <artifactId>Dialog_Boxes_With_Selenium_Java</artifactId>
  <version>0.0.1-SNAPSHOT</version>
  <build>
	<sourceDirectory>src</sourceDirectory>
	<plugins>
  	<plugin>
    	<artifactId>maven-compiler-plugin</artifactId>
    	<version>3.8.1</version>
    	<configuration>
      	<release>16</release>
    	</configuration>
  	</plugin>
	</plugins>
  </build>
  <dependencies>
     <dependency>
      	<groupId>org.seleniumhq.selenium</groupId>
      	<artifactId>selenium-java</artifactId>
      	<version>3.141.59</version>
     </dependency>
     <dependency>
      	<groupId>org.testng</groupId>
      	<artifactId>testng</artifactId>
      	<version>7.5</version>
      	<scope>test</scope>
     </dependency>
  </dependencies>
</project>
第4步。现在在src包内,添加一个包,并将其命名为test。这将包含所有将在本博客中创建的测试类。
第5步。在测试包内添加一个Java类文件,命名为BaseClass.java。这个文件将包含基本的驱动功能,如初始化驱动,退出驱动等。
在这个关于如何在Selenium WebDriver Java中处理模态对话框的博客中,我们将使用TestNG测试框架来执行测试。原因是,它被Selenium Java广泛支持,并提供了一个简单的方法来编写和管理测试自动化脚本的使用注释。
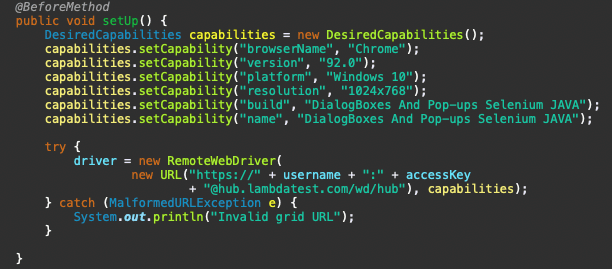
文件名:BaseClass.java
package test;

import java.net.MalformedURLException;
import java.net.URL;

import org.openqa.selenium.remote.DesiredCapabilities;
import org.openqa.selenium.remote.RemoteWebDriver;
import org.testng.annotations.AfterMethod;
import org.testng.annotations.BeforeMethod;

public class BaseClass {

 	public RemoteWebDriver driver = null;
 	String username = "<lambdatest_username>";
 	String accessKey = "<lambdatest_accesskey>";

 	@BeforeMethod
 	public void setUp() {
      	DesiredCapabilities capabilities = new DesiredCapabilities();
      	capabilities.setCapability("browserName", "Chrome");
      	capabilities.setCapability("version", "92.0");
      	capabilities.setCapability("platform", "Windows 10");
      	capabilities.setCapability("resolution", "1024x768");
      	capabilities.setCapability("build", "DialogBoxes And Pop-ups Selenium JAVA");
      	capabilities.setCapability("name", "DialogBoxes And Pop-ups Selenium JAVA");

      	try {
           	driver = new RemoteWebDriver(
                      	new URL("https://" + username + ":" + accessKey + "@hub.lambdatest.com/wd/hub"), capabilities);
      	} catch (MalformedURLException e) {
           	System.out.println("Invalid grid URL");
      	}
 	}

 	@AfterMethod
 	public void closeDriver() {
      	driver.quit();
 	}
}

}
代码演练
我们已经创建了BaseClass.java作为第一个文件,它将有代码来启动Selenium自动化的浏览器会话,处理浏览器设置的代码,并在测试完成后关闭它。这将被继承到我们的测试类中,从而防止这些代码的冗余,并为其他类的用户提供一个驱动代码的抽象化。
第1步。在BaseClass里面,我们将添加两个函数,一个是初始化驱动程序并创建一个实例,另一个是在测试案例执行完毕后关闭它。
我们将使用Selenium RemoteWebDriver的一个实例在Selenium Cloud Grid上执行代码。
原因是,除了Selenium网格的优势,如在不同的浏览器和操作系统上执行多个案例,云网格还提供了速度和可扩展性,这使得执行更快、更可靠。
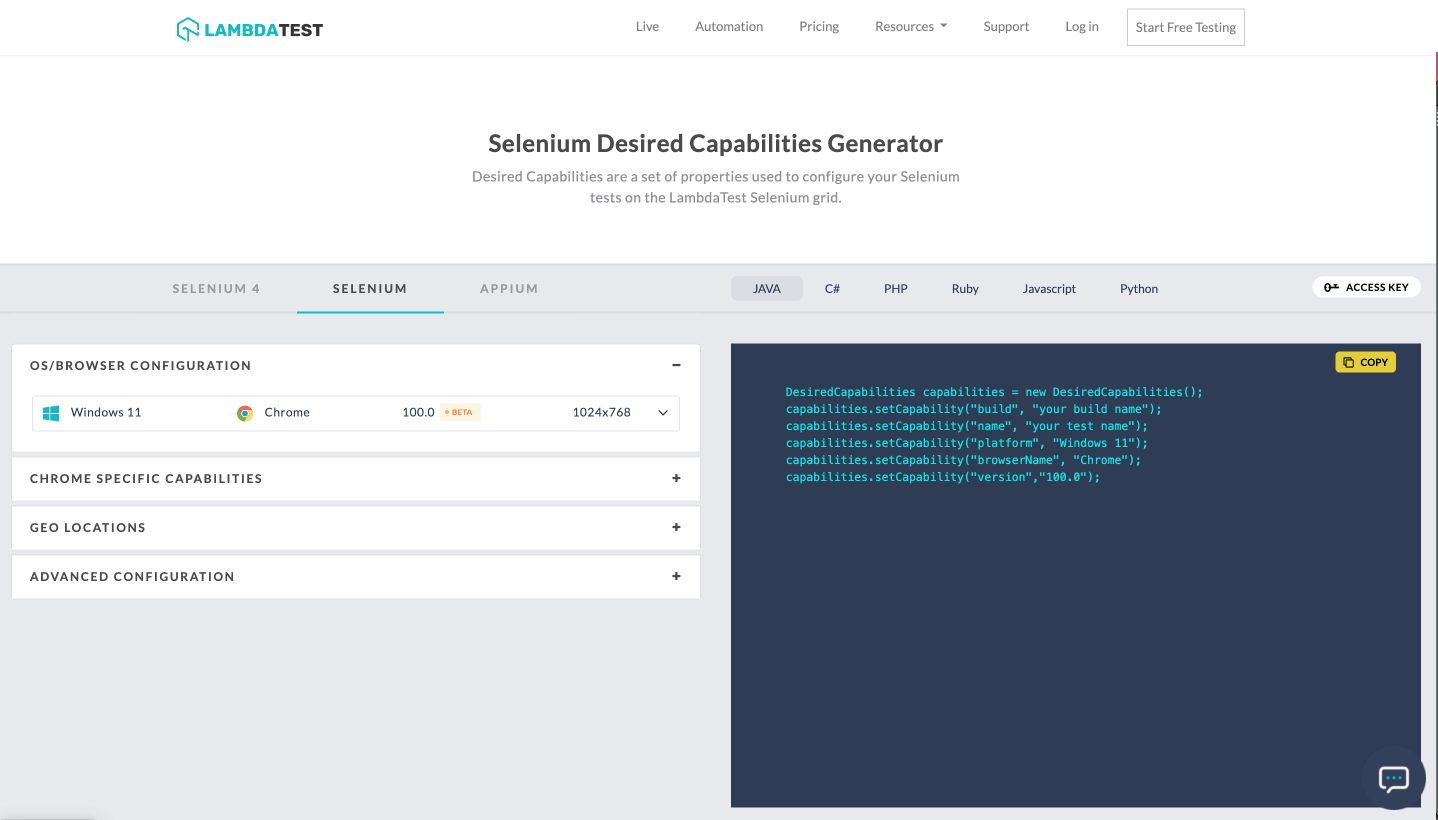
兰姆达测试(LambdaTest)就是这样一个例子,它可以在云端的3000多个真实浏览器和操作系统的在线浏览器农场中进行跨浏览器测试。像LambdaTest这样的自动化测试工具为结果分析提供了一个交互式报告仪表板,以及云测试的所有好处。
下面是LambdaTest云Selenium网格的一瞥。
你也可以订阅LambdaTest的YouTube频道,随时了解围绕自动化浏览器测试、Cypress测试、CI/CD等的最新教程。
public RemoteWebDriver driver = null;
第2步。下一步将是为你的账户添加LambdaTest用户名和访问密钥,以用于运行脚本。你可以在LambdaTest配置文件部分找到这些细节。
String username = "<lambdatest_username>";
String accessKey = "<lambdatest_accesskey>";
第3步。之后,在这个文件中添加第一个方法setUp(),它将被用来设置浏览器的初始能力,并使用给定的凭证启动网格。
你可以看到我们已经为Chrome浏览器设置了一些功能,以用于我们的测试案例。由于我们在这里使用LambdaTest平台进行远程执行,我们可以利用其Selenium Desired Capabilities Generator的优势,根据需要选择,为一些浏览器和操作系统组合生成此类值。
第四步。就像setUp()方法会创建用于执行脚本的驱动实例一样,在案例完成后立即退出当前的浏览器实例是一个好的做法。为了方便起见,添加下一个方法作为closeDriver()来退出驱动实例。这在TestNG中会有@AfterMethod 注解,因为有这个注解的方法将在每个测试方法执行完毕后被调用。
@AfterMethod
public void closeDriver() {
	driver.quit();
}
这就完成了我们基础实现的设置。让我们进入下一节来实现,看看模态对话框自动化是如何工作的。
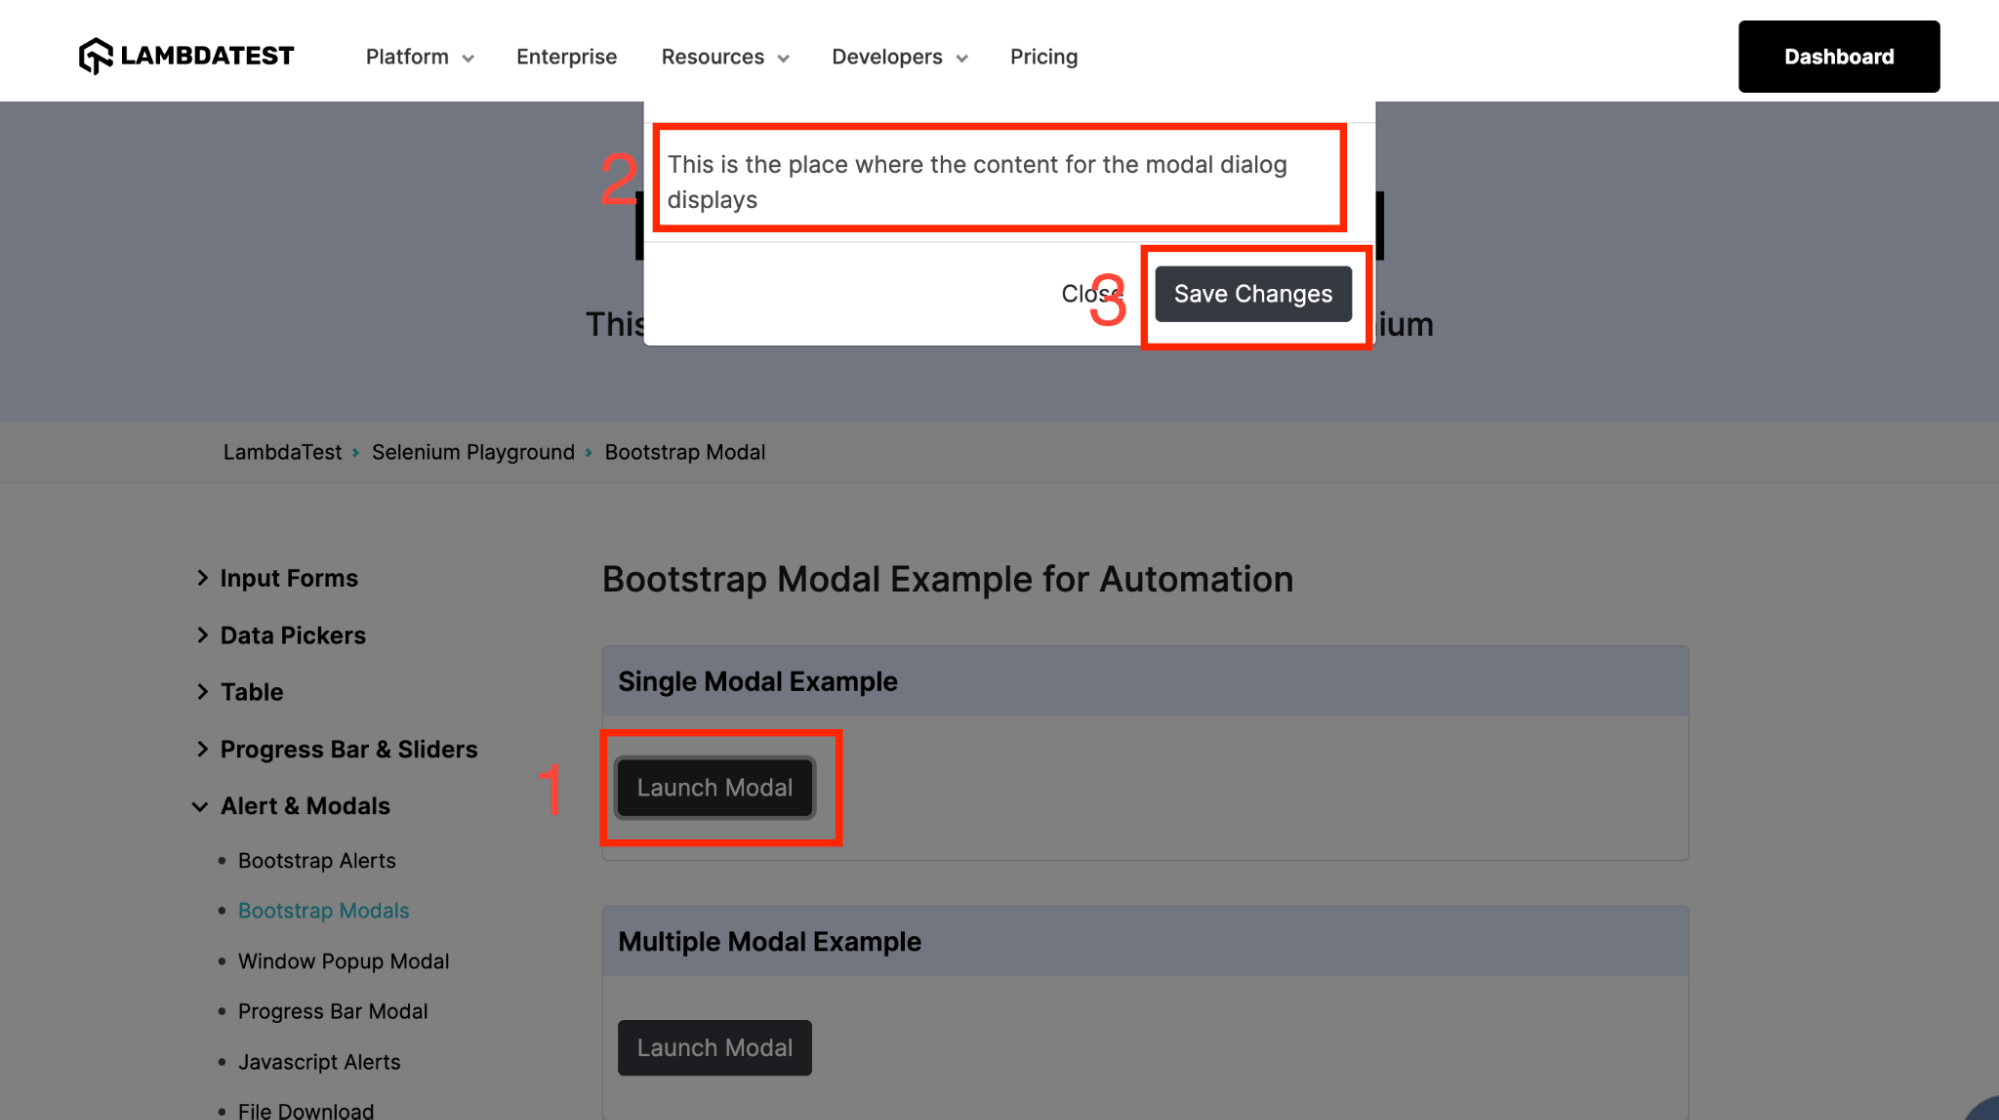
模态对话框自动化实例
在这篇博客中,我们将对以下流程进行自动化。
- 导航到www.lambdatest.com/selenium-pl…
- 点击单个模态例子下的启动模型。
- 取出模态容器的网页元素。
- 使用容器元素获取模态内容网络元素。
- 验证并与模态对话窗口进行交互。
文件名:TestModalDialogBox.java
package test;

import org.openqa.selenium.By;
import org.openqa.selenium.WebElement;
import org.testng.Assert;
import org.testng.annotations.Test;
import org.openqa.selenium.support.ui.ExpectedConditions;
import org.openqa.selenium.support.ui.WebDriverWait;

public class TestModalDialogBox extends BaseClass {

	@Test(description = "test to verify modal dialog box")
	public void verifyModalDialogBox() throws InterruptedException {
		// to navigate to the website
		System.out.println("Navigating to the website");
		driver.get("https://www.lambdatest.com/selenium-playground/bootstrap-modal-demo");

		// to click Launch model button - Trigger element
		System.out.println("Clicking launch modal button");
		driver.findElement(By.xpath("//button[@data-target='#myModal']")).click();

		// wait to let the modal box be visible
		WebDriverWait wait = new WebDriverWait(driver, 30);
            wait.until(ExpectedConditions.visibilityOfElementLocated(
                                     By.className("modal-dialog")));

		// to fetch the web element of the modal container
		System.out.println("Fetching the web element for modal container");
		WebElement modalContainer = driver.findElement(
                       By.className("modal-dialog"));

		// to fetch the web elements of the modal content and interact with them
		// code to fetch content of modal body and verify it
		System.out.println("Fetching modal body content and asserting it");
		WebElement modalContentBody = modalContainer.findElement(By.xpath(".//div[@class='modal-body']"));
		Assert.assertEquals(modalContentBody.getText(),
				"This is the place where the content for the modal dialog displays", "Verify modal body message");

		// code to click on accept modal button
		System.out.println("Clicking modal accept button");
		WebElement modalAcceptButton = modalContainer
				.findElement(By.xpath(".//button[contains(text(),'Save Changes')]"));
		modalAcceptButton.click();
	}
}
代码演练
第1步。测试案例中的第一行代码是导航到URL,我们将在该URL上实现模态对话框的自动化。
driver.get("https://www.lambdatest.com/selenium-playground/bootstrap-modal-demo");
第2步。在页面加载完毕后,我们点击按钮来启动对话框。正如我们所学到的,这是一个触发元素,使对话框出现。
为此,我们使用XPath元素定位器,使用其标签和属性键值来获取该元素。
driver.findElement(By.xpath("//button[@data-target='#myModal']")).click();
第三步。点击按钮后,我们等待模态框的出现。为此,我们使用了显式等待,WebDriver在执行进一步的代码之前会等待某个条件的发生。要了解更多关于显式等待的信息,你可以通过这篇文章了解Selenium中的等待类型。
要在你的测试自动化脚本中使用这些等待,需要完成以下导入。
import org.openqa.selenium.support.ui.ExpectedConditions;
import org.openqa.selenium.support.ui.WebDriverWait;
第4步。之后,WebDriverWait类的一个对象被实例化,使用WebDriver的引用和引发异常前的最大等待时间。该时间以秒为单位。
WebDriverWait wait = new WebDriverWait(driver, 30);
使用这个等待对象,我们实现了一些需要满足的 "ExpectedConditions "函数。在Selenium中有一些预定义的条件,其中我们使用了visibilityOfElementLocated(),这意味着要等待到给定的WebElement是可见的。
wait.until(ExpectedConditions.visibilityOfElementLocated(By.className("modal-dialog")));
第5步。一旦模态对话框打开,我们将获取模态容器的WebElement,因为我们将与模态对话框容器内的元素进行交互。
WebElement modalContainer = driver.findElement(By.className("modal-dialog"));
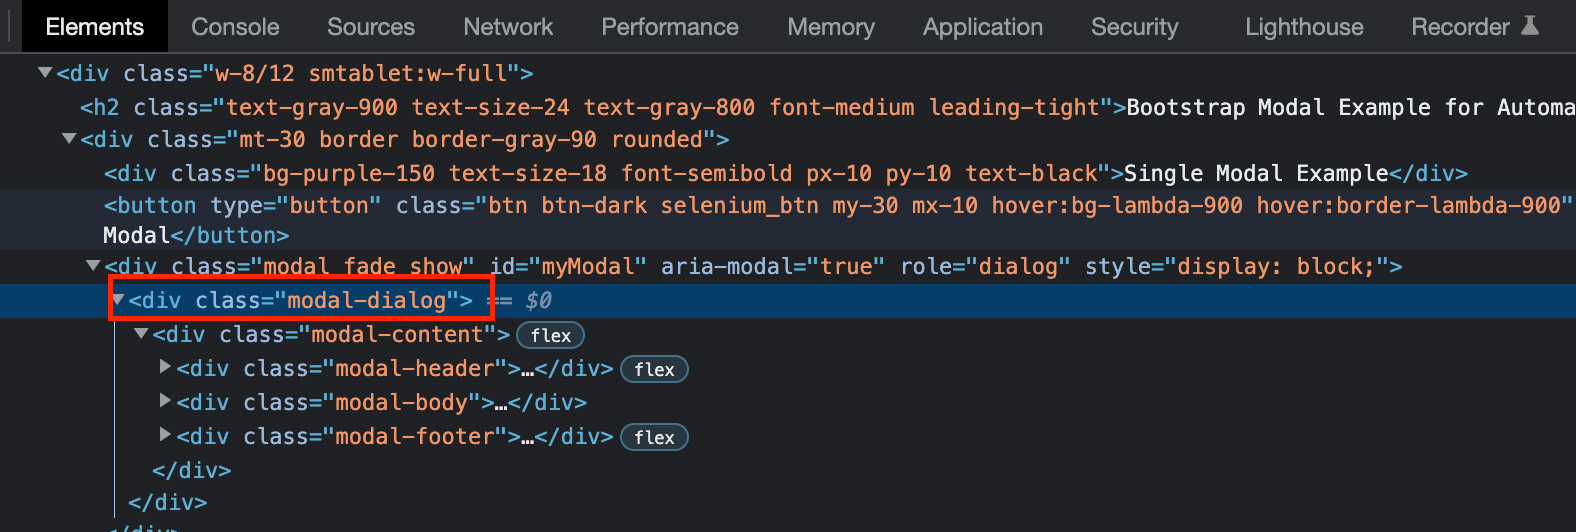
第6步。接下来,我们获取模态对话框的WebElements来对其内容执行操作。这里需要注意的一件事是如何获取模型内容的WebElements的方式。
为此,我们使用模态容器的WebElement标识符来代替驱动程序,元素的识别XPath以".//"开始**,**这意味着要找到的相应元素就在这个元素里面,也就是在模态对话框里面。
下面的代码展示了如何识别元素的这个实现,以及我们如何对它进行断言或点击按钮。要了解更多关于断言的信息,你可以通过我们之前的博客:如何在TestNG中使用断言与Selenium。
WebElement modalContentBody = modalContainer.findElement(By.xpath(".//div[@class='modal-body']"));
Assert.assertEquals(modalContentBody.getText(), "This is the place where the content for the modal dialog displays", "Verify modal body message");

// code to click on accept modal button
WebElement modalAcceptButton = modalContainer .findElement (By.xpath (".//button[contains(text(),'Save Changes')]"));
modalAcceptButton.click();
测试执行
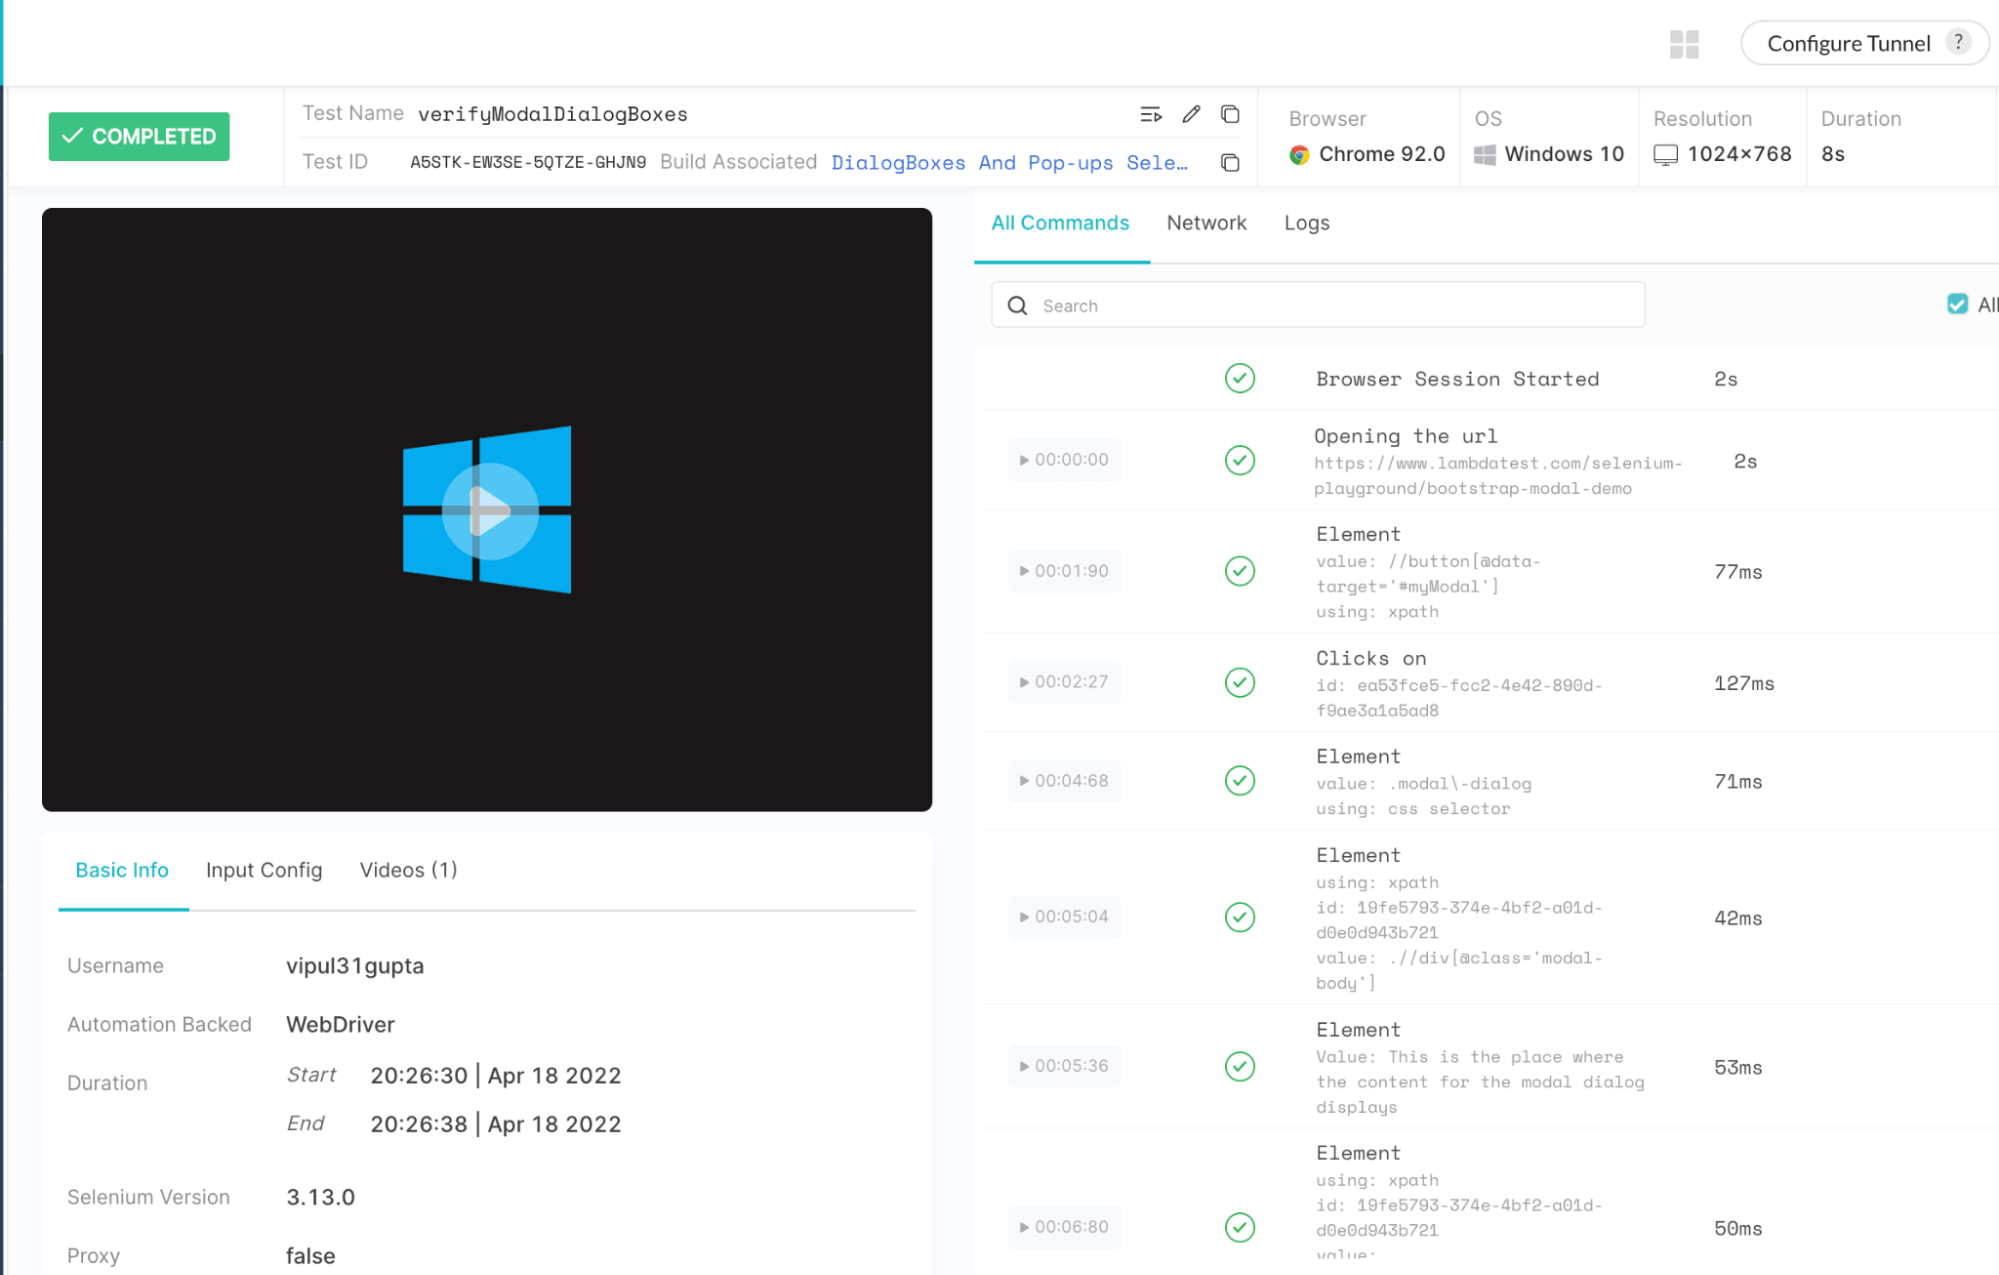
在理解了代码的实现之后,让我们用TestNG来执行代码。一旦成功执行,你可以在IDE上看到以下输出。
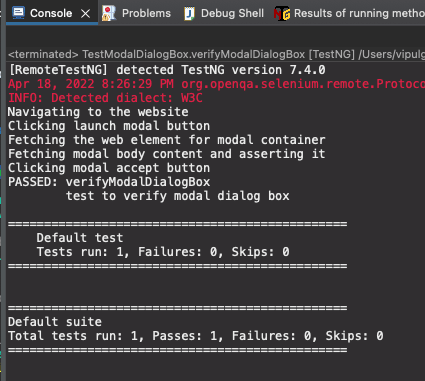
由于我们使用LambdaTest在远程网格上执行代码,执行日志也可以在LambdaTest仪表板上看到,包括视频、自动化脚本的步骤,以及网络和控制台日志。
你可以在仪表板上的 "最近测试"下看到你执行的测试案例。
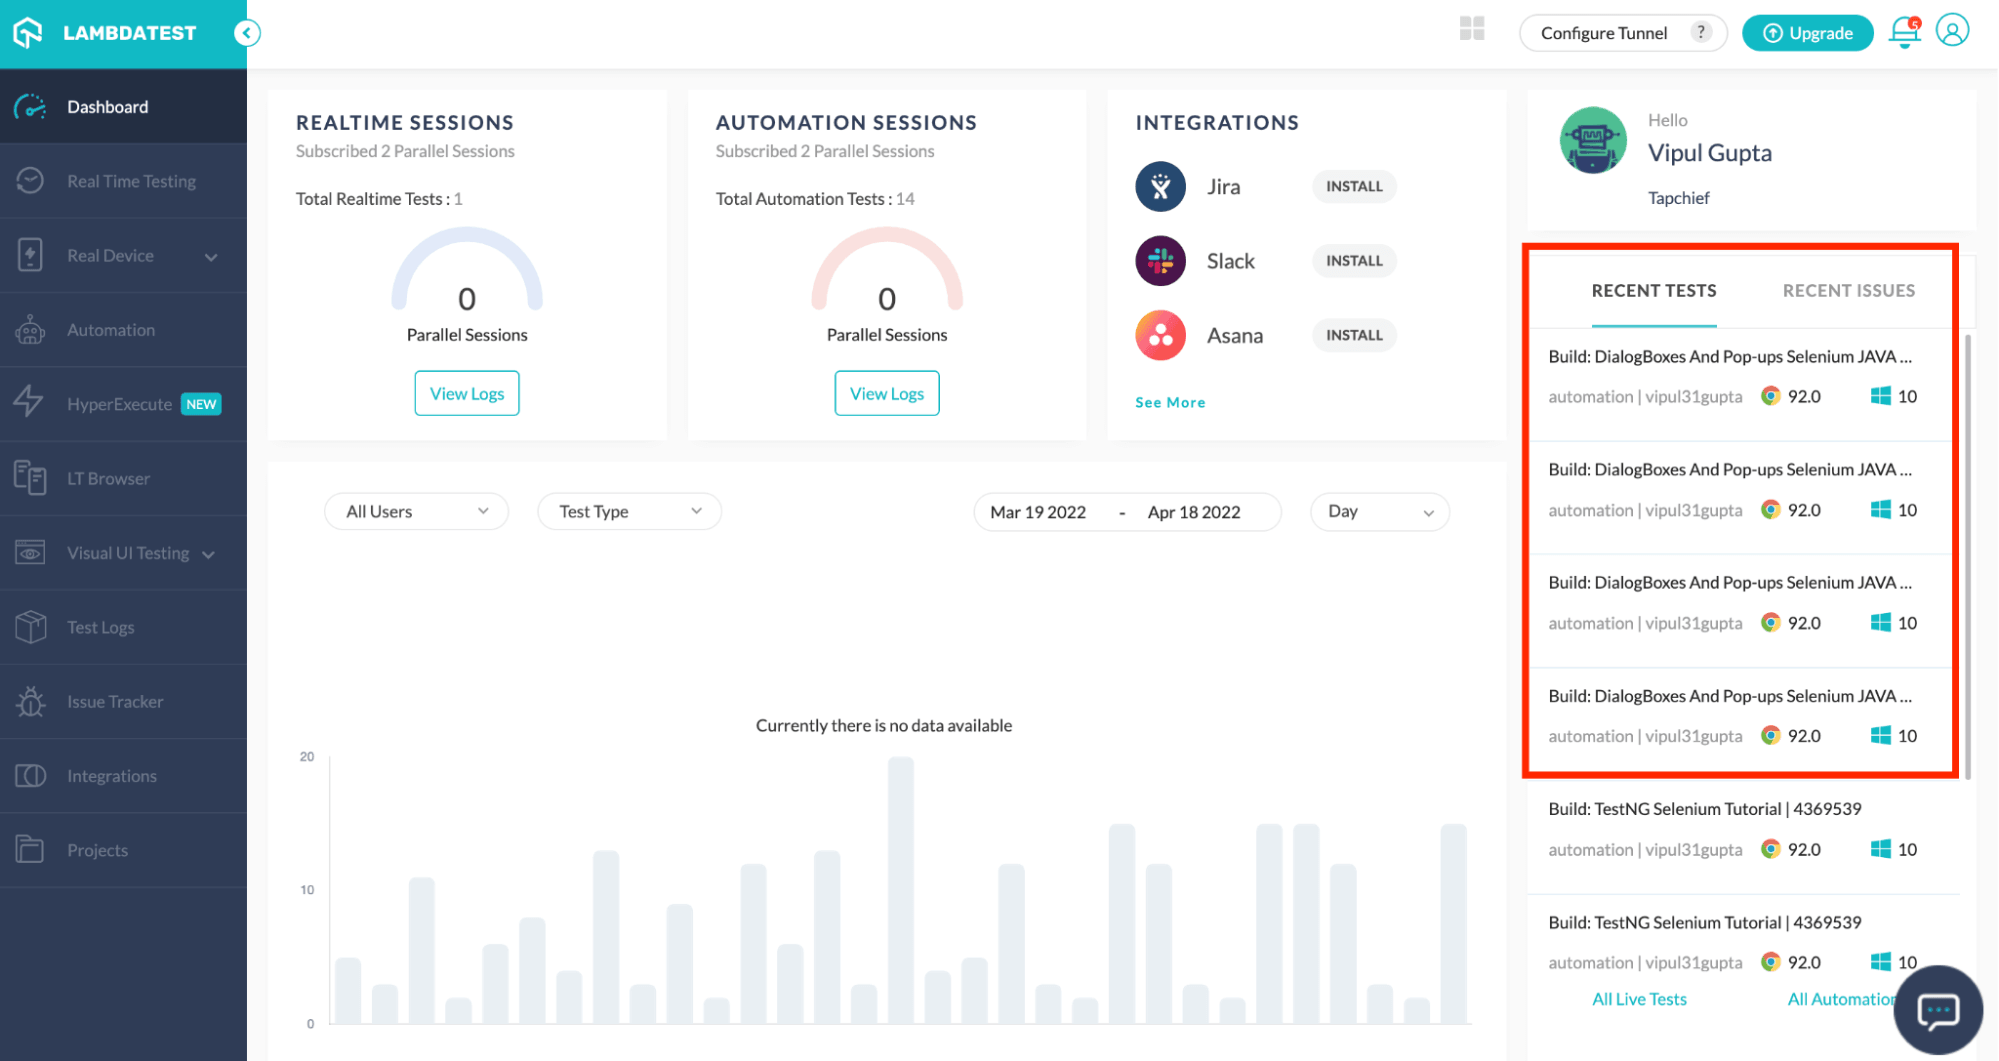
要查看案例的详细执行情况,请点击测试案例,你可以看到如下的细节。
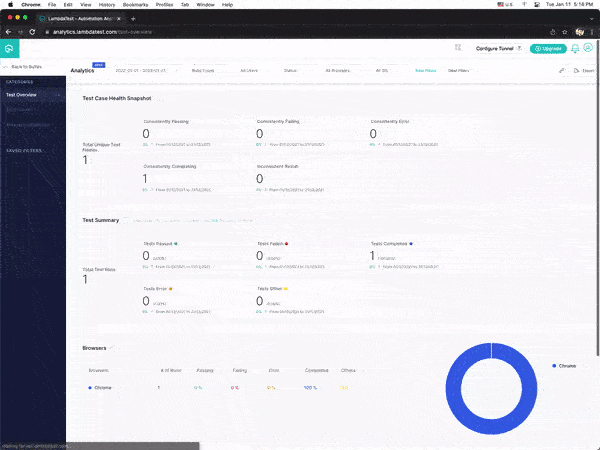
您还可以浏览LambdaTest分析仪表板,查看测试性能指标。从测试摘要部分,你将看到通过或失败的测试总数,包括已完成和待完成的测试。你还可以从 "测试概述 "部分看到一致的测试的快照。
有兴趣了解更多关于LambdaTest的信息吗?现在就试试lambdaTest吧!
如何使用Selenium Java处理警报?
在本节关于如何在Selenium WebDriver Java中处理模态框的博客中,我们将学习什么是警报以及如何使用Selenium Java处理Windows中的警报。
什么是警报?
网络开发中的警报通常指的是让用户了解信息的消息或通知,即。
- 询问访问权限。
- 突出显示表单上的必填字段。
- 显示警告信息或帮助信息。
与模态对话框不同,Selenium提供了一些特殊功能来处理警报。这是因为对于测试人员来说,使用常规方法自动处理警报是一项非常棘手和耗时的工作。这些预定义的方法中有几个是
- 点击警报的接受按钮 撤消/取消一个警报框
driver.switchTo().alert().dismiss();
- 点击警报框的接受按钮
driver.switchTo().alert().accept();
- 从警报箱中获取静态数据
driver.switchTo().alert().getText();
- 发送数据到警报框的输入字段
driver.switchTo().alert().sendKeys("Text");
**sendKeys()**函数用于在Selenium自动化中向任何网页的输入字段输入数据。在Selenium中的SenKeys在这里执行同样的动作,将数据输入到警报中的任何输入字段。
示范。使用Selenium Java处理警报窗口
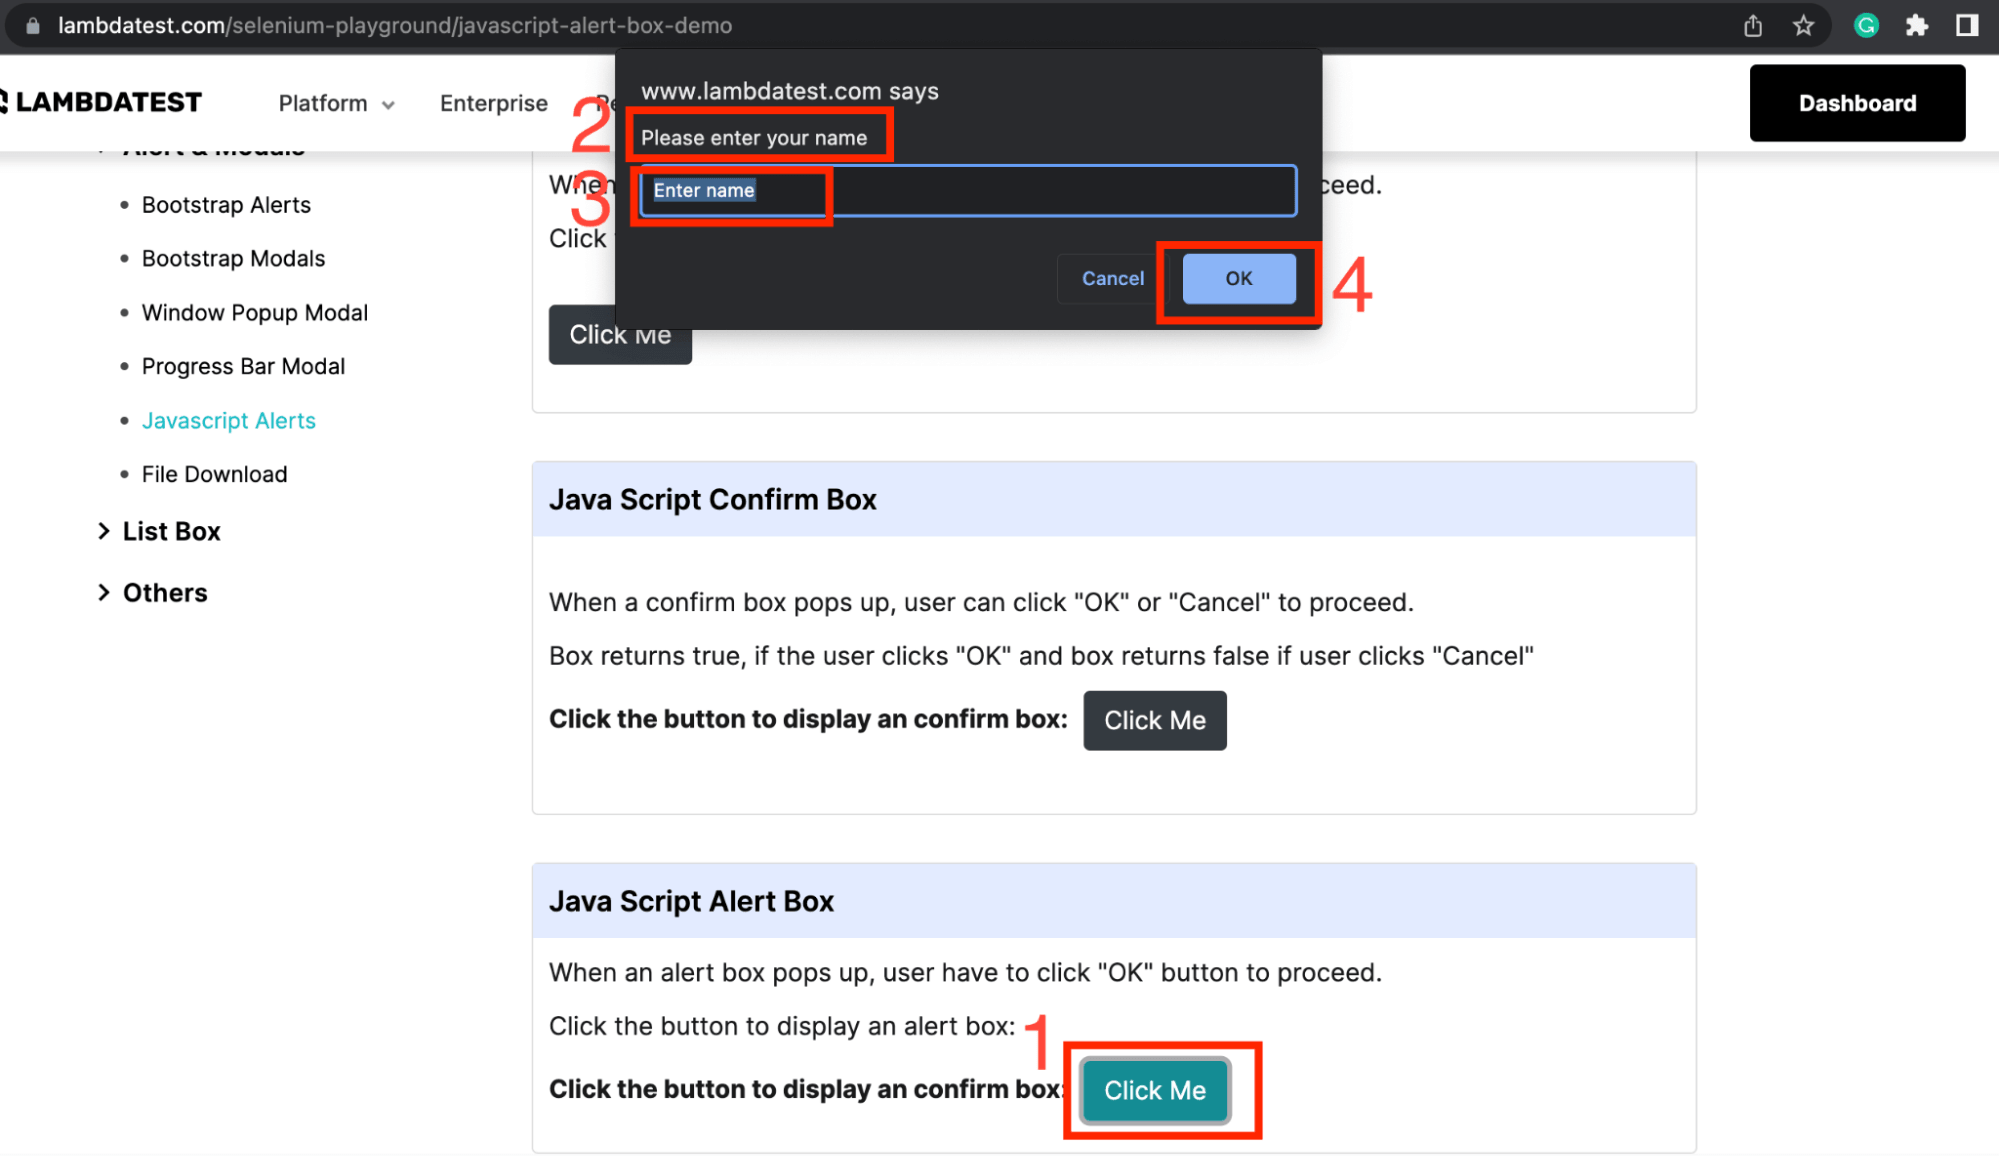
在这篇关于如何在Selenium Java中处理模态对话框的博客中,我们将对以下流程进行自动化。
- 导航到www.lambdatest.com/selenium-pl…
- 点击Java Script Alert Box下的Click Me按钮。
- 验证警报主体内容是否为 "请输入你的姓名"。
- 在警报输入框中输入一些数据。
- 点击OK,接受警报。
文件名:TestAlerts.java
package test;

import org.openqa.selenium.By;
import org.testng.Assert;
import org.testng.annotations.Test;
import org.openqa.selenium.support.ui.ExpectedConditions;
import org.openqa.selenium.support.ui.WebDriverWait;

public class TestAlerts extends BaseClass {

	@Test(description = "test to verify alerts")
	public void verifyAlerts() throws InterruptedException {
		// to navigate to the website
		System.out.println("Navigating to the website");
		driver.get("https://www.lambdatest.com/selenium-playground/javascript-alert-box-demo");

		// to click the button to get demo alert
		System.out.println("Clicking launch alert button");
		driver.findElement(By.xpath("(//button[contains(text(),'Click Me')])[3]")).click();

		// to let the alert be visible
		WebDriverWait wait = new WebDriverWait(driver, 30);
            wait.until(ExpectedConditions.alertIsPresent());

		// to fetch the alert body content and verify it
		System.out.println("Fetching the alert body content and asserting it");
		String alertBodyText = driver.switchTo().alert().getText();
		Assert.assertEquals(alertBodyText, "Please enter your name", "Verify alert body content");

		// to enter data as required by the alert
		System.out.println("Entering date in the alert input box");
		driver.switchTo().alert().sendKeys("LambdaTest");

		// to accept the alert
		System.out.println("Accepting the alert");
		driver.switchTo().alert().accept();
	}
}
代码演练
第1步。这段代码也是从第一步开始的,即导航到目标页面,在那里实际的自动化脚本将被执行。
driver.get("https://www.lambdatest.com/selenium-playground/javascript-alert-box-demo");
第2步。一旦页面被加载,我们就点击按钮来获得警报,警报功能可以被实现和验证。
driver.findElement(By.xpath("(//button[contains(text(),'Click Me')])[3]")).click();
第3步。就像模态对话框一样,对于警报来说,显式的等待也正在被实现。在这种情况下,进口和对象的创建也是一样的,唯一不同的是ExpectedConditions。为了支持警报,就像Selenium中的预定义函数一样,本例中使用了alertIsPresent()。
wait.until(ExpectedConditions.alertIsPresent());
第4步。在警报可见之后,我们开始实现**alert().getText()**来获取警报上的内容并进行断言。
但是在这之前,我们需要确保驱动实例的焦点已经从主窗口切换到了警报上。为此,**switchTo()**函数在Selenium自动化测试中被使用。当我们在网络自动化中处理多个窗口,如新标签、警报、弹出窗口等时,都会用到这个函数。
因为在这个测试脚本中,我们需要切换到警报来与之交互,所以使用switchTo().alert()。我们将在弹出窗口部分学习更多关于如何在父/子窗口之间切换的知识。
String alertBodyText = driver.switchTo().alert().getText();
第5步。这里我们使用TestNG的Assert类,使用**assertEquals()**函数来比较内容。在这个函数中,我们将传递预期的内容,也就是字符串和实际的内容,也就是在上一步中获取的警报的主体内容。如果两者匹配,assert就会通过;否则,就会出现预期和实际数据不相等的错误,从而失败。
Assert.assertEquals(alertBodyText, "Please enter your name","Verify alert body content");
第6步。接下来,我们通过在输入框中输入一些数据来验证**alert().sendKeys()**函数。
driver.switchTo().alert().sendKeys("LambdaTest");
第7步。这个测试方案的最后一步是接受警报,Selenium提供的预定义方法正在被使用。
driver.switchTo().alert().accept();
根据不同的用例,你也可以实现驳回/取消警报的功能。对于这个方法,可以使用以下Selenium方法
driver.switchTo().alert().dismiss();
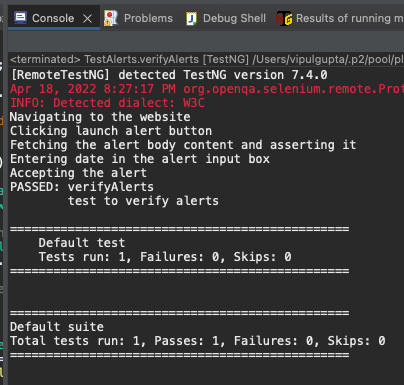
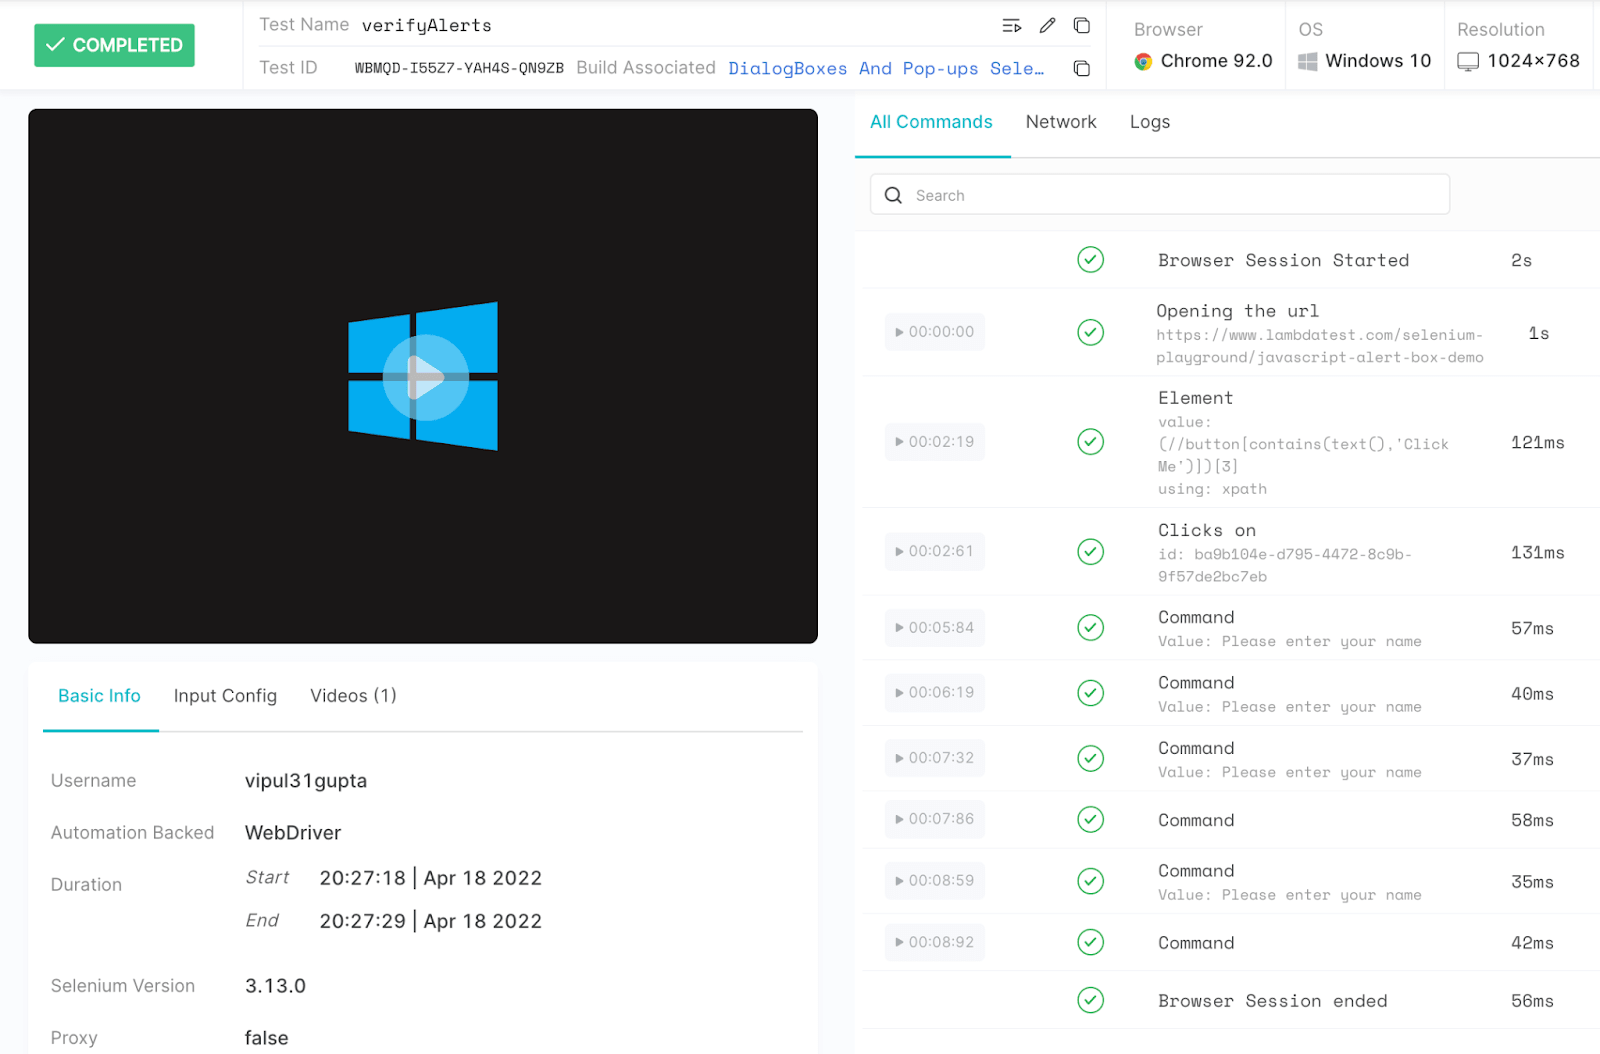
测试执行
正如上一节提到的模态对话框,我们同样可以从IDE中执行警报测试案例,并在IDE和LambdaTest仪表板上看到如下成功执行自动化案例的输出。
想知道如何在云Selenium网格上处理警报?现在就试试LambdaTest吧!
如何使用Selenium Java处理弹出窗口?
在这一节关于如何在Selenium WebDriver Java中处理模态框的博客中,我们将学习什么是弹出窗口以及如何使用Selenium Java处理弹出窗口。
什么是弹出窗口?
弹出式窗口是指由于网页上的某些交互而弹出或打开的新窗口或标签。它可以在多种条件下出现,并根据实施情况而定。
在Selenium自动化中,驱动程序总是专注于当前活动的窗口并与之互动。所以当我们在Selenium中处理弹出式窗口时,一些额外的方法被用来将驱动的焦点转移到新打开的窗口,然后再返回到主窗口。
- 获取所有在该实例中打开的窗口的句柄。
driver.getWindowHandles();
- 获取当前驱动所关注的窗口句柄。
driver.getWindowHandle();
- 切换到主父窗口。
driver.switchTo().defaultContent();
- 使用其句柄切换到任何特定的窗口。
driver.switchTo().window(handleId);
handleId在这里指的是窗口的id,我们可以通过WebDriver的**getWindowHandle()或getWindowHandles()**函数来获取。
示范 使用Selenium Java处理弹出窗口
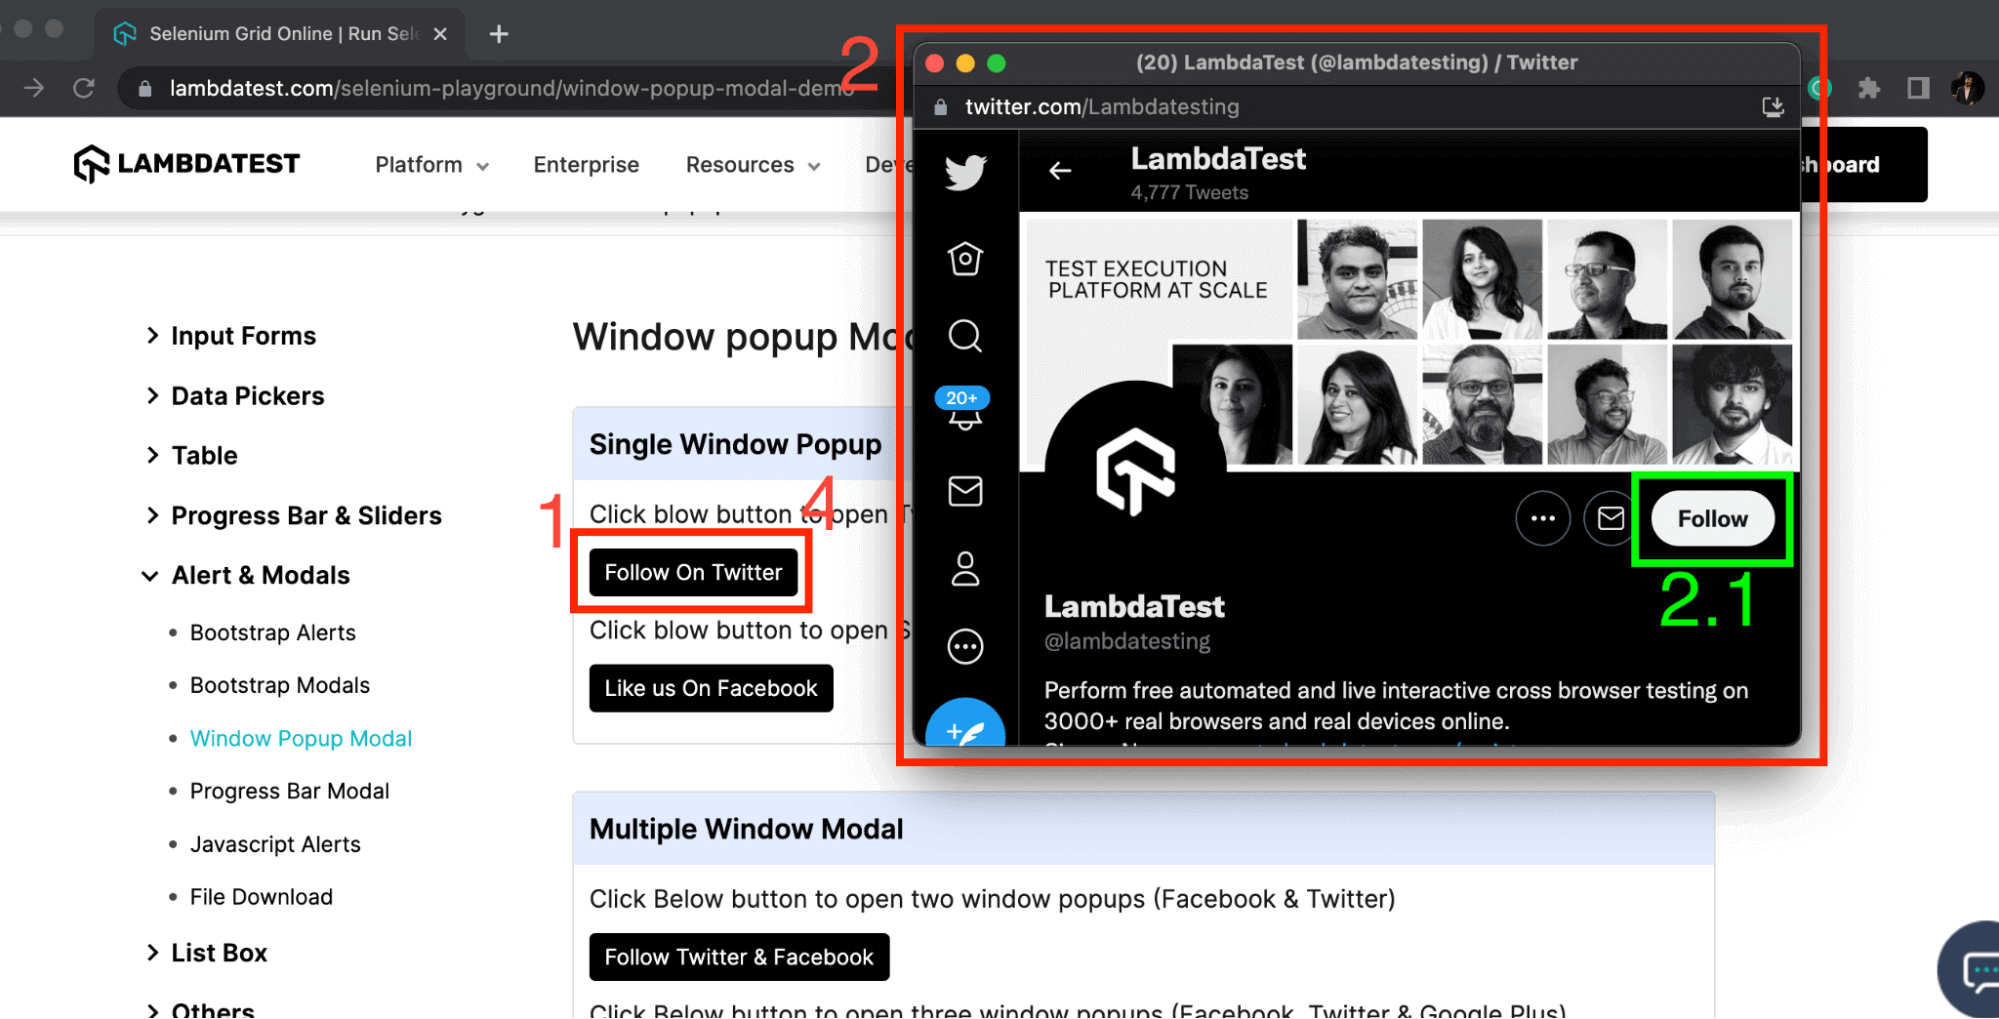
在这篇博客中,我们将实现以下流程的自动化。
- 导航到www.lambdatest.com/selenium-pl…
- 点击单窗口弹出窗口下的Follow On Twitter。
- 切换到一个新的弹出窗口。
- 断言上面的Follow按钮是存在的。
- 切换回主窗口。
- 断言Follow On Twitter被显示出来。
文件名:TestPopups.java
package test;

import java.util.Iterator;
import java.util.Set;

import org.openqa.selenium.By;
import org.openqa.selenium.WebElement;
import org.testng.Assert;
import org.testng.annotations.Test;
import org.openqa.selenium.support.ui.ExpectedConditions;
import org.openqa.selenium.support.ui.WebDriverWait;

public class TestPopups extends BaseClass {

	@Test(description = "test to verify pop ups")
	public void verifyPopups() throws InterruptedException {
		// to navigate to the website
		System.out.println("Navigating to the website");
		driver.get("https://www.lambdatest.com/selenium-playground/window-popup-modal-demo");
		driver.manage().window().maximize();

		// to fetch and save the handle of current window
		System.out.println("storing the main window handle");
		String mainWindowHandle = driver.getWindowHandle();

		// to click the button to get a popup (new tab in this case)
		System.out.println("Clicking launch popup button");
		WebElement followButtonOnMainWindow = driver.findElement(By.xpath("//a[contains(@title,'Twitter')]"));
		followButtonOnMainWindow.click();

		// to get the list of all window handles after the new tab
		// should have length 2 since 1 new tab opens up
		System.out.println("Fetching the list of all window handles and asserting them");
		Set<String> windowHandles = driver.getWindowHandles();
		Assert.assertEquals(windowHandles.size(), 2, "Verify the total number of handles");

		// switch to new opened tab
		System.out.println("Switching to the new window handle");
		Iterator<String> itr = windowHandles.iterator();
		while (itr.hasNext()) {
			String childWindowHandle = itr.next();
			// to skip the handle of our main window and switch to new one
			if (!mainWindowHandle.equalsIgnoreCase(childWindowHandle))
				driver.switchTo().window(childWindowHandle);

		}

		WebDriverWait wait = new WebDriverWait(driver, 30);
            wait.until(ExpectedConditions.visibilityOfElementLocated(
                                     By.xpath("//span[(text()='Follow')]")));
		// to verify that driver focus is shifted to popup window
		System.out.println("Asserting some element on the new popup window to confirm switch");
		WebElement twitterFollowButton = driver.findElement(By.xpath("//span[(text()='Follow')]"));
		Assert.assertTrue(twitterFollowButton.isDisplayed(), "Verify twitter follow button is displayed");

		// shift driver back to main window and verify
		System.out.println("Switching back to main window and asserting same");
		driver.switchTo().window(mainWindowHandle);
            wait.until(ExpectedConditions.visibilityOfElementLocated(
                                     By.xpath("//a[contains(@title,'Twitter')]")));
		Assert.assertTrue(followButtonOnMainWindow.isDisplayed(), "Verify focus is shifted to main window");
	}
}
代码演练
你可以在这个测试类中找到两个特殊的导入,即
import java.util.Iterator;
import java.util.Set;
这是为了支持使用Set类型的数据结构和Iterator,它是遍历Set的函数。关于这些的更多细节,请参见使用这些的相应代码。
第1步.为了编写处理弹出式窗口的自动化测试案例,在导航到所需的网页后,首先,我们获得并保存主窗口的句柄。这样做是因为一旦有一个新的弹出窗口,我们需要有一些方法来区分当前窗口的句柄和新打开的窗口。
String mainWindowHandle = driver.getWindowHandle();
第二2步。存储之后,下一步是点击链接文本或按钮,在这种情况下,点击当前/主窗口,以获得新的弹出窗口。
WebElement followButtonOnMainWindow = driver.findElement(By.xpath ("//a[contains(@title,'Twitter')]"));
followButtonOnMainWindow.click();
第3步。现在,根据测试方案的期望,我们应该在屏幕上有两个窗口。为了验证这一点,使用**getWindowHandles()**方法来获取各个窗口的标识符(或窗口句柄)。
这个方法返回所有窗口的句柄列表,可以理解为不同窗口的ID,可以用来识别它们。整个列表被存储在一个Set类型的数据结构中,以便于访问。
由于窗口句柄的数量被存储在Set类型的变量中,我们可以使用**size()**方法来获取其中的句柄总数,并按照期望值断言,这里是2。
Set<String> windowHandles = driver.getWindowHandles(); Assert.assertEquals(windowHandles.size(), 2, "Verify the total number of handles");
第4步。下一步将是切换到新的弹出窗口。为此,我们遍历窗口句柄的列表,并将其与我们在第一步中存储的主窗口句柄值进行比较。
为了遍历包含所有窗口手柄的Set,我们使用了Iterator。顾名思义,它意味着重复访问,直到某个点。所以在这里,我们不断地迭代这个集合的下一个值,直到我们到达最后一个值。
Iterator<String> itr = windowHandles.iterator();
while (itr.hasNext()) {
	String childWindowHandle = itr.next();
	// to skip the handle of our main window and switch to new one
	if (!mainWindowHandle.equalsIgnoreCase(childWindowHandle))
		driver.switchTo().window(childWindowHandle);

	}
第5步。一旦我们得到一个不匹配的值,我们就切换到新弹出的窗口,并使用之前讨论过的Explicit Wait,使用**visibilityOfElementLocated()**函数等待新弹出的窗口,并提出一个Assert来验证切换是否成功。
// to verify that driver focus is shifted to popup window
WebDriverWait wait = new WebDriverWait(driver, 30);
wait.until(ExpectedConditions.visibilityOfElementLocated(By.xpath("//span[(text()='Follow')]")));
WebElement twitterFollowButton = driver.findElement(By.xpath ("//span[(text()='Follow')]"));
Assert.assertTrue(twitterFollowButton.isDisplayed(), "Verify twitter follow button is displayed");
第6步。最后一步是使用已经存储的句柄切换回主窗口,并对其提出一些元素断言,以验证驱动的焦点已经再次转移到主窗口。
driver.switchTo().window(mainWindowHandle);
Assert.assertTrue(followButtonOnMainWindow.isDisplayed(), "Verify focus is shifted to main window");
测试执行
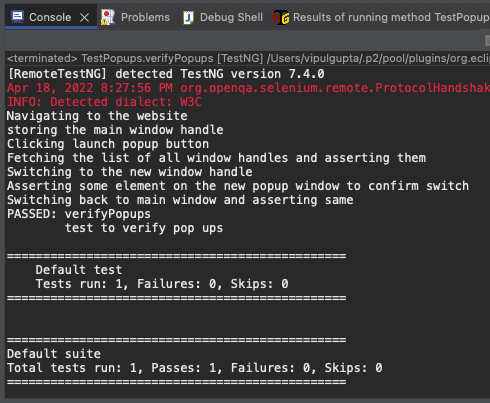
与上面讨论的方法类似,执行后,我们将在IDE上得到如下结果。
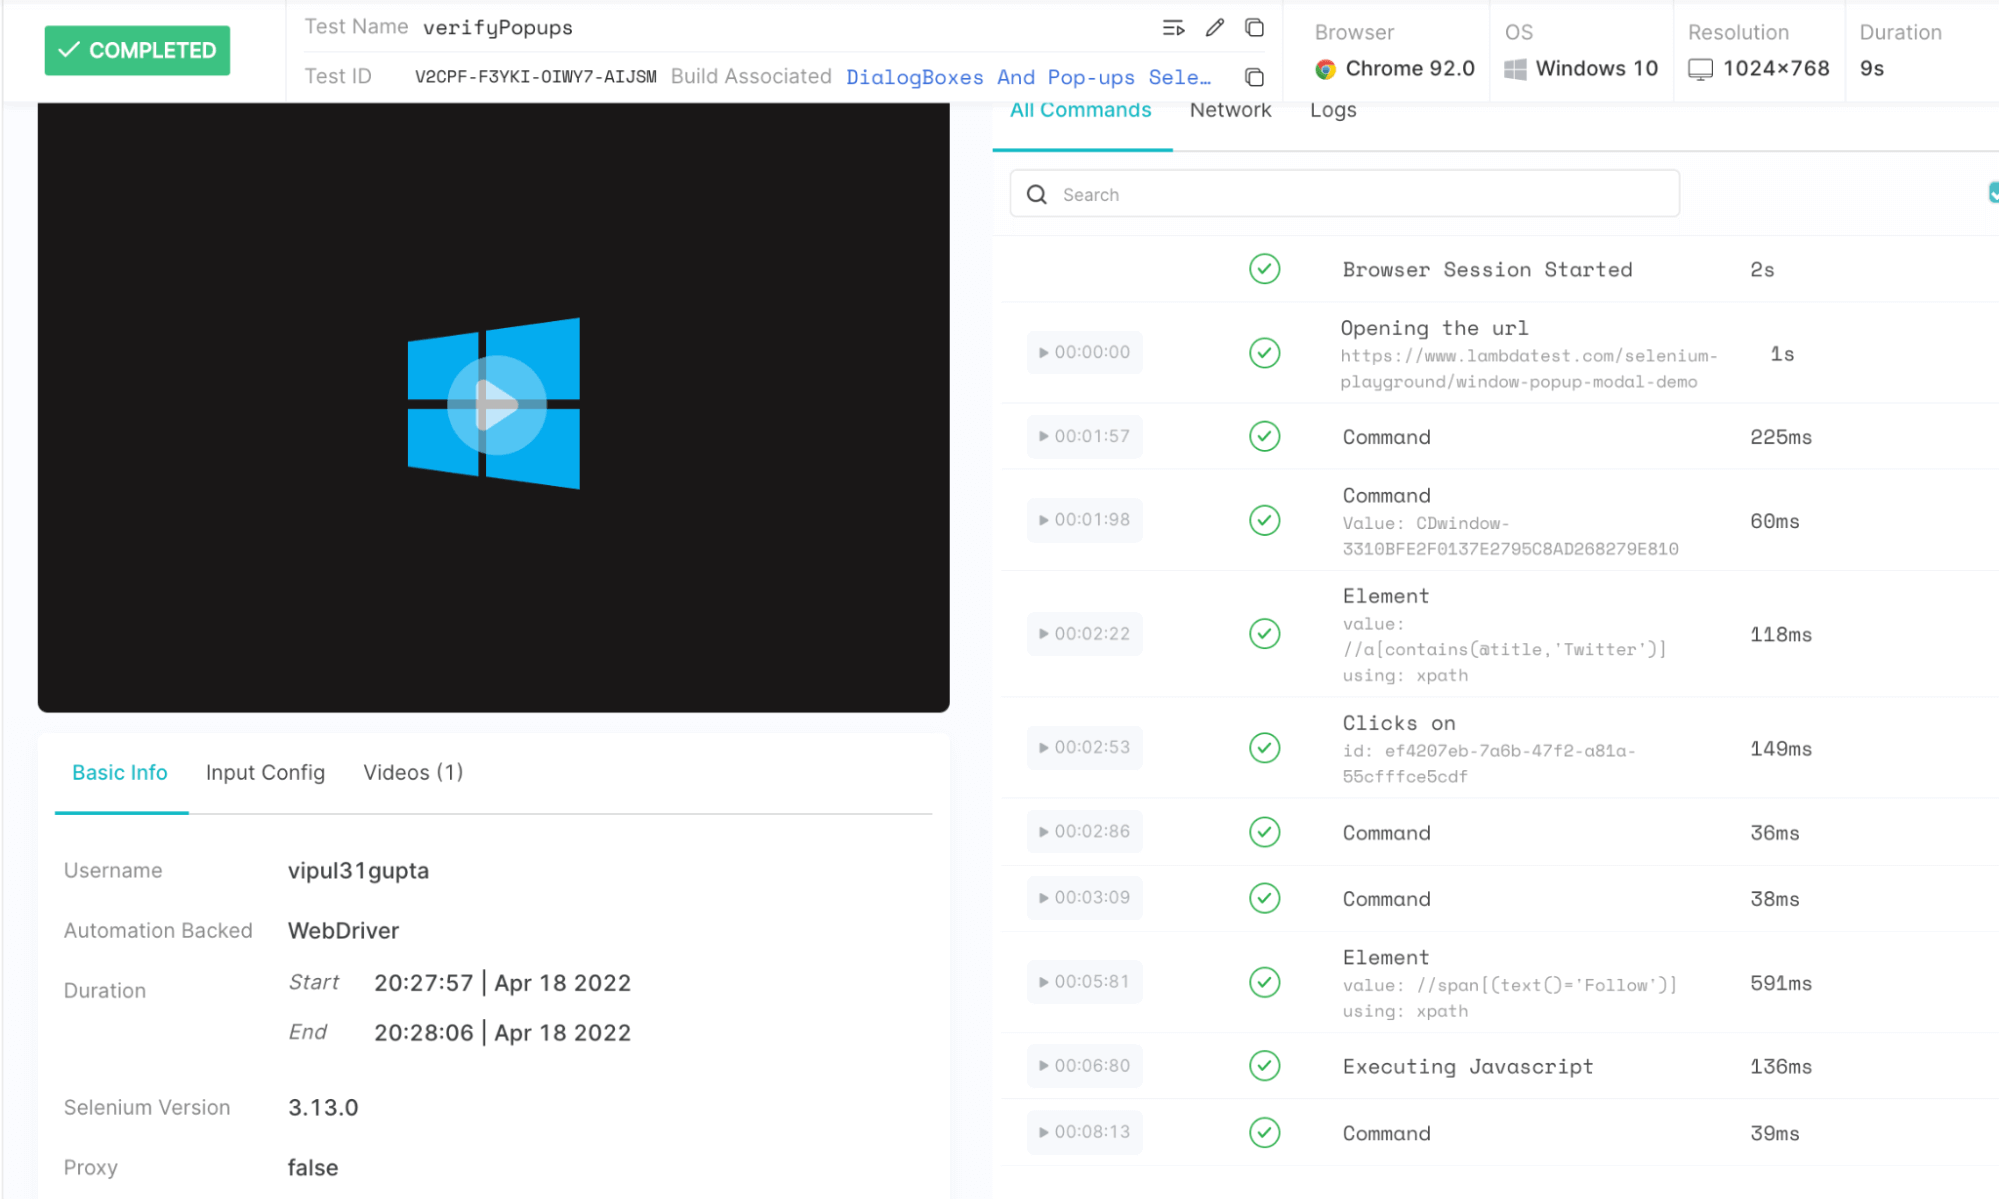
我们可以在LamdaTest仪表板上看到详细的执行日志,通过导航到测试细节,可以看到如下数据。
这个Selenium Java 101认证是为那些想复习编程语言知识和了解Selenium自动化测试的初到中级水平的Java开发人员准备的。
以下是LambdaTest公司对Selenium Java 101认证的简短介绍。
现在你一定已经对弹出窗口和警报有了相当的了解,以及如何通过LambdaTest这样的云网格在Selenium WebDriver Java中处理模态对话框。然而,如果你想利用云设置的最佳功能和更快的执行速度(与本地设置的速度一样好),你可以尝试HyperExecute--一个极快的下一代测试云,它比任何传统的Selenium云设置快70%。
总结
通过这篇关于如何在Selenium WebDriver Java中处理模态对话框的博客,我们已经了解了所有这些的实现和工作细节,涵盖了你在工作中可能遇到和需要的所有方面和功能。我希望,到现在为止,你已经有足够的信心来自动化你的自动化脚本中出现的任何类型的模态对话框、警报或弹出窗口。所以,请继续使用Selenium Java自动化测试,轻松处理这些问题。
祝您自动化测试愉快!
常见问题(FAQ)
对话框是模态的吗?
模态对话框是用户界面设计中最有用的功能之一。它们允许你在你的应用程序上叠加一个对话框,允许用户与之互动或取消它,而不干扰主要内容。
你如何使用对话框?
一个模态对话框是一个小窗格,由一个或多个带有各种控件的窗口组成。模态对话框阻断了除活动控件以外的所有输入。要创建一个模态对话框,你可以使用Visual Basic代码或创建模板,并在开发环境中用控件填充它。
要创建一个对话框,请使用 "DialogBox "函数。这个函数使用一个模板和当用户做出选择时被激活的程序的名称。
如何在Selenium中停止弹出窗口?
为了用Selenium关闭弹出窗口,我们可以使用getWindowHandles和getWindowHandle方法来打开弹出窗口。getWindowHandles方法用于将Selenium中所有的窗口句柄存储在一个Set数据结构中。getWindowHandle方法用于存储焦点中的弹出窗口的句柄。
