

我是当年Firebase的第一批用户之一。事实上,我带头为Firebase的拥护者开展了 "火炬计划"(这早已停止了,而且是在他们被谷歌收购之前)。当他们宣布Firebase主机时,我就在那里。我已经建立了十几个使用Firebase进行数据和/或认证的小应用。但由于这样或那样的原因,我放弃了Firebase,并尝试了一些其他的服务,这些服务对我非常好。
但现在我又回来了,我很高兴能尝试Firebase现在所提供的一切。特别是,我正在玩remix,我刚刚添加了Firebase Firestore作为数据存储,并想添加认证。 Firebase Firestore + Firebase认证 + Firebase云功能似乎是完美的组合。虽然我已经使用了Netlify的功能,但Firebase是一个有点不同的动物。把事情分解成最基本的和绝对必要的组成部分,有助于我对我正在使用的抽象概念有正确的认识,所以不用多说,这里是你的 "Firebase函数的超级简单开始"。
如何使用Firebase云函数
在你开始之前,你需要一个GitHub账户,一个Firebase账户(用你的Google账户就可以了),以及一个新的仓库。一旦你把项目放在电脑上,那么你就可以开始下面的步骤了。
第一步:创建一个Firebase项目

进入Firebase控制台,创建一个新项目。按照那里的步骤进行(你在这里的选项选择并不重要)。
你将需要记住你的项目的名称。你可以在你的项目创建后的URL中找到它。
https://console.firebase.google.com/u/0/project/{your-project-id-is-here}/functions
它是在你给项目起名时产生的,你也可以在那个时候改变它。

第二步:创建一个firebase.json 文件
为了让firebase识别你的项目是一个firebase项目,它需要有一个firebase.json 文件。我相信有很多重要的配置可以放在这里,但对于这个超级简单的开始来说,不需要任何配置,所以只需放入一个空对象。
{}
第3步:创建一个.firebaserc 文件
这个文件是将你的仓库与firebase项目联系起来的地方(#spoileralert,所以当你以后运行firebase deploy ,它知道你的代码要部署到哪个项目)。
以下是你在该文件中需要的全部内容。
{
  "projects": {
    "default": "{your-project-id}"
  }
}
请确保将{your-project-id} 改为你的项目ID。同样,你可以从上面提到的Firebase控制台中的项目URL中得到。你也可以从你的项目的设置页面得到它。

第四步:创建一个functions/package.json 文件
这里是你需要的东西。
{
  "engines": {
    "node": "12"
  },
  "dependencies": {
    "firebase-admin": "^9.3.0",
    "firebase-functions": "^3.11.0"
  }
}
firebase-admin 和 是运行Firebase云功能的firebase-functions 必要依赖。从技术上讲,你不必使用 ,但如果你没有安装它,你的函数就不会被部署。我们接下来会使用 。firebase-admin``firebase-functions
engines.node 也是必须的,这样Firebase就能知道你想让你的函数使用哪个版本的Node.js。
第五步:添加.gitignore
在我们安装这些依赖项之前,让我们准备好.gitignore ,以便忽略node_modules 。
node_modules

# ignores a few log files firebase creates when running functions locally
*.log
第6步:安装函数依赖项
cd functions && npm install
这应该会得到所有的依赖关系的安装,并且会生成一个package-lock.json 文件,你现在可以安全地忽略它(但你会想把它提交到你的仓库中)。
第7步:创建一个functions/index.js 文件
现在你已经安装了依赖关系,你可以创建你的第一个函数。
下面是你要放在里面的东西。
const functions = require('firebase-functions')

module.exports = {
  hello: functions.https.onRequest((req, res) => {
    const subject = req.query.subject || 'World'
    res.send(`Hello ${subject}!`)
  }),
}
你要导出的那个对象的每个属性都将是一个单独的函数。 因此,有了这个,我们就有了一个名为hello 的单一函数。
你可能会注意到其他的人使用这种语法。
exports.hello = functions.https.onRequest((req, res) => {})
这些在功能上是等同的。我只是碰巧喜欢module.exports = {} 。但这并没有什么实质性的区别。
另外,这个文件不一定要叫index.js ,但如果你把它改成别的东西,那么你就需要在package.json 的main 字段中设置。我说,更容易的是直接使用index.js 惯例。
第8步:安装firebase-tools
要在本地部署,你需要安装firebase-tools ,以便你可以使用firebase CLI。
npm install --global firebase-tools
现在你可以登录了。
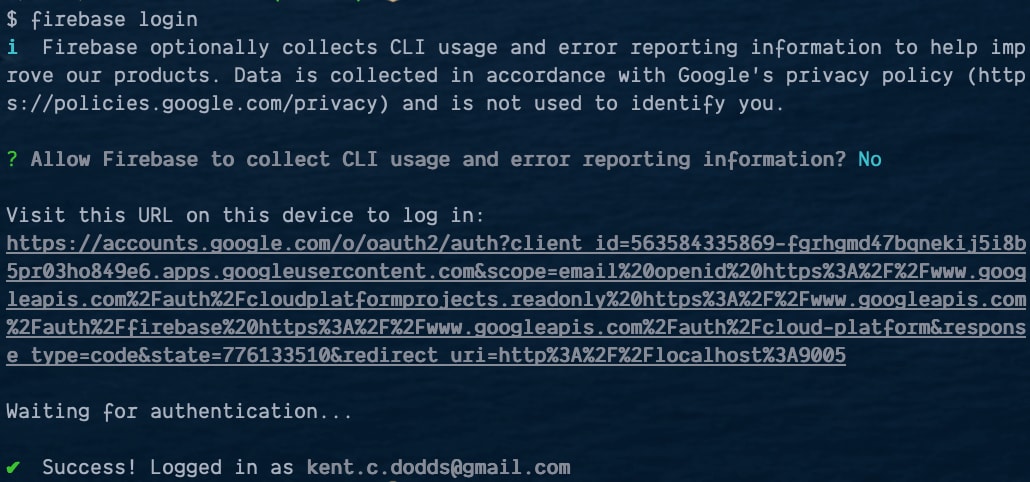
firebase login
这应该会打开你的浏览器,让你用你的谷歌账户登录。继续并登录。当你完成后,你就可以在本地登录了。
第9步:在本地测试
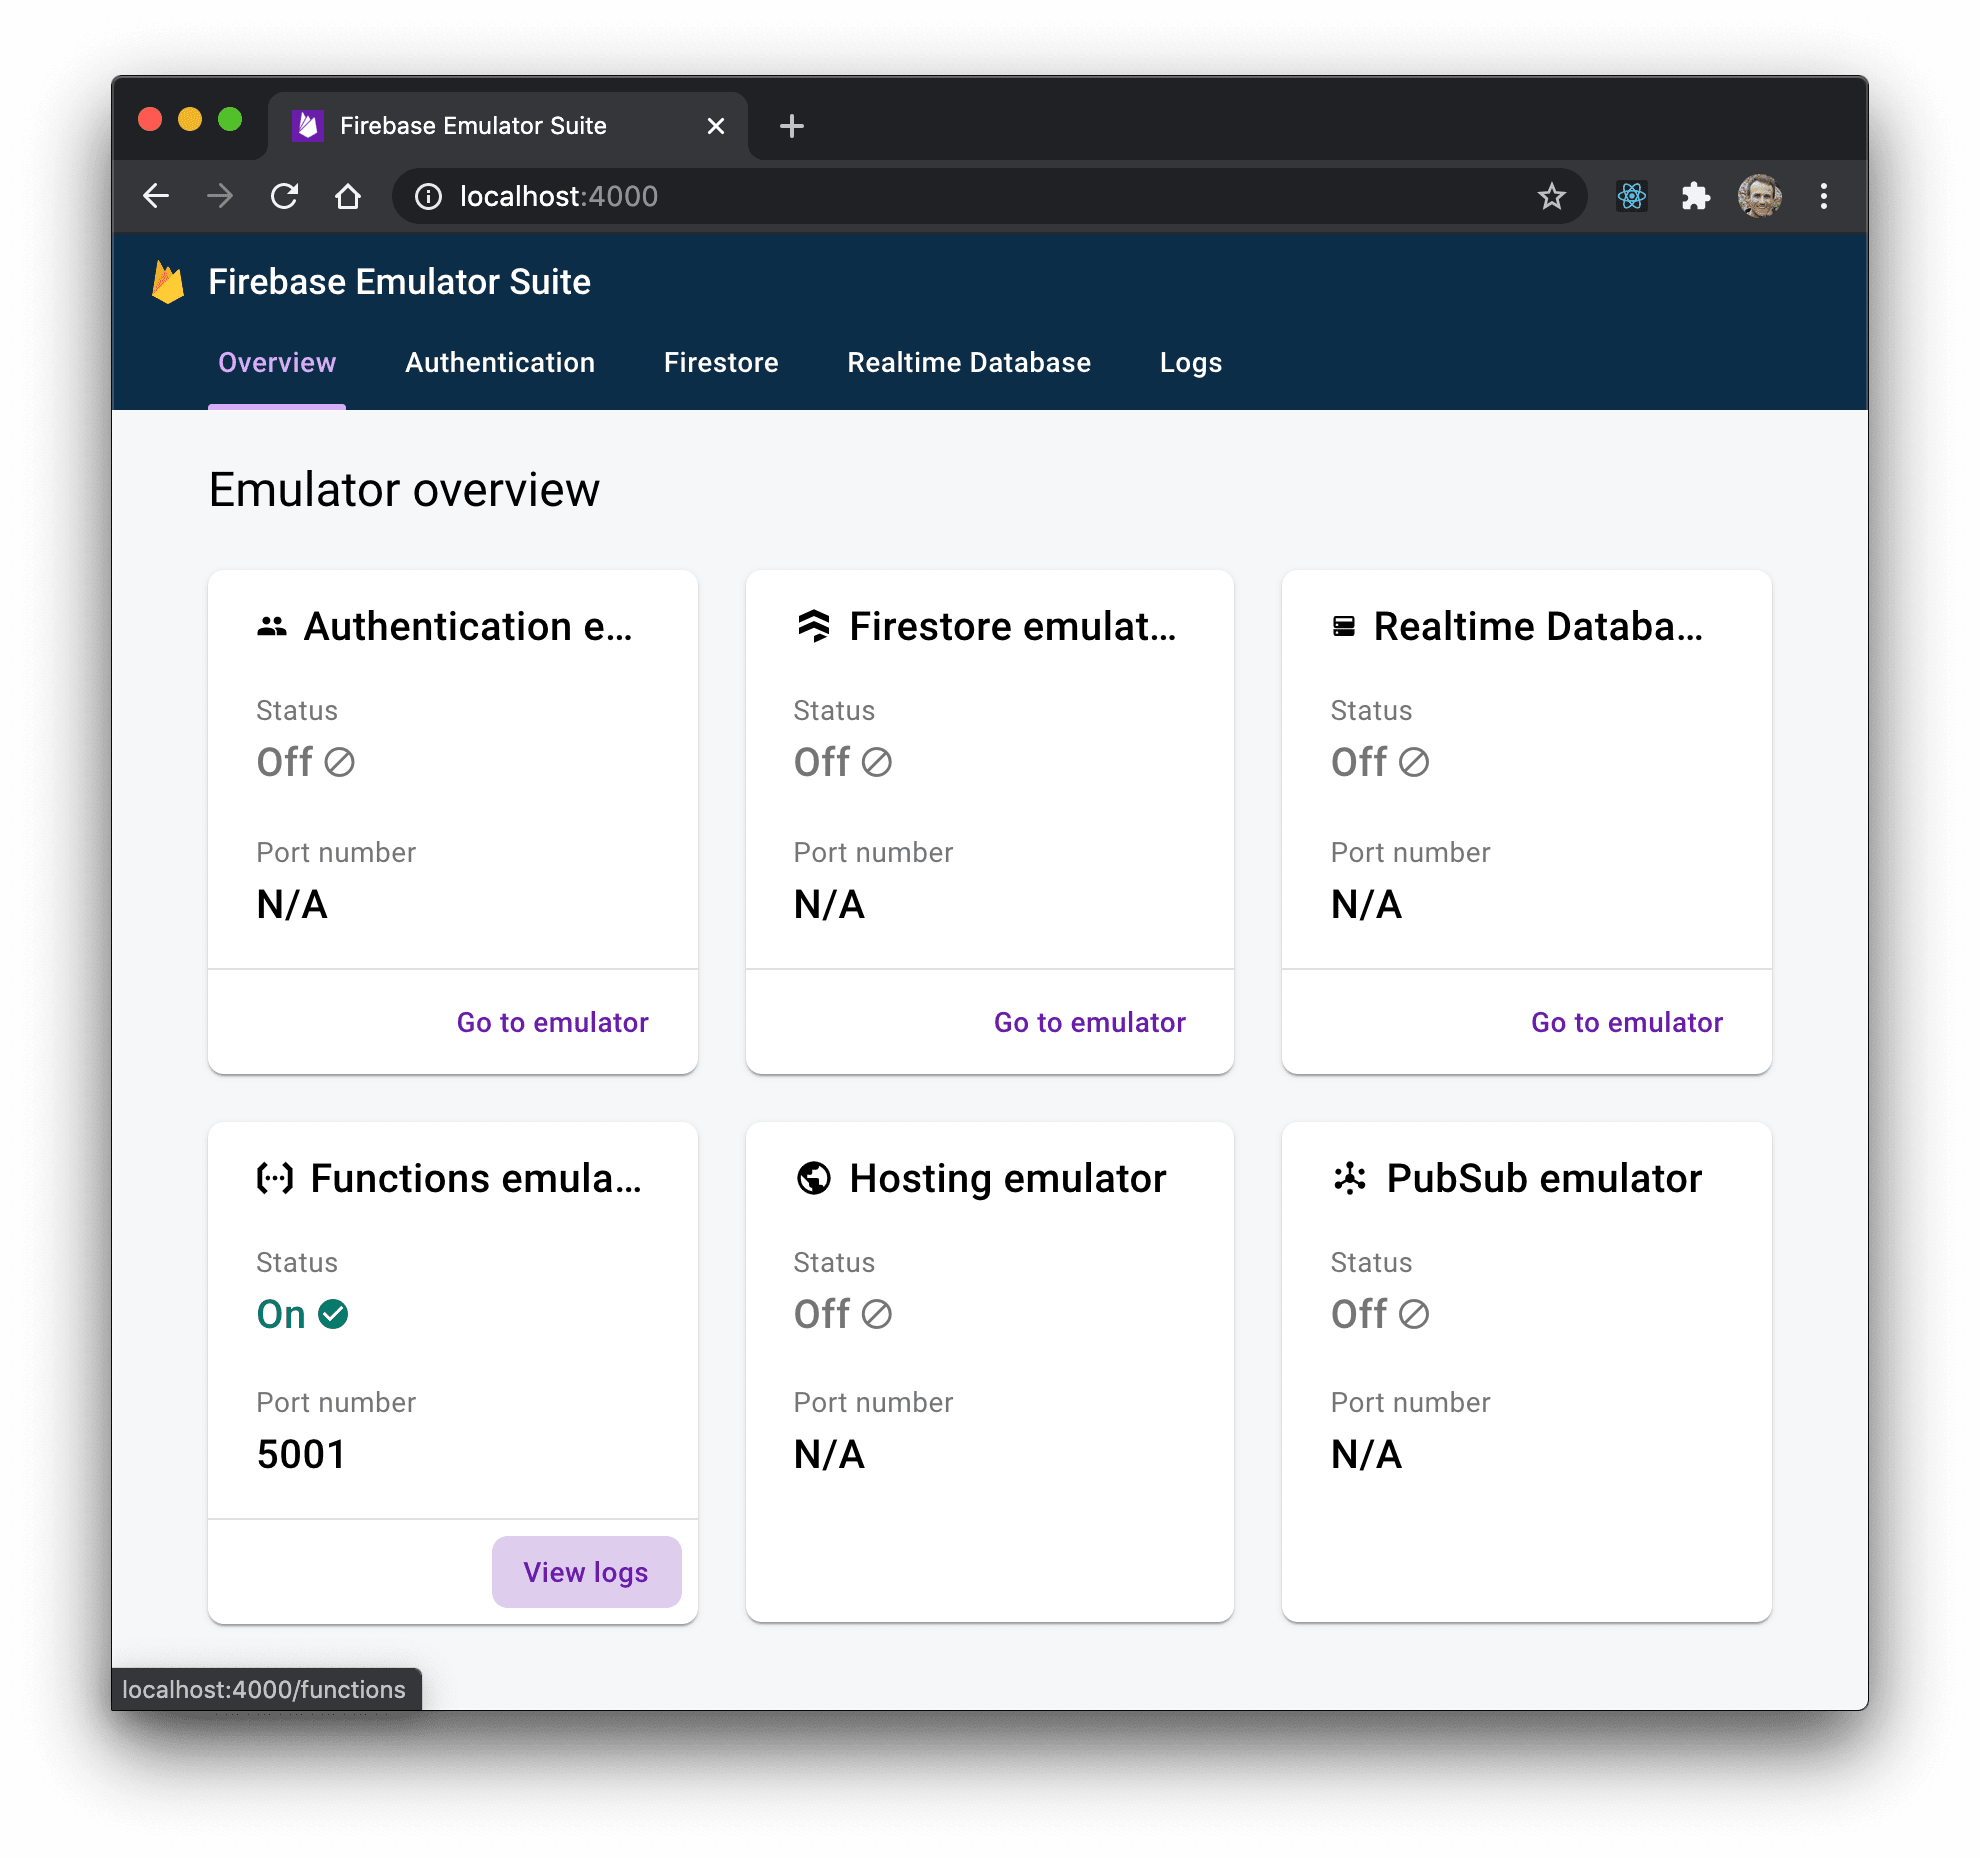
现在你已经登录了,你可以在把你的Firebase函数部署到生产中之前测试它。你可以用Firebase模拟器来做,这很不错。
在你的项目目录中,运行以下命令。
firebase emulators:start
它做了一堆事情,但这里是重要的输出。
i  emulators: Starting emulators: functions
... some irrelevant stuff here ...
✔  functions[hello]: http function initialized (http://localhost:5001/{your-project-id}/us-central1/hello).

┌───────────────────────────────────────────────────────────────────────┐
│ ✔  All emulators ready! View status and logs at http://localhost:4000 │
└───────────────────────────────────────────────────────────────────────┘

┌───────────┬────────────────┬─────────────────────────────────┐
│ Emulator  │ Host:Port      │ View in Emulator UI             │
├───────────┼────────────────┼─────────────────────────────────┤
│ Functions │ localhost:5001 │ http://localhost:4000/functions │
└───────────┴────────────────┴─────────────────────────────────┘
  Other reserved ports: 4400, 4500
如果你打开模拟器的用户界面,你会看到模拟器的概况,你可以选择函数的日志。
如果你在浏览器中点击你的无服务器函数,你应该看到输出。
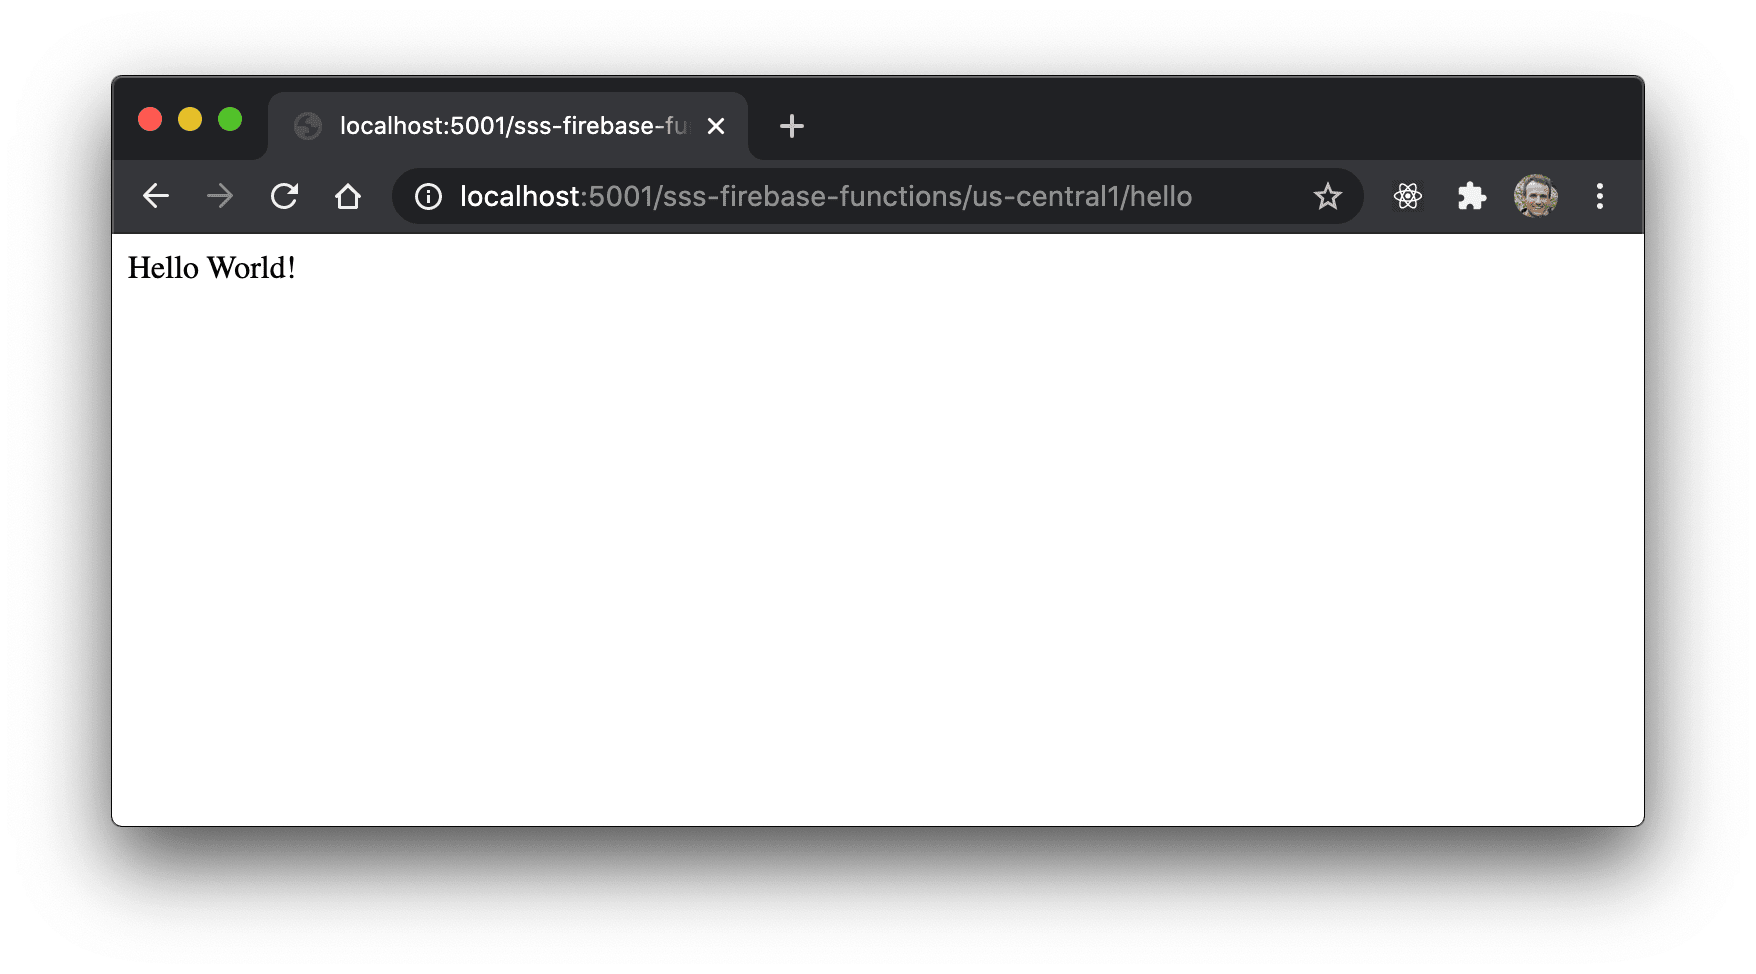
然后你的日志会显示该函数已经运行。

太棒了!因此,该函数正在运行!进入下一个步骤。
第十步。本地部署(也许?)
现在你准备将你的函数部署到世界范围内。在你的项目目录中,运行以下命令。
firebase deploy
这将触发你的函数被部署....但是,等等!我看到的这个是什么?
Error: HTTP Error: 400, Billing account for project '189225252738' is not found.
Billing must be enabled for activation of service(s)
'cloudbuild.googleapis.com,containerregistry.googleapis.com' to proceed.
这是什么?这到底是什么意思?好吧,事实证明,Firebase可以对这个错误信息进行改进,说明下一步该怎么做,因为这一部分说实话真的很麻烦。但这里是你需要做的......
第11步:启用计费
所以你要回到你的项目的Firebase控制台,导航到 "使用和计费",然后到 "细节和设置 "标签。
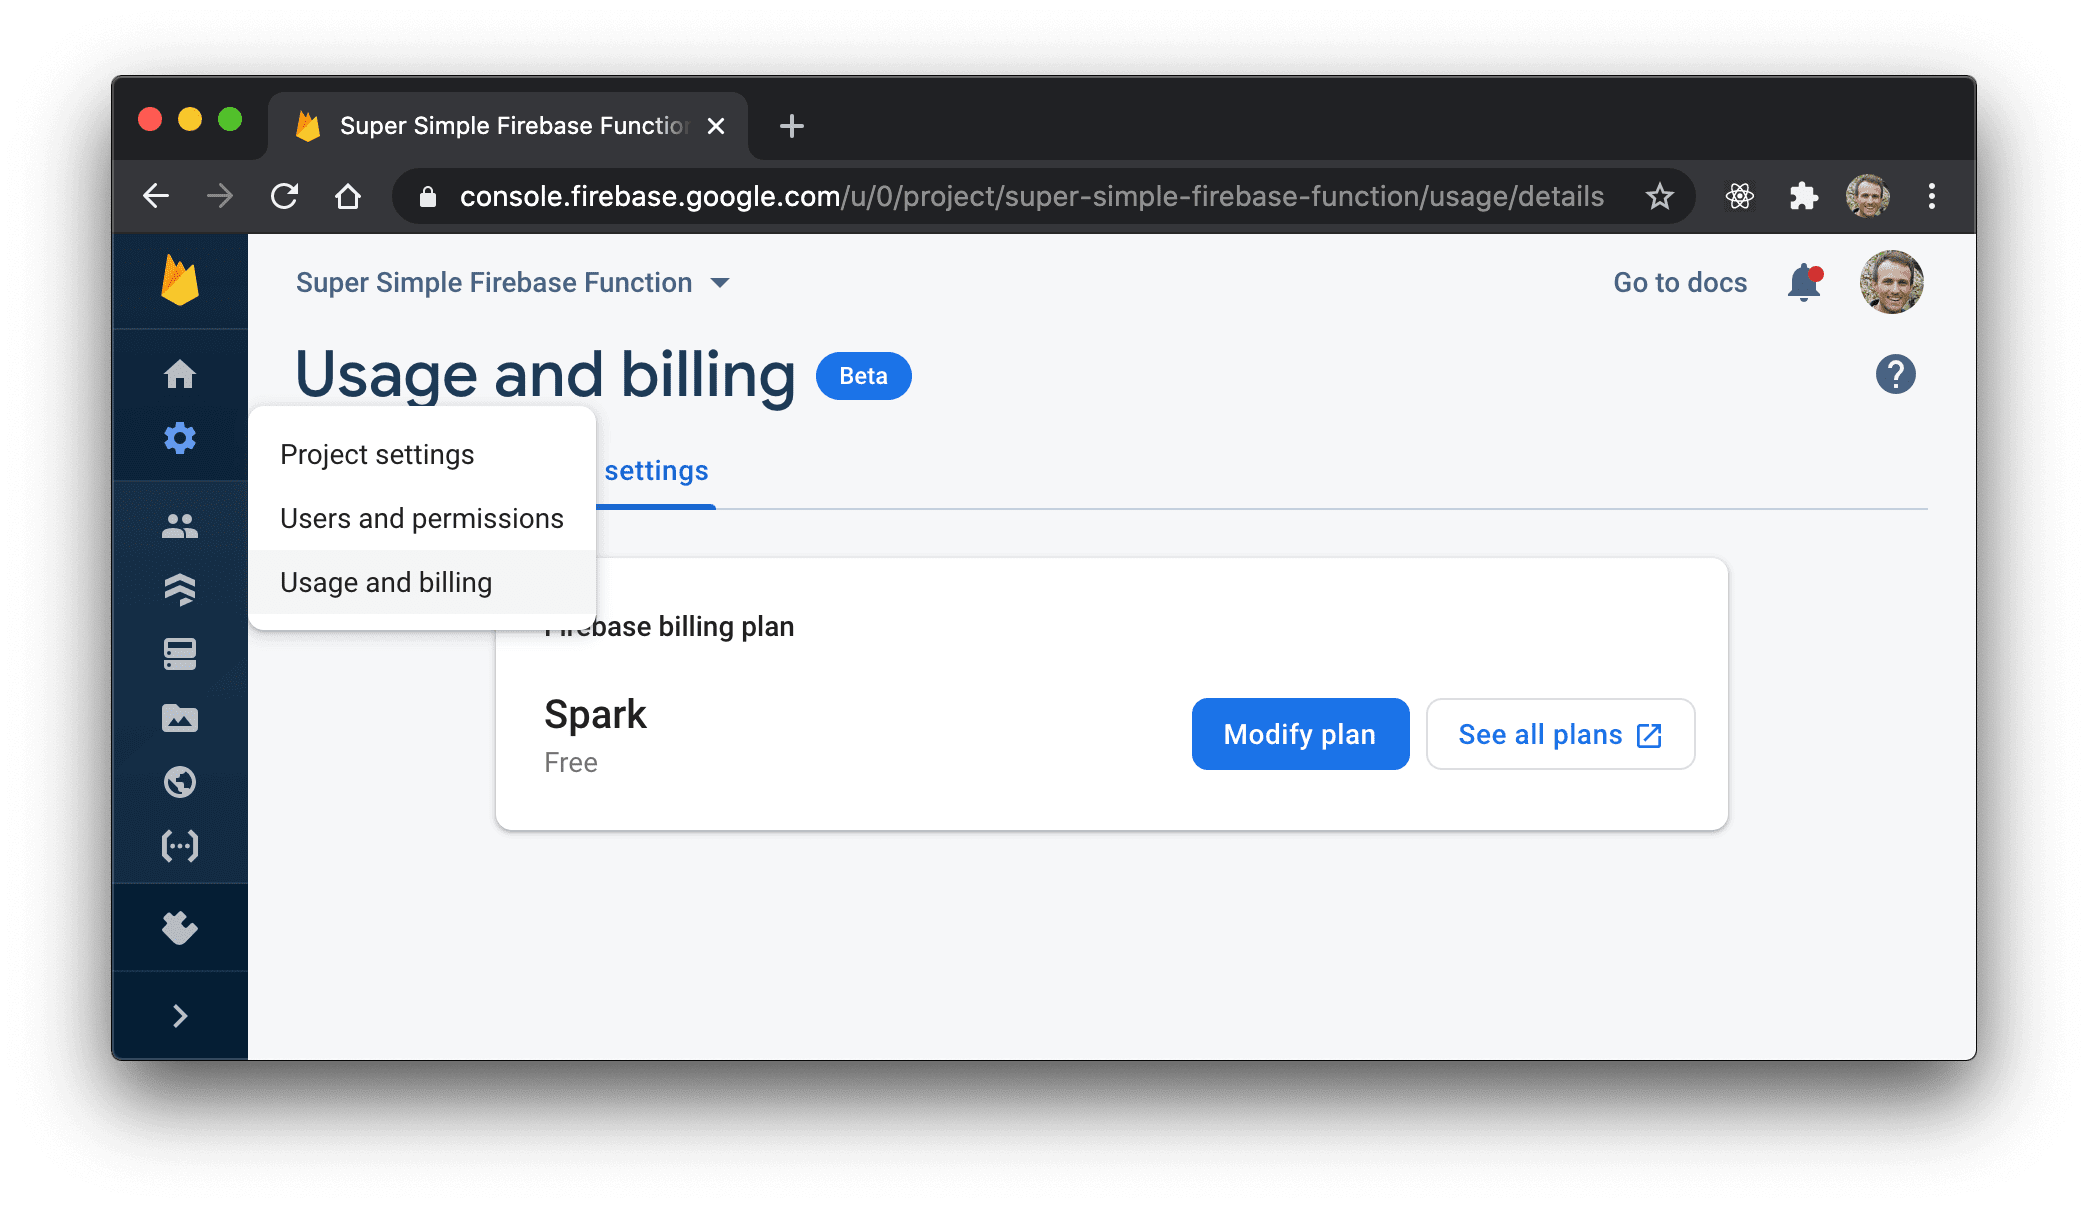
然后你会点击 "修改计划",然后在 "Blaze Pay as you go "下的 "选择计划"。
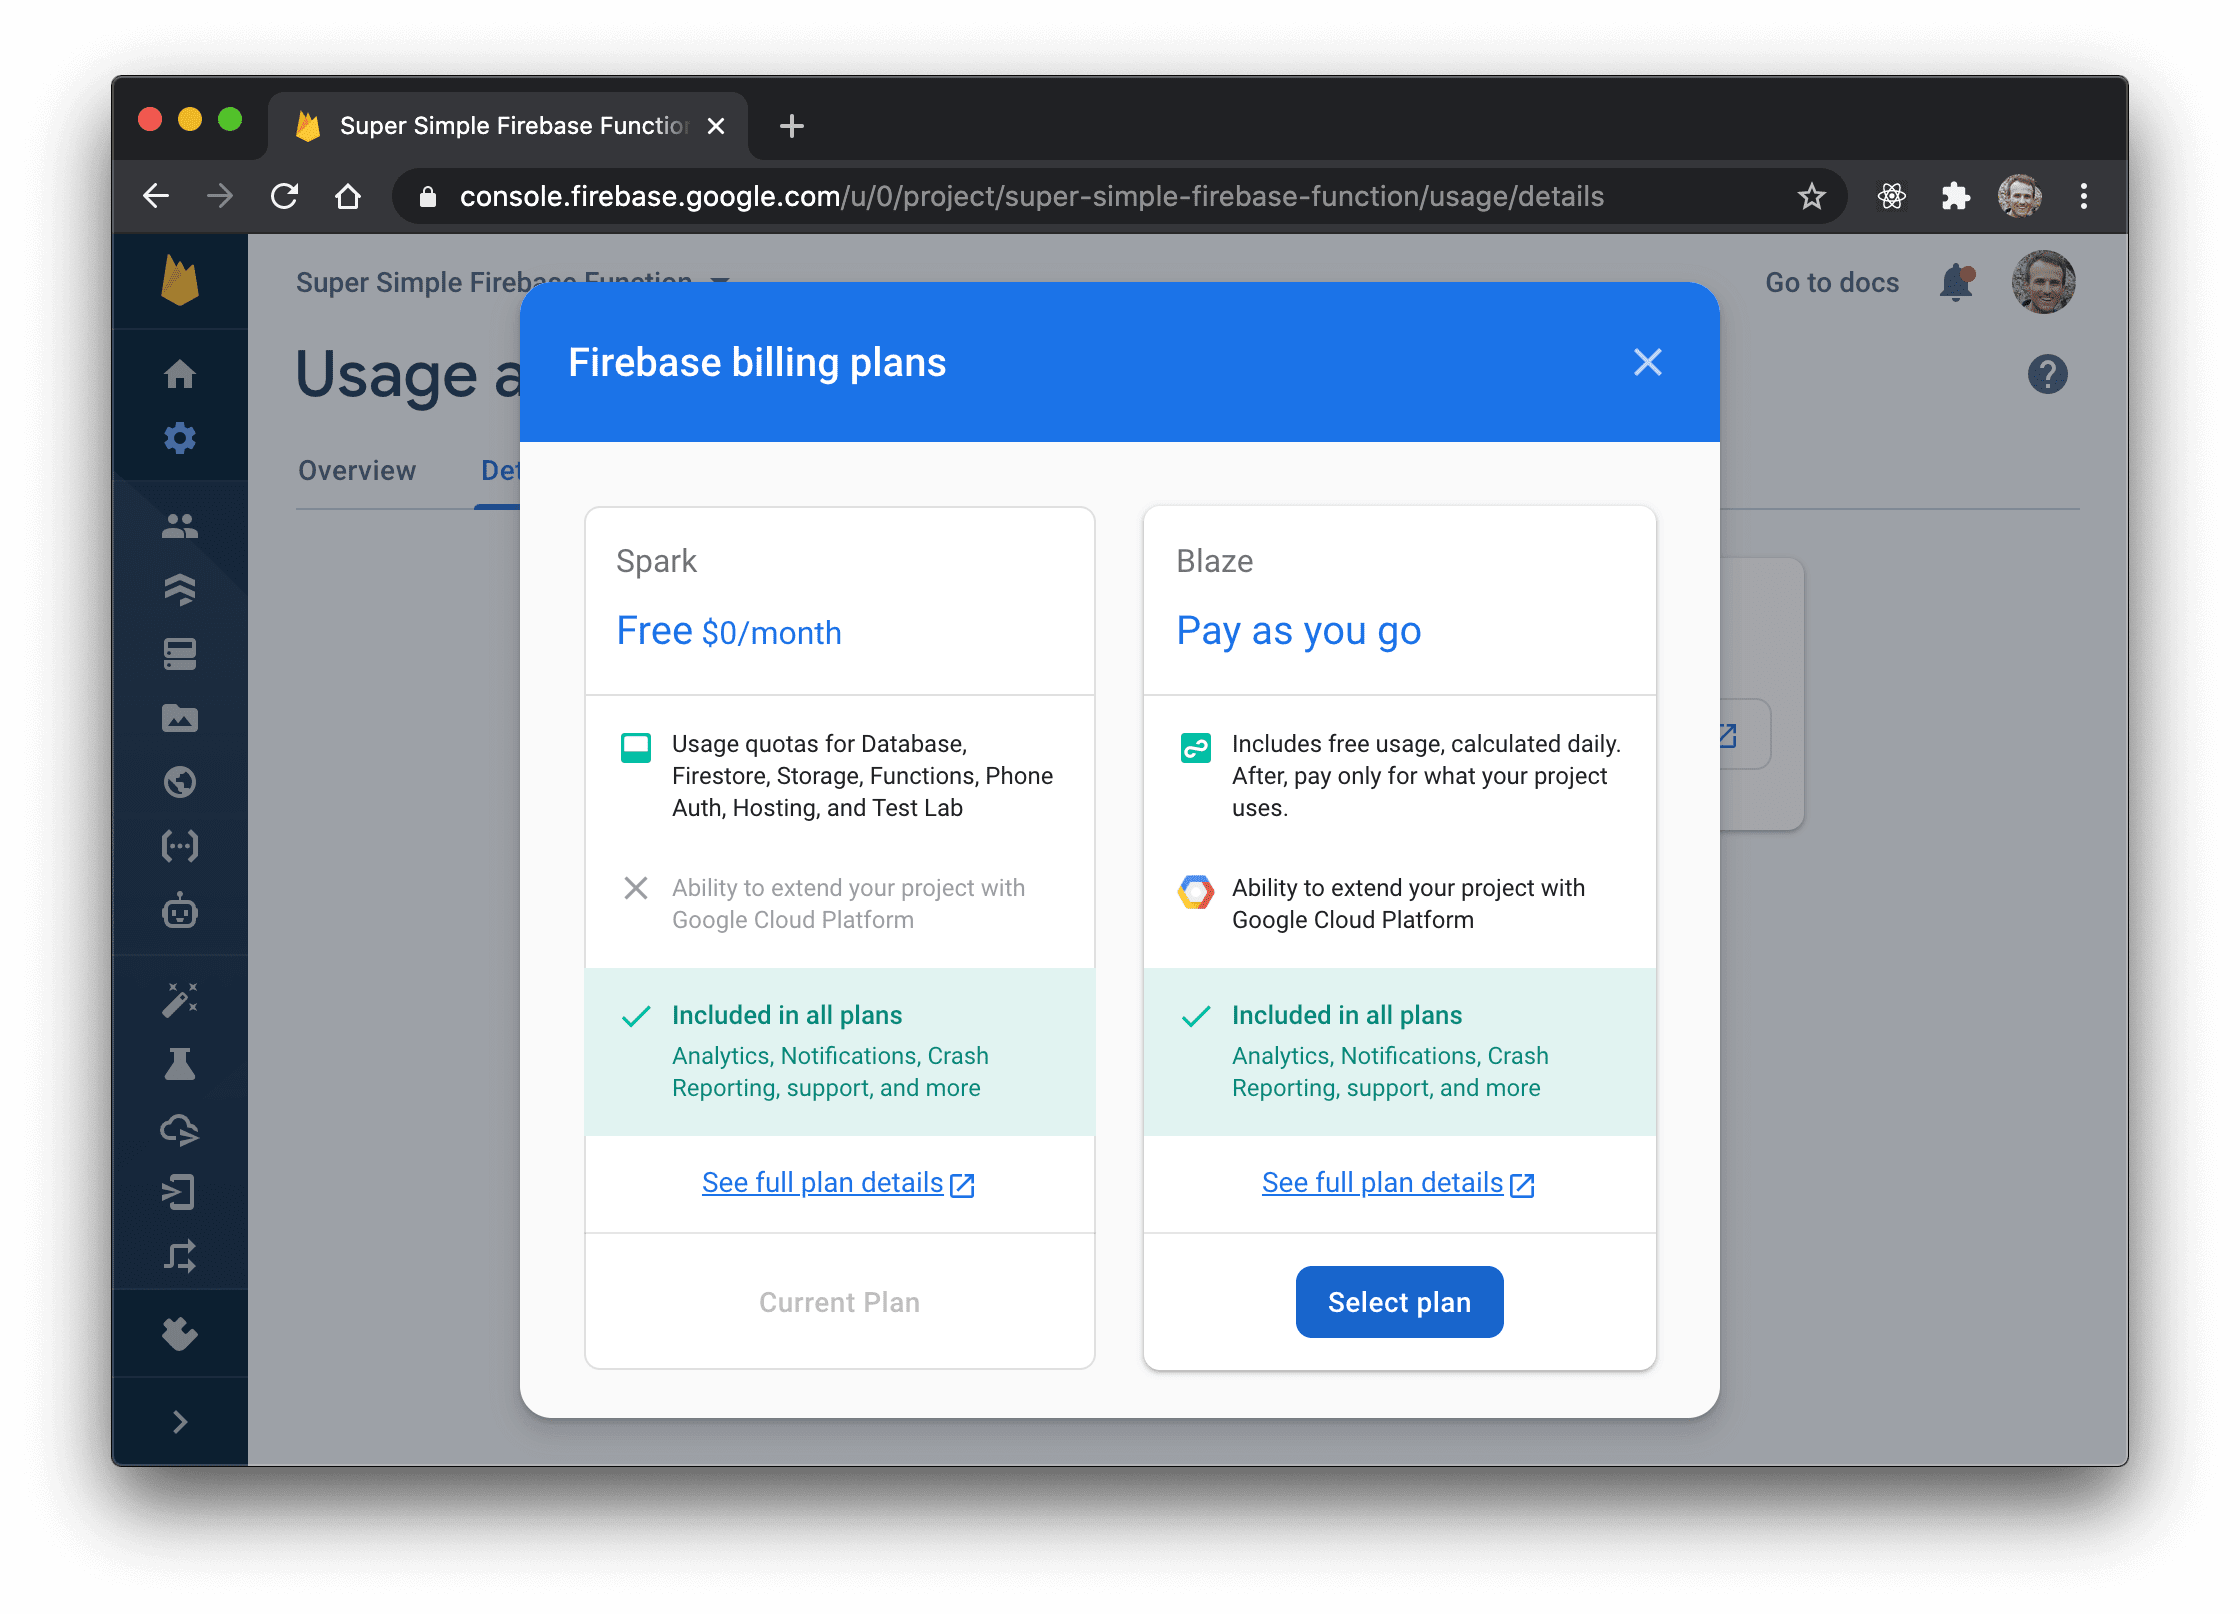
不要担心,Firebase有一个慷慨的免费层,(我认为)在你真正开始大量使用该功能之前,你应该被收取任何费用。但在这一点上,它会让你在console.cloud.google.com/billing上设置一个计费账户,这样你就可以有一个信用卡的档案。
一旦你解决了这个问题,你就可以继续实际部署你的功能。
第12步:本地部署(现在是真正的部署)
现在,你的账户已经配置了计费功能,你可以尝试再次部署。
firebase deploy
这将需要一点时间,但当它最终完成时,你应该得到这样的输出。
=== Deploying to '{your-project-id}'...
i deploying functions
i functions: ensuring required API cloudfunctions.googleapis.com is enabled...
i functions: ensuring required API cloudbuild.googleapis.com is enabled...
✔ functions: required API cloudbuild.googleapis.com is enabled
✔ functions: required API cloudfunctions.googleapis.com is enabled
i functions: preparing functions directory for uploading...
i functions: packaged functions (23.46 KB) for uploading
✔ functions: functions folder uploaded successfully
i functions: creating Node.js 12 function hello(us-central1)...
✔ functions[hello(us-central1)]: Successful create operation.
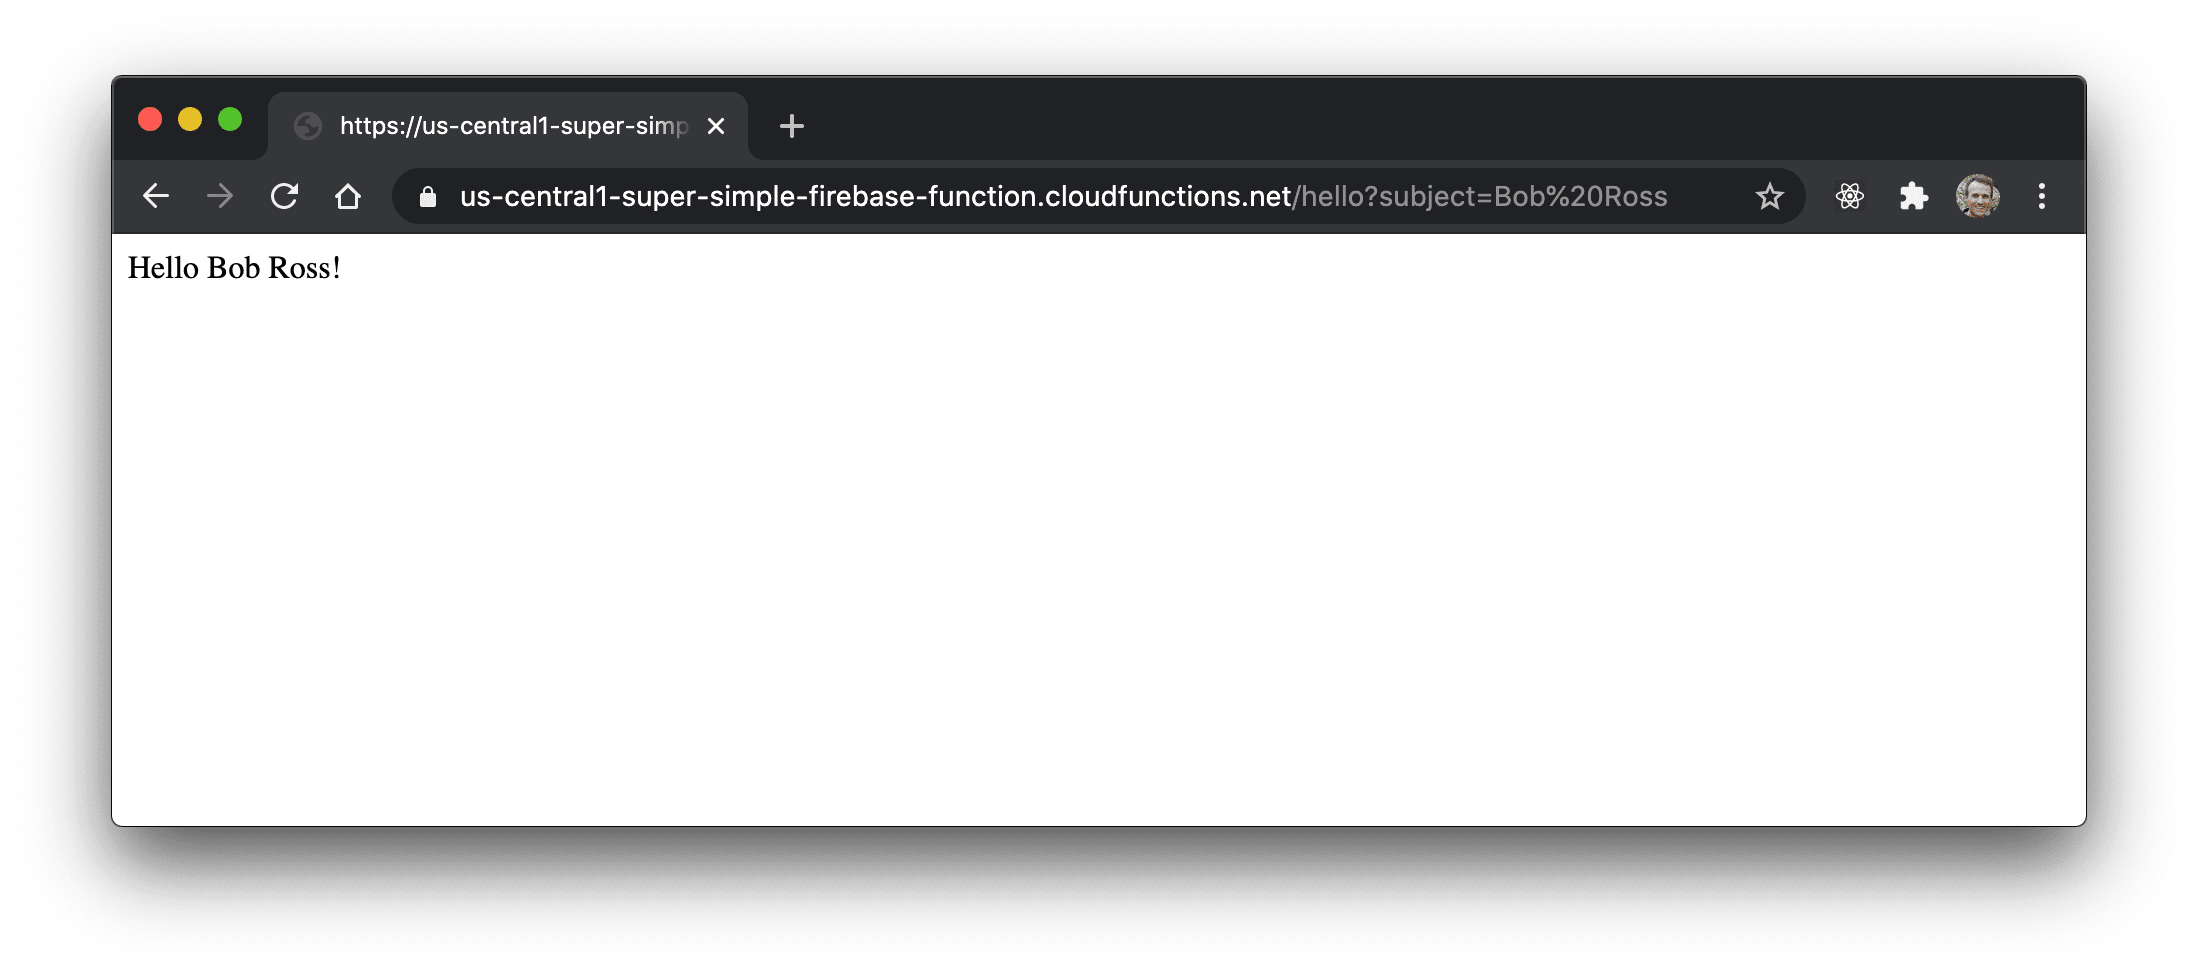
Function URL (hello): https://us-central1-{your-project-id}.cloudfunctions.net/hello
✔ Deploy complete!
Project Console: https://console.firebase.google.com/project/{your-project-id}/overview
如果你点击他们给你的端点,你应该可以得到你的函数的输出。为了增加乐趣,我们的函数处理了提供一个自定义的主题,所以如果你在该URL的末尾添加?subject=Bob%20Ross ,你会得到一个漂亮的问候语。Hello there Bob Ross!
第13步:用GitHub Actions自动部署Firebase云函数
我不知道你怎么想,但我不喜欢从我的本地机器上部署。我更喜欢用持续集成服务器来做这件事。幸运的是,我们的项目是GitHub repo的一部分,我们可以使用GitHub actions来为我们做这件事。
首先,创建一个.github/workflows/deploy.yml 文件,把这个放在里面。
name: deploy
on:
push:
branches:
- main
jobs:
main:
runs-on: ubuntu-latest
steps:
- name: ⬇️ Checkout repo
uses: actions/checkout@v2
- name: ⎔ Setup node
uses: actions/setup-node@v1
with:
node-version: 12
- name: 📥 Download deps
working-directory: functions
run: npm install
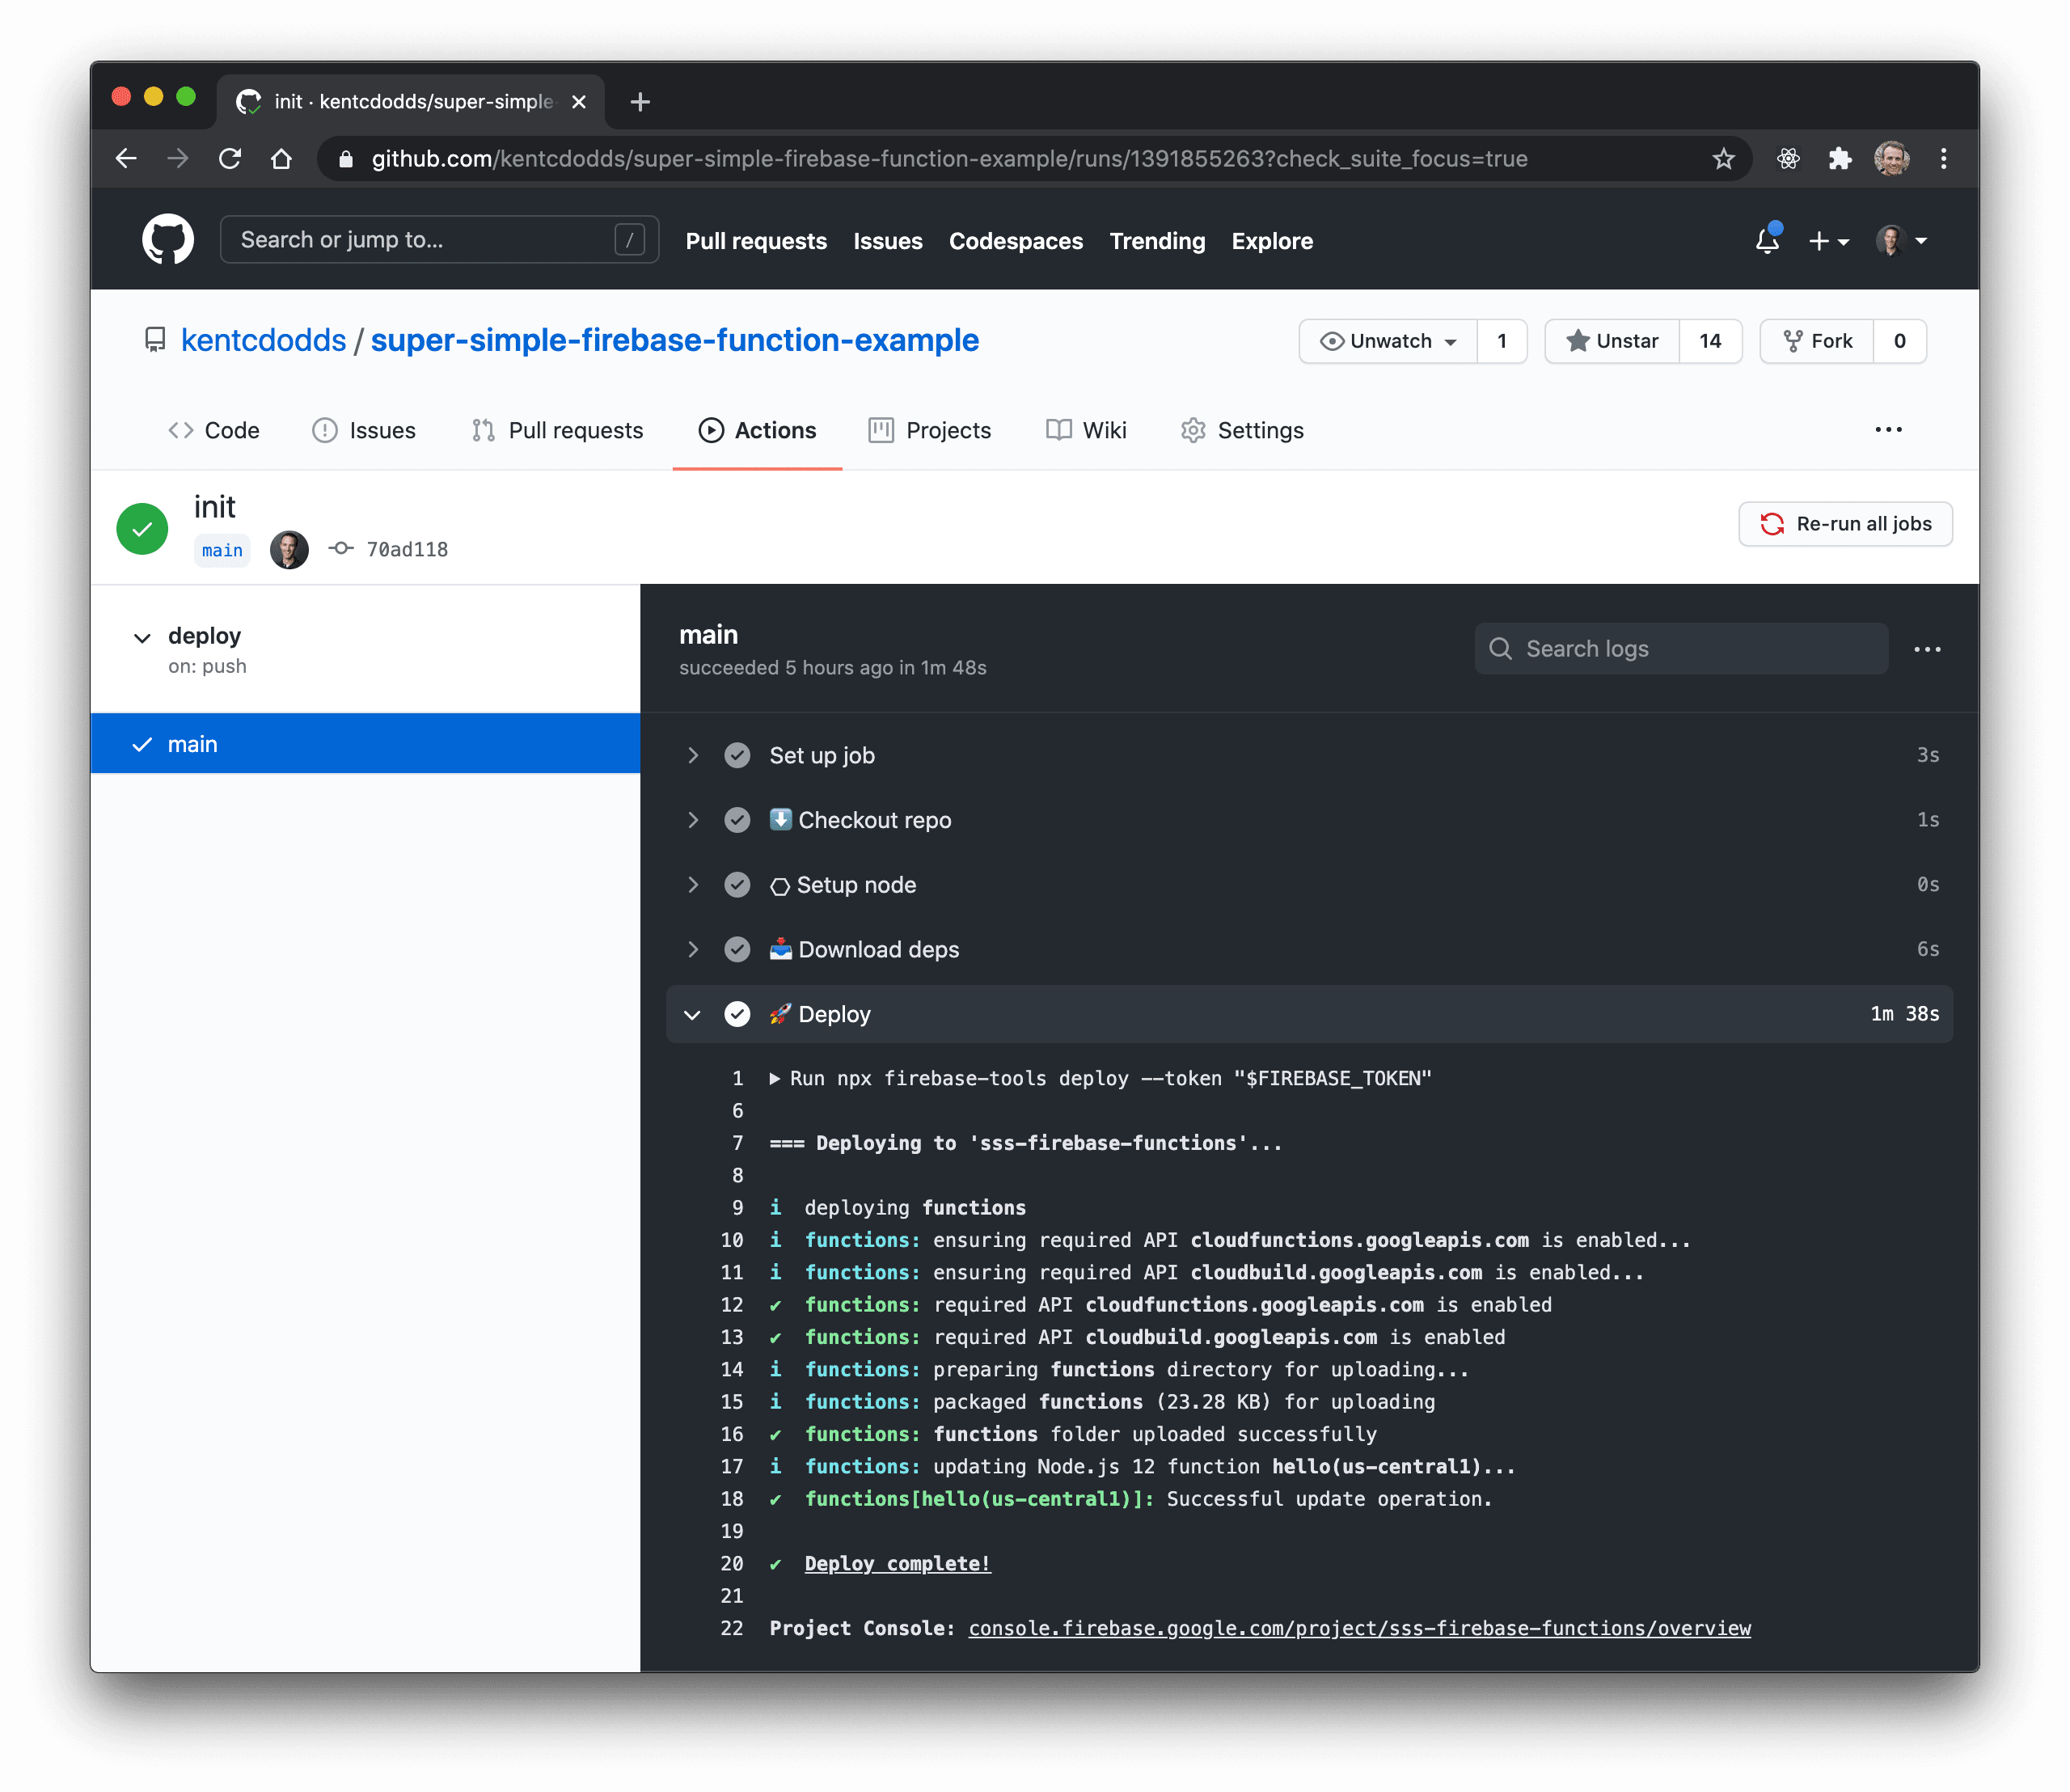
- name: 🚀 Deploy
run: npx firebase-tools deploy --token "$FIREBASE_TOKEN"
env:
FIREBASE_TOKEN: ${{ secrets.FIREBASE_TOKEN }}
以下是推送main 分支(如果你还在使用master 作为默认分支名,则master )时的动作。
- 克隆回购
- 安装Node v12
- 通过
npm在functions目录中安装依赖项 - 使用
firebase-tools,像我们一样部署到firebase。
对于最后一步,它做了一些不同的事情。
- 它使用了
npx,所以我们不必担心全局安装的问题。 - 它使用了
--token标志,所以我们不必担心登录的问题 - 它公开了一个
FIREBASE_TOKEN环境变量。
让我们把Firebase令牌设置好。
第14步:为CI创建一个Firebase令牌
运行这个。
firebase login:ci
这将使你再次经历登录过程,当你完成后,它将在终端输出中给你一个令牌。
✔  Success! Use this token to login on a CI server:

1//06SeHVPB6AOF9CgYIARAAGAYSNwF-L9IrcdTvBfmn_ako1m3iJXRNpyV6tROQ193ZTGUtwLB95aoCC1l45ES40dRYfa5YjNCRxRc

Example: firebase deploy --token "$FIREBASE_TOKEN"
甚至不要尝试使用这个令牌,我已经撤销了它😜获得你自己的令牌吧
firebase logout --token 1//06SeHVPB6AOF9CgYIARAAGAYSNwF-L9IrcdTvBfmn_ako1m3iJXRNpyV6tROQ193ZTGUtwLB95aoCC1l45ES40dRYfa5YjNCRxRc
✔  Logged out token "1//06SeHVPB6AOF9CgYIARAAGAYSNwF-L9IrcdTvBfmn_ako1m3iJXRNpyV6tROQ193ZTGUtwLB95aoCC1l45ES40dRYfa5YjNCRxRc"
第15步:将Firebase令牌添加到GitHub秘密中
很好,现在你要把这个令牌复制到 GitHub 仓库的secrets配置中。https://github.com/{your-username}/{your-repo-name}/settings/secrets/actions

添加完毕后,你就可以进行部署了!
第16步:提交和推送
现在提交并推送你所有的修改。
git add -A
git commit -m "firebase functions rock"
git push
然后去你的仓库的行动页面(https://github.com/{your-username}/{your-repo-name}/actions),看着部署自动发生!
然后庆祝一下吧 🎉
总结
Firebase云功能是非常强大的。希望这个超级简单的Firebase函数的开始对你有帮助!祝你好运,愿你的函数能够正常运行。祝你好运,愿你的函数能够发挥作用✌
