

作者:Vincy。最后修改于2022年9月19日。
我们将看到使用JavaScript捕捉网页截图的三种不同方法。这三种方法给出了使用和不使用库进行截图的解决方案。
- 使用html2canvas JavaScript库。
- 使用普通的HTML5与JavaScript。
- 使用WebRTC的getDisplayMedia方法。
- 使用 html2canvas JavaScript 库
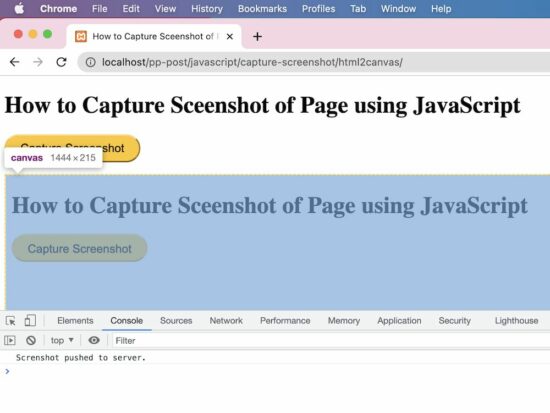
这个方法使用流行的JS库html2canvas来捕捉网页上的截图。
该脚本实现了以下步骤,以从页面 HTML 中捕获屏幕截图。
- 它初始化了html2canvas库类,并向它提供了主体 HTML。
- 它设置目标,将输出的屏幕截图附加到HTML主体中。
- 生成画布元素并附加到HTML中。
- 它从canvas对象中获取图像源数据URL。
- 通过AJAX将源URL推送给PHP,将屏幕截图保存到服务器上。
capture-screenshot/index.html
快速实例
<!DOCTYPE html>
<html>
<head>
<title>How to Capture Screenshot of Page using JavaScript</title>
<link rel='stylesheet' href='form.css' type='text/css' />
</head>
<body>
    <div class="phppot-container">
        <h1>How to Capture Screenshot of Page using JavaScript</h1>
        <p>
            <button id="capture-screenshot">Capture Screenshot</button>
        </p>
    </div>

    <script
    src="https://ajax.googleapis.com/ajax/libs/jquery/3.2.1/jquery.min.js"></script>
    <script type="text/javascript"
    src="https://html2canvas.hertzen.com/dist/html2canvas.min.js"></script>
    <script type="text/javascript">
        $('#capture-screenshot').click(function() {
            const screenshotTarget = document.body;
            html2canvas(screenshotTarget).then(canvas => {
            	// to image as png use below line
                // const base64image = canvas.toDataURL("image/png");
            	// show the image in window use below line
                // window.location.href = base64image;

            	// screenshot appended to the body as canvas
                document.body.appendChild(canvas);
                dataURL = canvas.toDataURL();
                // to print the screenshot in console use below line
                // console.log(dataURL);

                // following line is optional and it is to save the screenshot
                // on the server side. It initiates an ajax call
                pushScreenshotToServer(dataURL);
            });
        });

        function pushScreenshotToServer(dataURL) {
            $.ajax({
                url: "push-screenshot.php",
                type: "POST",
                data: {
                    image: dataURL
                },
                dataType: "html",
                success: function() {
                	console.log('Screenshot pushed to server.');
                }
            });
        }
    </script>
</body>
</html>
我们已经在生成具有动态数据的画布元素的代码中使用了这个库。例如,我们使用 html2canvas从 HTML 中使用 JavaScript 创建发票 PDF。
将屏幕截图推送给PHP保存
这个PHP脚本读取通过AJAX发布的屏幕截图二进制文件。它准备了JSON格式的截图属性。
capture-screenshot/push-screenshot.php
 $_POST['image']
    );
    $contentArray[] = $screenshotImage;
    $fullData = json_encode($contentArray);
    file_put_contents('screenshot.json', $fullData);
    fclose($screenshotJson);
}
?>
这将输出一个带有图片数据URL的*"screenshot.json "*文件,并将其存储在应用程序中。
视频演示
- 使用纯HTML5与JavaScript
这个JavaScript代码包括两个功能。一个是生成图像对象URL,另一个是通过准备页面中的blob对象来进行截图。
它准备了一个blob对象的URL,代表从页面上捕获的输出截图图像。它通过点击用户界面中的 "捕获屏幕截图 "按钮进行截图。
它控制推送到屏幕截图对象的节点的样式属性和滚动坐标。这是为了阻止用户在BLOB对象上有鼠标控制。
在之前的例子中,我们已经看到如何创建一个BLOB并将其存储在MySQL数据库中。
这段代码将在一个新页面上显示捕获的屏幕截图。新页面中生成的blob URL将为blob:http://localhost/0212cfc1-02ab-417c-b92f-9a7fe613808c
html5-javascript/index.html
function takeScreenshot() {
	var screenshot = document.documentElement
		.cloneNode(true);
	screenshot.style.pointerEvents = 'none';
	screenshot.style.overflow = 'hidden';
	screenshot.style.webkitUserSelect = 'none';
	screenshot.style.mozUserSelect = 'none';
	screenshot.style.msUserSelect = 'none';
	screenshot.style.oUserSelect = 'none';
	screenshot.style.userSelect = 'none';
	screenshot.dataset.scrollX = window.scrollX;
	screenshot.dataset.scrollY = window.scrollY;
	var blob = new Blob([screenshot.outerHTML], {
		type: 'text/html'
	});
	return blob;
}

function generate() {
	window.URL = window.URL || window.webkitURL;
	window.open(window.URL
		.createObjectURL(takeScreenshot()));
}
- 使用WebRTC的getDisplayMedia方法
该方法使用JavaScriptMediaServices类来捕捉页面内容的截图。
这个例子使用这个类的**getDisplayMedia()**来返回当前页面内容的媒体流。
注意: 它需要授予权限来获取显示的全部或部分页面内容。
它准备了一个图像源,用其上下文的引用来绘制到画布上。在将媒体流对象写入上下文后,该脚本将画布转换为一个数据URL。
这个数据URL被用来查看在新页面上捕获的页面截图。
在把媒体流对象读到屏幕截图元素对象后,应该关闭它。如果不需要的话,JS MediaStreamTrack.stop()被用来关闭这个轨迹。
这个JavaScript forEach迭代了MediaStream对象数组,以获得要停止的轨道实例。
webrtc-get-display-media/index.html
<!DOCTYPE html>
<html>
<head>
<title>How to Capture Sceenshot of Page using JavaScript</title>
<link rel='stylesheet' href='form.css' type='text/css' />
</head>
<body>
    <div class="phppot-container">
        <p>This uses the WebRTC standard to take screenshot. WebRTC
            is popular and has support in all major modern browsers. It
            is used for audio, video communication.</p>
        <p>getDisplayMedia() is part of WebRTC and is used for
            screen sharing. Video is rendered and then page screenshot
            is captured from the video.</p>
        <p>
        <p>
            <button id="capture-screenshot"
                onclick="captureScreenshot();">Capture
                Screenshot</button>
        </p>
    </div>
    <script>
    const captureScreenshot = async () => {
        const canvas = document.createElement("canvas");
        const context = canvas.getContext("2d");
        const screenshot = document.createElement("screenshot");

        try {
            const captureStream = await navigator.mediaDevices.getDisplayMedia();
            screenshot.srcObject = captureStream;
            context.drawImage(screenshot, 0, 0, window.width, window.height);
            const frame = canvas.toDataURL("image/png");
            captureStream.getTracks().forEach(track => track.stop());
            window.location.href = frame;
        } catch (err) {
            console.error("Error: " + err);
        }
    };
    </script>
</body>
</html>
