

用Rodauth进行Rails认证
在本教程中,我们将展示如何使用Rodauth认证框架在Rails应用中添加全功能认证和账户管理功能。与Devise、Sorcery、Clearance和Authlogic等主流替代方案相比,Rodauth有很多优势。
我们将使用PostgresSQL、Hotwire、Bootstrap、主页、导航条、flash消息和帖子脚手架设置来处理一个新的Rails应用。
$ rails new blog --database=postgresql --css=bootstrap
$ cd blog
$ rails db:create
$ rails generate controller home index
$ rails generate scaffold post title:string body:text
$ rails db:migrate
# config/routes.rb
Rails.application.routes.draw do
  root to: "home#index"
  resources :posts
end
<!-- app/views/layouts/application.html.erb -->
<!-- ... -->
  <body>
    <%= render "navbar" %>

    <div class="container">
      <%= render "flash" %>
      <%= yield %>
    </div>
  </body>
<!-- ... -->
<!-- app/views/application/_flash.html.erb -->
<% if notice %>
  <div class="alert alert-success"><%= notice %></div>
<% end %>
<% if alert %>
  <div class="alert alert-danger"><%= alert %></div>
<% end %>
<!-- app/views/application/_navbar.html.erb -->
<nav class="navbar navbar-expand-sm navbar-light bg-light border-bottom mb-4">
  <div class="container">
    <%= link_to "Rails App", root_path, class: "navbar-brand" %>

    <div class="navbar-collapse">
      <ul class="navbar-nav">
        <li class="nav-item">
          <%= link_to "Posts", posts_path, class: "nav-link #{"active" if request.path.start_with?("/posts")}" %>
        </li>
      </ul>
    </div>
  </div>
</nav>
安装Rodauth
让我们先把rodauth-railsgem添加到我们的Gemfile中。
$ bundle add rodauth-rails
接下来,我们将运行由rodauth-rails提供的rodauth:install 生成器。
$ rails generate rodauth:install

# create  db/migrate/20200820215819_create_rodauth.rb
# create  config/initializers/rodauth.rb
# create  config/initializers/sequel.rb
# create  app/misc/rodauth_app.rb
# create  app/misc/rodauth_main.rb
# create  app/controllers/rodauth_controller.rb
# create  app/models/account.rb
# create  app/mailers/rodauth_mailer.rb
这将创建Rodauth应用程序和一些默认的Rodauth配置,配置Rodauth用于数据库交互的Sequel以重用Active Record的数据库连接,并生成一个迁移,为加载的Rodauth功能创建表。让我们运行迁移。
$ rails db:migrate

# == CreateRodauth: migrating ==========================
# -- create_table(:accounts)
# -- create_table(:account_password_hashes)
# -- create_table(:account_password_reset_keys)
# -- create_table(:account_verification_keys)
# -- create_table(:account_login_change_keys)
# -- create_table(:account_remember_keys)
# == CreateRodauth: migrated ===========================
我们还需要为Rodauth设置Action Mailer的默认URL选项,以便能够在RodauthMailer 中生成电子邮件链接。
# config/environments/development.rb
Rails.application.configure do
  # ...
  config.action_mailer.default_url_options = { host: 'localhost', port: 3000 }
end
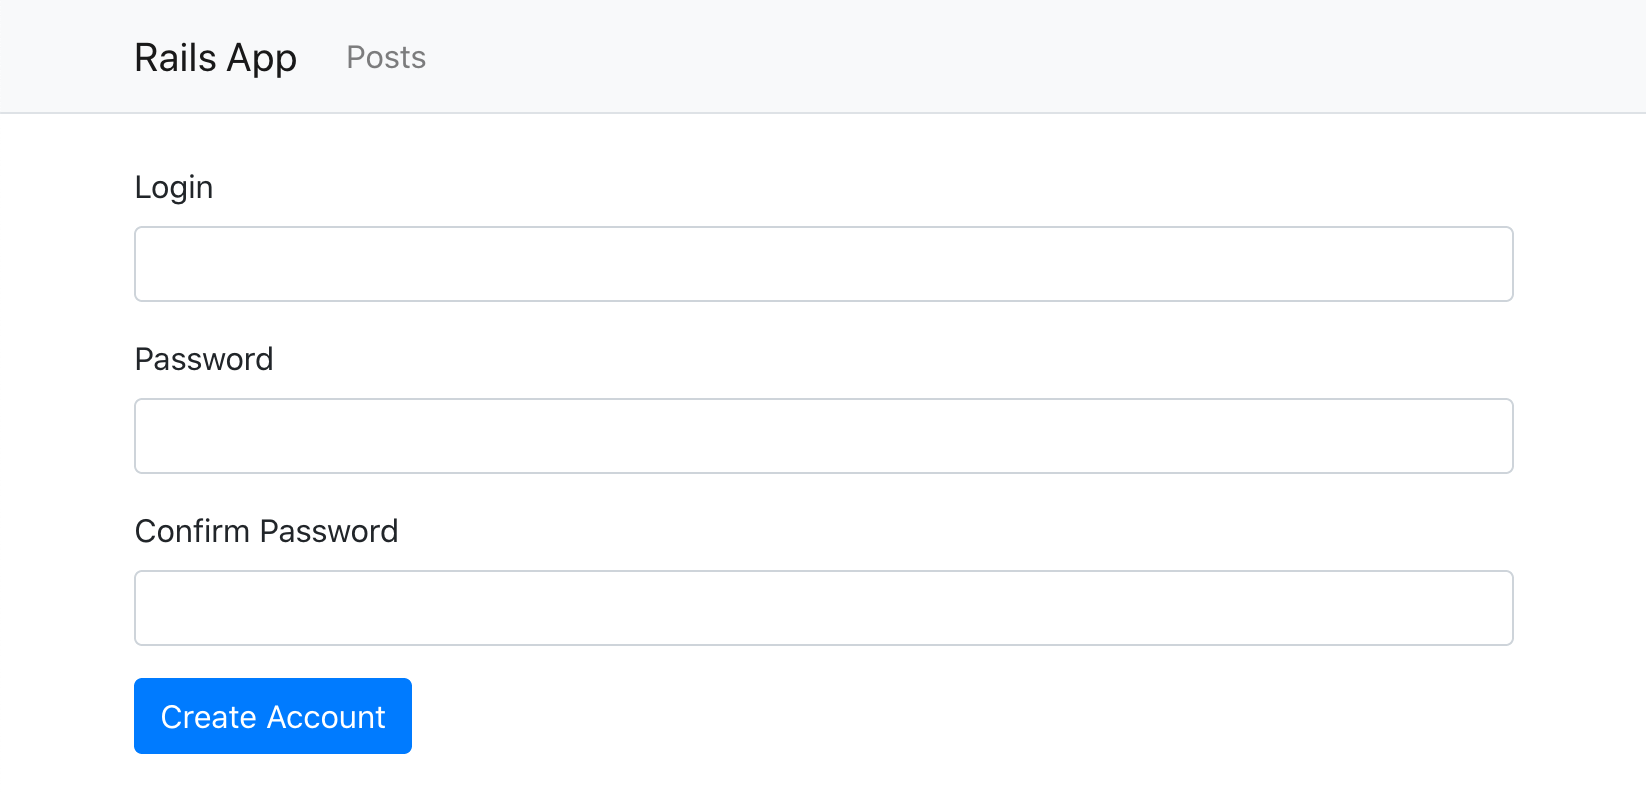
重启Rails服务器后,我们应该能够打开/create-account 页面,看到Rodauth的默认注册表。
添加认证链接
由rodauth-rails生成的Rodauth配置为认证和账户管理提供了几条路线。
$ rails rodauth:routes

# /login                   rodauth.login_path
# /create-account          rodauth.create_account_path
# /verify-account-resend   rodauth.verify_account_resend_path
# /verify-account          rodauth.verify_account_path
# /logout                  rodauth.logout_path
# /remember                rodauth.remember_path
# /reset-password-request  rodauth.reset_password_request_path
# /reset-password          rodauth.reset_password_path
# /change-password         rodauth.change_password_path
# /change-login            rodauth.change_login_path
# /verify-login-change     rodauth.verify_login_change_path
# /close-account           rodauth.close_account_path
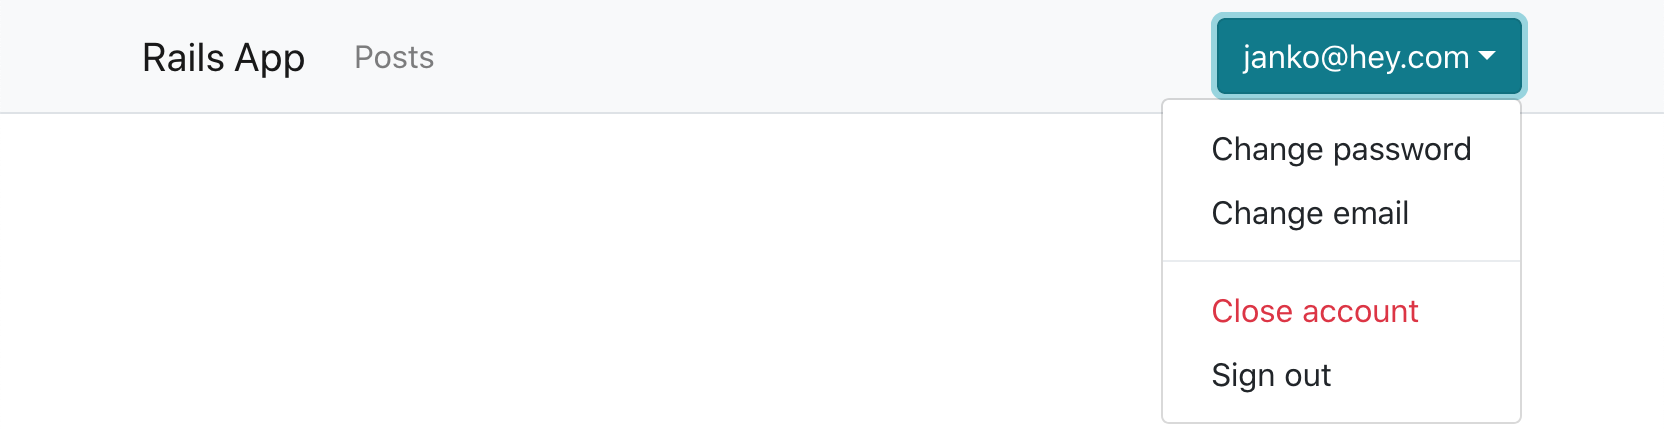
让我们利用这些信息,在我们的导航栏中添加一些主要的认证链接。
<!-- app/views/application/_navbar.html.erb -->
<!-- ... --->
<% if rodauth.logged_in? %>
<div class="dropdown">
<button class="btn btn-info dropdown-toggle" data-bs-toggle="dropdown" type="button">
<%= current_account.email %>
</button>
<div class="dropdown-menu dropdown-menu-end">
<%= link_to "Change password", rodauth.change_password_path, class: "dropdown-item" %>
<%= link_to "Change email", rodauth.change_login_path, class: "dropdown-item" %>
<div class="dropdown-divider"></div>
<%= link_to "Close account", rodauth.close_account_path, class: "dropdown-item text-danger" %>
<%= link_to "Sign out", rodauth.logout_path, data: { turbo_method: :post }, class: "dropdown-item" %>
</div>
</div>
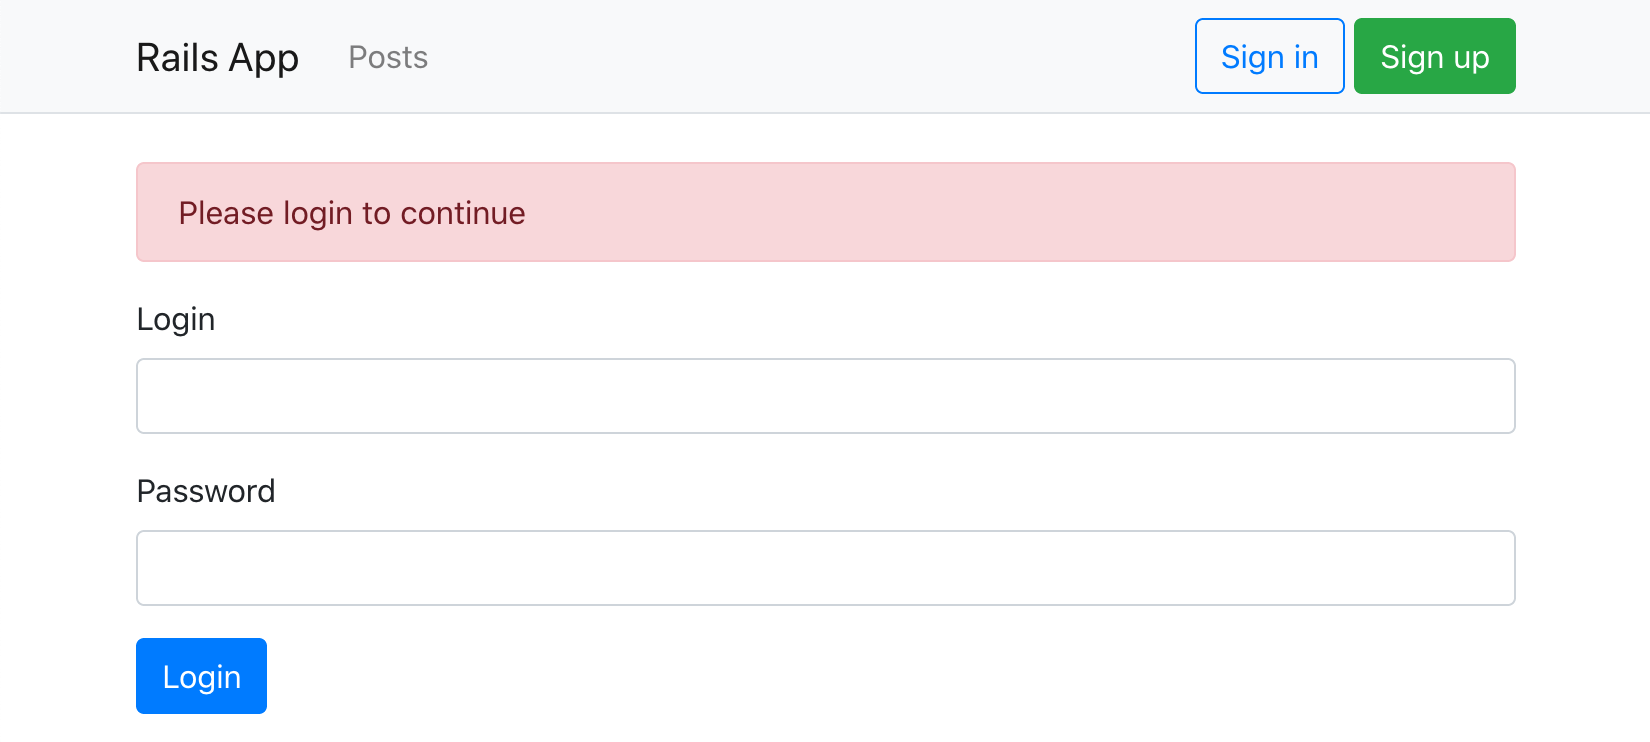
<% else %>
<div>
<%= link_to "Sign in", rodauth.login_path, class: "btn btn-outline-primary" %>
<%= link_to "Sign up", rodauth.create_account_path, class: "btn btn-success" %>
</div>
<% end %>
<!-- ... --->
这里我们使用rodauth-rails提供的#current_account 辅助方法,该方法返回当前登录的账户。
现在我们的应用程序将在用户没有登录的时候显示登录和注册链接。

在登录的时候,用户会看到一些基本的账户管理链接。
要求认证
现在我们有了有效的认证,我们很可能想要求用户对我们应用程序的某些部分进行认证。在我们的案例中,我们想对帖子控制器进行认证。
我们可以在控制器中添加一个before_action 回调,但Rodauth允许我们在Rodauth应用的路由块中这样做,它在每个Rails路由之前被调用。这样,我们就可以把我们的认证逻辑控制在一个地方。
# app/misc/rodauth_app.rb
class RodauthApp < Rodauth::Rails::App
  # ...
  route do |r|
    # ...
    if r.path.start_with?("/posts")
      rodauth.require_authentication
    end
  end
end
现在,如果用户没有登录,访问/posts 页面将被重定向到/login 页面。
我们还想把帖子关联到accounts 表。
$ rails generate migration add_account_id_to_posts account:references
$ rails db:migrate
# app/models/account.rb
class Account < ApplicationRecord
  # ...
  has_many :posts
end
并将它们的范围扩大到post控制器中的当前账户。
# app/controllers/posts_controller.rb
class PostsController < ApplicationController
  # ...
  def index
    @posts = current_account.posts.all
  end
  # ...
  def create
    @post = current_account.posts.build(post_params)
    # ...
  end
  # ...
  private
    def set_post
      @post = current_account.posts.find(params[:id])
    end
    # ...
end
添加新的字段
为了显示用户的电子邮件地址以外的东西,让我们要求用户在注册时输入他们的名字。这也将给我们一个机会来看看Rodauth是如何被配置的。
由于我们需要编辑注册表,让我们先把Rodauth的HTML模板复制到我们的Rails应用程序中。
$ rails generate rodauth:views

# create  app/views/rodauth/_login_form.html.erb
# create  app/views/rodauth/_login_form_footer.html.erb
# create  app/views/rodauth/_login_form_header.html.erb
# create  app/views/rodauth/login.html.erb
# create  app/views/rodauth/multi_phase_login.html.erb
# create  app/views/rodauth/logout.html.erb
# create  app/views/rodauth/create_account.html.erb
# create  app/views/rodauth/verify_account_resend.html.erb
# create  app/views/rodauth/verify_account.html.erb
# create  app/views/rodauth/reset_password_request.html.erb
# create  app/views/rodauth/reset_password.html.erb
# create  app/views/rodauth/change_password.html.erb
# create  app/views/rodauth/change_login.html.erb
# create  app/views/rodauth/close_account.html.erb
我们现在可以打开create_account.erb 模板,添加一个新的name 字段。
<!-- app/views/rodauth/create_account.erb -->
<%= form_with url: rodauth.create_account_path, method: :post, data: { turbo: false } do |form| %>
  <!-- new "name" field -->
  <div class="mb-3">
    <%= form.label :name, "Name", class: "form-label" %>
    <%= form.text_field :name, value: params[:name], required: true, class: "form-control #{"is-invalid" if rodauth.field_error("name")}", aria: ({ invalid: true, describedby: "login_error_message" } if rodauth.field_error("name")) %>
    <%= content_tag(:span, rodauth.field_error("name"), class: "invalid-feedback", id: "login_error_message") if rodauth.field_error("name") %>
  </div>
  <!-- ... -->
<% end %>
由于用户的名字不会被用于认证,让我们把它存储在一个新的profiles 表里,并把profiles 表与accounts 表联系起来。
$ rails generate model Profile account:references name:string
$ rails db:migrate
# app/models/account.rb
class Account < ApplicationRecord
  # ...
  has_one :profile
end
我们现在需要我们的Rodauth应用程序实际处理新的name 参数。我们将验证它是否被填入,并在账户创建后创建相关的配置文件记录。
# app/misc/rodauth_main.rb
class RodauthMain < Rodauth::Rails::Auth
  configure do
    # ...
    before_create_account do
      # Validate presence of the name field
      throw_error_status(422, "name", "must be present") unless param_or_nil("name")
    end
    after_create_account do
      # Create the associated profile record with name
      Profile.create!(account_id: account_id, name: param("name"))
    end
    after_close_account do
      # Delete the associated profile record
      Profile.find_by!(account_id: account_id).destroy
    end
    # ...
  end
end
现在我们可以更新我们的导航条,使用用户的名字而不是他们的电子邮件地址。
  <button class="btn btn-info dropdown-toggle" data-bs-toggle="dropdown" type="button">
-   <%= current_account.email %>
+   <%= current_account.profile.name %>
  </button>

结束语
在本教程中,我们已经使用Rodauth认证框架逐步建立了一个完整的认证和账户管理流程。它支持登录和注销、带有电子邮件验证和宽限期的账户创建、密码变更和密码重置、带有电子邮件验证的电子邮件变更,以及关闭账户功能。我们已经看到了如何添加认证链接,要求对某些路线进行认证,以及在注册表格中添加新的字段。
