

用Rodauth在Rails中进行多因素认证
多因素认证或MFA(广义的双因素认证或2FA)是一种认证方法,用户需要提供两个或两个以上的证据("因素")才能被授予访问权。通常情况下,用户首先要证明只有他们知道的东西(如他们的密码),然后证明只有他们拥有的东西(如另一个设备)。这为用户的账户提供了一个额外的安全层。
最常见的多因素认证方法包括。
-
TOTP(基于时间的一次性密码)--用户在其设备上安装一个应用程序,显示认证码,每30秒刷新一次
-
短信代码- 当应用程序要求时,用户通过短信在其手机上收到认证代码
-
恢复代码- 用户得到一套固定的一次性代码,他们可以在登录时输入(这通常是作为一种备份方法)。
在这篇文章中,我想告诉你如何使用Rodauth将多因素认证添加到Rails应用程序中,Rodauth内置了对上述每种多因素认证方法的支持。与其他方法相比1,Rodauth通过提供完整的端点、默认的HTML模板、会话管理、锁定逻辑等提供了更多的集成体验2。为了保持本教程的重点,我们将只实现前三种方法,因为它们是迄今为止最常见的。
我们将使用rodauth-railsgem。目标功能:允许用户设置TOTP作为他们的主要MFA方法,并使用短信代码和恢复代码作为备份MFA方法。
TOTP
TOTP功能是由Rodauth的 otp功能提供的。它依赖于rotp和rqrcode宝石,所以我们首先安装这些宝石。
$ bundle add rotp rqrcode
接下来,我们需要创建所需的数据库表。为此,我们将使用rodauth-rails提供的迁移生成器。
$ rails generate rodauth:migration otp
# create  db/migrate/20201214200106_create_rodauth_otp.rb

$ rails db:migrate
# == 20201214200106 CreateRodauthOtp: migrating =======================
# -- create_table(:account_otp_keys)
# == 20201214200106 CreateRodauthOtp: migrated ========================
现在我们可以在我们的Rodauth配置中启用otp 功能。
# app/misc/rodauth_main.rb
class RodauthMain < Rodauth::Rails::Auth
  configure do
    # ...
    enable :otp
  end
end
这将在我们的应用程序中添加以下路由。
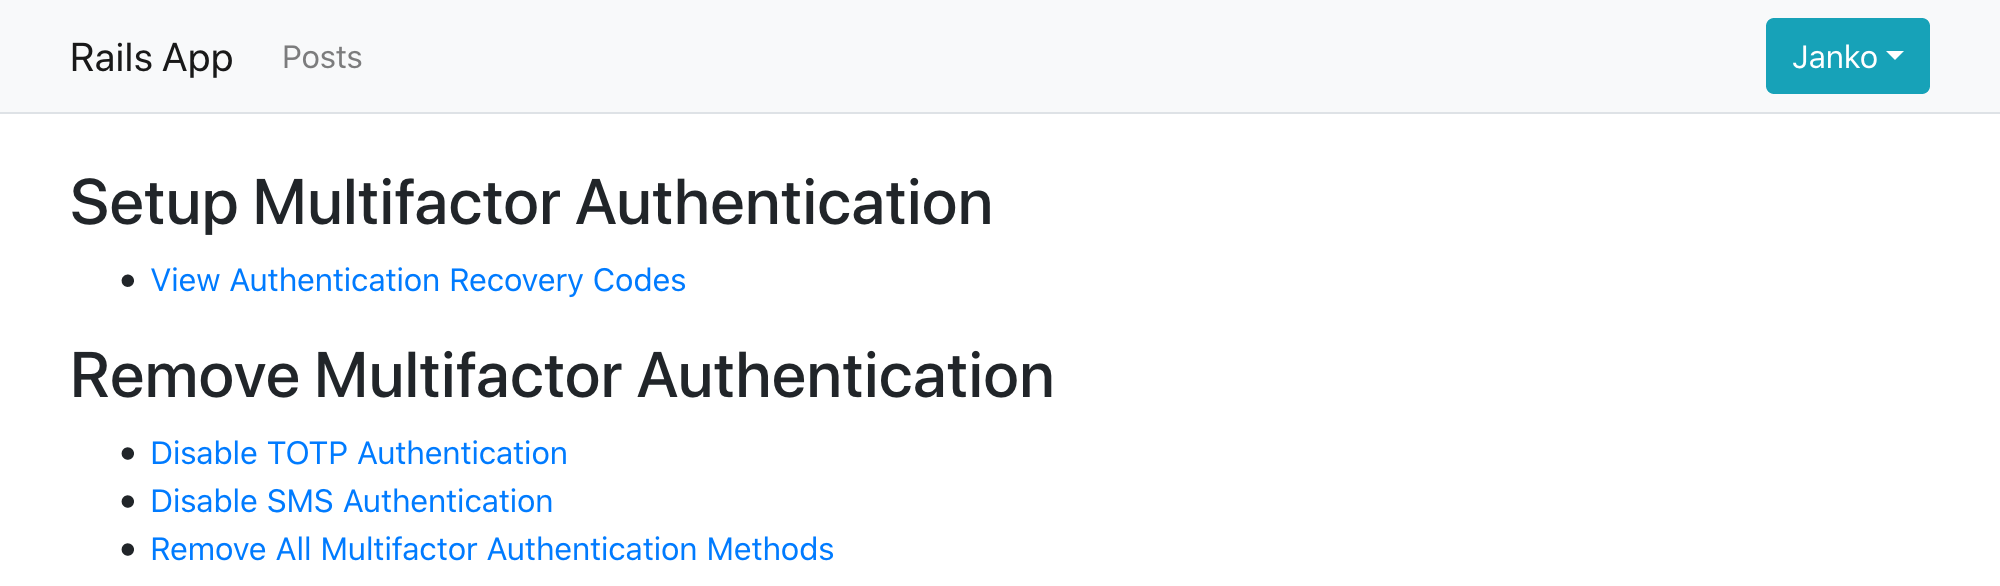
/otp-auth- 通过TOTP代码进行认证/otp-setup- 设置TOTP认证/otp-disable- 禁用TOTP认证/multifactor-manage- 设置或禁用可用的MFA方法/multifactor-auth- 通过可用的MFA方法进行认证/multifactor-disable- 禁用所有MFA方法
为了让用户配置MFA,让我们在我们的视图中显示一个链接到管理MFA方法的/multifactor-manage 路线。
<!-- app/views/application/_navbar.html.erb -->
<% if rodauth.logged_in? %>
  <!-- ... --->
  <%= link_to "Manage MFA", rodauth.two_factor_manage_path, class: "dropdown-item" %>
  <!-- ... --->
<% end %>
现在,当用户登录并点击 "管理MFA "时,他们将被重定向到Rodauth提供的OTP设置页面,即开箱即用3。
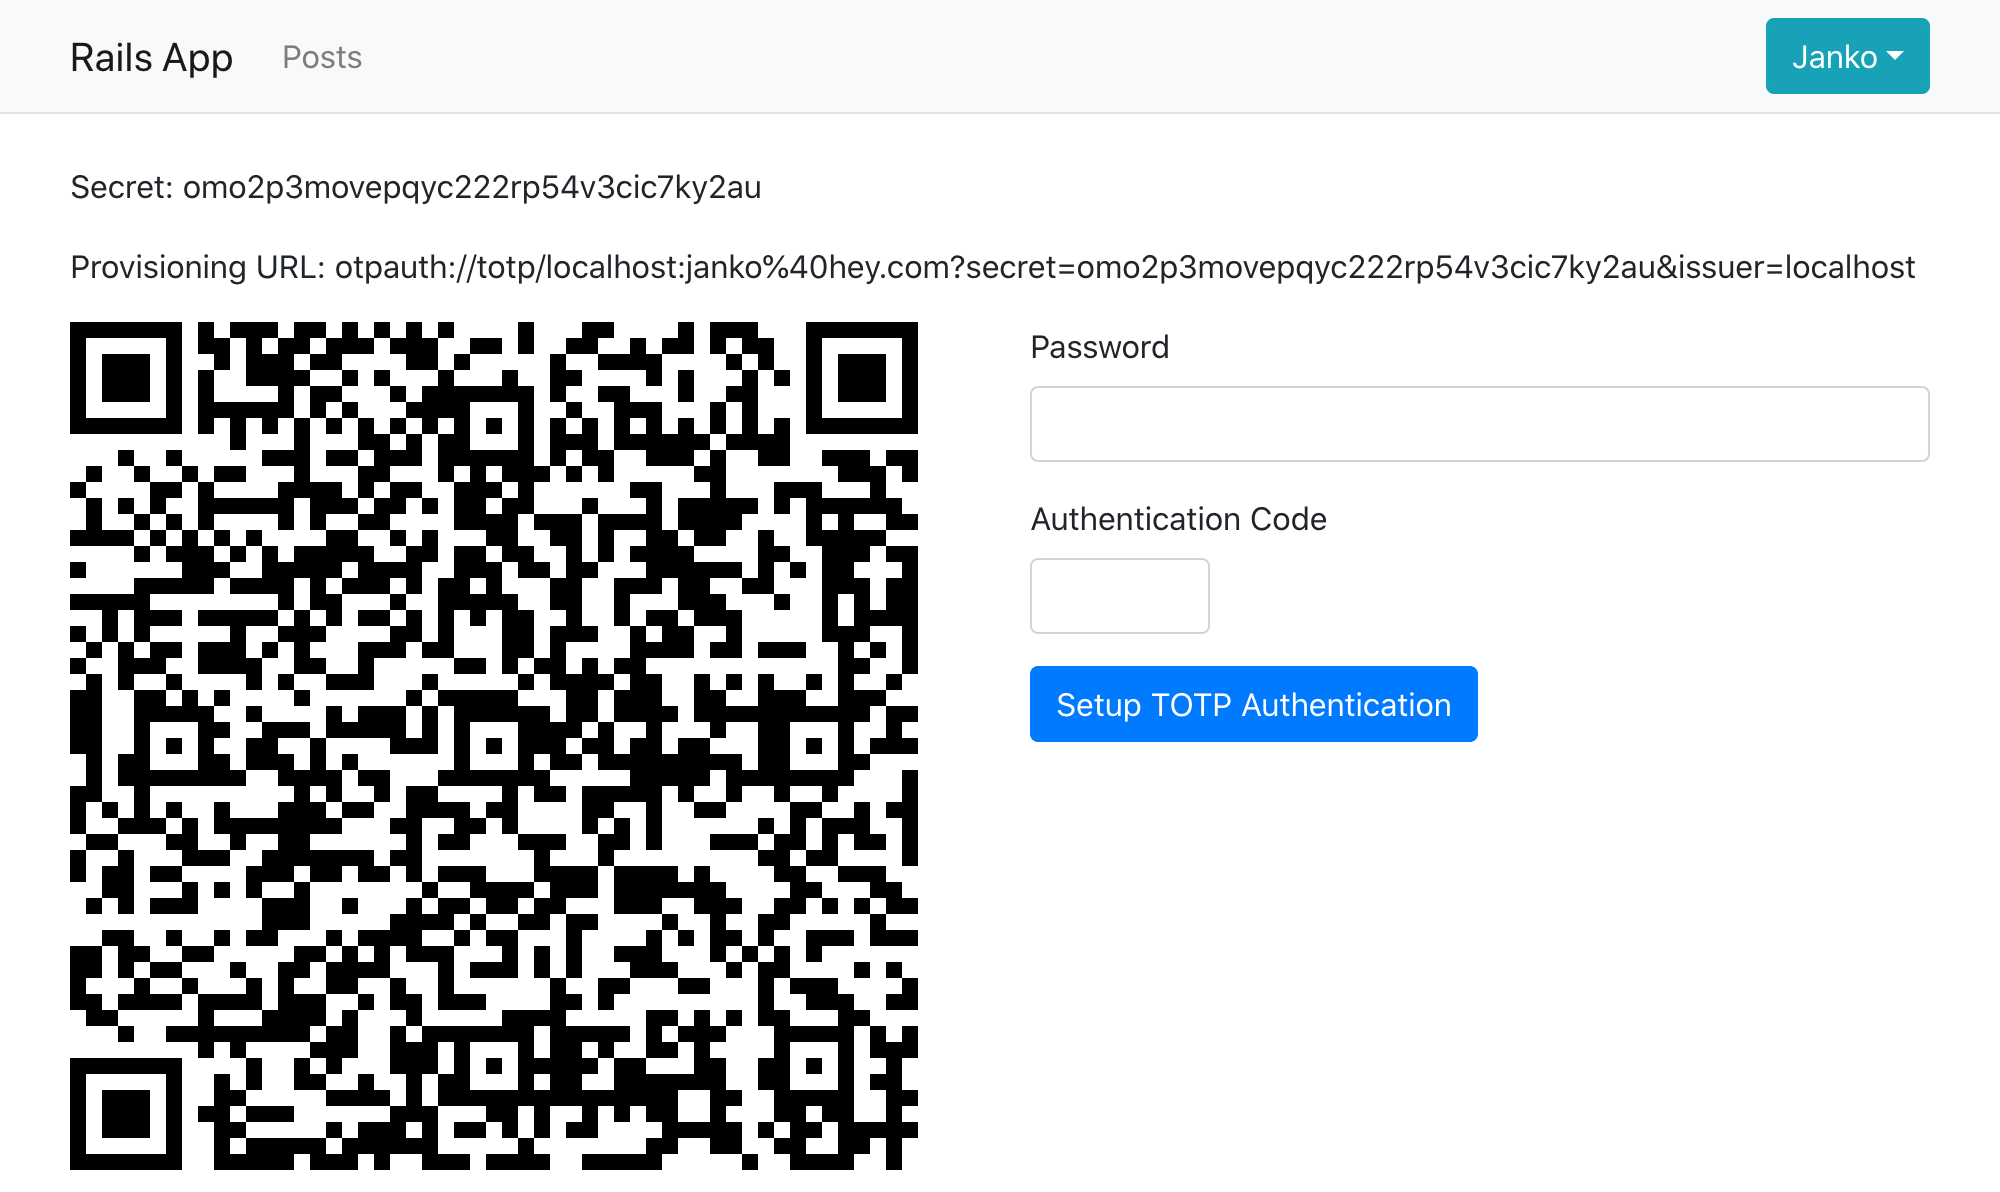
用户现在可以使用谷歌认证器、微软认证器或Authy等认证器应用程序扫描二维码,并输入OTP代码(连同他们当前的密码)来完成OTP的设置。作为一个开发者,你可以使用ROTP gem从OTP的秘密中生成代码。
$ rotp --secret omo2p3movepqyc222rp54v3cic7ky2au
409761
当设置了OTP的用户下次登录时,我们希望他们能被自动重定向到OTP认证页面。我们可以通过要求设置了MFA的登录用户使用第二因素认证来实现这一点,并调整闪光信息,使其感觉是一个登录的一部分。
# app/misc/rodauth_app.rb
class RodauthApp < Rodauth::Rails::App
  # ...
  route do |r|
    # ...
    # require MFA if the user is logged in and has MFA setup
    if rodauth.uses_two_factor_authentication?
      rodauth.require_two_factor_authenticated
    end
  end
end
# app/misc/rodauth_main.rb
class RodauthMain < Rodauth::Rails::Auth
  configure do
    # ...
    # don't show error message when redirected after login
    two_factor_need_authentication_error_flash { flash[:notice] == login_notice_flash ? nil : super() }
    # show generic authentication message
    two_factor_auth_notice_flash { login_notice_flash }
  end
end
恢复代码
在用户设置了TOTP之后,建议也为他们生成一组 "恢复 "代码,保存在某个地方,万一他们失去了对TOTP设备的访问,可以在登录时使用。这个功能是由Rodauth的 recovery_codes功能提供的。
让我们从创建所需的数据库表开始。
$ rails generate rodauth:migration recovery_codes
# create  db/migrate/20201214200106_create_rodauth_recovery_codes.rb

$ rails db:migrate
# == 20201217071036 CreateRodauthRecoveryCodes: migrating =======================
# -- create_table(:account_recovery_codes, {:primary_key=>[:id, :code]})
# == 20201217071036 CreateRodauthRecoveryCodes: migrated ========================
并在我们的Rodauth配置中启用recovery_codes 功能。
# app/misc/rodauth_main.rb
class RodauthMain < Rodauth::Rails::Auth
  configure do
    # ...
    enable :otp, :recovery_codes
  end
end
这将在我们的应用程序中添加以下路线。
/recovery-auth- 通过恢复代码进行认证/recovery-codes- 查看和添加恢复代码
现在我们将覆盖after_otp_setup 钩子,在用户成功设置TOTP后向他们显示恢复代码,而不是默认的重定向。
# app/misc/rodauth_main.rb
class RodauthMain < Rodauth::Rails::Auth
  configure do
    # ...
    # automatically generate recovery codes after enabling first MFA method
    auto_add_recovery_codes? true
    # automatically remove recovery codes after disabling last MFA method
    auto_remove_recovery_codes? true
    # display recovery codes after TOTP setup
    after_otp_setup do
      set_notice_now_flash "#{otp_setup_notice_flash}, please make note of your recovery codes"
      return_response add_recovery_codes_view
    end
  end
end
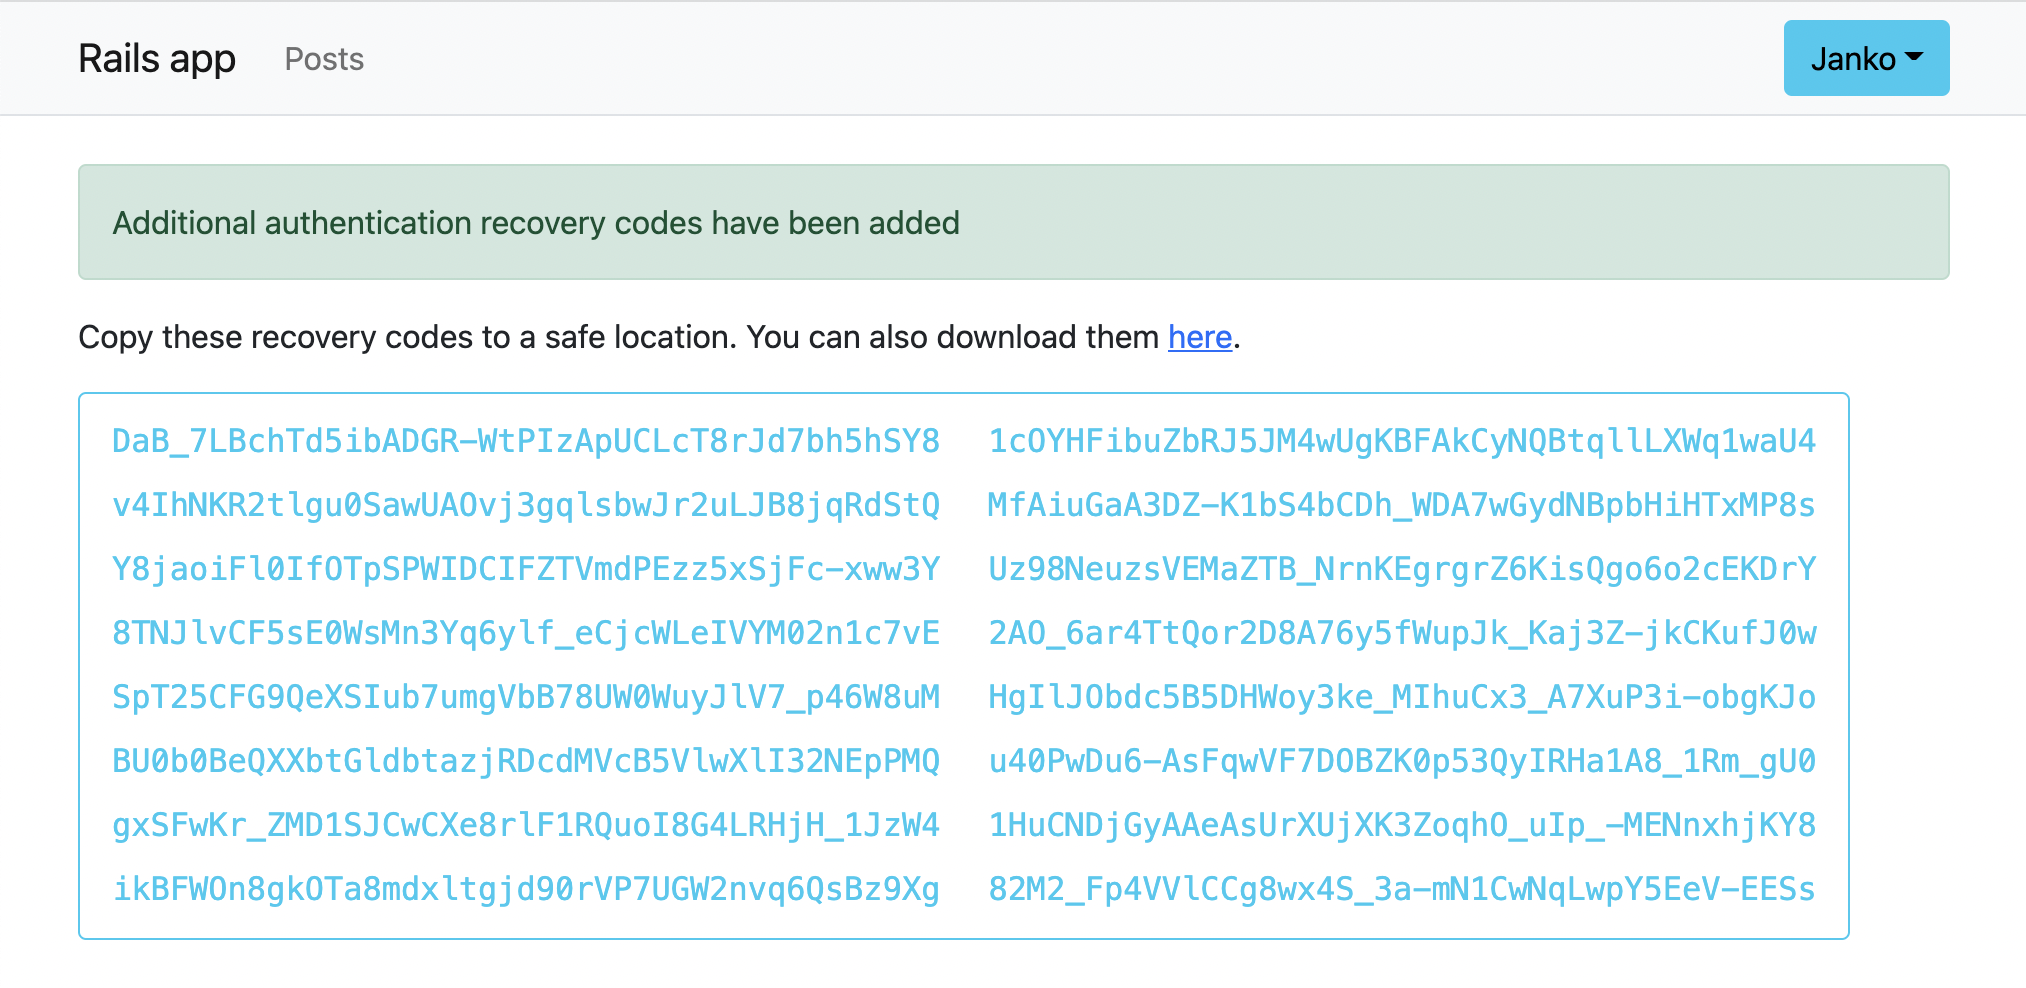
我们还将覆盖默认的Rodauth模板,以更漂亮的方式显示恢复代码。为方便起见,我们还将为恢复代码添加一个下载链接。我们将使用数据URL和download 属性,在普通的HTML中实现下载链接,而不是添加一个新的端点,因为该端点必须有密码保护以保持安全。
$ rails generate rodauth:views recovery_codes
<!-- app/views/rodauth/add_recovery_codes.html.erb -->
<% content_for :title, rodauth.add_recovery_codes_page_title %>

<% if rodauth.recovery_codes.any? %>
  <p class="my-3">
    Copy these recovery codes to a safe location.
    You can also download them <%= link_to "here", "data:,#{rodauth.recovery_codes.join("\n")}", download: "myapp-recovery-codes.txt" %>.
  </p>

  <div class="d-inline-block mb-3 border border-info rounded px-3 py-2">
    <% rodauth.recovery_codes.each_slice(2) do |code1, code2| %>
      <div class="row text-info text-left">
        <div class="col-lg my-1 font-monospace"><%= code1 %></div>
        <div class="col-lg my-1 font-monospace"><%= code2 %></div>
      </div>
    <% end %>
  </div>
<% end %>

<!-- Used for filling in missing recovery codes later on -->
<% if rodauth.can_add_recovery_codes? %>
  <%== rodauth.add_recovery_codes_heading %>
  <%= render template: "rodauth/recovery_codes", layout: false %>
<% end %>
当用户现在设置TOTP时,他们会看到一个类似这样的页面。
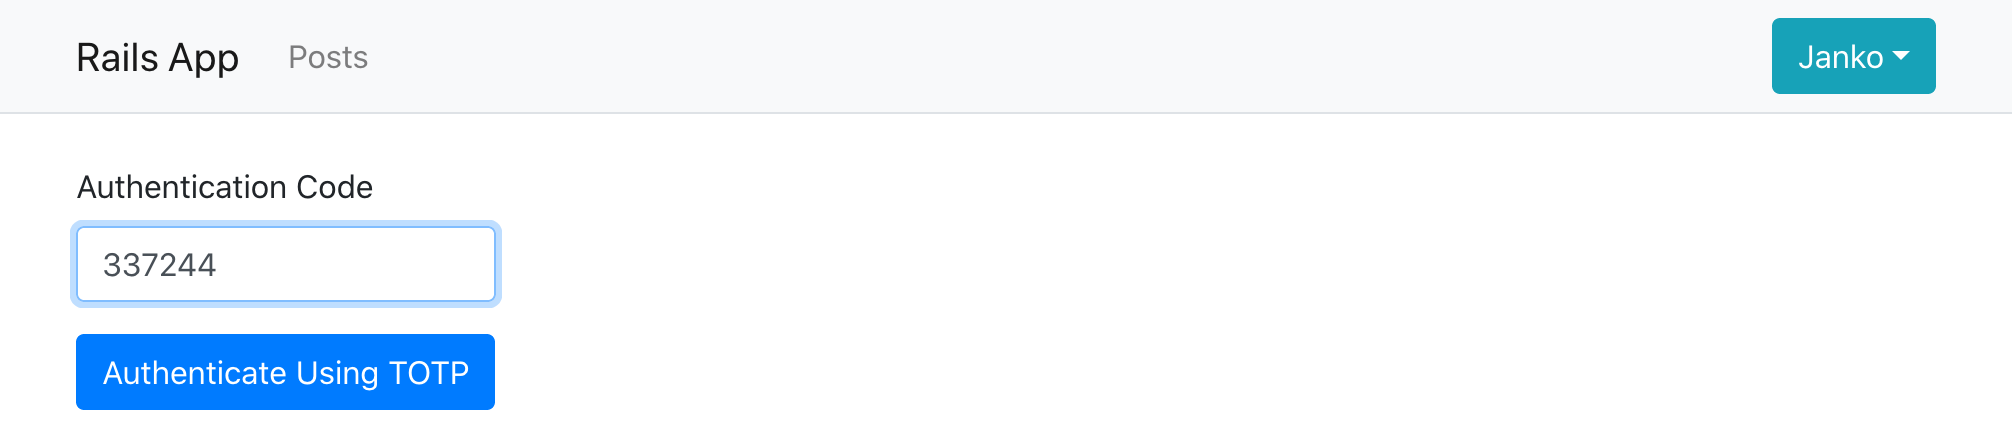
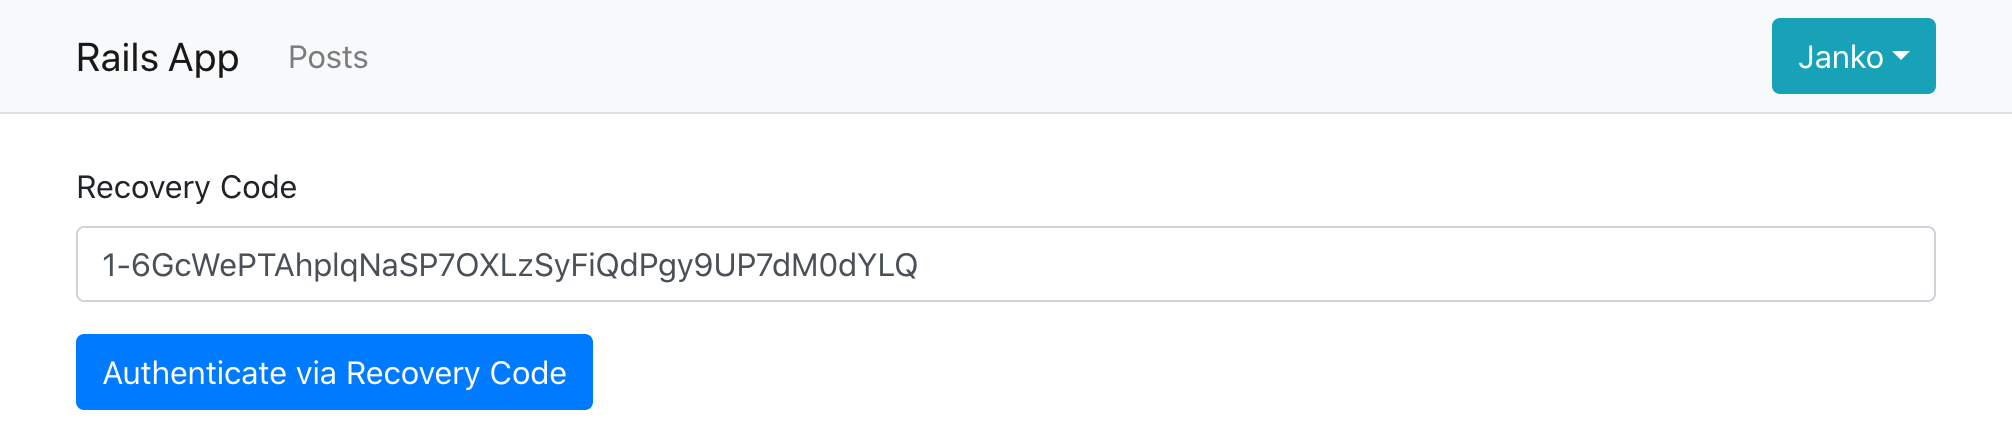
而当他们下次登录他们的账户时,在多因素认证页面,他们可以选择输入恢复代码而不是TOTP。
短信代码
除了TOTP,提供使用短信代码进行第二因素认证的能力也是很好的做法。Rodauth为此提供了一个专门的 sms_codes功能。
为了设置它,我们再次创建所需的数据库表。
$ rails generate rodauth:migration sms_codes
# create  db/migrate/20201219173710_create_rodauth_sms_codes.rb

$ rails db:migrate
# == 20201219173710 CreateRodauthSmsCodes: migrating ==================
# -- create_table(:account_sms_codes)
# == 20201219173710 CreateRodauthSmsCodes: migrated ===================
并在Rodauth配置中启用sms_codes 功能。
# app/misc/rodauth_main.rb
class RodauthMain < Rodauth::Rails::Auth
  configure do
    # ...
    enable :otp, :recovery_codes, :sms_codes
  end
end
这将在我们的应用程序中添加以下路线。
/sms-request- 请求发送短信代码/sms-auth- 通过短信代码进行认证/sms-setup- 设置短信代码认证/sms-confirm- 确认所提供的电话号码/sms-disable- 禁用短信代码认证
当要求发送短信代码时,Rodauth用配置的电话号码和相应的文本信息调用sms_send 方法。这个方法默认没有定义,因为Rodauth不知道我们要如何发送短信,而是希望我们能实现sms_send 。
# app/misc/rodauth_main.rb
class RodauthMain < Rodauth::Rails::Auth
  configure do
    # ...
    sms_send do |phone, message|
      # we need to implement this
    end
  end
end
我们将使用Twilio来发送短信。假设我们已经设置了一个账户,我们将把账户的SID、Auth令牌和电话号码添加到Rails凭证中。
$ rails credentials:edit
twilio:
  account_sid: <YOUR_ACCOUNT_SID>
  auth_token: <YOUR_AUTH_TOKEN>
  phone_number: <YOUR_PHONE_NUMBER>
接下来,我们将安装twilio-rubygem,并为Twilio客户端创建一个包装类,使用配置的凭证。
$ bundle add twilio-ruby
# app/misc/twilio_client.rb
class TwilioClient
  Error              = Class.new(StandardError)
  InvalidPhoneNumber = Class.new(Error)

  def initialize
    @account_sid = Rails.application.credentials.twilio.account_sid!
    @auth_token = Rails.application.credentials.twilio.auth_token!
    @phone_number = Rails.application.credentials.twilio.phone_number!
  end

  def send_sms(to, message)
    client.messages.create(from: @phone_number, to: to, body: message)
  rescue Twilio::REST::RestError => error
    # more details here: https://www.twilio.com/docs/api/errors/21211
    raise TwilioClient::InvalidPhoneNumber, error.message if error.code == 21211
    raise TwilioClient::Error, error.message
  end

  def client
    Twilio::REST::Client.new(@account_sid, @auth_token)
  end
end
最后,我们将使用我们新的TwilioClient 类实现sms_send 。我们将把短信发送错误转换成验证错误,确保我们回滚包装数据库事务,以防止电话号码和代码被持久化。
# app/misc/rodauth_main.rb
class RodauthMain < Rodauth::Rails::Auth
  configure do
    # ...
    sms_send do |phone, message|
      twilio = TwilioClient.new
      twilio.send_sms(phone, message)
    rescue TwilioClient::Error => error
      db.rollback_on_exit
      throw_error_status(422, sms_phone_param, sms_invalid_phone_message) if error.is_a?(TwilioClient::InvalidPhoneNumber)
      throw_error_status(500, sms_phone_param, "sending the SMS code failed")
    end
  end
end
当用户现在访问多因素管理页面上的短信验证设置页面时,他们可以输入他们的电话号码和密码,然后输入他们收到的短信代码来完成短信验证设置。
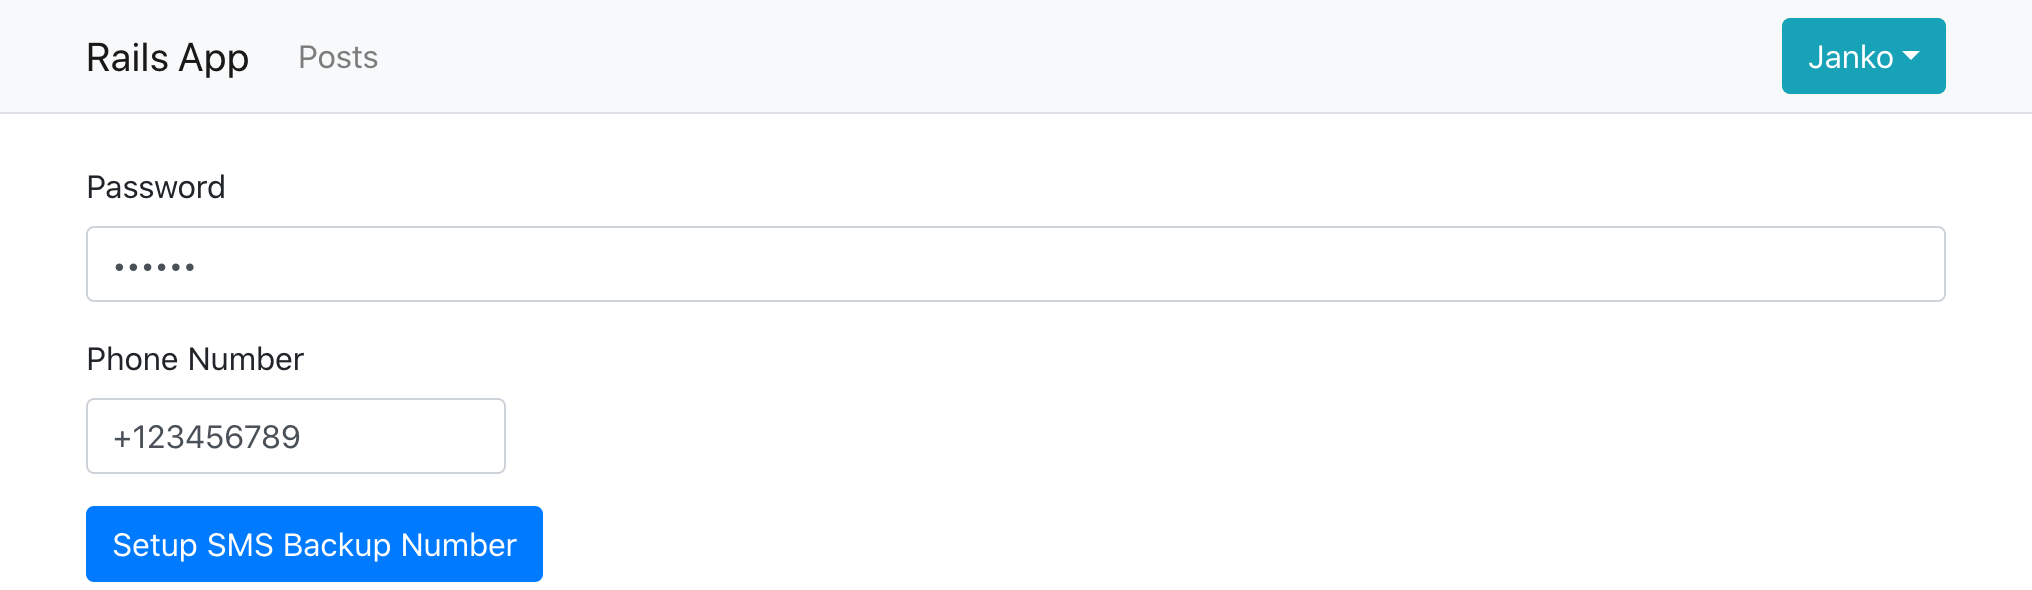
之后,当用户下次登录时,除了通过TOTP或恢复码进行认证外,他们现在还可以选择通过短信进行认证。
禁用多因素认证
除了设置和认证,Rodauth还提供了禁用任何MFA方法的端点,这需要用户确认他们的密码。
/otp-disable- 禁用OTP认证/sms-disable- 禁用多因素认证/multifactor-disable- 禁用所有多因素方法
禁用以前设置的MFA方法的链接会自动显示在多因素管理页面上。
禁用一个MFA方法将负责从相应的数据库表中删除与该账户相关的任何记录。
结束语
在本教程中,我们展示了如何用Rodauth和rodauth-rails在Rails中添加多因素认证功能。我们已经使用户能够设置TOTP作为他们的主要MFA方法,之后他们会收到一组恢复代码,并有可能也设置SMS作为备份MFA方法。
我们看到,Rodauth为管理多种MFA方法提供了完整的端点和默认的HTML模板,而且与其他方法相比,它通常提供了更多的集成体验。鉴于多因素认证正成为一个越来越普遍的要求,有一个框架能以与其他认证功能相同的标准支持它是非常有用的。
