

继续上次我们写的绝对最小的Livebook智能单元,我们将写一个LiveBook智能单元,让我们能够轻松查询GitHub GraphQLAPI。
上一次
上次我们写了一个最简单的智能单元。它只打印出几个硬编码的字符串,完全忽略了前端的用户体验。
这一次我们将写一个交互式的智能单元。我们的目标是让用户粘贴一个GitHubAPI令牌,一个GraphQL查询,并命名一个将接收查询结果的变量。智能单元格将执行GraphQL查询,并将结果存储在给定的变量名称中。
查询 GitHub 的 GraphQLAPI
如果你只是想跳过通过LiveBook查询GitHub GraphQLAPI,那么你可以简单地启动一个新的Livebook笔记本,添加github_graphql_smartcell 包,添加一个 "GitHub GraphQL Query "智能单元,就可以了
GitHub GraphQL智能单元在
但是,如果你想阅读如何实现一个更复杂的智能单元,那么我们就开始吧!
让我们来写一个智能的智能单元
我们的智能单元将处理对GitHub GraphQLAPI进行GraphQL查询。
同样,我们的首要工作是弄清楚我们希望我们的智能单元生成的代码模式:
- 我们的智能单元需要哪些(如果有的话)依赖性来运作?Kino用于智能单元功能,Neuron用于处理GraphQL查询,jason用于处理JSON。
- 我们希望我们的单元格有什么最终结果?打印一些输出?将结果分配给一个变量?与LiveBook的用户进行互动?用户应该能够填写GitHubAPItoken、graphql查询和变量名称来接收结果。
像往常一样,首先我们要对所需的代码进行加注。
秒杀代码
我们将使用优秀的Neuron来作为我们的GraphQL客户端,并使用jason 来处理JSON。
我们还需要一个GitHub的个人访问令牌,如他们的文档所述。用GraphQL形成调用
LiveBook是一个完美的原型设计环境,让我们来做一个LiveBook!
使用软件包添加UI来查找并添加neuron和jason,或者复制这个设置代码。然后运行安装程序来安装依赖项:
Mix.install([
  {:neuron, "~> 5.0"},
  {:jason, "~> 1.3"}
])
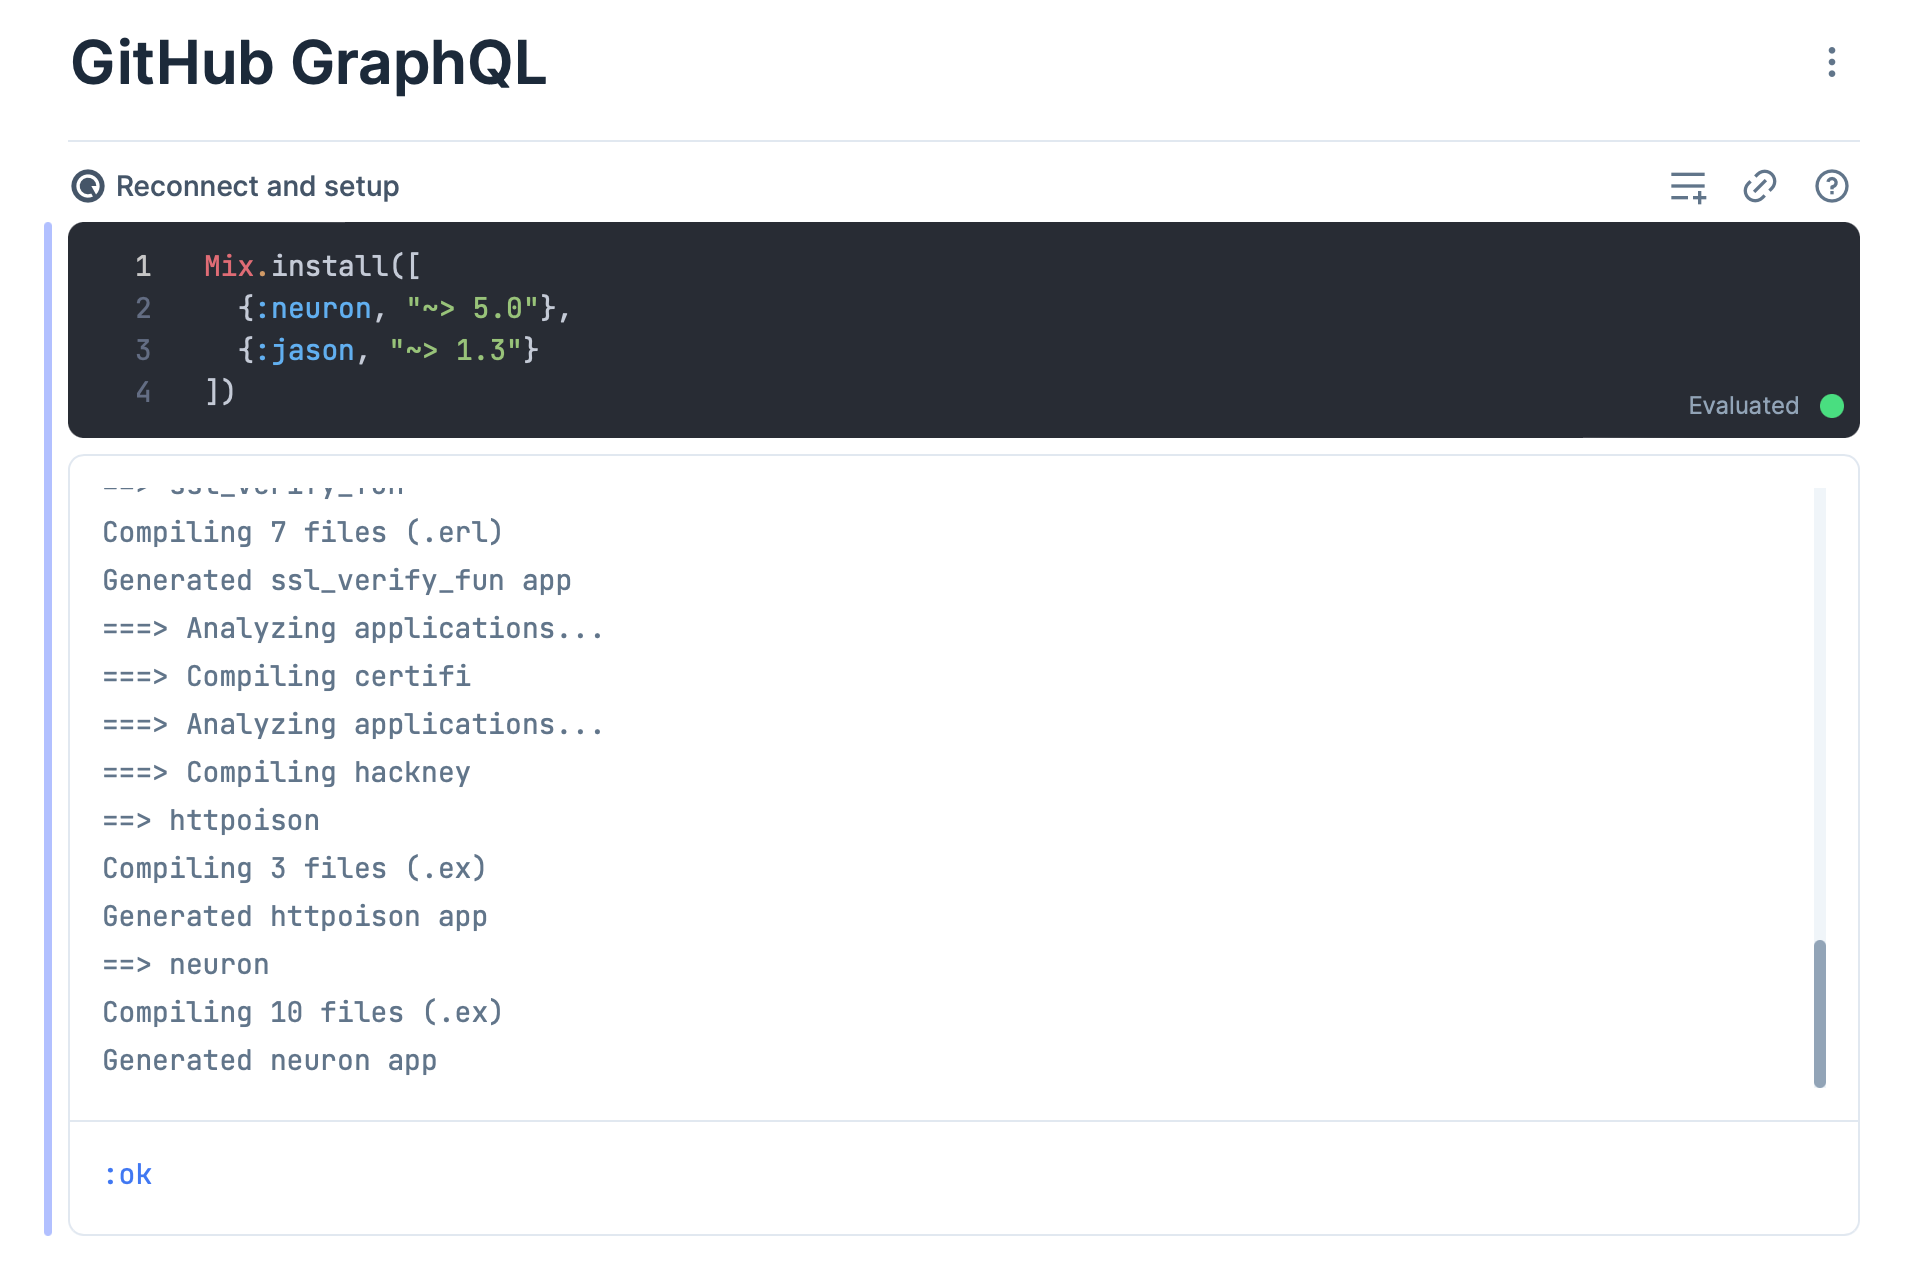 在我们的LiveBook中添加GraphQL的依赖项
进行第一次GitHub GraphQL调用
信不信由你,我们已经准备好进行GitHub GraphQLAPI调用了。
把这段代码放到一个代码块中并运行它:
token = "ghp_YOUR_TOKEN_HERE"
endpoint = "https://api.github.com/graphql"

Neuron.query("{ viewer { login }}", %{},
  url: endpoint,
  headers: [authorization: "Bearer #{token}"]
)
如果一切顺利,你应该看到结果了
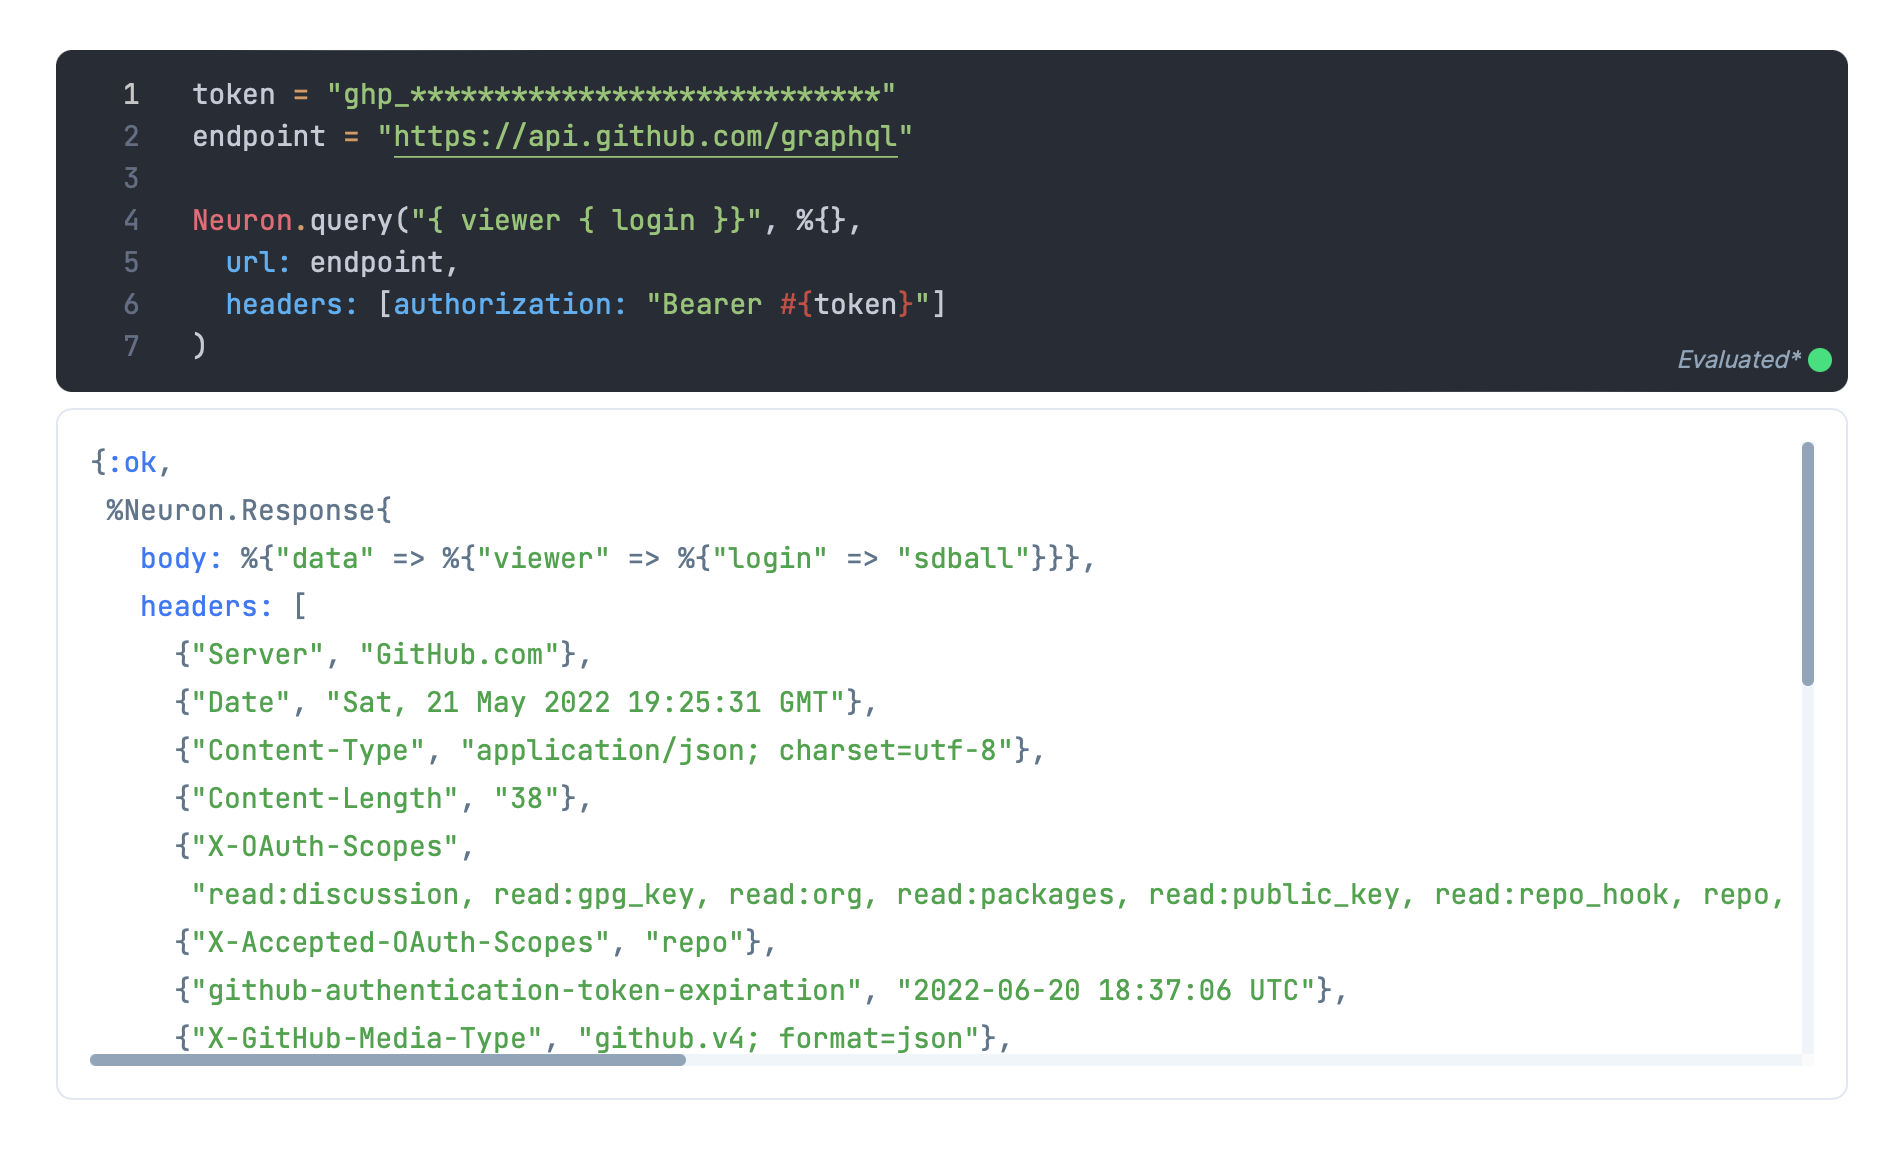 成功查询了GitHub GraphQL
{:ok,
 %Neuron.Response{
   body: %{"data" => %{"viewer" => %{"login" => "sdball"}}},
   headers: [
     {"Server", "GitHub.com"},
     {"Date", "Sat, 21 May 2022 19:25:31 GMT"},
     {"Content-Type", "application/json; charset=utf-8"},
     {"Content-Length", "38"},
     {"X-OAuth-Scopes",
      "read:discussion, read:gpg_key, read:org, read:packages, read:public_key, read:repo_hook, repo, user"},
     {"X-Accepted-OAuth-Scopes", "repo"},
     {"github-authentication-token-expiration", "2022-06-20 18:37:06 UTC"},
     {"X-GitHub-Media-Type", "github.v4; format=json"},
     {"X-RateLimit-Limit", "5000"},
     {"X-RateLimit-Remaining", "4997"},
     {"X-RateLimit-Reset", "1653161963"},
     {"X-RateLimit-Used", "3"},
     {"X-RateLimit-Resource", "graphql"},
     {"Access-Control-Expose-Headers",
      "ETag, Link, Location, Retry-After, X-GitHub-OTP, X-RateLimit-Limit, X-RateLimit-Remaining, X-RateLimit-Used, X-RateLimit-Resource, X-RateLimit-Reset, X-OAuth-Scopes, X-Accepted-OAuth-Scopes, X-Poll-Interval, X-GitHub-Media-Type, X-GitHub-SSO, X-GitHub-Request-Id, Deprecation, Sunset"},
     {"Access-Control-Allow-Origin", "*"},
     {"Strict-Transport-Security", "max-age=31536000; includeSubdomains; preload"},
     {"X-Frame-Options", "deny"},
     {"X-Content-Type-Options", "nosniff"},
     {"X-XSS-Protection", "0"},
     {"Referrer-Policy", "origin-when-cross-origin, strict-origin-when-cross-origin"},
     {"Content-Security-Policy", "default-src 'none'"},
     {"Vary", "Accept-Encoding, Accept, X-Requested-With"},
     {"X-GitHub-Request-Id", "E1DB:33B8:695955:15E21B7:62893CAB"}
   ],
   status_code: 200
 }}
头文件里有很多东西,但没有我们需要的。至少我们现在还不需要。我们需要的关键数据是响应主体。
%{"data" => %{"viewer" => %{"login" => "sdball"}}}
让我们用一些模式匹配和一些代码结构来为我们提供良好的抽象来获取数据。
抽象我们的查询接口
开始一个新的代码单元。这将是我们负责处理GitHub GraphQL查询的模块:
defmodule GitHub.GraphQL do
end
我们的模块将有一个query/2 方法,它将接受一个端点和一个配置图:
defmodule GitHub.GraphQL do
  def query(query, config) do
    Neuron.query(query, %{},
      url: config[:endpoint],
      headers: [authorization: "Bearer #{config[:token]}"]
    )
  end
end
我们可以像这样调用query/2
"""
{ viewer { login }}
"""
|> GitHub.GraphQL.query(
  endpoint: "https://api.github.com/graphql",
  token: "ghp_************************************"
)
然后就成功了
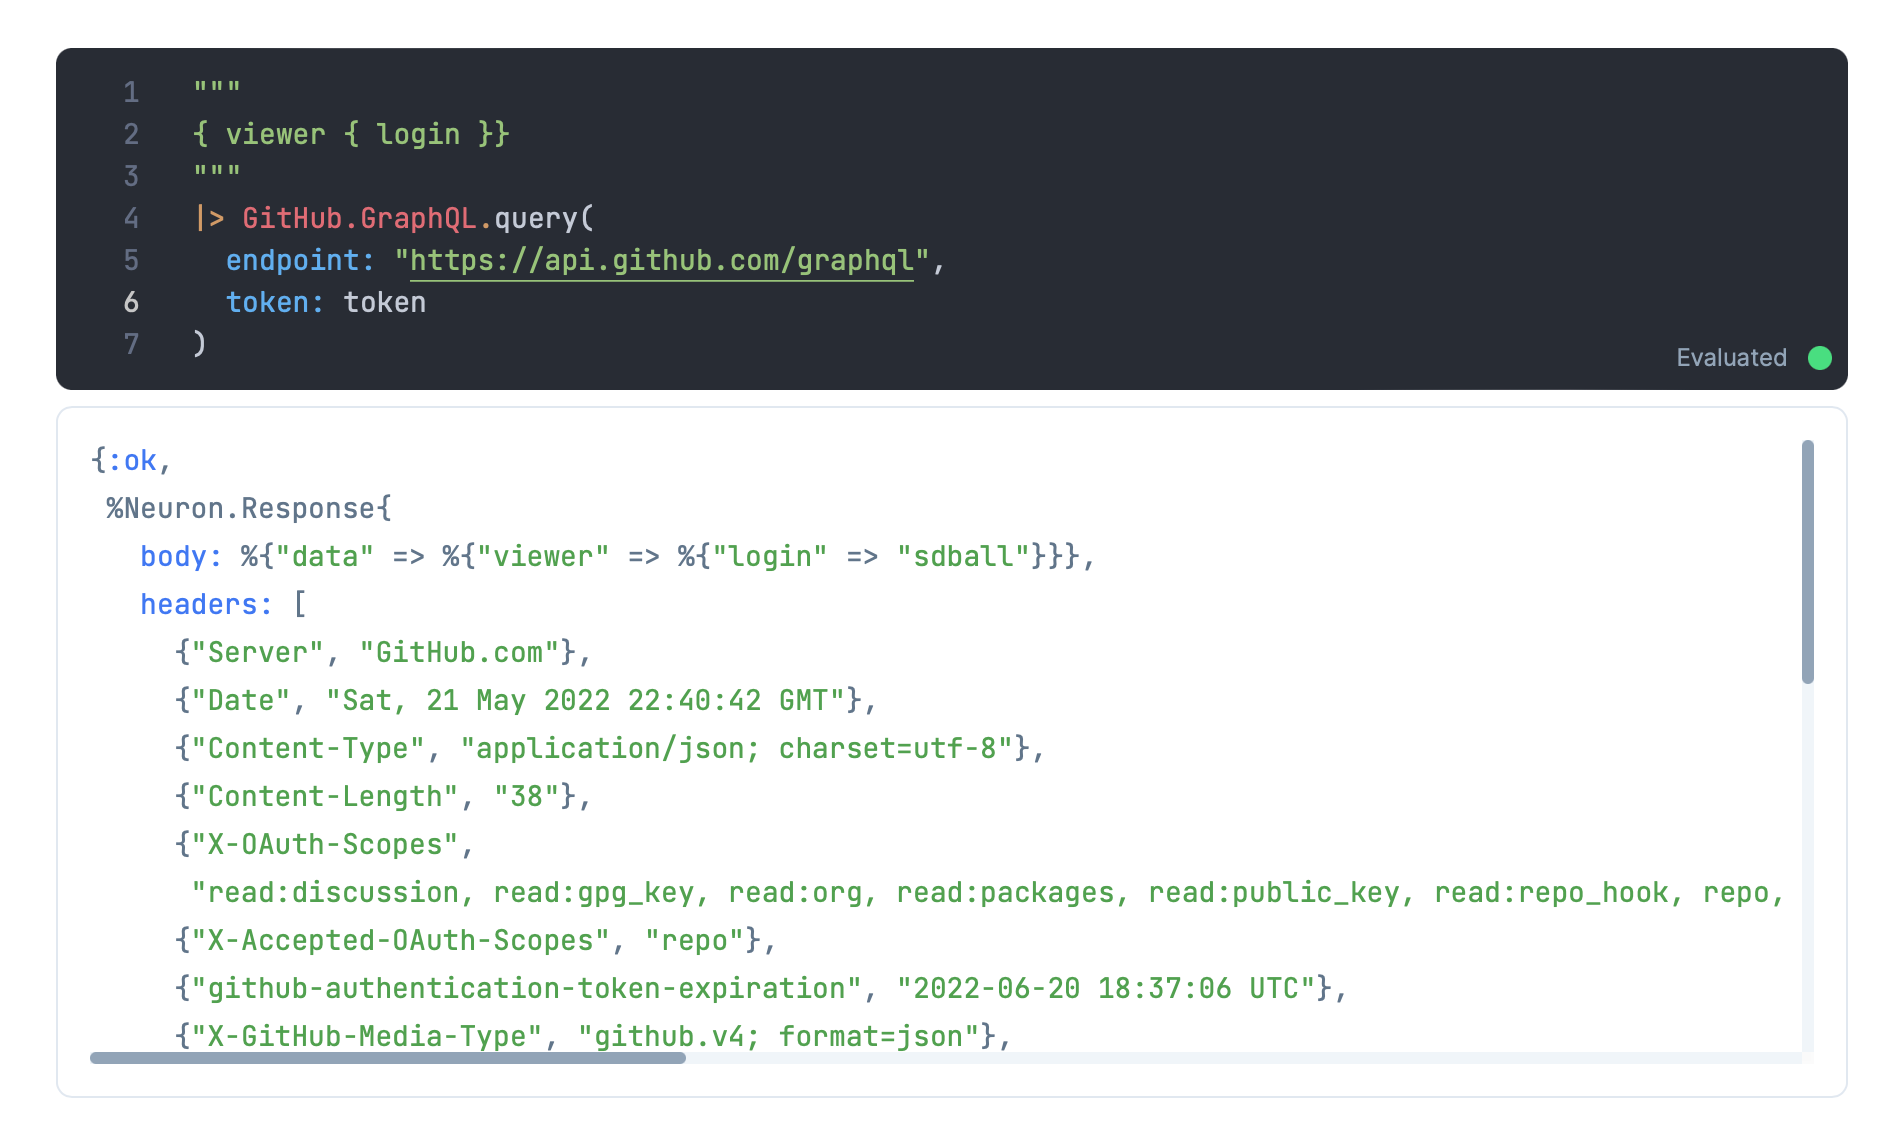 成功地从我们的模块中查询到了GitHub GraphQL
现在让我们把实际的数据提取出来,作为一种方便,同时识别一些错误模式。
defmodule GitHub.GraphQL do
  def query(query, config) do
    query
    |> request(config)
    |> case do
      {:ok, %Neuron.Response{status_code: 200, body: %{"errors" => errors}}} ->
        {:error, errors}
      {:ok, %Neuron.Response{status_code: 200, body: %{"data" => data}}} ->
        {:ok, data}
      {:error, %Neuron.Response{body: body}} ->
        {:error, body}
      error ->
        error
    end
  end

  def request(query, config) do
    Neuron.query(query, %{},
      url: config[:endpoint],
      headers: [authorization: "Bearer #{config[:token]}"]
    )
  end
end
在那里,现在我们可以显示正文,如果响应是好的,或者我们识别的各种错误的关键上下文,或者任何错误响应不匹配的东西。
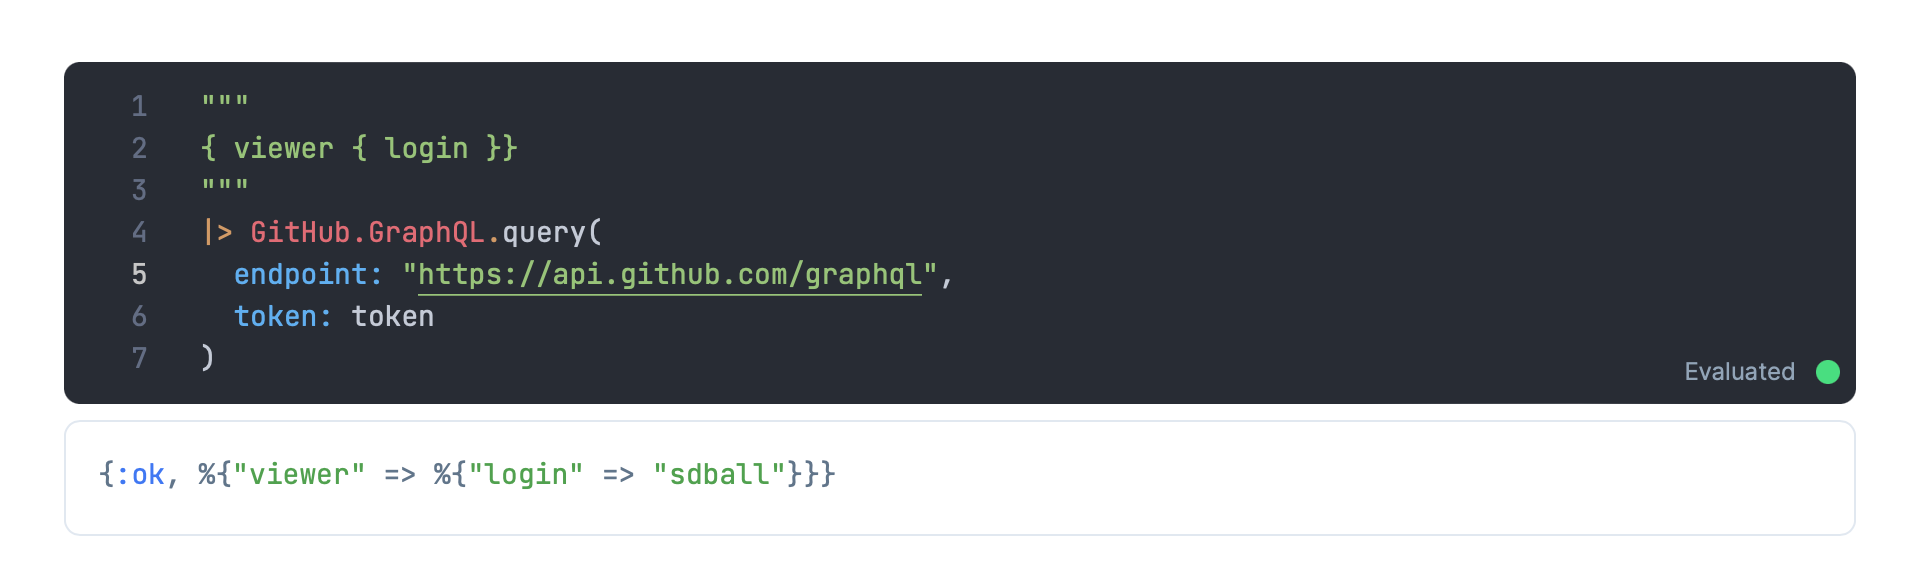 我们的查询工作
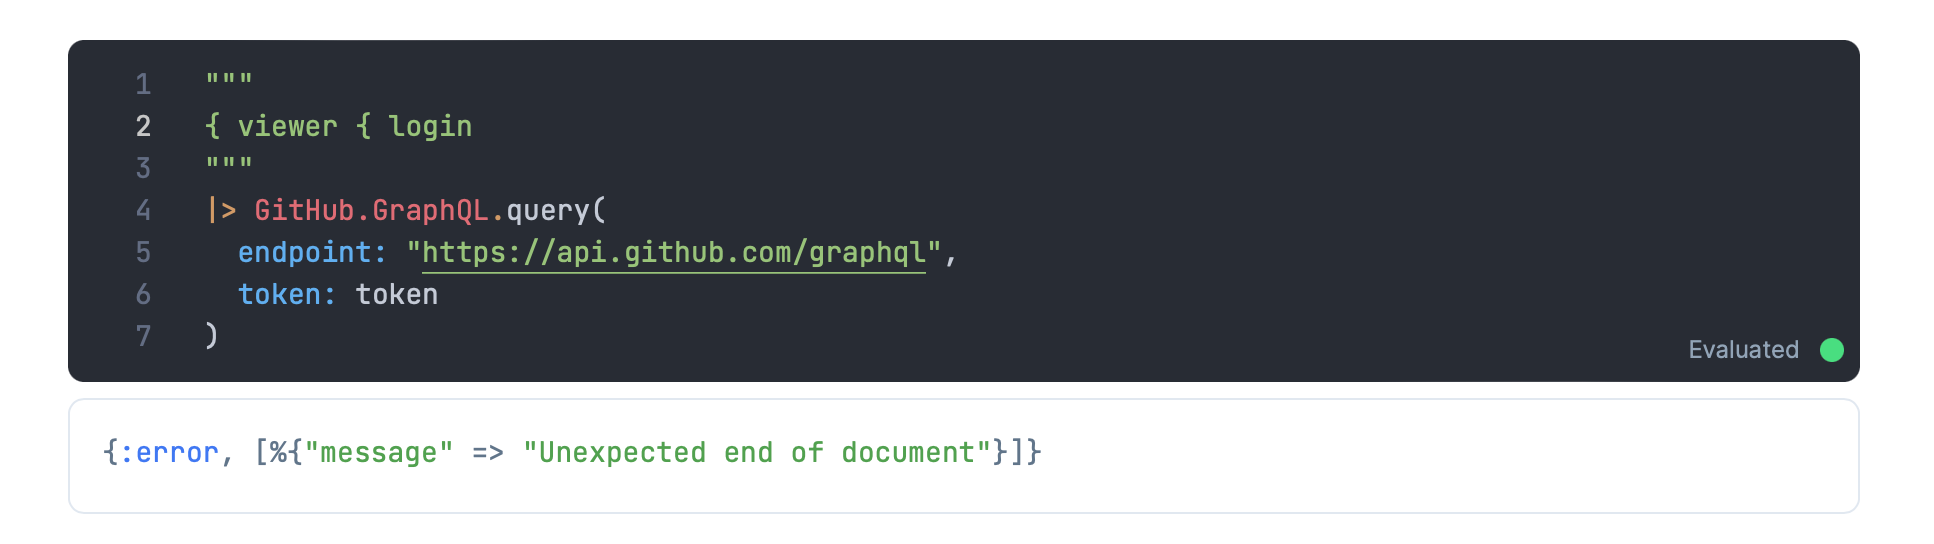 畸形的GraphQL查询的错误
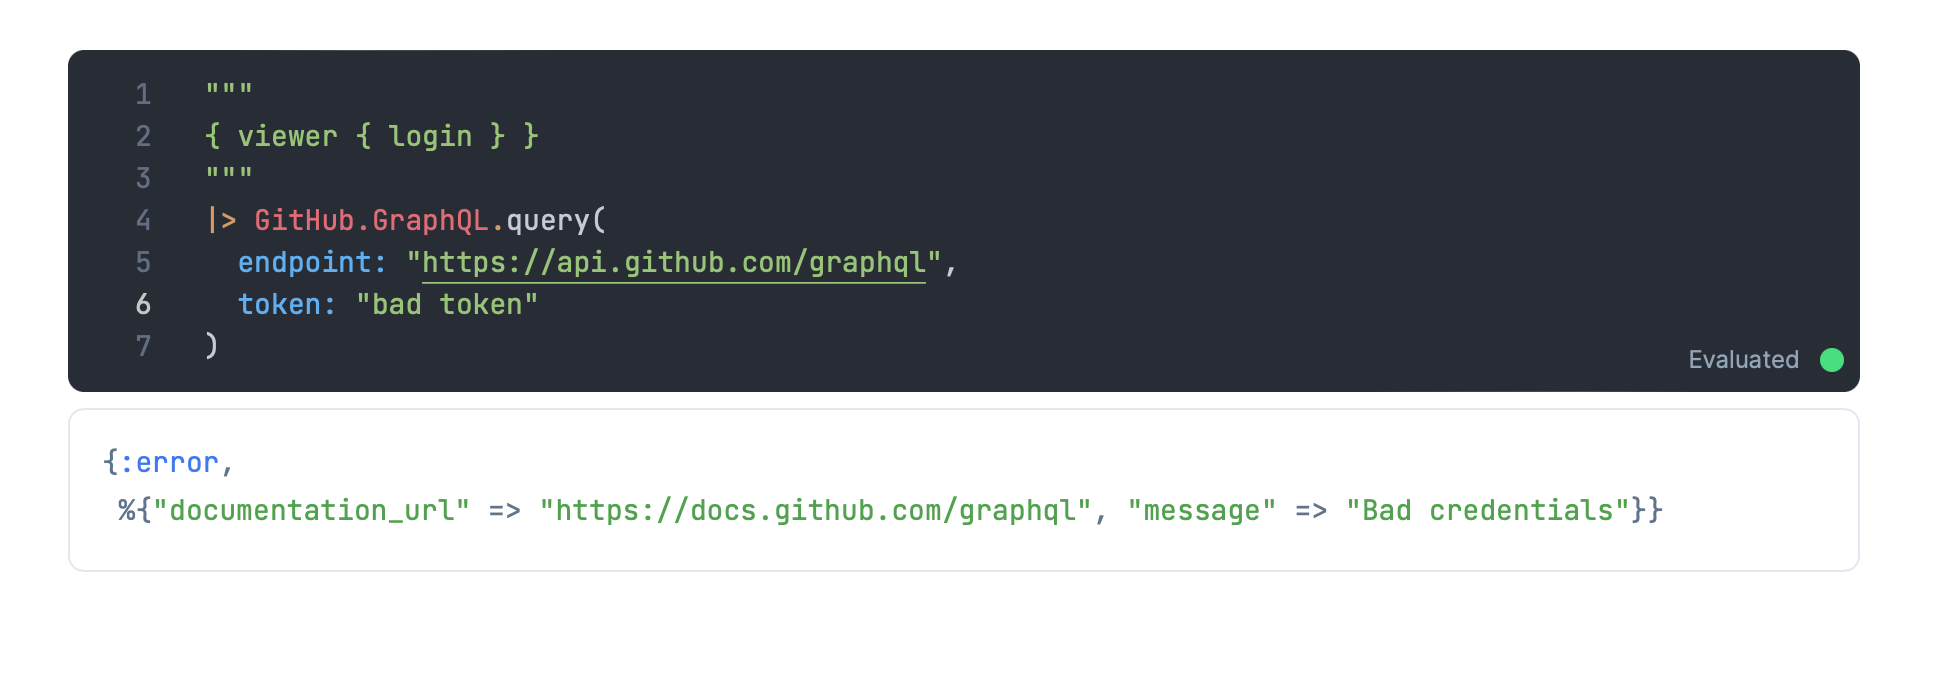 糟糕的GitHub令牌的错误
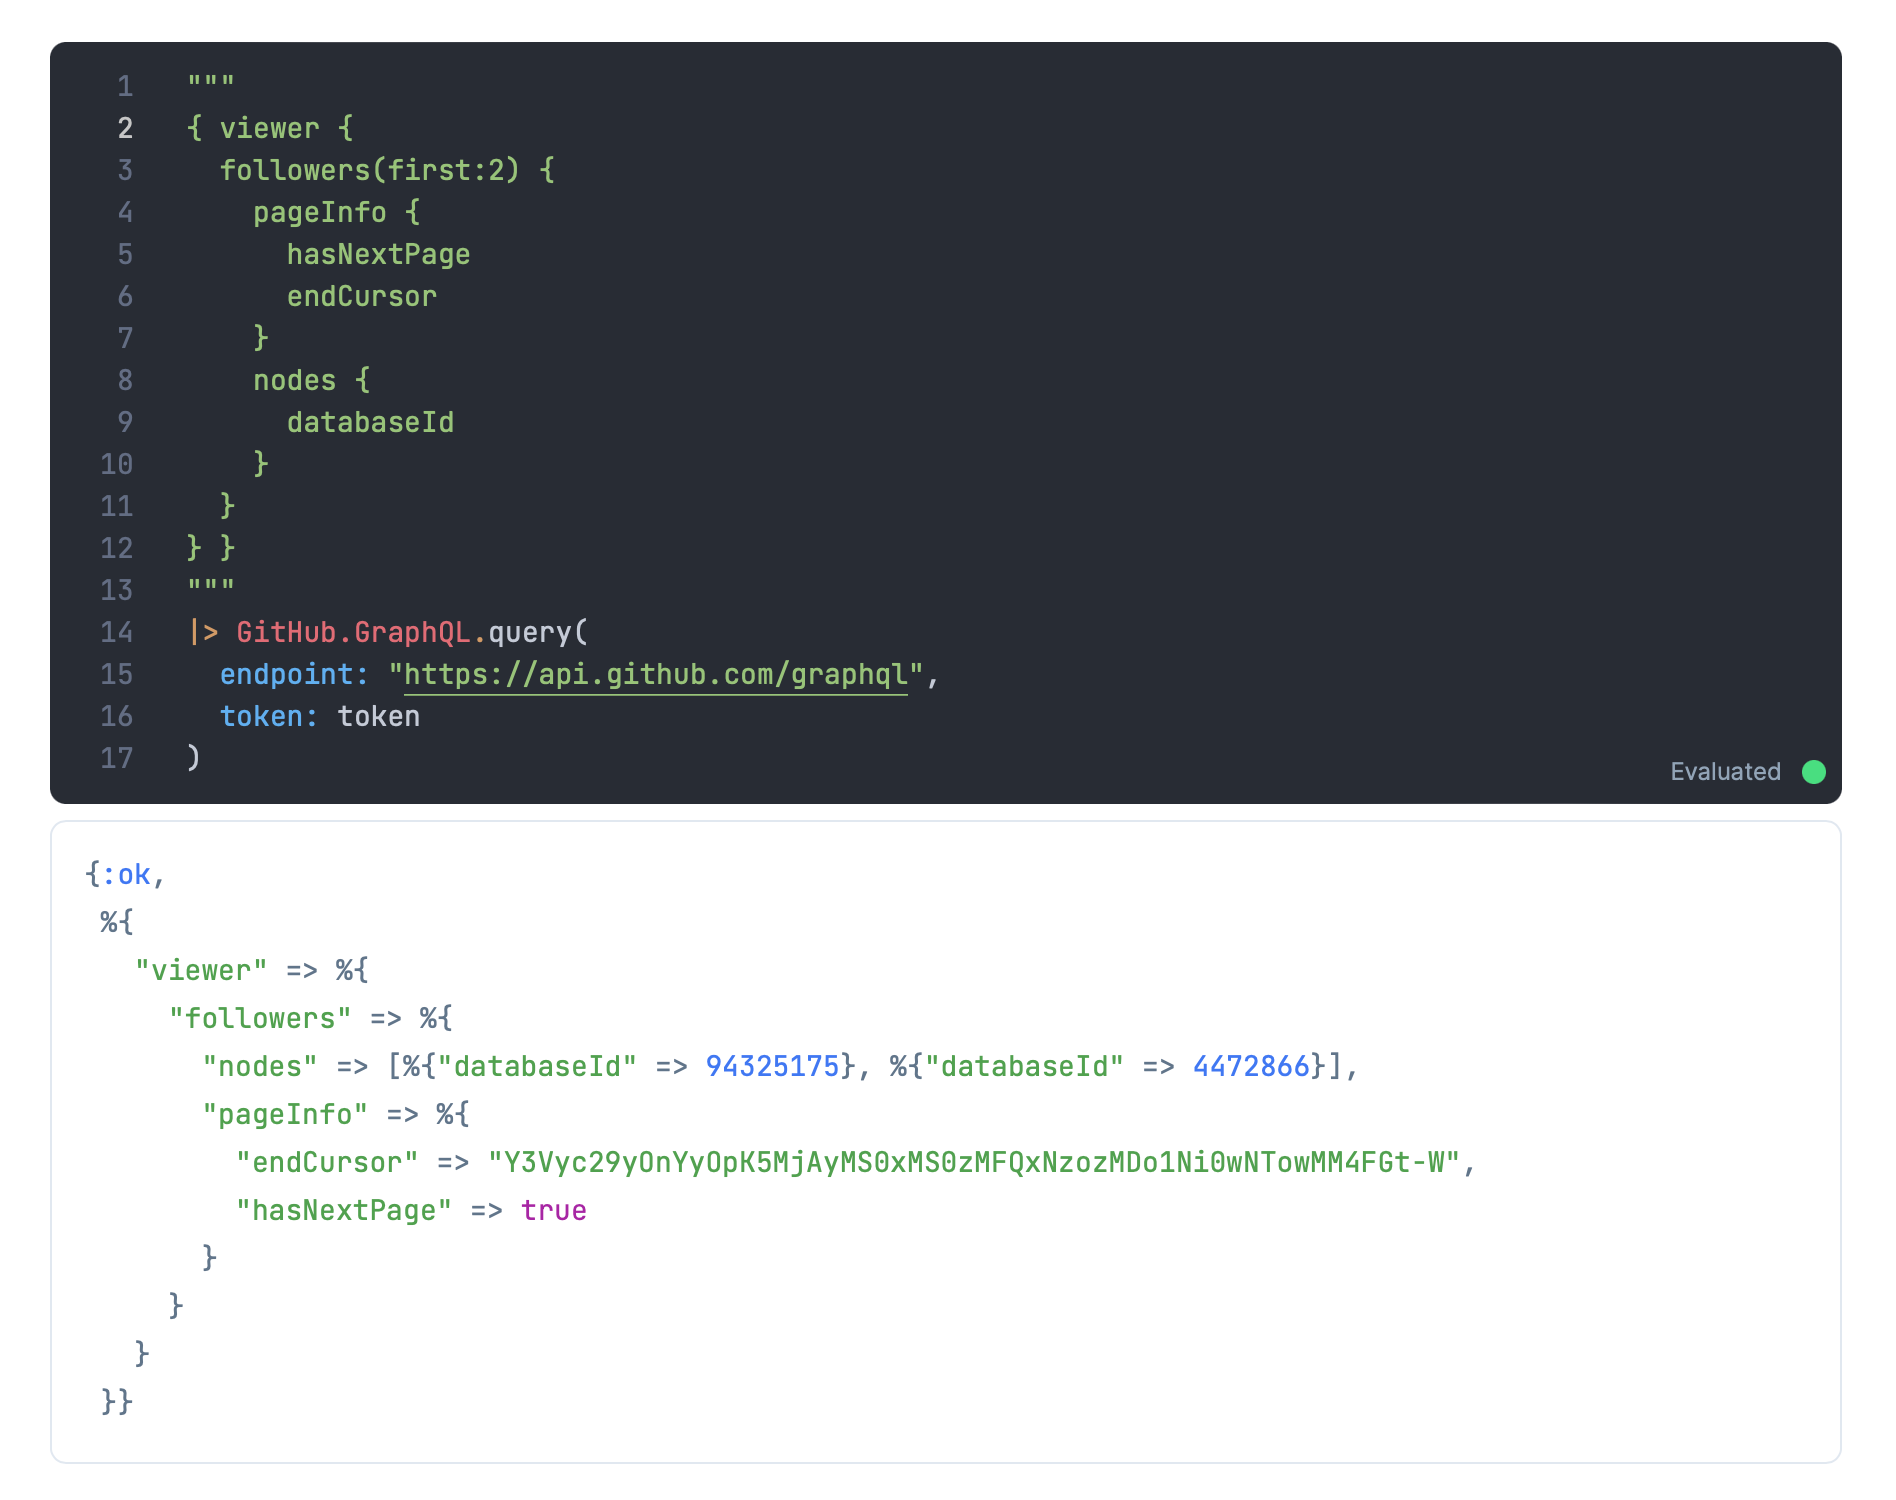
我们甚至可以提交更复杂的查询,它们的工作也很正常。
 一个更复杂的GraphQL查询
嘿,看看查询和响应中的pageInfo 。那是GraphQL如何进行分页的,我们在此不做介绍。但要点是,你必须要求分页信息作为请求的一部分,并使用响应中的信息来构建你的下一个请求,直到你收集了所有你想要的数据或者你已经到达了页面的末端。
在实际的包中,我已经得到了一个初步可以接受的分页抽象工作。但我不会说它是完整的。
如果你想了解这些细节,那么Elixir中的Stream paginated GraphQLAPI就非常值得一读。如果你看一下我的github_graphql_smartcell repo,你会发现它的分页完全是由那篇文章提供的。
现在,让我们把我们已经得到的单一的未分页的查询行为包装成一个智能单元。
实际编写智能单元格
就像我们对 "not ready "智能单元所做的那样,让我们把代码打包起来,这样做才对:
$ mix new github_graphql_smartcell
$ cd github_graphql_smartcell
将kino、jason和neuron添加到我们的软件包依赖项中,并在mix.exs中声明一个应用程序:
defmodule GithubGraphqlSmartcell.MixProject do
  use Mix.Project

  def project do
    [
      app: :github_graphql_smartcell,
      version: "0.1.0",
      elixir: "~> 1.13",
      start_permanent: Mix.env() == :prod,
      deps: deps()
    ]
  end

  def application do
    [
      mod: {GithubGraphqlSmartcell.Application, []}
    ]
  end

  defp deps do
    [
      {:kino, "~> 0.6.1"},
      {:neuron, "~> 5.0"},
      {:jason, "~> 1.3"}
    ]
  end
end
写出lib/application.ex 文件来注册我们的智能单元:
defmodule GithubGraphqlSmartcell.Application do
  @moduledoc false

  use Application

  @impl true
  def start(_type, _args) do
    Kino.SmartCell.register(GithubGraphqlSmartcell)
    children = []
    opts = [strategy: :one_for_one, name: KinoDB.Supervisor]
    Supervisor.start_link(children, opts)
  end
end
让我们把我们的GitHub.GraphQL模块放到我们的包里:
$ mkdir lib/github
$ vim lib/github/graphql.ex
在该文件中,只需粘贴我们上面加注的模块:
defmodule GitHub.GraphQL do
  def query(query, config) do
    query
    |> request(config)
    |> case do
      {:ok, %Neuron.Response{status_code: 200, body: %{"errors" => errors}}} ->
        {:error, errors}
      {:ok, %Neuron.Response{status_code: 200, body: %{"data" => data}}} ->
        {:ok, data}
      {:error, %Neuron.Response{body: body}} ->
        {:error, body}
      error ->
        error
    end
  end

  def request(query, config) do
    Neuron.query(query, %{},
      url: config[:endpoint],
      headers: [authorization: "Bearer #{config[:token]}"]
    )
  end
end
现在我们已经准备好了所有的部件:是时候添加智能单元了!
最后,智能单元
与我们之前的智能单元不同,这个智能单元将有一个用户体验组件。一个允许用户输入GitHub端点、API令牌和GraphQL查询的表单。
这意味着我们需要一个真正的main.js文件,我们也可以提供一个真正的main.css文件来使事情看起来更漂亮。该行为与LiveBook中的数据库连接器智能单元非常相似,所以这是一个完美的地方,我可以偷取参考文件并重新加工,以满足我们在这里的需求。
由于我们的资产需要真实的文件,我们将使它变得简单,在我们的智能单元中声明一个assets_path:
$ mkdir -p lib/assets/github_graphql_smartcell
$ touch lib/assets/github_graphql_smartcell/main.js
$ touch lib/assets/github_graphql_smartcell/main.css
现在我们将依次浏览每个文件。
main.css
我们的main.css是这里最简单的文件,所以让我们从这里开始。就像我的大多数智能单元文件一样,这完全是从LiveBook附带的数据库连接智能单元中撕下来的:
.app {
  font-family: "Inter";

  box-sizing: border-box;

  --gray-50: #f8fafc;
  --gray-100: #f0f5f9;
  --gray-200: #e1e8f0;
  --gray-300: #cad5e0;
  --gray-400: #91a4b7;
  --gray-500: #61758a;
  --gray-600: #445668;
  --gray-800: #1c2a3a;

  --blue-100: #ecf0ff;
}

input,
select,
textarea,
button {
  font-family: inherit;
}

.container {
  border: solid 1px var(--gray-300);
  border-radius: 0.5rem;
  background-color: rgba(248, 250, 252, 0.3);
  padding-bottom: 8px;
}

.row {
  display: flex;
  align-items: center;
  padding: 8px 16px;
  gap: 8px;
}

.header {
  display: flex;
  justify-content: flex-start;
  background-color: var(--blue-100);
  padding: 8px 16px;
  margin-bottom: 12px;
  border-radius: 0.5rem 0.5rem 0 0;
  border-bottom: solid 1px var(--gray-200);
  gap: 16px;
}

.input {
  padding: 8px 12px;
  background-color: var(--gray-50);
  font-size: 0.875rem;
  border: 1px solid var(--gray-200);
  border-radius: 0.5rem;
  color: var(--gray-600);
}

input[type="number"] {
  appearance: textfield;
}

.input::placeholder {
  color: var(--gray-400);
}

.input:focus {
  outline: none;
  border: 1px solid var(--gray-300);
}

.input--sm {
  width: auto;
  min-width: 300px;
}

.input--xs {
  width: auto;
  min-width: 150px;
}

.input--text {
  max-width: 50%;
}

.input-label {
  display: block;
  margin-bottom: 2px;
  font-size: 0.875rem;
  color: var(--gray-800);
  font-weight: 500;
}

.inline-input-label {
  display: block;
  margin-bottom: 2px;
  color: var(--gray-600);
  font-weight: 500;
  padding-right: 6px;
  font-size: 0.875rem;
  text-transform: uppercase;
}

.field {
  display: flex;
  flex-direction: column;
}

.inline-field {
  display: flex;
  flex-direction: row;
  align-items: baseline;
}

.grow {
  flex-grow: 1;
}

.info-box {
  margin-bottom: 24px;
  padding: 16px;
  border-radius: 0.5rem;
  white-space: pre-wrap;
  font-weight: 500;
  font-size: 0.875rem;
  background-color: var(--gray-100);
  color: var(--gray-500);
}

.info-box p {
  margin: 0;
  padding: 1em 0 0.3em;
}

.info-box p:first-child {
  padding-top: 0;
}

.info-box span {
  color: var(--gray-600);
  padding-left: 0.5em;
}

.hidden {
  display: none;
}

@media only screen and (max-width: 750px) {
  .mixed-row .field {
    max-width: 32%;
  }
  .input--number {
    max-width: 100%;
  }
}

input::-webkit-outer-spin-button,
input::-webkit-inner-spin-button {
  -webkit-appearance: none;
  margin: 0;
}
main.js
main.js文件这次是真的了!它保存了输入的表单,并处理了输入数据。它持有输入的表单,并处理将用户数据送回智能单元以转化为代码。
这个文件的交互作用可以自己写一篇博文。所以我们现在就继续:
import * as Vue from "https://cdn.jsdelivr.net/npm/vue@3.2.26/dist/vue.esm-browser.prod.js";

export function init(ctx, info) {
  ctx.importCSS("main.css");
  ctx.importCSS("https://fonts.googleapis.com/css2?family=Inter:wght@400;500&display=swap");

  const app = Vue.createApp({
    template: `
    <div class="app">
      <!-- Info Messages -->
      <form @change="handleFieldChange">
        <div class="container">
          <div class="row header">
            <BaseInput
              name="variable"
              label=" Assign query results to "
              type="text"
              placeholder="Assign to"
              v-model="fields.variable"
              inputClass="input input--xs input-text"
              :inline
              :required
            />
          </div>

          <div class="row">
            <BaseInput
              name="endpoint"
              label="Endpoint"
              type="text"
              placeholder="https://api.github.com/graphql"
              v-model="fields.endpoint"
              inputClass="input"
              :grow
            />
          </div>
          <div class="row">
            <BaseInput
              name="api_token"
              label="API Token"
              type="password"
              placeholder="PASTE API TOKEN"
              v-model="fields.api_token"
              inputClass="input"
              :grow
            />
          </div>
          <div class="row">
            <BaseTextArea
              name="query"
              label="Query"
              type="text"
              placeholder="{ now }"
              v-model="fields.query"
              inputClass="input"
              :grow
            />
          </div>
        </div>
      </form>
    </div>
    `,

    data() {
      return {
        fields: info.fields,
      }
    },

    methods: {
      handleFieldChange(event) {
        const { name, value } = event.target;
        ctx.pushEvent("update_field", { field: name, value });
      },
    },

    components: {
      BaseInput: {
        props: {
          label: {
            type: String,
            default: ''
          },
          inputClass: {
            type: String,
            default: 'input'
          },
          modelValue: {
            type: [String, Number],
            default: ''
          },
          inline: {
            type: Boolean,
            default: false
          },
          grow: {
            type: Boolean,
            default: false
          },
          number: {
            type: Boolean,
            default: false
          }
        },

        template: `
        <div v-bind:class="[inline ? 'inline-field' : 'field', grow ? 'grow' : '']">
          <label v-bind:class="inline ? 'inline-input-label' : 'input-label'">

          </label>
          <input
            :value="modelValue"
            @input="$emit('update:data', $event.target.value)"
            v-bind="$attrs"
            v-bind:class="[inputClass, number ? 'input-number' : '']"
          >
        </div>
        `
      },
      BaseTextArea: {
        props: {
          label: {
            type: String,
            default: ''
          },
          inputClass: {
            type: String,
            default: 'input'
          },
          modelValue: {
            type: [String, Number],
            default: ''
          },
          inline: {
            type: Boolean,
            default: false
          },
          grow: {
            type: Boolean,
            default: false
          },
          number: {
            type: Boolean,
            default: false
          }
        },

        template: `
        <div v-bind:class="[inline ? 'inline-field' : 'field', grow ? 'grow' : '']">
          <label v-bind:class="inline ? 'inline-input-label' : 'input-label'">

          </label>
          <textarea
            rows=10
            :value="modelValue"
            @input="$emit('update:data', $event.target.value)"
            v-bind="$attrs"
            v-bind:class="[inputClass, number ? 'input-number' : '']"
          >
        </div>
        `
      },
    }
  }).mount(ctx.root);

  ctx.handleEvent("update", ({ fields }) => {
    setValues(fields);
  });

  ctx.handleSync(() => {
    // Synchronously invokes change listeners
    document.activeElement &&
      document.activeElement.dispatchEvent(new Event("change", { bubbles: true }));
  });

  function setValues(fields) {
    for (const field in fields) {
      app.fields[field] = fields[field];
    }
  }
}
lib/github_graphql_smartcell.ex
还有smartcell本身。从根本上说,它和 "not ready "单元相同,它的最终工作是通过to_source 函数生成一些 Elixir 源代码。这里的主要区别是,to_source 函数现在实际上使用了一组由用户体验设置的属性:
defmodule GithubGraphqlSmartcell do
  @moduledoc false

  use Kino.JS, assets_path: "lib/assets/github_graphql_smartcell"
  use Kino.JS.Live
  use Kino.SmartCell, name: "GitHub GraphQL Query"

  @impl true
  def init(attrs, ctx) do
    fields = %{
      "variable" => Kino.SmartCell.prefixed_var_name("results", attrs["variable"]),
      "endpoint" => attrs["endpoint"] || "https://api.github.com/graphql",
      "api_token" => attrs["api_token"] || "PASTE API TOKEN",
      "query" => attrs["query"] || "{ viewer { login } }",
    }

    {:ok, assign(ctx, fields: fields)}
  end

  @impl true
  def handle_connect(ctx) do
    payload = %{
      fields: ctx.assigns.fields
    }

    {:ok, payload, ctx}
  end

  @impl true
  def to_attrs(%{assigns: %{fields: fields}}) do
    Map.take(fields, ["variable", "endpoint", "api_token", "query"])
  end

  @impl true
  def to_source(attrs) do
    quote do
      {:ok, unquote(quoted_var(attrs["variable"]))} = GitHub.GraphQL.query(unquote(attrs["query"]), endpoint: unquote(attrs["endpoint"]), token: unquote(attrs["api_token"]))
    end
    |> Kino.SmartCell.quoted_to_string()
  end

  @impl true
  def handle_event("update_field", %{"field" => field, "value" => value}, ctx) do
    updated_fields = to_updates(ctx.assigns.fields, field, value)
    ctx = update(ctx, :fields, &Map.merge(&1, updated_fields))
    broadcast_event(ctx, "update", %{"fields" => updated_fields})
    {:noreply, ctx}
  end

  defp quoted_var(string), do: {String.to_atom(string), [], nil}

  defp to_updates(fields, "variable", value) do
    if Kino.SmartCell.valid_variable_name?(value) do
      %{"variable" => value}
    else
      %{"variable" => fields["variable"]}
    end
  end

  defp to_updates(_fields, field, value), do: %{field => value}
end
运行智能单元!
有了这些文件,你就可以在本地运行智能单元了!
启动一个新的 livebook,在设置单元中通过本地文件路径添加软件包,例如
Mix.install([ {:github_graphql_smartcell, path: "/Users/sdball/learning/livebook/smartcells/github_graphql_smartcell"}])
然后你就可以添加你的单元格,它就可以工作了
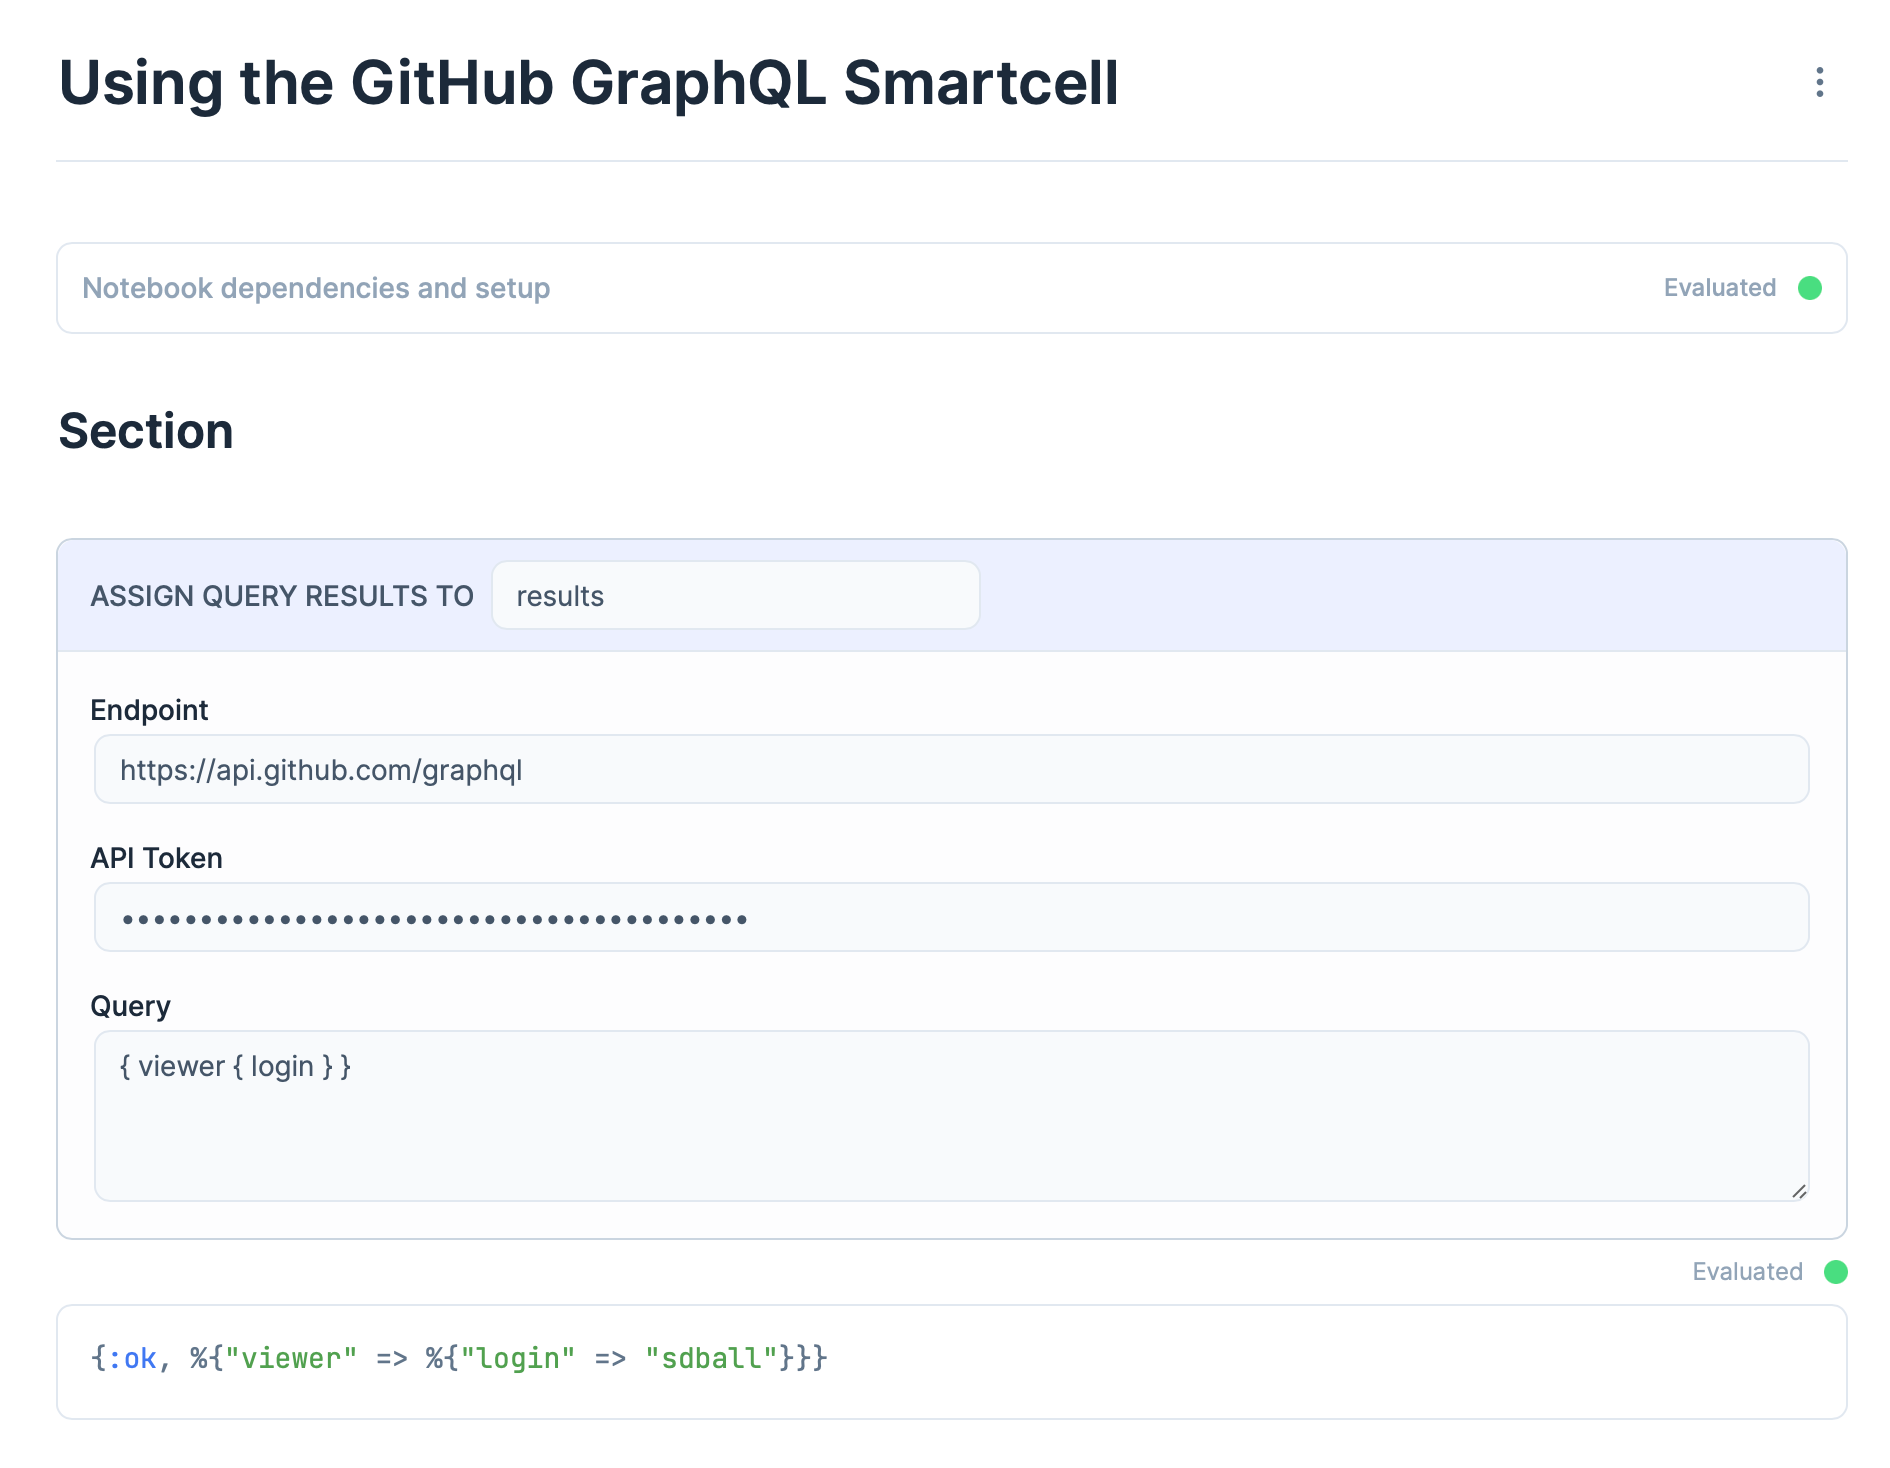 来自 GitHub GraphQL Query 智能单元的工作查询结果
查询结果被正确地放置在results 变量中(或你命名的任何变量)
 结果变量已被设置
因为它是一个智能单元,你可以随时查看生成的代码:
{:ok, results} =
  GitHub.GraphQL.query("{ viewer { login } }",
    endpoint: "https://api.github.com/graphql",
    token: "ghp_************************************"
  )
我希望这有助于揭开LiveBook智能单元的神秘面纱。回顾一下智能单元:
- 在LiveBook中生成Elixir代码
- 具有相互连接的前端和后端生命周期
- 可以将其数据保存到LiveBook的标记中
