

使用基于组件的前端使开发网络应用更容易、更容易管理。开发人员可以利用Vue.js、React和Angular等框架在几个小时内建立一个像样的应用程序。
此外,开发人员经常使用带有预制组件的UI库,如Vuetify,以加快和促进开发过程,甚至更多。
在本教程中,我们将探讨最好的基于Vue的UI组件库之一,名为PrimeVue,以及如何将其与Vue 3一起使用来创建一个示例应用程序。
什么是PrimeVue?
PrimeVue是PrimeTek提供的开源UI组件库系列中的一个成员。
除了PrimeVue组件库,PrimeTek还提供Java(PrimeFaces)、Angular(PrimeNG)和React(PrimeReact)的版本。这很好,因为你可以从一个框架切换到另一个框架,仍然有几乎相同的组件可以使用。
PrimeVue提供了一套丰富的90多个响应式UI组件--足以覆盖广泛的使用案例。它还提供了一些独特的组件,如终端,一个基于文本的UI,和Dock,一个导航组件。
PrimeVue的另一个好处是它是设计无关的,所以你不会被限制在Material或类似Bootstrap的风格。你可以为你的应用程序选择大量不同的主题,或者你可以建立自己的主题。
PrimeVue为每个组件提供了很好的文档,并为Options API和Composition API提供了专门的例子。文档简短、清晰,而且易于遵循和理解。
探索PrimeVue的生态系统
PrimeVue为主库提供了一些伟大的补充,包括PrimeIcons、PrimeFlex、Theme Designer、Templates和Blocks。让我们更详细地了解一下这些东西。
PrimeIcons
PrimeIcons是一套超过200个常用的图标,你可以在所有Prime UI库中使用。由于PrimeIcons,你不需要添加第三方包,如Font Awesome来访问和显示你的应用程序中的图标。
PrimeFlex
PrimeFlex是一个CSS工具库,类似于TailwindCSS。它与PrimeVue完美匹配。
一般来说,大多数UI库(包括PrimeVue)的组件都有或多或少的观点风格,这往往是很难调整的。这就是像PrimeFlex这样的库可以帮助的地方。
实用类让你有能力快速而轻松地调整或改变组件的外观。作为奖励,PrimeFlex可以与PrimeVue和该家族的其他成员无缝集成。
主题设计器
主题设计器是一个基于网络的工具,让你完全控制组件在你的应用程序中的外观。如果你不想使用PrimeFlex,那么PrimeVue可视化主题设计器可以帮助你创建你所追求的外观和感觉。
这个方便的工具需要一个许可证来使用它的所有功能。
模板
你可以为你的Vue应用程序选择一系列的模板。虽然这些模板很方便,但大多数PrimeVue模板只需购买,起价约为19美元。
PrimeBlocks
PrimeVue的PrimeBlocks是一个超过350个即用型UI块的集合,如布局、导航、表单、页面等。虽然有一些免费的块,但你需要一个许可证来访问完整的集合。
请注意,最后三个资源--Theme Designer、Templates和PrimeBlocks--大部分是付费的。然而,有很多你可以通过PrimeVue实现,而不需要为额外的功能付费。
现在,当我们很好地理解了PrimeVue是什么以及它提供了哪些好东西时,让我们来探索如何使用这个库的组件。
开始使用PrimeVue和Vue 3
为了开始,我们将使用Vite来构建一个新的Vue项目。在你的终端运行以下程序:
npm create vite@latest
按照提示完成脚手架后,导航到该项目并安装依赖:
cd your-project
npm install
现在让我们通过运行以下命令将PrimeVue、PrimeIcons和PrimeFlex添加到该项目中:
npm install primevue@^3.15.0
npm install primeicons
npm install primeflex
接下来,让我们看一个导入PrimeVue组件的例子。打开main.js ,用下面的内容替换它:
import {createApp} from 'vue'
import App from './App.vue'

import PrimeVue from 'primevue/config'  // import PrimeVue

// import CSS resources
import 'primevue/resources/primevue.min.css'            // core
import 'primevue/resources/themes/saga-blue/theme.css'  // theme
import 'primeicons/primeicons.css'                      // icons
import '/node_modules/primeflex/primeflex.css'          // PrimeFlex

import Button from 'primevue/button'  // import Button component

const app = createApp(App)  // create new Vue app

app.use(PrimeVue)  // register PrimeVue

app.component('Button', Button)  // register Button component

app.mount('#app')  // mount the app
现在你可以在Vue模板中使用PrimeVue [Button](https://www.primefaces.org/primevue/button) 组件在Vue模板中使用,就像这样:
<Button label="Submit" />
这就是使用PrimeVue组件的简便之处。只需导入并注册它们,它们就可以使用了。
请注意,为了获得PrimeFlex实用类的代码完成和片段支持,你可以为VS Code安装官方扩展。
用PrimeVue和Vue 3构建一个简单的记事本应用程序
在本节中,我们将通过构建一个简单的记事本应用来进一步探索PrimeVue组件。
下面是我们要构建的内容的预览:
用户将能够创建、编辑和删除笔记。每个笔记将包含一个标题,一些内容,以及一个或多个标签。
我们还将添加使用搜索栏搜索笔记和按标签过滤的功能,以及将笔记添加到 "收藏夹 "集合的能力,这可以独立探索。
导入和注册PrimeVue组件
对于这个应用程序,我们将使用一堆PrimeVue组件。要导入和注册这些组件,用以下内容替换main.js 文件的内容:
import { createApp } from 'vue'
import App from './App.vue'

import PrimeVue from 'primevue/config'

import 'primevue/resources/primevue.min.css'
import 'primevue/resources/themes/lara-dark-blue/theme.css'
import 'primeicons/primeicons.css'
import '/node_modules/primeflex/primeflex.css'

import Panel from 'primevue/panel'
import Toolbar from 'primevue/toolbar'
import Button from 'primevue/button'
import Dropdown from 'primevue/dropdown'
import AutoComplete from 'primevue/autocomplete'
import Card from 'primevue/card'
import Tag from 'primevue/tag'
import Dialog from 'primevue/dialog'
import Inplace from 'primevue/inplace'
import InputText from 'primevue/inputtext'
import Editor from 'primevue/editor'
import Chips from 'primevue/chips'

import Tooltip from 'primevue/tooltip'

const app = createApp(App)

app.use(PrimeVue)

app.component('Panel', Panel)
app.component('Toolbar', Toolbar)
app.component('Button', Button)
app.component('Dropdown', Dropdown)
app.component('AutoComplete', AutoComplete)
app.component('Card', Card)
app.component('Tag', Tag)
app.component('Dialog', Dialog)
app.component('Inplace', Inplace)
app.component('InputText', InputText)
app.component('Editor', Editor)
app.component('Chips', Chips)

app.directive('tooltip', Tooltip)

app.mount('#app')
在上面的代码中,我们添加了所有必要的组件,加上Tooltip 指令。
下一步是将components 目录下的HelloWord.vue 文件重命名为NotesWriter.vue 。然后,编辑App.vue 文件以反映改变后的文件名:
<script setup>
// This starter template is using Vue 3 <script setup> SFCs
// Check out https://vuejs.org/api/sfc-script-setup.html#script-setup
import NotesWriter from './components/NotesWriter.vue'
</script>
<template>
  <NotesWriter />
</template>
现在,我们准备开始有趣的部分了。
设置我们的应用程序
打开NotesWriter.vue 文件,将其内容改为以下内容:
><script setup>
import { ref, reactive, computed, onMounted, watchEffect } from 'vue'

// Local storage setup
const STORAGE_KEY = 'notes'
const notes = ref(JSON.parse(localStorage.getItem(STORAGE_KEY) || '[]'))
watchEffect(() => {
  localStorage.setItem(STORAGE_KEY, JSON.stringify(notes.value))
})

// Get current state
const currentNotes = ref()
const currentNote = reactive({
  id: null,
  title: 'Give me a name',
  content: '',
  tags: [],
  fav: false
})

// Get notes
onMounted(() => {
  allNotes()
})
function allNotes() {
  currentNotes.value = notes.value
}
function favNotes() {
  currentNotes.value = notes.value.filter((note) => note.fav === true)
}

// Dialog logic
const displayDialog = ref(false)
function openDialog() {
  displayDialog.value = true
}
function closeDialog() {
  displayDialog.value = false
}

</script>
在上述代码的开头,我们导入了所有我们需要的Vue函数和工具。
然后,我们为笔记设置了本地存储。笔记将被从本地存储中获取,供用户查看或编辑。然后,存储将通过使用watchEffect 函数来更新变化。
watchEffect 函数在其任何依赖关系发生变化时运行。在我们的例子中,该依赖关系是notes 阵列。
接下来,我们定义了两个变量:currentNotes 将用于显示当前过滤的笔记集合,而currentNote 将在我们创建或编辑单个笔记时使用。
在下一节中,我们使用onMounted 钩子来加载组件安装的笔记。
通过allNotes 函数,我们可以将notes 赋值给currentNotes ,这样我们就可以呈现所有创建的笔记。true通过favNotes 函数,我们可以过滤notes 数组,以获得所有键设置为fav 的笔记,然后将结果分配给currentNotes ,这样我们就可以在 "收藏夹 "集合中呈现它们。
代码的最后部分设置了Dialog 组件的逻辑,我们将用它来创建和编辑笔记。
现在,让我们来添加组件模板。
添加PrimeVue组件模板
把下面的代码放在脚本标签后面:
<template>
  <div>
    <Panel header="Notes Writer">
      <Toolbar class="mb-6">
        <template #start>
          <Button class="mr-3" label="New" icon="pi pi-plus" @click="addNote" />
          <span class="p-buttonset">
            <Button class="p-button-success" label="All notes" icon="pi pi-list" @click="allNotes" />
            <Button class="p-button-danger" label="Favorites" icon="pi pi-heart" @click="favNotes" />
          </span>
        </template>
        <template #end>
          <!-- Add filter and search functionality here later on -->
        </template>
      </Toolbar>
      <div class="flex flex-wrap justify-content-around gap-3">
        <div class="text-xl" v-if="!notes.length">No notes have been created yet. Hit the <b>New</b> button to create one.</div>
        <Card class="w-3 bg-bluegray-900 shadow-4" v-for="(note, index) in currentNotes" :key="index">
          <template #title>
            {{ note.title }}
          </template>
          <template #subtitle>
            <Tag class="mr-2" :value="tag" v-for="tag in note.tags"></Tag>
          </template>
          <template #content>
            <div class="overflow-hidden max-h-5rem" v-html="note.content"></div>
          </template>
          <template #footer>
            <Button class="p-button-rounded p-button-text" v-tooltip.bottom="'Edit'" icon="pi pi-pencil" @click="editNote(note)" />
            <Button class="p-button-rounded p-button-text p-button-danger" v-tooltip.bottom="'Add to Favorites'" :icon="note.fav ? 'pi pi-heart-fill' : 'pi pi-heart'" @click="note.fav = !note.fav" />
            <Button class="p-button-rounded p-button-text text-red-500" v-tooltip.bottom="'Delete'" icon="pi pi-trash" @click="removeNote(note)" />
          </template>
        </Card>
      </div>
    </Panel>
    <!-- Add Dialog component here later on -->
  </div>
</template>
在上面的代码中,我们将我们的应用程序包装成一个 [Panel](https://www.primefaces.org/primevue/panel) 组件,并通过使用header 属性设置应用程序的标题。然后,我们用一个 [Toolbar](https://www.primefaces.org/primevue/toolbar) 组件来添加必要的按钮。
我们通过使用PrimeFlex实用类(mb-6)给工具栏增加了一些底边。这将在工具条和笔记之间增加一些空间。
Toolbar 组件有两个槽,start 和end ,它们分别用于将工具条元素定位在左边和右边。我们在这里使用start 槽来添加一个用于创建新笔记的单一按钮,以及一个用于 "所有笔记 "和 "收藏夹 "按钮集。
为了使用PrimeIcons,我们需要为一个特定的组件添加icon 属性,并按照这个模式设置其值:pi pi-[icon-name] 。在这种情况下,我们像这样设置第一个按钮组件的图标:pi pi-plus 。
对于每个按钮,我们将相应的函数分配给click 事件处理程序。
我们将在下一节中创建addNote 按钮。稍后我们还将使用Toolbar 组件的end 槽来添加用于搜索和过滤笔记的输入。
在上面的代码中处理完按钮后,我们为笔记使用了一个封装的div ,它使用flex utility类来正确地样式笔记。然后,我们有另一个div ,如果还没有创建笔记(即,如果notes 数组是空的),则显示一条信息。
接下来,我们用一个 [Card](https://www.primefaces.org/primevue/card) 组件来表示一个单一的音符。我们可以遍历currentNotes ,并使用卡片的插槽(title,subtitle,content,footer)来填充笔记的数据,使用一个 [Tag](https://www.primefaces.org/primevue/tag) 组件来渲染笔记的标签,并使用v-html 指令来将笔记的内容显示为HTML。
最后,我们使用Tooltip 指令为每个按钮添加了一个提示。对于 "添加到收藏夹 "按钮,我们使用了一个三元运算符来检查笔记的fav 值,并相应地设置适当的图标。在每次点击时,注释的fav 值会从true 改为false ,反之亦然。
我在上面的模板中使用了一些实用类,使设计更令人愉快。PrimeVue也使用了自己的类,你可以通过p 前缀来识别--例如,如p-buttonset 。
让我们看看到目前为止我们都做了些什么。用下面的命令运行该项目:
npm run dev
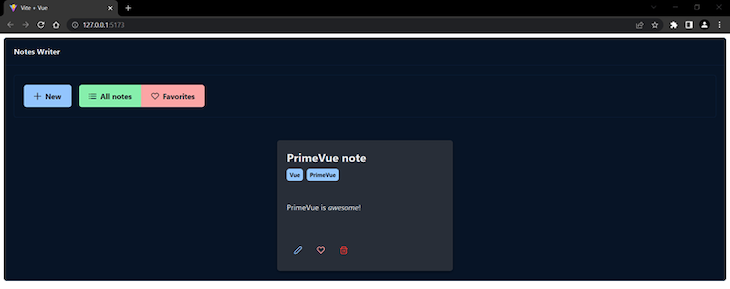
当你访问该应用程序的地址(http://127.0.0.1:5173/)时,你应该在浏览器窗口中看到以下内容:
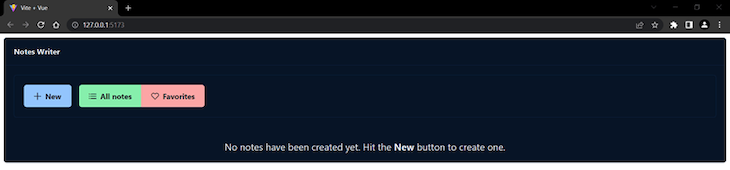
相当酷!
创建用于添加、编辑、保存和删除笔记的功能
在script 标签内添加以下内容:
// Notes actions
const isNewNote = ref(false)
function addNote() {
  isNewNote.value = true
  currentNote.id = Date.now()
  currentNote.title = 'Give me a name'
  currentNote.content = ''
  currentNote.tags = []
  currentNote.fav = false
  openDialog()
}
function editNote(note) {
  currentNote.id = note.id
  currentNote.title = note.title
  currentNote.content = note.content
  currentNote.tags = note.tags
  currentNote.fav = note.fav
  openDialog()
}
在这里,我们首先设置了一个isNewNote 变量,它将被用来定义我们是在创建一个新的笔记还是在编辑一个现有的笔记。
接下来,在addNote 函数中,我们用初始值设置了currentNote ,然后打开对话框。我们还将isNewNote 设置为true ,以表明我们要创建一个新的笔记。
在editNote 函数中,我们将已编辑的笔记的数据分配给了currentNote ,这样当我们打开对话框时,它就会显示已编辑的笔记的数据。
让我们来添加其余的动作:
function saveNote() {
  if (isNewNote.value === false) {
    let note = notes.value.find((note) => note.id === currentNote.id)
    let editedNote = Object.assign({}, currentNote)
    notes.value.splice(notes.value.indexOf(note), 1, editedNote)
    currentNotes.value[currentNotes.value.indexOf(note)] = editedNote
  } else {
    let newNote = Object.assign({}, currentNote)
    notes.value.push(newNote)
    isNewNote.value = false
  }
  closeDialog()
}
function removeNote(note) {
  if (currentNotes.value === notes.value) {
    notes.value.splice(notes.value.indexOf(note), 1)
  } else {
    notes.value.splice(notes.value.indexOf(note), 1)
    currentNotes.value.splice(currentNotes.value.indexOf(note), 1)
  }
}
上面的saveNote 函数首先检查我们是否保存了编辑过的笔记--换句话说,如果isNewNote 的值是false 。如果是,我们通过currentNote.id 获得该笔记。然后我们通过Object.assign() 克隆currentNote 。
我们这样做是为了打破currentNote 和编辑过的笔记之间的联系。它们之间的联系是因为在JavaScript中,对象是通过引用来复制的;当我们编辑源对象时,复制的对象也会被更新,反之亦然。
然后我们更新了我们的notes 和currentNotes 数组。我们需要更新这两个数组,以便当我们看到所有的笔记以及过滤后的笔记时,可以看到这些变化。
如果我们保存了一个新的笔记,我们就把它推到notes 数组中,并把isNewNote 设为false 。
在removeNote 函数中,我们检查currentNotes 和notes 是否相等。如果是,我们只需要更新notes 。如果不是,我们需要同时更新notes 和currentNotes ,原因和上面提到的saveNote 函数一样。
在我们的笔记编辑界面中使用PrimeVue组件
在下一节,我们将使用 [Editor](https://www.primefaces.org/primevue/editor) 组件,该组件将Quill文本编辑器作为一个依赖项。我们需要先安装它,所以停止应用程序并运行以下内容:
npm install quill
现在用npm run dev 命令再次运行该应用程序。
很好!现在让我们为对话框添加代码。在Panel 组件后添加以下内容:
<Dialog header="Note" v-model:visible="displayDialog" :breakpoints="{'960px': '75vw', '640px': '90vw'}" :style="{width: '50vw'}" :maximizable="true" :modal="true">
  <Inplace :closable="true">
    <template #display>
      <span class="text-xl">{{ currentNote.title }}</span>
    </template>
    <template #content>
      <InputText v-model="currentNote.title" />
    </template>
  </Inplace>
  <Editor class="my-4" v-model="currentNote.content" editorStyle="height: 320px">
    <template #toolbar>
      <span class="ql-formats">
        <button class="ql-bold" v-tooltip.bottom="'Bold'"></button>
        <button class="ql-italic" v-tooltip.bottom="'Italic'"></button>
        <button class="ql-underline" v-tooltip.bottom="'Underline'"></button>
      </span>
    </template>
  </Editor>
  <span class="p-float-label">
    <Chips v-model="currentNote.tags" separator="," />
    <label for="chips">Add tags...</label>
  </span>
  <template #footer>
    <Button class="p-button-text" label="Cancel" icon="pi pi-times" @click="closeDialog" />
    <Button label="Save" icon="pi pi-check" @click="saveNote" />
  </template>
</Dialog>
在这里,我们用 [Dialog](https://www.primefaces.org/primevue/dialog) 组件来为笔记添加一个编辑界面。它将打开一个模态窗口,我们可以在其中编辑笔记的标题、内容和标签。我们要用这个组件做几件事:
- 使用
displayDialog变量来打开或关闭对话框 - 通过添加一些断点使对话框具有响应性
- 将
modal和maximizable属性设置为true
我们还用 [Inplace](https://www.primefaces.org/primevue/inplace) 组件来编辑标题,同时使用 [InputText](https://www.primefaces.org/primevue/inputtext) 组件。这使得用户可以通过简单的点击来编辑标题,然后在完成后点击关闭按钮。
然后,我们使用了一个Editor 组件来表示注释的内容。我们只添加了三个格式化按钮,这对于简单的笔记来说完全足够了。
接下来,我们创建了一个 [float-label](https://www.primefaces.org/primevue/floatlabel) 输入,我们可以通过使用 [Chips](https://www.primefaces.org/primevue/chips) 组件。为了添加标签,我们需要用逗号来分隔它们。
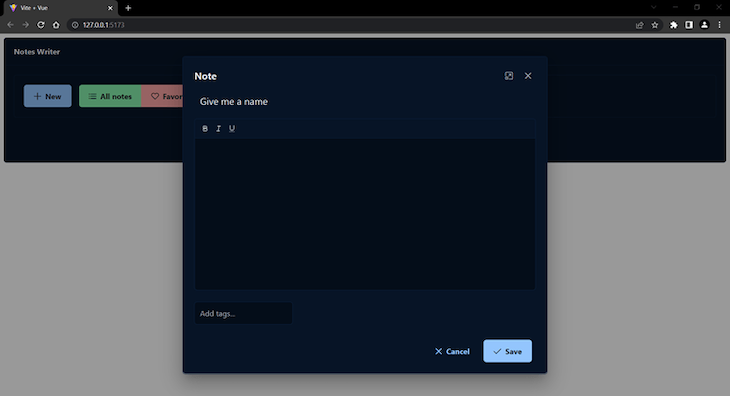
最后,我们在页脚添加了两个按钮,用于Cancel 笔记的创建或Save 一个已创建的笔记。
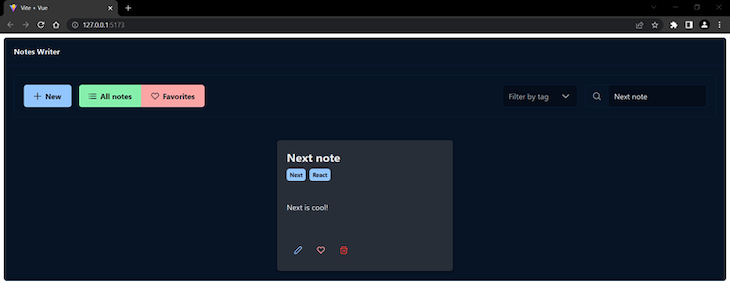
下面是当我们创建一个新笔记时,Dialog 组件的样子:
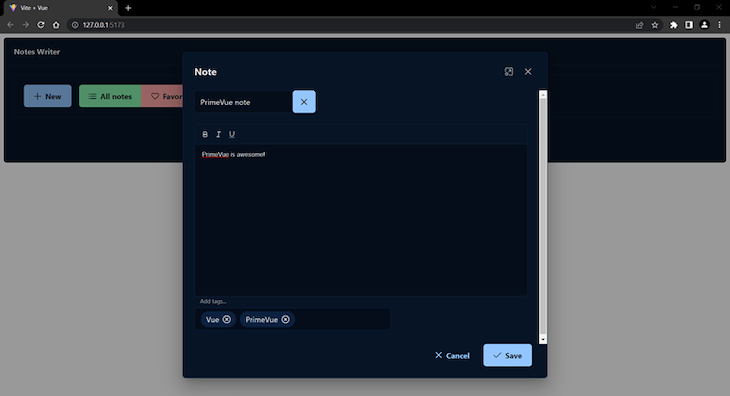
而当我们编辑笔记的时候:
下面是创建的笔记的样子:
现在我们可以使用我们的应用程序创建任意多的笔记。然而,随着我们添加笔记,要找到你需要的笔记会变得更难。这就是为什么建立应用程序的最后一步是添加搜索和过滤功能。
添加搜索和过滤功能
在脚本标签内添加这段代码:
// Filter notes logic
const selectedTag = ref()
const tags = computed(() => {
  let allTags = []
  notes.value.map((note) => allTags = allTags.concat(note.tags))
  let uniqueTags = [...new Set(allTags)]
  return uniqueTags
})
function filterNotes() {
  currentNotes.value = notes.value.filter((note) => note.tags.includes(selectedTag.value))
}
在这里,我们创建了一个名为tags 的计算常量,从所有笔记中获取所有标签,然后通过创建一个新的Set() ,删除重复的标签,该标签只能包含唯一的项目。
然后,我们定义了一个filterNotes 函数,它允许我们获得所有带有选定标签的笔记。
现在,在工具条组件的#end 模板内添加以下内容:
<template #end>
  <div class="flex">
    <Dropdown class="mr-3" v-model="selectedTag" :options="tags" placeholder="Filter by tag" @change="filterNotes" @blur="selectedTag = ''" />
  </div>
</template>
在这里,我们使用了一个 [Dropdown](https://www.primefaces.org/primevue/dropdown) 组件来让我们选择我们想要的标签。在@blur ,我们将selectedTag 设置为一个空字符串,这样输入的内容就会被清除掉。
接下来,在script 标签内添加以下内容:
// Search notes logic
const foundNotes = ref()
function searchNote(event) {
  setTimeout(() => {
    if (event.query.trim().length) {
      foundNotes.value = notes.value.filter((note) => {
        return note.title.toLowerCase().startsWith(event.query.toLowerCase())
      })
    }
  }, 250)
}
const selectedNote = ref()
function searchNotes() {
  currentNotes.value = [notes.value.find((note)=>note.title === selectedNote.value.title)]
}
在上面的代码中,在我们的searchNote 函数中,我们首先添加了一个setTimeout 函数,在组件显示搜索结果之前添加一个短暂的延迟。
我们可以使用searchNote 函数,通过使用event 参数来检查输入的查询是否为空。如果输入的查询不是空的,我们就通过查询来过滤笔记。
然后,我们定义了一个searchNotes 函数,它允许我们通过标题找到一个笔记,并把它放在一个数组中,我们把它分配给currentNotes 。
我们需要做的最后一件事是在模板中添加AutoComplete 组件,我们将在Dropdown 组件之后添加它:
<div class="flex">
  <Dropdown class="mr-3" v-model="selectedTag" :options="tags" placeholder="Filter by tag" @change="filterNotes" @blur="selectedTag = ''" />
  <div class="p-inputgroup">
    <span class="p-inputgroup-addon">
      <i class="pi pi-search"></i>
    </span>
    <AutoComplete placeholder="Search notes..." field="title" v-model="selectedNote" :suggestions="foundNotes" @complete="searchNote($event)" @item-select="searchNotes" @blur="selectedNote = ''" />
  </div>
</div>
在上面的代码中,我们使用了一个 [AutoComplete](https://www.primefaces.org/primevue/autocomplete) 组件与一个 [InputGroup](https://www.primefaces.org/primevue/inputgroup) 组件,它在输入前添加了一个图标。
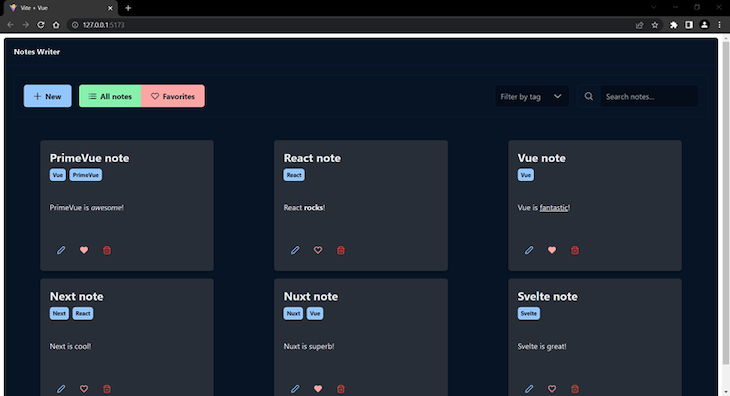
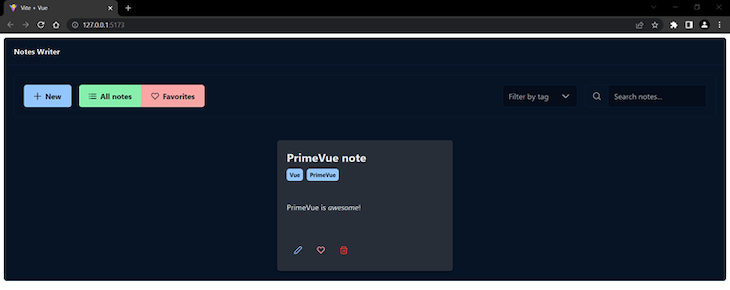
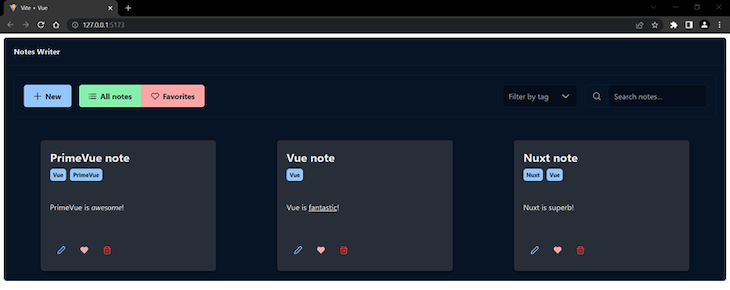
下面是添加了Dropdown 和AutoComplete 组件后的应用程序的样子。
测试和预览应用程序的功能
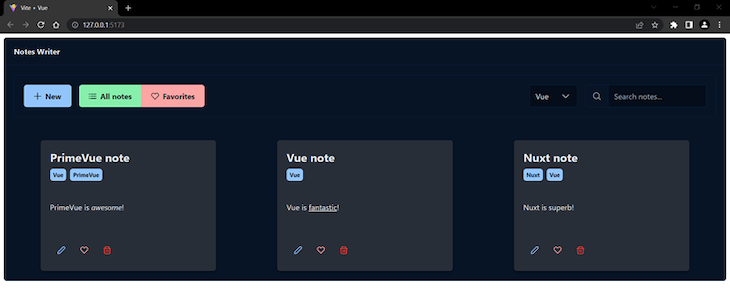
现在我们已经完成了项目的代码,我们可以测试和预览我们添加的不同功能。下面的图片显示了通过Vue 标签过滤我们的笔记的结果。
当我们搜索我们的笔记时,我们应该看到在 "搜索笔记...... "占位符下面弹出一些建议。
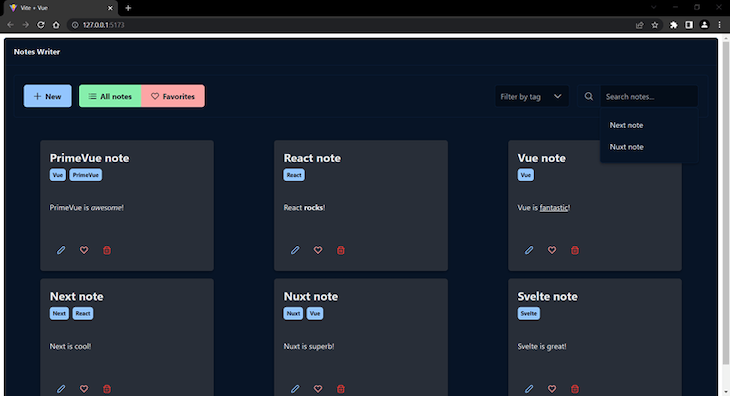
在添加一个输入查询后,应用程序应该显示找到的笔记,像这样。
点击 "收藏夹 "按钮后,应用程序应该显示 "收藏夹 "集合,像这样。
结论
正如我们所看到的,PrimeVue是一个组件丰富的UI库,它提供了一个完整的UI构建方案、独特的组件、简单的主题设计和优秀的文档。
我们已经通过建立一个简单但功能齐全的记事本应用程序,它使用了很多PrimeVue组件。我们学会了如何将它们组合在一起,为我们的应用程序创建我们想要的功能。
掌握了这些知识和PrimeVue广泛的文档,你可以开始建立你自己的甚至更复杂的应用程序。编码愉快!
