

在本指南中,我们将介绍如何用RedwoodJS构建一个全栈应用程序。
你可能已经看到了很多围绕用x框架(或)技术构建全栈应用的教程和指南,但是,RedwoodJS在某些方面是不同的,而且是有益的,包括:
- RedwoodJS包括Typescript、GraphQL、Prisma和一个测试框架
- 初创公司可以构建和制作产品原型,因为它提供了认证、授权和CRUD操作等模块。我们需要做的就是为我们的需求设计业务逻辑。
- CLI是RedwoodJS最好的功能之一;它使开发过程更快、更容易。
在这里,我们要建立一个论坛来了解RedwoodJS应用程序是如何建立的。它包括所有的功能,帮助你了解所有框架的功能。
我们要建立的功能是:
- 登录和注册
- 创建、阅读和更新帖子
- 评论系统
- 基于用户的帖子访问
除了RedwoodJS,我们还将使用Typescript进行类型检查,并使用TailwindCSS进行样式设计。
RedwoodJS的安装和设置
RedwoodJS使用yarn作为一个包管理器。一旦你安装了它,你可以使用以下命令创建一个新项目:
yarn create redwood-app --ts ./redwoodblog
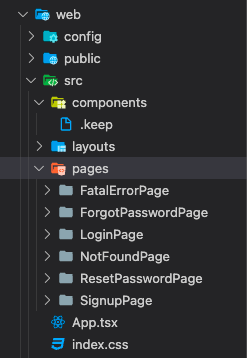
它将所有的模块搭成脚手架,以建立一个全栈的应用程序。在这里,你可以看到一个RedwoodJS应用程序的完整结构:

有三个主要的目录。它们是:api ,scripts ,和web 。让我们详细讨论一下它们。
.redwood:包含应用程序的构建。api:为应用程序的后端服务。它主要包含db,它为应用程序的数据库模式服务。所有的后端功能都将在src目录中。src:包含你所有的后端代码。它包含五个目录,它们是:。directives:包含GraphQL模式指令,以控制对GraphQL查询的访问。functions:RedwoodJS将GraphQL API作为无服务器函数运行。它自动生成graphql.ts;你可以在它上面添加额外的无服务器函数。graphql:包含用模式定义语言(SDL)编写的GraphQL模式。lib:包含整个后端API的所有可重复使用的功能,例如,认证services:包含与你的数据有关的业务逻辑。它运行与API相关的功能并返回结果。
设置TailwindCSS
安装TailwindCSS是很简单的;在根目录下运行以下命令:
yarn rw setup ui tailwindcss
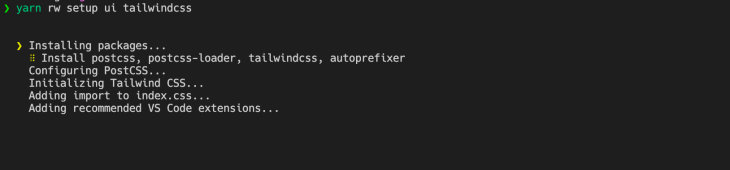
为了确认TailwindCSS的安装,请进入web/src/index.css ,并在该文件中看到Tailwind类。
连接数据库
为了连接Postgres数据库,我们将使用Docker进行本地开发。
(注意:要安装docker,请看docker官方网站的文档)
在根目录下创建docker-utils/postgres-database.sh ,并添加以下脚本:
#!/bin/bash

set -e
set -u

function create_user_and_database() {
        local database=$1
        echo "  Creating user and database '$database'"
        psql -v ON_ERROR_STOP=1 --username "$POSTGRES_USER" <<-EOSQL
            CREATE USER $database;
            CREATE DATABASE $database;
            GRANT ALL PRIVILEGES ON DATABASE $database TO $database;
EOSQL
}

if [ -n "$POSTGRES_MULTIPLE_DATABASES" ]; then
        echo "Multiple database creation requested: $POSTGRES_MULTIPLE_DATABASES"
        for db in $(echo $POSTGRES_MULTIPLE_DATABASES | tr ',' ' '); do
                create_user_and_database $db
        done
        echo "Multiple databases created"
fi
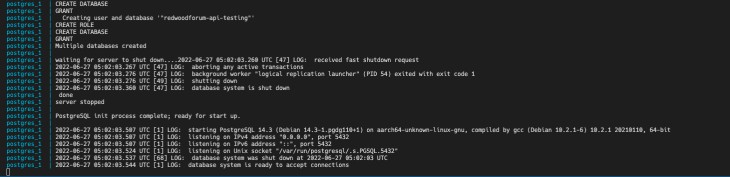
这个脚本实现了一个在Postgres中创建用户和数据库的功能。一旦你创建了这个脚本,你就可以使用docker-compose up 来运行Postgres数据库。
创建docker-compose.yml ,并添加下面的代码:
version: "3.6"
services:
  postgres:
    image: postgres
    restart: unless-stopped
如果你想根据环境创建不同版本的docker-compose up ,你也可以这样做。要做到这一点,请创建docker-compose.override.yml ,并添加以下代码:
version: "3"
services:
  postgres:
    image: postgres
    environment:
      - POSTGRES_USER=api
      - POSTGRES_PASSWORD=development_pass
      - POSTGRES_MULTIPLE_DATABASES="redwoodforum-api","redwoodforum-api-testing"
    volumes:
      - ./docker-utils:/docker-entrypoint-initdb.d
      - redwoodforum_api_data:/data/postgres
    ports:
      - 5440:5432
volumes:
  redwoodforum_api_data: {}
一旦你添加了这个脚本,你就可以用这个命令运行数据库:
docker-compose up
要将红木应用程序连接到Postgres,将Prisma配置改为PostgreSQL提供者,并在环境变量中添加数据库URL。
转到api/db/schema.prisma ,并将db提供者改为postgresql 。在你的.env中添加DATABASE_URL:
DATABASE_URL=postgres://api:development_pass@localhost:5440/redwoodforum-api
设计数据库
正如你在演示中看到的,我们想建立一个论坛。然而,在我们实现这些功能之前,以下是我们希望用户能够在我们的应用程序中做的关键事情:
- 用户可以登录/注册到应用程序中
- 一旦用户登录,他们可以在论坛中创建一个帖子
- 用户可以对任何帖子发表评论,而主人可以删除任何评论
- 用户可以查看自己的帖子,也可以到主页查看所有的帖子。
让我们为该应用程序设计一个ER图:
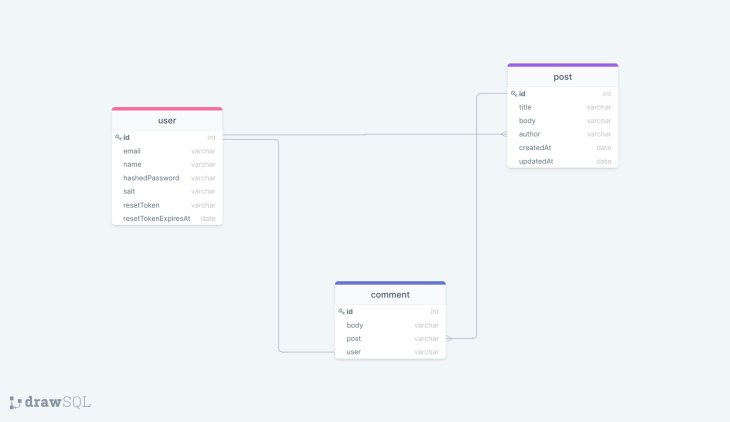
这里我们有user,post, 和comment 模式。
user 和 有一对多的关系, 和 有一对多的关系,而 和 有一对一的关系。post post comment comment user
现在我们有了应用程序的ER图。让我们为数据库创建模式。为此,请访问api/db/schema.prisma 。
(注意:RedwoodJS使用Prisma做数据库。如果你是Prisma世界的新手,请查看他们的文档以获得更多信息)
现在,在一个Prisma文件中创建模式:
model User {
  id           Int            @id @default(autoincrement())
  email        String         @unique
  name         String?
  hashedPassword     String
  salt String
  resetToken String?
  resetTokenExpiresAt DateTime?
  posts   Post[]
  comments Comment[]
}

model Post {
  id           Int            @id @default(autoincrement())
  title        String
  body         String
  comments     Comment[]
  author     User    @relation(fields: [authorId], references: [id])
  authorId   Int
  createdAt    DateTime  @default(now())
  updatedAt    DateTime  @default(now())
}

model Comment {
  id     Int    @id @default(autoincrement())
  body   String
  post   Post   @relation(fields: [postId], references: [id])
  postId Int
  author User   @relation(fields: [authorId], references: [id])
  authorId Int
  createdAt DateTime @default(now())
  updatedAt DateTime @default(now())
}
正如你所看到的,我们在User,Post, 和Comment 架构之间有一种关系。
在Prisma中定义一个关系是很简单的。你可以参考文档以了解更多细节。
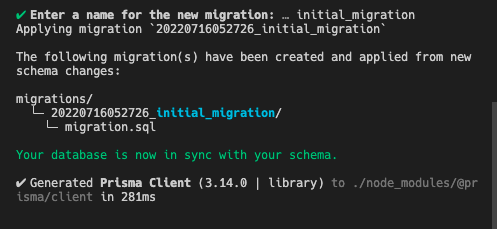
一旦你在Prisma中定义了一个模式,你就必须运行迁移以在Postgres中把这些模式创建为一个表。
Prisma迁移
Prisma的一个特点是,你可以管理不同阶段的迁移。在这里,我们将只为开发运行迁移。为此,你可以使用这个命令:
yarn redwood prisma migrate dev
要检查迁移是否成功,你可以进入Prisma Studio,看到迁移后的所有表。你可以通过访问http://localhost:5555,看到所有的表和每个表内的列:
yarn redwood prisma studio
现在,我们有了API和前端的数据库和模式,让我们来为应用程序创建认证。
身份验证
RedwoodJS提供了开箱即用的认证。一条CLI命令就可以得到你所需要的一切,以使认证工作正常进行:
yarn rw setup auth dbAuth
它将创建一个auth.ts 无服务器函数,检查cookie是否存在于数据库中以及令牌是否过期。然后,它在此基础上向客户端返回响应。
它还创建了lib/auth.ts ,以处理各种功能,如从会话中获取当前用户,检查是否已认证,要求认证等。
到目前为止,我们有API和数据库的认证功能。让我们来创建登录、注册和忘记密码的页面。然后,你可以使用命令来构建登录、注册和忘记密码的页面:
yarn rw g dbAuth
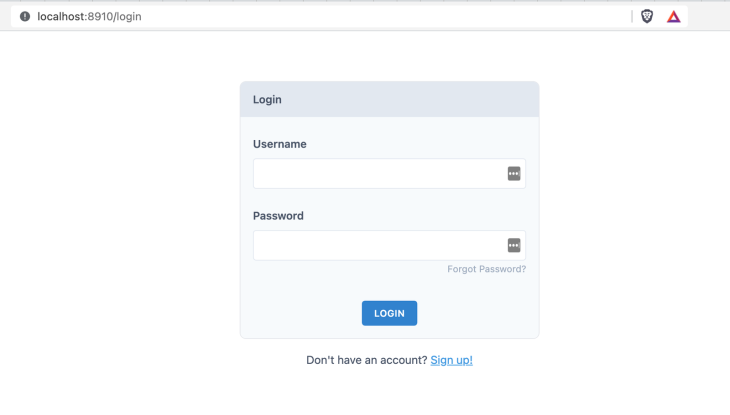
它将创建所有用于认证的页面。你可以在web/src/pages 查看这些页面。
对于页面的样式,你可以使用源代码中的组件,并根据你的喜好进行定制。下面是实现中的完整的登录页面。
为了连接一个用于登录和注册功能的API,RedwoodJS提供了钩子,在引擎盖下完成所有的魔法:
import { useAuth } from '@redwoodjs/auth'

// provides login and signup functionality out of the box
const { isAuthenticated, signUp, logIn, logOut } = useAuth()
在表单onSubmit 函数中,我们可以使用该signup 和logIn 来进行API请求并发送有效载荷:
const onSubmit = async (data) => {
    const response = await signUp({ ...data })

    if (response.message) {
      toast(response.message)
    } else if (response.error) {
      toast.error(response.error)
    } else {
      // user is signed in automatically
      toast.success('Welcome!')
    }
  }
一旦用户注册或登录,你可以使用currentUser ,在整个应用程序中访问用户信息:
const { currentUser } = useAuth()
现在,我们已经让用户登录到应用程序中。接下来,让我们建立发布和评论的功能。
一旦用户登录,他们就会进入主页,在那里我们需要显示论坛中的所有帖子。然后,用户可以创建一个新的帖子和更新一个帖子。
为了实现列表页,用主页组件创建一个路由,从API中获取数据,在客户端显示。
幸运的是,RedwoodJS提供了脚手架,为我们生成了所有的实现。假设你想为所有的页面搭建脚手架,包括GraphQL后端实现,你可以使用以下命令:
yarn redwood g scaffold post
它将生成页面、SDL和post模型的服务。你可以在RedwoodJS的文档中参考所有的命令。
由于我们要定制页面。让我们只对SDL和服务进行支架化。使用这个命令:
yarn redwood g sdl --typescript post
它将在graphql/posts.sdl.ts 和services/posts 中创建后域文件 - 让我们在网上创建页面。
即使我们定制了页面和组件,我们也不需要从头开始创建一切。相反,我们可以使用脚手架,并根据我们的要求来修改它。
让我们用这个命令创建一个主页:
yarn redwood g page home
它将创建一个主页,并将该页面添加到Routes.tsx 。 所以现在,你有了基本的主页组件。
现在,为了在主页上列出所有的帖子,你需要从api获取数据并在页面上显示。为了使这个过程更容易,RedwoodJS提供了单元格。单元是一种获取数据的声明性方法--它执行GraphQL查询并管理其生命周期。
要生成单元格,请使用这个命令:
yarn rw generate cell home
它将创建一个GraphQL查询和它的生命周期:
import type { FindPosts } from 'types/graphql'

import { Link } from '@redwoodjs/router'
import type {
  CellSuccessProps,
  CellFailureProps,
  CellLoadingProps,
} from '@redwoodjs/web'

export const QUERY = gql`
  query FindPosts {
    posts {
      id
      title
      body
      comments {
        id
      }
      createdAt
      updatedAt
    }
  }
`

export const Loading: React.FC<CellLoadingProps> = () => <div>Loading...</div>

export const Empty = () => <div>No posts found</div>

export const Failure = ({ error }: CellFailureProps) => (
  <div>Error loading posts: {error.message}</div>
)

export const Success = ({ posts }: CellSuccessProps<FindPosts>) => {
  return (
    <div>
      <ul>
        {posts.map((post) => (
          <li key={post.id}>
            {' '}
            <Link to={`/posts/${post.id}`}>
              <div className="p-2 my-2 rounded-lg shadow cursor-pointer">
                <h4 className="text-xl font-medium">{post.title}</h4>

                <p>{post.body}</p>
              </div>
            </Link>
          </li>
        ))}
      </ul>
    </div>
  )
}
受保护的路由
为了保护RedwoodJS应用程序中的路由,你可以使用Private ,从@redwoodjs/router ,并将所有东西包裹在路由内:
<Private unauthenticated="login">
        <Set wrap={NavbarLayout}>
          <Set wrap={ContainerLayout}>
            <Route path="/new" page={NewpostPage} name="newpost" />
            <Set wrap={SidebarLayout}>
              <Route path="/" page={HomePage} name="home" />
              // routes come here
            </Set>
          </Set>
        </Set>
</Private>
创建帖子
要创建一个新的帖子,使用以下命令搭建一个新的帖子页面的脚手架:
yarn redwood g page newpost /new
如果你想定制路由的URL,你可以在这里作为一个参数传递。RedwoodJS会根据提供的名称添加路由。RedwoodJS提供了开箱即用的表单和验证:
import {
  FieldError,
  Form,
  Label,
  TextField,
  TextAreaField,
  Submit,
  SubmitHandler,
} from '@redwoodjs/forms'
一旦用户提交表单,你可以调用GraphQL突变来创建一个帖子:
const CREATE_POST = gql`
  mutation CreatePostMutation($input: CreatePostInput!) {
    createPost(input: $input) {
      id
    }
  }
`
const onSubmit: SubmitHandler<FormValues> = async (data) => {
    try {
      await create({
        variables: {
          input: { ...data, authorId: currentUser.id },
        },
      })
      toast('Post created!')
      navigate(routes.home())
    } catch (e) {
      toast.error(e.message)
    }
  }
帖子的细节
创建一个帖子的详细信息页面和单元格,以获取数据来查看帖子的详细信息。你可以遵循我们之前所做的相同过程:
yarn redwood g page postdetails
这将在routes.tsx 中创建页面和路由。为了在路由中传递URL参数,你可以这样修改它:
<Route path="/posts/{id:Int}" page={PostDetails} name="postdetails" />
你可以把ID作为道具传入组件。然后,创建一个单元格来获取帖子的详细信息,并在组件中呈现:
yarn redwood g cell post
添加以下代码来获取特定帖子的数据和评论:
import type { FindPosts } from 'types/graphql'
import { format } from 'date-fns'
import { useAuth } from '@redwoodjs/auth'
import type {
  CellSuccessProps,
  CellFailureProps,
  CellLoadingProps,
} from '@redwoodjs/web'

export const QUERY = gql`
  query FindPostDetail($id: Int!) {
    post: post(id: $id) {
      id
      title
      body
      author {
        id
      }
      comments {
        id
        body
        author {
          id
          name
        }
        createdAt
      }
      createdAt
      updatedAt
    }
  }
`

export const Loading: React.FC<CellLoadingProps> = () => <div>Loading...</div>

export const Empty = () => <div>No posts found</div>

export const Failure = ({ error }: CellFailureProps) => (
  <div>Error loading posts: {error.message}</div>
)

export const Success = ({ post }: CellSuccessProps<FindPosts>) => {
  const { currentUser } = useAuth()

  return (
    <div>
      <div>
        <h2 className="text-2xl font-semibold">{post.title}</h2>
        <p className="mt-2">{post.body}</p>
      </div>

      <div className="mt-4 ">
        <hr />
        <h3 className="my-4 text-lg font-semibold text-gray-900">Comments</h3>
        {post.comments.map((comment) => (
          <div
            key={comment.id}
            className="flex justify-between sm:px-2 sm:py-2 border rounded-lg"
          >
            <div className="my-4 flex-1  leading-relaxed">
              <strong>{comment.author.name}</strong>{' '}
              <span className="text-xs text-gray-400">
                {format(new Date(comment.createdAt), 'MMM d, yyyy h:mm a')}
              </span>
              <p>{comment.body}</p>
            </div>
            {currentUser && currentUser.id === post.author.id && (
              <div className="m-auto">
                <button
                  type="button"
                  className="focus:outline-none text-white bg-red-700 hover:bg-red-800 focus:ring-4 focus:ring-red-300 font-medium rounded-lg text-sm px-5 py-2.5 mr-2 mb-2 dark:bg-red-600 dark:hover:bg-red-700 dark:focus:ring-red-900"
                >
                  Delete
                </button>
              </div>
            )}
          </div>
        ))}
      </div>
    </div>
  )
}
这里需要注意的是,检查当前登录的用户是否是帖子的作者的条件。在这种情况下,我们提供一个选项来删除评论。
基于用户的访问
为了在应用程序中提供基于用户的访问,你可以使用useAuth 钩子获得当前用户,并在上面添加条件。例如,为了显示用户创建的帖子列表,你可以使用当前的用户ID按作者来获取帖子:
const { currentUser } = useAuth()
MyPostCell.tsx
import { Link } from '@redwoodjs/router'
import type { FindPosts } from 'types/graphql'
import type {
  CellSuccessProps,
  CellFailureProps,
  CellLoadingProps,
} from '@redwoodjs/web'

export const QUERY = gql`
  query FindMyPosts($id: Int!) {
    user: user(id: $id) {
      id
      name
      posts {
        id
        title
        body
      }
    }
  }
`

export const Loading: React.FC<CellLoadingProps> = () => <div>Loading...</div>

export const Empty = () => <div>No posts found</div>

export const Failure = ({ error }: CellFailureProps) => (
  <div>Error loading posts: {error.message}</div>
)

export const Success = ({ user }: CellSuccessProps<FindPosts>) => {
  return (
    <div>
      <ul>
        {user.posts.map((post) => (
          <li key={post.id}>
            {' '}
            <Link to={`/posts/${post.id}`}>
              <div className="shadow rounded-lg p-2 my-2 cursor-pointer">
                <h4 className="text-xl font-medium">{post.title}</h4>

                <p>{post.body}</p>
              </div>
            </Link>
          </li>
        ))}
      </ul>
    </div>
  )
}
总结
RedwoodJS提供了开箱即用的一切。所有这些都是根据我们的要求来构建应用程序。一些重要的概念是单元格、页面、Prisma模式和迁移,以及了解系统如何工作。
一旦你了解了RedWoodJS,你就可以用很少的时间构建一个全栈的应用程序,正如我们在这篇文章中所看到的那样。你可以在这里找到本教程的源代码。
