

前言
Oauth2授权是项目中使用很多的协议,在三方授权中有这很大的应用。
spring 官方宣布在spring-security5以后删除掉Authorization Server相关功能,官方推荐使用第三方oauth2服务器,例如keycloak。作为spring的忠实舔狗,我跟很多开发者一样对spring的这个宣布不能认同,spring 迫于对广大开发者强烈不满和迫切需求,觉得另开一个项目(Spring Authorization Server). 时间过去很久了。社区一直在开发中。
在开发过程中社区将jar包上传到maven central,例如0.1.0-0.1.2版本,但是都未明文说明可以使用到生产环境。
近期spring 官方发布了几个通知:
- 2021年8月17日,通知:Spring Authorization Server迁移到spring projects
-
2021年8月19日,通知Spring Authorization Server 生产环境可用。(其实这几天官方的通知有变化,比如先发的文档,上面未写maven central上的jar地址。也可以理解,事情要一步一步做的嘛😁)
看到该通知后,想尝试下。于是进入仓库地址(github.com/spring-proj…
因此有些抵触,没有文档使用难度较大,无法深入理解开发者思想。所以想再等等。
此时想起以前的oauth2实现方案,想做个复习,所以想写个demo。记录下来。也给其他学者一个参考。因此写下此demo。
之后我会使用Spring Authorization Server 依赖,再次实现跟本demo一样的例子,敬请关注。
什么是Oauth2.0
本文不作赘述,网上文章较多。推荐几个,www.ruanyifeng.com/blog/2019/0… oauth.net/2/ 。zhuanlan.zhihu.com/p/84670338。
使用Spring Security和Spring Security Oauth2依赖实现
-
说明
spring Boot: 2.3.4.RELEASE
spring-Security-oauth2:2.5.1.RELEASE
jdk: 1.8
开发工具: IDEA
包管理工具:MAVEN
-
项目结构
authorization-server //授权服务器module根目录 ├── README.md // 说明文档 ├── authorization-server.iml // idea系统文件(忽略) ├── pom.xml // maven依赖(注意父级依赖) └── src // 源码路径 ├── main │ ├── java │ │ └── com │ │ └── xpp │ │ └── sslt5 │ │ └── as │ │ ├── AuthorizationServerApplication.java // 启动类 │ │ ├── config │ │ │ ├── AuthorizationServerConfig.java // 授权服务器配置类 │ │ │ └── SecurityConfig.java //security安全配置 │ │ ├── entity │ │ │ └── Account.java //用户实体类 │ │ ├── repository │ │ │ └── UserRepository.java // 账户Dao │ │ └── svc │ │ └── UserDetailSvc.java // security user Details类 │ └── resources // 源文件目录 │ ├── application.yml // spring boot 配置文件 │ ├── oauth2-data.sql // 初始化oauth2数据sql │ ├── import.sql // jpa初始化Account表语句 │ └── oauth2-schema.sql // 初始化创建oauth2相关表语句 └── test // 测试源码路径 └── java -
Maven依赖:
<?xml version="1.0" encoding="UTF-8"?> <project xmlns="http://maven.apache.org/POM/4.0.0" xmlns:xsi="http://www.w3.org/2001/XMLSchema-instance" xsi:schemaLocation="http://maven.apache.org/POM/4.0.0 http://maven.apache.org/xsd/maven-4.0.0.xsd"> <parent> <artifactId>spring-security-lt5-oauth2</artifactId> <groupId>com.xpp</groupId> <version>0.0.1</version> </parent> <modelVersion>4.0.0</modelVersion> <artifactId>authorization-server</artifactId> <version>0.0.1</version> <properties> <maven.compiler.source>8</maven.compiler.source> <maven.compiler.target>8</maven.compiler.target> </properties> <dependencies> <dependency> <groupId>org.springframework.boot</groupId> <artifactId>spring-boot-starter-data-jpa</artifactId> </dependency> <dependency> <groupId>org.springframework.boot</groupId> <artifactId>spring-boot-starter-security</artifactId> </dependency> <dependency> <groupId>org.springframework.boot</groupId> <artifactId>spring-boot-starter-web</artifactId> </dependency> <dependency> <groupId>org.springframework.security</groupId> <artifactId>spring-security-test</artifactId> <scope>test</scope> </dependency> <dependency> <groupId>org.springframework.security.oauth</groupId> <artifactId>spring-security-oauth2</artifactId> <version>2.5.1.RELEASE</version> </dependency> <dependency> <groupId>com.h2database</groupId> <artifactId>h2</artifactId> <scope>runtime</scope> </dependency> </dependencies> </project> -
Security config类
package com.xpp.sslt5.as.config; import com.xpp.sslt5.as.svc.UserDetailSvc; import org.springframework.beans.factory.annotation.Autowired; import org.springframework.context.annotation.Bean; import org.springframework.context.annotation.Configuration; import org.springframework.security.authentication.AuthenticationManager; import org.springframework.security.config.annotation.authentication.builders.AuthenticationManagerBuilder; import org.springframework.security.config.annotation.web.configuration.WebSecurityConfigurerAdapter; import org.springframework.security.crypto.bcrypt.BCryptPasswordEncoder; import org.springframework.security.crypto.password.PasswordEncoder; @Configuration public class SecurityConfig extends WebSecurityConfigurerAdapter { @Bean public PasswordEncoder passwordEncoder() { return new BCryptPasswordEncoder(); } @Autowired private UserDetailSvc userDetailSvc; @Override protected void configure(AuthenticationManagerBuilder auth) throws Exception { auth.userDetailsService(userDetailSvc).passwordEncoder(passwordEncoder()); } // AuthenticationManager 对象在 OAuth2 认证服务中要使用,提前放入 IOC 容器中 // 必须使用@Bean注入IOC容器中,否则password grant_type无效。 @Override @Bean public AuthenticationManager authenticationManagerBean() throws Exception { return super.authenticationManagerBean(); } } -
Authorization Server Config 配置类
package com.xpp.sslt5.as.config; import org.springframework.beans.factory.annotation.Autowired; import org.springframework.context.annotation.Bean; import org.springframework.context.annotation.Configuration; import org.springframework.security.authentication.AuthenticationManager; import org.springframework.security.oauth2.config.annotation.configurers.ClientDetailsServiceConfigurer; import org.springframework.security.oauth2.config.annotation.web.configuration.AuthorizationServerConfigurerAdapter; import org.springframework.security.oauth2.config.annotation.web.configuration.EnableAuthorizationServer; import org.springframework.security.oauth2.config.annotation.web.configurers.AuthorizationServerEndpointsConfigurer; import org.springframework.security.oauth2.config.annotation.web.configurers.AuthorizationServerSecurityConfigurer; import org.springframework.security.oauth2.provider.ClientDetailsService; import org.springframework.security.oauth2.provider.approval.ApprovalStore; import org.springframework.security.oauth2.provider.approval.JdbcApprovalStore; import org.springframework.security.oauth2.provider.client.JdbcClientDetailsService; import org.springframework.security.oauth2.provider.code.AuthorizationCodeServices; import org.springframework.security.oauth2.provider.code.JdbcAuthorizationCodeServices; import org.springframework.security.oauth2.provider.token.AuthorizationServerTokenServices; import org.springframework.security.oauth2.provider.token.DefaultTokenServices; import org.springframework.security.oauth2.provider.token.TokenStore; import org.springframework.security.oauth2.provider.token.store.JdbcTokenStore; import javax.sql.DataSource; @Configuration @EnableAuthorizationServer public class AuthorizationServerConfig extends AuthorizationServerConfigurerAdapter { // 数据库连接池对象,SpringBoot 配置完成后自动注入 @Autowired private DataSource dataSource; // 授权模式专用对象,在 Security 配置中注入容器 @Autowired private AuthenticationManager authenticationManager; // 客户端信息来源 @Bean public ClientDetailsService jdbcClientDetailsService() { return new JdbcClientDetailsService(dataSource); } // token 保存策略,指你生成的 Token 要往哪里存储 //JdbcTokenStore , InMemoryTokenStore, JwkTokenStore,JwtTokenStore, RedisTokenStore @Bean public TokenStore tokenStore() { return new JdbcTokenStore(dataSource); } // 指定客户端信息的数据库来源 @Override public void configure(ClientDetailsServiceConfigurer clients) throws Exception { clients.withClientDetails(jdbcClientDetailsService()); } // 授权信息保存策略 @Bean public ApprovalStore approvalStore() { return new JdbcApprovalStore(dataSource); } // 授权码模式数据来源 @Bean public AuthorizationCodeServices authorizationCodeServices() { return new JdbcAuthorizationCodeServices(dataSource); } // 令牌管理 @Bean public AuthorizationServerTokenServices tokenServices() { DefaultTokenServices tokenServices = new DefaultTokenServices(); // token 保存策略 tokenServices.setTokenStore(tokenStore()); // 支持刷新模式 tokenServices.setSupportRefreshToken(true); // 客户端信息来源 tokenServices.setClientDetailsService(jdbcClientDetailsService()); // token 有效期自定义设置,默认 12 小时 tokenServices.setAccessTokenValiditySeconds(60 * 60 * 12); // refresh token 有效期自定义设置,默认 30 天 tokenServices.setRefreshTokenValiditySeconds(60 * 60 * 24 * 7); return tokenServices; } // 检查 token 的策略,即配置令牌端点的安全约束 // 就是这个端点谁能访问,谁不能访问 @Override public void configure(AuthorizationServerSecurityConfigurer security) { // 此时指 endpoint 完全公开 security.tokenKeyAccess("permitAll()"); // checkToken 这个 endpoint 完全公开 security.checkTokenAccess("permitAll()"); // 是否允许表单认证 security.allowFormAuthenticationForClients(); } // OAuth2 的主配置信息 @Override public void configure(AuthorizationServerEndpointsConfigurer endpoints) { endpoints .approvalStore(approvalStore()) .authenticationManager(authenticationManager) .authorizationCodeServices(authorizationCodeServices()) .tokenServices(tokenServices()); } } -
UserDetailSvc类
package com.xpp.sslt5.as.svc; import com.xpp.sslt5.as.entity.Account; import com.xpp.sslt5.as.repository.AccountRepository; import org.springframework.beans.factory.annotation.Autowired; import org.springframework.security.core.GrantedAuthority; import org.springframework.security.core.authority.SimpleGrantedAuthority; import org.springframework.security.core.userdetails.User; import org.springframework.security.core.userdetails.UserDetails; import org.springframework.security.core.userdetails.UserDetailsService; import org.springframework.security.core.userdetails.UsernameNotFoundException; import org.springframework.security.crypto.bcrypt.BCryptPasswordEncoder; import org.springframework.stereotype.Component; import java.util.*; import java.util.stream.Collectors; @Component public class UserDetailSvc implements UserDetailsService { @Autowired private AccountRepository userRepository; @Override public UserDetails loadUserByUsername(String s) throws UsernameNotFoundException { List<GrantedAuthority> grantedAuths = new ArrayList<>(); Account account = userRepository.findByUsername(s); if (Objects.isNull(account)) { throw new UsernameNotFoundException("No user found with username: " + s); } Arrays.stream(account.getRoleIdentifies().split(",")).collect(Collectors.toSet()) .forEach(x-> grantedAuths.add(new SimpleGrantedAuthority(x))); return new User(account.getUsername(), account.getPassword(), grantedAuths); } public static void main(String[] args) { System.out.println(new BCryptPasswordEncoder().encode("xpp")); } } -
以上只是简单的累出来重要文件,其他配置文件请自行去github上查看。
测试(重点)
-
授权码模式
启动项目后,打开浏览器输入:
http://localhost:8080/oauth/authorize?response_type=code&client_id=xpp
出现如下界面:
出现上述界面后,输入用户名密码(a1,a2,a3皆可,密码都是xpp):
按照上图点击,Authorize按钮。
因为我配置的redirect_uri是百度,如图:
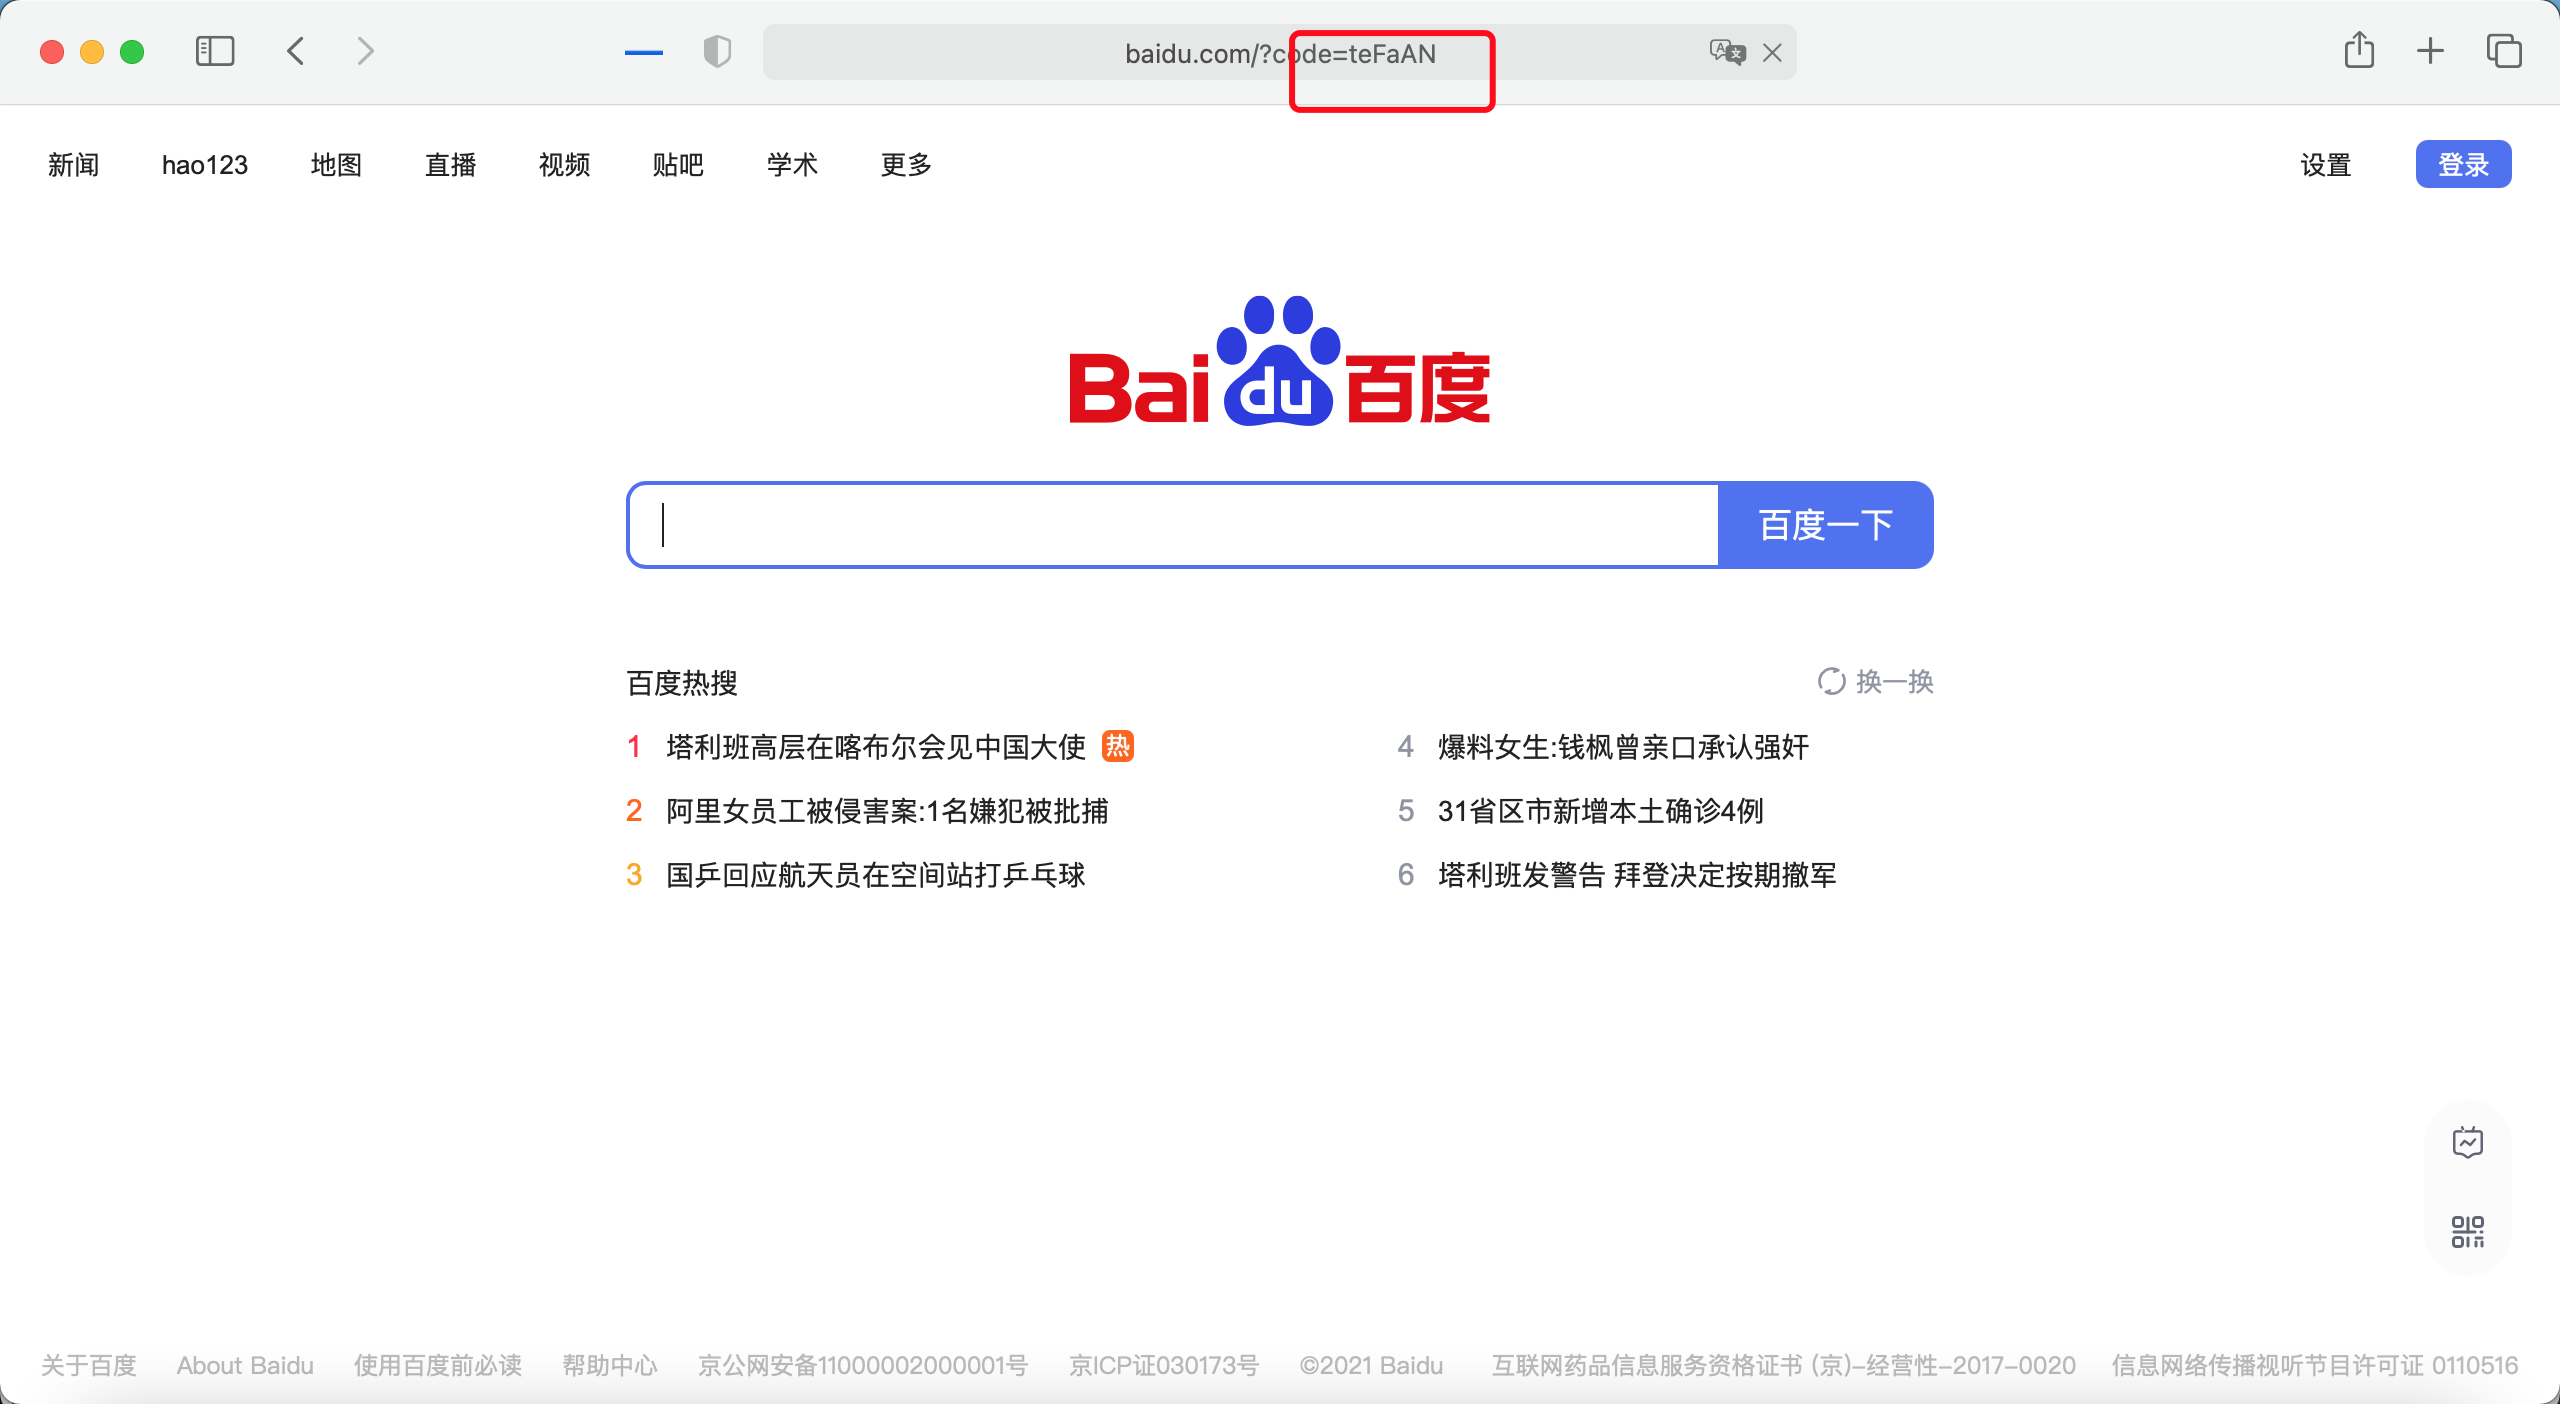
我们看到百度后面跟了个code,复制这个code值,打开postman获取token:
注意client和secret的授权
传递参数界面:
发送请求返回的界面:
测试刷新token:
我们看到access_token跟之前获取的变化了,refresh_token未变化。
-
简化模式
访问简化模式地址:http://localhost:8080/oauth/authorize?response_type=token&client_id=xpp
输入用户名密码(同一个client下的用户如果授权过不会出现登录界面),输入密码登录后, 点击授权和authorize按钮,浏览器自动跳转到百度,地址来为:www.baidu.com/#access_tok…
我们看到省去了请求oauth/token,直接在回调地址中看到了access_token. 这就是简化模式。
-
密码模式
刷新token此处不再举例测试。
-
客户端模式
以上就讲oauth2的功能基本完成,对于inmemory和redis的方式没有举例。
这里还有两个问题,第一个:获取的token如何使用,也就是authorization client和 resource server,后期慢慢补充。
第二个:登录用户和client维护应该通过接口提供创建更新等方位方式。后期慢慢补充。
本文使用的事spring-security-oauth2实现,在spring security 5以后已经弃用,后续会单独使用security实现。敬请期待,期待您的关注。期待您的意见。
源码地址:github.com/xpp1109/spr… 主页:itlab1024.com
