

Typescript
准备1.Wwebpack
npm i -g typescript
-
初始化项目
-
进入项目根目录,执行命令
npm init -y
- 主要作用:创建package.json文件
-
-
下载构建工具
-
npm i -D webpack webpack-cli webpack-dev-server typescript ts-loader html-webpack-plugin
-
共安装了7个包
-
webpack
- 构建工具webpack
-
webpack-cli
- webpack的命令行工具
-
webpack-dev-server
- webpack的开发服务器
-
typescript
- ts编译器
-
ts-loader
- ts加载器,用于在webpack中编译ts文件
-
html-webpack-plugin
- webpack中html插件,用来自动创建html文件
-
-
-
-
根目录下创建webpack的配置文件webpack.config.js
const { resolve } = require('path'); const HtmlWebpackPlugin = require("html-webpack-plugin"); const path = require('path'); module.exports = { //1. entry entry: "./src/main.ts", //2. 输出 output: { path: resolve(__dirname, "dist"), filename: "bundle.js", }, //3.module module: { rules: [ { test: /.ts/, use: { loader: "ts-loader" }, exclude: /node_modules/ } ] }, //4.插件 plugins: [ new HtmlWebpackPlugin({ template:resolve(__dirname,"public/index.html"),//你的html模板 (注释1) title: 'TS测试' }), ], //5. 模式 mode: 'development', //其他配置 resolve: { extensions: ['.ts', '.js'] }, devServer: { host: 'localhost',//服务器域名 port: "9999",//端口号(注意不要冲突) open: true,//浏览器自动打开 }, devtool: "inline-source-map", optimization:{ minimize: false // 关闭代码压缩,可选 }, } -
根目录下创建tsconfig.json,配置可以根据自己需要
-
 {
    "compilerOptions": {
        "target": "ES2015",
        "module": "ES2015",
        "strict": true
    }
 }
-
-
修改package.json添加*“dev”: “webpack-dev-server”*如下配置
 {
   ...略...
   "scripts": {
     "test": "echo "Error: no test specified" && exit 1",
     "dev": "webpack-dev-server"
   },
   ...略...
 }
- public文件夹新建 index,文件路径详细请查看步骤 3 的 注释5
-
终端输入 :
npx webpack
准备二
我们更推荐第二种简单快捷的方式创建并且编译ts,
-
初始化项目
-
进入项目根目录,执行命令
npm init -y
- 主要作用:创建package.json文件
-
-
根目录下创建tsconfig.json,配置可以根据自己需要
{ "compilerOptions": { "target": "ES2015", "module": "ES2015", "strict": true } } -
自动更新ts包
npm i ts-node -g
一. 类型
1.1 常用类型
TS原始类型:number,string,boolean,null,undefined,symbol,
TS新增类型:联合,自定义(类型别名),接口,元组,字面量类型,枚举,void,any(不推荐,失去了TS类型保护)
1.2 原始类型
1.3 数组类型
const arr1: number[] = [1, 2];
1.4 联合类型 |
const arr2: (number | string)[] = [1, 2, '3'];
1.5 类型别名 type
简化复杂类型的书写
 type myType = (number | string)[];
 const arr3: myType = [1, 2, "1"];// 注意不是 myType[]
 const arr4: myType[] = [[1, '1'], [2, 2], ['3', '3']]// 这才是
1.6 函数类型
指定函数的形参类型和返回值的类型
 //1. 先声明函数类型,再使用(一般函数使用表达式申明的时候使用)
   type fnType = (a: number, b: number) => number;
   const add: fnType = (a, b) => a + b;
 //2. 边使用变定义类型
   function add2(a: number, b: number): number {
     return a + b;
   };
   const add3 = (a: number, b: number): number => {
     return a + b;
   }
1.7 可选参数
可选参数只能出现再参数列表的最后面
1.8 对象类型
 type PeresonType = {
     name: string,
     age: number,
     call(): void//定义为方法,返回值为 空
     myAge(age: number): number
   }
 //使用
 const Person: PeresonType = {
     name: "KK",age: 12,
     call() {
       console.log(1);
     },
     myAge() {
       return this.age
     }
   }
1.9 接口 interface
以上代码可以使用接口写
 interface PeresonType {
     name: string,
     age: number,
     call(): void//定义为方法,返回值为 空
     myAge(age: number): number
   }
 //使用
1.10 interface 和 type 区别
interface只能为对象指定类型
type可为任意类型指定
1.11接口继承
使用 extends(继承) 关键字实现了接口的继承
 interface type1 {
     a: number,
     b: number
 }
 interface type2 extends type1 { c: number }
 const num: type2 = { a: 1, b: 2, c: 3 };
1.12 元组
Tuple类型,确切的知道元素个数以及对应的类型
 type tuple = [number, number]
 const arr: tuple = [1, 2];
1.13 类型推论
在声明变量并且赋值的时候,或者函数返回值的类型,TS会推论出此时的类型
 let str1 = "hello";// let str1: string
 const str2 = "hello";// const str2: "hello"
1.14 类型断言
as 实现断言
const link = document.querySelector('#link') as HTMLAnchorElement;
< >实现
const link = <HTMLAnchorElement>document.querySelector('#link');
1.15 字面量
场景:表示一组明确可选值列表
 function direction(to: 'top' | 'right' | 'buttom' | 'left') {
     console.log(to);
 }
 direction('1');//错误,形参to 只能取'top' 或 'right' 或 'buttom' 或 'left'
1.16 枚举
- 用于定义一组命名常量
- 功能类似字面量类型 + 联合类型组合,
  //定义枚举
   enum to {
     Top, Right, Buttom, Left
   }
   function changeDirection(direction: to) {
     console.log(direction);
   }
   // .访问枚举成员
   changeDirection(to.Top);//值为 0
- 上面枚举成员没有定义值,默认从0开始,因此也称为数字枚举,因为值为数字
- 枚举成员的值也可以为字符串,称为字符串枚举
 //字符串枚举
   enum Dir {
     Top = 'top',
     Right = 'tight',
     Buttom = 'button',
     Left = 'left',
   }
 Dir.Buttom//button
 console.log(Dir);//{Top: 'top', Right: 'tight', Buttom: 'button', Left: 'left'}
本质就是创建了一个对象
1.17 Typeof运算符
 const p = {
     x: 1,
     y: 1,
   }
   const add = (number: typeof p) => {
     return number.x + number.y;
   }
   console.log(add({ x: 1, y: 100 }));
二.高级类型
1. class类
 class Person {
     name: string
     age: number
 }
 const p1: Person = { name: 'k', age: 12 }
1.1 extends(继承父类)
class Class1 {
name: string;
constructor(name: string) {
this.name = name;
}
}
class Class2 extends Class1 {
age: number;
constructor(age: number, name: string) {
super(name);//调用父类构造函数,实现name属性
this.age = age;
}
}
const p1 = new Class2(12, 'kk');
console.log(p1);//Class2 {name: 'kk', age: 12}
1.2 implements(继承接口)
 interface Sing {
     Sing(): void;
     name: string;
   }
   class Person implements Sing {
     name: string;
     Sing(): void {
       console.log("lololo");
     }
     constructor(name: string) {
       this.name = name;
     }
   }
   const p1 = new Person('kk');
   console.log(p1);//Person {name: 'kk'}
   p1.Sing();//lololo
Person类使用了继承接口,因此需要提供 属性和方法
1.3 成员可见性
可见性的修饰符
- public: 公有(默认)
- protected: 受保护,仅在声明内部和子类内部访问,但是实例不可见
- private: 私有,仅在声明内部可见
 (function () {
   class Animal {
     protected Call(content: string): void {
       console.log(`${content}`);
     }
   }
   class Cat extends Animal {
     ...
     back() {
       this.Call('kk')//正确访问: 子类内部通过this
     }
   }
   const c1 = new Cat();
   c1.back()//kk
   // c1.Call('miaomiao');//错误访问: 实例无法读取
 })()
1.4 readonly
- 只读,防止在构造函数之外对属性修改,只能给属性添加
- 必须手动提供类型
- 接口 / {}对象类型,也可以使用
 const p1: { readonly name: string, age: number } = {
     name: 'kk',
     age: 12
   }
   interface Person {
     readonly name:string
   }
   p1.name = 'zz';//不允许
2. 类型兼容性
两种类型系统:
- StructuralType System(结构化类型系统) <==TS采用
- Nominal Type System(标明类型系统)
在结构化类型系统中,两个对象具有相同的形状,则认为它们是同一类
2.1 对象
对象,类,接口都可以兼容: Y的成员至少与X,==>X兼容Y(多的可以赋值给少的)
2.2 函数
参数少 赋值 参数多(和对象相反)
参数类型相同或者兼容
3. 交叉类型
多个类型组合为一个类型
   type t1 = {x:number};
   type t2 = {y:number};
   type t3 = t1 & t2;
与 继承(extends)对比
相同: 都可以实现对象类型组合
不同: 对于同名属性,处理冲突方式不同
- extends: 会报错
- & : 兼容多者
4. 泛型和keyof
泛型:在保证类型安全的前提下,让函数等与多种类型一起工作,从而实现复用,常用于:函数,接口,class
例子: 创建函数,传入什么类型的参数都可以返回
 function id<Type>(value: Type): Type {
     return value
 }
- 语法:在函数名称后加 <类型>
- 类型变量Type(名字自取),是一种特殊的变量,它处理类型而不是值
4.1 泛型约束
将以上函数传入数组,并打印长度,发现不可以,因为不能保证Type类型一定有length属性,所以需要添加泛型约束
 function id<Type>(value: Type): Type {
     console.log(value.length);//报错
     return value
  }
添加泛型约束有以下方式
- 指定更加具体的类型
 function id<Type>(value: Type[]): Type[] {
     console.log(value.length);//报错
     return value
  }
- 添加约束
 interface ILength { length: number }
   function id<Type extends ILength>(value: Type): Type {
     console.log(value.length);//报错
     return value
   }
添加了约束.类型变量必须满足具有length的约束
4.2 keyof
keyof 关键字:接收对象,返回键名的联合类型
 function show<Type,Key extends keyof Type>(obj:Type,key:Key) {
     return obj[key];
 }
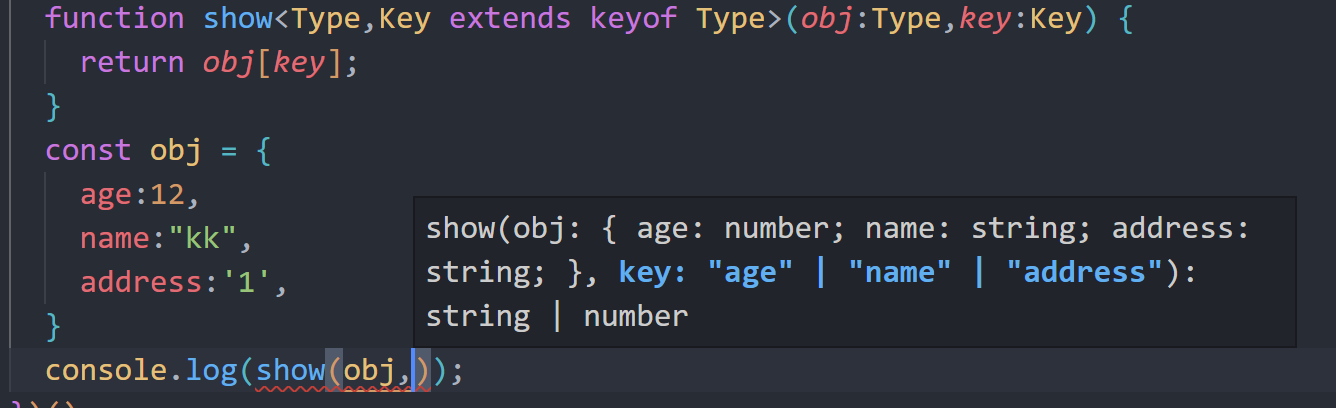
不妨看出,没传入第二个参数的时候,已经提示了三个属性
4.3 泛型使用
接口: 也可以适配泛型,但是使用的时候必须手动添加类型,(接口没有类型推断)
类:
4.4 泛型工具
定义 type
 interface type {
     name: String;
     age: number;
   }
- Partial:构造一个新类型,将原来类型 T 类型变为可选
 type type1 = Partial <type>;
 实际上==>type type1 = {
     name?: String | undefined;
     age?: number | undefined;
 }
- Readonly:构造一个新类型,将原来类型 T 类型变为只读
- Pick<T,key>:选择key,构造一个新类型,(key只能是T中存在的)
 type type2 = Pick<type,"name">//如果有多个,则可以通过 | 连接
 实际上==>type type2 = {
     name: String;
 }
如果有多个,则可以通过 | 连接
- Record<T,key>:构造一个对象类型,键为T,类型为 key
 type obj = Record<'a'| 'b',string>
 type obj = {
     a: string;
     b: string;
 }
5.索引签名和索引查询类型
无法确定对象属性
interface anyType {
[key: string]: number//表示 键:类型为string,值:类型为nunmber的,都可以出现在接口
}
//模拟实现数组类型
interface anyArray<T> {
[key: number]: T
}
const arr: anyArray<number> = [1, 2, 3, 4]
表示 键:类型为string,值:类型为nunmber的,都可以出现在接口anyType中
6.映射类型
基于久类创建新类,减少重复,提高开发效率
   type PropKeys = 'X' | 'Y' | 'Z' | 'P' | 'L';
   //映射类型实现
   type Type2 = {
     [key in PropKeys]: number
   }
   //相当于
   type Type2 = {X: number;Y: number;Z: number;P: number;L: number;}
结合keyof
  //结合 keyof 实现
   type Type = { name: string, age: string, done: boolean };
   type type2 = {
     [key in keyof Type]: string | number | boolean
   }
   const p: type2 = {
     name: 'kk',
     age: 12,
     done: true,
   }
手动实现Partial
 //实现 Partial
   type myPartical<T> = {
     //k : 获得 T 的 key ,类型为 T[k]
     [k in keyof T]?: T[k];
   }
 type Type22 = myPartical<Type>;
- 传入Type后T就是Type,然后 k 获得了Type的 key
- 后面?使其变成可选的
- 属性的类型由 T[k]取的,T[k]也称为索引查询
6.1 索引查询(访问)
   type Props = { a: number, b: boolean, c: string };
   type type1 = Props['a'];//type type1 = number;
[]中的属性必须存在于被查询类型中
三 Typescript类型申明文件
在TS中,有两种类型文件:
-
.ts
- 包含信息、代码
- 可被编译.js文件,并执行
-
.d.ts
- 只包含类型信息的类型声明文件
- 不会被编译成.js文件
为已存在的JS库提供类型信息, (以.d.ts为后缀)
该文件只能够声明类型
